PDF.js 简介
PDF.js 是什么?
PDF.js 是 Mozilla 基于 JavaScript + HTML5 Canvas 构建的 PDF 渲染引擎,完全运行于浏览器,不依赖插件。
核心目标:
- 在浏览器解析 PDF 二进制
- 使用 Canvas / SVG 渲染页面
- 提供可供二次开发的 API 和完整 Viewer
PDF.js 的主要模块结构
plain
pdf.js(主库)
pdf.worker.js(Worker 后台解析)
PDFViewer(UI 查看器)
双层架构
- 主线程(UI线程)
- 负责用户界面交互
- 处理页面导航、缩放等操作
- 管理Canvas渲染
- Worker线程(核心处理线程)
- 真正解析PDF文档
- 处理复杂的计算任务
- 文本提取和布局计算
- 图像解码和渲染
核心流程
plain
getDocument()
    ↓
 PDFDocumentLoadingTask
    ↓
 PDFDocumentProxy
    ↓
 getPage(n)
    ↓
 PDFPageProxy
    ↓
 Canvas/SVG 渲染
PDF.js 的三大关键对象
| 对象 | 描述 |
|---|---|
| PDFDocumentLoadingTask | PDF 加载任务,支持中断、进度、promise |
| PDFDocumentProxy | PDF 文档本体,包含页数、metadata、加载页面等 |
| PDFPageProxy | 页对象,可渲染/提取文本/提取指令 |
安装PDF.js
安装依赖
javascript
npm install pdfjs-dist --save安装版本:5.4.449
引入并配置worker
在指定 .vue文件中引入
javascript
import * as pdfjsLib from 'pdfjs-dist'配置 worker路径
- PDF.js使用Web Worker来处理PDF文档的解析和渲染,这样可以避免阻塞主线程
GlobalWorkerOptions.workerSrc用于指定Web Worker脚本的URL路径
对于Vite 构建工具,需要使用new URL()配合import.meta.url的资源引用方式,确保在生产环境和开发环境都能正确找到Worker文件
javascript
pdfjsLib.GlobalWorkerOptions.workerSrc = new URL(
  'pdfjs-dist/legacy/build/pdf.worker.min.mjs',
  import.meta.url,
).toString()对于Webpack构建工具,使用require语法
javascript
pdfjsLib.GlobalWorkerOptions.workerSrc = require('pdfjs-dist/legacy/build/pdf.worker.min.mjs');使用PDF.js
加载pdf
通过pdfjsLib.getDocument(pdfPath)加载pdf文件
javascript
const loadFile = () => {
  const loadingTask = pdfjsLib.getDocument(pdfPath)
  console.log(loadingTask, 'loadingTask')
}
获取文件加载进度
javascript
loadingTask.onProgress = (progressData) => {
  console.log(progressData.loaded / progressData.total) // 0-1
  state.percentage = (progressData.loaded / progressData.total) * 100
}
获取pdf信息
javascript
let pdfDoc = null

loadingTask.promise.then((pdf) => {
  console.log(pdf, 'pdf')
  // 保存pdf文档对象到全局,便于后续使用
  pdfDoc = pdf
  state.padPageNum = pdf.numPages  //pdf的页码
})
渲染页面
通过pdf.getPage(currentPage)获取页对象, 可渲染/提取文本/提取节点属性等
javascript
const currentPage = 1
// 此处pdf为通过文件路径加载获得
pdf.getPage(currentPage).then((page) => {
  showPdf(page)
})通过page.render(renderContext)渲染页面
javascript
// 渲染pdf
const showPdf = (page)=>{
  const viewport = page.getViewport({ scale: 1.5 })
  const canvas = document.getElementById('the-canvas') // 提前准备canvas
  const context = canvas.getContext('2d')
  // 将画布尺寸设为文档原本尺寸
  canvas.height = viewport.height
  canvas.width = viewport.width
  const renderContext = {
    canvasContext: context,
    viewport: viewport,
  }
  const renderTask = page.render(renderContext)
  renderTask.promise.then(() => {
    console.log('渲染完成')
  })
}
pdf文字交互
PDF.js 将 PDF 渲染在 canvas 上,而 Canvas 只是位图(图片),浏览器是无法直接选中里面的文字的。要实现文字选中,必须启用 Text Layer(文本层)。
核心原理:三明治结构
PDF.js 的解决方案是在 Canvas 之上覆盖一层透明的 HTML 层。
- 底层 (Canvas):负责展示 PDF 的视觉内容(字体、图片、排版)。
- 上层 (Text Layer) :一个透明的
div,里面包含了很多 ,这些 span 的位置、大小、文字内容与底层的 Canvas 完全重叠。
当用户"选中"文字时,实际上选中的是上层透明的 HTML DOM,而不是底层的 Canvas。
javascript
// <div id="text-layer" class="textLayer"></div>
// 页对象获取后,渲染文本交互层
const randerTextContent = async (viewport, scale, page) => {
  const textLayerDiv = document.getElementById('text-layer')

  // 设置文本层容器尺寸,必须与页面渲染时的 Canvas 一致
  textLayerDiv.style.height = viewport.height
  textLayerDiv.style.width = viewport.width

  // CSS 变量设置 (PDF.js v3+ 需要这个变量来计算字体缩放)
  textLayerDiv.style.setProperty('--total-scale-factor', scale)
  textLayerDiv.style.setProperty('--scale-round-x', 1)
  textLayerDiv.style.setProperty('--scale-round-y', 1)

  try {
    // 获取页面文本内容
    const textContent = await page.getTextContent()

    // 清除height为0的子项,避免无用的dom渲染
    let obj = { ...textContent }
    obj.items = textContent.items.filter((item) => item.height)

    // 注意:在 v5.x 中使用 new pdfjsLib.TextLayer
    const textLayer = new pdfjsLib.TextLayer({
      textContentSource: obj,
      container: textLayerDiv,
      viewport: viewport,
    })


    // 注意:在 v5.x 中使用 new pdfjsLib.TextLayer
    const textLayer = new pdfjsLib.TextLayer({
      textContentSource: obj,
      container: textLayerDiv,
      viewport: viewport,
    })

    await textLayer.render()

    console.log('文本层渲染完毕,现在可以选中文本了')
  } catch (err) {
    console.error('Text layer render error:', err)
  }
}
官方有提供现成的 Text Layer CSS 样式,样式表包含了 PDF.js 官方的 Text Layer 字体和定位计算规则。
javascript
import 'pdfjs-dist/web/pdf_viewer.css'渲染结果
搜索高亮
基本功能:搜索、切换匹配项、清空
搜索功能实现
1、遍历所有页面内容,获取与搜索内容的匹配项。
javascript
// totalPageNum从加载文件时的pdf对象获取
for (let pageNum = 1; pageNum <= state.totalPageNum; pageNum++) {
  const page = await pdfDoc.getPage(pageNum)
  const textContent = await page.getTextContent()

  // 页面内容中会有一些空对象,并且height都为 0,筛选出有内容的item
  let arr = textContent.items.filter((item) => item.height)
  arr.forEach((item, index) => {
    // 获取包含搜索文本的item,并记录页码、文本内容、item索引
    if (item.str.toLowerCase().includes(state.searchText.toLowerCase())) {
      state.searchResult.push({
        pageNum,
        str: item.str,
        itemIndex: index,
      })
    }
  })
}
2、展示第一个匹配项所在页面内容。
javascript
// 文档内容与搜索内容匹配到的数量
state.searchCount = state.searchResult.length
if (state.searchCount > 0) {
  // 根据当前匹配的索引获取第一个匹配项(便于设置深色的高亮,清晰的展示当前匹配的位置)
  const searchItem = state.searchResult[state.searchIndex]
  if (state.currentPage === searchItem.pageNum) {
    //
    searchHeightLight(searchItem)
  } else {
    state.currentPage = searchItem.pageNum
    // 跳转页面
    await getPage()
  }
}
3、获取当前页面内容中所有与搜索内容匹配的子项
javascript
let textLayerDiv = document.getElementById('text-layer')

const searchHeightLight = (searchItem) => {
  // 找到所有文本的span元素
  const spans = textLayerDiv.querySelectorAll('span[role]')

  spans.forEach((span, index) => {
    if (
      span.textContent.toLowerCase().includes(state.searchText.toLowerCase())
    ) {
      // 找到包含搜索内容的span元素,对搜索词进行高亮
      spanSearchTextHandle(span, index, searchItem)
    } else {
      span.style.backgroundColor = ''
    }
  })
}
4、对匹配的子项中的搜索词进行高亮
首次匹配会将所有匹配内容从 文本 -> span ,颜色为浅色高亮rgba(255, 255, 0, 0.5),第一个匹配项颜色为深色高亮rgba(255, 164, 0, 0.5)
javascript
// 替换span元素中的搜索文本为高亮span元素
const spanSearchTextHandle = (span, index, searchItem) => {
  let target = span.innerHTML

  // 找到搜索内容的位置
  let replaceIndex = target.toLowerCase()
    .indexOf(state.searchText.toLowerCase())

  // 找到需要高亮的原内容【为了保证英文大小写都能匹配到,不能直接使用搜索内容进行替换高亮】
  let replaceText = target.substring(
    replaceIndex,
    replaceIndex + state.searchText.length,
  )

  let newHtml = target.replace(
    replaceText,
    `<span class="searchLight" style="background-color: rgba(255, 255, 0, 0.5);">${replaceText}</span>`,
  )

  // 对当前匹配项进行更深色的高亮,使用户感知更清晰
  if (index === searchItem.itemIndex) {
    newHtml = target.replace(
      replaceText,
      `<span  class="searchLight" style="background-color: rgba(255, 164, 0, 0.5);">${replaceText}</span>`,
    )

    span.scrollIntoView({
      behavior: 'smooth',
      block: 'center',
    })
  }
  span.innerHTML = newHtml

}
至此搜索功能基本实现。
切换匹配项功能实现
当用户切换匹配项时【点击"上一个/下一个"按钮】,对匹配索引进行计算
javascript
// 上一个
const searchPrev = () => {
  if (state.searchIndex > 0) {
    state.searchIndex--
    // 保证不在当前页的匹配项能够丝滑跳转进入
    jumpSearch()
  }
}
// 下一个
const searchNext = () => {
  if (state.searchIndex < state.searchCount) {
    // 避免超出
    state.searchIndex = (state.searchIndex + 1) % state.searchCount
    jumpSearch()
  }
}
切换匹配项时,更换深色高亮位置
javascript
// 替换span元素中的搜索文本为高亮span元素
const spanSearchTextHandle = (span, index, searchItem) => {
  let target = span.innerHTML
  // 此时所有匹配项已经变为span了
  if (target.includes('span')) {
    // 找到当前匹配项
    if (index === searchItem.itemIndex) {
      // 替换深色高亮
      let newHtml = target.replace(
        'rgba(255, 255, 0, 0.5)',
        'rgba(255, 164, 0, 0.5)',
      )
      span.innerHTML = newHtml
      // 平滑移动到目标位置
      span.scrollIntoView({
        behavior: 'smooth',
        block: 'center',
      })
    } else {
      // 其他项保持浅色高亮
      let newHtml = target.replace(
        'rgba(255, 164, 0, 0.5)',
        'rgba(255, 255, 0, 0.5)',
      )
      span.innerHTML = newHtml
    }
  }
}
清空搜索功能实现
清空搜索匹配项的数组内容,恢复文本层dom
javascript
if (state.searchText === '') return
state.searchText = ''
state.searchResult = []
state.searchIndex = 0
state.searchCount = 0

if (!textLayerDiv) return
// 获取文本层
const spans = textLayerDiv.querySelectorAll('.searchLight')
const parent = textLayerDiv.parentNode
// 先将文本层dom删除,避免遍历频繁触发回流
parent.removeChild(textLayerDiv)
spans.forEach((span) => {
  // 将所有嵌套span替换为文本
  span.parentNode.innerHTML = span.parentNode.textContent
})
// 恢复
parent.appendChild(textLayerDiv)
选中高亮
基础功能:选中高亮、擦除高亮
选中高亮功能实现
功能设计:
- 选中文本,可以设置不同的颜色
- 对于已设置过颜色的文本,可再次选中更换其他颜色
关键:
- 保证dom结构扁平化
- 跨标签选中高亮
分析:
选中高亮也尝试过通过搜索高亮的方式实现,但是考虑到文本层是通过绝对定位实现,在文本层父节点实现dom扁平化获取定位困难、在文本子项下实现也会导致高亮与后面的文本重叠,导致后面文本选中问题。
最终可行实现:
再增加一层,保证与文本层重叠,置于文本层的下方,保证文本层可选中。
通过getClientRects()获取选中文本相对于视口的矩形信息(含位置以及宽高),并且该方法能够自动处理跨标签的选中内容,返回多个矩形信息。
结合getBoundingClientRect()获取整个文本层相对于视口的矩形信息,计算出选中文本的精确位置以及宽高,增加到数组中,再渲染到页面,这样的处理逻辑就非常简单,干净利落。
实现:
设置鼠标移动监听
javascript
const highLight = () => {
  state.isLight = !state.isLight
  if (state.isLight) {
    textLayerDiv.addEventListener('pointerup', handleMouseUp)
  } else {
    // 不使用时需要移除,避免重复创建
    textLayerDiv.removeEventListener('pointerup', handleMouseUp)
  }
}通过window.getSelection()获取唯一选中
javascript
const handleMouseUp = () => {
  const selection = window.getSelection()
  // 无选中不处理
  if (selection.toString().trim() === '' || selection.rangeCount === 0) return
  const range = selection.getRangeAt(0)
  // 确保文本层包含选中内容
  if (!textLayerDiv.contains(range.commonAncestorContainer)) return
  // 高亮处理
  hightLightHandle(range)
  // 移除选中
  selection.removeAllRanges()
}
直接计算选中内容的矩形信息,添加到数组中
javascript
// 获取选中内容相对于视口的矩形信息
const reacts = Array.from(range.getClientRects())
// 获取文本层相对于视口的矩形信息
const textLayerRect = textLayerDiv.getBoundingClientRect()

reacts.forEach((react) => {
  state.hightLightList.push({
    page: state.currentPage,  // 记录高亮内容所在页码
    style: {   // 后期可直接在此设置不同的背景颜色
      top: `${react.top - textLayerRect.top}px`,
      left: `${react.left - textLayerRect.left}px`,
      width: `${react.width}px`,
      height: `${react.height}px`,
    },
  })
})
渲染模版
vue
<template>
  <div class="pdfShow">
    <!-- PDF文件渲染层 -->
    <canvas id="the-canvas"></canvas>
    <!-- 文本层 -->
    <div id="text-layer" class="textLayer"></div>
    <!-- 高亮层 -->
    <div
      v-if="state.hightLightList.length !== 0"
      :style="{
        width: state.viewportWidth,
        height: state.viewportHeight,
        position: absolute,
      }"
      >
      <div
        class="highlight"
        v-for="item in state.hightLightList"
        :key="item"
        :style="item.page === state.currentPage ? item.style : {}"
        ></div>
    </div>
  </div>
</template>

<style scoped>
  .highlight {
    position: absolute;
    background: rgba(255, 255, 0, 0.4);
  }
</style>
擦除高亮功能实现
功能设计: 可对高亮内容部分擦除
实现思路:通过遍历,对目标高亮项进行截断/删除,再通过计算将剩余的未选中高亮块增加到数组
分析:
确保选中范围与高亮块有交集,那么选中范围相对于高亮块的位置有可能三种情况【左相交,包含,右相交】
情况一:选中的开始位置在高亮块开始位置的右侧,选中的结束位置在高亮块开始位置的右侧
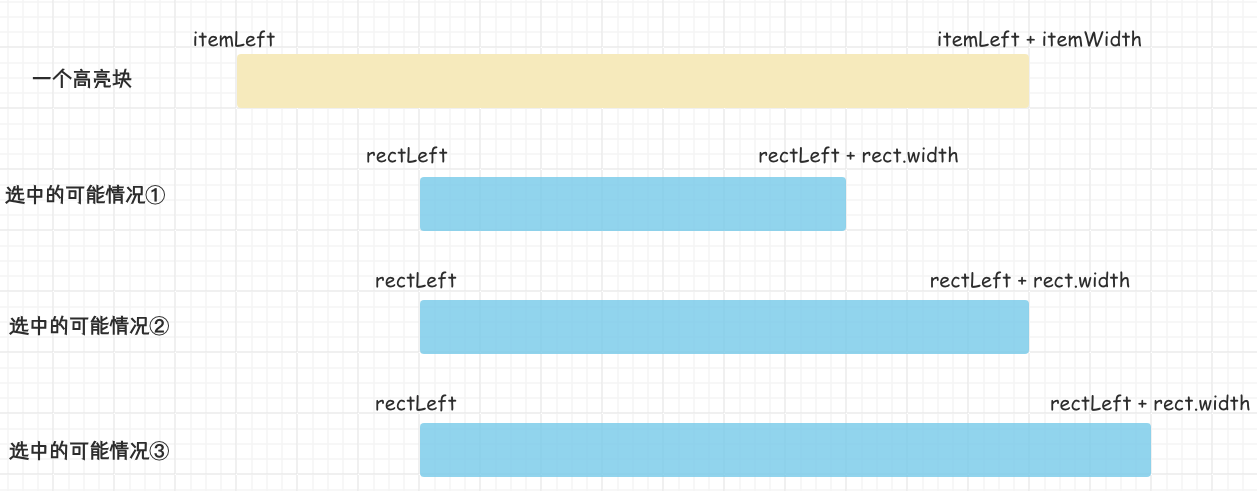
该情况的判断前提条件为
reactLeft > itemLeft && reactLeft < itemLeft + itemWidth && reactLeft + react.width > itemLeft
选中的可能情况① 为包含状态,需要对高亮进行截断,设置当前item的宽度,并向数组内再push后半段高亮。
其他选中情况为相交,只需要修改当前item的宽度。
javascript
// 选中范围右侧在高亮范围内
if (reactLeft + react.width < itemLeft + itemWidth) {
  arr.push({
    page: state.currentPage,
    style: {
      top: `${reactTop}px`,
      left: `${reactLeft + react.width}px`,
      width: `${itemLeft + itemWidth - (reactLeft + react.width)}px`,
      height: `${react.height}px`,
    },
  })
}
item.style.width = `${reactLeft - itemLeft}px`情况二:选中的开始位置与高亮块的开始位置相同,选中的结束位置在高亮块开始位置的右侧
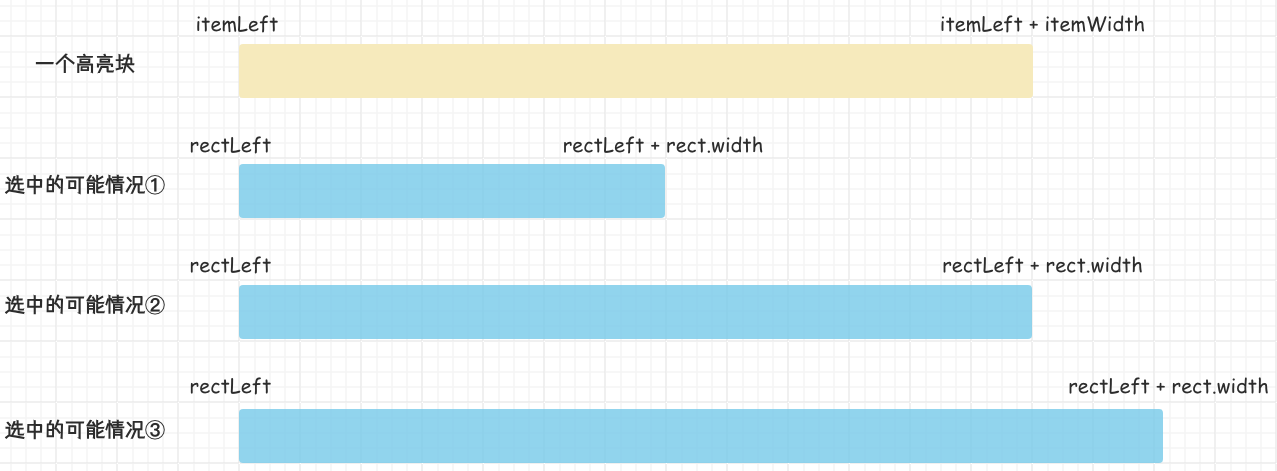
该情况的判断前提条件为
reactLeft == itemLeft && reactLeft < itemLeft + itemWidth && reactLeft + react.width > itemLeft
由图可已看出,选中的可能情况① 需要修改当前item的left和width,在reactLeft + react.width >= itemLeft + itemWidth的情况下,需要删除该高亮【注意此时处于循环中,无法对数组本身进行删除,所以收集索引】
javascript
// 选中范围 完全包裹住 高亮范围 的 先收集索引,遍历结束后再删除。避免删除后索引错乱
if (reactLeft + react.width >= itemLeft + itemWidth) {
  deleteIndexArr.push(i)
} else {
  item.style.width = `${itemLeft + itemWidth - (reactLeft + react.width)}px`
  item.style.left = `${reactLeft + react.width}px`
}情况三:选中的开始位置在高亮块开始位置的左侧,选中的结束位置在高亮块开始位置的右侧
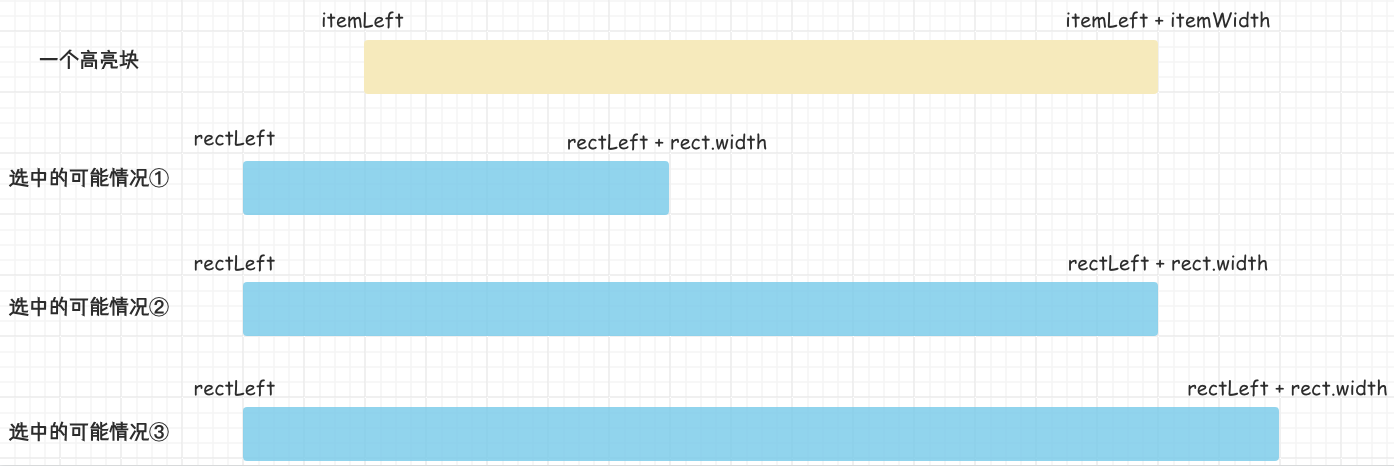
该情况的判断前提条件为
reactLeft < itemLeft && reactLeft < itemLeft + itemWidth && reactLeft + react.width > itemLeft
由图可已看出,本质与情况二一致,所以处理逻辑可复用。
最终实现:
在高亮处理逻辑中增加擦除逻辑
javascript
// 获取 reacts、textLayerRect矩形信息
reacts.forEach((react) => {
  if (state.isClear) {
    clearHandle(react, textLayerRect)
    return
  }
  //...
})
完整处理逻辑整合如下:
javascript
const clearHandle = (react, textLayerRect) => {
  let deleteIndexArr = []
  state.hightLightList.forEach((item, i, arr) => {
    // 排除非当前页的高亮项
    if (item.page !== state.currentPage) return
    const itemTop = Number(item.style.top.replace('px', ''))
    const reactTop = react.top - textLayerRect.top
    // 排除 选中 与 高亮 不在同一高度 的项
    if (itemTop !== reactTop) return
    const itemWidth = Number(item.style.width.replace('px', ''))
    const itemLeft = Number(item.style.left.replace('px', ''))
    const reactLeft = react.left - textLayerRect.left

    // 确保 选中范围 与 高亮范围 有交集
    if (
      reactLeft < itemLeft + itemWidth &&
      reactLeft + react.width > itemLeft
    ) {
      // 高亮范围 包含 选中范围
      if (reactLeft > itemLeft) {
        // 选中范围右侧在高亮范围内
        if (reactLeft + react.width < itemLeft + itemWidth) {
          arr.push({
            page: state.currentPage,
            style: {
              top: `${reactTop}px`,
              left: `${reactLeft + react.width}px`,
              width: `${itemLeft + itemWidth - (reactLeft + react.width)}px`,
              height: `${react.height}px`,
            },
          })
        }
        item.style.width = `${reactLeft - itemLeft}px`
      } else {
        // 选中范围 完全包裹住 高亮范围 的 先记录索引,遍历结束后再删除。避免删除后索引错乱
        if (reactLeft + react.width >= itemLeft + itemWidth) {
          deleteIndexArr.push(i)
        } else {
          item.style.width = `${itemLeft + itemWidth - (reactLeft + react.width)}px`
          item.style.left = `${reactLeft + react.width}px`
        }
      }
    }
  })

  // 最后统一将需要删除的项 以及 width<=6px(精度校准)的项 删除
  if (deleteIndexArr.length !== 0) {
    state.hightLightList = state.hightLightList.filter(
      (item, index) =>
        !deleteIndexArr.includes(index) &&
        Number(item.style.width.replace('px', '')) > 6,
    )
  }
  console.log(state.hightLightList, 'state.hightLightList')
}