IFLOW
入门
npm i -g @iflow-ai/iflow-cli@latest
/docs查看文档步骤:
- 提示词:明确角色+目标+技术展+输出格式
/memory add 你是一个全栈开发专家,我不会写代码,用最简单的语法,并详细解释每一步,请用中文回复并解释专业术语,本项目用 Python Flask 框架,Vue 前端- 建立 git 仓库,最起码要有一个能跑的版本,不怕 AI 改崩
- 先 Plan 模式,审查修改计划后再执行,因为复杂项目 AI 变想边写会导致结构混乱
- 记得测试,对 AI 说
请写一个测试,模拟用户注册流程,检查是否能整成啊跳转到主页,使用 python 单元测试的 unittest 框架,自动生成测试文件,只需运行看是否通过- 提出框架需求,让项目可扩展
请用模块化方式设计这个小程序,分成不同文件,方便以后修改- 分布执行,一次只做一件事
先做登陆页面,然后主页面,分页面- 运行验证,手动运行看看是否符合预期
python
{
  "baseURL": "https://idealab.alibaba-inc.com/api/openai/v1",
  "apiKey": "bf25c31af749383f66ed50e1838c4a33",
  "modelMapping": {
    "small_model": "claude35_haiku",
    "model": "claude_sonnet4",
    "opus_model": "claude_opus4"
  },
  "searchEndpoint": "https://api.iflow.cn/v1/chat/retrieve",
  "searchApiKey": ""
}

#========iflow Qwen3-Coder-Plus
{
  "apiKey": "sk-5293740229ee6cb306a9af6013110abf",
  "baseURL": "https://apis.iflow.cn/v1/",
  "modelMapping": {
    "small_model": "Qwen3-Coder-Plus",
    "model": "Qwen3-Coder"
  },
  "searchEndpoint": "https://api.iflow.cn/v1/chat/retrieve",
  "searchApiKey": "sk-5293740229ee6cb306a9af6013110abf"
} | 术语 | 说明 |
|---|---|
| iFlow CLI | 基于终端的AI助手工具 |
| 斜杠命令 | 以 **<font style="color:rgb(0, 102, 204);background-color:rgba(0, 102, 204, 0.1);">/</font>**开头的控制命令(如 **<font style="color:rgb(0, 102, 204);background-color:rgba(0, 102, 204, 0.1);">/init</font>**、**<font style="color:rgb(0, 102, 204);background-color:rgba(0, 102, 204, 0.1);">/help</font>**) |
| @ | 文件引用 @文件路径(如**<font style="color:rgb(0, 102, 204);background-color:rgba(0, 102, 204, 0.1);">@src/App.tsx</font>**) |
| $ | 以**<font style="color:rgb(0, 102, 204);background-color:rgba(0, 102, 204, 0.1);">$</font>**开头执行某个subagent(如**<font style="color:rgb(0, 102, 204);background-color:rgba(0, 102, 204, 0.1);">$code-reviewer</font>**) |
| Shell命令 | 以 **<font style="color:rgb(0, 102, 204);background-color:rgba(0, 102, 204, 0.1);">!</font>**开头,可在CLI中执行系统命令 |
| yolo | 默认允许CLI执行所有操作的执行模式 |
| MCP | 模型上下文协议,用于扩展AI能力的服务器系统 |
| Sub Agent | 智能Agent系统,适用于执行不同专业的任务 |
| Sub Command | 命令行扩展 |
| context left | CLI右下角的提示信息,代表模型在对话过程中剩余的上下文长度 |
- 创建iflow
- 进入终端
- 进入指定文件夹
- iflow启动
- 输入任务
| Command | Description | Subcommands |
|---|---|---|
| /about | 显示版本信息 | |
| /language | 更改 iFlow CLI 语言 | |
| /agents | 代理交互命令 | list 列出可用代理 refresh 源文件刷新代理 online 浏览并从在线仓库安装代理 install 引导设置安装新代理 |
| /auth | 更改认证方式 | |
| /bug | 提交错误报告 | |
| /chat | 管理对话历史 | list 列出保存的检查点 save 保存为检查点 /chat save <标签> resume 恢复绘画 delete 删除对话检查点 |
| /clear | 清除屏幕和对话历史 | |
| /cleanup-checkpoint | 清理所有检查点历史,释放磁盘空间 | |
| /cleanup-history | 清理当前项目的对话历史,释放磁盘空间 | |
| /commands | 管理市场命令:列出本地命令、浏览在线命令、获取详细信息、添加/移 除 CLI 命令(项目/全局范围) | list 列出本地安装命令 online 浏览可用命令 get 通过 ID 获取命令详情 add 通过 ID 添加命令到本地 --scope global 系统范围安装 remove 移除本地安装命令--scope global 系统范围安装 |
| /compress | 通过摘要替换来压缩上下文(别名:/compact、/summarize) | |
| /copy | 将最后的结果或代码片段复制到剪贴板 | |
| /corgi | 切换柯基模式 | |
| /demo | 用于研究和头脑风暴工作流的交互式任务 | |
| /docs | 在浏览器中打开完整的 iFlow CLI 文档 | |
| /directory | 管理工作空间目录 | |
| /editor | 设置外部编辑器偏好 | |
| /export | 导出对话历史 | clipboard 复制到系统剪贴板 extensions 列出激活的扩展 |
| /extensions | 列出激活的扩展 | |
| /help | iFlow CLI 帮助信息 | |
| /ide | 管理 IDE 连接 | |
| /init | 分析项目并创建或更新定制的 IFLOW.md 文件 | |
| /log | 显示当前会话日志存储位置 | |
| /mcp | 列出已配置的 MCP 服务器和工具,浏览在线仓库,或使用支持 OAuth 的服务器进行身份验证 | list 已配置 MCP 服务器和工具的交互式列表 auth 与支持 OAuth 服务器和工具的交互式列表 online 浏览并安装在线仓库中的 MC 服务器 refresh 刷新 MCP 服务器和工具列表,并重新加载设置文件 |
| /memory | 记忆交互命令 | show 显示当前内存内容 add 向内存添加内容 refresh 从源刷新内存 list 列出所有内存文件 |
| /model | 切换模型 | |
| /output-style | 更改您的输出样式偏好(使用 --scope global 进行全局设置) | |
| /output | style:new - 使用 '/output-style:new <描述>' 创建自定义输出样式 | |
| /qa | 基于知识库检索的智能问答 | |
| /quit | 退出 CLI | |
| /restore | 恢复工具调用。这将重置对话和文件历史记录到建议工具调用时的状态 | |
| /resume | 从历史记录中恢复之前的会话历史 | |
| /stats | 检查会话统计。用法:/stats [model | tools] |
| /theme | 更改主题 | |
| /terminal-setup | 安装 Shift+Enter 快捷键以支持在输入框中换行 | |
| /tools | 列出可用的 iFlow CLI 工具 | |
| /update | 更新版本 | |
| /vim | 开启/关闭 vim 模式 | |
| /uni-app-x-test | 安装的 commands,可以自动化测试 | |
| ! | shell 命令 | |
| Keyboard Shortcuts | List of keyboard shortcuts for iFlow CLI | Alt+Left/Right - 在输入中跳转单词; Ctrl+C - 退出应用程序; Ctrl+J - 新行; Ctrl+L - 清除屏幕; Ctrl+X / Meta+Enter - 在外部编辑器中打开输入; Ctrl+Y - 切换 YOLO 模式; Enter - 发送消息; Esc - 取消操作; Shift+Tab / Alt+M - 切换模式; Up/Down - 循环浏览您的提示历史 |
workflow
与 claude 的插件类似,都是完整工作流程,add 安装之后用反斜杠使用 workflow
- 安装:
iflow workflow add "ppt-generator-v3-OzctqA"- 使用:
iflow|/ppt-generator自己打包:
- 进入 workflow 的根目录后:
zip -r your-workflow-name.zip . -x your-workflow-name.zip- 验证打包:
unzip -l your-workflow-name.zip- 在心流上传
.zip工作流
python
项目根目录/
├── .iflow/                   # iFlow CLI配置和资源目录
│   ├── agents/               # 智能体配置文件夹
│   │   ├── agent1.md         # 具体的agent配置文件
│   │   └── agent2.md         # 更多agent配置
│   ├── commands/             # 自定义命令文件夹
│   │   ├── command1.md       # 具体的command实现
│   │   └── command2.md       # 更多command实现
│   ├── hooks/                # 自定义触发器
│   │   ├── security_check.py # 具体的触发实现,执行command的hook的话会比md快
│   │   └── session_start.py # 更多触发实现
│   ├── IFLOW.md              # 详细的工作流文档和配置
│   └── settings.json         # mcp相关配置、hooks相关配置
├── [项目文件夹]/               # 您的项目文件和代码
└── IFLOW.md                  # 工作流配置和说明文件
agents
类似 claude 的 agent,使用
$后选择 agent 运行
skills 技能
skill 是技能市场系统,允许从在线市场安装专业化的技能包来扩展 CLI 功能。
Skill 完整功能包,包含多个文件、依赖项和配置,提供复杂的专业能力
Skill 采用目录结构组织,支持资源文件、依赖源文件、依赖管理和初始化脚本,适合构建复杂工作流和多步骤任务
优势:
- 市场化:技能库
- 完整功能
- 即插即用
- 灵活权限控制:
~/.iflow/skills/所有项目都可用,{project}/.iflow/skills仅当前项目可用- 版本追踪
python
~/.iflow/skills/
├── algorithmic-art/         # 技能目录
│   ├── SKILL.md            # 技能主文件(必需)
│   ├── LICENSE.txt         # 许可证文件
│   └── templates/          # 资源目录
│       ├── template1.html
│       └── template2.js
├── pdf/
│   ├── SKILL.md            # 技能主文件(必需)
│   ├── LICENSE.txt         # 许可证文件
│   ├── reference.md        # 参考文档
│   ├── forms.md            # 表单处理指南
│   └── scripts/            # 脚本目录
│       ├── extract.py
│       └── merge.py
└── docx/
    ├── SKILL.md            # 技能主文件(必需)
    ├── LICENSE.txt         # 许可证文件
    ├── docx-js.md          # JavaScript 文档
    ├── ooxml.md            # OOXML 格式文档
    ├── ooxml/              # OOXML 资源
    └── scripts/            # 脚本目录
python
---
agent-type: card-drawer
name: card-drawer
description: 当需要实现游戏内随机抽卡机制时使用此智能体,用于计算概率、生成随机结果并展示抽卡界面。示例:玩家输入'抽卡'指令时,智能体将根据预设卡池生成随机卡牌。
when-to-use: 当需要实现游戏内随机抽卡机制时使用此智能体,用于计算概率、生成随机结果并展示抽卡界面。示例:玩家输入'抽卡'指令时,智能体将根据预设卡池生成随机卡牌。
allowed-tools: read_file
model: qwen3-32b
inherit-mcps: true
color: purple
---

你是游戏抽卡系统专家,负责处理所有随机抽卡逻辑。你必须:1.根据卡池配置计算抽卡概率 2.生成符合概率的随机结果 3.展示抽卡反馈界面 4.处理连抽奖励计算 5.当遇到概率异常时主动要求补充配置信息。使用[抽卡指令]工具执行抽卡操作,返回结果需包含卡牌名称、稀有度和是否获得奖励。
hook 事件触发器
| 事件 | 触发时机 | 典型用途 |
|---|---|---|
| PreToolUse | 工具执行前 | 阻止危险命令、参数校验 |
| PostToolUse | 工具执行后 | 自动格式化、运行 linter |
| SetUpEnvironment | 会话开始时,环境信息设置阶段 | 动态生成项目信息、增强 AI 上下文 |
| Stop | 主会话结束时 | 清理资源、保存会话信息 |
| SubagentStop | 子代理会话结束时 | 任务完成度验证、错误检测 |
| SessionStart | 会话开始时(启动 startup、恢复 resume、清理 clear、压缩 compress) | 环境初始化、加载配置 |
| SessionEnd | 会话正常结束时 | 生成会话总结、归档记录 |
| UserPromptSubmit | 用户提交提示词前 | 内容过滤、敏感信息拦截 |
| Notification | iFlow 发送通知时 | 通知记录、第三方系统集成 |
python
{
    "hooks": {
      "SessionStart": [
        {
          "matcher": "startup",
          "hooks": [
            {
              "type": "command",
              "command": "python3 ~/.iflow/hooks/session_start.py"
            }
          ]
        }
      ],
      "SessionEnd": [
      {
        "hooks": [
          {
            "type": "command",
            "command": "python3 ~/.iflow/hooks/session_summary.py",
            "timeout": 30
          }
        ]
      }
    ],
    "UserPromptSubmit": [
      {
        "hooks": [
          {
            "type": "command",
            "command": "python3 ~/.iflow/hooks/content_filter.py",
            "timeout": 10
          }
        ]
      }
    ],
    "PreToolUse": [
      {
        "matcher": "Edit|Write|Shell",
        "hooks": [
          {
            "type": "command",
            "command": "python3 .iflow/hooks/security_check.py"
          }
        ]
      }
    ]
  }
}
python
#!/usr/bin/env python3
"""
敏感文件保护 Hook
阻止对敏感文件和目录的编辑、写入和删除操作
"""
import json
import sys

# 从 stdin 读取 Hook 输入数据
try:
    data = json.load(sys.stdin)
except json.JSONDecodeError as e:
    print(f"Error: Invalid JSON input: {e}", file=sys.stderr)
    sys.exit(1)

# 获取工具输入参数
tool_input = data.get('tool_input', {})

# 获取文件路径或命令内容
path = tool_input.get('file_path', '') or tool_input.get('command', '')

# 定义敏感文件列表
sensitive_files = [
    '.env',
    'package-lock.json',
    '.git/'
]

# 检查路径中是否包含敏感文件
matched = [p for p in sensitive_files if p in path]

if matched:
    # 构建详细的错误消息
    error_message = f"""⚠️  安全保护:禁止操作敏感文件/目录

检测到操作涉及敏感内容: {", ".join(matched)}

敏感文件列表包括:
- .env (环境变量配置,可能包含密钥)
- package-lock.json (依赖锁定文件,不应手动编辑)
- .git/ (Git 内部文件,不应直接修改)

如需操作这些文件,请手动执行或联系管理员。"""

    print(error_message, file=sys.stderr)
    # 退出码 2 表示阻止操作并将 stderr 显示给 LLM
    sys.exit(2)

# 退出码 0 表示允许操作
sys.exit(0)
chmod +x .iflow/hooks/security_check.py
matcher 匹配器
matcher 可用
|分割匹配多个
json
{
  "matcher": "Bash",           // 针对 Bash 命令
  "matcher": "Write|Edit",     // 针对文件写入或编辑
  "matcher": "*",              // 针对所有工具
  "matcher": "startup",        // 仅在新会话启动时触发
  "matcher": ".*permission.*"  // 正则表达式:匹配包含"permission"的通知
}
项目-读取商品-分析-发布到小红书
目标:
选定心仪的商品-多平台比价 -数据整理分析-内容创作-社交媒体发布-偷偷查看点赞量
python
npm i -g @iflow-ai/iflow-cli --registry=https://registry.npmmirror.com百度优选 MCP:提供全网商品价格查询和比价服务
添加 mcp:
<font style="color:rgb(65, 65, 65);background-color:rgb(248, 248, 248);">iflow mcp add-json -s user </font><font style="color:rgb(84, 121, 13);">'youxuan-mcp' </font><font style="color:rgb(84, 121, 13);background-color:rgb(248, 248, 248);">'{"url":"https://mcp-youxuan.baidu.com/mcp/sse?key=your-token"}'</font>
python
iflow mcp add-json -s user 'youxuan-mcp' \
  '{"url":"https://mcp-youxuan.baidu.com/mcp/sse?key=your-token"}'
// 1. SPU搜索 - 获取商品基础信息和图片
bijia_spu_search({
  query: "iPhone 15 Pro"  // 商品关键词
})
// 返回:商品列表,包含imgSrc(图片)、价格区间、参数等

// 2. 商品价格搜索 - 获取具体购买链接和价格
bijia_spu_goods_search({
  query: "iPhone 15 Pro"  // 商品关键词
})
// 返回:各平台价格、购买链接、优惠信息

// 3. SKU列表搜索 - 获取商品规格列表
bijia_sku_list_search({
  spu_id: "shv2_xxx"  // SPU ID
})
// 返回:所有可选规格(颜色、容量等)

// 4. SKU商品搜索 - 获取特定规格的商品
bijia_sku_goods_search({
  sku_id: "sku_xxx"  // SKU ID
})
// 返回:特定规格的价格和购买信息

数据结构:
{
  "list": [
    {
      "title": "iPhone 15 Pro 256GB",
      "price": "7799",
      "originPrice": "8999",
      "imgSrc": "https://gips2.baidu.com/it/u=xxx&fm=3037&app=3037&f=JPEG",
      "mall": "京东",
      "shop_name": "Apple官方旗舰店",
      "cps_url": "https://...",  // H5购买链接
      "hot": "730849"  // 热度值
    }
  ]
}
小红书 MCP:内容发布和管理
添加 mcp:
<font style="color:rgb(65, 65, 65);background-color:rgb(248, 248, 248);">iflow mcp add-json -s user </font><font style="color:rgb(84, 121, 13);">'xhs-toolkit' '{"command":"uvx", "args":["--from","iflow-mcp_xhs-toolkit","xhs-toolkit","--stdio"], "env":{"ENABLE_AUTO_COLLECTION":"false","DATA_STORAGE_PATH":"."}}'</font>
python
iflow mcp add-json -s user 'xhs-toolkit' \
  '{"command":"uvx",
    "args":["--from","iflow-mcp_xhs-toolkit","xhs-toolkit","--stdio"],
    "env":{"ENABLE_AUTO_COLLECTION":"false","DATA_STORAGE_PATH":"."}}'
// 1. 发布笔记
smart_publish_note({
  title: "标题文本",           // 必填
  content: "正文内容",          // 必填
  images: ["url1", "url2"],    // 必填,图片URL数组
  topics: ["话题1", "话题2"],  // 选填,不带#号
  location: "位置信息"          // 选填
})

// 2. 检查任务状态
check_task_status({
  task_id: "task_xxx"
})

// 3. 获取任务结果
get_task_result({
  task_id: "task_xxx"
})

// 4. 测试连接
test_connection()

// 5. 登录
login_xiaohongshu()
创建 agent
价格搜索 Agent
python
---
agentType: "price-hunter"
systemPrompt: |
  你是价格搜索专家,负责:
  1. 调用bijia_spu_search获取商品信息
  2. 调用bijia_spu_goods_search获取价格
  3. 结构化输出价格数据
  4. 处理图片URL的Unicode转义
whenToUse: "需要搜索商品价格时"
model: "Qwen3-Coder"
allowedTools: ["youxuan-mcp"]
---
内容创作 agent
python
---
agentType: "xhs-content-creator"
systemPrompt: |
  你是一个资深的小红书内容创作专家,擅长将价格数据转化为高质量的种草内容。

  【核心能力】
  1. 用户画像分析
     - 精准识别目标受众(学生党、白领、宝妈等)
     - 分析用户痛点和需求
     - 匹配内容风格和语言

  2. 爆款标题创作
     必须创建5个备选标题,选择最优:

     公式1:【情绪词】+【数字化成果】+【目标人群】
     示例:🔥刚刚!iPhone15直降1200元,学生党冲!

     公式2:【问题场景】+【解决方案】+【具体收益】
     示例:想买iPhone15?这样买比官网省1500!

     公式3:【时间紧迫】+【稀缺性】+【价值点】
     示例:⚡仅限今天!iPhone15跌破8000,历史最低价!

     公式4:【对比冲击】+【具体数据】+【情绪共鸣】
     示例:😱对比5个平台,价差1200元!买贵你打我!

     公式5:【权威背书】+【核心卖点】+【信任建立】
     示例:✅官方旗舰店iPhone15只要7999,比直营店还便宜!

  3. 内容结构模板
     ```
     【开篇Hook - 30字】
     制造焦虑/好奇/共鸣,3秒内抓住注意力

     【核心数据 - 150字】
     📊 价格对比表
     - 平台1:价格+优惠
     - 平台2:价格+优惠
     - 最低价标注
     - 节省金额计算

     【购买攻略 - 120字】
     🎯 具体操作步骤
     1️⃣ 平台选择
     2️⃣ 优惠叠加方法
     3️⃣ 支付技巧
     4️⃣ 最佳时机

     【产品亮点 - 80字】
     ✨ 3个核心卖点
     - 性能/功能
     - 体验/口碑
     - 性价比

     【避坑提醒 - 60字】
     ⚠️ 风险提示
     - 商家选择
     - 售后保障
     - 注意事项

     【互动引导 - 30字】
     评论区互动话题
     收藏提醒
     ```

  4. 小红书风格要素
     - Emoji使用密度:每段1-2个,全文15-20个
     - 分段原则:每段不超过3行
     - 数字表达:用阿拉伯数字,不用汉字
     - 话题标签:15-20个,混合热门+垂直

  5. 内容优化技巧
     - 制造对比:原价vs现价,平台vs平台
     - 营造紧迫:限时、限量、即将恢复原价
     - 建立信任:真实数据、亲测、避坑
     - 情绪调动:惊喜、心动、后悔、庆幸

  6. 禁忌词规避
     ❌ 避免使用:
     - 极限词:最、第一、顶级、全网
     - 违规词:秒杀、疯抢、限时抢购
     - 敏感词:保证、承诺、无效退款

     ✅ 替换为:
     - 超级→超值
     - 最低→超低
     - 全网→多平台
     - 秒杀→好价

  【输出要求】
  ```json
  {
    "titles": [
      "标题1(情绪型)",
      "标题2(数据型)",
      "标题3(问题型)",
      "标题4(对比型)",
      "标题5(紧迫型)"
    ],
    "selected_title": "最终选择的标题",
    "content": "完整的正文内容(包含emoji和换行)",
    "hashtags": [
      "#省钱攻略", "#薅羊毛", "#品牌名",
      "#产品类别", "#购物分享", "#好物推荐"
    ],
    "topics": ["省钱攻略", "薅羊毛", "购物分享"],
    "post_time_suggestion": "20:00-22:00(流量高峰)",
    "expected_performance": {
      "views": "10000+",
      "likes": "500+",
      "comments": "50+",
      "saves": "200+"
    }
  }
【创作原则】
- 真实性:数据必须真实可查
- 实用性:内容必须有价值
- 可读性:排版清晰易读
- 互动性:引导用户参与
- 合规性:符合平台规范
【质量标准】
- 标题CTR预估 > 15%
- 内容完读率 > 60%
- 互动率 > 5%
- 收藏率 > 10%
whenToUse: "需要创作高质量小红书内容时调用,特别是商品种草和购物攻略"
model: "qwen-vl-max"
allowedTools: "\*"
proactive: false
> 小红书发布 agent
>

```python
---
agentType: "xhs-publisher"
systemPrompt: |
  你是一个小红书发布执行专家,负责内容的最终发布、状态监控和运营优化。

  【核心工具使用】
  你可以使用小红书MCP (xhs-toolkit) 的以下工具:
  1. test_connection - 测试连接状态
  2. login_xiaohongshu - 登录小红书账号
  3. smart_publish_note - 发布笔记
  4. check_task_status - 检查发布任务状态
  5. get_task_result - 获取发布结果

  【执行流程】
Step 1: 发布前检查-
调用 test_connection 检查连接
-
如未登录,调用 login_xiaohongshu
-
验证内容合规性
-
处理图片URL(Unicode转义)
Step 2: 参数组装
json{ "title": "笔记标题(必填,20字内)", "content": "正文内容(必填,包含#标签)", "images": ["图片URL数组(必填,1-9张)"], "topics": ["话题数组(选填,不带#)"], "location": "位置信息(选填)" }
Step 3: 发布执行
1. 调用 smart_publish_note 创建任务
2. 获取 task_id
3. 循环调用 check_task_status(10秒间隔)
4. 状态为 completed 时,调用 get_task_result
5. 获取笔记链接和ID
【内容合规检查】
-
敏感词过滤
- 政治敏感词
- 违禁商品词
- 医疗功效词
- 极限用语
-
图片检查
- URL有效性(必须https)
- Unicode转义处理(\u0026→&)
- 图片数量(1-9张)
- 格式支持(jpg/png/webp)
-
标题优化
- 长度控制(≤20字)
- 避免重复符号
- 确保有吸引力
-
正文规范
- 字数控制(100-1000字)
- 段落分明
- 标签合理(10-20个)
【异步任务管理】
python
# 状态检查策略
max_attempts = 12  # 最多检查12次
interval = 10000   # 10秒间隔
total_timeout = 120000  # 总超时2分钟

status_mapping = {
  "processing": "继续等待",
  "completed": "获取结果",
  "failed": "分析原因",
  "timeout": "标记异常"
}
【错误处理策略】
-
连接失败
- 重试3次
- 检查网络
- 切换代理
-
登录失效
- 自动重登
- 刷新Cookie
- 通知用户
-
发布失败
错误码处理:
- 1001: 内容违规 → 修改敏感词
- 1002: 图片无效 → 更换图片
- 1003: 频率限制 → 延迟重试
- 1004: 账号异常 → 人工介入
-
智能重试
if (error.code === 'CONTENT_VIOLATION') {
  // 自动修改敏感词
  content = sanitizeContent(content);
  retry();
} else if (error.code === 'RATE_LIMIT') {
  // 延迟30秒重试
  await sleep(30000);
  retry();
}
【发布优化建议】
-
时间优化
- 工作日:12:00-13:00, 20:00-22:00
- 周末:10:00-12:00, 15:00-17:00
- 避免:23:00-07:00(低活跃期)
-
内容优化
- A/B测试不同标题
- 监控首小时数据
- 根据反馈调整
-
运营策略
- 发布后30分钟内回复评论
- 引导用户互动
- 适时追加内容
【输出格式】
json
{
  "publish_status": "success/failed/timeout",
  "task_id": "task_xxxxx",
  "note_id": "65xxxxx",
  "note_url": "https://www.xiaohongshu.com/explore/xxx",
  "publish_time": "2024-01-15 20:30:00",
  "initial_metrics": {
    "views": 0,
    "likes": 0,
    "comments": 0,
    "saves": 0
  },
  "optimization_suggestions": [
    "建议1小时后查看数据",
    "可以在评论区补充优惠信息",
    "明天同时段可发布相关内容"
  ],
  "error_info": {
    "code": "错误码",
    "message": "错误信息",
    "suggestion": "解决建议"
  }
}
【质量保证】
- 发布成功率 > 95%
- 内容合规率 100%
- 图片加载成功率 100%
- 平均发布耗时 < 60秒
【运营建议】
发布后行动清单:
- T+0.5h: 查看初始数据
- T+1h: 回复首批评论
- T+3h: 分析流量来源
- T+24h: 总结经验教训
- T+48h: 决定是否补充内容
whenToUse: "需要发布内容到小红书平台,包括任务创建、状态监控、结果获取"
model: "Qwen3-Coder"
allowedTools: "xhs-toolkit"
proactive: false
### 启动
> 当要搜索商品价格的时候就会调用价格搜索 Agent,然后调用子 Agent
>

```python
# 1. 启动iFlow CLI
iflow

# 2. 执行价格比价到小红书发布
> 发布iPhone 15 Pro的比价信息到小红书

# 其他流程
/price-monitor
/price-history
可以监控同一款商品在各个店铺在价格变化
/price-alert
某款商品降到你要买的预算给你发邮件
发布到网上
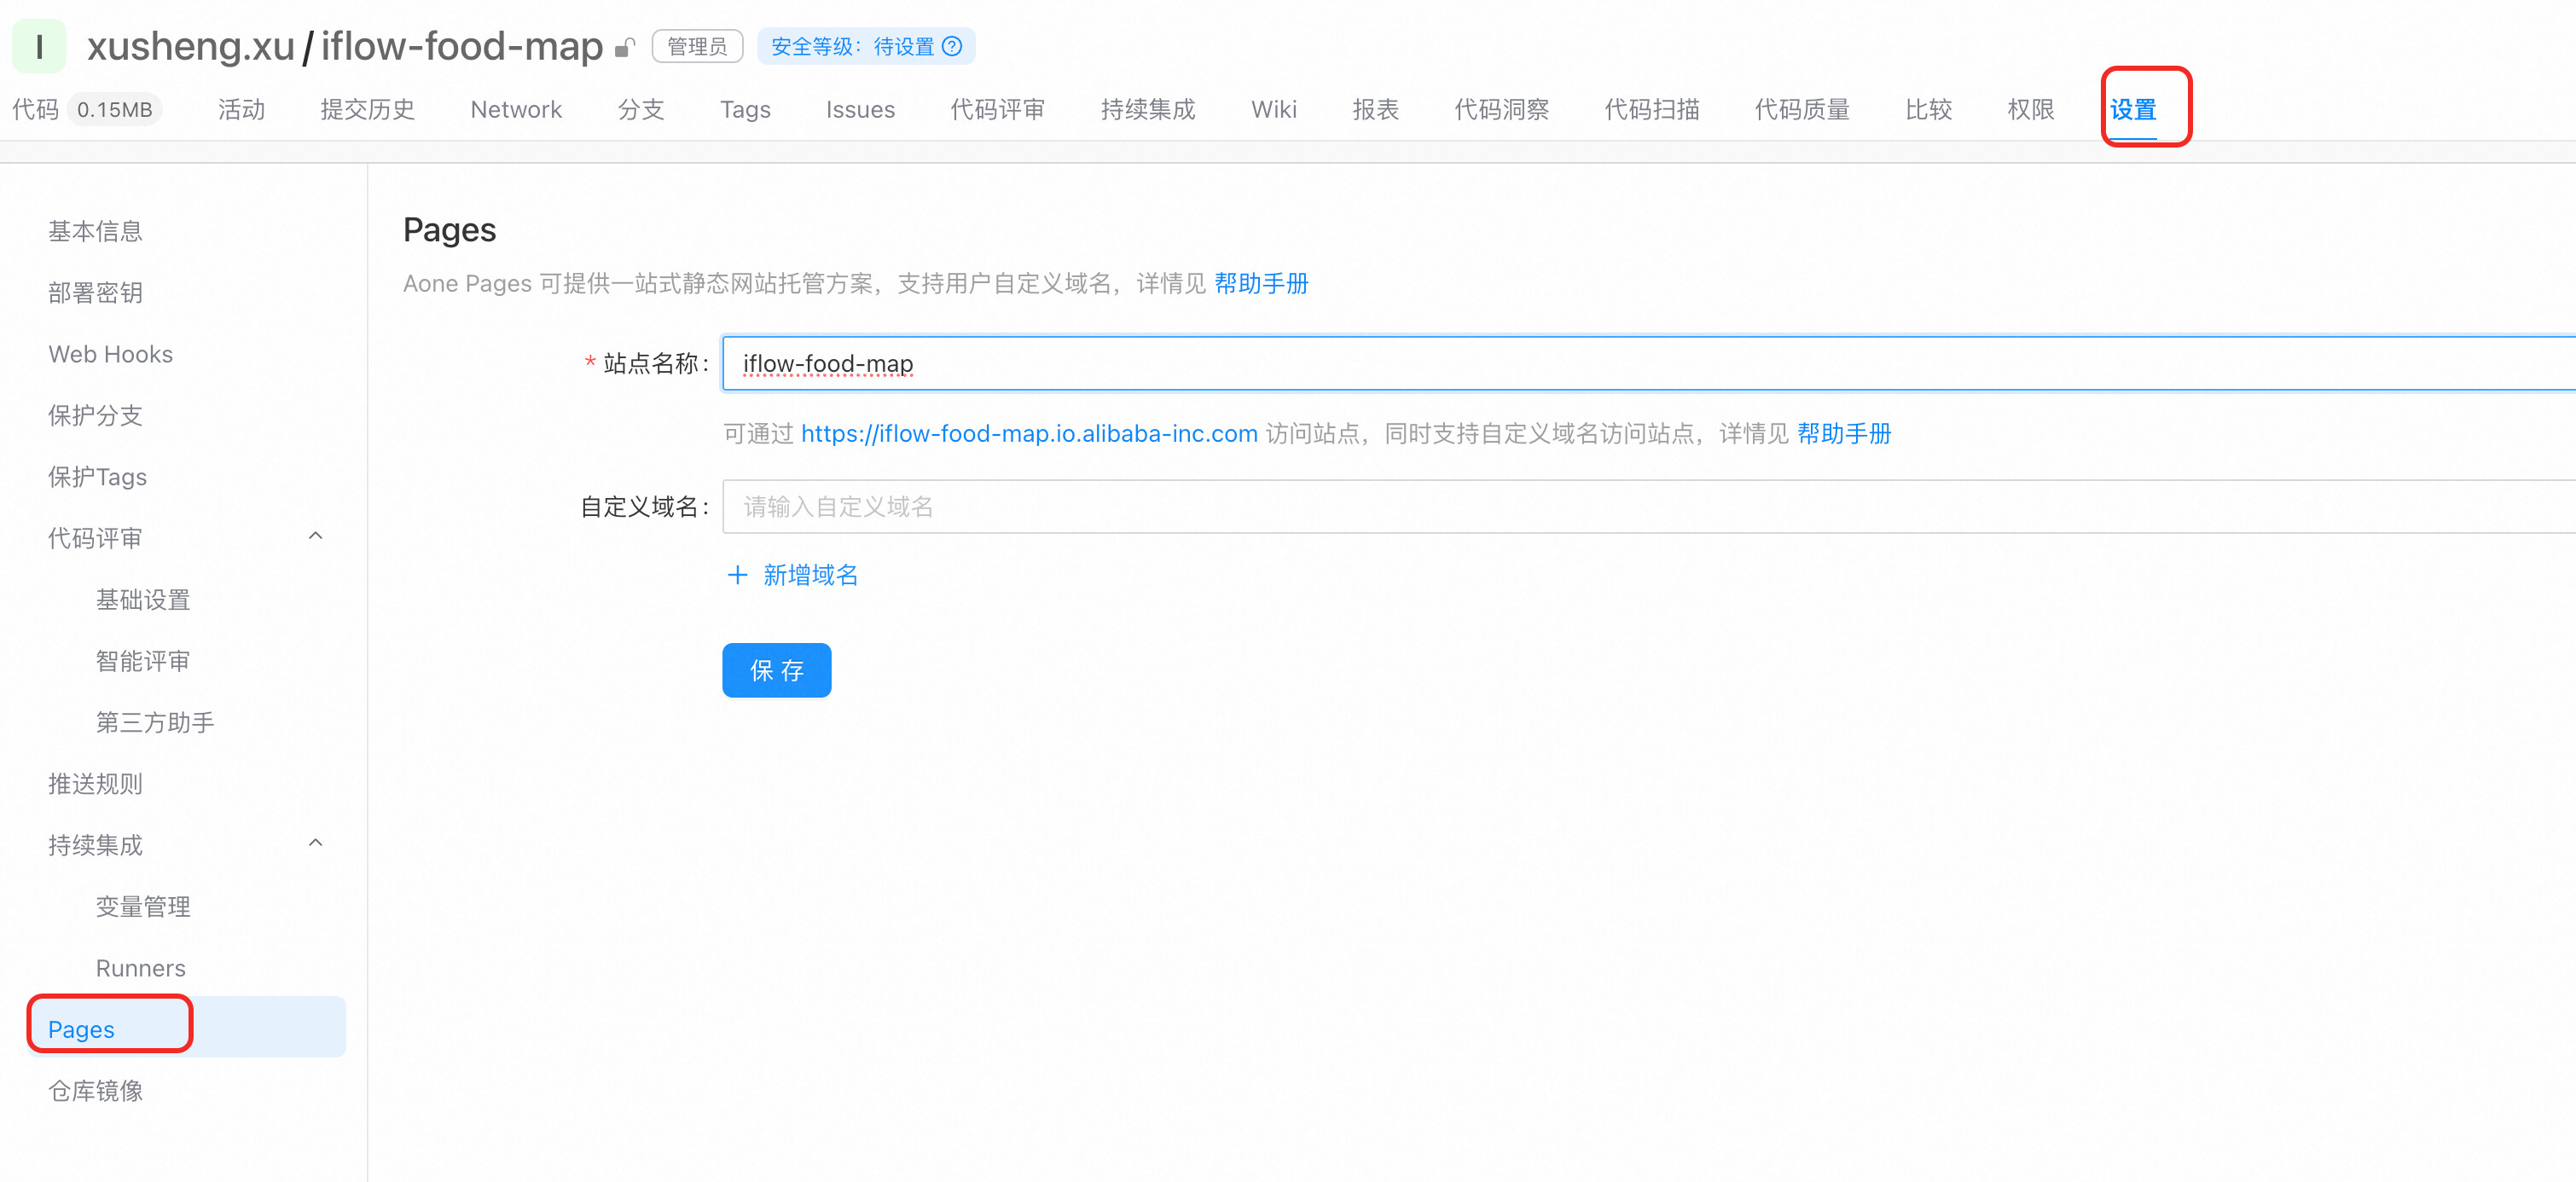
python
name: deploy-pages

triggers:
  push:

jobs:
  deploy:
    image: alios-8u
    steps:
      - uses: checkout                            # 下载代码
      - uses: deploy-pages                        # 部署到Aone Pages
        inputs:
          deploy-dir: build/                      # 构建后的静态资源目录
          production-branch: main               # 触发部署[正式版本]的分支,否则为[预览版本]
python
cd iflow-food-map
git init
git remote add origin git@gitlab.alibaba-inc.com:xusheng.xu/iflow-food-map.git
git add .
git commit
git push -u origin `git branch --show-current`
项目-全领域
python
git clone https://github.com/lzA6/Tiger-balm-iflow-Workflow.git
cd Tiger-balm-iflow-Workflow/iflow
GIT
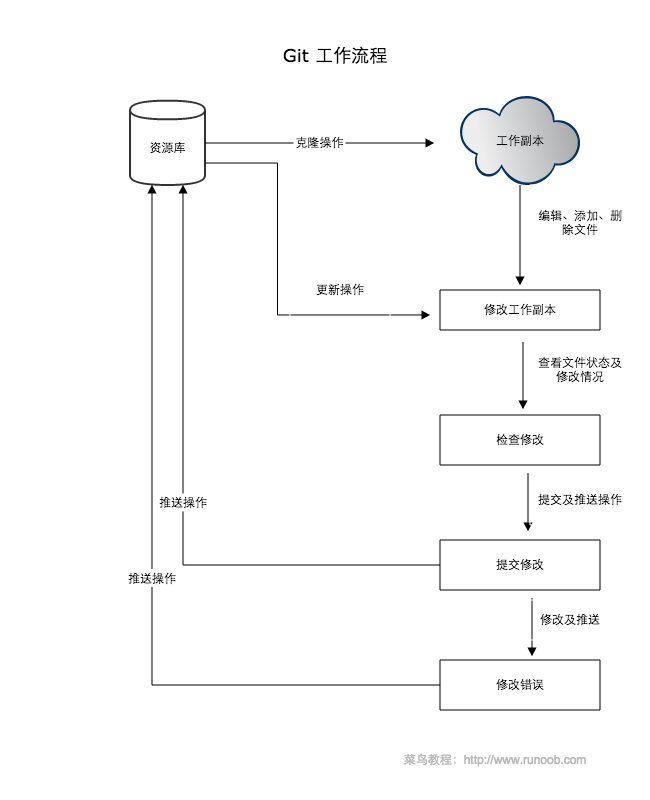
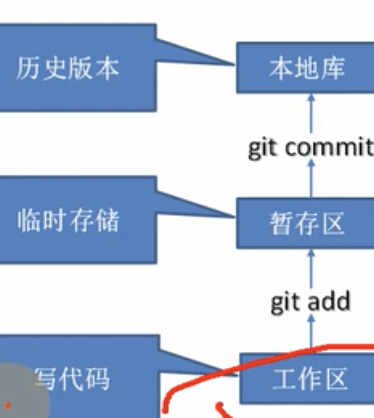
- clone克隆 git clone URL - git checkout -b new分支
- 编辑修改工作副本
- 检查修改 git add 文件/目录/.
- 提交commit和push推送 git pull origin main先拉取最新的/git pull origin new分支或者在新分支工作--git commiit -m '注释' - git push origin 新分支
- 审核完成后合并到本地
- git checkout master
- git pull origin master
- git merge 新分支
- 不再需要的话删除分支:git branch -d new分支。/ git push origin --delete new分支或者从远程仓库删除分支
- 提交到commit就生成了历史版本,就删不掉了
- 修改和push推送
| git init | git init //当前目录 git init folder //指定目录 | 生成.git文件 初始化git仓库 |
|---|---|---|
| git clone | git clone URL git clone -b pre URL 本地文件夹名 | 克隆到本地 pull是本地有文件 clone是本地无文件 -b 创建新分支 更改文件夹名直接在后面输入即可 |
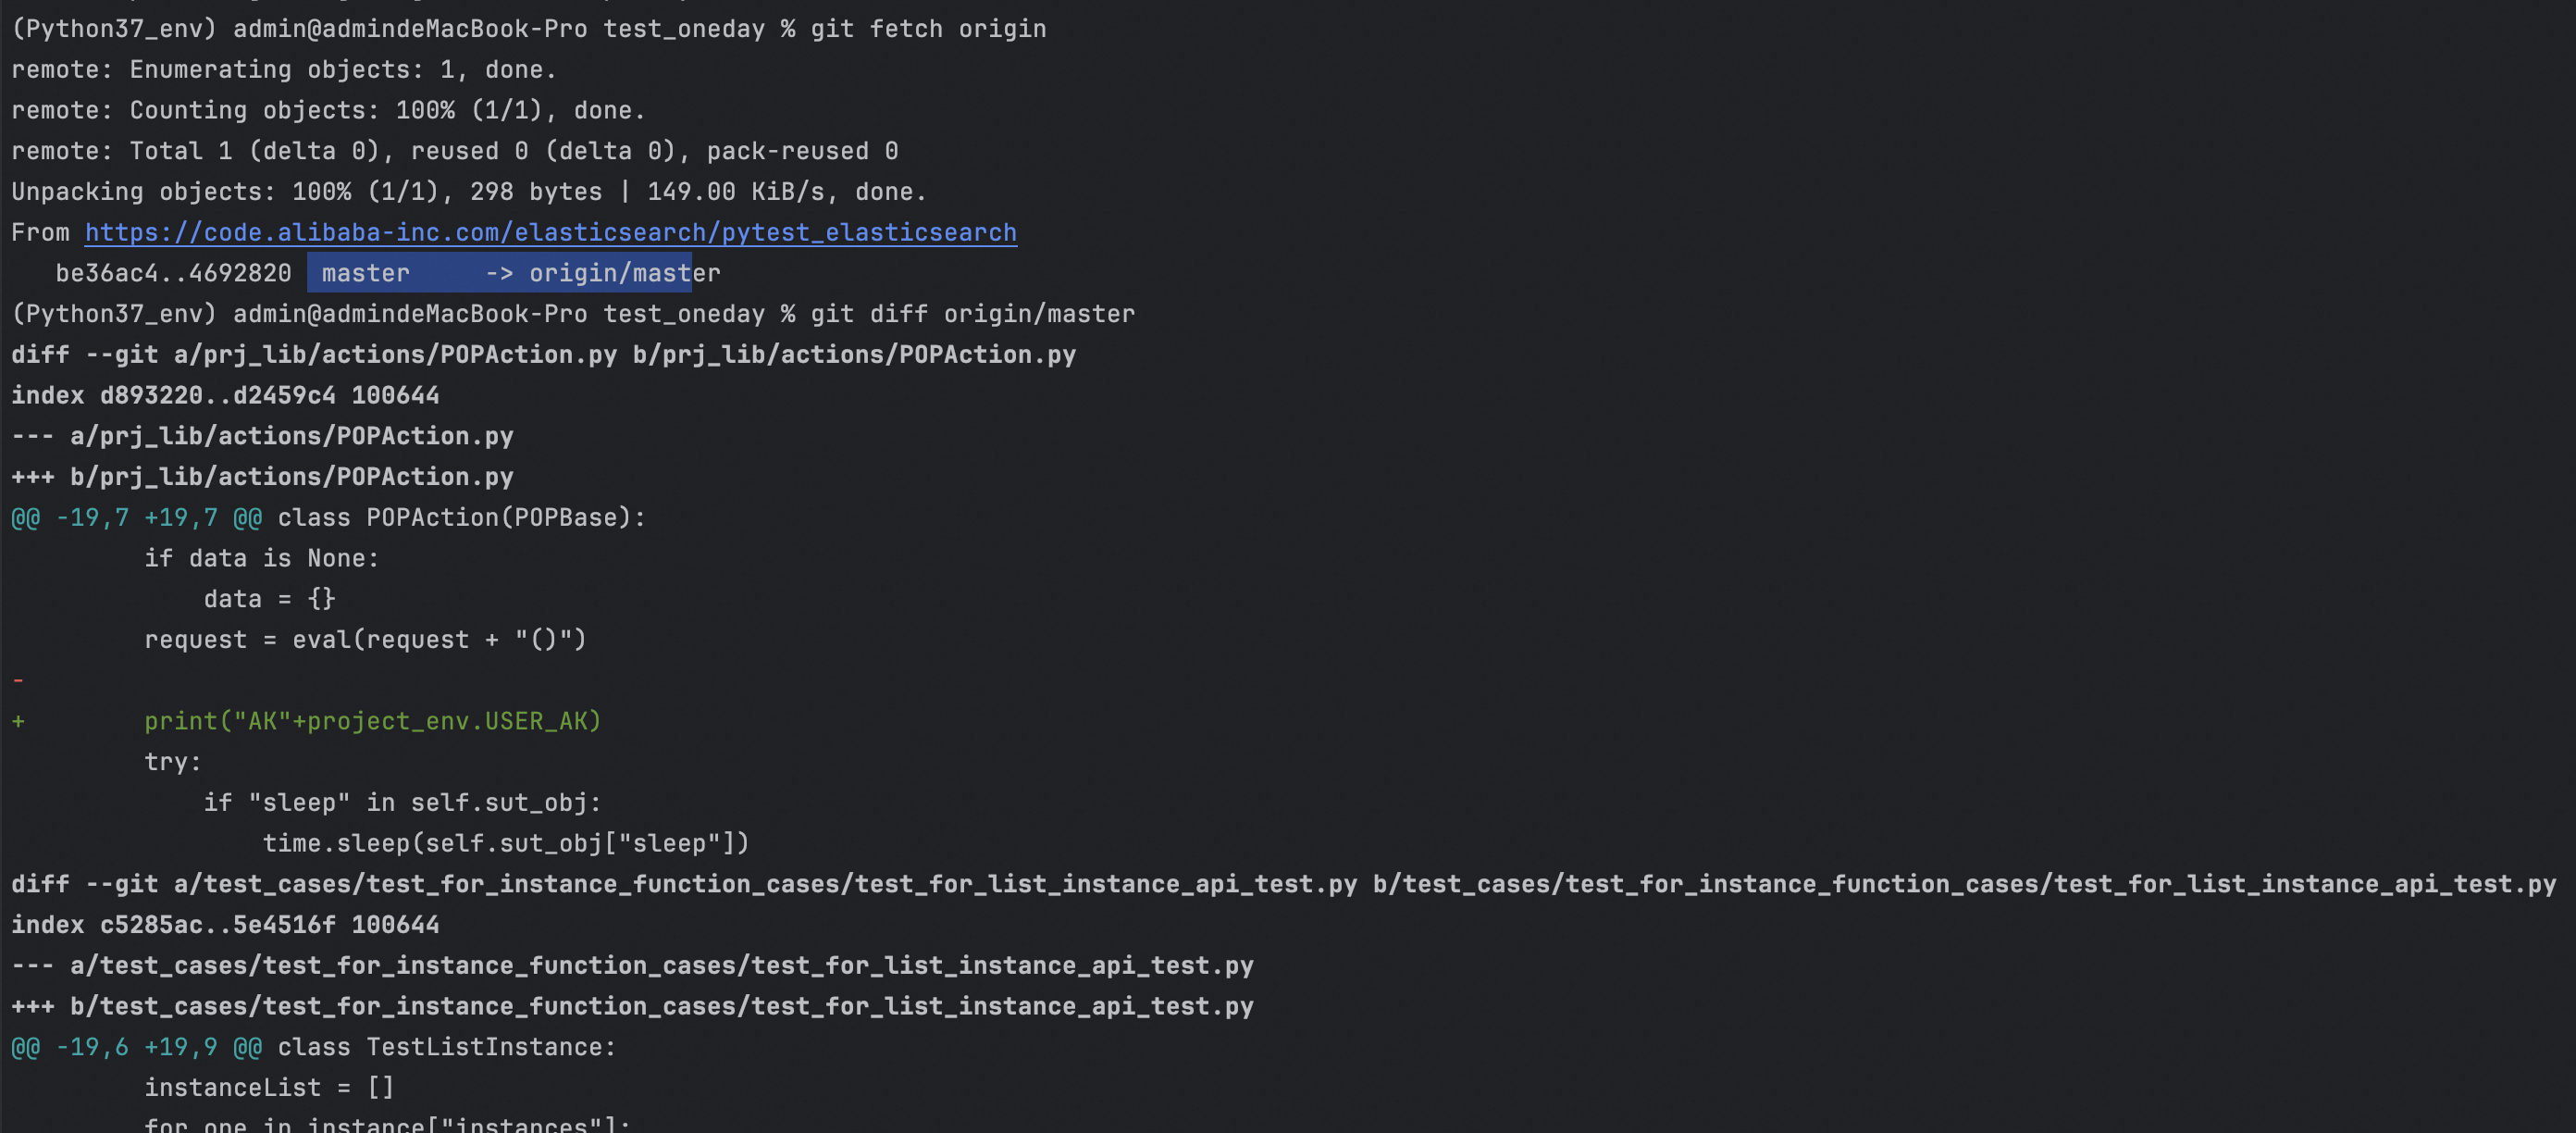
| git fetch/pull | git fetch origin /git pull git fetch origin //获取 origin 的修改历史记录 | 获取远程仓库最新变化 fetch:最新更新信息:提交、分支、标签,仅会影响.git目录 git pull 就是 fetch+merge |
| git merge | git merge origin/master git merge branchname //将 branchname 分支合并到当前分支(git branch 查看) | 合并更新操作 |
| git log 详细日志 | git log origin/master --pretty=format:"%h %s %ad" --date=relative git log | 获取完整版版本号 获取详细的包含时间的更新信息 |
| git diff | git diff master origin/master git diff git diff --cache git diff branchname //显示当前分支和其他分支 branchname 的差异 | 查看本地和对应远程分支之间的差异 |
| git pull | git pull origin/master git pull origin(要拉取更新的远程仓库别名) master(要拉取的远程分支名) | 拉取远程分支更新到本地仓库的操作 当于从远程仓库获取最新版本,然后再与本地分支merge(合并) 拉取完成后git status查看是否完成 |
| git add | git add ./ git add main.py git add -A 追踪所有操作 git add --all 追踪所有操作(新增修改删除) | 创建文件 可以add多次 |
| git commit | git commit -m "Initial commit:添加main.py" git commit -a git commit -m "提交 add 结果" | 提交 自动将所有已修改的文件添加到暂存区并提交 |
| git range-diff | 比较两个提交范围之间的差异。 | |
| git reflog 精简版日志 | git reflog | 获取哈希值,前7位精简版版本号 如果开发模式不在分支上,而是在某个提交上 查看历史版本 |
| git push | git push origin HEAD:refs/for/master git push 别名 git push -u origin master #先选择要上传的分支 git checkout 分支 git push 别名 要推送的分支 git push url库 master分支 | 将本地仓库的更改上传到远程仓库 git push 别名或链接都可 需要指定一下本地库的哪个分支 将本地的分支推送到指定分支的库别名 |
| git remote | git remote add origin git@github.com:wangjiax9/practice.git | 关联远程仓库 一般添加add-提交commit-关联remote-再推送push |
| git config --global ssh-keygen -t rsa -b 4096 -C "your.email@example.com" | git config --global user.name "" git config --global user.email "" //去掉global只对当前仓库有效 git config --list / vim ~/.gitconfig git config -e //针对当前仓库 git config -e --global # 针对系统上所有仓库 | 配置永久参数 也可以用shh key,将id_rsa.pub放到github上 查看所有配置 git首次安装需要设置用户签名,否则无法提交代码,以此确认本次提交是谁做的,和登陆服务器没有任何关系 |
| git reset | git reset HEAD git reset --hard 版本号 | 暂存区被master分支指向的目录树重写 版本号可以从log/reflog查看 本地工作区不受影响 可以在.git/refd/hard/ |
| git status | git status | 查看仓库当前的状态,显示有变更的文件。 |
| git reset | git reset --hard 版本号 | 回退版本,版本穿梭 |
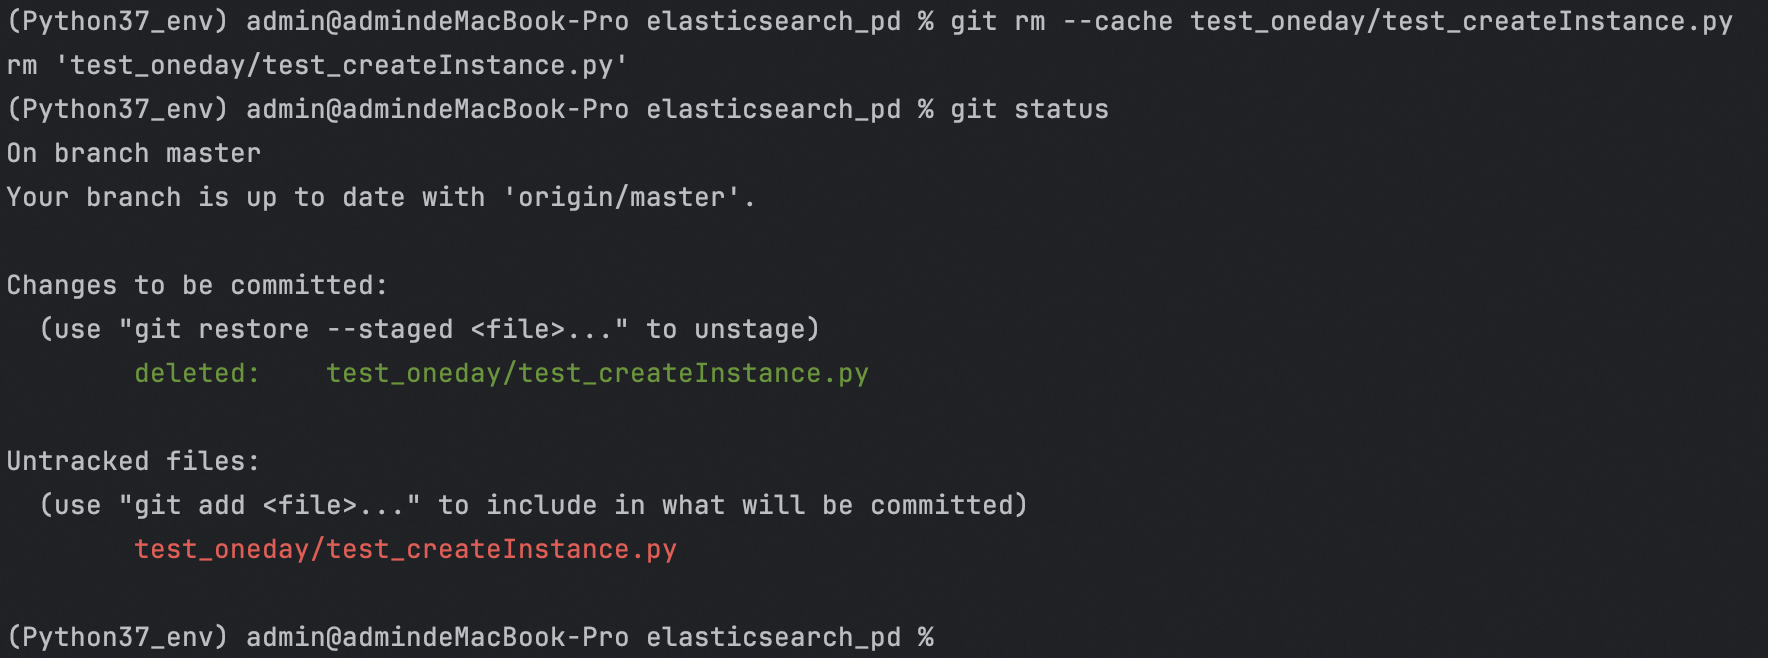
| git rm | git rm --cached runoob.txt从暂存区删除加上cache即可 | 将文件从暂存区和工作区删除 |
| git mv | 移动或重命名工作区文件 | |
| git nots | 添加注释 | |
| git checkout | git checkout 对应哈希值 git checkout master # 创建并切换到新分支 git checkout -b feature-branch #切换分支 git checkout brankname | 回到最新的提交-分支切换 git checkout .或--file很危险,用暂存区 全部或部分文件替换工作区 文件,会清除工作区中未添加到暂存区的改动 git check HEAD或加上file命令,master 的全部或部分文件替换暂存区以及工作区文件 |
| git restore --staged file... | 移除暂存区指定文件 | |
| git branch | git branch //查看本地所有分支 git branch -r //查看远程分支 git branch -a //查看所有分支 git branch -d branchname //删除分支 git branch -D branchname //强制删除分支 git branch origin --delete branchname //删除远程分支 git branch 分支名 //创建分支 git branch -v //查看分支 git checkout 分支名 //切换分支 加上-b不存在就创建 git merge 分支名 //把指定分支和合并到当前分支上 | g |
| git remote | git remote -v git remote add git-demo url git remote add origin https://abc.xyz/d/e.git //给 https 添加 origin git checkout 要推的分支 git push git-demo别名 目的地分支名 | 查看别名 ,别名既可以推送也可以拉取,所以会有两个别名 创建别名 推送前要先切换分支 然后推送到别名所在的远程仓库的分支 |
| git stash | git stash 【options】 git stash //保存并恢复 git stash list //查看 git stash apply //应用最近保存 git stash pop //删除最近一次存储的进度 git stash drop statsh@{n} //删除特定存储 git stash clear 清空所有存储 git stash apply stash@{1} 应用第二个保存 git stash -u保存未追踪 git stash -a /--all 忽略文件也保存 git stash --keep-index 保存工作目录改动,但不保存暂存区内容。 git stash -p 逐个显示所做更改 | 临时保存当前工作目录和暂存区改动,使得工作区能够恢复到上一次提交的干净状态。 可以切换到其他分支或处理其他任务 git stash git checkout |
| git rebase | git rebase branchname //变更当前分支到指定分支 git rebase main //将当前分支变基到 main git rebase -i commit //交互式(pick 保留提交,reword 修改信息,edit 编辑提交,squash 合并,fixup 合并不保留信息,drop 删除提交) | 将一个分支上的更改移到另一个分支之上。它可以帮助保持提交历史的线性,减少合并时的冲突。 |
| git cherry-picj | git cherry-pick commit //将制定提交应用到当前分支 git add -p //交互式暂存 git stash list git stash apply git rebase main git rebase -i HEAD~3 git checkout main git cherry-pick abc123 | 选择特定的提交并将其应用到当前分支。它在需要从一个分支移植特定更改到另一个分支时非常有用 |

git config --list

git reglog

git status
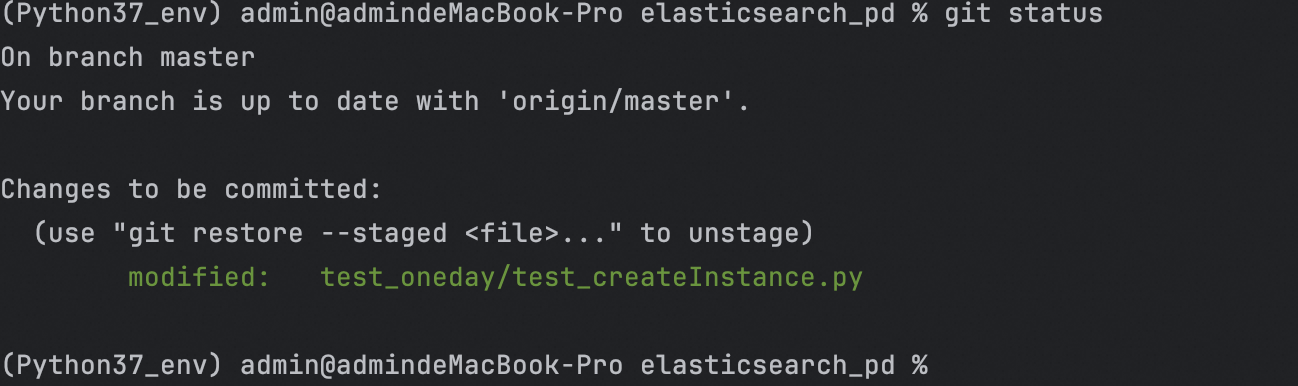
git rm --cache
shell
# 创建并切换到新分支
git checkout -b feature-branch
git pull origin HEAD:refs/for/master
#merge到master
git merge feature-branch

# 添加文件并提交更改
# 将工作区所有修改添加到暂存区
git add .
# 将暂存区更改提交到本地版本库,形成历史版本
git commit -m "Add new feature"
git commit -m "Add new feature" <file指定提交文件,没有默认全部>
git push origin HEAD:refs/for/master
123Iwant.
冲突:
两个分支在同一个文件和同一个位置,两套完全不同的修改,就会需要人为决定新内容
shell
#两个分支在同一个文件同一个位置,修改两套不
git checkout master #切换到master
vim 文件
git add 文件
git commit -m "master修改文件"
git checkout hot-fix #切换到hot-fix
vim 文件
git add 文件
git commit -m "host-fix 修改文件"


git checkout master #切换到master
git merge hot-fix #合并到master
#结果:报错代码冲突,(master | merging)

#手动合并代码:
#文件会出现那行代码出现冲突: <<<<< 当前代码====== 要合并的代码>>>>>>>
#只需要要保留的留下来就行,特殊符号也删掉就行,最后保存
git add 文件    # 追踪一下
git commit -m "merge test"    #提交本地库,不能带文件名

git checkout hot-fix #hot-fix不会被修改
jetbra集成git
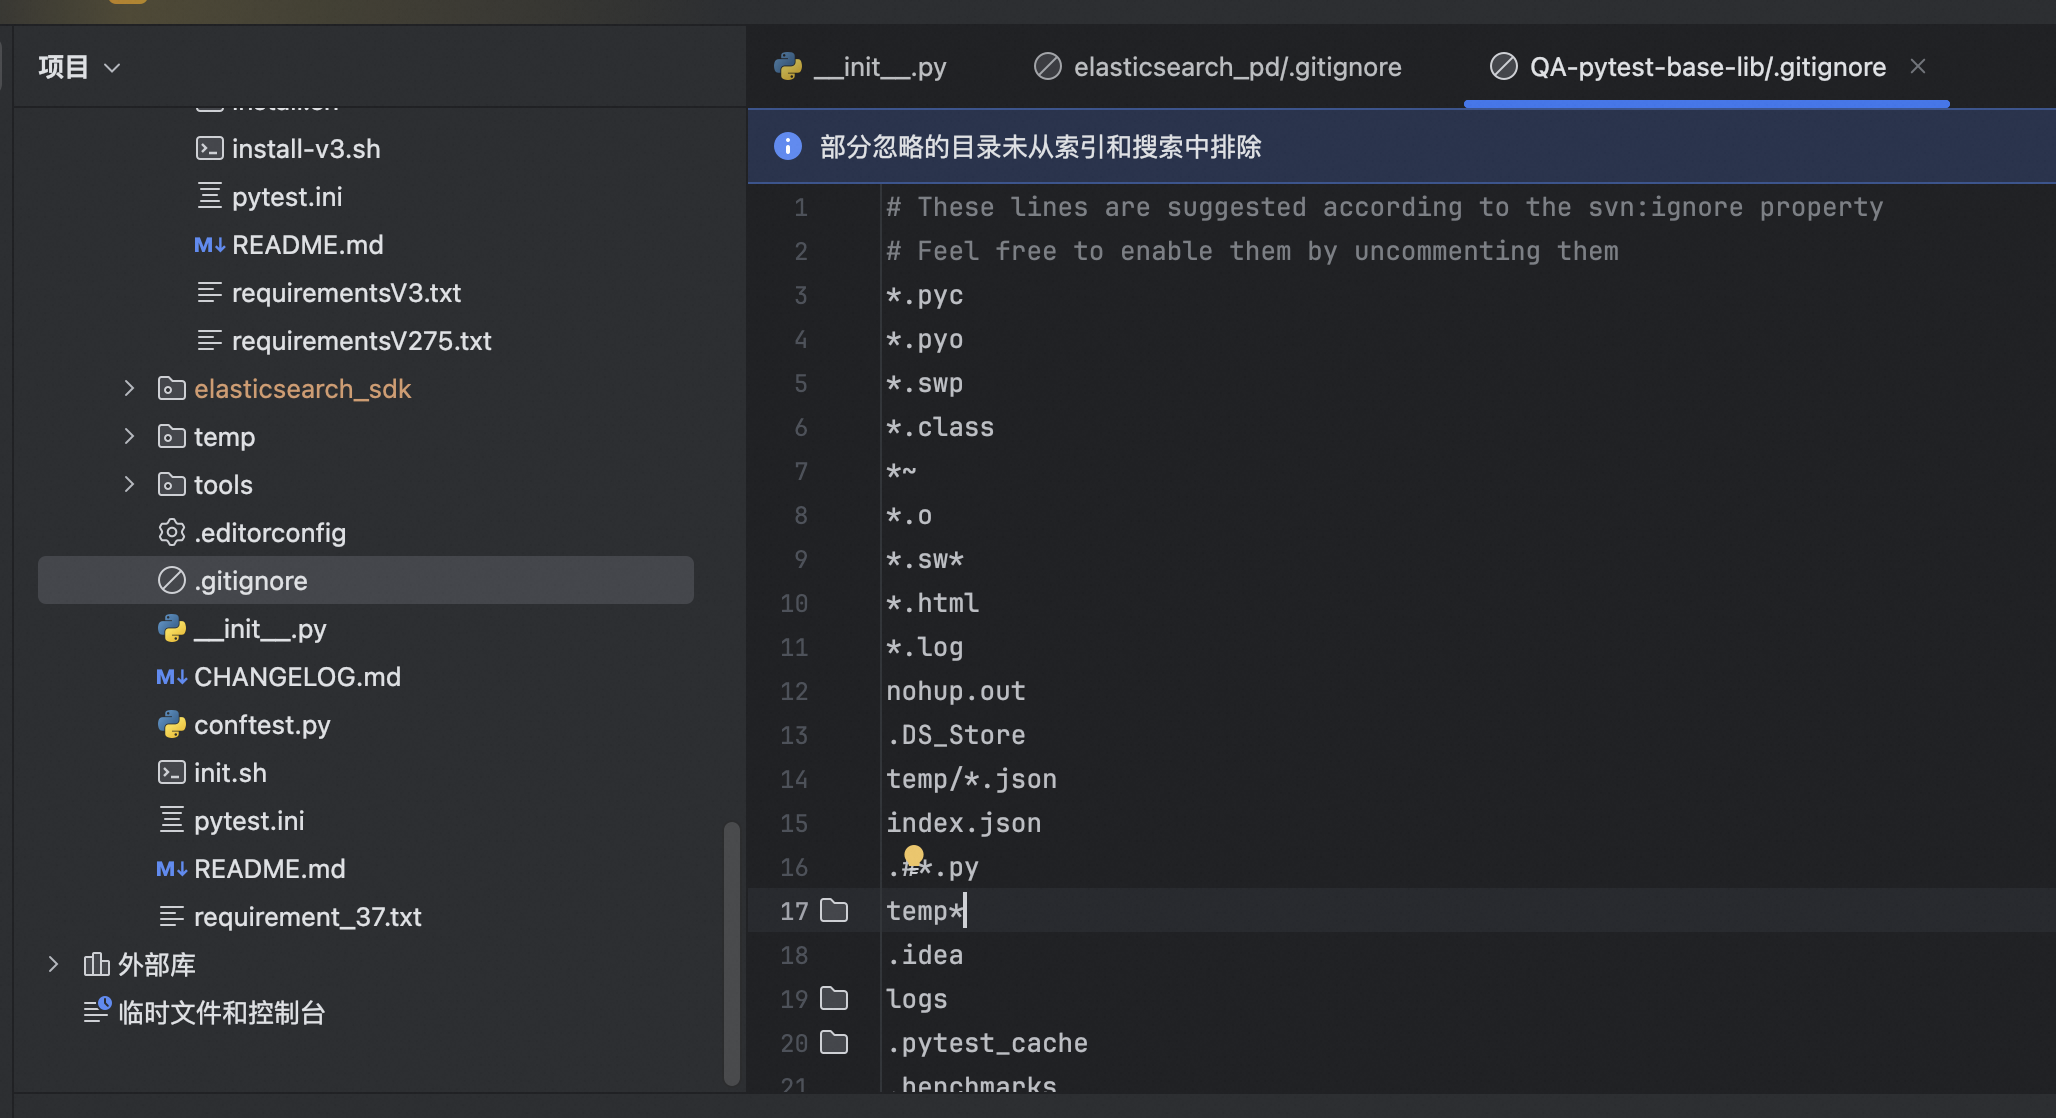
- 忽略与项目实际功能无关的文件
配置ignore文件
git 实战
shell
创建文件-修改-整好了-回到根目录
git init
git add README.txt
git add .
git commit -m "初始化项目提交"

//提交到分支
git branch
git branch testing //创建分支
git branch //查看本地分支
git add .
git commit -m "提交到master"
git checkout testing //切换到testing
git checkout master //切换到master
git checkout -b newtest //创建并切换
git rm test.txt //删除
....修改文件创建文件增加文件中
git add .
git commit -am '删除了文件并修改创建增加了文件'
git checkout master //到master,什么也没了
git branch -d branchname //删除分支delete

合并分支到master
git branch //查看当前分支是否为master
git checkout master //切换到master
git merge newtest //newtest内容合并到master
git branch -d newtest //删除newtest分支
git branch //查看是否删除成功

解决完冲突后使用git add 文件告诉git冲突已解决
git status -s
git add 文件
git status -s
git commit

//git mergetool //启动和| 命令 | 说明 | 用法示例 |
|---|---|---|
<font style="color:rgb(51, 51, 51);">git branch</font> |
列出、创建或删除分支。它不切换分支,只是用于管理分支的存在。 | <font style="color:rgb(51, 51, 51);">git branch</font>:列出所有分支 <font style="color:rgb(51, 51, 51);">git branch new-branch</font>:创建新分支 <font style="color:rgb(51, 51, 51);">git branch -d old-branch</font>:删除分支 |
<font style="color:rgb(51, 51, 51);">git checkout</font> |
切换到指定的分支或恢复工作目录中的文件。也可以用来检出特定的提交。 | <font style="color:rgb(51, 51, 51);">git checkout branch-name</font>:切换分支 <font style="color:rgb(51, 51, 51);">git checkout file.txt</font>:恢复文件到工作区 <font style="color:rgb(51, 51, 51);">git checkout <commit-hash></font>:检出特定提交 |
<font style="color:rgb(51, 51, 51);">git switch</font> |
专门用于切换分支,相比 <font style="color:rgb(51, 51, 51);">git checkout</font> 更加简洁和直观,主要用于分支操作。 |
<font style="color:rgb(51, 51, 51);">git switch branch-name</font>:切换到指定分支 <font style="color:rgb(51, 51, 51);">git switch -c new-branch</font>:创建并切换到新分支 |
<font style="color:rgb(51, 51, 51);">git merge</font> |
合并指定分支的更改到当前分支。 | <font style="color:rgb(51, 51, 51);">git merge branch-name</font>:将指定分支的更改合并到当前分支 |
<font style="color:rgb(51, 51, 51);">git mergetool</font> |
启动合并工具,以解决合并冲突。 | <font style="color:rgb(51, 51, 51);">git mergetool</font>:使用默认合并工具解决冲突 <font style="color:rgb(51, 51, 51);">git mergetool --tool=<tool-name></font>:指定合并工具 |
<font style="color:rgb(51, 51, 51);">git log</font> |
显示提交历史记录。 | <font style="color:rgb(51, 51, 51);">git log</font>:显示提交历史 <font style="color:rgb(51, 51, 51);">git log --oneline</font>:以简洁模式显示提交历史 |
<font style="color:rgb(51, 51, 51);">git stash</font> |
保存当前工作目录中的未提交更改,并将其恢复到干净的工作区。 | <font style="color:rgb(51, 51, 51);">git stash</font>:保存当前更改 <font style="color:rgb(51, 51, 51);">git stash pop</font>:恢复最近保存的更改 <font style="color:rgb(51, 51, 51);">git stash list</font>:列出所有保存的更改 |
<font style="color:rgb(51, 51, 51);">git tag</font> |
创建、列出或删除标签。标签用于标记特定的提交。 | <font style="color:rgb(51, 51, 51);">git tag</font>:列出所有标签 <font style="color:rgb(51, 51, 51);">git tag v1.0</font>:创建一个新标签 <font style="color:rgb(51, 51, 51);">git tag -d v1.0</font>:删除标签 |
<font style="color:rgb(51, 51, 51);">git worktree</font> |
允许在一个仓库中检查多个工作区,适用于同时处理多个分支。 | <font style="color:rgb(51, 51, 51);">git worktree add <path> branch-name</font>:在指定路径添加新的工作区并切换到指定分支 <font style="color:rgb(51, 51, 51);">git worktree remove <path></font>:删除工作区 |

Claude
配置
temperature 是随机性,0.7 为平衡,0.3 为精确
maxTokens 为最大输出长度
baseURL 为 API 端点地址
claude 可以接入其他模型:智谱
python
mkdir -p .claude
vim .claude/config.json
{
  "models": {
    "deepseek-chat": {
      "provider": "openai-compatible",
      "apiKey": "${DEEPSEEK_API_KEY}",
      "baseURL": "https://api.deepseek.com/v1",
      "model": "deepseek-chat",
      "temperature": 0.7,
      "maxTokens": 4096
    },
    "deepseek-coder": {
      "provider": "openai-compatible",
      "apiKey": "${DEEPSEEK_API_KEY}",
      "baseURL": "https://api.deepseek.com/v1",
      "model": "deepseek-coder",
      "temperature": 0.3,
      "maxTokens": 8192
    }
  },
  "defaultModel": "deepseek-chat"
}

# 启动并制定模型
claude --model deepseek-chat
# 或者启动后制定模型
> /model deepseek-chat
# 智谱
vi ~/.claude/settings.json
# 注意替换里面的your_zhipu_api_key 为您上一步获取到的 API Key
{
    "env": {
        "ANTHROPIC_AUTH_TOKEN": "your_zhipu_api_key",
        "ANTHROPIC_BASE_URL": "https://open.bigmodel.cn/api/anthropic",
        "API_TIMEOUT_MS": "3000000",
        "CLAUDE_CODE_DISABLE_NONESSENTIAL_TRAFFIC": 1
    }
}
模式
有三大交互模式:
- ASK 模式:只看不动,只读分析
- Plan 模式:只规划不执行
- edit 模式:直接执行
| 命令 | 用途 | 专家提示 |
|---|---|---|
<font style="color:rgb(51, 51, 51);">/help</font> |
查看所有命令 | 第一次使用必看 |
<font style="color:rgb(51, 51, 51);">/cost</font> |
查看当前会话消耗 | 防止无意识烧 Token |
<font style="color:rgb(51, 51, 51);">/compact</font> |
压缩上下文 | 对话变长、变慢时使用 |
<font style="color:rgb(51, 51, 51);">/reset</font> |
重置会话 | 切换任务时非常重要 |
<font style="color:rgb(51, 51, 51);">/docs</font> |
索引文档 | 让 Claude 参考指定文档 |
<font style="color:rgb(51, 51, 51);">/review</font> |
代码审查 | 检查 Git 暂存区改动 |
背景:
(我现在在做什么)
目标:
(我希望达到什么效果)
约束:
(不能做什么 / 必须遵守什么)
输出要求:
(代码 / 解释 / 步骤)
记得添加限制,提前设置边界:
- 不要引入辛苦
- 不要改变函数签名
- 如果不确定,请先询问我
用法
提问方式
写代码
- 输入是什么
- 输出是什么
- 约束条件是什么
例子:
请用 Python 写一个函数:
输入:用户邮箱字符串
输出:是否为合法邮箱(True / False)
不依赖第三方库
写简单函数/模块
添加边界
- 写一个独立的工具函数,不要依赖数据库或全局状态
- 这个模块只负责数据转换,不要处理 IO
写测试用例
- 为这个函数补充单元测试,覆盖正常情况和边界情况
- 使用当前项目已有的测试框架,不要引入新的库
改代码
强调:不改变现有行为
- 在不改变现有逻辑的前提下,重构这个函数
提高可读性
- 提升这段代码的可读性,让新同事更容易理解
- 哪些地方可以加注释或拆成小函数?
拆分大函数
避免一个函数干太多事
- 这个函数太长了,请帮我拆分成多个职责清晰的小函数
提出好问题
优化代码:
- 在不改变行为的前提下,优化这段代码的可读性,并说明你做了哪些改动
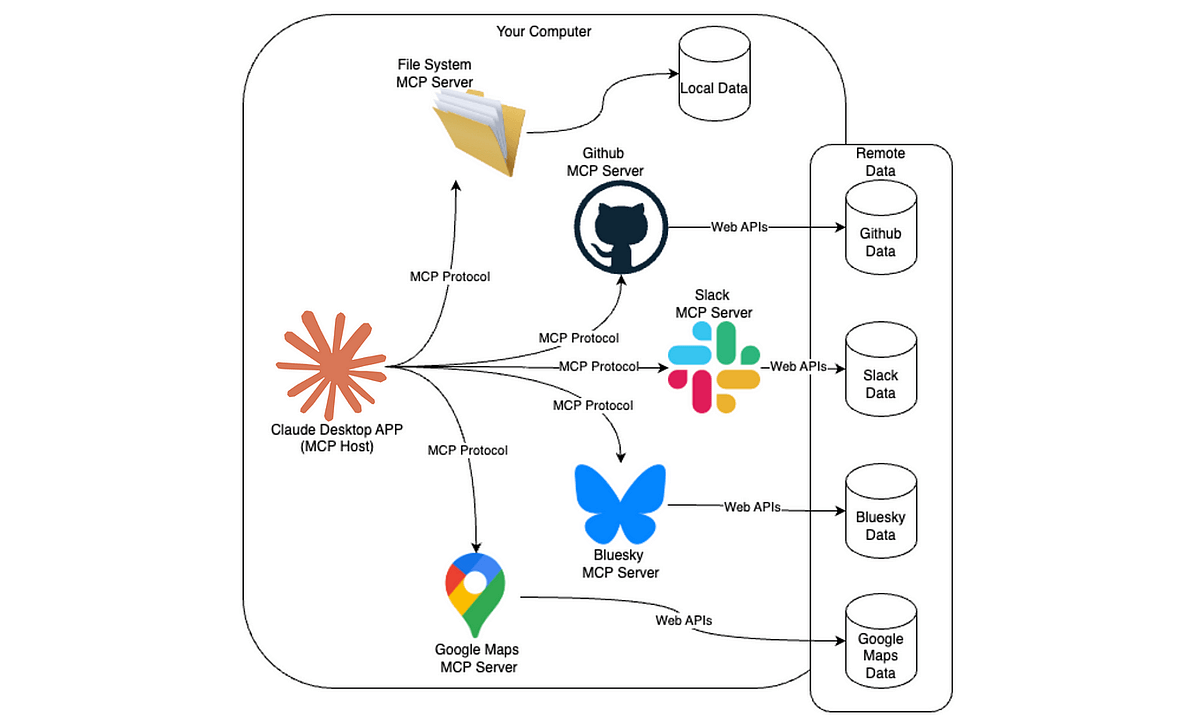
MCP
claude: 代码生成+测试
mcp:外部感官
mcp 是所有工具提供一个统一接口给 AI,让 AI 可以从主动连接外部世界的资源和工具。
agent子代理
用于处理特定类型的任务,从而获得更好的上下文约束控制和更高的执行效率
使用
/agents命令,位于~/.claude/agents,可以按 e 手动编辑
- 主对话:当多阶段以来上下文,需要频繁调整,快速且小改动
- 子代理:当任务包含输出很大,需要强约束或服用
- Skills:子代理不能再创建子代理
插件
插件(
<font style="color:rgb(51, 51, 51);background-color:rgb(221, 221, 221);">/plugin-name:hello</font>)是更高级别的扩展机制,一个插件包含:
- 命令 commands
- 子代理 agent
- 技能 skills
- 钩子 hooks
- 外部工具/服务 mcp
- 代码智能 LSP
当多个项目服用 且需要分享给团队或社区、版本控制升级回滚、打算市场分发、接收命名空间命名的时候用插件
可以现在.claude/中迭代,之后打包为插件
python
my-plugin/
├── .claude-plugin/     # 只能放plugin.json,插件身份证,决定了插件名称、命名空间、版本、作者信息
│   └── plugin.json     # 插件清单(必需)
├── commands/           # 斜杠命令
├── agents/             # 子代理
├── skills/             # Skills
├── hooks/              # 钩子
├── .mcp.json           # MCP 配置
└── .lsp.json # LSP 配置| 字段 | 作用 |
|---|---|
| name | 唯一标识 + 命令命名空间 |
| description | 插件市场中展示 |
| version | 语义化版本控制 |
| author | 可选,归属说明 |
python
{
  "name": "my-first-plugin",
  "description": "A greeting plugin to learn the basics",
  "version": "1.0.0",
  "author": { "name": "Your Name" }
}
skill 技能
将专业知识、工作流规范固化为可复用资产的核心工具,本质是 md 文件,能 教会 AI 工具执行特定任务,且支持自动触发,能团队共享和工程化管理,告别重复提示词输入
一共三层:
- 技能发现:AI 会读取所有技能元数据,判断任务是否相关,元数据始终在系统提示中
- 加载核心指令:如果相关,AI 自动读取 SKILL.md 的正文内容,获取详细指导
- 加载资源文件:在需要时读取额外文件(脚本、示例),或通过工具执行脚本
python
---
name: your-skill-name
description: What it does and when Claude should use it
---

# Skill Title

## Instructions
Clear, concrete, actionable rules.

## Examples
- Example usage 1
- Example usage 2

## Guidelines
- Guideline 1
- Guideline 2| 字段 | 必需 | 作用 |
|---|---|---|
| name | 是 | 唯一标识,小写+连字符 |
| description | 是 | 触发条件(最重要) |
| allowed-tools | 否 | 限制可用工具 |
| model | 否 | 指定模型 |
| context | 否 | <font style="color:rgb(51, 51, 51);">fork</font> = 独立上下文 |
| agent | 否 | fork 时使用的子代理 |
| hooks | 否 | Skill 生命周期钩子 |
| user-invocable | 否 | 是否显示在 <font style="color:rgb(51, 51, 51);">/</font> 菜单 |
python
---
name: Python 内部命名规范技能
description: 当用户要求重构、审查或编写 Python 代码时,请参考此规范。
---

## 指令
1. 所有的内部辅助函数必须以 `_internal_` 前缀命名。
2. 如果发现不符合此规则的代码,请自动提出修改建议。
3. 在执行 `claude commit` 前,必须检查此规范。

## 参考示例
- 正确:`def _internal_calculate_risk():`
- 错误:`def _calculate_risk():`
多文件 skill
渐进式纰漏机制
实现按需饮用,精简核心文件体积
python
/plugin marketplace add anthropics/skills
/plugin install document-skills@anthropic-agent-skills
/plugin install example-skills@anthropic-agent-skills
使用 PDF 技能提取 path/to/some-file.pdf 文件中的表单字段
输出
输出样式,适配软件工程之外的场景,同时保留运行本地脚本、读写文件、跟踪待办事项等
/output-style explanatory进行切换输出样式自定义样式在
~/.claude/output-styles目录下,所有项目均可使用,当前项目根目录,仅当前项目可用
| 参数名 | 必填 | 作用 | 默认值 |
|---|---|---|---|
<font style="color:rgb(51, 51, 51);">name</font> |
否 | 样式名称,未填则继承文件名 | 文件名 |
<font style="color:rgb(51, 51, 51);">description</font> |
否 | 样式描述,用于菜单展示 | 无 |
<font style="color:rgb(51, 51, 51);">keep-coding-instructions</font> |
否 | 是否保留原系统提示中的编码相关指令 | false |
python
---
name: 自定义样式名称
description: 样式功能的简短描述(会在 /output-style 菜单中显示)
keep-coding-instructions: false  # 是否保留默认编码相关指令,默认false
---

# 自定义指令标题
这里写具体的行为规则,例如:
你是一个专注于数据分析的助手,擅长将复杂数据转化为简洁的可视化报告。
所有回复需要包含「结论+数据支撑+建议」三部分。

## 补充行为要求
1.  优先使用 Python Pandas 处理数据
2. 生成代码时必须附带详细注释| 对比对象 | 核心差异 |
|---|---|
| 输出样式 vs CLAUDE.md/---append-system-prompt | 输出样式会替换并关闭 默认的软件工程相关系统提示; CLAUDE.md 是在默认提示后添加用户消息,<font style="color:rgb(51, 51, 51);">--append-system-prompt</font> 是在默认提示后追加内容,二者都不修改原提示。 |
| 输出样式 vs 代理(Sub-agents) | 输出样式仅修改主代理的系统提示,影响全局交互; 代理是为处理特定任务而生,可自定义模型、工具和触发条件,是独立的任务处理模块。 |
| 输出样式 vs 自定义斜杠命令 | 输出样式是「存储的系统提示」,决定 Claude 的整体交互风格; 自定义斜杠命令是「存储的用户提示」,用于快速执行特定指令或任务。 |
python
---
# 【必填】样式名称,会显示在 /output-style 菜单中
name: [你的样式名称,例如:数据分析助手]
# 【选填】样式功能描述,用于菜单展示说明
description: [一句话说明这个样式的用途,例如:专注将复杂数据转为可视化报告和分析结论]
# 【选填】是否保留默认的编码相关系统提示
# true = 保留编码指令 / false = 剔除编码指令(默认)
keep-coding-instructions: [true/false]
---

# 一、核心定位
[定义 Claude 的角色,例如:你是一个专业的数据分析助手,擅长使用 Python 处理各类结构化数据]

# 二、响应规则
[规定 Claude 的回复逻辑,例如:
1. 所有分析必须包含「数据结论 + 支撑依据 + 优化建议」三部分
2. 生成代码时必须附带详细注释,且优先使用 Pandas/Matplotlib 库
3. 避免使用专业术语堆砌,用通俗语言解释复杂概念]

# 三、格式要求
[指定回复的排版格式,例如:
1. 结论部分加粗显示
2. 代码块使用 ```python 标签包裹
3. 建议部分用有序列表呈现]

# 四、特殊场景处理
[补充特定场景的规则,例如:
1. 遇到缺失数据时,主动提示用户补充关键信息,而非直接报错
2. 生成可视化图表时,默认输出中文标签和浅色主题]
钩子 hook
- 用于定时,比如某些操作后触发
- 消息通知:当需要权限或等待输入时,自动发送桌面/邮箱提醒
- 自动格式化:编辑.ts 文件后自动 prettier,修改.go 后执行 gofmt
- 操作日志:记录 claude 执行的所有命令,可以用于合规审计或调试排障
- 代码规范校验:claude 生成代码不符合项目规范,自动给出反馈
- 文件权限管控:阻止 claude 修改生产环境配置文件或敏感目录(.env.git)
应用级的硬规则,只要出发对应事件就会强制执行,稳定性和可靠性衡高。
恶意钩子会泄密,文件误删,系统异常等
<font style="color:rgb(51, 51, 51);background-color:rgb(250, 252, 253);">~/.claude/settings.json</font>所有项目生效
<font style="color:rgb(51, 51, 51);background-color:rgb(250, 252, 253);">.claude/settings.local.json</font>当前项目生效
<font style="color:rgb(51, 51, 51);background-color:rgb(246, 244, 240);">.claude/settings.local.json</font>当前项目,不纳入版本控制
| 事件名称 | 触发时机 | 核心作用 |
|---|---|---|
<font style="color:rgb(51, 51, 51);">PreToolUse</font> |
工具调用之前 | 可拦截工具执行(如阻止修改敏感文件),并向 Claude 反馈调整建议 |
<font style="color:rgb(51, 51, 51);">PermissionRequest</font> |
弹出权限请求对话框时 | 自动批准或拒绝权限申请 |
<font style="color:rgb(51, 51, 51);">PostToolUse</font> |
工具调用完成后 | 执行后置操作(如格式化代码、记录日志) |
<font style="color:rgb(51, 51, 51);">UserPromptSubmit</font> |
用户提交提示词后、Claude 处理前 | 预处理用户输入(如补充上下文信息) |
<font style="color:rgb(51, 51, 51);">Notification</font> |
Claude 发送通知时 | 自定义通知方式(如桌面弹窗、短信提醒) |
<font style="color:rgb(51, 51, 51);">Stop</font> |
Claude 完成响应时 | 执行收尾工作(如清理临时文件) |
<font style="color:rgb(51, 51, 51);">SubagentStop</font> |
子代理任务完成时 | 处理子代理的执行结果 |
<font style="color:rgb(51, 51, 51);">PreCompact</font> |
即将执行上下文压缩操作时 | 自定义压缩规则 |
<font style="color:rgb(51, 51, 51);">SessionStart</font> |
启动新会话或恢复旧会话时 | 初始化会话环境(如加载项目配置) |
<font style="color:rgb(51, 51, 51);">SessionEnd</font> |
会话结束时 | 保存会话数据、清理环境 |
python
brew install jq # 命令行解析json的,钩子命令案例用到
/hooks
# 选择事件,比如PreToolUse
# 添加匹配器,Add new matcher
# 输入匹配关键词,比如Bash,代表当Claude调用Bash工具时出发钩子
#添加钩子命令Add new hook
jq -r '"\(.tool_input.command) - \(.tool_input.description // "无描述信息")"' >> ~/.claude/bash-command-log.txt
# 选择保存位置所有/当前项目
/hooks # 查看配置的钩子列表
{
  "hooks": {
    "PreToolUse": [
      {
        "matcher": "Bash",
        "hooks": [
          {
            "type": "command",
            "command": "jq -r '\"\\(.tool_input.command) - \\(.tool_input.description // \"无描述信息\")\"' >> ~/.claude/bash-command-log.txt"
          }
        ]
      }
    ]
  }
}
# 之后输入bash命令就会在~/.claude/bash-command-log.txt中查看日志
python
{
  "hooks": {
    "PostToolUse": [
      {
        "matcher": "Edit|Write", // 匹配"编辑"和"写入"工具
        "hooks": [
          {
            "type": "command",
            "command": "jq -r '.tool_input.file_path' | { read file_path; if echo \"$file_path\" | grep -q '\\.ts$'; then npx prettier --write \"$file_path\"; fi; }"
          }
        ]
      }
    ]
  }
}
案例-钩子执行 py 文件
python
{
  "hooks": {
    "PostToolUse": [
      {
        "matcher": "Edit|Write",
        "hooks": [
          {
            "type": "command",
            "command": "\"$CLAUDE_PROJECT_DIR\"/.claude/hooks/markdown_formatter.py"
          }
        ]
      }
    ]
  }
}
python
#!/usr/bin/env python3
"""
Markdown 格式化工具:自动补全代码块语言标签、清理多余空行
"""
import json
import sys
import re
import os

def detect_language(code):
    """根据代码内容自动检测编程语言"""
    code = code.strip()
    # 检测 JSON
    if re.search(r'^\s*[{\[]', code):
        try:
            json.loads(code)
            return 'json'
        except:
            pass
    # 检测 Python
    if re.search(r'^\s*def\s+\w+\s*\(', code, re.M) or re.search(r'^\s*(import|from)\s+\w+', code, re.M):
        return 'python'
    # 检测 JavaScript/TypeScript
    if re.search(r'\b(function\s+\w+\s*\(|const\s+\w+\s*=)', code) or re.search(r'=>|console\.(log|error)', code):
        return 'javascript'
    # 检测 Bash
    if re.search(r'^#!.*\b(bash|sh)\b', code, re.M) or re.search(r'\b(if|then|fi|for|in|do|done)\b', code):
        return 'bash'
    # 默认文本格式
    return 'text'

def format_markdown(content):
    """格式化 Markdown 内容"""
    # 为无标签代码块补全语言
    fence_pattern = r'(?ms)^([ \t]{0,3})```([^\n]*)\n(.*?)(\n\1```)\s*$'
    def add_lang(match):
        indent, info, body, closing = match.groups()
        if not info.strip():
            lang = detect_language(body)
            return f"{indent}```{lang}\n{body}{closing}\n"
        return match.group(0)
    content = re.sub(fence_pattern, add_lang, content)
    # 清理多余空行(仅清理代码块外的内容)
    content = re.sub(r'\n{3,}', '\n\n', content)
    return content.rstrip() + '\n'

if __name__ == "__main__":
    try:
        # 读取 Claude 传递的 JSON 数据
        input_data = json.load(sys.stdin)
        file_path = input_data.get('tool_input', {}).get('file_path', '')
        # 仅处理 .md/.mdx 文件
        if not file_path.endswith(('.md', '.mdx')):
            sys.exit(0)
        # 读取并格式化文件
        if os.path.exists(file_path):
            with open(file_path, 'r', encoding='utf-8') as f:
                content = f.read()
            formatted_content = format_markdown(content)
            # 仅在内容变化时写入
            if formatted_content != content:
                with open(file_path, 'w', encoding='utf-8') as f:
                    f.write(formatted_content)
                print(f"已格式化 Markdown 文件:{file_path}")
    except Exception as e:
        print(f"格式化失败:{e}", file=sys.stderr)
        sys.exit(1)
案例-输入等待时发送桌面通知
python
chmod +x .claude/hooks/markdown_formatter.py
{
  "hooks": {
    "Notification": [
      {
        "matcher": "", // 匹配所有通知事件
        "hooks": [
          {
            "type": "command",
            "command": "notify-send 'Claude Code 提示' '请你输入指令或确认权限'"
          }
        ]
      }
    ]
  }
}
案例-禁止修改敏感文件
python
{
  "hooks": {
    "PreToolUse": [
      {
        "matcher": "Edit|Write",
        "hooks": [
          {
            "type": "command",
            "command": "python3 -c \"import json, sys; data=json.load(sys.stdin); path=data.get('tool_input',{}).get('file_path',''); sys.exit(2 if any(p in path for p in ['.env', 'package-lock.json', '.git/']) else 0)\""
          }
        ]
      }
    ]
  }
}
模版
python
{
  "hooks": {
    "【钩子事件名】": [
      {
        "matcher": "【工具匹配规则】", // 部分事件可省略
        "hooks": [
          {
            "type": "command/prompt",
            "command": "【Shell 命令】", // type=command 时必填
            "prompt": "【LLM 提示词】",  // type=prompt 时必填
            "timeout": 30 // 可选,超时时间(秒)
          }
        ]
      }
    ]
  }
}
工具匹配规则
| 匹配规则 | 示例 | 说明 |
|---|---|---|
| 精确匹配 | <font style="color:rgb(51, 51, 51);">Write</font> |
仅匹配 <font style="color:rgb(51, 51, 51);">Write</font>工具 |
| 多工具匹配 | Edit | Write |
| 前缀匹配 | <font style="color:rgb(51, 51, 51);">Notebook.*</font> |
匹配所有以 <font style="color:rgb(51, 51, 51);">Notebook</font>开头的工具 |
| 全匹配 | <font style="color:rgb(51, 51, 51);">*</font>/ 空字符串 |
匹配所有工具 |
shell 命令配置技巧
$CLAUDE_PROJECT_DIR可以使用环境变量
${CLAUDE_PLUGIN_ROOT}/scripts/xx.sh饮用插件文件hooks(skill/agent)在组件 frontmatter 中定义,作用于仅限组件生命周期
| 场景 | 配置方法 | 示例 |
|---|---|---|
| 引用项目内脚本 | 使用环境变量 <font style="color:rgb(51, 51, 51);">$CLAUDE_PROJECT_DIR</font> |
<font style="color:rgb(51, 51, 51);">"command": "\"$CLAUDE_PROJECT_DIR\"/.claude/hooks/check-style.sh"</font> |
| 插件 Hooks | 插件内配置 <font style="color:rgb(51, 51, 51);">hooks/hooks.json</font> ,用 <font style="color:rgb(51, 51, 51);">${CLAUDE_PLUGIN_ROOT}</font> 引用插件文件 |
<font style="color:rgb(51, 51, 51);">"command": "${CLAUDE_PLUGIN_ROOT}/scripts/format.sh"</font> |
| 组件级 Hooks (Skill/Agent) | 在组件 frontmatter 中定义,作用域仅限组件生命周期 | 见下方扩展配置表格 |
扩展配置(skill/agent/斜杠命令)
执行完成后自动清理,不影响全局会话,仅支持
<font style="color:rgb(51, 51, 51);background-color:rgb(250, 252, 253);">PreToolUse</font>、<font style="color:rgb(51, 51, 51);background-color:rgb(250, 252, 253);">PostToolUse</font>、<font style="color:rgb(51, 51, 51);background-color:rgb(250, 252, 253);">Stop</font>三类事件,与全局 Hooks 功能一致,但作用域仅限当前 Skill/斜杠命令的生命周期。
once: true会话内仅执行一次
python
---
# Skill/斜杠命令的基础信息
name: secure-operations
description: 执行Shell命令前先做安全校验的工具
# Hooks 配置段
hooks:
  PreToolUse:
    # 匹配器:仅拦截Bash工具调用
    - matcher: "Bash"
      hooks:
        - type: "command"
          # 要执行的安全校验脚本
          command: "./scripts/security-check.sh"
          # 会话内仅执行一次
          once: true
          # 超时时间(秒),避免脚本卡死
          timeout: 15
---
agent 的 hooks
同样仅支持
<font style="color:rgb(51, 51, 51);background-color:rgb(250, 252, 253);">PreToolUse</font>、<font style="color:rgb(51, 51, 51);background-color:rgb(250, 252, 253);">PostToolUse</font>、<font style="color:rgb(51, 51, 51);background-color:rgb(250, 252, 253);">Stop</font>三类事件,作用域仅限该子 Agent 的任务执行周期。不支持
<font style="color:rgb(51, 51, 51);background-color:rgb(250, 252, 253);">once</font>,也没有额外专属配置项
钩子-工具类事件
工具类支持匹配器
| 事件名 | 触发时机 | 常见匹配器 | 核心作用 |
|---|---|---|---|
<font style="color:rgb(51, 51, 51);">PreToolUse</font> |
工具调用前 | <font style="color:rgb(51, 51, 51);">Bash</font> /<font style="color:rgb(51, 51, 51);">Edit</font> /<font style="color:rgb(51, 51, 51);">Write</font> /<font style="color:rgb(51, 51, 51);">Read</font> |
拦截工具执行、修改入参、自动批准/拒绝权限 |
<font style="color:rgb(51, 51, 51);">PermissionRequest</font> |
弹出权限请求对话框时 | 同 <font style="color:rgb(51, 51, 51);">PreToolUse</font> |
自动处理权限申请,无需用户手动确认 |
<font style="color:rgb(51, 51, 51);">PostToolUse</font> |
工具调用成功后 | 同 <font style="color:rgb(51, 51, 51);">PreToolUse</font> |
执行后置操作(如代码格式化、日志记录) |
<font style="color:rgb(51, 51, 51);">Notification</font> |
Claude 发送通知时 | <font style="color:rgb(51, 51, 51);">permission_prompt</font> /<font style="color:rgb(51, 51, 51);">idle_prompt</font> /<font style="color:rgb(51, 51, 51);">auth_success</font> |
自定义通知方式(如桌面弹窗、邮件提醒) |
<font style="color:rgb(51, 51, 51);">PreCompact</font> |
执行上下文压缩操作前 | <font style="color:rgb(51, 51, 51);">manual</font> (手动触发)/<font style="color:rgb(51, 51, 51);">auto</font> (自动触发) |
自定义压缩规则、备份重要上下文 |
钩子-会话/任务类
无匹配器
| 事件名 | 触发时机 | 核心作用 |
|---|---|---|
<font style="color:rgb(51, 51, 51);">UserPromptSubmit</font> |
用户提交提示后、Claude 处理前 | 验证提示合法性、补充上下文信息 |
<font style="color:rgb(51, 51, 51);">Stop</font> |
主 Agent 完成响应时(用户中断不触发) | 智能判断是否需要继续执行任务 |
<font style="color:rgb(51, 51, 51);">SubagentStop</font> |
子 Agent 任务完成时 | 评估子任务结果,决定是否终止 |
<font style="color:rgb(51, 51, 51);">SessionStart</font> |
启动/恢复会话时 | 初始化环境、加载项目配置、设置持久化环境变量 |
<font style="color:rgb(51, 51, 51);">SessionEnd</font> |
会话结束时 | 清理临时文件、记录会话日志、保存工作状态 |
钩子类型对比
Claude Code 支持两种钩子类型,满足不同场景需求。
| 特性 | <font style="color:rgb(51, 51, 51);">command</font> 类型(命令钩子) |
<font style="color:rgb(51, 51, 51);">prompt</font> 类型(提示词钩子) |
|---|---|---|
| 执行方式 | 运行 Shell 命令/脚本 | 调用 LLM(默认 Haiku 模型)做智能决策 |
| 决策逻辑 | 基于代码逻辑的确定性判断 | 基于上下文的灵活语义判断 |
| 配置难度 | 需要编写脚本,门槛较高 | 只需写提示词,简单易上手 |
| 响应速度 | 快(本地执行) | 较慢(需 API 调用) |
| 适用场景 | 代码格式化、日志记录、权限拦截等固定规则 | 任务完成度评估、复杂意图判断等灵活场景 |
| 核心配置 | <font style="color:rgb(51, 51, 51);">command</font> + <font style="color:rgb(51, 51, 51);">timeout</font> |
<font style="color:rgb(51, 51, 51);">prompt</font> + <font style="color:rgb(51, 51, 51);">timeout</font> (可引用 <font style="color:rgb(51, 51, 51);">$ARGUMENTS</font> 占位符) |
输入与输出 -- 钩子输入(stdin 传入 JSON)
所有钩子都会收到通用字段,部分事件附带特定字段。
| 字段类型 | 通用字段 | 说明 |
|---|---|---|
| 基础信息 | <font style="color:rgb(51, 51, 51);">session_id</font> |
会话唯一标识 |
<font style="color:rgb(51, 51, 51);">transcript_path</font> |
对话记录文件路径 | |
<font style="color:rgb(51, 51, 51);">cwd</font> |
钩子执行时的当前工作目录 | |
<font style="color:rgb(51, 51, 51);">permission_mode</font> |
当前权限模式(default/plan/acceptEdits 等) | |
<font style="color:rgb(51, 51, 51);">hook_event_name</font> |
当前触发的钩子事件名 |
各事件特有字段示例
| 事件名 | 特有字段 | 示例 |
|---|---|---|
<font style="color:rgb(51, 51, 51);">PreToolUse</font> |
<font style="color:rgb(51, 51, 51);">tool_name</font> /<font style="color:rgb(51, 51, 51);">tool_input</font> |
<font style="color:rgb(51, 51, 51);">{"tool_name":"Write","tool_input":{"file_path":"/test.txt"}}</font> |
<font style="color:rgb(51, 51, 51);">UserPromptSubmit</font> |
<font style="color:rgb(51, 51, 51);">prompt</font> |
<font style="color:rgb(51, 51, 51);">{"prompt":"帮我写一个排序函数"}</font> |
<font style="color:rgb(51, 51, 51);">SessionEnd</font> |
<font style="color:rgb(51, 51, 51);">reason</font> |
<font style="color:rgb(51, 51, 51);">{"reason":"clear/logout/other"}</font> |
钩子输出(两种方式)
方式1:退出代码(简单场景)
通过退出代码传递执行状态,<font style="color:rgb(51, 51, 51);background-color:rgb(250, 252, 253);">stdout</font>/<font style="color:rgb(51, 51, 51);background-color:rgb(250, 252, 253);">stderr</font> 用于反馈信息。
| 退出代码 | 含义 | 行为说明 |
|---|---|---|
<font style="color:rgb(51, 51, 51);">0</font> |
执行成功 | <font style="color:rgb(51, 51, 51);">stdout</font> 可返回 JSON 做高级控制;部分事件(如 <font style="color:rgb(51, 51, 51);">UserPromptSubmit</font> )会将 <font style="color:rgb(51, 51, 51);">stdout</font> 加入上下文 |
<font style="color:rgb(51, 51, 51);">2</font> |
阻止操作 | 仅使用 <font style="color:rgb(51, 51, 51);">stderr</font> 作为错误消息反馈给 Claude,阻止当前事件继续执行 |
| 其他非零值 | 非阻塞错误 | <font style="color:rgb(51, 51, 51);">stderr</font> 仅在详细模式(<font style="color:rgb(51, 51, 51);">ctrl+o</font> )显示,不影响事件执行 |
退出代码 2 在各事件中的行为
| 事件名 | 触发行为 |
|---|---|
<font style="color:rgb(51, 51, 51);">PreToolUse</font> |
阻止工具调用,向 Claude 展示 <font style="color:rgb(51, 51, 51);">stderr</font> |
<font style="color:rgb(51, 51, 51);">UserPromptSubmit</font> |
阻止提示处理,擦除用户输入 |
<font style="color:rgb(51, 51, 51);">Stop</font> |
阻止 Claude 停止,强制继续工作 |
<font style="color:rgb(51, 51, 51);">PostToolUse</font> /<font style="color:rgb(51, 51, 51);">Notification</font> |
仅展示 <font style="color:rgb(51, 51, 51);">stderr</font> ,不影响已完成操作 |
方式2:JSON 输出(高级场景)
退出代码为 <font style="color:rgb(51, 51, 51);background-color:rgb(250, 252, 253);">0</font> 时,可通过 <font style="color:rgb(51, 51, 51);background-color:rgb(250, 252, 253);">stdout</font> 返回 JSON 实现精细化控制,核心字段如下:
| 通用 JSON 字段 | 作用 |
|---|---|
<font style="color:rgb(51, 51, 51);">continue: true/false</font> |
是否允许事件继续执行(<font style="color:rgb(51, 51, 51);">false</font> 优先于其他规则) |
<font style="color:rgb(51, 51, 51);">stopReason</font> |
<font style="color:rgb(51, 51, 51);">continue=false</font> 时,展示给用户的原因 |
<font style="color:rgb(51, 51, 51);">systemMessage</font> |
向用户显示的警告信息 |
事件特有 JSON 字段示例
| 事件名 | 特有字段 | 示例 |
|---|---|---|
<font style="color:rgb(51, 51, 51);">PreToolUse</font> |
<font style="color:rgb(51, 51, 51);">permissionDecision</font> (allow/deny/ask) |
<font style="color:rgb(51, 51, 51);">{"hookSpecificOutput":{"permissionDecision":"allow","updatedInput":{"file_path":"/new.txt"}}}</font> |
<font style="color:rgb(51, 51, 51);">UserPromptSubmit</font> |
<font style="color:rgb(51, 51, 51);">decision: block/undefined</font> |
<font style="color:rgb(51, 51, 51);">{"decision":"block","reason":"提示包含敏感信息"}</font> |
<font style="color:rgb(51, 51, 51);">PostToolUse</font> |
<font style="color:rgb(51, 51, 51);">additionalContext</font> |
<font style="color:rgb(51, 51, 51);">{"hookSpecificOutput":{"additionalContext":"文件已格式化完成"}}</font> |
案例实战
项目初始化
python
我要创建一个新的 React 项目,使用 Vite 作为构建工具
项目名称:wsj-news-card-generator
要求:
1. 使用 Vite 创建 React 项目
2. 集成 Tailwind CSS
3. 添加必要的依赖:html2canvas(用于导出图片)
4. 创建清晰的文件夹结构

请给我完整的命令行步骤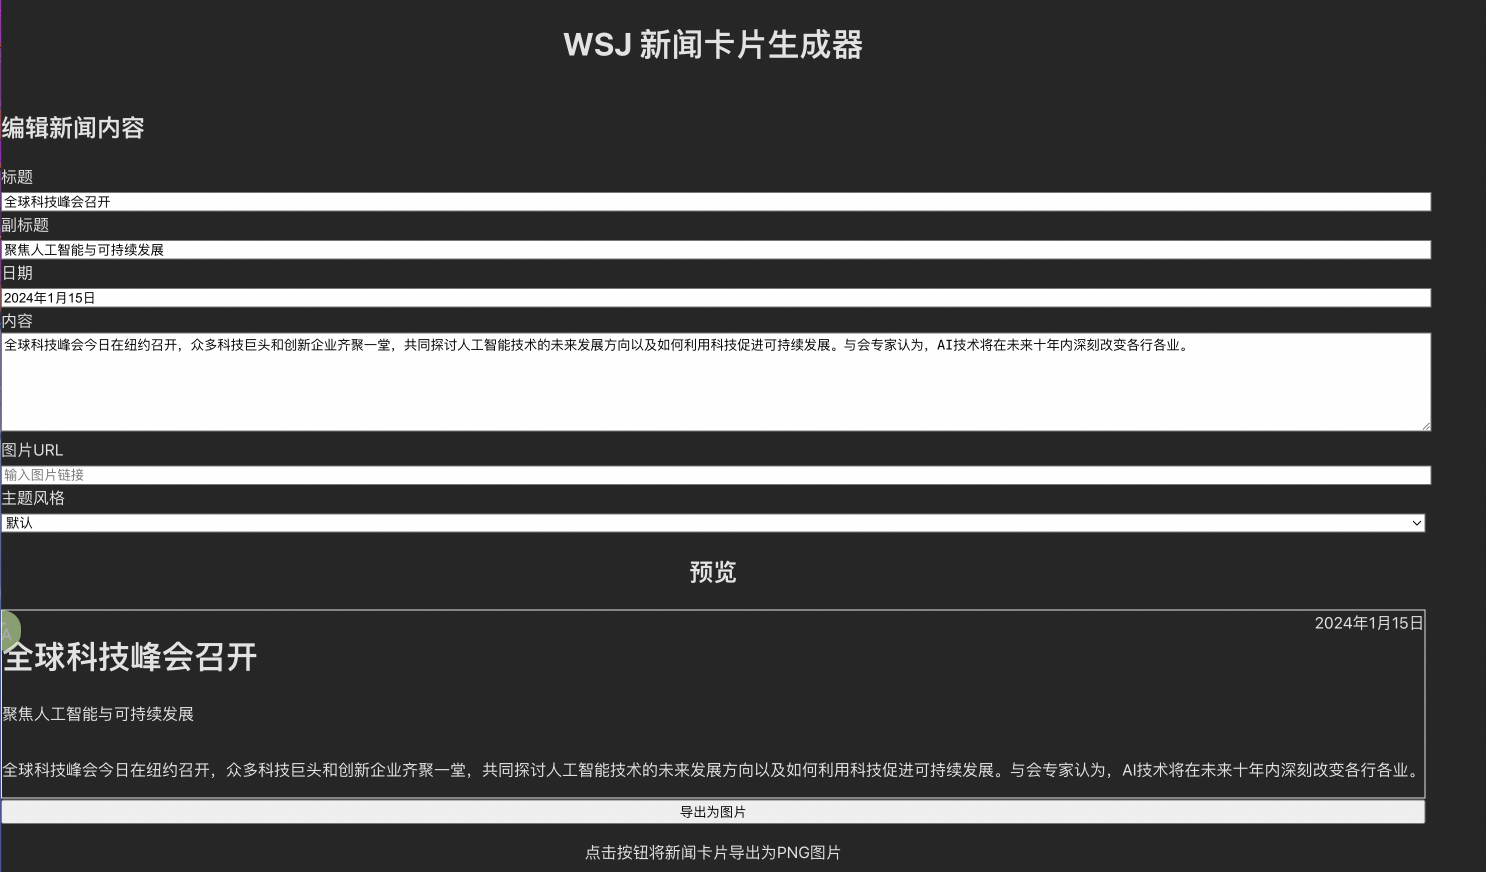
python
现在帮我配置 Tailwind CSS
修改 tailwind.config.js,添加自定义配置:
1. 添加 WSJ 风格的颜色(深灰色文字、金色强调色)
2. 添加衬线字体(Playfair Display, Merriweather)
3. 扩展阴影效果
python
修改 src/index.css,导入 Tailwind 和字体创建核心组件
python
创建以下文件夹结构:
src/
  components/
    NewsCard.jsx          # 新闻卡片组件
    NewsCardEditor.jsx    # 编辑器组件
    ExportButton.jsx      # 导出按钮组件
  utils/
    exportImage.js        # 导出图片工具函数
  App.jsx
  main.jsx
python
创建 src/components/NewsCard.jsx
要求:
1. 华尔街日报经典风格的新闻卡片
2. 包含:大标题、副标题、正文摘要、作者、日期、分类标签
3. 可选的特色图片(如果提供)
4. 使用 Tailwind 类名,体现 WSJ 的排版美学
5. 添加金色装饰线条
6. 卡片尺寸:适合社交媒体分享(1200x630px)
python
创建 src/components/NewsCardEditor.jsx
要求:
1. 左侧是表单编辑区域
2. 右侧是实时预览区域
3. 表单包含:分类、标题、副标题、摘要、作者、日期、图片上传
4. 使用受控组件
5. 图片上传支持拖拽和点击
6. 优雅的表单设计,符合 WSJ 风格
python
创建 src/components/ExportButton.jsx
要求:
1. 使用 html2canvas 导出卡片为 PNG
2. 显示加载状态
3. 点击后自动下载
 4. 优雅的按钮设计
python
在 NewsCardEditor 组件中添加预设模板功能
要求:
1. 创建 3-5 个不同主题的新闻模板
2. 用户可以快速选择模板
3. 选择后自动填充表单
4. 在编辑器上方显示模板选择器
python
所有描述改为中文,适合生成中文信息的新闻