背景:
前面一篇blog
仿oppo三星samsung手机分屏收藏代码实现
有给大家展示分屏收藏功能相关的实现详细步骤等,最后也实行了这种分屏收藏demo,这些都是自己在aosp14版本实现的。
不过在文章发布后,vip学员朋友反馈发现在aosp16版本上,安卓已经自带实现了这个分屏收藏的功能,所以本文将带大家以前来探索google官方是如何实现这个分屏收藏功能,对这块功能的源码进行相关的剖析。

功能展示:
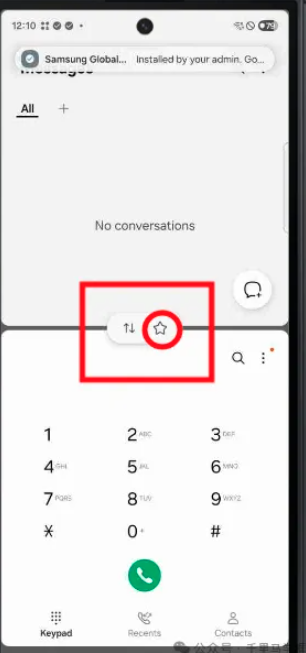
先打开2个task,而且操作进入分屏,在分屏的画面下点击最近任务进入分屏,可以看到分屏的task卡片。
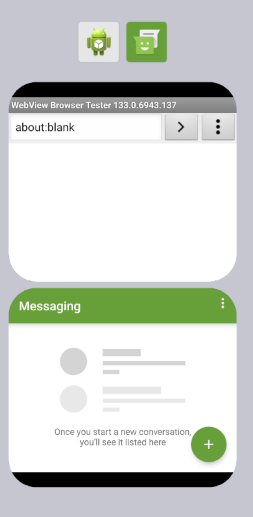
在安卓16版本上在分屏情况下,再进入最近任务,可以看到这时候有分屏的两个task的卡片,点击双图标
 点击后会出现如下弹框,发现有一个Save app pair
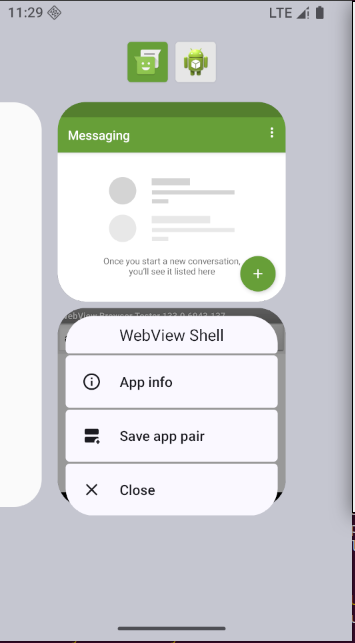
点击这个"Save app pair"按钮,其实字面意思就可以理解这个按钮就是保存这对app的task卡片图标,点击后桌面出现多了一个刚才分屏的两个app图标的app:
 点击后直接可以进入分屏。
源码剖析:
创建AppPairIcon部分剖析
以"Save app pair"按钮为切入点分析
packages/apps/Launcher3/quickstep/src/com/android/quickstep/TaskShortcutFactory.java
cpp
        @Override
        public void onClick(View view) {
            dismissTaskMenuView();
            //核心就是调用了AppPairsController的saveAppPair方法
            ((RecentsView) mTarget.getOverviewPanel())
                    .getSplitSelectController().getAppPairsController().saveAppPair(mTaskView);
        }
下面重点看看AppPairsController的saveAppPair方法部分
saveAppPair方法剖析
cpp
   /**
     * Creates a new app pair ItemInfo and adds it to the workspace.
     * <br>
     * We create WorkspaceItemInfos to save onto the app pair in the following way:
     * <br> 1. We verify that the ComponentKey from our Recents tile corresponds to a real
     * launchable app in the app store.
     * <br> 2. If it doesn't, we search for the underlying launchable app via package name, and use
     * that instead.
     * <br> 3. If that fails, we re-use the existing WorkspaceItemInfo by cloning it and replacing
     * its intent with one from PackageManager.
     * <br> 4. If everything fails, we just use the WorkspaceItemInfo as is, with its existing
     * intent. This is not preferred, but will still work in most cases (notably it will not work
     * well on trampoline apps).
     */
    public void saveAppPair(GroupedTaskView gtv) {
      //参数类型GroupedTaskView中包含了分屏两个Task的相关信息


      //通过GroupedTaskView获取TaskViewItemInfo和WorkspaceItemInfo信息
        List<TaskViewItemInfo> recentsInfos =
                gtv.getTaskContainers().stream().map(TaskContainer::getItemInfo).toList();
                //注意这里resolveAppPairWorkspaceInfo是一个匹配方法,核心就是匹配componentName
        List<WorkspaceItemInfo> apps =
                recentsInfos.stream().map(this::resolveAppPairWorkspaceInfo).toList();

        for (int i = 0; i < apps.size(); i++) {
            apps.get(i).rank = encodeRank(getIndex(i), snapPosition);
        }
        //根据两个task对应的WorkspaceItemInfo信息创建AppPairInfo对象
        AppPairInfo newAppPair = new AppPairInfo(apps);

        IconCache iconCache = LauncherAppState.getInstance(mContext.asContext()).getIconCache();
        MODEL_EXECUTOR.execute(() -> {
        //根据newAppPair创建对应的桌面分屏两个小图标
            newAppPair.getAppContents().forEach(member -> {
                member.title = "";
                member.bitmap = iconCache.getDefaultIcon(newAppPair.user);
                iconCache.getTitleAndIcon(member, member.getMatchingLookupFlag());
            });
            MAIN_EXECUTOR.execute(() -> {
                LauncherAccessibilityDelegate delegate = QuickstepLauncher.getLauncher(
                        mContext.asContext()).getAccessibilityDelegate();
                if (delegate != null) {
                //调用addToWorkspace方法添加newAppPair信息到桌面
                    delegate.addToWorkspace(newAppPair, true, (success) -> {

                    });

                }
            });
        });
    }
这saveAppPair方法里面核心步骤有以下几个:
1、参数GroupedTaskView转换成TaskViewItemInfo信息
2、TaskViewItemInfo信息转换WorkspaceItemInfo信息
3、使用WorkspaceItemInfo构造AppPairInfo信息
4、根据AppPairInfo创建对应的桌面图标Icon
5、调用addToWorkspace把这个AppPairInfo对应的Icon添加到桌面UI,及保存相关数据信息
addToWorkspace这块就不展开了,熟悉桌面同学都懂这个。
点击AppPairIcon部分剖析
packages/apps/Launcher3/src/com/android/launcher3/touch/ItemClickHandler.java
cpp
  private static void onClick(View v) {
        Object tag = v.getTag();
        if (tag instanceof WorkspaceItemInfo) {
            onClickAppShortcut(v, (WorkspaceItemInfo) tag, launcher);
        } else if (tag instanceof FolderInfo) {
            onClickFolderIcon(v);
        } else if (tag instanceof AppPairInfo) {//针对AppPairInfo类型的桌面图标调用onClickAppPairIcon方法
            onClickAppPairIcon(v);
        }
看看onClickAppPairIcon方法:
cpp
    private static void onClickAppPairIcon(View v) {

        // Either the app pair is not disabled, or it is a disabled state that can be handled by
        // framework directly (e.g. one app is paused), so go ahead and launch.
        launcher.launchAppPair(icon);//核心就是调用launchAppPair
    }
这里再来看看 launcher.launchAppPair方法,在QuickstepLauncher中:
packages/apps/Launcher3/quickstep/src/com/android/launcher3/uioverrides/QuickstepLauncher.java
cpp
/**
 * Launches two apps as an app pair.
 */
public void launchAppPair(AppPairIcon appPairIcon) {
    // Potentially show the Taskbar education once the app pair launch finishes
    //可以看到最后调用到了SplitSelectStateController的launchAppPair方法
    mSplitSelectStateController.getAppPairsController().launchAppPair(appPairIcon,
            CUJ_LAUNCHER_LAUNCH_APP_PAIR_FROM_WORKSPACE,
            (success) -> {
                if (success && mTaskbarUIController != null) {
                    mTaskbarUIController.showEduOnAppLaunch();
                }
            });
}
下面看看launchAppPair具体实现
packages/apps/Launcher3/quickstep/src/com/android/quickstep/util/SplitSelectStateController.java
cpp
    /**
     * Launches an app pair by searching the RecentsModel for running instances of each app, and
     * staging either those running instances or launching the apps as new Intents.
     *
     * @param cuj Should be an integer from {@link Cuj} or -1 if no CUJ needs to be logged for jank
     *            monitoring
     * @param callback Called after the app pair launch finishes animating, or null if no method is
     *                 to be called
     */
    public void launchAppPair(AppPairIcon appPairIcon, int cuj,
            @Nullable Consumer<Boolean> callback) {

//核心调用findLastActiveTasksAndRunCallback来寻找当前活跃的task
        mSplitSelectStateController.findLastActiveTasksAndRunCallback(
                Arrays.asList(app1Key, app2Key),
                false /* findExactPairMatch */,
                foundTasks -> {
                //如果寻找到对应的活跃task,则被放到foundTasks集合中
                    @Nullable Task foundTask1 = foundTasks[0];//访问集合中的task
                    Intent task1Intent;
                    int task1Id;
                    if (foundTask1 != null) {//如果找到task,则使用taks既可以
                        task1Id = foundTask1.key.id;
                        task1Intent = null;
                    } else {//如果没找到task,那么task1Id就为INVALID_TASK_ID
                        task1Id = INVALID_TASK_ID;
                        task1Intent = app1.intent;
                    }

								//调用setInitialTaskSelect接口设置第一个要启动task相关变量
                    mSplitSelectStateController.setInitialTaskSelect(task1Intent,
                            AppPairsController.convertRankToStagePosition(app1.rank),
                            app1,
                            LAUNCHER_APP_PAIR_LAUNCH,
                            task1Id);

                    @Nullable Task foundTask2 = foundTasks[1];
                    //下面也是判断task2的情况,来设置secondTask的情况
                    if (foundTask2 != null) {
                        mSplitSelectStateController.setSecondTask(foundTask2, app2);
                    } else {
                        mSplitSelectStateController.setSecondTask(
                                app2.intent, app2.user, app2);
                    }

                    mSplitSelectStateController.setLaunchingIconView(appPairIcon);

                    //最后调用launchSplitTasks进行两个task的启动
                    mSplitSelectStateController.launchSplitTasks(
                            AppPairsController.convertRankToSnapPosition(app1.rank), callback);
                }
        );
    }
再看看最核心launchSplitTasks方法
cpp
public void launchTasks(@Nullable Consumer<Boolean> callback, boolean freezeTaskList,
            @PersistentSnapPosition int snapPosition, @Nullable InstanceId shellInstanceId) {


        SplitSelectDataHolder.SplitLaunchData launchData =
                mSplitSelectDataHolder.getSplitLaunchData();
        int firstTaskId = launchData.getInitialTaskId();
        int secondTaskId = launchData.getSecondTaskId();
        ShortcutInfo firstShortcut = launchData.getInitialShortcut();
        ShortcutInfo secondShortcut = launchData.getSecondShortcut();
        PendingIntent firstPI = launchData.getInitialPendingIntent();
        PendingIntent secondPI = launchData.getSecondPendingIntent();
        Intent widgetIntent = launchData.getWidgetSecondIntent();
        int firstUserId = launchData.getInitialUserId();
        int secondUserId = launchData.getSecondUserId();
        int initialStagePosition = launchData.getInitialStagePosition();

			//根据上面的数据情况,识别不同的LaunchType然后调用不同的start接口
        switch (launchData.getSplitLaunchType()) {
            case SPLIT_TASK_TASK ->
            //2个都有taskId类型情况
                    mSystemUiProxy.startTasks(firstTaskId, optionsBundle, secondTaskId,
                            null /* options2 */, initialStagePosition, snapPosition,
                            remoteTransition, shellInstanceId);

            case SPLIT_TASK_PENDINGINTENT ->
                    mSystemUiProxy.startIntentAndTask(secondPI, secondUserId, optionsBundle,
                            firstTaskId, extrasBundle, initialStagePosition, snapPosition,
                            remoteTransition, shellInstanceId);

            case SPLIT_TASK_SHORTCUT ->
                    mSystemUiProxy.startShortcutAndTask(secondShortcut, optionsBundle,
                            firstTaskId, null /*options2*/, initialStagePosition, snapPosition,
                            remoteTransition, shellInstanceId);

            case SPLIT_PENDINGINTENT_TASK ->
                    mSystemUiProxy.startIntentAndTask(firstPI, firstUserId, optionsBundle,
                            secondTaskId, null /*options2*/, initialStagePosition, snapPosition,
                            remoteTransition, shellInstanceId);

            case SPLIT_PENDINGINTENT_PENDINGINTENT ->

            //2个都没有taskId类型情况
                    mSystemUiProxy.startIntents(firstPI, firstUserId, firstShortcut,
                            optionsBundle, secondPI, secondUserId, secondShortcut, extrasBundle,
                            initialStagePosition, snapPosition, remoteTransition,
                            shellInstanceId);

            case SPLIT_SHORTCUT_TASK ->
                    mSystemUiProxy.startShortcutAndTask(firstShortcut, optionsBundle,
                            secondTaskId, null /*options2*/, initialStagePosition, snapPosition,
                            remoteTransition, shellInstanceId);
        }

    }
原文地址:
https://mp.weixin.qq.com/s/Ao7qN6uxxWjo1FLB6FZ9yA
更多framework实战开发干货,请关注"千里马学框架"