欢迎加入开源鸿蒙跨平台社区:开源鸿蒙跨平台开发者社区
Flutter for OpenHarmony 实战:推箱子游戏完整开发指南
文章目录
- [Flutter for OpenHarmony 实战:推箱子游戏完整开发指南](#Flutter for OpenHarmony 实战:推箱子游戏完整开发指南)
-
- 摘要
- 一、项目背景与功能概述
-
- [1.1 推箱子游戏介绍](#1.1 推箱子游戏介绍)
- [1.2 应用功能规划](#1.2 应用功能规划)
- [1.3 地图元素设计](#1.3 地图元素设计)
- 二、数据模型设计
-
- [2.1 地图表示](#2.1 地图表示)
- [2.2 关卡数据结构](#2.2 关卡数据结构)
- [2.3 游戏状态](#2.3 游戏状态)
- 三、技术选型与架构设计
-
- [3.1 核心技术栈](#3.1 核心技术栈)
- [3.2 应用架构](#3.2 应用架构)
- [3.3 游戏逻辑流程](#3.3 游戏逻辑流程)
- 四、关卡管理系统
-
- [4.1 加载关卡](#4.1 加载关卡)
- [4.2 关卡切换](#4.2 关卡切换)
- [4.3 深拷贝地图](#4.3 深拷贝地图)
- 五、移动逻辑实现
-
- [5.1 移动玩家](#5.1 移动玩家)
- [5.2 推箱子逻辑](#5.2 推箱子逻辑)
- [5.3 碰撞检测流程图](#5.3 碰撞检测流程图)
- 六、胜利判断
-
- [6.1 检查胜利条件](#6.1 检查胜利条件)
- [6.2 胜利对话框](#6.2 胜利对话框)
- 七、UI界面实现
-
- [7.1 地图渲染](#7.1 地图渲染)
- [7.2 元素颜色和图标](#7.2 元素颜色和图标)
- [7.3 控制按钮](#7.3 控制按钮)
- [7.4 控制区域布局](#7.4 控制区域布局)
- 八、关卡设计技巧
-
- [8.1 关卡难度递增](#8.1 关卡难度递增)
- [8.2 关卡设计原则](#8.2 关卡设计原则)
- 九、扩展功能
-
- [9.1 撤销功能](#9.1 撤销功能)
- [9.2 键盘控制](#9.2 键盘控制)
- [9.3 最佳记录](#9.3 最佳记录)
- 十、运行效果与测试
-
- [10.1 项目运行命令](#10.1 项目运行命令)
- [10.2 功能测试清单](#10.2 功能测试清单)
- 十一、总结
摘要
推箱子(Sokoban)是一款经典的益智游戏,玩家需要将箱子推到指定的目标位置。本文将详细介绍如何使用Flutter for OpenHarmony框架开发一款功能完整的推箱子游戏。文章涵盖了游戏地图设计、碰撞检测算法、关卡管理系统、UI交互控制等核心技术点。通过本文学习,读者将掌握Flutter在鸿蒙平台上开发游戏类应用的完整流程,了解二维网格游戏的实现方法。
一、项目背景与功能概述
1.1 推箱子游戏介绍
推箱子是一款经典的益智游戏:
- 目标:将所有箱子推到目标点
- 规则:只能推不能拉,一次只能推一个箱子
- 难度:需要策略规划,走错可能无法完成
1.2 应用功能规划
| 功能模块 | 具体功能 |
|---|---|
| 关卡系统 | 多个难度递增的关卡 |
| 移动控制 | 上下左右移动 |
| 碰撞检测 | 墙壁、箱子检测 |
| 胜利判断 | 箱子全部归位 |
| 步数统计 | 记录移动步数 |
| 关卡切换 | 上一关/下一关 |
| 重置功能 | 重新开始当前关卡 |
1.3 地图元素设计
| 元素 | 数值 | 颜色 | 图标 |
|---|---|---|---|
| 空地 | 0 | 灰色 | 无 |
| 墙 | 1 | 棕色 | 方块 |
| 箱子 | 2 | 橙色 | 箱子 |
| 目标点 | 3 | 绿色 | 旗帜 |
| 箱子在目标点 | 5 | 深绿 | 勾选 |
二、数据模型设计
2.1 地图表示
使用二维数组表示地图:
dart
final List<List<int>> _map = [
  [1, 1, 1, 1, 1, 1, 1, 1],  // 第一行:墙
  [1, 0, 0, 0, 0, 0, 0, 1],  // 空地
  [1, 0, 0, 2, 0, 0, 0, 1],  // 箱子
  [1, 0, 0, 0, 0, 3, 0, 1],  // 目标点
  [1, 0, 0, 0, 0, 0, 0, 1],
  [1, 1, 1, 1, 1, 1, 1, 1],
];
2.2 关卡数据结构
dart
final List<Map<String, dynamic>> _levels = [
  {
    'name': '第一关',
    'map': [...],           // 地图数据
    'startX': 1,            // 玩家初始X位置
    'startY': 1,            // 玩家初始Y位置
  },
  // 更多关卡...
];
2.3 游戏状态
dart
class _GamePageState extends State<GamePage> {
  int _currentLevelIndex = 0;      // 当前关卡索引
  int _playerX = 0;                // 玩家X坐标
  int _playerY = 0;                // 玩家Y坐标
  late List<List<int>> _currentMap; // 当前地图
  int _steps = 0;                  // 步数
}
三、技术选型与架构设计
3.1 核心技术栈
状态管理
- StatefulWidget管理游戏状态
- setState更新UI
UI组件
- Container:地图格子
- Icon:游戏元素图标
- IconButton:控制按钮
- InteractiveViewer:缩放支持
交互设计
- 按钮控制移动
- 触摸滑动支持
- 键盘方向键
3.2 应用架构
GamePage (游戏页面)
├── AppBar
│ └── 步数显示
├── 关卡信息区域
│ ├── 上一关按钮
│ ├── 关卡名称
│ └── 下一关按钮
├── 游戏地图区域
│ └── 地图网格 (多个格子)
│ ├── 墙壁/箱子/目标点
│ └── 玩家
└── 控制区域
├── 方向按钮
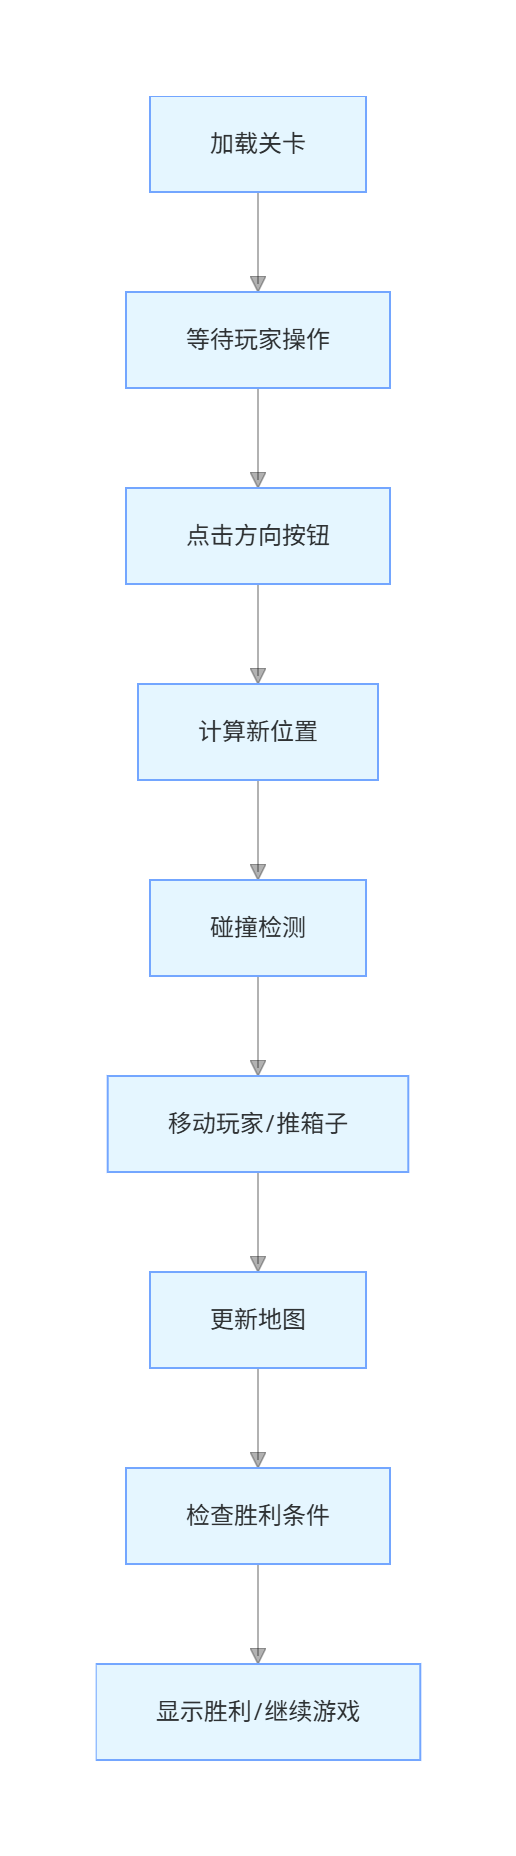
└── 重置按钮3.3 游戏逻辑流程
四、关卡管理系统
4.1 加载关卡
dart
void _loadLevel(int index) {
  final level = _levels[index];
  // 深拷贝地图,避免修改原始数据
  _currentMap = (level['map'] as List<List<int>>)
      .map((row) => List<int>.from(row))
      .toList();
  _playerX = level['startX'] as int;
  _playerY = level['startY'] as int;
  _steps = 0;
  setState(() {});
}
4.2 关卡切换
dart
// 上一关
void _previousLevel() {
  if (_currentLevelIndex > 0) {
    _currentLevelIndex--;
    _loadLevel(_currentLevelIndex);
  }
}

// 下一关
void _nextLevel() {
  if (_currentLevelIndex < _levels.length - 1) {
    _currentLevelIndex++;
    _loadLevel(_currentLevelIndex);
  }
}

// 重置当前关卡
void _resetLevel() {
  _loadLevel(_currentLevelIndex);
}
4.3 深拷贝地图
为什么需要深拷贝:
- 原始地图数据需要保留
- 每次重玩都要从初始状态开始
- 避免关卡间数据污染
dart
// 错误的方式:浅拷贝
_currentMap = level['map'];  // 会修改原始数据

// 正确的方式:深拷贝
_currentMap = (level['map'] as List<List<int>>)
    .map((row) => List<int>.from(row))
    .toList();
五、移动逻辑实现
5.1 移动玩家
dart
void _movePlayer(int dx, int dy) {
  final newX = _playerX + dx;
  final newY = _playerY + dy;

  // 检查边界
  if (newX < 0 || newX >= _currentMap[0].length ||
      newY < 0 || newY >= _currentMap.length) {
    return;
  }

  final targetElement = _currentMap[newY][newX];

  // 碰到墙,不能移动
  if (targetElement == 1) {
    return;
  }

  // 碰到箱子
  if (targetElement == 2 || targetElement == 5) {
    _tryPushBox(newX, newY, dx, dy);
    return;
  }

  // 移动到空地或目标点
  _playerX = newX;
  _playerY = newY;
  _steps++;
  setState(() {});
}
5.2 推箱子逻辑
dart
void _tryPushBox(int boxX, int boxY, int dx, int dy) {
final boxNewX = boxX + dx;
final boxNewY = boxY + dy;
// 检查箱子新位置边界
if (boxNewX < 0 || boxNewX >= _currentMap[0].length ||
boxNewY < 0 || boxNewY >= _currentMap.length) {
return;
}
final boxTargetElement = _currentMap[boxNewY][boxNewX];
// 箱子后面是墙或另一个箱子,不能推
if (boxTargetElement == 1 || boxTargetElement == 2 || boxTargetElement == 5) {
return;
}
// 移动箱子
final currentElement = _currentMap[boxY][boxX];
// 恢复箱子原来位置的状态
if (currentElement == 5) {
_currentMap[boxY][boxX] = 3; // 箱子从目标点上移开
} else {
_currentMap[boxY][boxX] = 0; // 箱子从普通地移开
}
// 设置箱子新位置的状态
if (boxTargetElement == 3) {
_currentMap[boxNewY][boxNewX] = 5; // 箱子推到目标点
} else {
_currentMap[boxNewY][boxNewX] = 2; // 箱子推到普通地
}
// 移动玩家
_playerX = boxX;
_playerY = boxY;
_steps++;
setState(() {});
// 检查胜利
_checkWin();
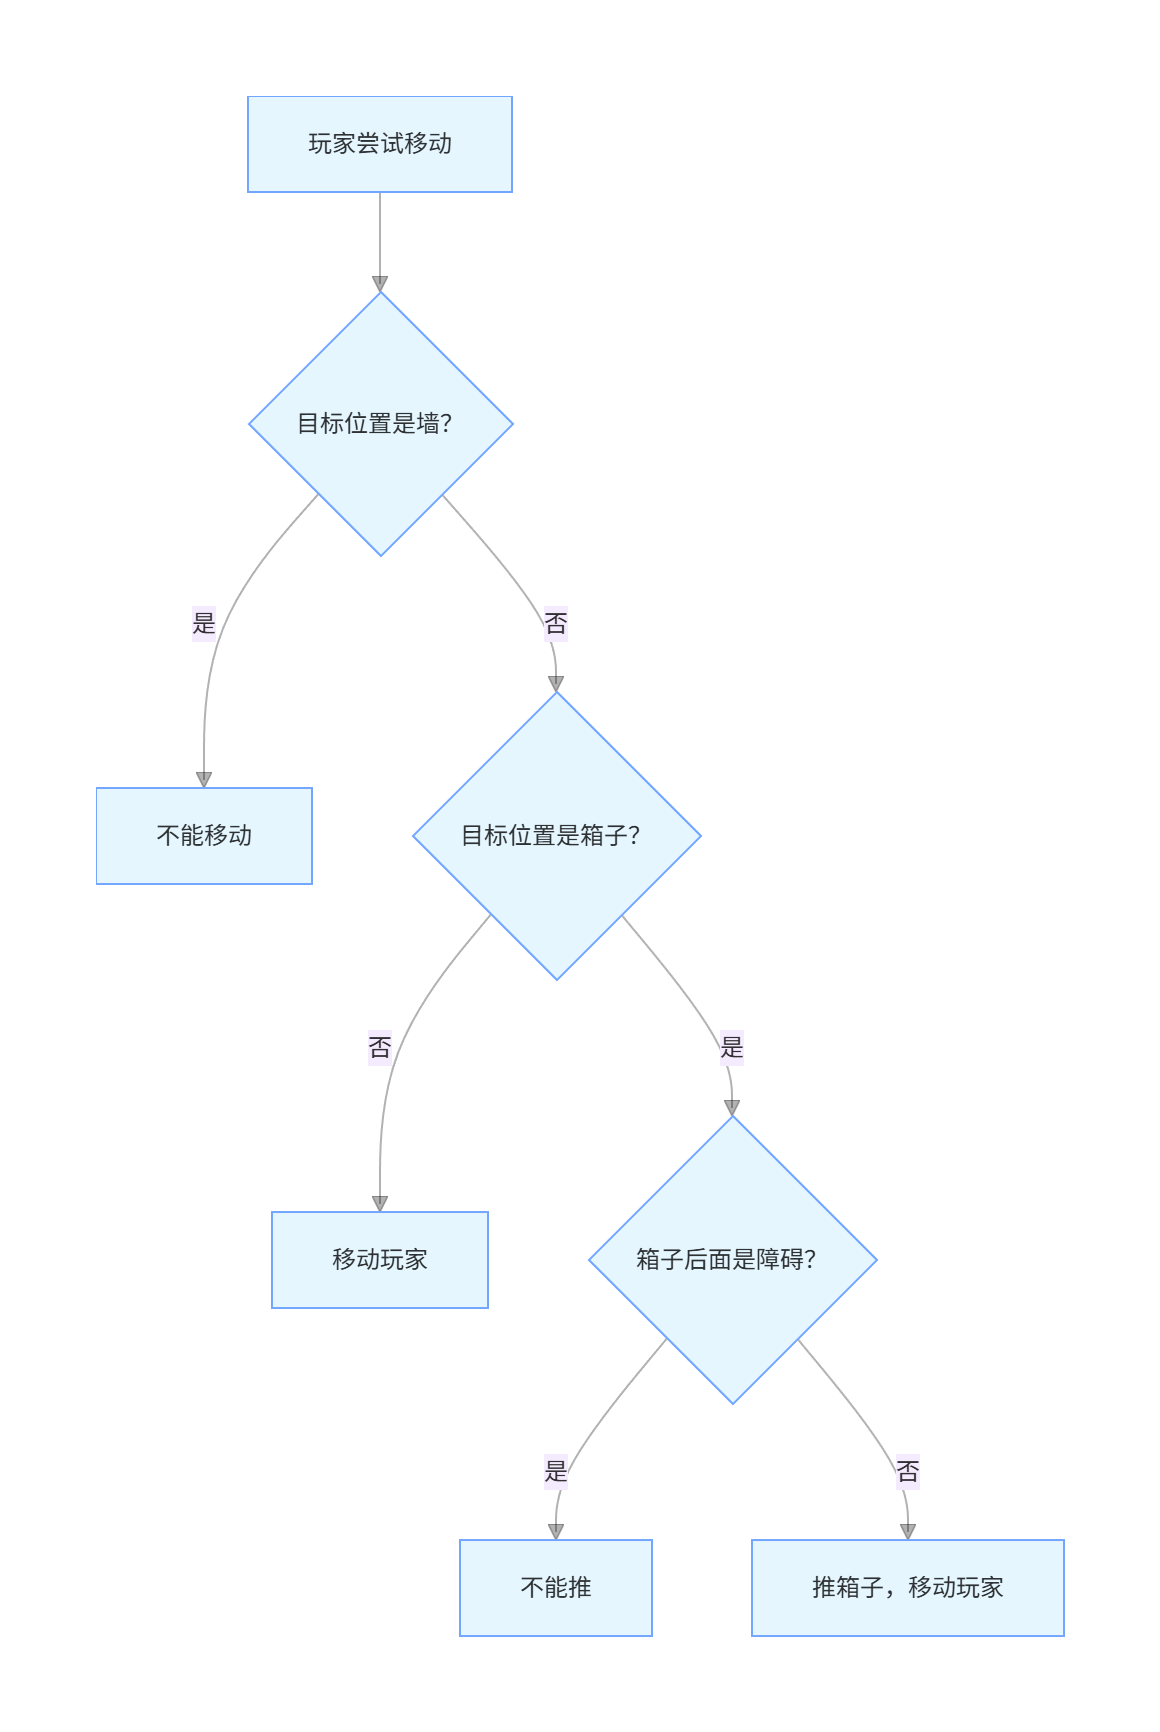
}5.3 碰撞检测流程图
六、胜利判断
6.1 检查胜利条件
dart
void _checkWin() {
  bool allBoxesOnTarget = true;
  for (final row in _currentMap) {
    for (final cell in row) {
      if (cell == 2) {
        // 还有箱子不在目标点上
        allBoxesOnTarget = false;
        break;
      }
    }
  }

  if (allBoxesOnTarget) {
    Future.delayed(const Duration(milliseconds: 300), () {
      if (!mounted) return;
      _showWinDialog();
    });
  }
}
6.2 胜利对话框
dart
void _showWinDialog() {
  showDialog(
    context: context,
    barrierDismissible: false,
    builder: (context) => AlertDialog(
      title: const Text('恭喜过关!'),
      content: Column(
        mainAxisSize: MainAxisSize.min,
        children: [
          const Icon(Icons.celebration, size: 64, color: Colors.orange),
          const SizedBox(height: 16),
          Text('关卡: ${_levels[_currentLevelIndex]['name']}'),
          const SizedBox(height: 8),
          Text('步数: $_steps'),
        ],
      ),
      actions: [
        TextButton(
          onPressed: () {
            Navigator.pop(context);
            _loadLevel(_currentLevelIndex);
          },
          child: const Text('重玩'),
        ),
        if (_currentLevelIndex < _levels.length - 1)
          ElevatedButton(
            onPressed: () {
              Navigator.pop(context);
              _currentLevelIndex++;
              _loadLevel(_currentLevelIndex);
            },
            child: const Text('下一关'),
          ),
      ],
    ),
  );
}
七、UI界面实现
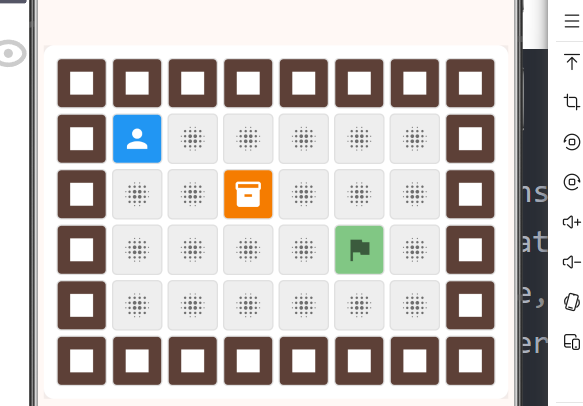
7.1 地图渲染
dart
Widget _buildMap() {
  return Container(
    padding: const EdgeInsets.all(8),
    decoration: BoxDecoration(
      color: Colors.white,
      borderRadius: BorderRadius.circular(8),
      boxShadow: [
        BoxShadow(
          color: Colors.black.withValues(alpha: 0.1),
          blurRadius: 10,
          spreadRadius: 2,
        ),
      ],
    ),
    child: Column(
      mainAxisSize: MainAxisSize.min,
      children: List.generate(_currentMap.length, (y) {
        return Row(
          mainAxisSize: MainAxisSize.min,
          children: List.generate(_currentMap[y].length, (x) {
            final element = _currentMap[y][x];
            final isPlayer = x == _playerX && y == _playerY;

            return Container(
              width: 40,
              height: 40,
              margin: const EdgeInsets.all(2),
              decoration: BoxDecoration(
                color: isPlayer ? Colors.blue : _getElementColor(element),
                borderRadius: BorderRadius.circular(4),
                border: Border.all(color: Colors.grey.shade300),
              ),
              child: Icon(
                isPlayer ? Icons.person : _getElementIcon(element),
                color: _getElementIconColor(element, isPlayer),
                size: 24,
              ),
            );
          }),
        );
      }),
    ),
  );
}
7.2 元素颜色和图标

dart
Color _getElementColor(int element) {
  switch (element) {
    case 1: return Colors.brown.shade700;  // 墙
    case 2: return Colors.orange.shade700; // 箱子
    case 3: return Colors.green.shade300;  // 目标点
    case 5: return Colors.green.shade600;  // 箱子在目标点
    default: return Colors.grey.shade200;  // 空地
  }
}

IconData _getElementIcon(int element) {
  switch (element) {
    case 1: return Icons.square;
    case 2: return Icons.inventory_2;
    case 3: return Icons.flag;
    case 5: return Icons.check_circle;
    default: return Icons.blur_on;
  }
}
7.3 控制按钮
dart
Widget _buildControlButton(IconData icon, VoidCallback? onPressed) {
return Container(
width: 56,
height: 56,
decoration: BoxDecoration(
color: Colors.orange,
borderRadius: BorderRadius.circular(12),
boxShadow: [
BoxShadow(
color: Colors.orange.withValues(alpha: 0.3),
blurRadius: 8,
spreadRadius: 2,
),
],
),
child: IconButton(
onPressed: onPressed,
icon: Icon(icon, color: Colors.white, size: 28),
style: IconButton.styleFrom(
backgroundColor: Colors.orange,
foregroundColor: Colors.white,
),
),
);
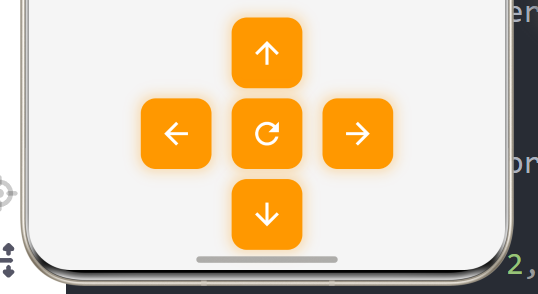
}7.4 控制区域布局
dart
Container(
  padding: const EdgeInsets.all(16),
  color: Colors.grey.shade100,
  child: Column(
    children: [
      Row(
        mainAxisAlignment: MainAxisAlignment.center,
        children: [
          _buildControlButton(Icons.arrow_upward, () => _movePlayer(0, -1)),
        ],
      ),
      const SizedBox(height: 8),
      Row(
        mainAxisAlignment: MainAxisAlignment.center,
        children: [
          _buildControlButton(Icons.arrow_back, () => _movePlayer(-1, 0)),
          const SizedBox(width: 16),
          _buildControlButton(Icons.refresh, _resetLevel),
          const SizedBox(width: 16),
          _buildControlButton(Icons.arrow_forward, () => _movePlayer(1, 0)),
        ],
      ),
      const SizedBox(height: 8),
      Row(
        mainAxisAlignment: MainAxisAlignment.center,
        children: [
          _buildControlButton(Icons.arrow_downward, () => _movePlayer(0, 1)),
        ],
      ),
    ],
  ),
)
八、关卡设计技巧
8.1 关卡难度递增
dart
// 第一关:1个箱子,简单布局
Level 1:
[1, 1, 1, 1, 1, 1, 1, 1]
[1, 0, 0, 0, 0, 0, 0, 1]
[1, 0, 0, 2, 0, 0, 0, 1]  // 1个箱子
[1, 0, 0, 0, 0, 3, 0, 1]  // 1个目标
[1, 0, 0, 0, 0, 0, 0, 1]
[1, 1, 1, 1, 1, 1, 1, 1]

// 第二关:2个箱子
Level 2:
[1, 1, 1, 1, 1, 1, 1, 1]
[1, 0, 0, 0, 0, 0, 0, 1]
[1, 0, 2, 0, 2, 0, 0, 1]  // 2个箱子
[1, 0, 0, 0, 0, 0, 0, 1]
[1, 0, 3, 0, 3, 0, 0, 1]  // 2个目标
[1, 0, 0, 0, 0, 0, 0, 1]
[1, 1, 1, 1, 1, 1, 1, 1]

// 第五关:3个箱子,复杂布局
Level 5:
[0, 1, 1, 1, 1, 1, 0]
[1, 1, 0, 0, 0, 1, 0]
[1, 0, 0, 2, 0, 1, 1]
[1, 0, 2, 0, 2, 0, 1]  // 3个箱子
[1, 1, 0, 0, 0, 1, 1]
[0, 1, 0, 3, 0, 1, 0]
[0, 1, 3, 0, 3, 1, 0]  // 3个目标
[0, 1, 0, 0, 0, 1, 0]
[0, 1, 1, 1, 1, 1, 0]
8.2 关卡设计原则
- 可解性:确保关卡有解
- 循序渐进:难度逐步增加
- 空间利用:合理利用有限空间
- 陷阱设计:设置一些容易走错的路径
- 测试验证:每个关卡都要测试可解
九、扩展功能
9.1 撤销功能
dart
final List<Map<String, dynamic>> _history = [];

void _movePlayer(int dx, int dy) {
  // 保存当前状态
  _history.add({
    'playerX': _playerX,
    'playerY': _playerY,
    'map': List<List<int>>.from(
      _currentMap.map((row) => List<int>.from(row))
    ),
    'steps': _steps,
  });

  // 执行移动...

  // 限制历史记录数量
  if (_history.length > 100) {
    _history.removeAt(0);
  }
}

void _undo() {
  if (_history.isEmpty) return;

  final lastState = _history.removeLast();
  _playerX = lastState['playerX'] as int;
  _playerY = lastState['playerY'] as int;
  _currentMap = (lastState['map'] as List<List<int>>)
      .map((row) => List<int>.from(row))
      .toList();
  _steps = lastState['steps'] as int;
  setState(() {});
}
9.2 键盘控制
dart
@override
Widget build(BuildContext context) {
  return KeyboardListener(
    focusNode: FocusNode(),
    onKeyEvent: (KeyEvent event) {
      if (event is KeyDownEvent) {
        switch (event.logicalKey) {
          case LogicalKeyboardKey.arrowUp:
            _movePlayer(0, -1);
            break;
          case LogicalKeyboardKey.arrowDown:
            _movePlayer(0, 1);
            break;
          case LogicalKeyboardKey.arrowLeft:
            _movePlayer(-1, 0);
            break;
          case LogicalKeyboardKey.arrowRight:
            _movePlayer(1, 0);
            break;
        }
      }
    },
    child: Scaffold(...),
  );
}
9.3 最佳记录
dart
final Map<int, int> _bestScores = {};

void _checkWin() {
  if (allBoxesOnTarget) {
    // 更新最佳记录
    if (!_bestScores.containsKey(_currentLevelIndex) ||
        _steps < _bestScores[_currentLevelIndex]!) {
      _bestScores[_currentLevelIndex] = _steps;
    }
    _showWinDialog();
  }
}

// 显示最佳记录
Text('最佳: ${_bestScores[_currentLevelIndex] ?? '-'} 步')
十、运行效果与测试
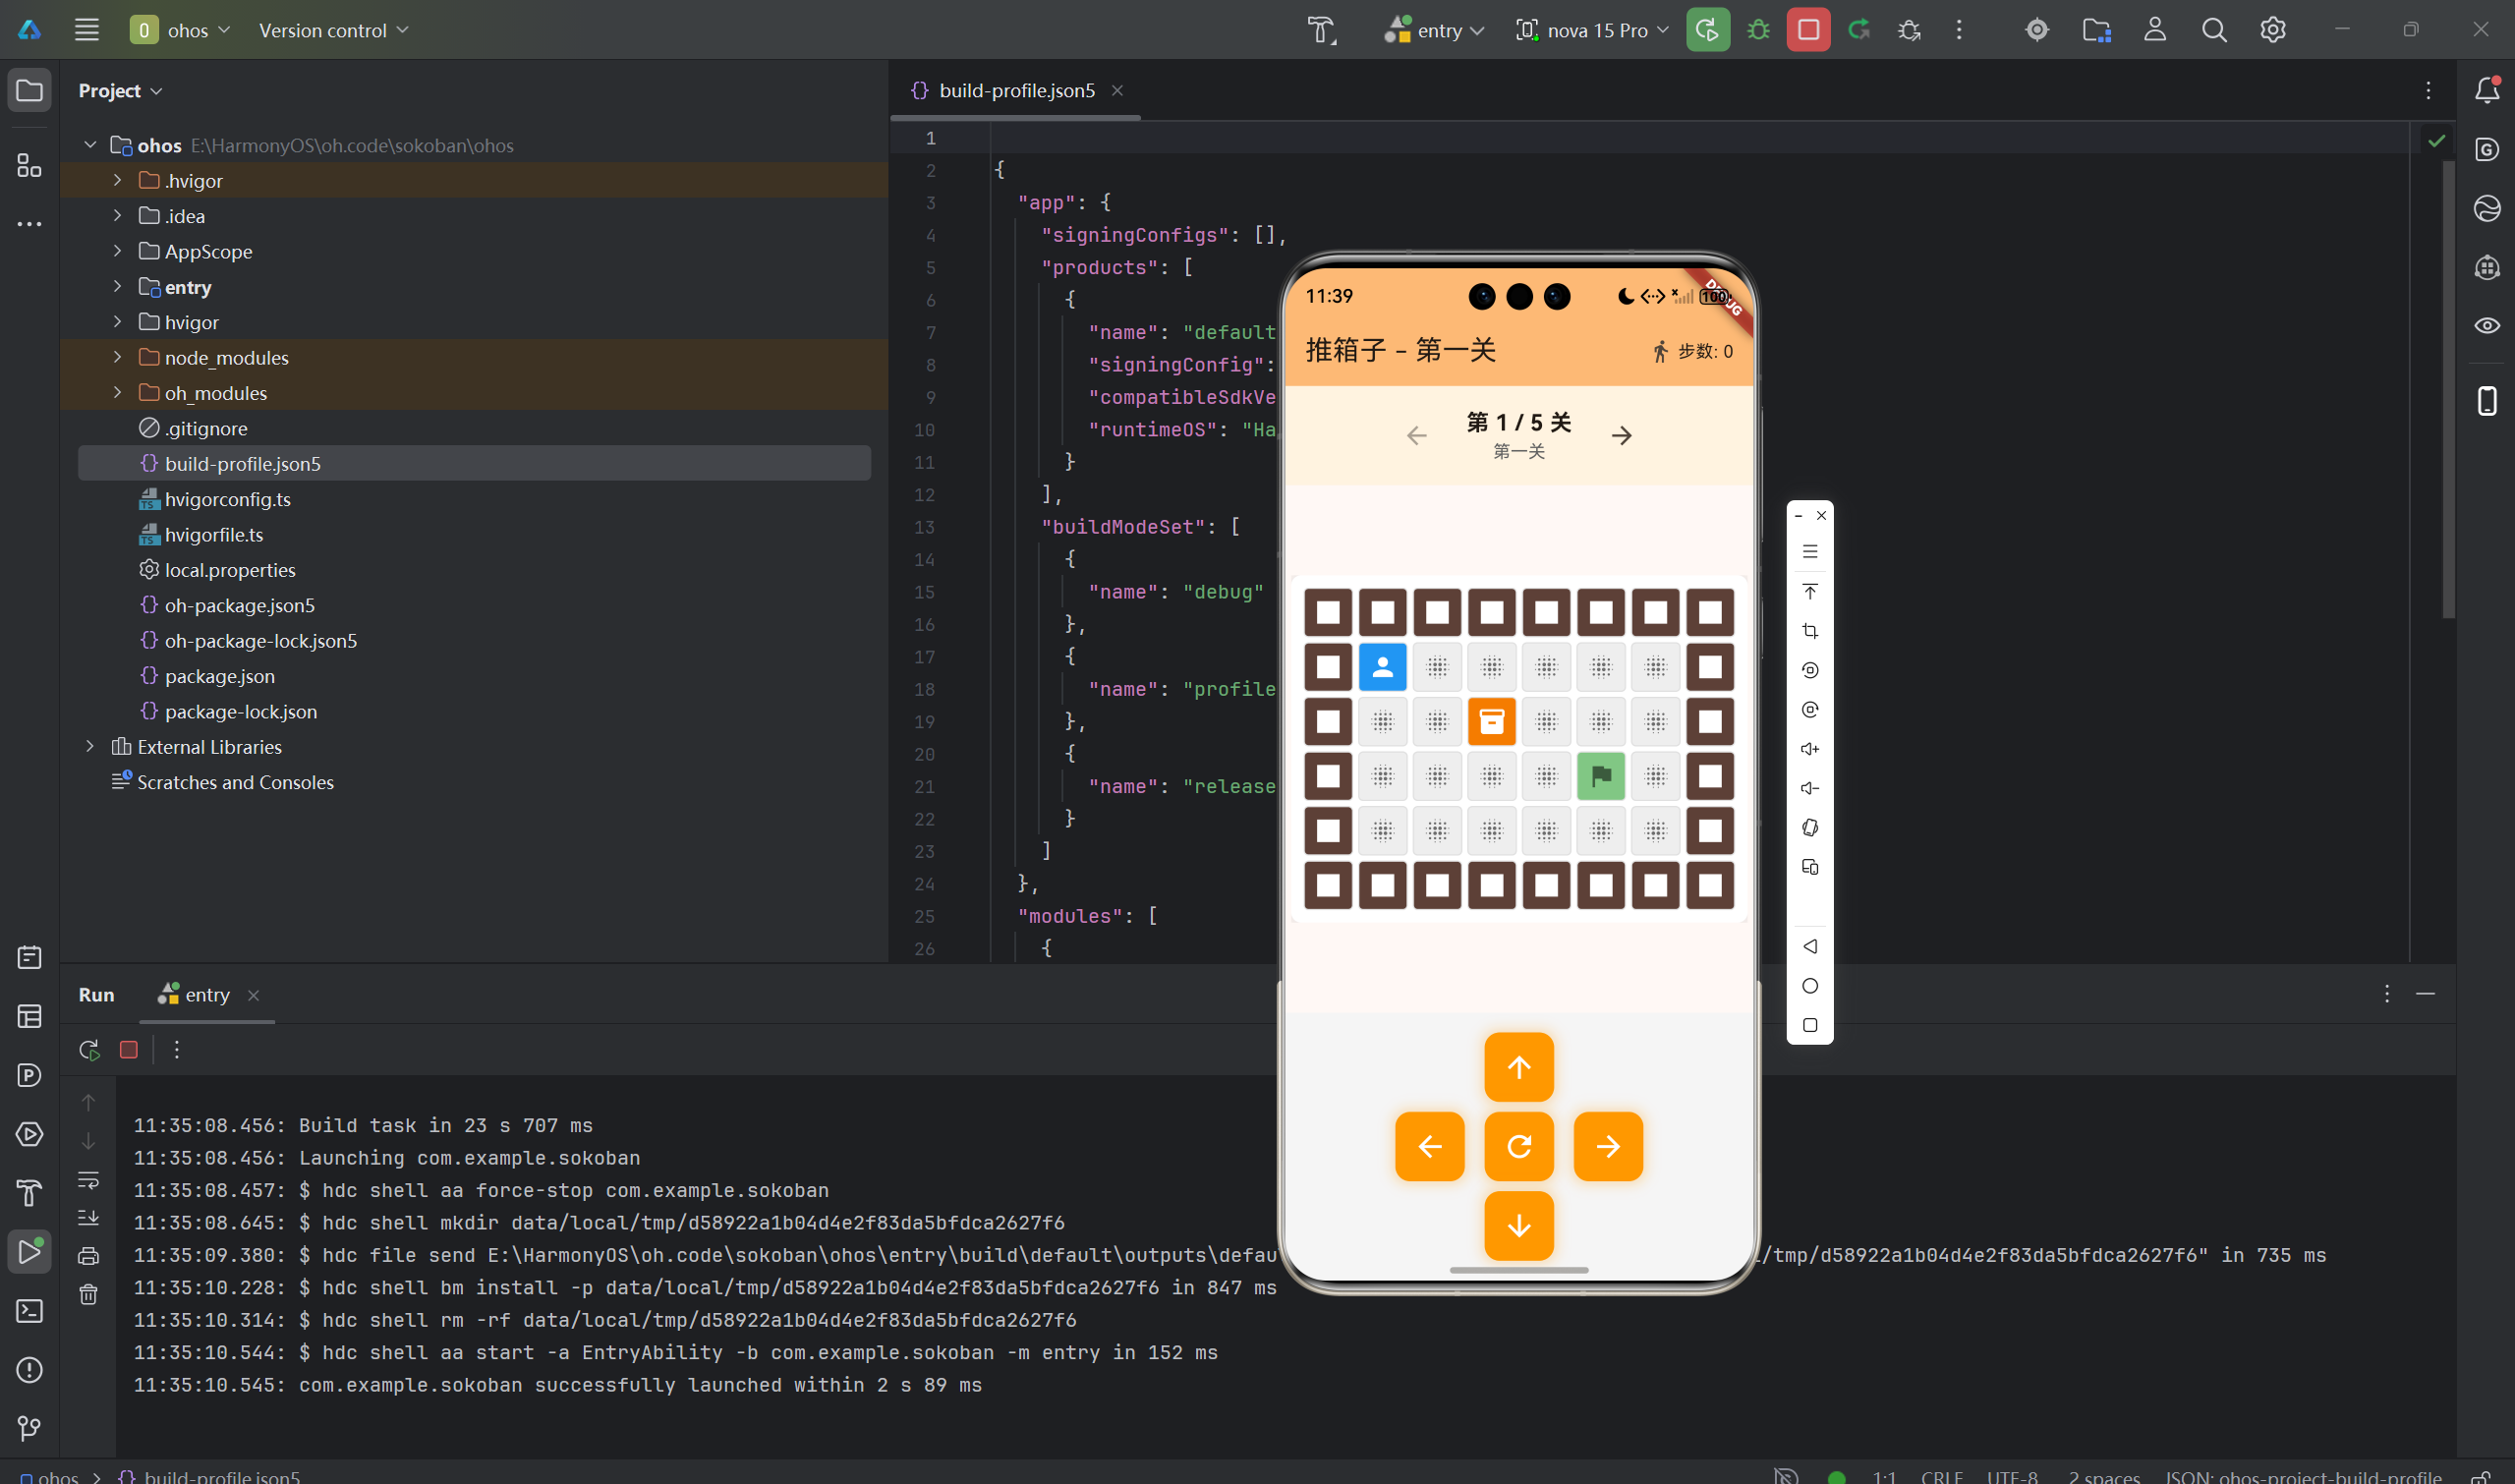
10.1 项目运行命令
bash
cd E:\HarmonyOS\oh.code\sokoban
flutter run -d ohos
10.2 功能测试清单
移动测试
- 方向按钮控制移动
- 碰到墙壁不能移动
- 可以推动单个箱子
- 不能同时推多个箱子
关卡测试
- 上一关/下一关切换
- 关卡正确加载
- 重置功能正常
胜利测试
- 箱子全部归位触发胜利
- 显示步数统计
- 重玩按钮功能正常
- 最后一关无下一关按钮
UI测试
- 地图正确渲染
- 玩家位置正确
- 元素颜色正确
- 缩放功能正常
十一、总结
本文详细介绍了使用Flutter for OpenHarmony开发推箱子游戏的完整过程,涵盖了以下核心技术点:
- 地图设计:二维数组表示、元素编码
- 移动逻辑:玩家移动、箱子推动、碰撞检测
- 关卡管理:关卡加载、切换、重置
- 胜利判断:状态检测、对话框显示
- UI实现:地图渲染、控制按钮
- 状态管理:游戏状态、步数统计
- 数据结构:深拷贝、历史记录
这个项目展示了Flutter在游戏开发中的完整流程。读者可以基于此项目添加更多功能:
- 撤销/重做功能
- 键盘控制支持
- 更多关卡
- 关卡编辑器
- 最佳记录排行
- 游戏音效
- 动画效果
通过本文的学习,读者应该能够独立开发类似的网格类游戏,掌握Flutter在鸿蒙平台上的游戏开发技巧。
欢迎加入开源鸿蒙跨平台社区 : 开源鸿蒙跨平台开发者社区