文章目录
- 摘要
- Abstract
- 一、项目调试最终版本
- 二、视觉RAG
-
- [1. 传统RAG与视觉RAG](#1. 传统RAG与视觉RAG)
-
- [1.1 传统RAG](#1.1 传统RAG)
- [1.2 视觉RAG](#1.2 视觉RAG)
- [1.3 当下视觉RAG痛点](#1.3 当下视觉RAG痛点)
- [2. PDF 预处理](#2. PDF 预处理)
-
- [2.1 PDF 按页切片](#2.1 PDF 按页切片)
- [2.2 常用库函数使用方法](#2.2 常用库函数使用方法)
- 总结
摘要
本周完成代码的调试,进入对视觉RAG的学习。主要对比视觉RAG与传统RAG,并且掌握 PDF、图像的切片、裁剪、归一化核心操作;用 PyMuPDF 实现 PDF 按页、按图表切片。
Abstract
This week, I completed the code debugging and embarked on learning Visual RAG. I mainly compared Visual RAG with traditional RAG, and mastered the core operations of slicing, cropping, and normalization for PDFs and images. Specifically, I implemented PDF slicing by page and by charts/tables using PyMuPDF.
一、项目调试最终版本
powershell
# 加载环境变量(使用绝对路径)
script_dir = os.path.dirname(os.path.abspath(__file__))
project_root = os.path.dirname(script_dir)
env_path = os.path.join(project_root, 'key.env')
load_dotenv(dotenv_path=env_path)


def count_tokens(text, model=None):
    if not text:
        return 0
    enc = tiktoken.encoding_for_model(model)
    tokens = enc.encode(text)
    return len(tokens)

# -------------------------- 新增/修改:千问API配置 --------------------------
# 方式1:使用千问OpenAI兼容接口(推荐,改动最小)

QWEN_API_KEY = os.getenv("DASHSCOPE_API_KEY")  # 从环境变量获取千问API密钥
QWEN_BASE_URL = os.getenv("QWEN_BASE_URL", "https://dashscope.aliyuncs.com/compatible-mode/v1")  # 千问兼容接口地址

# 千问模型映射(替换原OpenAI模型)
MODEL_MAPPING = {
    "gpt-4o-2024-11-20":"qwen-plus",            # 千问增强版
}

# -------------------------- 重写GPT API调用函数 --------------------------
def ChatGPT_API(prompt, model="gpt-4o-2024-11-20", temperature=0.0, max_tokens=4096):
    """
    替换为阿里千问API的同步调用函数(保留原函数名,避免修改其他调用处)
    """

    # 适配千问模型名称
    qwen_model = MODEL_MAPPING.get(model, "qwen-plus")
    # 初始化千问兼容的OpenAI客户端
    client = OpenAI(
        api_key=QWEN_API_KEY,
        base_url=QWEN_BASE_URL
    )

    retry_count = 0
    max_retries = 3  # 保留原重试逻辑
    while retry_count < max_retries:
        try:
            response = client.chat.completions.create(
                model=qwen_model,
                messages=[{"role": "user", "content": prompt}],
                temperature=temperature,
                max_tokens=max_tokens,
                stream=False
            )
            # 千问
            # 返回格式与OpenAI兼容,直接提取content
            content = response.choices[0].message.content.strip()
            return content
        except (APIError, RateLimitError, APIConnectionError) as e:
            retry_count += 1
            if retry_count >= max_retries:
                raise Exception(f"千问API调用失败(重试{max_retries}次):{str(e)}")
            time.sleep(2 ** retry_count)  # 指数退避重试
        except Exception as e:
            raise Exception(f"千问API调用异常:{str(e)}")

async def ChatGPT_API_async(prompt, model="gpt-4o-2024-11-20", temperature=0.0, max_tokens=4096):
    """
    替换为阿里千问API的异步调用函数
    """
    qwen_model = MODEL_MAPPING.get(model, "qwen-plus")
    client = AsyncOpenAI(
        api_key=QWEN_API_KEY,
        base_url=QWEN_BASE_URL
    )

    retry_count = 0
    max_retries = 3
    while retry_count < max_retries:
        try:
            response = await client.chat.completions.create(
                model=qwen_model,
                messages=[{"role": "user", "content": prompt}],
                temperature=temperature,
                max_tokens=max_tokens,
                stream=False
            )
            content = response.choices[0].message.content.strip()
            return content
        except (APIError, RateLimitError, APIConnectionError) as e:
            retry_count += 1
            if retry_count >= max_retries:
                raise Exception(f"千问API异步调用失败(重试{max_retries}次):{str(e)}")
            await asyncio.sleep(2 ** retry_count)
        except Exception as e:
            raise Exception(f"千问API异步调用异常:{str(e)}")

def ChatGPT_API_with_finish_reason(prompt, model="gpt-4o-2024-11-20", temperature=0.0, max_tokens=4096):
    """
    保留finish_reason返回的版本(适配千问)
    """
    qwen_model = MODEL_MAPPING.get(model, "qwen-plus")
    client = OpenAI(
        api_key=QWEN_API_KEY,
        base_url=QWEN_BASE_URL
    )

    retry_count = 0
    max_retries = 3
    while retry_count < max_retries:
        try:
            response = client.chat.completions.create(
                model=qwen_model,
                messages=[{"role": "user", "content": prompt}],
                temperature=temperature,
                max_tokens=max_tokens,
                stream=False
            )
            content = response.choices[0].message.content.strip()
            finish_reason = response.choices[0].finish_reason  # 千问兼容该字段
            return content, finish_reason
        except (APIError, RateLimitError, APIConnectionError) as e:
            retry_count += 1
            if retry_count >= max_retries:
                raise Exception(f"千问API调用失败(重试{max_retries}次):{str(e)}")
            time.sleep(2 ** retry_count)
        except Exception as e:
            raise Exception(f"千问API调用异常:{str(e)}")

def get_json_content(response):
    start_idx = response.find("```json")
    if start_idx != -1:
        start_idx += 7
        response = response[start_idx:]

    end_idx = response.rfind("```")
    if end_idx != -1:
        response = response[:end_idx]

    json_content = response.strip()
    return json_content


def extract_json(content):
    try:
        # 清理内容,移除特殊字符
        content = content.replace('\x00', '').replace('\x01', '').replace('\x02', '')
        content = content.replace('\x03', '').replace('\x04', '').replace('\x05', '')
        content = content.replace('\x06', '').replace('\x07', '').replace('\x08', '')
        content = content.replace('\x0b', '').replace('\x0c', '').replace('\x0e', '')
        content = content.replace('\x0f', '').replace('\x10', '').replace('\x11', '')
        content = content.replace('\x12', '').replace('\x13', '').replace('\x14', '')
        content = content.replace('\x15', '').replace('\x16', '').replace('\x17', '')
        content = content.replace('\x18', '').replace('\x19', '').replace('\x1a', '')
        content = content.replace('\x1b', '').replace('\x1c', '').replace('\x1d', '')
        content = content.replace('\x1e', '').replace('\x1f', '')

        # First, try to extract JSON enclosed within ```json and ```
        start_idx = content.find("```json")
        if start_idx != -1:
            start_idx += 7  # Adjust index to start after the delimiter
            end_idx = content.rfind("```")
            json_content = content[start_idx:end_idx].strip()
        else:
            # If no delimiters, assume entire content could be JSON
            json_content = content.strip()

        # Clean up common issues that might cause parsing errors
        json_content = json_content.replace('None', 'null')  # Replace Python None with JSON null
        json_content = json_content.replace('\n', ' ').replace('\r', ' ')  # Remove newlines
        json_content = ' '.join(json_content.split())  # Normalize whitespace

        # Attempt to parse and return the JSON object
        return json.loads(json_content)
    except json.JSONDecodeError as e:
        logging.error(f"Failed to extract JSON: {e}")
        # Try to clean up the content further if initial parsing fails
        try:
            # Remove any trailing commas before closing brackets/braces
            json_content = json_content.replace(',]', ']').replace(',}', '}')
            return json.loads(json_content)
        except Exception as e2:
            logging.error(f"Failed to parse JSON even after cleanup: {e2}")
            # Return empty dict as fallback
            return {}
    except Exception as e:
        logging.error(f"Unexpected error while extracting JSON: {e}")
        # Return empty dict as fallback
        return {}
主要对utils.py文件修改为:
- 将原OpenAI模型进行映射,因此实际使用模型为阿里千问
- 将环境变量全部写入.env文件中,并在文件总通过路径加载使用
- 加载模型成功后输出JSON格式有问题,并对内部细节进行调整
二、视觉RAG
1. 传统RAG与视觉RAG
1.1 传统RAG
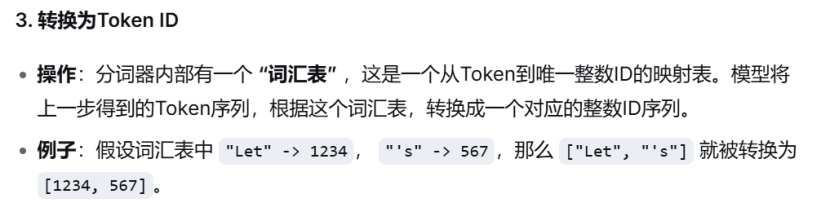
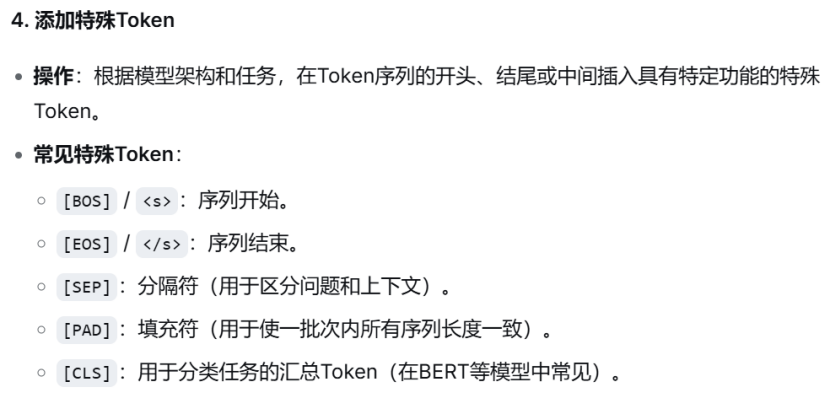
核心流程:文本预处理(分词、清洗等)→ 文本嵌入(将文本转为向量)→ 向量检索(从文本向量库匹配相关上下文)→ 文本生成(结合查询与检索到的文本,输出文本回答)
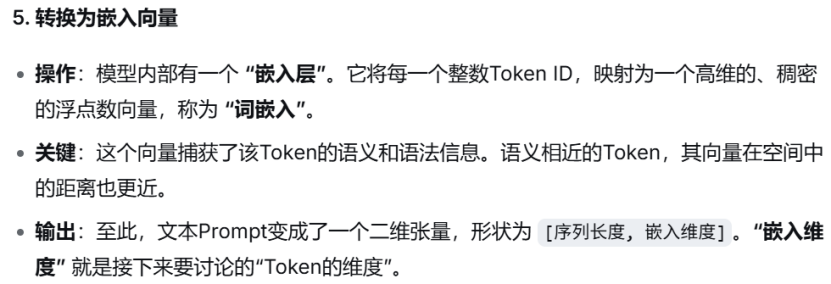
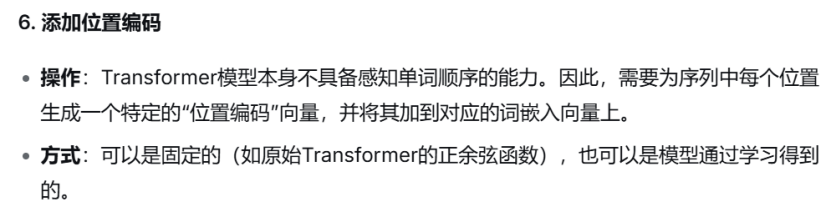
文本预处理,嵌入流程:文本清洗--->分词--->转换为token id--->添加特殊token id--->embedding嵌入向量
将提示词进行清洗(去除多余空格、统一编码)后分词转化变为token id(一串数字编码),
补充:
1,Prompt内容决定了有多少个Token(序列长度)
2,使用的模型决定了每个Token被表示成多长的向量(Token维度/嵌入维度)。也就是 "模型隐藏层的大小",研究人员和工程师在设计和训练模型时,会将其作为一个超参数来设定。
3,词义相近的token在向量空间中距离更近具体解释?
利用余弦计算向量相似度
4,隐藏层对token输入维度也有要求吗?不是只对输出维度有要求吗?
隐藏层对输入维度有严格要求,而且这个要求是统一的
1.2 视觉RAG
视觉RAG
核心流程:视觉内容处理→向量构建→检索匹配→多模态生成
(1)视觉预处理
将原始视觉内容(PDF 扫描件、图片、图文混排文档)按合理粒度切分为标准化视觉片段,一般包含下列操作:
整页切分:PDF 按页转为图片,适合简单图文文档;
精细化切分:用工具(PyMuPDF/OpenCV)识别并裁剪 PDF / 图片中的独立视觉区块(图表、公式、图片区域),避免文本干扰,提升检索精准度;
标准化:统一所有视觉片段的尺寸、格式,适配后续模型编码。
(2)跨模态嵌入 & 向量索引(核心:视觉嵌入 + 建库)
用 VLM / 跨模态模型将视觉片段转为跨模态向量(保证所有视觉片段的向量维度统一),再将向量存入向量库,构建可检索的视觉向量库(索引类型适配数据量):
补充:
跨模态向量:能同时表征图像视觉特征和文本文义特征的统一维度向量,是解决"图文无法直接匹配"的核心。
如何区别跨模态向量和文本向量?
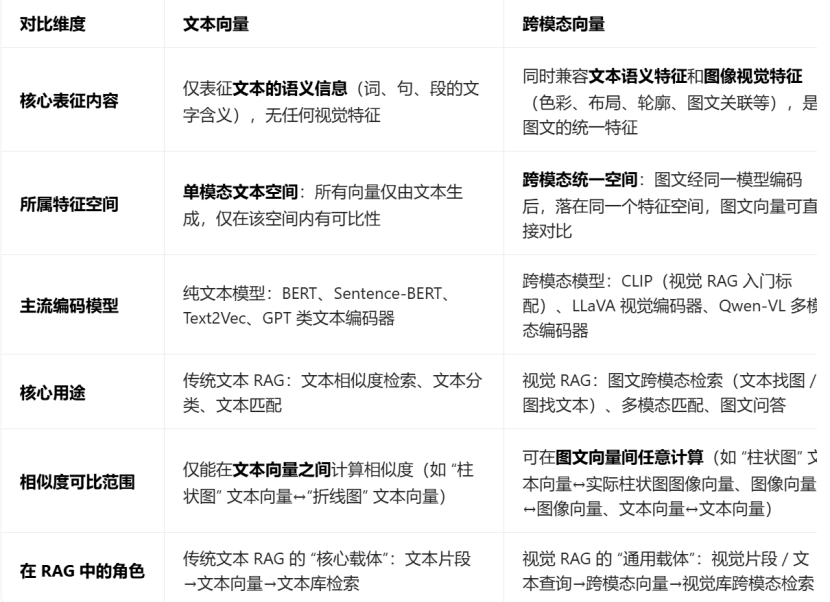
注意:二者的本质区别:是否能表征视觉特征、是否属于图文统一特征空间,而非向量维度、数值大小
(3)跨模态检索
用户输入查询(文本 / 图像),将查询也转为同维度的跨模态向量,从视觉向量库中相似度匹配出相关视觉片段,保证跨模态对齐。
(4)多模态增强生成(核心:视觉上下文辅助)
将 用户查询 与 检索到的视觉上下文 按固定格式输入开源视觉语言模型 VLM,模型基于视觉上下文生成有依据、无幻觉的回答,可增加结果溯源(标注回答来自哪张视觉片段)。
1.3 当下视觉RAG痛点
视觉 RAG 的核心痛点:跨模态对齐不准、视觉切片粒度、显存占用。
- 跨模态对齐不准:文本与视觉特征的匹配度不足,导致检索结果与查询不相关;
- 视觉切片粒度:过粗导致丢失细节,过细导致增加计算量,均会影响检索和生成效果;
- 显存占用高:视觉模型(VLM)、跨模态嵌入及向量处理对硬件显存要求高于传统文本 RAG。
2. PDF 预处理
PyMuPDF 是处理 PDF 的轻量高效库,能精准提取 PDF 的页面、图片对象,是视觉 RAG 中 PDF 切片的首选工具。
PyMuPDF参考教程:玩转PDF处理,PyMuPDF就是你的不二之选
PyMuPDF官方文档:PyMuPDF官方文档
2.1 PDF 按页切片
将 PDF 的每一页转为标准化图像(PNG 格式),是视觉 RAG 中最基础的 PDF 切片方式,适合大部分图文混排文档。
powershell
import fitz  # PyMuPDF的核心库
from pathlib import Path

def pdf_page_slicing(pdf_path, output_dir, img_format="png", dpi=300):
    """
    PDF按页切片:将PDF每页转为图像并保存
    :param pdf_path: 输入PDF文件路径
    :param output_dir: 切片图像保存目录(自动创建)
    :param img_format: 输出图像格式(png/jpg)
    :param dpi: 图像分辨率(dpi越高越清晰,300是视觉RAG常用值)
    """
    # 创建输出目录(不存在则自动创建)
    output_dir = Path(output_dir)
    output_dir.mkdir(parents=True, exist_ok=True)

    # 打开PDF文件
    pdf_doc = fitz.open(pdf_path)
    print(f"PDF总页数:{len(pdf_doc)}")

    # 逐页处理
    for page_num in range(len(pdf_doc)):
        page = pdf_doc[page_num]
        # 设置渲染参数(dpi控制分辨率,matrix是缩放矩阵)
        # fitz.Matrix(dpi/72, dpi/72):72是PDF默认dpi,转为目标dpi
        matrix = fitz.Matrix(dpi/72, dpi/72)
        # 渲染页面为图像(pixmap是PyMuPDF的图像对象)
        pix = page.get_pixmap(matrix=matrix, alpha=False)  # alpha=False去除透明通道

        # 保存图像(命名格式:pdf名_页码.格式)
        img_name = f"{Path(pdf_path).stem}_page_{page_num+1}.{img_format}"
        img_path = output_dir / img_name
        pix.save(img_path)
        print(f"已保存第{page_num+1}页:{img_path}")

    pdf_doc.close()

# 测试调用
if __name__ == "__main__":
    pdf_page_slicing(
        pdf_path="test.pdf",  # 替换为你的PDF路径
        output_dir="pdf_page_slices",
        dpi=300
    )
关键参数解释:
- dpi=300:视觉 RAG 的黄金分辨率,兼顾清晰度和文件大小(dpi 太低会导致后续 CLIP 编码模糊,太高会增加显存占用);
- alpha=False:去除透明通道,避免后续 OpenCV/Pillow 处理时出现黑边;
- fitz.Matrix:缩放矩阵,核心作用是将 PDF 的默认 72dpi 转为目标 dpi,保证图像清晰。
2.2 常用库函数使用方法
powershell
import fitz
#打开文档
doc = fitz.open("test.pdf")  # 打开名为test.pdf的文档

#获取文档元数据
metadata = doc.metadata  # 获取文档的元数据

#提取文本内容
text = ""
for page in doc:
    text += page.get_text()  # 提取每一页的文本内容

#页面操作
doc.move_page(1, 0)  # 将第2页移动到文档开头
doc.copy_page(0)  # 复制第1页到文档末尾

#转换页面为图像
page = doc.load_page(0)  # 加载第1页
pix = page.get_pixmap()  # 获取页面的像素映射
pix.save("page.png")  # 将像素映射保存为PNG图像
补充说明:
- fitz.open()函数用于创建一个Document对象,这是操作PDF文件的基础。
- metadata属性返回一个字典,包含PDF文档的创建者、作者、标题、主题等信息。
- page.get_text()方法用于获取页面上的文本,返回一个字符串,可以指定不同的参数来获取不同格式的文本。
总结
本周完成对项目模型的替换工作并保证项目顺利运行、结果正确,同时开启对视觉RAG的学习。