本文首发于我的个人博客:chaosgoo.com,欢迎来访交流。
前言
我住的屋子床头没有插座也没有控制房间顶灯的开关,假如熄灯睡觉的话会让房间陷入一片漆黑. 所以很长一段时间里我都把米家屏幕挂灯的控制器放在床头,用于临时照明.
这就引发了另外一个问题,每次回家开电脑打开屏幕挂灯,我都得走到床头找到控制器开启屏幕挂灯. 在经历了多次麻烦后,我决定把这个屏幕挂灯接入HomeKit. 这样就可以用语音或者手机控制了.
资料搜集
在阅读了这篇拆解报告:MJ米家显示器挂灯MJGJD01YL后, 需要做的工作就很明确了. 大致分为以下几个步骤
- 阅读手册,找到控制引脚
- 拆除芯片,替换成ESP32
- 编写代码,接入HomeKit
阅读手册,找到控制引脚
看完拆解报告后,得知亮度由TLSR8368和SY7301A芯片控制实现, 两款芯片的资料很容易在Google上搜索到.
基本上可以确定是由TLSR8368发送PWM信号给SY7301A进行调光.
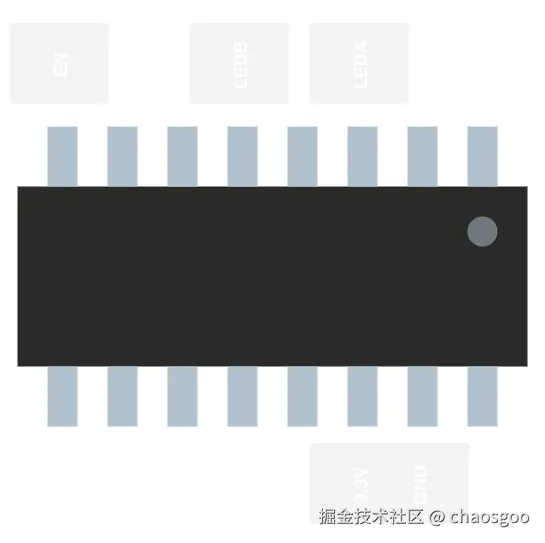
TLSR8368一共就16个引脚, 对照手册配合示波器挨个测量控制引脚测出PWM引脚是由#3,#5产生, 还有一个引脚#8用于使能SY7301A芯片.

测量出引脚如下
拆除芯片,替换成ESP32
到了这一步需要选择合适尺寸的芯片,然后重新绘制一块板子寄生在原始位置即可.
TLSR8368的焊盘空间还算宽敞, 这里可以焊接一个封装小一点的ESP32-C3(对应的型号名称是ESP8685), 封装为QFN28 4x4mm

这里右半部分的TypeC和LDO部分将会在在烧录后折断, 后续固件可以通过4P 2mm间距探针或者OTA进行更新.
附上一张初版焊接后的图片, 初版为之前没有预留可折断TypeC部分的版本.

编写代码,接入HomeKit
得益于HomeSpan这个库,需要编写的代码很简单.
目前实现了白色LED的调光, 由于我损坏了暖黄色LED控制引脚的阻焊,导致最终版本未能实现色温调节功能。
因此,以下代码主要演示了如何控制白色LED的开关与调光
cpp
##include <Arduino.h>

##include "HomeSpan.h"
##include "extras/PwmPin.h"  // library of various PWM functions

////////////////////////////////////

struct FadingLED : Service::LightBulb {
  LedPin *ledPin;             // reference to Led Pin
  SpanCharacteristic *power;  // reference to the On Characteristic
  SpanCharacteristic *level;  // reference to the Brightness Characteristic
  SpanCharacteristic *colorTemperature;  // reference to the Color Temperature

  FadingLED(int _ledPin) : Service::LightBulb() {
    power = new Characteristic::On();
    level = new Characteristic::Brightness(0);
    colorTemperature = new Characteristic::ColorTemperature(200, true);
    ledPin = new LedPin(_ledPin);
  }

  boolean update() {
    Serial.printf("power->getNewVal()=%d", power->getNewVal());
    Serial.printf(",level->getNewVal()=%d", level->getNewVal());
    Serial.printf(",colorTemperature->getNewVal()=%d\n",
                  colorTemperature->getNewVal());
    ledPin->fade(power->getNewVal() * level->getNewVal(), 2000,
                 LedPin::PROPORTIONAL);
    while (ledPin->fadeStatus() == LedPin::FADING)
      ;

    return (true);
  }

  void loop() override {
    if (ledPin->fadeStatus() == LedPin::COMPLETED) {
      power->setVal(1 - power->getVal());
      level->setVal(power->getVal() ? 100 : 0);
    }
  }
};

//////////////////////////////////

void setup() {
  pinMode(5, OUTPUT);
  pinMode(10, OUTPUT);
  digitalWrite(5, HIGH);
  digitalWrite(10, LOW);
  Serial.begin(115200);
  digitalWrite(10, HIGH);

  Serial.println("Wi-Fi is Connected!");
  homeSpan.enableOTA("12345678");
  homeSpan.setPairingCode("11223344");
  homeSpan.begin(Category::Lighting, "Lamp++");

  new SpanAccessory();
  new Service::AccessoryInformation();
  new Characteristic::Identify();
  new Characteristic::ColorTemperature(200, true);
  new FadingLED(4);
}

//////////////////////////////////////

void loop() {
  homeSpan.poll();
}
ini
[env:airm2m_core_esp32c3]
platform = espressif32@5.4.0
board = airm2m_core_esp32c3
framework = arduino
monitor_speed = 115200
lib_deps = homespan/HomeSpan@^1.8.0
; upload_protocol = espota
; upload_flags =  --auth=12345678
; upload_port = 192.168.0.104
build_flags =
	-D ARDUINO_USB_MODE=1
	-D ARDUINO_USB_CDC_ON_BOOT=1
效果展示
