文章目录
- 【GO】并发编程
-
- 使用sync.WaitGroup实现协同调度
-
- 底层代码
- [cursor 总结 WaitGroup](#cursor 总结 WaitGroup)
-
- 架构
- [WaitGroup 结构](#WaitGroup 结构)
- Add
- Wait
- 信号量底层 (runtime)
- 信号量流程图
- 为什么这样设计?
-
- [1. 为什么用自旋 + CAS + 阻塞?](#1. 为什么用自旋 + CAS + 阻塞?)
- [2.为什么需要用前 31 位存储 waiter 数量,既然 Add 对于是否唤醒操作是判断是否有 waiter,那我只设置 1bit 位标识是否有 waiter 不就好了,第一个 waiter 商场把 flag 置为 1](#2.为什么需要用前 31 位存储 waiter 数量,既然 Add 对于是否唤醒操作是判断是否有 waiter,那我只设置 1bit 位标识是否有 waiter 不就好了,第一个 waiter 商场把 flag 置为 1)
- [3. 为什么用信号量而不是 channel?](#3. 为什么用信号量而不是 channel?)
- 总结
- goroutine的并发规模
-
- goroutine的最小为2KB
- goroutine内部资源竞争溢出
- [goruntine 池](#goruntine 池)
- 并发调度
- 小结
- Channel通信
-
- Channel概述
-
- Channel类型
- 初始化Channel值
- 关闭channel
- [for range channel](#for range channel)
- [缓冲与无冲 channel](#缓冲与无冲 channel)
- 单向Channel
- Channel结构
-
- [channel 的阻塞机制](#channel 的阻塞机制)
- [核心数据结构:hchan 和 sudog](#核心数据结构:hchan 和 sudog)
- 缓冲数组
- Channel与Goroutine的关系
- 初始化channel流程
- [向 channel 发送流程](#向 channel 发送流程)
- [gopark 函数与线程协程状态讲解](#gopark 函数与线程协程状态讲解)
- 从channel接收流程
- 关闭channel流程
- [select 语句](#select 语句)
-
- 执行流程
- [for + select](#for + select)
- 阻塞select
- [nil channel的case](#nil channel的case)
- 带有default的select,非阻塞收发
- Race模式
- [All 模式](#All 模式)
- 无缓冲Channel+关闭作典型同步信号
- [signal.Notify 信号通知监控](#signal.Notify 信号通知监控)
- 定时器与断续器,Timer&Ticker
- 小结
- Context上下文
-
- Context概述
- [Context 核心结构](#Context 核心结构)
- 默认(空)Context的使用
- Context传递取消信号
-
- 主动取消
- Deadline和Timeout定时取消
- Cancel操作的向下传递
- 取消操作流程
-
- 创建cancelCtx的流程
- [ctx.Done() 初始信号channel流程](#ctx.Done() 初始信号channel流程)
- cancel()操作流程
- Context传值
- 小结
- 同步和锁
-
- 概述
- 互斥锁Mutex的使用
- 读写RWMutex的使用
- [同步Map sync.Map](#同步Map sync.Map)
-
- [sync.Map 底层实现](#sync.Map 底层实现)
- 为什么锁+Map写快读慢?
- 读操作对比
- 写操作对比
- [sync.Map 的工作流程 TODO](#sync.Map 的工作流程 TODO)
- [何时使用 sync.Map](#何时使用 sync.Map)
- [原子操作 sync/atomic](#原子操作 sync/atomic)
- [sync.Pool 并发安全池](#sync.Pool 并发安全池)
- [DATA RACE 现象](#DATA RACE 现象)
- sync.Once
- sync.Cond
-
- [sync.Cond 基本原理](#sync.Cond 基本原理)
- 小结
- 案例
【GO】并发编程
Go语言在并发编程方面的能力特别强大,实现典型的协程的概念。内置的Go调度器在调度Goroutine时开销非常低。
Go并发编程的理念是:
通过通信来共享内存,而不是共享内存来通信
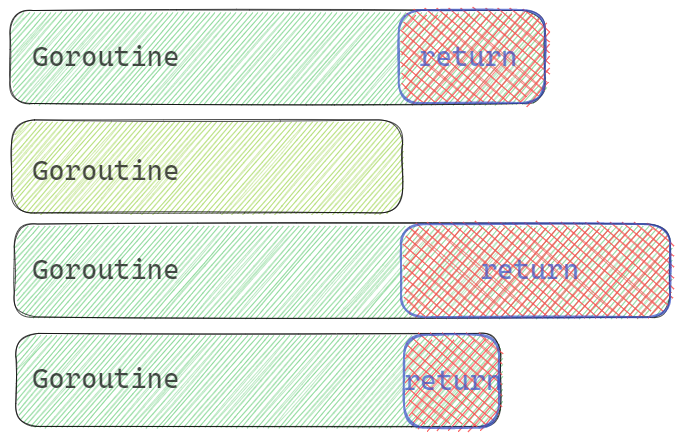
在Go中,每个并发执行的单元称为goroutine。通常称为Go协程。
主goroutine结束了,内部调用的goroutine也会随之结束。
使用sync.WaitGroup实现协同调度
go
func GoroutineWG() {
    // 1. 初始化 WaitGroup
    wg := sync.WaitGroup{}
    // 定义输出奇数的函数
    printOdd := func() {
        // 3.并发执行结束后,计数器-1
        defer wg.Done()
        for i := 1; i <= 10; i += 2 {
            fmt.Println(i)
            time.Sleep(100 * time.Millisecond)
        }
    }

    // 定义输出偶数的函数
    printEven := func() {
        // 3.并发执行结束后,计数器-1
        defer wg.Done()
        for i := 2; i <= 10; i += 2 {
            fmt.Println(i)
            time.Sleep(100 * time.Millisecond)
        }
    }
    // 在 main goroutine 中,开启新的goroutine
    // 并发调用
    // 2, 累加WG的计数器
    wg.Add(2)
    go printOdd()
    go printEven()

    // main goroutine 运行结束
    // 内部调用的goroutine也就结束
    // 4. 主goroutine等待
    wg.Wait()
    fmt.Println("after main wait")
}
底层代码
使用 go1.20 2025 年 1 月发布的版本
go
// Copyright 2024 The Go Authors. All rights reserved.
// Use of this source code is governed by a BSD-style
// license that can be found in the LICENSE file.

package sync

type WaitGroup struct {
	noCopy noCopy

	// Bits (high to low):
	//   bits[0:32]  counter 任务计数器,表示待等待的goroutine数量
	//   bits[32]    flag: synctest bubble membership 用于synctest的标记
	//   bits[33:64] wait count 等待者数量,表示正在Wait的goroutine数量
	state atomic.Uint64
	sema  uint32 // 信号量,用于阻塞/唤醒等待的goroutine
}

// waitGroupBubbleFlag indicates that a WaitGroup is associated with a synctest bubble.
const waitGroupBubbleFlag = 0x8000_0000

// Add adds delta, which may be negative, to the [WaitGroup] task counter.
// 如果计数器变为零,释放所有因调用Wait而阻塞的goroutine。
// 如果计数器变为负数,Add会触发panic。
//
// 调用者应优先使用 [WaitGroup.Go]。
//
// 注意:当计数器为零时,带正数delta的Add调用必须在Wait之前执行。
// 带负数delta的调用,或当计数器大于零时才开始执行的正数Add调用,则可以在任意时刻发生。
// 通常这意味着Add的调用应先于创建goroutine或其他需等待的事件。
// 如果WaitGroup被复用以等待多个独立的事件集,新的Add调用必须在前一次所有Wait返回之后执行。
// 请参阅WaitGroup示例。
func (wg *WaitGroup) Add(delta int) {
	// race.Enabled 用于数据竞争检测,在正式代码中通常为false
	if race.Enabled {
		if delta < 0 {
			// 同步递减操作与Wait之间的竞争
			race.ReleaseMerge(unsafe.Pointer(wg))
		}
		race.Disable()
		defer race.Enable()
	}

	// bubbled 标记当前Add调用是否在synctest bubble内执行
	bubbled := false

	// synctest.IsInBubble() 检查当前是否在bubble测试环境中
	if synctest.IsInBubble() {
		// 如果Add从bubble内调用,则所有Add调用必须来自同一个bubble
		switch synctest.Associate(wg) {
		case synctest.Unbubbled:
			// 无特殊关联,正常处理
		case synctest.OtherBubble:
			// wg已与其他bubble关联,panic
			fatal("sync: WaitGroup.Add called from multiple synctest bubbles")
		case synctest.CurrentBubble:
			// 当前bubble匹配,设置bubbled标记
			bubbled = true
			// 设置waitGroupBubbleFlag标记
			state := wg.state.Or(waitGroupBubbleFlag)
			// 检查是否有从bubble外调用的Add
			if state != 0 && state&waitGroupBubbleFlag == 0 {
				fatal("sync: WaitGroup.Add called from inside and outside synctest bubble")
			}
		}
	}

	// state的高32位存储counter,低32位存储waiter count
	// 将delta左移32位后累加到state的高32位
	state := wg.state.Add(uint64(delta) << 32)

	// 检查Add调用是否在synctest bubble中一致
	if state&waitGroupBubbleFlag != 0 && !bubbled {
		fatal("sync: WaitGroup.Add called from inside and outside synctest bubble")
	}

	// 提取counter值(高32位,有符号)
	v := int32(state >> 32)
	// 提取waiter count(低32位,忽略最高位标记位)
	w := uint32(state & 0x7fffffff)

	// race检测:第一个递增必须与Wait同步
	if race.Enabled && delta > 0 && v == int32(delta) {
		// 需要建模为读操作,因为可能有多个并发的counter从0开始的转变
		race.Read(unsafe.Pointer(&wg.sema))
	}

	// counter为负数,panic
	if v < 0 {
		panic("sync: negative WaitGroup counter")
	}

	// waiter不为0且delta>0且是第一个增加操作,说明Add和Wait并发调用
	if w != 0 && delta > 0 && v == int32(delta) {
		panic("sync: WaitGroup misuse: Add called concurrently with Wait")
	}

	// 如果counter还没减到0,或者没有等待者,直接返回
	if v > 0 || w == 0 {
		return
	}

	// 执行到这里说明:counter变为0,且有等待者(w > 0)
	// 此时不能再有并发的Add或Wait操作
	// 做一次廉价的状态检查以检测误用
	if wg.state.Load() != state {
		panic("sync: WaitGroup misuse: Add called concurrently with Wait")
	}

	// 将waiter count重置为0
	wg.state.Store(0)

	// 如果有关联的bubble,断开关联
	if bubbled {
		// counter为0时,不能有并发的Add操作,所以可以安全断开wg与bubble的关联
		synctest.Disassociate(wg)
	}

	// 唤醒所有等待的goroutine
	for ; w != 0; w-- {
		// 释放信号量,唤醒一个等待者
		runtime_Semrelease(&wg.sema, false, 0)
	}
}

// Done decrements the [WaitGroup] task counter by one.
// 它相当于 Add(-1)。
//
// 调用者应优先使用 [WaitGroup.Go]。
//
// 根据 Go 内存模型,Done 的调用 "同步先于" 它所解除阻塞的任何 Wait 调用的返回。
func (wg *WaitGroup) Done() {
	wg.Add(-1)
}

// Wait blocks until the [WaitGroup] task counter is zero.
// 阻塞直到WaitGroup的任务计数器变为零
func (wg *WaitGroup) Wait() {
	if race.Enabled {
		race.Disable()
	}

	// 自旋等待
	for {
		// 读取当前状态
		state := wg.state.Load()

		// 提取counter(高32位)
		v := int32(state >> 32)
		// 提取waiter count(低32位)
		w := uint32(state & 0x7fffffff)

		// counter为0,无需等待
		if v == 0 {
			if race.Enabled {
				race.Enable()
				race.Acquire(unsafe.Pointer(wg))
			}

			// 处理synctest bubble相关逻辑
			if w == 0 && state&waitGroupBubbleFlag != 0 && synctest.IsAssociated(wg) {
				// counter为0时不能有并发的Add,可以断开wg与bubble的关联
				if wg.state.CompareAndSwap(state, 0) {
					synctest.Disassociate(wg)
				}
			}
			return
		}

		// counter不为0,需要等待
		// 使用CAS原子地增加waiter count
		if wg.state.CompareAndSwap(state, state+1) {
			// race检测:第一个waiter需要与第一个Add同步
			if race.Enabled && w == 0 {
				// 需要建模为写操作,与Add中的读操作竞争
				// 只有第一个waiter执行写操作,避免并发Wait之间的竞争
				race.Write(unsafe.Pointer(&wg.sema))
			}

			// 标记是否为durable blocking(用于synctest)
			synctestDurable := false
			if state&waitGroupBubbleFlag != 0 && synctest.IsInBubble() {
				if race.Enabled {
					race.Enable()
				}
				if synctest.IsAssociated(wg) {
					// Add在当前bubble内调用,所以这个Wait是durable blocking
					synctestDurable = true
				}
				if race.Enabled {
					race.Disable()
				}
			}

			// 阻塞等待信号量,被唤醒时counter已经变为0
			runtime_SemacquireWaitGroup(&wg.sema, synctestDurable)

			// 被唤醒后检查wg状态
			if wg.state.Load() != 0 {
				panic("sync: WaitGroup is reused before previous Wait has returned")
			}
			if race.Enabled {
				race.Enable()
				race.Acquire(unsafe.Pointer(wg))
			}
			return
		}
		// CAS失败,说明状态被其他线程修改,重新循环
	}
}
cursor 总结 WaitGroup
架构
go
┌─────────────────────────────────────────────────────────────────┐
│                         用户层                                   │
│  Add(delta) → Done() → Wait()                                   │
└─────────────────────────────────────────────────────────────────┘
                              │
                              ▼
┌─────────────────────────────────────────────────────────────────┐
│                      sync 包层                                   │
│  ┌─────────────────────────────────────────────────────────┐   │
│  │ WaitGroup 结构                                           │   │
│  │   - state (atomic.Uint64): counter + waiter + flag      │   │
│  │   - sema (uint32): 信号量                               │   │
│  └─────────────────────────────────────────────────────────┘   │
│  ┌─────────────────────────────────────────────────────────┐   │
│  │ 方法逻辑                                                │   │
│  │   - Add: 修改counter,counter=0时唤醒waiter             │   │
│  │   - Wait: 自旋+CAS增加waiter,阻塞等待sema               │   │
│  │   - Done: Add(-1) 的语法糖                              │   │
│  └─────────────────────────────────────────────────────────┘   │
└─────────────────────────────────────────────────────────────────┘
                              │
                              ▼
┌─────────────────────────────────────────────────────────────────┐
│                     runtime 包层 (汇编实现)                      │
│  runtime_SemacquireWaitGroup(): P原子队列等待                   │
│  runtime_Semrelease(): 唤醒等待的P                              │
│  执行信号量的 PV 操作 (睡眠/唤醒 goroutine)                     │
└─────────────────────────────────────────────────────────────────┘
WaitGroup 结构
go
type WaitGroup struct {
    noCopy noCopy                          // 禁止复制
    state  atomic.Uint64                   // 64位原子整数
    sema   uint32                          // 信号量
}
// state 的位布局 (64位):
┌────────────────────────────────────────────────────────────────┐
│  63                        33    32            0              │
│  [      counter (32位)       ][标记][   waiter count (31位) ]  │
│         高32位                    ↑       低32位(除最高位)      │
│                          waitGroupBubbleFlag                   │
│                          = 0x8000_0000                          │
└────────────────────────────────────────────────────────────────┘
++为什么这样设计?++
| 设计点 | 原因 |
|---|---|
| atomic.Uint64 | 用一个 64 位整数存储多个字段,减少内存占用,保证原子性 |
| counter 和 waiter 合并 | counter 归零时需要知道 waiter 数量,一起读取避免竞态 |
| 标记位 | 用于 synctest bubble 测试(Go 1.24 新增) |
| sema 分离 | 信号量是独立的资源,不能合并到 state |
Add
go
func (wg *WaitGroup) Add(delta int) {
    // ========== 步骤1: race 检测干预 ==========
    if race.Enabled {
        if delta < 0 {                    // Done() 场景
            race.ReleaseMerge(unsafe.Pointer(wg))  // 建立同步点
        }
        race.Disable()                    // 内部操作无需检测
    }
    // ========== 步骤2: synctest bubble 处理 ==========
    bubbled := false
    if synctest.IsInBubble() {
        // 确保同一 wg 的所有 Add 来自同一 bubble
        switch synctest.Associate(wg) {
        case synctest.CurrentBubble:
            bubbled = true
            state := wg.state.Or(waitGroupBubbleFlag)  // 设置标记位
            // 检查是否有从 bubble 外调用的 Add
            if state != 0 && state&waitGroupBubbleFlag == 0 {
                panic("...")
            }
        }
    }
    // ========== 步骤3: 核心 - 修改 counter ==========
    // delta 左移32位,只修改高32位的counter
    state := wg.state.Add(uint64(delta) << 32)
    // ========== 步骤4: 合法性检查 ==========
    v := int32(state >> 32)               // 提取 counter
    w := uint32(state & 0x7fffffff)       // 提取 waiter count
    if v < 0 {
        panic("sync: negative WaitGroup counter")
    }
    if w != 0 && delta > 0 && v == int32(delta) {
        panic("sync: WaitGroup misuse: Add called concurrently with Wait")
    }
    if v > 0 || w == 0 {
        return  // counter 还没到 0,或没有等待者,直接返回
    }
    // ========== 步骤5: counter 归零,唤醒所有 waiter ==========
    // 双重检查:确保状态没有被并发修改
    if wg.state.Load() != state {
        panic("sync: WaitGroup misuse: Add called concurrently with Wait")
    }
    // 重置 waiter count
    wg.state.Store(0)
    // 断开 bubble 关联(如果有)
    if bubbled {
        synctest.Disassociate(wg)
    }
    // 循环唤醒所有等待的 goroutine
    for ; w != 0; w-- {
        runtime_Semrelease(&wg.sema, false, 0)  // 唤醒一个
    }
}
Add 流程图
go
Add(delta) 被调用
        │
        ▼
┌───────────────────┐
│ 提取 counter 和   │
│ waiter count      │
└─────────┬─────────┘
          │
          ▼
    ┌─────────────┐
    │ v = counter │────── v < 0? ────→ panic(负数)
    └──────┬──────┘
           │
           ▼
    ┌─────────────┐
    │ v > 0 ?     │─── 是 ───→ return (还有未完成的任务)
    └──────┬──────┘
           │ 否 (v == 0)
           ▼
    ┌─────────────┐
    │ w = waiter  │
    │ w == 0 ?    │─── 是 ───→ return (没人等待)
    └──────┬──────┘
           │ 否 (w > 0,有人等待)
           ▼
┌───────────────────────────────┐
│ counter 归零,唤醒所有 waiter │
│ for w 次:                     │
│   runtime_Semrelease()        │
└───────────────────────────────┘
Wait
go
func (wg *WaitGroup) Wait() {
    // ========== 步骤1: race 检测干预 ==========
    if race.Enabled {
        race.Disable()
    }
    // ========== 步骤2: 自旋等待 ==========
    for {
        state := wg.state.Load()
        v := int32(state >> 32)           // counter
        w := uint32(state & 0x7fffffff)   // waiter count
        // ========== 步骤3: 检查是否需要等待 ==========
        if v == 0 {
            // counter 已归零,无需等待
            if race.Enabled {
                race.Enable()
                race.Acquire(unsafe.Pointer(wg))
            }
            // 处理 bubble 关联
            if w == 0 && state&waitGroupBubbleFlag != 0 && synctest.IsAssociated(wg) {
                if wg.state.CompareAndSwap(state, 0) {
                    synctest.Disassociate(wg)
                }
            }
            return
        }
        // ========== 步骤4: CAS 增加 waiter count ==========
        // 使用 CAS 确保原子性,防止多个 waiter 竞争
        if wg.state.CompareAndSwap(state, state+1) {
            // race 检测:第一个 waiter 需要同步
            if race.Enabled && w == 0 {
                race.Write(unsafe.Pointer(&wg.sema))
            }
            // ========== 步骤5: 阻塞等待 ==========
            synctestDurable := false
            if state&waitGroupBubbleFlag != 0 && synctest.IsInBubble() {
                if race.Enabled {
                    race.Enable()
                }
                if synctest.IsAssociated(wg) {
                    synctestDurable = true
                }
                if race.Enabled {
                    race.Disable()
                }
            }
            // 核心阻塞调用:被唤醒时 counter 已经归零
            runtime_SemacquireWaitGroup(&wg.sema, synctestDurable)
            // ========== 步骤6: 被唤醒后检查 ==========
            if wg.state.Load() != 0 {
                panic("sync: WaitGroup is reused before previous Wait has returned")
            }
            if race.Enabled {
                race.Enable()
                race.Acquire(unsafe.Pointer(wg))
            }
            return
        }
        // CAS 失败,说明状态被修改,重新循环
    }
}
Wait 流程图
go
Wait() 被调用
        │
        ▼
┌───────────────────┐
│ 读取 state        │
│ v = counter       │
│ w = waiter count  │
└─────────┬─────────┘
          │
          ▼
    ┌─────────────┐
    │ v == 0 ?    │─── 是 ───→ return (已完成)
    └──────┬──────┘
           │ 否
           ▼
    ┌───────────────────┐
    │ CAS: state+1      │──── 失败 ──→ 重新循环
    └─────────┬─────────┘
              │ 成功
              ▼
    ┌───────────────────┐
    │ race 检测处理     │
    └─────────┬─────────┘
              │
              ▼
    ┌───────────────────┐
    │ runtime_Semacquire│
    │ 阻塞等待信号量     │
    └─────────┬─────────┘
              │ 被 Add 唤醒
              ▼
    ┌───────────────────┐
    │ 检查 wg 是否复用  │─── 复用 ──→ panic
    └─────────┬─────────┘
              │ 没复用
              ▼
          return
信号量底层 (runtime)
go
// 核心数据结构:semaTable (信号量表)
// 每个 goroutine M 有一个等待队列
// runtime_SemacquireWaitGroup 内部实现(伪代码)
func runtime_SemacquireWaitGroup(sema *uint32, durable bool) {
    // 1. 将当前 goroutine 加入等待队列
    gp := getg()                          // 获取当前 goroutine
    gp.waitSema = sema
    // 2. 原子操作:如果 sema 仍为0,睡眠当前 goroutine
    for !atomic.Cas(sema, 0, 1) {
        // 放入等待队列
        enqueue_waiter(sema, gp)
        // 调度器:当前 goroutine 睡眠,切换到其他 goroutine
        gopark(unlock, sema, "semacquirewaitgroup")
    }
    // 3. 被唤醒时继续执行
}
// runtime_Semrelease 内部实现(伪代码)
func runtime_Semrelease(sema *uint32, handoff bool, traceskip int) {
    // 1. 从等待队列取出一个 waiter
    gp := dequeue_waiter(sema)
    // 2. 唤醒该 goroutine
    // 设置为可运行状态,等待调度器调度
    goready(gp, traceskip)
}
信号量流程图
go
goroutine A (Wait)              goroutine B (Add)
        │                              │
        │   runtime_Semacquire()       │
        │─────────────────────┐        │
        │                     │        │
        │   加入等待队列       │        │
        │   gopark 睡眠       │        │
        │                     │        │
        ▼                     │        ▼
    [睡眠等待]                │   counter == 0
        │                     │   runtime_Semrelease()
        │                     │          │
        │                     │          ▼
        │                     │   [唤醒 waiter]
        │                     │          │
        │                     │          ▼
        │◀────────────────────│   goready(gp)
        │                     │
   [被唤醒,继续执行]            │
        │                     │
        ▼                     ▼
   return
为什么这样设计?
1. 为什么用自旋 + CAS + 阻塞?
go
// Wait 中的 for 循环
for {
    if wg.state.CompareAndSwap(state, state+1) {
        runtime_SemacquireWaitGroup(...)
    }
}
原因:
- 自旋:如果 counter 很快归零,不需要真正阻塞,节省一次上下文切换
- CAS:确保 waiter count 的增加是原子的
- 阻塞:counter 长时间不归零时,休眠 goroutine 让出 CPU
}
2.为什么需要用前 31 位存储 waiter 数量,既然 Add 对于是否唤醒操作是判断是否有 waiter,那我只设置 1bit 位标识是否有 waiter 不就好了,第一个 waiter 商场把 flag 置为 1
go
for ; w != 0; w-- {
    runtime_Semrelease(&wg.sema, false, 0)
}
所以需要知道有多少个 waiter
单个唤醒 vs 全部唤醒
因为信号量进入等待的 goruntine 在一个队列里,唤醒就是出队列的过程,时间复杂度都是 O(N)
单个唤醒你就可以
- 让第一个被唤醒的 goroutine 很快就能运行
- 不需要等待所有 1000 个都被调度,调度器可以并行调度这些 goroutine
如果用 broadcast:
- 必须先遍历整个链表
- 然后一次性标记所有 goroutine 为 ready
- 再让调度器去调度
- 开销更大,因为是连续操作
go
// 场景:Add 唤醒 1000 个 waiter
for i := 0; i < 1000; i++ {
    runtime_Semrelease(&wg.sema, false, 0)
}
3. 为什么用信号量而不是 channel?
go
// ❌ 如果用 channel
ch := make(chan struct{}, 100)  // 缓冲多大?
wg.Wait() <- struct{}{}         // Add 发送
// 问题:不知道有多少个 Wait,无法确定缓冲大小
信号量的优势:
- 不需要预先知道 waiter 数量
- 动态队列,自动扩容
- 直接对接 runtime 调度器,性能更好
总结
| 组件 | 作用 | 为什么 |
|---|---|---|
| state (atomic.Uint64) | 存储 counter + waiter + flag | 一个原子操作完成多个字段更新 |
| sema (uint32) | 信号量句柄 | 对接 runtime 调度器 |
| Add | 修改 counter,counter=0 时唤醒 | 任务完成通知 |
| Wait | 自旋+CAS+阻塞等待 | 等待任务完成 |
| runtime_Semacquire | goroutine 睡眠 | 让出 CPU |
| runtime_Semrelease | goroutine 唤醒 | 恢复执行 |
一句话总结:WaitGroup 用一个 64 位原子整数记录任务数量和等待者数量,用信号量实现 goroutine 的睡眠与唤醒,通过 CAS 保证并发安全。
goroutine的并发规模
Goroutine 的并发数量有上限吗?
- 受goroutine占用的栈内存限制
- 受内部操作资源限制
- goroutine本身无上限
函数 <font style="color:rgb(36, 41, 46);background-color:rgba(27, 31, 35, 0.05);">runtime.NumGoroutine()</font> 可以获取当前存在的Goroutine数量。
goroutine的最小为2KB
之所以支持百万级的goroutine并发,核心原因是因为每个goroutine的初始栈内存为2KB ,用于保持goroutine中的执行数据,例如局部变量等。相对来说,线程线程的栈内存通常为2MB。除了比较小的初始栈内存外,goroutine的栈内存可扩容的,也就是说支持按需增大或缩小,一个goroutine最大的栈内存当前限制为1GB。
goroutine内部资源竞争溢出
在goroutine内增加,fmt.Println() 测试:
shell
panic: too many concurrent operations on a single file or socket (max 1048575)goruntine 池
pool, err = ants.NewPool(size)
defer pool.Release()
err := pool.Submit(funct)
go
$ go get -u github.com/panjf2000/ants/v2

func GoroutineAnts() {
    // 1. 统计当前存在的goroutine的数量
    go func() {
        for {
            fmt.Println("NumGoroutine:", runtime.NumGoroutine())
            time.Sleep(500 * time.Millisecond)
        }
    }()

    // 2. 初始化协程池,goroutine pool
    size := 1024
    pool, err := ants.NewPool(size)
    if err != nil {
        log.Fatalln(err)
    }
    // 保证pool被关闭
    defer pool.Release()

    // 3. 利用 pool,调度需要并发的大量goroutine
    for {
        // 向pool中提交一个执行的goroutine
        err := pool.Submit(func() {
            time.Sleep(100 * time.Second)
        })
        if err != nil {
            log.Fatalln(err)
        }
    }
}

// ======
> go test -run TestGoroutineAnts
runtime.NumGoroutine():  8
runtime.NumGoroutine():  1031
runtime.NumGoroutine():  1031
runtime.NumGoroutine():  1031
runtime.NumGoroutine():  1031
并发调度
GMP 底层源码
数据结构
go
type g struct {
// ...
m *m // 在 p 的代理,负责执行当前 g 的 m;
// ...
sched gobuf
// ...
}
type gobuf struct {
sp uintptr // 保存 CPU 的 rsp 寄存器的值,指向函数调用栈栈顶;
pc uintptr // 保存 CPU 的 rip 寄存器的值,指向程序下一条执行指令的地址;
ret uintptr // 保存系统调用的返回值;
bp uintptr // 保存 CPU 的 rbp 寄存器的值,存储函数栈帧的起始位置.
}
type m struct {
g0 *g // 系统 goroutine,用于调度(始终不变)
curg *g // 当前正在运行的 g(会变化)
// ...
tls [tlsSlots]uintptr // thread-local storage (for x86 extern register)
// ...
gsignal *g // 每个 m 有一个 gsignal 把信号处理隔离,避免打断持锁/内存分配
// gsignal 的特殊之处:
// - 有独立的信号栈 (很小,通常 64KB)
// - 不受用户信号处理函数影响
// - 用于运行时内部信号处理
// m.tls[0] 存储的是当前运行的 g,因此线程可以通过 g 找到当前的 m、p、g0 等信息.
}
type p struct {
// ...
runqhead uint32
runqtail uint32
runq [256]guintptr
runnext guintptr // 下一个可执行的 goroutine.
// ...
}
type schedt struct {
// ...
lock mutex
// ...
runq gQueue
runqsize int32
// ...
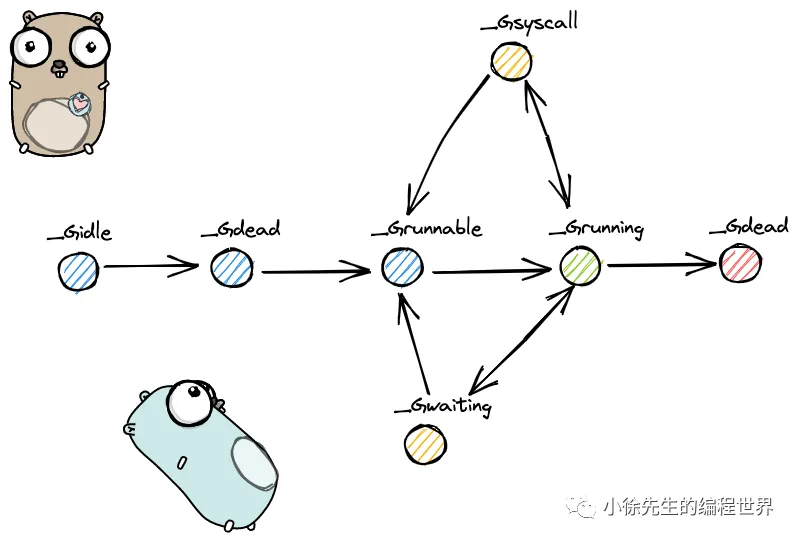
}状态
go
const(
  _Gidle = itoa // 0协程开始创建时的状态,此时尚未初始化完成;
  _Grunnable // 1协程在待执行队列中,等待被执行;
  _Grunning // 2协程正在执行,同一时刻一个 p 中只有一个 g 处于此状态;
  _Gsyscall // 3协程正在执行系统调用;
  _Gwaiting // 4 	协程处于挂起态,需要等待被唤醒. gc、
    //				channel 通信或者锁操作时经常会进入这种状态;
  _Gdead // 6 刚初始化完成或者已经被销毁,会处于此状态;
  _Gcopystack // 8 协程正在栈扩容流程中;
  _Gpreempted // 9 协程被抢占后的状态.
)
两种 G 的切换
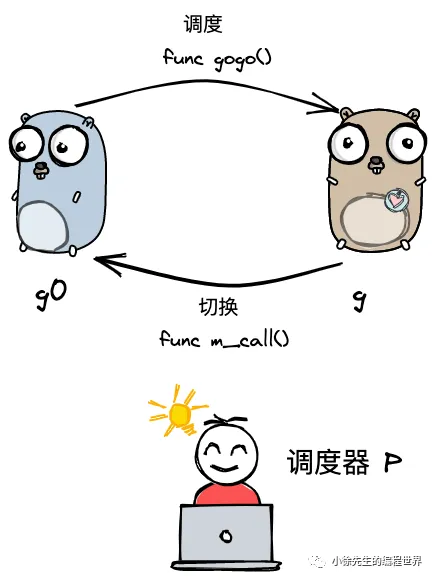
m 通过 p 调度执行的 goroutine 永远在普通 g 和 g0 之间进行切换,当 g0 找到可执行的 g 时,会调用 gogo 方法,调度 g 执行用户定义的任务;当 g 需要主动让渡或被动调度时,会触发 mcall 方法,将执行权重新交还给 g0.
gogo 和 mcall 可以理解为对偶关系,其定义位于 runtime/stubs.go 文件中.
go
func gogo(buf *gobuf)
// ...
func mcall(fn func(*g))
调度(此处指切换 P)类型
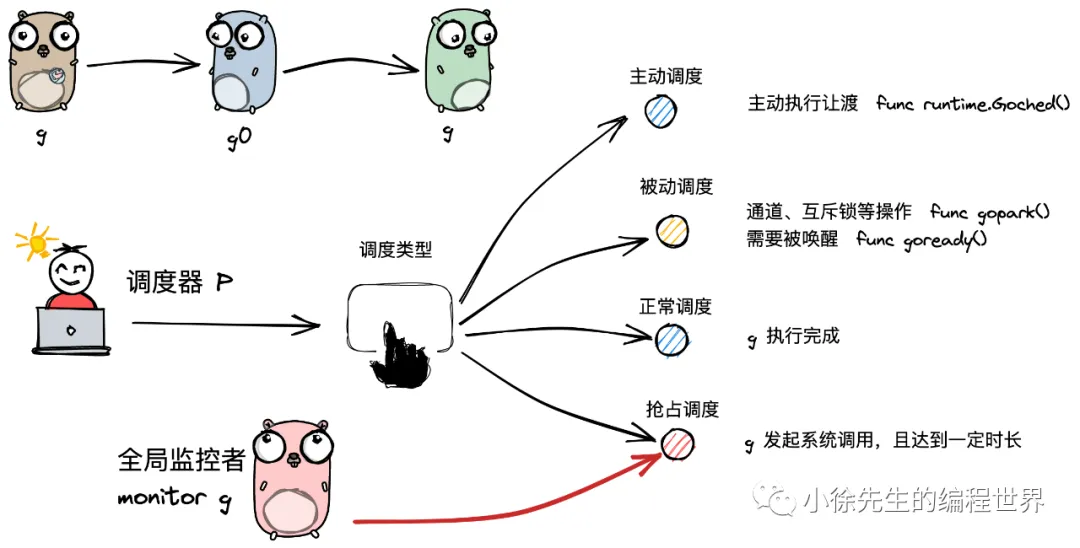
主动调度
plain
func Gosched() {
    checkTimeouts()
    mcall(gosched_m)
}
被动调度
g 可能会陷入阻塞态无法被调度,直到关注的条件达成后,g才从阻塞中被唤醒,重新进入可执行队列等待被调度.
go
func gopark(unlockf func(*g, unsafe.Pointer) bool, lock unsafe.Pointer, reason waitReason, traceEv byte, traceskip int) {
    // ...
    mcall(park_m)
}
goready 方法通常与 gopark 方法成对出现,能够将 g 从阻塞态中恢复,重新进入等待执行的状态.
go
func goready(gp *g, traceskip int) {
    systemstack(func() {
        ready(gp, traceskip, true)
    })
}
正常调度
g 中的执行任务已完成,g0 会将当前 g 置为死亡状态,发起新一轮调度.(go 执行 schedule)
抢占调度
g 执行超过指定的时长或者被系统调用阻塞(非阻塞的不会)。
值得一提的是,前 3 种调度方式都由 m 下的 g0 完成,唯独抢占调度不同.
因为发起系统调用时需要打破用户态的边界进入内核态,此时 m 陷入僵直,无法主动完成抢占调度的行为.
因此,在 Golang 进程会有一个全局监控协程 monitor g 的存在,这个 g 会越过 p 直接与一个 m 进行绑定,不断轮询对所有 p 的执行状况进行监控. 倘若发现满足抢占调度的条件,则会从第三方的角度出手干预,主动发起该动作
- 当M的执行因为G进行了系统调用时,M会释放与之绑定的P,把P转移给其他的M去执行。称为P抢占。
- 当M执行完的系统调用阻塞的G后,M会尝试获取新的空闲P,同时将G放入P的本地队列执行。若没有空闲的P,则将G放入全局G队列,M进入休眠,等待被唤醒或被垃圾回收
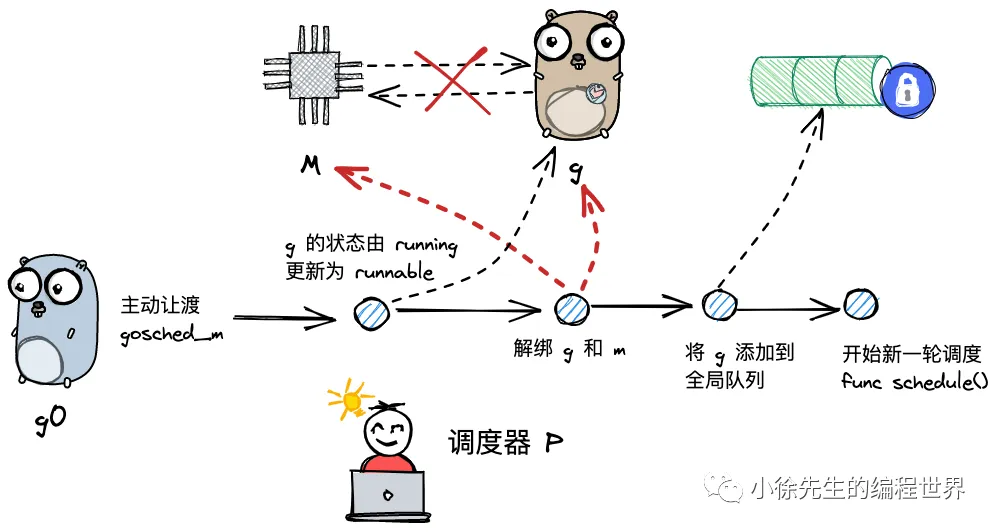
总结
集齐各部分理论碎片之后,我们可以尝试对 gmp 的宏观调度流程进行整体串联:
(1)以 g0 -> g -> g0 的一轮循环为例进行串联;
(2)g0 执行 schedule() 函数,寻找到用于执行的 g;
(3)g0 执行 execute() 方法,更新当前 g、p 的状态信息(g 由 runnable->running),调度器调度次数+1,并调用 gogo() 方法,将执行权交给 g;
(4)g 因主动让渡( gosche_m() )、被动调度( park_m() )、正常结束( goexit0() )等原因,调用 m_call 函数,执行权重新回到 g0 手中;
(5)g0 执行 schedule() 函数,开启新一轮循环.
findRunnable
源码
go
func findRunnable() (gp *g, inheritTime, tryWakeP bool) {
    _g_ := getg()


    top:
    _p_ := _g_.m.p.ptr()
    // ...
    if _p_.schedtick%61 == 0 && sched.runqsize > 0 {
        lock(&sched.lock)
        gp = globrunqget(_p_, 1)
        unlock(&sched.lock)
        if gp != nil {
            return gp, false, false
        }
    }

    // ...
    if gp, inheritTime := runqget(_p_); gp != nil {
        return gp, inheritTime, false
    }

    // ...
    if sched.runqsize != 0 {
        lock(&sched.lock)
        gp := globrunqget(_p_, 0)
        unlock(&sched.lock)
        if gp != nil {
            return gp, false, false
        }
    }


    if netpollinited() && atomic.Load(&netpollWaiters) > 0 && atomic.Load64(&sched.lastpoll) != 0 {
        if list := netpoll(0); !list.empty() { // non-blocking
            gp := list.pop()
            injectglist(&list)
            casgstatus(gp, _Gwaiting, _Grunnable)
            return gp, false, false
        }
    }


    // ...
    procs := uint32(gomaxprocs)
    if _g_.m.spinning || 2*atomic.Load(&sched.nmspinning) < procs-atomic.Load(&sched.npidle) {
        if !_g_.m.spinning {
            _g_.m.spinning = true
            atomic.Xadd(&sched.nmspinning, 1)
        }


        gp, inheritTime, tnow, w, newWork := stealWork(now)
        now = tnow
        if gp != nil {
            // Successfully stole.
            return gp, inheritTime, false
        }
        if newWork {
            // There may be new timer or GC work; restart to
            // discover.
            goto top
        }
        if w != 0 && (pollUntil == 0 || w < pollUntil) {
            // Earlier timer to wait for.
            pollUntil = w
        }
    }


    //
过程
p 每执行 61 次调度,会从全局队列中获取一个 goroutine 进行执行
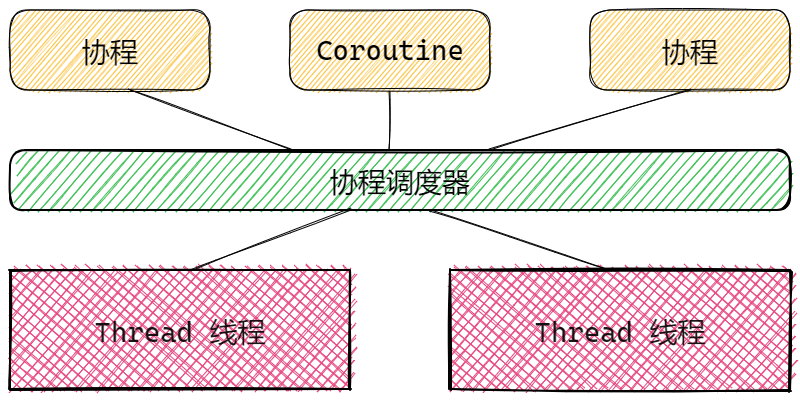
多对多的协程调度
整体来说就是一个函数一旦执行,不能被打断去执行别的函数。
而协程Coroutine的设计就是在某个函数执行的过程中,可以主动(Python的yield)和被动(go 的goroutine)的被终止执行,转而去执行其他函数。
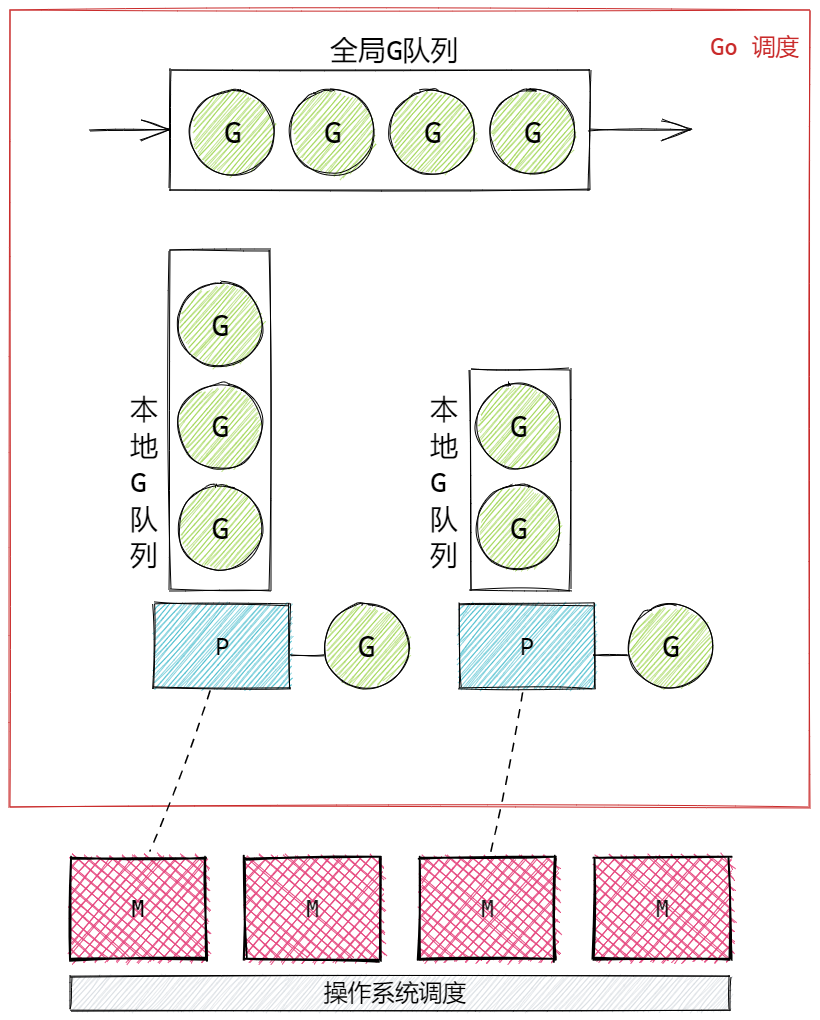
GMP模型结构
Goroutine 就是Go语言实现的协程模型。其核心结构有三个,称为GMP,也叫GMP模型。分别是:
- G,Goroutine,我们使用关键字go调用的函数。存储于P的本地队列或者是全局队列中。
- M,Machine,就是Work Thread,就是传统意义的线程,用于执行Goroutine,G。只有在M与具体的P绑定后,才能执行P中的G。
- P,Processor,处理器,主要用于协调G和M之间的关系,存储需要执行的G队列,与特定的M绑定后,执行Go程序,也就是G。
GMP整体结构逻辑图:
P的数量
P的数量通常是固定的,当程序启动时由 **<font style="color:rgb(36, 41, 46);background-color:rgba(27, 31, 35, 0.05);">$GOMAXPROCS</font>**环境变量决定创建P的数量。默认的值为当前CPU的核心数所有的 P 都在程序启动时创建。
这意味着程序的执行过程中,最多同时有$GOMAXPROCS个Goroutine同时运行,默认与CPU核数保持一致,可以最大程度利用多核CPU并行执行的能力。
程序运行时,runtime.GOMAXPROCS()函数可以动态改变P的数量,但通常不建议修改,或者即使修改也不建议数量超过CPU的核数。调动该函数的典型场景是控制程序的并行规模,例如:
go
// 最多利用一半的CPU
runtime.GOMAXPROCS(runtime.NumCPU() / 2)

// 获取当前CPU的核数
runtime.NumCPU()
我们知道Go没有限定G的数量,那M的数量呢?
- Go对M的数量做了一个上限,10000个,但通常不会到达这个规模,因为操作系统很难支持这么多的线程。
- M的数量是由P决定的。
- 当P需要执行时,会去找可用的M,若没有可用的M,就会创建新的M,这就会导致M的数量不断增加
- 当M线程长时间空闲,也就是长时间没有新任务时,GC会将线程资源回收,这会导致M的数量减少
- 整体来说,M的数量一定会多于P的数量,取决于空闲(没有G可执行的)的,和完成其他任务(例如CGO操作,GC操作等)的M的数量多少
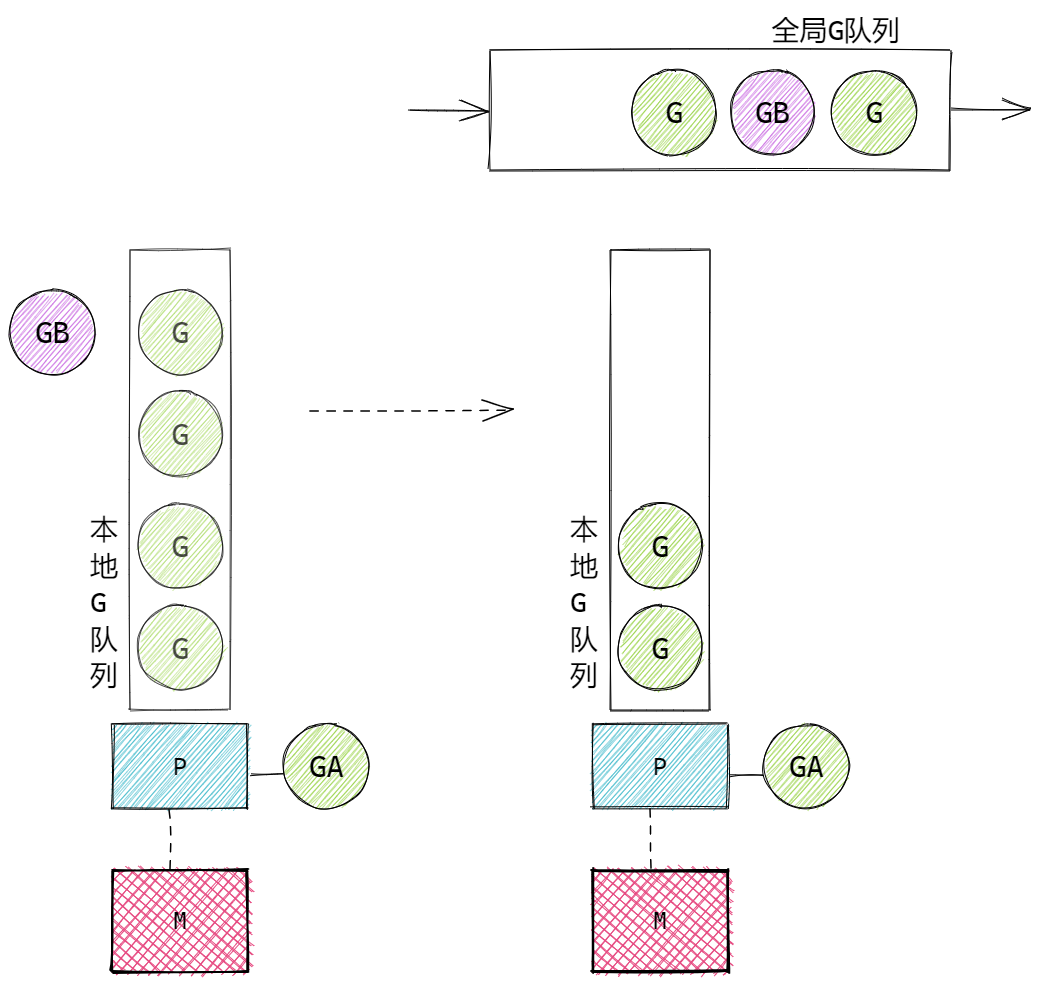
P与G关联的流程
go 创建的待执行的Goroutine与P建立关联的核心流程:
- ++新创建的G会优先保持在P的本地队列中。++例如A函数中执行了 go B(),那么B这个Goroutine会优先保存在A所属的P的本地队列中。
- 若G加入P的本地队列时++本地队列已满++ ,那么G会被加入到全局G队列中。新G加入全局队列时,会把P本地队列中一半的G也同时移动到全局队列中(++是乱序入队列++),以保证P的本地队列可以继续加入新的G。
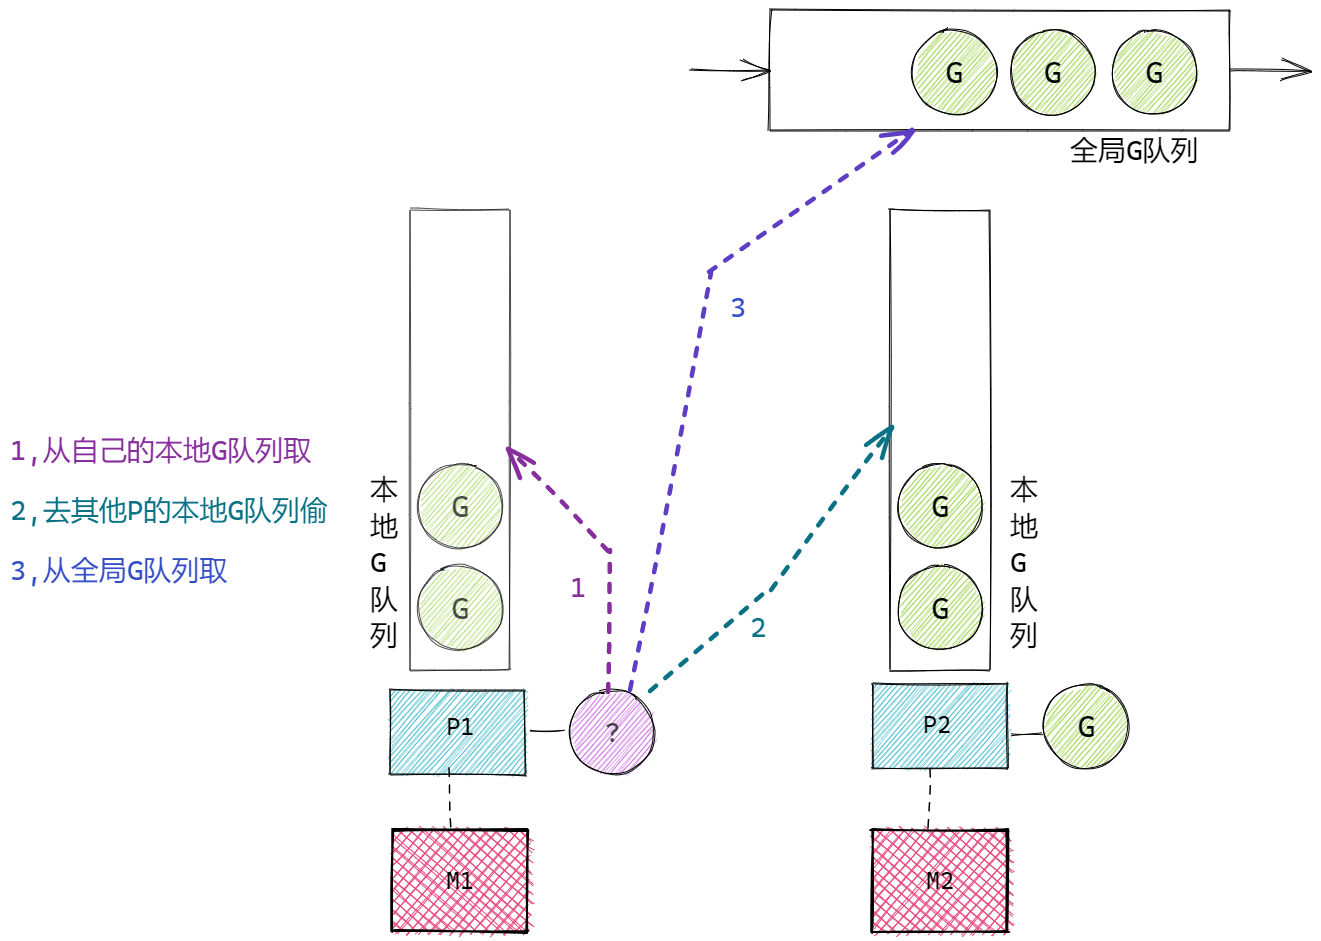
- 当P要执行G时
- 会从P的本地队列查找G。
- 若本地队列中没有G,则会尝试从其他的P中偷取(Steal)G来执行,通常会偷取一半的G。
- 若无法从其他的P中偷取G,则从全局G队列中获取G,会一次获取多个G。
- 整体:本地G队列->其他P的本地G队列->全局G队列
- 当全局运行队列中有待执行的 G 时,还会有固定几率(每61个调度时钟周期 schedtick)会从全局的运行队列中查找对应的 G,为了保证全局G队列一定可以被调度。
核心流程图例:
A 中调用了 go B(), P的本地队列未满时:

A 中调用了 go B(), P的本地队列已满时:
当P要执行G时:
P与M关联的流程
P中关联了大量待执行的G,若需要执行G,P要去找可用的M。P不能执行G,只有M才能真正执行G。
P与M建立关联的核心过程:
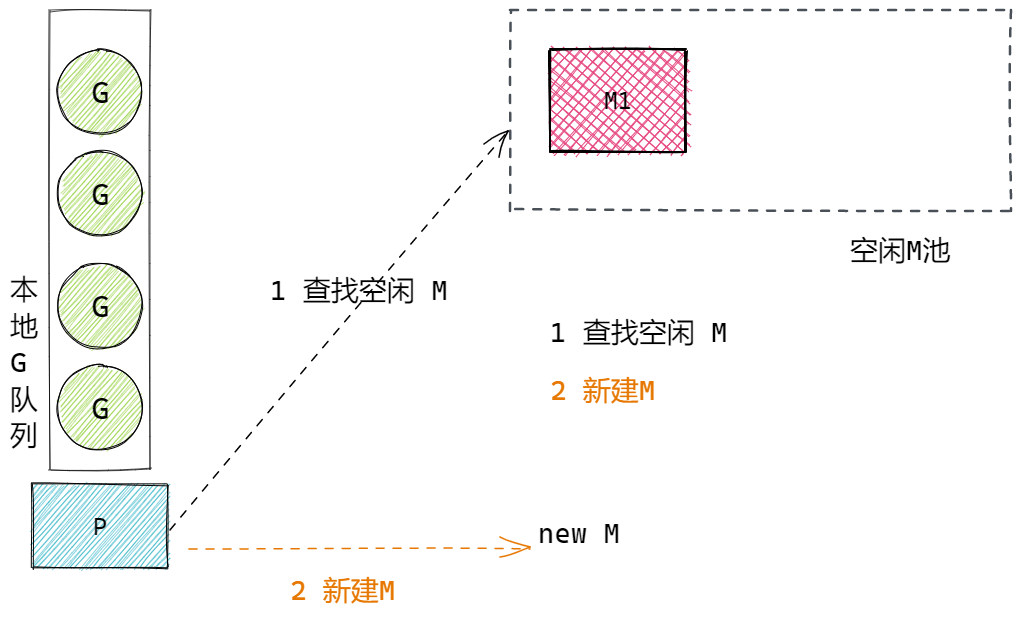
- 当P需要执行时,P要寻找可用的M,优先从空闲M池中找,若没有空闲的,则新建M来执行
- ++在创建G时,G会尝试唤醒空闲的M++
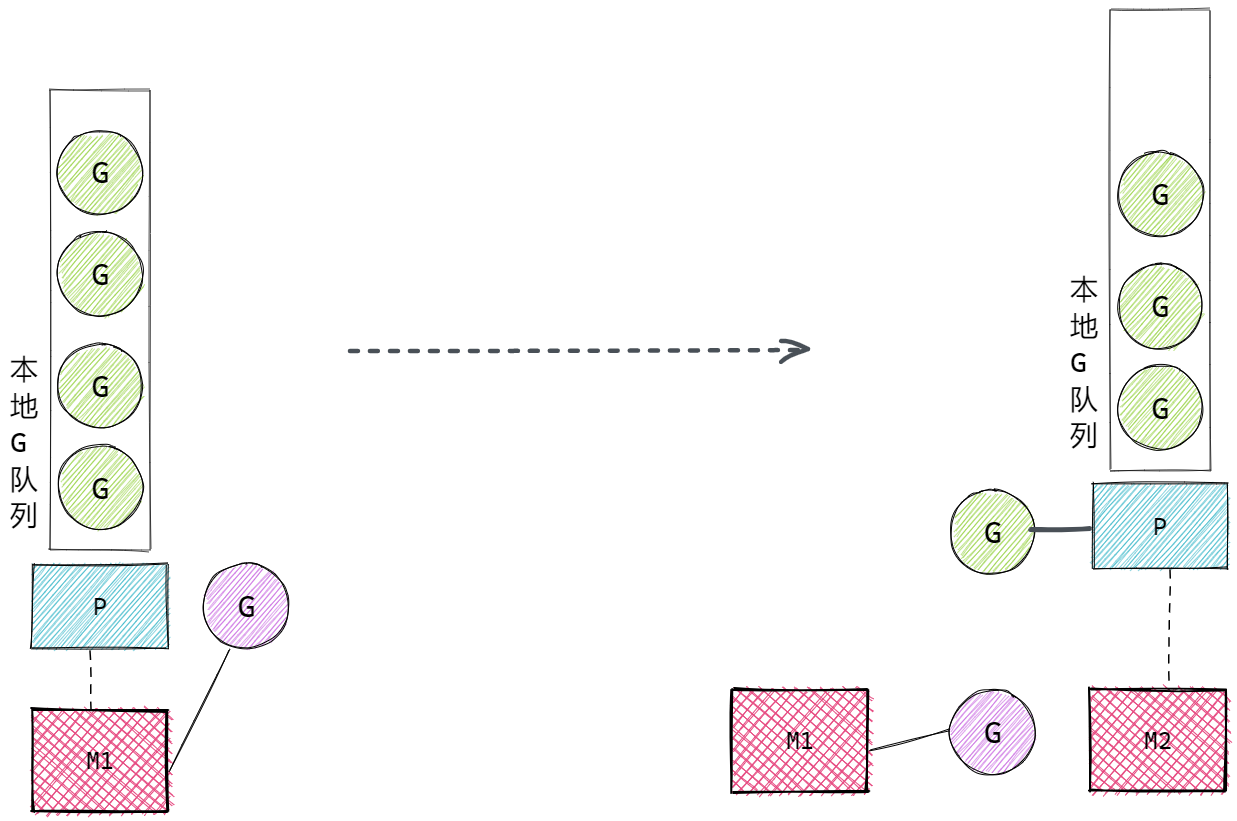
- 当M的执行因为G进行了系统调用(无论是否阻塞)时,M会释放与之绑定的P,把P转移给其他的M去执行。称为P抢占。如果是用户态阻塞,M 不会解除 P,会继续执行 G
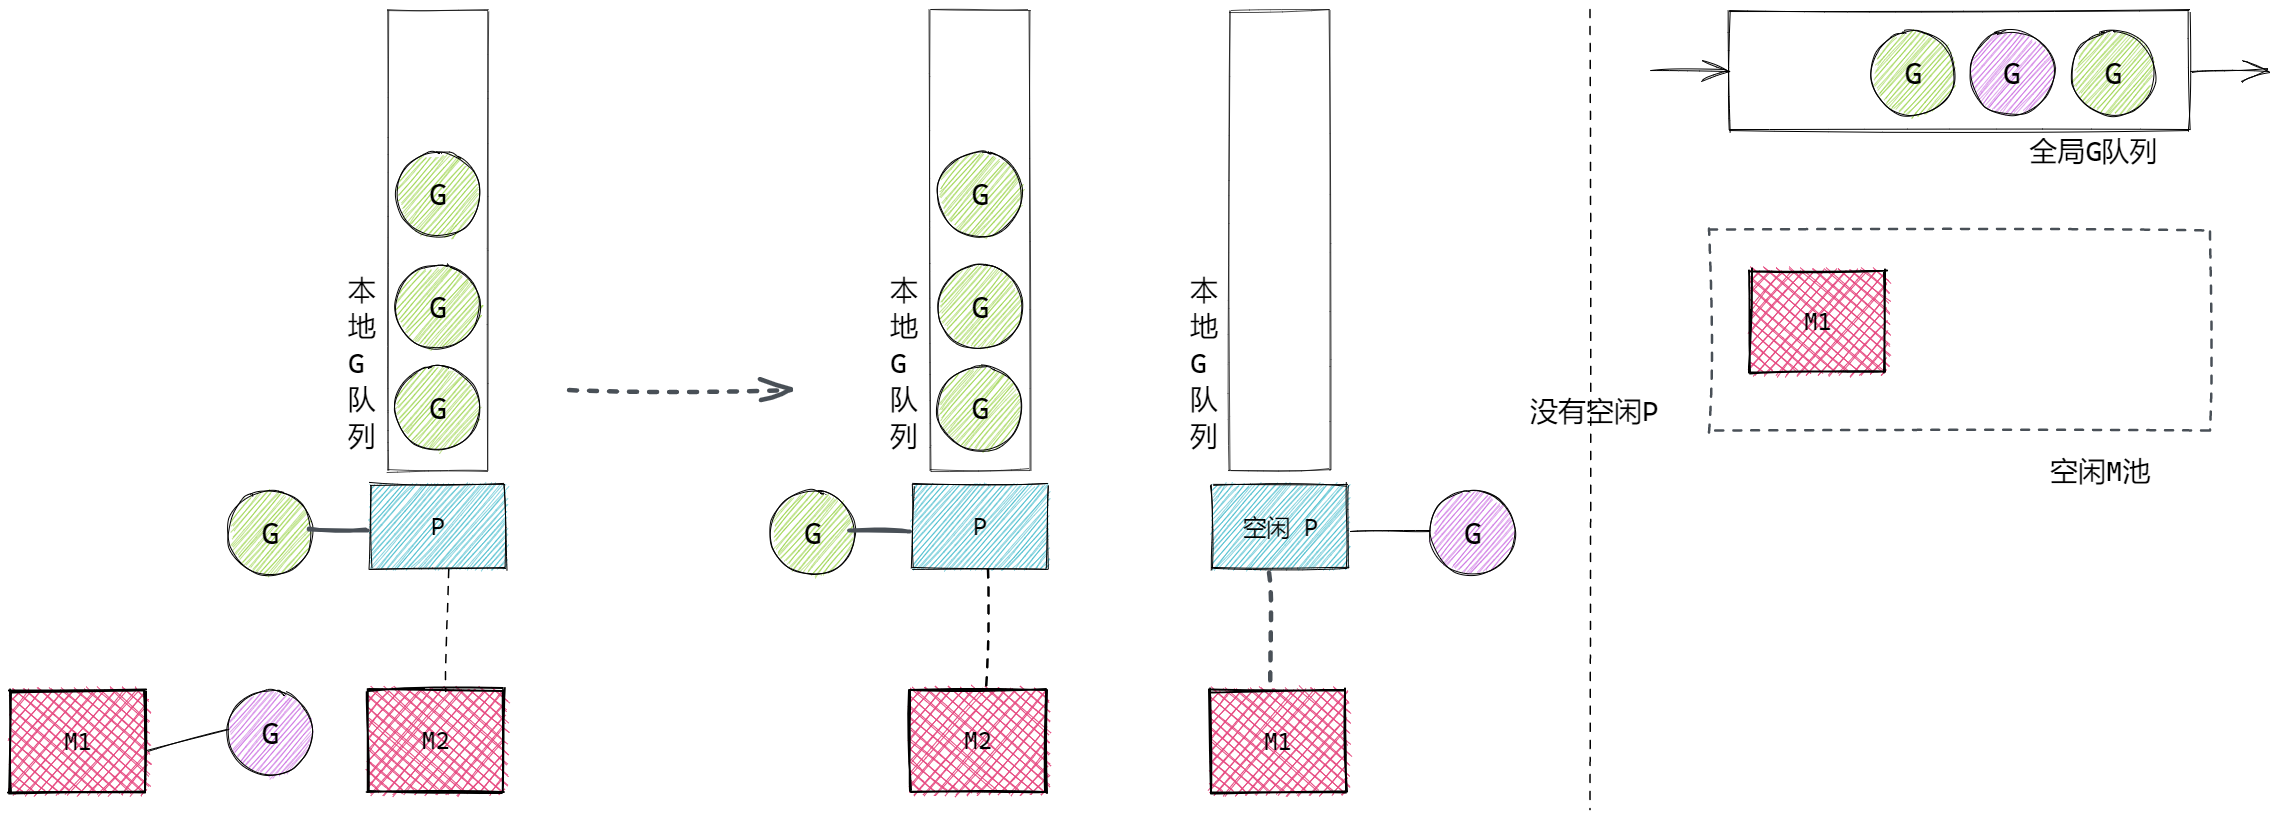
- 当M执行完的系统调用阻塞的G后,M会尝试获取新的空闲P,同时将G放入P的本地队列执行。若没有空闲的P,则将G放入全局G队列,M进入休眠,等待被唤醒或被垃圾回收
如图所示:
P要寻找可用的M:
G执行了阻塞式系统调用,M与P解绑(释放),P转移到新的M上执行:
M1执行完G的系统调用后,G不一定结束,还要继续执行,则M1会尝试获取空闲的P(没有与M绑定的P),若没有空闲的P可用,将M1执行的G放入全局G队列,M1进入空闲状态:
M0 和 G0
- M0, 启动程序后的编号为 0 的主线程,负责执行初始化操作和启动第一个 G,也就是 main Goroutine。之后与其他M一样调度。
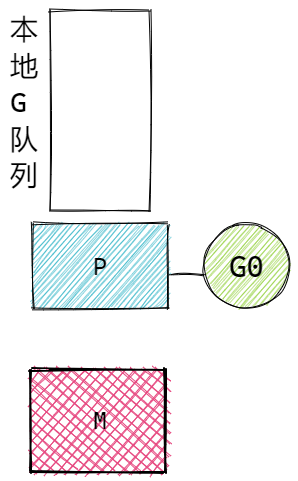
- G0,每个 M 创建的第一个 Goroutine。G0 仅用于负责调度的 G,G0 不指向任何可执行的函数,每个 M 都会有一个自己的 G0。在调度或系统调用时会使用 G0 的栈空间。
- 当一个 M 被创建时,会自动同步初始化一个专属的 G0;G0 从诞生到销毁,始终与所属 M 绑定,不会被调度到其他 M 上,也不会有多个 M 共用一个 G0 的情况。
- M 是独立的操作系统线程,拥有自己的内核上下文,而调度操作(如切换 G、处理系统调用)需要专属、稳定的栈空间和上下文,如果多个 M 共用 G0,会导致栈数据混乱、调度逻辑冲突(比如两个 M 同时用 G0 的栈执行不同的调度操作)
- G0 的「工作内容」是 Go 运行时内置的调度核心逻辑(如保存 G 上下文、查找待运行 G、绑定 P 与 M、处理系统调用等)
理解 G0
切换动作本身(保存当前 G 的上下文,查找下一个要运行的 G,恢复该 G 的上下文)是由 schedule() 和 execute() 等函数完成的。这些代码不能运行在普通的用户 G 栈上,因为:
- 大小限制:普通 G 的栈一开始很小(2KB),调度逻辑可能需要更多空间。
- 隔离性:如果调度逻辑在用户 G 的栈上运行,用户 G 的栈空间随时可能动态增长/收缩,这会破坏调度代码的稳定性。
g0 存在的意义就是提供一个"工作台":
- 它有一个硕大且动态增长的栈(通常比用户 G 的初始栈大得多)。
- M 在执行调度逻辑时,会从"用户 G"切换到"自己的 g0",在 g0 的栈上运行调度代码。
- 当 M 执行用户 G 时:
- 当前 CPU 的栈指针(SP)指向用户 G 的栈。
- M 的 g0 字段依然指向那个 g0 结构体,但 CPU 并没有在执行 g0 的代码。
- g0 此时就像一个"工具",被放在一旁(存在内存中),并没有被调度运行。
- 当需要调度时:
- M 触发上下文切换。
- CPU 切换到 g0 的栈(由 g0 结构体中的 sched.sp 和 sched.pc 决定)。
- M 开始执行调度代码(在 g0 的栈上)。
如图:
M的G0:
协作和抢占调度
当某个 G 执行时间过长,其他的 G 如何调度。通常有两种方案:
- 协作式,主动让出执行权,让其他G执行。通过runtime.Gosched()可以让出执行权。
- 抢占式,被动让出执行权,也就是调度器将G的执行权取消,分配给其他的G。Go目前默认的方式。在Go中一个G最多可以执行10ms,超时就会被让出调度权。
函数:
go
runtime.Gosched()方法可以要求Go主动调度该goroutine,去执行其他的goroutine。这种是典型的协作调度模式,类似于 py 的 yield。
示例:
go
func GoroutineSched() {
    runtime.GOMAXPROCS(1)
    wg := sync.WaitGroup{}
    wg.Add(1)
    max := 100
    go func() {
        defer wg.Done()
        for i := 1; i <= max; i += 2 {
            fmt.Print(i, " ")
            runtime.Gosched()
            //time.Sleep(time.Millisecond)
        }
    }()

    wg.Add(1)
    go func() {
        defer wg.Done()
        for i := 2; i <= max; i += 2 {
            fmt.Print(i, " ")
            runtime.Gosched()
            //time.Sleep(time.Millisecond)
        }
    }()

    wg.Wait()
}
我们采用1个P来进行模拟,看主动让出交替执行的情况。
上面代码中,若goroutine中,没有runtime.GoSched,则会先执行完一个,再执行另一个。若存在runtime.GoSched,则会交替执行。这就是协作式。
除此之外,增加sleep时间1ms,不增加runtime.GoSched调用,也会出现交替执行的情况,这种情况就是调度器主动调度Goroutine了,是抢占式。
小结
- Goroutine:Go语言中实现的协程。
- go 关键字:使用go 关键字调用函数,可以让函数独立运行在Goroutine中。
- main 函数也是运行在Goroutine中
- 通常 main 函数需要等待其他Goroutine运行结束
- 典型的并发等待使用 sync.WaitGroup 类型。
- 并发Goroutine的调度在应用层面可以认为是随机的
- 支持海量gouroutine的特点:
- goroutine语法层面没有限制,但使用时通常要限制,避免并发的goroutine过多,资源占用过大
- 更小的goroutine栈内存
- 强大的GMP调度
- GMP
- G,Goroutine,独立并发执行的代码段
- M,mechine, 系统线程
- P,Processor,逻辑处理器,用于联系G和M。
- G存在与P的本地队列或全局队列中
- M要与P绑定,P中的G才会执行
- M执行G中的系统调用时,会解绑M和P,P会找到新的M执行
Channel通信
Channel概述
不要通过共享内存的方式进行通信,而是应该通过通信的方式共享内存
这是Go语言最核心的设计模式之一。
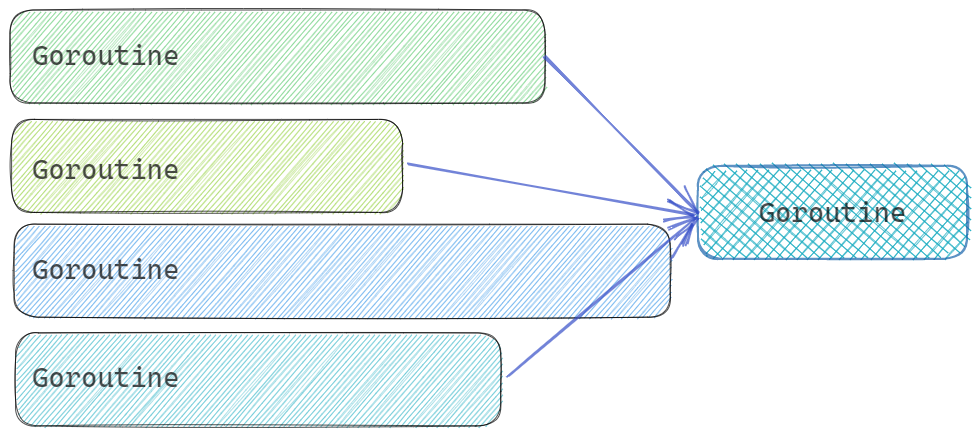
Go语言中多Goroutine通信的主要方案是Channel。Go语言也可以使用共享内存的方式支持Goroutine通信。
Go语言实现了CSP 通信模式,CSP是Communicating Sequential Processes的缩写,通信顺序进程。Goroutine和Channel分别对应CSP中的实体和传递信息的媒介。
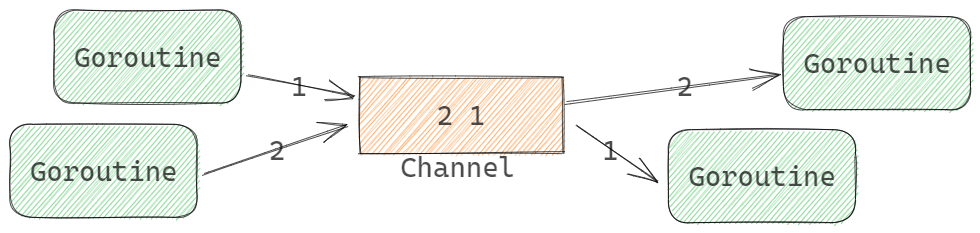
- channel类型的元素是先进先出的,先发送到channel的value会先被receive
- 先向Channel发送数据的Goroutine会先执行
- 先从Channel接收数据的Goroutine会先执行
- ++上面三句话从底层理解++
Channel类型
go
package main

import "fmt"

// 生产者:仅能向通道发送int,参数为chan<- int
func producer(ch chan<- int) {
	for i := 1; i <= 3; i++ {
		ch <- i // 合法:发送操作
		fmt.Printf("生产者发送:%d\n", i)
	}
	close(ch) // 发送方负责关闭通道,单向发送通道支持关闭
}

// 消费者:仅能从通道接收int,参数为<-chan int
func consumer(ch <-chan int) {
	for num := range ch { // 合法:接收操作
		fmt.Printf("消费者接收:%d\n", num)
	}
}

func main() {
	// 调用方创建双向通道,桥接生产者和消费者
	ch := make(chan int)
	go producer(ch) // 双向通道隐式转换为仅发送通道(兼容)
	consumer(ch)    // 双向通道隐式转换为仅接收通道(兼容)
}
初始化Channel值
内建函数make()可用于初始化Channel值。支持两个参数:
go
make(ChannelType, Capacity)其中:
- ChannelType是channel类型
- Capacity是缓冲容量。可以省略或为0,表示无缓冲Channel
channel是引用类型,类似于map和slice。
示例:
go
ch := make(chan int)
var ch = make(chan int)
ch := make(chan int, 10)
ch := make(<-chan int)
ch := make(chan<- int, 10)
未使用make()初始化的channel为nil。nil channel不能执行收发通信操作,例如:
go
var ch chan intch就是nil channel。 nil 通道仅关闭操作会触发 panic,发送、接收、遍历均只阻塞不 panic。
关闭channel
内置函数close()用于关闭channel。
关闭Channel的意思是记录该Channel不能再被发送任何元素了,而不是销毁该Channel的意思。也就意味着关闭的Channel是可以继续接收值的。因此:
- 向已关闭的Channel发送会引发runtime panic
- 关闭nil Channel会引发runtime panic
- 不能关闭仅接收Channel
当从已关闭的Channel接收时:
- 可以接收关闭前发送的全部值
- 若没有已发送的值会返回类型的零值,不会被阻塞
使用接收操作符的多值返回结构,可以判断Channel是否已经关闭:
go
var x, ok = <-ch
x, ok := <-ch- ok为true,channel未关闭
- ok为false,channel已关闭
for range channel
for语句的range子句可以持续地从Channel中接收元素,语法如下:
go
for e := range ch {
    // e是ch中元素值
}
持续接收操作与接收操作<-行为一致:
- 若ch为nil channel会阻塞
- 若ch没有已发送元素会阻塞
for会持续执行到channel被关闭,关闭后,若channel中存在已发送元素,for会全部读取完毕。
缓冲与无冲 channel
Channel区别于是否存在缓冲区,分为:
- 缓冲Channel,make(chan T, cap),cap是大于0的值。
- 无缓冲Channel, make(chan T), make(chan T, 0)
无缓冲channel

也称为同步Channel,只有当发送方和接收方都准备就绪时,通信才会成功。
同步操作示例:
go
func ChannelSync() {
    // 初始化数据
    ch := make(chan int)
    wg := sync.WaitGroup{}

    // 间隔发送
    wg.Add(1)
    go func() {
        defer wg.Done()
        for i := 0; i < 5; i++ {
            ch <- i
            println("Send ", i, ".\tNow:", time.Now().Format("15:04:05.999999999"))
            // 间隔时间
            time.Sleep(1 * time.Second)
        }
        close(ch)
    }()

    // 间隔接收
    wg.Add(1)
    go func() {
        defer wg.Done()
        for v := range ch {
            println("Received ", v, ".\tNow:", time.Now().Format("15:04:05.999999999"))
            // 间隔时间,注意与send的间隔时间不同
            time.Sleep(3 * time.Second)
        }
    }()

    wg.Wait()
}
代码中,采用同步channel,使用两个goroutine完成发送和接收。每次发送和接收的时间间隔不同。我们分别打印发送和接收的值和时间。注意结果:
- 发送和接收时间一致
- 间隔以长的为准,可见发送和接收操作为同步操作
同步Channel适合在gotoutine间做同步信号!
缓冲Channel
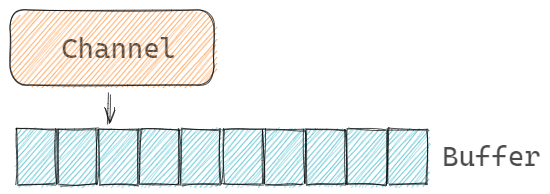
缓冲Channel也称为异步Channel,接收和发送方不用等待双方就绪即可成功。缓冲Channel会存在一个容量为cap的缓冲空间。当使用缓冲Channel通信时,接收和发送操作是在操作Channel的Buffer:
go
func ChannelASync() {
    // 初始化数据
    ch := make(chan int, 5)
    wg := sync.WaitGroup{}

    // 间隔发送
    wg.Add(1)
    go func() {
        defer wg.Done()
        for i := 0; i < 5; i++ {
            ch <- i
            println("Send ", i, ".\tNow:", time.Now().Format("15:04:05.999999999"))
            // 间隔时间
            time.Sleep(1 * time.Second)
        }
    }()

    // 间隔接收
    wg.Add(1)
    go func() {
        defer wg.Done()
        for v := range ch {
            println("Received ", v, ".\tNow:", time.Now().Format("15:04:05.999999999"))
            // 间隔时间,注意与send的间隔时间不同
            time.Sleep(3 * time.Second)
        }
    }()

    wg.Wait()
}
代码中,与同步channel一致,只是采用了容量为5的缓冲channel,使用两个goroutine完成发送和接收。每次发送和接收的时间间隔不同。我们分别打印发送和接收的值和时间。注意结果:
- 发送和接收时间不同
- 发送和接收操作不会阻塞,可见发送和接收操作为异步操作
缓冲channel非常适合做goroutine的数据通信了。
长度和容量,len()和cap()
内置函数 len() 和 cap() 可以分别获取:
- len()长度,缓冲中元素个数。
- cap()容量,缓冲的总大小。cap()返回0,意味着是无缓冲通道
单向Channel
使用单向通道约束双向通道的操作。
语法上来说,就是我们会将双向Channel转换为单向Channel来使用。典型使用在函数参数或返回值类型中。
示例代码:
go
func ChannelDirectional() {
    // 初始化数据
    ch := make(chan int)
    wg := &sync.WaitGroup{}

    // send and receive
    wg.Add(2)
    go setElement(ch, 42, wg)
    go getElement(ch, wg)

    wg.Wait()
}

// only receive channel
func getElement(ch <-chan int, wg *sync.WaitGroup) {
    defer wg.Done()

    println("received from ch, element is ", <-ch)
}

// only send channel
func setElement(ch chan<- int, v int, wg *sync.WaitGroup) {
    defer wg.Done()

    ch <- v
    println("send to ch, element is ", v)
}
函数getElement和setElement,分别使用了单向的接收和发送channel,在语义上表示只能接收和只能发送操作,同时程序上限定了操作。
典型的单向Channel的标准库例子:
go
// signal.Notify()
func Notify(c chan<- os.Signal, sig ...os.Signal)

// time.After
func After(d Duration) <-chan Time
以上两个示例分别展示了单向Channel作为函数参数和函数返回值的语法。
Channel结构
channel 的阻塞机制
:::info
抛出问题:go的channel的阻塞机制怎么实现的。整个channel消费唤醒是用了信号通知么。等待的goruntine进入等待和唤醒都是通过系统调用么
:::
问题解答:
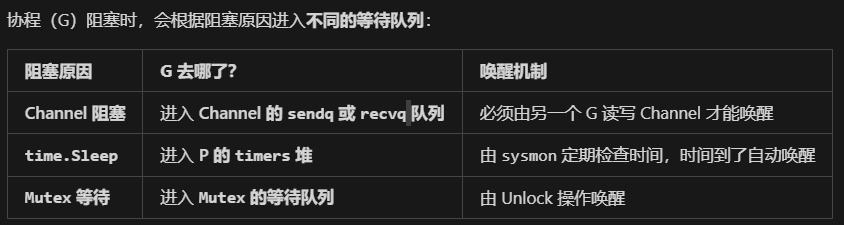
Go 的 Channel 阻塞与唤醒机制是 Go 调度器(GMP 模型)与底层操作系统(主要是 futex(负责把 G 由运行态转为阻塞态,GO 的线程没有阻塞态))协同工作的结果。
它没有直接使用 POSIX 信号或条件变量(pthread condition variable)那种"通知-回调"模式。而是采用了基于内存状态的自旋 + 阻塞队列 + futex 系统调用的组合策略。
核心数据结构:hchan 和 sudog
Channel的结构定义为 <font style="color:rgb(36, 41, 46);background-color:rgba(27, 31, 35, 0.05);">runtime.hchan</font>:
go
// GOROOT/src/runtime/chan.go
type hchan struct {
qcount uint // 元素个数。len()
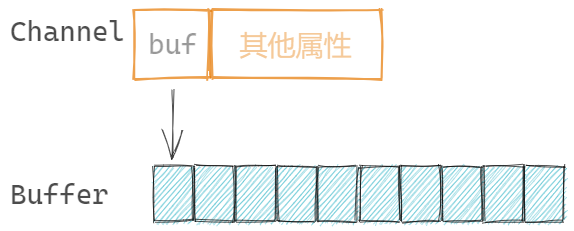
dataqsiz uint // 缓冲队列的长度。cap()
buf unsafe.Pointer // 缓冲队列指针,无缓冲队列为nil
elemsize uint16 // 元素大小
closed uint32
elemtype *_type // 元素类型
sendx uint // send index
recvx uint // receive index
recvq waitq // list of recv waiters
sendq waitq // list of send waiters
// lock protects all fields in hchan, as well as several
// fields in sudogs blocked on this channel.
//
// Do not change another G's status while holding this lock
// (in particular, do not ready a G), as this can deadlock
// with stack shrinking.
lock mutex
}- hchan (Channel Header): 这是 Channel 在内存中的对象。
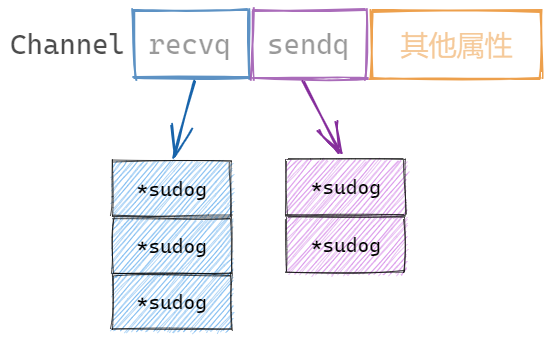
- sendq 和 recvq: 这两个是核心的等待队列。它们存储的是 sudog (Suspended Goroutine) 的指针。
- sendq: 在 channel 无人接收数据而阻塞的发送者队列。
- recvq: 在 channel 无数据可取而阻塞的接收者队列。
- buf: 环形缓冲区(如果是 buffered channel)。
- mutex: 一个互斥锁,保护上述所有字段。
- 若为无缓冲channel,不分配channel.buf空间
- sendq 和 recvq: 这两个是核心的等待队列。它们存储的是 sudog (Suspended Goroutine) 的指针。
- make()初始化的核心操作就是分配内存空间
缓冲数组
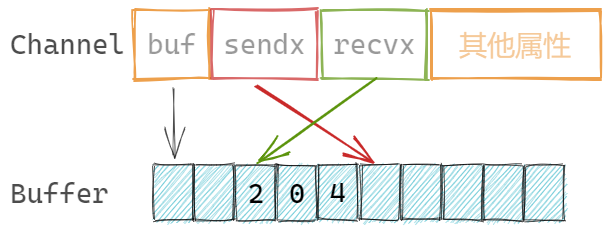
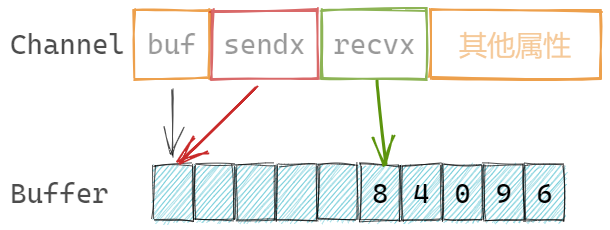
缓冲为数组结构,channel记录发送和接收元素的索引:
go
sendx    uint   // 发送索引
 recvx    uint   // 接收索引
缓冲数组是循环使用的,也就是若数组的最后一个元素存储了元素,那么下一次会尝试存储在第一个元素位置。
Channel与Goroutine的关系
Channel记录两个属性,由于记录等待接收和发送的goroutine队列:
go
recvq    waitq  // 等待接收goroutine队列
sendq    waitq  // 等待发送goroutine队列
当基于某channel的接收或发送的goroutine需要阻塞时,会被记录到Channel的等待队列中。当channel可以完成相应的接收或发送操作时,从等待队列中唤醒goroutine进行操作。
其中等待队列是 runtime.waitq 类型,是一个双向链表结构,具体的某个链表节点存在两个指针,指向前后节点:
go
// GOROOT/src/runtime/chan.go
type waitq struct {
    first *sudog
    last  *sudog
}- sudog (Suspended Goroutine):
- 这是 Go 运行时用来表示"等待中 goroutine"的结构体。
- 它不是 goroutine 本身(G 结构体),而是一个中介。它持有:
- 指向被阻塞的 G(goroutine)的指针。
- 等待发送 / 接收的数据指针(val)。 elem Unsafe.Pointer
- 指向下一个和上一个 sudog 的指针(用于链表)。
- 等等
初始化channel流程
make()初始化channel时,会根据是否存在缓冲,选择:
- 存在缓冲,为channel和buffer分别分配内存,同时channel.buf指向buffer地址
- 不存在缓冲,仅为channel分配内存,channel.buf为nil。
- 初始化channel中其他属性
向 channel 发送流程
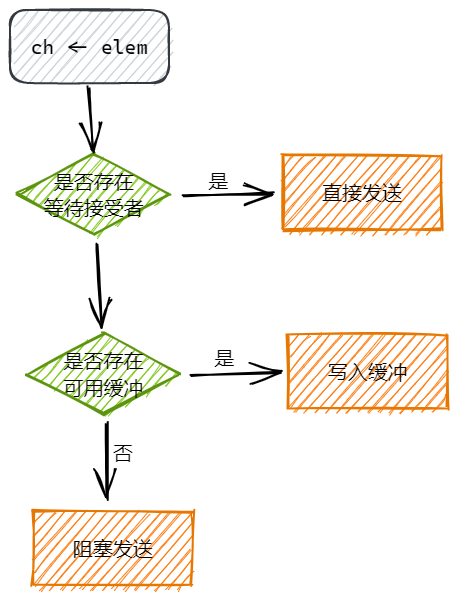
语句 ch <- element 向 channel 发送元素时,大体的执行流程如下:
- 加锁: 先获取 hchan 的 mutex。
- 直接发送:如果 recvq 不为空(说明有人在等数据),直接从 recvq 头部取出一个 sudog,把数据拷贝给它(写入接收者的变量),然后唤醒这个接收者(goready),将其放在M的 runnext 位置,下次调度立即执行
- 直接写缓冲区,当缓冲区存在空间时,将发送元素直接写入缓冲区,调整 channel.sendx 的位置
- 阻塞发送,当缓冲区已满或无缓冲区时,创建 sudog: 创建一个新的 sudog,把要发送的数据 x 存在里面,关联当前的 G 后进入 channel.sendq 队列,调用 gopark,将当前的 G 状态设置为 等待态 (Waiting),++注意了,G 进入等待,M 不会,整个过程不调用 futex++,并把它从 P 的运行队列中移除。等待其他 goroutine 从 channel 中接收元素,进而唤醒发送 goroutine
gopark 函数与线程协程状态讲解
暂停 G,M 的 P 制空,触发调度,然后判断是否需要挂起线程(需要的话要调用 futex)
只有当 M 找不到任何可运行的 G 时:
- M 自旋 (Spinning) 一会儿,试图找 G。
- 如果全局都没有 G,M 会调用 futex 彻底休眠。
- 直到有新的 G 被创建(例如新建一个协程),或者有 G 被唤醒,才会把 M 唤醒。
- M (线程) 有三种常见状态:
- Running: 正在执行 G。
- Spinning (自旋): M 空闲,但在努力找 G 跑(为了避免频繁休眠/唤醒,浪费 CPU 缓存)。
- Idle (空闲): M 彻底没事干,进入休眠(调用 futex 等待被唤醒)。
- 问:++怎么进入的空闲态,futex 和 gopark 调用会进入内核态么,是系统调用么,线程 M 携带执行了系统调用的 G 是什么状态?++
- ++futex 会让线程进入空闲态,futex 是系统调用,运行态。++
从channel接收流程
当另一个 goroutine 执行 <- ch 时:
- 加锁。

关闭channel流程
close(ch)关闭channel,主要工作是:
- 取消channel关联的sendq和recvq队列
- 调度阻塞在sendq和recvq中的goroutine
select 语句
执行流程

for + select
select 匹配到可操作的case或者是defaultcase后,就执行完毕了。实操时,我们通常需要持续监听某些channel的操作,因此典型的select使用会配合for完成。
阻塞select
以下典型的情况会直接导致阻塞goroutine:
- 不存在任何case的
- case监听都是nil channel
示例:
go
func SelectBlock() {
    // 空select阻塞
    println("before select")
    select {}
    println("after select")

    // nil select阻塞
    var ch chan int
    go func() {
        ch <- 1024
    }()
    println("before select")
    select {
    case <-ch:
    case ch <- 42:
    }
    println("after select")
}
go test 测试时,会一直阻塞。若上面的代码出现在常规执行流程中,会导致 deadlock。
nil channel的case
nil channel 不能读写,因此通过将channel设置为nil,可以控制某个case不再被执行。
例如,3秒后,不再接受ch的数据:
go
func SelectNilChannel() {
    ch := make(chan int)
    // 写channel
    go func() {
        // 随机写入int
        rand.Seed(time.Now().Unix())
        for {
            ch <- rand.Intn(10)
            time.Sleep(400 * time.Millisecond)
        }
    }()

    // 读channel
    go func() {
        sum := 0
        t := time.After(3 * time.Second)
        for {
            select {
            case v := <-ch:
                println("received value: ", v)
                sum += v
            case <-t:
                // 将channel设置为nil,不再读写
                ch = nil
                println("ch was set nil, sum is ", sum)
            }
        }

    }()

    // sleep 5 秒
    time.Sleep(5 * time.Second)
}
带有default的select,非阻塞收发
当select语句存在default case时:
- 若没有可操作的channel,会执行default case
- 若有可操作的channel,会执行对应的case
这样select语句不会进入block状态,称之为非阻塞(non-block)的收发(channel 的接收和发送)。
示例:多人猜数字游戏,我们在乎是否有人猜中数字:
go
func SelectNonBlock() {
    // 初始化数据
    counter := 10 // 参与人数
    max := 20     // [0, 19] // 最大范围
    rand.Seed(time.Now().UnixMilli())
    answer := rand.Intn(max) // 随机答案
    println("The answer is ", answer)
    println("------------------------------")

    // 正确答案channel
    bingoCh := make(chan int, counter)
    // wg
    wg := sync.WaitGroup{}
    wg.Add(counter)
    for i := 0; i < counter; i++ {
        // 每个goroutine代表一个猜数字的人
        go func() {
            defer wg.Done()
            result := rand.Intn(max)
            println("someone guess ", result)
            // 答案争取,写入channel
            if result == answer {
                bingoCh <- result
            }
        }()
    }
    wg.Wait()

    println("------------------------------")
    // 是否有人发送了正确结果
    // 可以是0或多个人
    // 核心问题是是否有人猜中,而不是几个人
    select {
    case result := <-bingoCh:
        println("some one hint the answer ", result)
    default:
        println("no one hint the answer")
    }
}
特别的情况是存在两个case,其中一个是default,另一个是channel case,那么go的优化器会优化内部这个select。内部会以if结构完成处理。因为这种情况,不用考虑随机性的问题。类似于:
go
select {
    case result := <-bingoCh:
    println("some one hint the answer ", result)
    default:
    // 非阻塞的保证,存在default case
    println("no one hint the answer")
}

// 优化伪代码
if selectnbrecv(bingoCh) {
    println("some one hint the answer ", result)
} else {
    println("no one hint the answer")
}
Race模式
Race模式,典型的并发执行模式之一,多路同时操作资源,哪路先操作成功,优先使用,同时放弃其他路的等待。简而言之,从多个操作中选择一个最快的。核心工作:
- 选择最快的
- 停止其他未完成的
示例代码,示例从多个查询器同时读取数据,使用最先反返回结果的,其他查询器结束:
go
func SelectRace() {
    // 一,初始化数据
    // 模拟查询结果,需要与具体的querier建立联系
    type Rows struct {
        // 数据字段

        // 索引标识
        Index int
    }
    // 模拟的querier数量
    const QuerierNum = 8
    // 用于通信的channel,数据,停止信号
    ch := make(chan Rows, 1)
    stopChs := [QuerierNum]chan struct{}{}
    for i := range stopChs {
        stopChs[i] = make(chan struct{})
    }
    // wg,rand
    wg := sync.WaitGroup{}
    rand.Seed(time.Now().UnixMilli())

    // 二,模拟querier查询,每个查询持续不同的时间
    wg.Add(QuerierNum)
    for i := 0; i < QuerierNum; i++ {
        // 每一个 querier
        go func(i int) {
            defer wg.Done()
            // 模拟执行时间
            randD := rand.Intn(1000)
            println("querier ", i, " start fetch data, need duration is ", randD, " ms.")
            // 查询结果的channel
            chRst := make(chan Rows, 1)

            // 执行查询工作
            go func() {
                // 模拟时长
                time.Sleep(time.Duration(randD) * time.Millisecond)
                chRst <- Rows{
                    Index: i,
                }
            }()

            // 监听查询结果和停止信号channel
            select {
            // 查询结果
            case rows := <-chRst:
                println("querier ", i, " get result.")
                // 保证没有其他结果写入,才写入结果
                if len(ch) == 0 {
                    ch <- rows
                }
            // stop信号
            case <-stopChs[i]:
                println("querier ", i, " is stopping.")
                return
            }

        }(i)
    }

    // 三,等待第一个查询结果的反馈
    wg.Add(1)
    go func() {
        defer wg.Done()
        // 等待ch中传递的结果
        select {
        // 等待第一个查询结果
        case rows := <-ch:
            println("get first result from ", rows.Index, ". stop other querier.")
            // 循环结构,全部通知querier结束
            for i := range stopChs {
                // 当前返回结果的goroutine不需要了,因为已经结束
                if i == rows.Index {
                    continue
                }
                stopChs[i] <- struct{}{}
            }

        // 计划一个超时时间
        case <-time.After(5 * time.Second):
            println("all querier timeout.")
            // 循环结构,全部通知querier结束
            for i := range stopChs {
                stopChs[i] <- struct{}{}
            }
        }
    }()

    wg.Wait()
}
其中核心点:
- 获取了结果,通知结束
- 通过多个无缓冲channel通知goroutine结束
- 通过缓冲channel传递结果
执行结果示例:
plain
querier  2  start fetch data, Need duration is  674  ms.
querier  6  start fetch data, Need duration is  695  ms.
querier  1  start fetch data, Need duration is  484  ms.
querier  4  start fetch data, Need duration is  544  ms.
querier  0  start fetch data, Need duration is  101  ms.
querier  7  start fetch data, Need duration is  233  ms.
querier  5  start fetch data, Need duration is  721  ms.
querier  3  start fetch data, Need duration is  727  ms.
querier  0  get result.
get first result from  0 . stop other querier.
querier  7  is stopping.
querier  2  is stopping.
querier  4  is stopping.
querier  6  is stopping.
querier  5  is stopping.
querier  1  is stopping.
querier  3  is stopping.
All 模式
Race模式是多个Goroutine获取相同的结果,优先使用快速响应的。
而All模式是多个Goroutine分别获取结果的各个部分,全部获取完毕后,组合成完整的数据,要保证全部的Goroutine都响应后,继续执行。
无缓冲Channel+关闭作典型同步信号
基于:
- 无缓冲Channel是同步的
- closed 的channel是可以接收内容的
以上两点原因,经常使用关闭无缓冲channel的方案来作为信号传递使用。前提是,信号纯粹是信号,没有其他含义,比如关闭时间等。
示例代码:
go
func SelectChannelCloseSignal() {
	wg := sync.WaitGroup{}
	// 定义无缓冲channel
	// 作为一个终止信号使用(啥功能的信号都可以,信号本身不分功能)
	ch := make(chan struct{})

	// goroutine,用来close, 表示
发出信号
	wg.Add(1)
	go func() {
		defer wg.Done()
		time.Sleep(2 * time.Second)
		fmt.Println("发出信号, close(ch)")
		close(ch)
	}()

	// goroutine,接收ch,表示接收信号
	wg.Add(1)
	go func() {
		defer wg.Done()
		// 先正常处理,等待ch的信号到来
		for {
			select {
			case <-ch:
				fmt.Println("收到信号, <-ch")
				return
			default:

			}
			// 正常的业务逻辑
			fmt.Println("业务逻辑处理中....")
			time.Sleep(300 * time.Millisecond)
		}
	}()

	wg.Wait()
}

// ====
> go test -run TestSelectChannelCloseSignal
业务逻辑处理中....
业务逻辑处理中....
业务逻辑处理中....
业务逻辑处理中....
业务逻辑处理中....
业务逻辑处理中....
业务逻辑处理中....
发出信号, close(ch)
收到信号, <-ch
PASS
ok      goConcurrency   2.168s
ps: close channel 后,<-ch 得到零值
:::info
那for range阻塞读取channel,此时关闭channel怎么办,需要在for range的处理逻辑里添加针对于零值的处理么
不需要,for range 会自动检测关闭并退出。
:::
signal.Notify 信号通知监控
系统信号也是通过channel与应用程序交互,例如典型的 ctrl+c 中断程序, <font style="color:rgb(36, 41, 46);background-color:rgba(27, 31, 35, 0.05);">os.Interrupt</font>,若不监控系统信号,ctrl+c后程序会直接终止,而如果监控了信号,那么可以在ctrl+c后,执行一系列的关闭处理,例如:
go
func SelectSignal() {
    // 一:模拟一段长时间运行的goroutine
    go func() {
        for {
            fmt.Println(time.Now().Format(".15.04.05.000"))
            time.Sleep(300 * time.Millisecond)
        }
    }()

    // 要求主goroutine等待上面的goroutine,方案:
    // 1. wg.Wait()
    // 2. time.Sleep()
    // 3. select{}

    // 持久阻塞
    //select {}

    // 二,监控系统的中断信号,interrupt
    // 1 创建channel,用于传递信号
    chSignal := make(chan os.Signal, 1)
    // 2 设置该channel可以监控哪些信号
    signal.Notify(chSignal, os.Interrupt)
    //signal.Notify(chSignal, os.Interrupt, os.Kill)
    //signal.Notify(chSignal) // 全部类型的信号都可以使用该channel
    // 3 监控channel
    select {
    case <-chSignal:
        fmt.Println("received os signal: Interrupt")
    }
}
定时器与断续器,Timer&Ticker
Timer&Ticker是Go标准包time中定义的类型,通过Channel与程序进行通信。
time包中两个与Channel紧密关联的结构:
go
// 定时器
time.Timer
// 断续器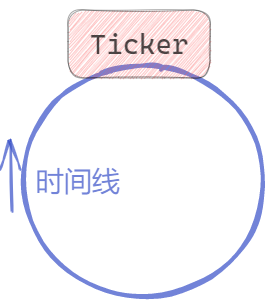
time.Ticker- 定时器Timer类似于一次性闹钟
- 断续器Ticker类似于重复性闹钟,循环定时器
无论是一次性还是重复性计时器,都是通过Channel与应用程序交互的。我们通过监控Timer和Ticker返回的Channel,来确定是否到时的需求。
定时器
使用语法:
go
// time.NewTimer
func NewTimer(d Duration) *Timer
创建定时器。参数是Duration时间。返回为 <font style="color:rgb(36, 41, 46);background-color:rgba(27, 31, 35, 0.05);">*Timer</font>。<font style="color:rgb(36, 41, 46);background-color:rgba(27, 31, 35, 0.05);">*Timer.C</font>是用来接收到期通知的单向Channel。
go
type Timer struct {
    C <-chan Time
}
因此我们只要可从 <font style="color:rgb(36, 41, 46);background-color:rgba(27, 31, 35, 0.05);">*Timer.C</font>上接收数据,就意味着定时器时间到。接收到的元素是 <font style="color:rgb(36, 41, 46);background-color:rgba(27, 31, 35, 0.05);">time.Time</font> 类型数据,为到时时间。
示例:
go
func TimerA() {
    t := time.NewTimer(time.Second)
    println("Set the timer, \ttime is ", time.Now().String())

    now := <-t.C
    println("The time is up, time is ", now.String())
}
Timer除了C之外,还有两个方法:
go
// 停止计时器
// 返回值bool类型,返回false,表示该定时器早已经停止,返回true表示由本次调用停止
func (t *Timer) Stop() bool

// 重置定时器
// 返回值bool类型,返回false,表示该定时器早已经停止,返回true表示由本次调用重置
func (t *Timer) Reset(d Duration) bool
使用这两个方法,可以完整定时器的业务逻辑。
示例代码,简单的猜数字游戏,共猜5次,每次有超时时间3秒钟:
go
func TimerB() {
    ch := make(chan int)

    // 写channel
    go func() {
        // 随机写入int
        for {
            ch <- rand.Intn(10)
            time.Sleep(400 * time.Millisecond)
        }
    }()

    // 每局时间
    t := time.NewTimer(time.Second * 3)
    hint, miss := 0, 0
    // 统计结果,共玩5次
    for i := 0; i < 5; i++ {
    guess:
        for {
            select {
            case v := <-ch:
                println("guess value: ", v)
                if v == 4 {
                    println("Bingo! some one hint the answer.")
                    // 新游戏,重置定时器
                    t.Reset(time.Second * 3)
                    hint++
                    break guess
                }
            case <-t.C:
                println("The time is up, no one hint.")
                miss++
                // 重新创建定时器
                t = time.NewTimer(time.Second * 3)
                break guess
            }
        }
    }
    println("Game Over! Hint ", hint, ", Miss ", miss)
}
// 可能出现 Timer 已经超时,但 t.C 的值还没被读取。
// // 3秒后,Timer 触发
// 此时 t.C 中已经有了一个值(等待被读取)

// 如果在这个状态下调用 t.Reset()
// 旧值还在 t.C 里!
// <-t.C 仍然会立即返回(读取到 3秒超时的那个旧值)
代码在猜中或者时间到时,要重置或新建定时器。
如果不需要定时器的关闭和重置操作,可以使用函数:
go
func After(d Duration) <-chan Time直接返回定时器到期的通知Channel。
go
func TimerC() {
    ch := time.After(time.Second)
    println("Set the timer, \ttime is ", time.Now().String())

    now := <-ch
    println("The time is up, time is ", now.String())
}
如果希望在定时器到期时执行特定函数,可以使用如下函数:
go
func AfterFunc(d Duration, f func()) *Timer该函数返回*Timer用于控制定时器,例如Stop或Reset.
断续器
也叫循环定时器。
使用语法:
go
func NewTicker(d Duration) *Ticker创建断续器。参数是Duration时间。返回为 <font style="color:rgb(36, 41, 46);background-color:rgba(27, 31, 35, 0.05);">*Ticker</font>。<font style="color:rgb(36, 41, 46);background-color:rgba(27, 31, 35, 0.05);">*Ticker.C</font>是用来接收到期通知的单向Channel。
go
type Ticker struct {
    C <-chan Time // The channel on which the ticks are delivered.
}
因此我们只要可从 <font style="color:rgb(36, 41, 46);background-color:rgba(27, 31, 35, 0.05);">*Ticker.C</font>上接收数据,就意味着断续器时间到。接收到的元素是 <font style="color:rgb(36, 41, 46);background-color:rgba(27, 31, 35, 0.05);">time.Time</font> 类型数据,为到时时间。当接收到到期时间后,间隔下一个Duration还会再次接收到到期时间。
<font style="color:rgb(36, 41, 46);background-color:rgba(27, 31, 35, 0.05);">*Ticker</font>也有方法:
go
// 停止断续器
func (t *Ticker) Stop()
// 重置断续器间隔时间
func (t *Ticker) Reset(d Duration)
示例:
go
func TickerA() {
    // 断续器
    ticker := time.NewTicker(time.Second)

    // 定时器
    timer := time.After(5 * time.Second)
loop: // 持续心跳
    for now := range ticker.C {
        println("now is ", now.String())
        // heart beat
        println("http.Get(\"/ping\")")

        // 非阻塞读timer,到时结束断续器
        select {
        case <-timer:
            ticker.Stop()
            break loop
        default:
        }
    }
}
代码模拟了一个心跳程序,间隔1秒,发送ping操作。整体到时,运行结束。
计时器底层
不是创建单独的 goroutine 来计时!Go 使用全局计时器管理器,所有 Timer 共享资源。
创建 Timer 时:
go
用户代码
    ↓
t = &timer{
    C: make(chan Time, 1),   // 这里的 C 是普通的 channel
    when: 某时间戳,           // 触发时间点
    period: 0,               // 周期(0表示不重复)
}
    ↓
runtime 将 Timer 注册到全局计时器堆
go
┌─────────────────────────────────────────────────────┐
│              全局计时器堆 (小根堆)                    │
│                                                      │
│   Timer结构: { when: 时间戳, C: channel }            │
│                                                      │
│     when=100  ─────────┐                             │
│     when=150  ──────────────┐                       │
│     when=200  ───────────────────────┐              │
│     when=250  ───────────────────────────────┐      │
│     when=300  ─────────────────────────────────────┤
└─────────────────────────────────────────────────────┘
                      ↓
              runtime 监控最小 when
绝对时间戳
不需要遍历,不需要做减法
go
时间线:
─────────────────────────────────────────────────────────────►

now=50:
  堆顶 when=100
  sleep(100-50) = 50毫秒
         │
         │  50ms 后 now=100
         ▼
now=100:
  堆顶 when=100 <= now ✓ 到期!
  pop 处理
  新的堆顶 when=150
  sleep(150-100) = 50ms
         │
         │  50ms 后 now=150
         ▼
now=150:
  堆顶 when=150 <= now ✓ 到期!
  pop 处理
  ...继续循环
小结
Channel的分类
- nil channel
- 缓冲Channel
- 无缓冲Channel
- 单向Channel
Channel的操作
- 初始化,make(channel type, cap)
- 发送,ch <- expression
- 接收, v, ok := <- ch
- 遍历接收,for e := range ch {}
- 关闭, close(ch)
select语句
- channel的多路复用
- 执行第一个可以操作channel的case
- 若同时多个channel可操作随机选择case避免饥饿case的出现
- 增加default case可以达到非阻塞channel操作的目的
- 经常配合for select使用循环多路监听
- 典型的多路模式有:Race和All
timer和ticker
- 定时器,到时执行一次,可以在到时前,重置或提前结束
- 断续器,配置间隔重复执行,重复定时器,可以重置间隔时间和提前结束
Context上下文
Context概述
Go 1.7 标准库引入 context,译作"上下文",准确说它是 goroutine 的上下文,包含 goroutine 的运行状态、环境、现场等信息。
context 主要用来在 goroutine 之间传递上下文信息,包括:取消信号、超时时间、截止时间、k-v 等。
随着 context 包的引入,标准库中很多接口因此加上了 context 参数,例如 database/sql 包。context 几乎成为了并发控制和超时控制的标准做法。
在一组goroutine 之间传递共享的值、取消信号、deadline是Context的作用。
以典型的HTTPServer为例:
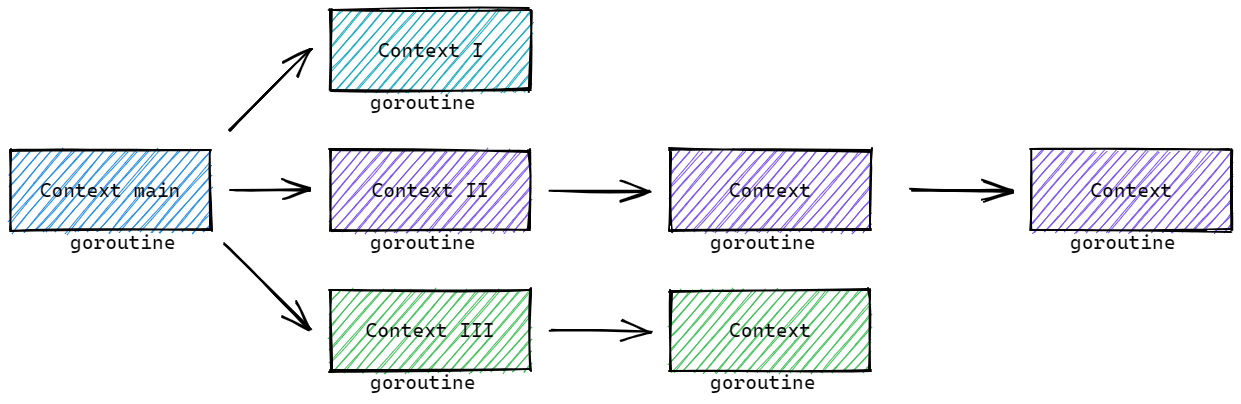
我们以 Context II为例,若没有上下文信号,当其中一个goroutine出现问题时,其他的goroutine不知道,还会继续工作。这样的无效的goroutine积攒起来,就会导致goroutine雪崩,进而导致服务宕机!
Context 核心结构
<font style="color:rgb(36, 41, 46);background-color:rgba(27, 31, 35, 0.05);">context.Context</font> 是 Go 语言在 1.7 版本中引入标准库的接口,该接口定义了四个需要实现的方法:
go
type Context interface {
    // 返回被取消的时间
	Deadline() (deadline time.Time, ok bool)
    // 返回用于通知Context完结的channel
    // 当这个 channel 被关闭时,说明 context 被取消了
    // 在子协程里读这个 channel,除非被关闭,否则读不出来任何东西
	Done() <-chan struct{}
    // 返回Context取消的错误
    Err() error
    // 返回key对应的value
	Value(key any) any
}
除了Context接口,还存在一个canceler接口,用于实现Context可以被取消:
go
type canceler interface {
	cancel(removeFromParent bool, err error)
	Done() <-chan struct{}
}
除了以上两个接口,还有4个预定义的Context类型:
go
// 空Context
type emptyCtx int

// 取消Context
type cancelCtx struct {
	Context
	mu       sync.Mutex            // protects following fields
	done     atomic.Value          // of chan struct{}, created lazily, closed by first cancel call
	children map[canceler]struct{} // set to nil by the first cancel call
	err      error                 // set to non-nil by the first cancel call
}

// 定时取消Context
type timerCtx struct {
	cancelCtx
	timer *time.Timer // Under cancelCtx.mu.

	deadline time.Time
}

// KV值Context
type valueCtx struct {
	Context
	key, val any
}
默认(空)Context的使用
context 包中最常用的方法是 <font style="color:rgb(36, 41, 46);background-color:rgba(27, 31, 35, 0.05);">context.Background</font>、<font style="color:rgb(36, 41, 46);background-color:rgba(27, 31, 35, 0.05);">context.TODO</font>,这两个方法都会返回预先初始化好的私有变量 background 和 todo,它们会在同一个 Go 程序中被复用:
- context.Background, 是上下文的默认值,所有其他的上下文都应该从它衍生出来,在多数情况下,如果当前函数没有上下文作为入参,我们都会使用
<font style="color:rgb(36, 41, 46);background-color:rgba(27, 31, 35, 0.05);">context.Background</font>作为起始的上下文向下传递。 - context.TODO,是一个备用,一个context占位,通常用在并不知道传递什么 context的情形。
使用示例,<font style="color:rgb(36, 41, 46);background-color:rgba(27, 31, 35, 0.05);">database/sql</font>包中的执行:
sql
func (db *DB) PingContext(ctx context.Context) error
func (db *DB) ExecContext(ctx context.Context, query string, args ...any) (Result, error)
func (db *DB) QueryContext(ctx context.Context, query string, args ...any) (*Rows, error)
func (db *DB) QueryRowContext(ctx context.Context, query string, args ...any) *Row
方法,其中第一个参数就是context.Context。
例如:操作时:
go
db, _ := sql.Open("", "")
query := "DELETE FROM `table_name` WHERE `id` = ?"
db.ExecContext(context.Background(), query, 42)
当然,单独 <font style="color:rgb(36, 41, 46);background-color:rgba(27, 31, 35, 0.05);">database.sql</font>包中,也支持不传递context.Context的方法。功能一致,但缺失了context.Context相关功能。
go
func (db *DB) Exec(query string, args ...any) (Result, error)context.Background 和 context.TODO 返回的都是预定义好的 emptyCtx 类型数据,其结构如下:
go
// 创建方法
func Background() Context {
    return background
}
func TODO() Context {
    return todo
}

// 预定义变量
var (
    background = new(emptyCtx)
    todo       = new(emptyCtx)
)

// emptyCtx 定义
type emptyCtx int

func (*emptyCtx) Deadline() (deadline time.Time, ok bool) {
    return
}

func (*emptyCtx) Done() <-chan struct{} {
    return nil
}

func (*emptyCtx) Err() error {
    return nil
}

func (*emptyCtx) Value(key any) any {
    return nil
}

func (e *emptyCtx) String() string {
    switch e {
    case background:
        return "context.Background"
    case todo:
        return "context.TODO"
    }
    return "unknown empty Context"
}
可见,emptyCtx 是不具备取消、KV值和Deadline的相关功能的,称为空Context,没有任何功能。
Context传递取消信号
context.WithCancel 函数能够从 context.Context 中衍生出一个新的子上下文并返回用于取消该上下文的函数。一旦我们执行返回的取消函数,当前上下文以及它的子上下文都会被取消,所有的 Goroutine 都会同步收到这一取消信号。取消操作通常分为主动取消,定时取消两类。
主动取消
需要的操作为:
- 创建带有cancel函数的Context,func WithCancel(parent Context) (ctx Context, cancel CancelFunc)
- 接收cancel的Channel,ctx.Done()
- 主动Cancel的函数,cancel CancelFunc

示例代码:
go
func ContextCancelCall() {
    // 1. 创建cancelContext
    ctx, cancel := context.WithCancel(context.Background()) // 会帮助创建Context

    wg := sync.WaitGroup{}
    wg.Add(4)
    // 2. 启动goroutine,携带cancelCtx
    for i := 0; i < 4; i++ {
        // 启动goroutine,携带ctx参数
        go func(c context.Context, n int) {
            defer wg.Done()
            // 监听context的取消完成channel,来确定是否执行了主动cancel操作
            for {
                select {
                // 等待接收c.Done()这个channel
                case <-c.Done():
                    fmt.Println("Cancel")
                    return
                default:

                }
                fmt.Println(strings.Repeat("  ", n), n)
                time.Sleep(300 * time.Millisecond)
            }
        }(ctx, i)
    }

    // 3. 主动取消 cancel()
    // 3s后取消
    select {
    case <-time.NewTimer(2 * time.Second).C:
        cancel() // ctx.Done() <- struct{}
    }

    select {
    case <-ctx.Done():
        fmt.Println("main Cancel")
    }

    wg.Wait()

}

// ======
> go test -run TestContextCancelCall
       3
   1
 0
     2
   1
       3
     2
 0
 0
   1
       3
     2
     2
   1
       3
 0
 0
   1
       3
     2
     2
   1
 0
       3
       3
 0
   1
     2
main Cancel
Cancel
Cancel
Cancel
Cancel
PASS
ok      goConcurrency   2.219s
当调用cancel()时,全部的goroutine会从 ctx.Done() 接收到内容,进而完成后续控制操作。
<font style="color:rgb(36, 41, 46);background-color:rgba(27, 31, 35, 0.05);">func WithCancel(parent Context) (ctx Context, cancel CancelFunc)</font> 函数返回的Context是 <font style="color:rgb(36, 41, 46);background-color:rgba(27, 31, 35, 0.05);">context.cancelCtx</font> 结构体对象,以及一个CancelFunc。
其中 <font style="color:rgb(36, 41, 46);background-color:rgba(27, 31, 35, 0.05);">context.cancelCtx</font> 结构如下:
go
// A cancelCtx can be canceled. When canceled, it also cancels any children
// that implement canceler.
type cancelCtx struct {
    Context

    mu       sync.Mutex            // protects following fields
    done     atomic.Value          // of chan struct{}, created lazily, closed by first cancel call
    children map[canceler]struct{} // set to nil by the first cancel call
    err      error                 // set to non-nil by the first cancel call
}
其中:
- Context,上级Context对象
- mu, 互斥锁
- done,用于处理cancel通知信号的channel。懒惰模式创建,调用cancel时关闭。
- children,以该context为parent的可cancel的context们
- err,error
Deadline和Timeout定时取消
与主动调用 CancelFunc 的差异在于,定时取消,增加了一个到时自动取消的机制:
- Deadline,某个时间点后,使用
<font style="color:rgb(36, 41, 46);background-color:rgba(27, 31, 35, 0.05);">func WithDeadline(parent Context, d time.Time) (Context, CancelFunc)</font>创建 - Timeout,某个时间段后,使用
<font style="color:rgb(36, 41, 46);background-color:rgba(27, 31, 35, 0.05);">func WithTimeout(parent Context, timeout time.Duration) (Context, CancelFunc)</font>创建
示例代码如下,与主动cancel的代码类似:
go
// 1s后cancel
ctx, cancel := context.WithTimeout(context.Background(), 1*time.Second)

// 每天 20:30 cancel
curr := time.Now()
t := time.Date(curr.Year(), curr.Month(), curr.Day(), 20, 30, 0, 0, time.Local)
ctx, cancel := context.WithDeadline(context.Background(), t)
其他代码一致,当时间到时,ctx.Done() 可以接收内容,进而控制goroutine停止。
不论WithDeadline和WithTimeout都会构建 <font style="color:rgb(36, 41, 46);background-color:rgba(27, 31, 35, 0.05);">*timerCtx</font> 类型的Context,结构如下:
go
// A timerCtx carries a timer and a deadline. It embeds a cancelCtx to
// implement Done and Err. It implements cancel by stopping its timer then
// delegating to cancelCtx.cancel.
type timerCtx struct {
   cancelCtx
   timer *time.Timer // Under cancelCtx.mu.

   deadline time.Time
}
其中:
- cancelCtx,基于parent构建的cancelCtx
- deadline,cancel时间
- timer,定时器,用于自动cancel
Cancel操作的向下传递
当父上下文被取消时,子上下文也会被取消。Context 结构如下:
plain
ctxOne
  |    \
ctxTwo    ctxThree
  |
ctxFour
示例代码:
go
func ContextCancelDeep() {
ctxOne, cancel := context.WithCancel(context.Background())
ctxTwo, _ := context.WithCancel(ctxOne)
ctxThree, _ := context.WithCancel(ctxOne)
ctxFour, _ := context.WithCancel(ctxTwo)
// 带有timeout的cancel
//ctxOne, _ := context.WithTimeout(context.Background(), 1*time.Second)
//ctxTwo, cancel := context.WithTimeout(ctxOne, 1*time.Second)
//ctxThree, _ := context.WithTimeout(ctxOne, 1*time.Second)
//ctxFour, _ := context.WithTimeout(ctxTwo, 1*time.Second)
cancel()
wg := sync.WaitGroup{}
wg.Add(4)
go func() {
defer wg.Done()
select {
case <-ctxOne.Done():
fmt.Println("one cancel")
}
}()
go func() {
defer wg.Done()
select {
case <-ctxTwo.Done():
fmt.Println("two cancel")
}
}()
go func() {
defer wg.Done()
select {
case <-ctxThree.Done():
fmt.Println("three cancel")
}
}()
go func() {
defer wg.Done()
select {
case <-ctxFour.Done():
fmt.Println("four cancel")
}
}()
wg.Wait()
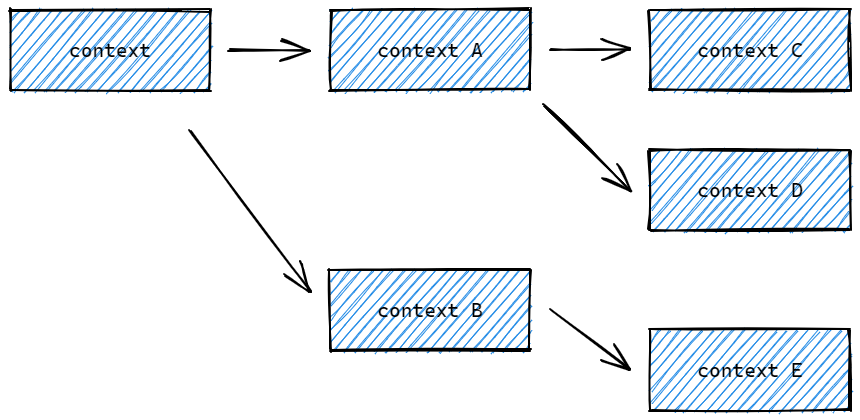
}我们调用 ctxOne 的 cancel, 其后续的context都会接收到取消的信号。
如果调用了其他的cancel,例如ctxTwo,那么ctxOne和ctxThree是不会接收到信号的。
取消操作流程
创建cancelCtx的流程
使用 <font style="color:rgb(36, 41, 46);background-color:rgba(27, 31, 35, 0.05);">context.WithCancel</font>, <font style="color:rgb(36, 41, 46);background-color:rgba(27, 31, 35, 0.05);">context.WithDeadlime</font>, <font style="color:rgb(36, 41, 46);background-color:rgba(27, 31, 35, 0.05);">context.WithTimeout</font> 创建cancelCtx或timerCtx的核心过程基本一致,以 <font style="color:rgb(36, 41, 46);background-color:rgba(27, 31, 35, 0.05);">context.WithCancel</font> 为例:
go
func WithCancel(parent Context) (ctx Context, cancel CancelFunc) {
    if parent == nil {
        panic("cannot create context from nil parent")
    }
    // 构建cancelCtx对象
    c := newCancelCtx(parent)
    // 传播Cancel操作
    propagateCancel(parent, &c)
    // 返回值,注意第二个cancel函数的实现
    return &c, func() { c.cancel(true, Canceled) }
}

func newCancelCtx(parent Context) cancelCtx {
    return cancelCtx{Context: parent}
}
由此可见,核心过程有两个:
- newCancelCtx, 使用 parent 构建 cancelCtx
- propagateCancel, 传播Cancel操作,用来构建父子Context的关联,用于保证在父级Context取消时可以同步取消子级Context
核心的propagateCancel 的实现如下:
go
// propagateCancel arranges for child to be canceled when parent is.
func propagateCancel(parent Context, child canceler) {
    // parent不会触发cancel操作
    done := parent.Done()
    if done == nil {
        return // parent is never canceled
    }

    // parent已经触发了cancel操作
    select {
    case <-done:
        // parent is already canceled
        child.cancel(false, parent.Err())
        return
    default:
    }

    // parent还没有触发cancel操作
    if p, ok := parentCancelCtx(parent); ok {
        // 内置cancelCtx类型
        p.mu.Lock()
        if p.err != nil {
            // parent has already been canceled
            child.cancel(false, p.err)
        } else {
            if p.children == nil {
                p.children = make(map[canceler]struct{})
            }
            // 将当前context放入parent.children中
            p.children[child] = struct{}{}
        }
        p.mu.Unlock()
    } else {
        // 非内置cancelCtx类型
        atomic.AddInt32(&goroutines, +1)
        go func() {
            select {
            case <-parent.Done():
                child.cancel(false, parent.Err())
            case <-child.Done():
            }
        }()
    }
}
以上代码在建立child和parent的cancelCtx联系时,处理了下面情况:
- parent不会触发cancel操作,不做任何操作,直接返回
- parent已经触发了cancel操作,执行child的cancel操作,返回
- parent还没有触发cancel操作,
<font style="color:rgb(36, 41, 46);background-color:rgba(27, 31, 35, 0.05);">child</font>会被加入<font style="color:rgb(36, 41, 46);background-color:rgba(27, 31, 35, 0.05);">parent</font>的<font style="color:rgb(36, 41, 46);background-color:rgba(27, 31, 35, 0.05);">children</font>列表中,等待<font style="color:rgb(36, 41, 46);background-color:rgba(27, 31, 35, 0.05);">parent</font>释放取消信号 - 如果是自定义Context实现了可用的Done(),那么开启goroutine来监听parent.Done()和child.Done(),同样在parent.Done()时取消child。
如果是WithDeadline构建的timerCtx,构建的过程多了两步:
- 对截至时间的判定,判定是否已经截至
- 设置定时器
示例代码:
go
func WithDeadline(parent Context, d time.Time) (Context, CancelFunc) {
    if parent == nil {
        panic("cannot create context from nil parent")
    }
    if cur, ok := parent.Deadline(); ok && cur.Before(d) {
        // The current deadline is already sooner than the new one.
        return WithCancel(parent)
    }
    c := &timerCtx{
        cancelCtx: newCancelCtx(parent),
        deadline:  d,
    }
    propagateCancel(parent, c)

    dur := time.Until(d)
    // 已过时
    if dur <= 0 {
        c.cancel(true, DeadlineExceeded) // deadline has already passed
        return c, func() { c.cancel(false, Canceled) }
    }
    c.mu.Lock()
    defer c.mu.Unlock()
    // 设置定时器
    if c.err == nil {
        c.timer = time.AfterFunc(dur, func() {
            c.cancel(true, DeadlineExceeded)
        })
    }
    return c, func() { c.cancel(true, Canceled) }
}
ctx.Done() 初始信号channel流程
以 cancelCtx 为例:
go
func (c *cancelCtx) Done() <-chan struct{} {
    // 加载已经存在的
    d := c.done.Load()
    if d != nil {
        return d.(chan struct{})
    }
    c.mu.Lock()
    defer c.mu.Unlock()

    // 初始化新的
    d = c.done.Load()
    if d == nil {
        d = make(chan struct{})
        c.done.Store(d)
    }
    return d.(chan struct{})
}
其中两个步骤:
- 先尝试加载已经存在的
- 后初始化新的
核心要点是,当调用Done()时,初始化chan struct{}, 而不是在上限文cancelCtx创建时,就初始化完成了。称为懒惰初始化。
cancel()操作流程
取消流程,我们以 cancelCtx 的主动取消函数cancel的实现为例:
go
// cancel closes c.done, cancels each of c's children, and, if
// removeFromParent is true, removes c from its parent's children.
func (c *cancelCtx) cancel(removeFromParent bool, err error) {
    if err == nil {
        panic("context: internal error: missing cancel error")
    }
    c.mu.Lock()
    if c.err != nil {
        c.mu.Unlock()
        return // already canceled
    }
    // 设置 err
    c.err = err
    // 关闭channel
    d, _ := c.done.Load().(chan struct{})
    if d == nil {
        c.done.Store(closedchan)
    } else {
        close(d)
    }
    // 遍历全部可取消的子context
    for child := range c.children {
        // NOTE: acquiring the child's lock while holding parent's lock.
        child.cancel(false, err)
    }
    c.children = nil
    c.mu.Unlock()

    // 从parent的children删除自己
    if removeFromParent {
        removeChild(c.Context, c)
    }
}
以上流程的核心操作:
- 关闭channel,用来通知全部使用该ctx的goroutine
- 遍历全部可取消的子context,执行child的取消操作
- 从parent的children删除自己
Context传值
若希望在使用context时,携带额外的Key-Value数据,可以使用 <font style="color:rgb(36, 41, 46);background-color:rgba(27, 31, 35, 0.05);">context.WithValue</font> 方法,构建带有值的context。并使用 <font style="color:rgb(36, 41, 46);background-color:rgba(27, 31, 35, 0.05);">Value(key any) any</font> 方法获取值。带有值
对应方法的签名如下:
go
func WithValue(parent Context, key, val any) Context

type Context interface {
    Value(key any) any
}
需要三个参数:
- 上级 Context
- key 要求是comparable的(可比较的),实操时,推荐使用特定的Key类型,避免直接使用string或其他内置类型而带来package之间的冲突。
- val any
示例代码
go
type MyContextKey string

func ContextValue() {
    wg := sync.WaitGroup{}

    ctx := context.WithValue(context.Background(), MyContextKey("title"), "Go")

    wg.Add(1)
    go func(c context.Context) {
        defer wg.Done()
        if v := c.Value(MyContextKey("title")); v != nil {
            fmt.Println("found value:", v)
            return
        }
        fmt.Println("key not found:", MyContextKey("title"))
    }(ctx)

    wg.Wait()
}
<font style="color:rgb(36, 41, 46);background-color:rgba(27, 31, 35, 0.05);">context.WithValue</font> 方法返回 <font style="color:rgb(36, 41, 46);background-color:rgba(27, 31, 35, 0.05);">context.valueCtx</font> 结构体类型。<font style="color:rgb(36, 41, 46);background-color:rgba(27, 31, 35, 0.05);">context.valueCtx</font> 结构体包含了上级Context和key、value:
go
// A valueCtx carries a key-value pair. It implements Value for that key and
// delegates all other calls to the embedded Context.
type valueCtx struct {
    Context
    key, val any
}


func (c *valueCtx) Value(key any) any {
    if c.key == key {
        return c.val
    }
    return value(c.Context, key)
}
也就是除了 value 功能,其他Contenxt功能都由parent Context实现。
如果 context.valueCtx.Value 方法查询的 key 不存在于当前 valueCtx 中,就会从父上下文中查找该键对应的值直到某个父上下文中返回 <font style="color:rgb(36, 41, 46);background-color:rgba(27, 31, 35, 0.05);">nil</font> 或者查找到对应的值。例如:
go
func ContextValueDeep() {
    wgOne := sync.WaitGroup{}

    ctxOne := context.WithValue(context.Background(), MyContextKey("title"), "One")
    //ctxOne := context.WithValue(context.Background(), MyContextKey("key"), "Value")
    //ctxTwo := context.WithValue(ctxOne, MyContextKey("title"), "Two")
    ctxTwo := context.WithValue(ctxOne, MyContextKey("key"), "Value")
    //ctxThree := context.WithValue(ctxTwo, MyContextKey("title"), "Three")
    ctxThree := context.WithValue(ctxTwo, MyContextKey("key"), "Value")

    wgOne.Add(1)
    go func(c context.Context) {
        defer wgOne.Done()
        if v := c.Value(MyContextKey("title")); v != nil {
            fmt.Println("found value:", v)
            return
        }
        fmt.Println("key not found:", MyContextKey("title"))
    }(ctxThree)

    wgOne.Wait()
}
小结
特定的结构体类型:
- emptyCtx,函数 context.Background, context.TODO
- cancelCtx,函数 context.WithCancel
- timerCtx, 函数 context.WithDeadline, context.WithTimeout
- valueCtx, 函数 context.WithValue
官方博客对Context使用的建议:
- 直接将 Context 类型作为函数的第一参数,而且一般都命名为 ctx。
- 如果你实在不知道传什么,标准库给你准备好了一个 context.TODO。
- context 存储的应该是一些goroutine共同的数据。
- context 是并发安全的。
同步和锁
概述
除了channel外,我们还可以使用go的官方同步包sync,sync/atomic 完成一些基础的同步功能。主要包含同步数据、锁、原子操作等。
Lock解决方案:
go
func SyncLock() {
    n := 0
    wg := sync.WaitGroup{}

    lk := sync.Mutex{}
    for i := 0; i < 1000; i++ {
        wg.Add(1)
        go func() {
            defer wg.Done()
            for i := 0; i < 100; i++ {
                lk.Lock()
                n++
                lk.Unlock()
            }
        }()
    }
    wg.Wait()
    fmt.Println("n:", n)
}

// run
n: 100000
互斥锁Mutex的使用
go
type Mutex
// 锁定锁m, 若锁m已是锁定状态,调用的goroutine会被阻塞,直到可以锁定
func (m *Mutex) Lock()
// 解锁锁m,若m不是锁定状态,会导致运行时错误
func (m *Mutex) Unlock()
// 尝试是否可以加锁,返回是否成功
func (m *Mutex) TryLock() bool
注意:锁与goroutine没有关联,意味着允许一个goroutine加锁,在另一个goroutine中解锁。但是不是最典型的用法。
读写RWMutex的使用
Go 的读写锁是写优先策略
手撕读写锁
cpp
#include <iostream>
#include <thread>
#include <mutex>
#include <condition_variable>
#include <atomic>
#include <queue>
#include <chrono>

// 读写锁基类
class RWLock {
public:
    virtual void RLock() = 0;
    virtual void RUnlock() = 0;
    virtual void WLock() = 0;
    virtual void WUnlock() = 0;
    virtual ~RWLock() = default;
};

// ==================== 读优先策略 ====================
// 读者优先:读者不等待,直接进入;写者可能饥饿
class RWLockReadFirst : public RWLock {
private:
    std::mutex mtx_;
    std::condition_variable read_cond_;
    std::condition_variable write_cond_;
    int read_count_ = 0;      // 当前读者数量
    int write_pending_ = 0;   // 等待中的写者数量
    bool writing_ = false;    // 是否有写者正在写

public:
    void RLock() override {
        std::unique_lock<std::mutex> lock(mtx_);
        // 有写者等待或正在写,读者需要等待吗?
        // 读优先策略:读者不等待,直接进入
        // 如果想严格读优先,去掉下面的条件
        while (writing_ || write_pending_ > 0) {
            read_cond_.wait(lock);
        }
        read_count_++;
    }

    void RUnlock() override {
        std::unique_lock<std::mutex> lock(mtx_);
        read_count_--;
        if (read_count_ == 0) {
            // 所有读者离开,唤醒等待的写者
            write_cond_.notify_one();
        }
    }

    void WLock() override {
        std::unique_lock<std::mutex> lock(mtx_);
        write_pending_++;
        // 等待所有读者离开
        while (read_count_ > 0 || writing_) {
            write_cond_.wait(lock);
        }
        write_pending_--;
        writing_ = true;
    }

    void WUnlock() override {
        std::unique_lock<std::mutex> lock(mtx_);
        writing_ = false;
        // 优先唤醒写者(如果写者优先策略)
        // 读优先:这里可以改成 notify_all 让读者和写者竞争
        if (write_pending_ > 0) {
            write_cond_.notify_one();
        } else {
            read_cond_.notify_all();
        }
    }
};

// ==================== 写优先策略 ====================
// 写者优先:新读者需要等待已有写者完成后,但新写者可以插队到新读者前面
class RWLockWriteFirst : public RWLock {
private:
    std::mutex mtx_;
    std::condition_variable read_cond_;
    std::condition_variable write_cond_;
    int read_count_ = 0;       // 当前读者数量
    int write_pending_ = 0;    // 等待中的写者数量
    bool writing_ = false;     // 是否有写者正在写
    int active_readers_ = 0;   // 正在读的读者(在写者等待期间进入的)

public:
    void RLock() override {
        std::unique_lock<std::mutex> lock(mtx_);

        // 有写者等待时,新读者需要等待
        // 这是写优先的关键!
        while (writing_ || write_pending_ > 0) {
            read_cond_.wait(lock);
        }
        active_readers_++;
        read_count_++;
    }

    void RUnlock() override {
        std::unique_lock<std::mutex> lock(mtx_);
        read_count_--;
        active_readers_--;

        if (active_readers_ == 0 && write_pending_ > 0) {
            // 所有读者完成,唤醒写者
            write_cond_.notify_one();
        }
    }

    void WLock() override {
        std::unique_lock<std::mutex> lock(mtx_);
        write_pending_++;

        // 等待所有读者离开
        while (read_count_ > 0 || writing_) {
            write_cond_.wait(lock);
        }
        write_pending_--;
        writing_ = true;
    }

    void WUnlock() override {
        std::unique_lock<std::mutex> lock(mtx_);
        writing_ = false;

        // 写优先:优先唤醒写者
        if (write_pending_ > 0) {
            write_cond_.notify_one();
        } else if (read_count_ > active_readers_) {
            // 还有读者在等待,让它们继续
            read_cond_.notify_all();
        }
    }
};

// ==================== 公平策略(先来先服务) ====================
// 读者和写者按照请求顺序排队
class RWLockFair : public RWLock {
private:
    std::mutex mtx_;
    std::condition_variable read_cond_;
    std::condition_variable write_cond_;
    int read_count_ = 0;
    int write_count_ = 0;       // 等待的写者数量
    int active_writers_ = 0;    // 正在写的写者数量
    bool writer_waiting_ = false;  // 是否有写者在等待

public:
    void RLock() override {
        std::unique_lock<std::mutex> lock(mtx_);

        // 如果有写者在等待,读者需要等待
        // 这样保证先来的写者优先
        while (active_writers_ > 0 || writer_waiting_) {
            read_cond_.wait(lock);
        }
        read_count_++;
    }

    void RUnlock() override {
        std::unique_lock<std::mutex> lock(mtx_);
        read_count_--;

        if (read_count_ == 0 && write_count_ > 0) {
            // 所有读者完成,唤醒一个写者
            write_cond_.notify_one();
        }
    }

    void WLock() override {
        std::unique_lock<std::mutex> lock(mtx_);
        write_count_++;
        writer_waiting_ = true;

        while (active_writers_ > 0 || read_count_ > 0) {
            write_cond_.wait(lock);
        }
        writer_waiting_ = false;
        write_count_--;
        active_writers_++;
    }

    void WUnlock() override {
        std::unique_lock<std::mutex> lock(mtx_);
        active_writers_--;

        // 按照顺序唤醒:先写者(如果还有),再读者
        if (write_count_ > 0) {
            write_cond_.notify_one();
        } else {
            read_cond_.notify_all();
        }
    }
};

// ==================== 测试代码 ====================
int shared_data = 0;

template<typename RWLockType>
void testRWLock(const std::string& name) {
    RWLockType rwlock;
    shared_data = 0;

    std::cout << "\n=== 测试 " << name << " ===\n";

    // 读者线程
    auto reader = [&]() {
        for (int i = 0; i < 5; i++) {
            rwlock.RLock();
            int data = shared_data;
            std::cout << "读线程 " << std::this_thread::get_id()
                      << " 读取数据: " << data << "\n";
            std::this_thread::sleep_for(std::chrono::milliseconds(100));
            rwlock.RUnlock();
        }
    };

    // 写者线程
    auto writer = [&]() {
        for (int i = 0; i < 5; i++) {
            rwlock.WLock();
            shared_data++;
            std::cout << "写线程 " << std::this_thread::get_id()
                      << " 写入数据: " << shared_data << "\n";
            std::this_thread::sleep_for(std::chrono::milliseconds(150));
            rwlock.WUnlock();
        }
    };

    std::thread writers[] = {
        std::thread(writer), std::thread(writer)
    };
    std::thread readers[] = {
        std::thread(reader), std::thread(reader), std::thread(reader)
    };

    for (auto& w : writers) w.join();
    for (auto& r : readers) r.join();
}

int main() {
    testRWLock<RWLockReadFirst>("读优先策略");
    testRWLock<RWLockWriteFirst>("写优先策略");
    testRWLock<RWLockFair>("公平策略");

    return 0;
}
接口说明
go
type RWMutex
// 写锁定
func (rw *RWMutex) Lock()
// 写解锁
func (rw *RWMutex) Unlock()

// 读锁定
func (rw *RWMutex) RLock()
// 读解锁
func (rw *RWMutex) RUnlock()

// 尝试加写锁定
func (rw *RWMutex) TryLock() bool
// 尝试加读锁定
func (rw *RWMutex) TryRLock() bool
使用样例
go
func SyncRLock() {
    wg := sync.WaitGroup{}
    // 模拟多个goroutine
    var rwlck sync.RWMutex
    for i := 0; i < 10; i++ {
        wg.Add(1)
        go func() {
            defer wg.Done()
            //
            //rwlck.Lock()
            rwlck.RLock()
            // 输出一段内容
            fmt.Println(time.Now())
            time.Sleep(1 * time.Second)
            //
            //rwlck.Unlock()
            rwlck.RUnlock()
        }()
    }

    wg.Add(1)
    go func() {
        defer wg.Done()
        //
        rwlck.Lock()
        //rwlck.RLock()
        // 输出一段内容
        fmt.Println(time.Now(), "Lock")
        time.Sleep(1 * time.Second)
        //
        rwlck.Unlock()
        //rwlck.RUnlock()
    }()

    wg.Wait()
}
RLock 底层
结构
go
type RWMutex struct {
    w           Mutex      // 底层互斥锁,写操作使用
    writerSem   uint32     // 写者信号量
    readerSem   uint32     // 读者信号量
    readerCount int32      // 当前读者数量 ⚠️ 关键!多个 goroutine 同时修改这里 → 原子竞争!
    readerWait  int32      // 写者需要等待的读者数量
}
实现原理
go
func (rw *RWMutex) RLock() {
    // 步骤1: 原子增加 readerCount
    if atomic.AddInt32(&rw.readerCount, 1) < 0 {
        // 步骤2: 如果有写者持有锁,加入等待队列
        runtime_SemacquireRWMutexR(&rw.readerSem)
    }
}
Lock 源码
go
func (rw *RWMutex) Lock() {
    // 步骤1: 与其他写者竞争
    rw.w.Lock()  // ← 关键!保证只有一个写者能进入
                 //         多个 goroutine 同时 Lock(),只有一个能获得 w

    // 步骤2: 标记"有写者在等待"
    // 原来的 readerCount 加上 (-rwmutexMaxReaders)
    // 例如:readerCount = 5 → 变成 5 - 2^30 = 负数
    r := rw.readerCount.Add(-rwmutexMaxReaders) + rwmutexMaxReaders
    //             ↓
    //    readerCount 变成负数
    //    向所有后续 RLock() 发出信号:"有写者在等待!"

    // 步骤3: 等待现有读者完成
    if r != 0 && rw.readerWait.Add(r) != 0 {
        // readerWait = 需要等待的读者数量
        // 阻塞直到所有读者完成 RUnlock()
        runtime_SemacquireRWMutex(&rw.writerSem, false, 0)
    }
}
RLock 源码
go
func (rw *RWMutex) RLock() {
    // 步骤1: 原子增加 readerCount
    if rw.readerCount.Add(1) < 0 {
        // 步骤2: readerCount 是负数 → 有写者在等待
        //       当前 goroutine 加入读者等待队列
        runtime_SemacquireRWMutexR(&rw.readerSem, false, 0)
    }
}
UnLock 源码
go
func (rw *RWMutex) Unlock() {
    if race.Enabled {
        race.Read(unsafe.Pointer(&rw.w))
        race.Release(unsafe.Pointer(&rw.readerSem))
        race.Disable()
    }

    // 步骤1: 恢复 readerCount
    // 把负数变回正数
    r := rw.readerCount.Add(rwmutexMaxReaders)
    if r >= rwmutexMaxReaders {
        race.Enable()
        fatal("sync: Unlock of unlocked RWMutex")
    }

    // 步骤2: 唤醒所有等待的读者
    for i := 0; i < int(r); i++ {
        runtime_Semrelease(&rw.readerSem, false, 0)
    }

    // 步骤3: 释放 w 锁,允许其他写者
    rw.w.Unlock()
}
RUnLock 源码
go
func (rw *RWMutex) RUnlock() {
    if race.Enabled {
        race.Read(unsafe.Pointer(&rw.w))
        race.ReleaseMerge(unsafe.Pointer(&rw.writerSem))
        race.Disable()
    }

    // 步骤1: 原子减少 readerCount
    if r := rw.readerCount.Add(-1); r < 0 {
        // 步骤2: 慢路径 - 有写者在等待
        rw.rUnlockSlow(r)
    }
}

func (rw *RWMutex) rUnlockSlow(r int32) {
    if r+1 == 0 || r+1 == -rwmutexMaxReaders {
        race.Enable()
        fatal("sync: RUnlock of unlocked RWMutex")
    }

    // 步骤3: readerWait 减 1
    if rw.readerWait.Add(-1) == 0 {
        // 步骤4: 最后一个读者,唤醒写者!
        runtime_Semrelease(&rw.writerSem, false, 1)
    }
}
同步Map sync.Map
Go中Map是非线程(goroutine)安全的。并发操作 Map 类型时,会导致 <font style="color:rgb(36, 41, 46);background-color:rgba(27, 31, 35, 0.05);">fatal error: concurrent map read and map write</font>错误:
go
func SyncMapErr() {
    m := map[string]int{}
    // 并发map写
    go func() {
        for {
            m["key"] = 0
        }
    }()
    // 并发map读
    go func() {
        for {
            _ = m["key"]
        }
    }()
    // 阻塞
    select {}
}
之所以Go不支持Map的并发安全,是因为Go认为Map的典型使用场景不需要在多个Goroutine间并发安全操作Map。
并发安全操作Map的方案:
- 锁 + Map,自定义Map操作,增加锁的控制,可以选择 Mutex和RWMutex。
- sync.Map,sync包提供的安全Map.
锁+Map示例,在结构体内嵌入sync.Mutex:
go
func SyncMapLock() {
    myMap := struct {
        sync.RWMutex
        Data map[string]int
    }{
        Data: map[string]int{},
    }

    // write
    myMap.Lock()
    myMap.Data["key"] = 0
    myMap.Unlock()

    // read
    myMap.RLock()
    _ = myMap.Data["key"]
    myMap.RUnlock()
}
sync.Map 的使用
go
type Map
// 最常用的4个方法:
// 存储
func (m *Map) Store(key, value any)
// 遍历 map
func (m *Map) Range(f func(key, value any) bool)
// 删除某个key元素
func (m *Map) Delete(key any)
// 返回key的值。存在key,返回value,true,不存在返回 nil, false
func (m *Map) Load(key any) (value any, ok bool)

// 若m[key]==old,执行删除。key不存在,返回false
func (m *Map) CompareAndDelete(key, old any) (deleted bool)
// 若m[key]==old,执行交换, m[key] = new
func (m *Map) CompareAndSwap(key, old, new any) bool

// 返回值后删除元素。loaded 表示是否load成功,key不存在,loaded为false
func (m *Map) LoadAndDelete(key any) (value any, loaded bool)
// 加载,若加载失败则存储。返回加载或存储的值和是否加载
func (m *Map) LoadOrStore(key, value any) (actual any, loaded bool)

// 存储新值,返回之前的值。loaded表示key是否存在
func (m *Map) Swap(key, value any) (previous any, loaded bool)
sync.Map 不需要类型初始化,即可使用,可以理解为mapcomparableany。
使用示例,不会触发 <font style="color:rgb(36, 41, 46);background-color:rgba(27, 31, 35, 0.05);">fatal error: concurrent map read and map write</font>:
go
func SyncSyncMap() {
    var m sync.Map
    go func() {
        for {
            m.Store("key", 0)
        }
    }()
    go func() {
        for {
            _, _ = m.Load("key")
        }
    }()
    select {}
}
sync.Map 底层实现
sync.Map 使用了分段锁 + 读写分离的设计:
go
type Map struct {
    mu     Mutex      // 保护 dirty 字段
    read   atomic.Pointer<readMap>  // 读map(无锁)
    dirty  map[interface{}]*entry   // 写map(需要加锁)
    misses int                       // 读miss计数
}
readMap(只读层):
- 包含大部分数据
- 使用 atomic 操作,无需加锁
- 存储 *entry,支持标记删除
dirtyMap(写层):
- 只包含新写入的数据
- 需要 mu 锁保护
- 数据不完整
为什么锁+Map写快读慢?
对于读多写少的场景,sync.Map 反而更快,原因如下:
读操作对比
| 特性 | RWMutex + Map | sync.Map |
|---|---|---|
| 锁类型 | 共享读锁 | 无锁(原子操作) |
| 并发度 | 多个读共享锁 | 完全并发 |
| 竞争 | 读操作竞争同一把 CAS 锁(修改读用户数量是原子修改,需要竞争) | 无竞争(读取 read 指针原子操作) |
| 缓存行 | 多线程争用 | 每个线程独立访问 |
sync.Map 读快的原因:
- 读操作完全无锁 - 使用 atomic.LoadPointer 读取 readMap
:::info
-
读缓存友好 - 没有锁竞争,CPU缓存更稳定
-
无伪共享 - 没有锁的缓存行争用问题
:::
写操作对比
| 特性 | RWMutex + Map | sync.Map |
|---|---|---|
| 锁类型 | 独占写锁 | Mutex + 双map维护 |
| 开销 | 单次加锁 | read+dirty同步、misses计数 |
| 删除 | 直接删除 | 标记删除 + 提升dirty |
sync.Map 写慢的原因:
- 需要维护两个map
- 删除不能直接删除,只能标记
- dirty提升到read时需要锁住整个map(这个 map 指的是什么)
sync.Map 的工作流程 TODO
读操作(Read)
go
┌─────────────────────────────────────────┐
│         尝试从 readMap 读取              │
│         (无锁,原子操作)                 │
└────────────────┬────────────────────────┘
                 │
        ┌───────┴───────┐
        ↓               ↓
     找到 ✓           未找到 ✗
        │               │
        ↓               ↓
    返回value     ┌────┴────┐
                  ↓         ↓
            检查是否标记     直接返回nil
            删除(soft delete)   │
                  │             │
                  ↓             ↓
            从dirty读取    记录miss
                  │         (mu锁)
                  └─────┬───────┘
                        ↓
              dirty非空时提升readMap
写操作(Store)
go
┌─────────────────────────────────────────┐
│         加锁 (mu.Lock)                  │
└────────────────┬────────────────────────┘
                 │
        ┌────────┴────────┐
        ↓                 ↓
   read中不存在?      read中存在?
        │                 │
        ↓                 ↓
   写入dirty       更新/标记删除
   (创建如果为空)   (read是copy-on-write)
        │                 │
        └────────┬────────┘
                 │
        ┌────────┴────────┐
        ↓                 ↓
   misses >= len(dirty) → 提升dirty到read
        │                 │
        ↓                 ↓
   清空dirty         释放锁
   重置misses
何时使用 sync.Map
✅ 适合:
- 读多写少(读>90%)
- 并发读远多于并发写
- key固定不变或很少删除
❌ 不适合:
- 写多读少
- 需要遍历所有数据(Range 需要锁)
- 需要精确统计长度
简单来说,sync.Map 用空间换时间,用额外的内存维护 read/dirty 双map,换取读操作的极致性能。
原子操作 sync/atomic
原子操作是CPU指令级别实现的,比如在Intel的CPU上主要是使用总线锁的方式,AMD的CPU架构机器上就是使用MESI一致性协议的方式来保证原子操作。
go中 sync/atomic 包提供了原子操作的支持
除了预定义的整型的支持,还可以使用 atomic.Value 类型,完成其他类型的原子操作:
go
type Value
func (v *Value) CompareAndSwap(old, new any) (swapped bool)
func (v *Value) Load() (val any)
func (v *Value) Store(val any)
func (v *Value) Swap(new any) (old any)
使用方法:
go
func SyncAtomicValue() {

    var loadConfig = func() map[string]string {
        return map[string]string{
            // some config
            "title":   "马士兵Go并发编程",
            "varConf": fmt.Sprintf("%d", rand.Int63()),
        }
    }

    var config atomic.Value

    // 每N秒加载一次配置文件
    go func() {
        for {
            config.Store(loadConfig())
            fmt.Println("latest config was loaded", time.Now().Format("15:04:05.99999999"))
            time.Sleep(time.Second)
        }
    }()

    // 使用配置
    // 不能在加载的过程中使用配置
    for {
        go func() {
            c := config.Load()
            fmt.Println(c, time.Now().Format("15:04:05.99999999"))
        }()

        time.Sleep(400 * time.Millisecond)
    }

    select {}
}
sync.Pool 并发安全池
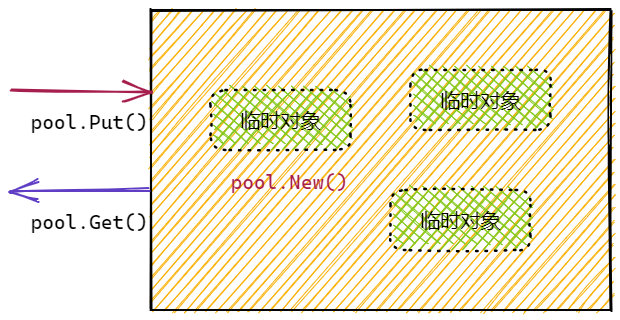
池是一组可以单独保存和检索的可以复用的临时对象。存储在池中的任何项目可随时自动删除,无需通知。一个池可以安全地同时被多个goroutine使用。
典型特征:
- sync.Pool 是并发安全的
- 池中的对象由Go负责删除,内存由Go自己回收
- 池中元素的数量由Go负责管理,用户无法干预
- 池中元素应该是临时的,不应该是持久的。例如长连接不适合放入 sync.Pool 中
池的目的是缓存已分配但未使用的项目以供以后重用,从而减轻垃圾收集器的压力。也就是说,它使构建高效、线程安全的自由元素变得容易。
池的一个适当用途是管理一组临时项 ,这些临时项在包的并发独立客户端之间默默共享,并可能被其重用。池提供了一种在许多客户机上分摊分配开销的方法。
一个很好地使用池的例子是fmt包,它维护了临时输出缓冲区的动态大小存储。
池由 sync.Pool类型实现,具体三个操作:
- 初始化Pool实例,需要提供池中缓存元素的New方法。
- 申请元素,func (p *Pool) Get() any
- 交回对象,func (p *Pool) Put(x any)
操作示例:
go
func SyncPool() {
    // 原子的计数器
    var counter int32 = 0

    // 定义元素的Newer,创建器
    elementNewer := func() any {
        // 原子的计数器累加
        atomic.AddInt32(&counter, 1)

        // 池中元素推荐(强烈)是指针类型
        return new(bytes.Buffer)
    }

    // Pool的初始化
    pool := sync.Pool{
        New: elementNewer,
    }

    // 并发的申请和交回元素
    workerNum := 1024 * 1024
    wg := sync.WaitGroup{}
    wg.Add(workerNum)
    for i := 0; i < workerNum; i++ {
        go func() {
            defer wg.Done()
            // 申请元素,通常需要断言为特定类型
            buffer := pool.Get().(*bytes.Buffer)
            // 不用Pool
            //buffer := elementNewer().(*bytes.Buffer)
            // 交回元素
            defer pool.Put(buffer)
            // 使用元素
            _ = buffer.String()
        }()
    }

    //
    wg.Wait()

    // 测试创建元素的次数
    fmt.Println("elements number is :", counter)
}

// elements number is : 12
测试的时候,大家可以发现创建的元素数量远远低于goroutine的数量。
DATA RACE 现象
当程序运行时,由于并发的原因会导致数据竞争使用,有时在编写代码时很难发现,要经过大量测试才会发现。可以用 <font style="color:rgb(36, 41, 46);background-color:rgba(27, 31, 35, 0.05);">go run -race </font> ,增加-race选项,检测运行时可能出现的竞争问题。
测试之前的计数器累加代码:本例子需要 main.main 来演示,因为是 go run:
go
package main

import (
    "fmt"
    "sync"
)

func main() {
    wg := sync.WaitGroup{}
    // 计数器
    counter := 0
    // 多个goroutine并发的累加计数器
    gs := 1000
    wg.Add(gs)
    for i := 0; i < gs; i++ {
        go func() {
            defer wg.Done()
            // 累加
            for k := 0; k < 100; k++ {
                counter++
                // ++ 操作不是原子的
                // counter = counter + 1
                // 1. 获取当前的counter变量
                // 2. +1
                // 3. 赋值新值到counter
            }
        }()
    }
    // 统计计数结果
    wg.Wait()
    fmt.Println("Counter:", counter)
}
结果:
shell
# 没有使用 -race
PS D:\apps\goExample\concurrency> go run .\syncRace.go
n: 94077

# 使用 -race
PS D:\apps\goExample\concurrency> go run -race .\syncRace.go
==================
WARNING: DATA RACE
Read at 0x00c00000e0f8 by goroutine 9:
  main.main.func1()
      D:/apps/goExample/concurrency/syncMain.go:16 +0xa8

Previous write at 0x00c00000e0f8 by goroutine 7:
Goroutine 9 (running) created at:
  main.main()
      D:/apps/goExample/concurrency/syncMain.go:13 +0x84

Goroutine 7 (finished) created at:
  main.main()
      D:/apps/goExample/concurrency/syncMain.go:13 +0x84
==================
n: 98807
Found 1 data race(s)
exit status 66
该选项用于在开发阶段,检测数据竞争情况。
出现 data race情况,可以使用锁,或原子操作的来解决。
sync.Once
若需要保证多个并发goroutine中,某段代码仅仅执行一次,就可以使用 sync.Once 结构实现。
例如,在获取配置的时候,往往仅仅需要获取一次,然后去使用。在多个goroutine并发时,要保证能够获取到配置,同时仅获取一次配置,就可以使用sync.Once结构:
go
func SyncOnce() {

    // 初始化config变量
    config := make(map[string]string)

    // 1. 初始化 sync.Once
    once := sync.Once{}

    // 加载配置的函数
    loadConfig := func() {
        // 2. 利用 once.Do() 来执行
        once.Do(func() {
            // 保证执行一次
            config = map[string]string{
                "varInt": fmt.Sprintf("%d", rand.Int31()),
            }
            fmt.Println("config loaded")
        })
    }

    // 模拟多个goroutine,多次调用加载配置
    // 测试加载配置操作,执行了几次
    workers := 10
    wg := sync.WaitGroup{}
    wg.Add(workers)
    for i := 0; i < workers; i++ {
        go func() {
            defer wg.Done()
            // 并发的多次加载配置
            loadConfig()
            // 使用配置
            _ = config

        }()
    }
    wg.Wait()
}
核心逻辑:
- 初始化 sync.Once
- once.Do(func()) 可以确保func()仅仅执行一次
sync.Once 的实现很简单:
go
type Once struct {
    // 是否已处理,保证一次
    done uint32
    // 锁,保证并发安全
    m    Mutex
}
sync.Cond
sync.Cond是sync包提供的基于条件(Condition)的通知结构。
该结构提供了4个方法:
go
// 创建Cond
func NewCond(l Locker) *Cond
// 全部唤醒
func (c *Cond) Broadcast()
// 唤醒1个
func (c *Cond) Signal()
// 等待唤醒
func (c *Cond) Wait()
其中,创建时,需要1个Locker作为参数,通常是 sync.Mutext或sync.RWMutex。然后两个方法用来通知,一个方法用来等待。
使用逻辑很简单,通常是一个goroutine负责通知,多个goroutine等待处理,如图:
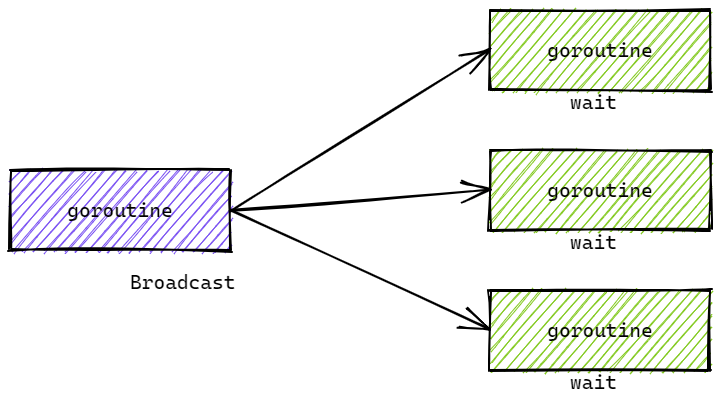
go
cond := sync.NewCond(&sync.Mutex{})
cond := sync.NewCond(&sync.RWMutex{})
cond的广播和信号通知操作是并发安全的,可以重复调用的。
要注意Wait()操作,是会先解锁,等到广播信号后,再加锁。因此,Wait()操作前,要加锁。
示例代码:
- 一个goroutine负责接收数据,完毕后,广播给处理数据的goroutine
- 多个goroutine处理数据,在数据未处理完前,等待广播信号。信号来了,处理数据
go
func SyncCond() {
    wg := sync.WaitGroup{}
    dataCap := 1024 * 1024
    var data []int
    cond := sync.NewCond(&sync.Mutex{})
    for i := 0; i < 8; i++ {
        wg.Add(1)
        go func(c *sync.Cond) {
            defer wg.Done()
            c.L.Lock()
            for len(data) < dataCap {
                c.Wait()
            }
            fmt.Println("listen", len(data), time.Now())
            c.L.Unlock()
        }(cond)
    }

    wg.Add(1)
    go func(c *sync.Cond) {
        defer wg.Done()
        c.L.Lock()
        defer c.L.Unlock()
        for i := 0; i < dataCap; i++ {
            data = append(data, i*i)
        }
        fmt.Println("Broadcast")
        c.Broadcast()
        //c.Signal()
    }(cond)

    // 为什么 for { wait() }
    // 另外的广播goroutine
    //wg.Add(1)
    //go func(c *sync.Cond) {
    //    defer wg.Done()
    //    c.Broadcast()
    //}(cond)

    wg.Wait()
}
示例代码要点:
- 因为调度问题,不能决定哪个协程先执行。所以会出现,先 broadcast 再 wait,有部分协程没有被唤醒。所以一定要在 wait 前判断条件。这个条件判断使用 for,为了让 wait 返回后再判断,防止其他地方 boradcast
- wait要使用for进行条件判定,因为在wait返回后,条件不一定成立。因为Broadcast()操作可能被提前调用(通常是在其他的goroutine中。
- Broadcast() 操作可选的是否加锁解锁
- Wait() 操作前,一定要加锁。因为Wait()操作,会先解锁,接收到信号后,再加锁。
sync.Cond 基本原理
sync.Cond结构:
go
type Cond struct {
    // 锁
    L Locker
    // 等待通知goroutine列表
    notify  notifyList

    // 限制不能被拷贝
    noCopy noCopy
    checker copyChecker
}
结构上可见,Cond记录了等待的goroutine列表,这样就可以做到,广播到全部的等待goroutine。这也是Cond应该被复制的原因,否则这些goroutine可能会被意外唤醒。
Wait() 操作:
go
func (c *Cond) Wait() {
   // 检查是否被复制
   c.checker.check()
   // 更新 notifyList 中需要等待的 waiter 的数量
   // 返回当前需要插入 notifyList 的编号
   t := runtime_notifyListAdd(&c.notify)
   // 解锁
   c.L.Unlock()
   // 挂起,直到被唤醒
   runtime_notifyListWait(&c.notify, t)
   // 唤醒之后,重新加锁。
   // 因为阻塞之前解锁了。
   c.L.Lock()
}
核心工作就是,记录当goroutine到Cond的notifyList。之后解锁,挂起,加锁。因此要在Wait()前加锁,后边要解锁。
Broadcast()操作:
go
func (c *Cond) Broadcast() {
   // 检查 sync.Cond 是否被复制了
   c.checker.check()
   // 唤醒 notifyList 中的所有 goroutine
   runtime_notifyListNotifyAll(&c.notify)
}
核心工作就是唤醒 notifyList 中全部的 goroutine。
小结
同步类型:
- 数据同步,保证数据操作的原子性
- sync/atomic
- sync.Map
- sync.Mutex, sync.RWMutex
- 操作同步
- sync.Mutex, sync.RWMutex
锁的类型:
- 互斥锁 sync.Mutex,完全独占
- 读写互斥锁 sync.RWMutex,可以共享读操作
锁的不锁资源,只是锁定申请锁本身的操作。
sync包总结
- 锁:sync.Mutex, sync.RWMutex
- 数据:sync.Map, sync/atomic
- sync.Pool
- sync.Once
- sync.Cond
使用Channel完成数据和信号的同步!
案例
并发目录大小统计
业务逻辑
统计目录的文件数量和大小(或其他信息)。示例输出:
shell
// 某个目录:
2637 files 1149.87 MB
实现思路
- 给定一个或多个目录,并发的统计每个目录的size,最后累加到一起。
- 当目录中存在子目录时,递归的统计。
- 每个目录的统计都由独立的Goroutine完成
- 累计总Size由独立的Goroutine完成
- 使用Channel传递获取的文件大小
- 使用WaitGroup调度
核心代码
go
// 读取目录内容
// os.ReadDir
func ReadDir(name string) ([]DirEntry, error)
entries, err := os.ReadDir(dir)

// 取得文件信息
info, err := entry.Info()

//判定是否为目录
entry.IsDir()
编码实现
go
package main

import (
	"fmt"
	"io/fs"
	"os"
	"path/filepath"
	"sync"
)

// WalkDir 遍历指定目录列表,计算所有文件的总大小和数量
// 参数 dirs: 可变数量的目录路径,如果不传则默认为当前目录"."
// 返回: 格式化字符串,包含文件数量和总大小(MB)
func WalkDir(dirs ...string) string {
	// 如果没有传入任何目录,使用当前目录作为默认值
	if len(dirs) == 0 {
		dirs = []string{"."}
	}

	// 创建带缓冲的通道,缓冲大小为1
	// 缓冲可以避免在等待接收时阻塞发送方,提高并发效率
	filesizeCh := make(chan int64, 1)

	// 初始化等待组,用于等待所有goroutine完成
	wg := &sync.WaitGroup{}

	// 遍历每个待处理的目录
	for _, dir := range dirs {
		// 等待组计数加1,表示有一个新的goroutine开始工作
		wg.Add(1)
		// 启动goroutine异步遍历子目录
		go walkDir(dir, filesizeCh, wg)
	}

	// 单独启动一个goroutine等待所有walkDir任务完成
	// 当所有goroutine完成后,关闭filesizeCh通道
	// 这样range循环就能正确结束
	go func(wg *sync.WaitGroup) {
		// 阻塞等待,直到所有goroutine调用wg.Done()
		wg.Wait()
		// 关闭通道,通知接收方没有更多数据了
		close(filesizeCh)
	}(wg)

	// 初始化计数器
	var fileNum, sizeTotal int64

	// 从通道中读取所有文件大小数据
	// 当通道被关闭时,range循环会自动结束
	for filesize := range filesizeCh {
		fileNum++      // 文件数量加1
		sizeTotal += filesize  // 累加文件大小
	}

	// 格式化输出结果
	// 文件数量取整,总大小转换为MB(1e6字节 = 1MB)
	return fmt.Sprintf("%d files %.2f MB\n", fileNum, float64(sizeTotal)/1e6)
}

// walkDir 递归遍历目录,发送所有文件的大小到通道
// 参数 dir: 当前要遍历的目录路径
// 参数 fileSizes: 用于发送文件大小的通道
// 参数 wg: 等待组引用,用于标记任务完成
func walkDir(dir string, fileSizes chan<- int64, wg *sync.WaitGroup) {
	// defer确保在函数返回时调用wg.Done()
	// 即使发生panic,也会执行,保证计数器正确递减
	defer wg.Done()

	// 获取目录下所有文件和子目录的信息
	for _, fileinfo := range fileInfos(dir) {
		// 判断当前条目是否是目录
		if fileinfo.IsDir() {
			// 构建子目录的完整路径
			subDir := filepath.Join(dir, fileinfo.Name())

			// 遇到子目录,需要递归遍历
			// 先增加等待组计数
			wg.Add(1)
			// 启动新的goroutine处理子目录
			go walkDir(subDir, fileSizes, wg)
		} else {
			// 如果是文件,将文件大小发送到通道
			// 非阻塞发送,因为通道有1个缓冲
			fileSizes <- fileinfo.Size()
		}
	}
}

// fileInfos 读取指定目录下的所有文件信息
// 参数 dir: 目录路径
// 返回: 文件信息切片,读取失败时返回空切片
测试执行
shell
> go test -run=WalkDir
70 files 0.09 MB

PASS
ok      goConcurrency   0.321s
快速排序的并发编程实现
典型的单线程快速排序实现
go
func QuickSortSingle(arr []int) []int {
    // 确保arr中至少存在2个或以上元素
    if arr == nil || len(arr) < 2 {
        return arr
    }
    // 执行排序
    quickSortSingle(arr, 0, len(arr)-1)
    return arr
}

func quickSortSingle(arr []int, l, r int) {
    // 判定待排序范围是否合法
    if l < r {
        // 获取参考元素位置索引
        mid := partition(arr, l, r)
        // 递归排序左边
        quickSortSingle(arr, l, mid-1)
        // 递归排序右边
        quickSortSingle(arr, mid+1, r)
    }
}

// 大小分区,返回参考元素索引
func partition(arr []int, l, r int) int {
    p := l - 1
    for i := l; i <= r; i++ {
        if arr[i] <= arr[r] {
            p++
            swap(arr, p, i)
        }
    }
    return p
}

// 交换arr中i和j元素
func swap(arr []int, i, j int) {
    t := arr[i]
    arr[i] = arr[j]
    arr[j] = t
}
并发编程实现思路
- 使用独立的Goroutine完成arr中某部分的排序
- WaitGroup 完成等待阻塞同步
编码实现
go
// QuickSortConcurrency 快速排序调用函数
func QuickSortConcurrency(arr []int) []int {
	// 一:校验arr是否满足排序需要,至少要有2个元素
	if arr == nil || len(arr) < 2 {
		return arr
	}

	// 四:同步的控制
	wg := &sync.WaitGroup{}
	// 二:执行排序
	// 初始排序整体[0, len(arr)-1]
	wg.Add(1)
	go quickSortConcurrency(arr, 0, len(arr)-1, wg)
	wg.Wait()

	// 三:返回结果
	return arr
}

// 实现递归快排的核心函数
// 接收arr,和排序区间的索引位置[l, r]
func quickSortConcurrency(arr []int, l, r int, wg *sync.WaitGroup) {
	// 一:-1wg的计数器
	defer wg.Done()

	// 二:判定是否需要排序, l < r
	if l < r {
		// 三:大小分区元素,并获取参考元素索引
		mid := partition(arr, l, r)

		// 四:并发对左部分排序
		wg.Add(1)
		go quickSortConcurrency(arr, l, mid-1, wg)

		// 五:并发的对右部分排序
		wg.Add(1)
		go quickSortConcurrency(arr, mid+1, r, wg)
	}
}
partition 和 swap 部分不变。
测试执行
shell
func TestQuickSortConcurrency(t *testing.T) {
	randArr := GenerateRandArr(1000)
	sortArr := QuickSortConcurrency(randArr)
	fmt.Println(sortArr)
}


// 生成大的随机数组
func GenerateRandArr(l int) []int {
	// 生产大量的随机数
	arr := make([]int, l)
	rand.Seed(time.Now().UnixMilli())
	for i := 0; i < l; i++ {
		arr[i] = int(rand.Int31n(int32(l * 5)))
	}

	return arr
}
shell
> go test -run=QuickSortConcurrency参考文件:src/runtime 源码。