
本篇博客给大家带来的是测试项目的过程记录, 包括测试优先级、测试覆盖率的考量,以及对测试结果的分析。
🐎文章专栏: 测试实战
★gitee: "发好论坛"接口自动化测试源码
🚀若有问题 评论区见
❤ 欢迎大家点赞 评论 收藏 分享
如果你不知道分享给谁,那就分享给薯条.
你们的支持是我不断创作的动力 .
王子,公主请阅🚀
- 要开心
- [一. 前言](#一. 前言)
- [二. 技术选型与架构设计](#二. 技术选型与架构设计)
-
- [2.1 技术栈](#2.1 技术栈)
- [2.2 框架设计思想](#2.2 框架设计思想)
- [三. 核心功能与亮点](#三. 核心功能与亮点)
-
- [3.1 统一的 Cookie 鉴权管理](#3.1 统一的 Cookie 鉴权管理)
- [3.2 数据驱动 (YAML + Pytest)](#3.2 数据驱动 (YAML + Pytest))
- [3.3 解决接口依赖:动态数据提取](#3.3 解决接口依赖:动态数据提取)
- [3.4 JSON Schema 结构校验](#3.4 JSON Schema 结构校验)
-
-
- [四. 遇到的bug](#四. 遇到的bug)
- [五. 效果展示](#五. 效果展示)
-
- [5.1 自动生成的日志](#5.1 自动生成的日志)
- [5.2 Allure 可视化报告](#5.2 Allure 可视化报告)
- [六. 后续优化](#六. 后续优化)
-
-
要开心
要快乐
顺便进步
一. 前言
在敏捷开发模式下,后端接口变动频繁。为了提高回归测试效率,保证发好论坛核心业务(发帖、回复、点赞)的稳定性,我实现了一套基于 Python + Pytest + Requests 的接口自动化测试框架。
本项目不仅仅是简单的接口调用,更着重解决了接口间的数据依赖、复杂的 Cookie 鉴权管理以及动态数据校验等痛点,最终实现了测试数据与代码的完全分离。
二. 技术选型与架构设计
2.1 技术栈
| 类别 | 选型工具 | 核心优势 | 典型应用场景 |
|---|---|---|---|
| 编程语言 | Python 3.7+ | 丰富的第三方库生态(如 requests, pytest),语法简洁 | 快速编写可维护的测试脚本,适合复杂业务逻辑校验 |
| 测试框架 | Pytest | Fixture 机制 支持全局复用(如登录态)、插件生态丰富(参数化) | 解决全局状态管理问题,提升测试执行效率 |
| HTTP 请求库 | Requests | 简洁易用,自动处理连接池、Cookie 持久化和 Header 注入,支持 Session 对象 | 封装统一请求类,实现异常捕获和日志拦截 |
| 数据驱动 | PyYAML | 支持代码与数据分离 | 管理复杂接口参数(如发帖数据),便于非技术人员维护用例 |
| 深度校验 | JSON Schema | 契约测试能力,校验字段类型、必要性和嵌套结构,避免数据结构变更导致的隐性缺陷 | 对接口返回值进行全量校验,构建健壮的测试防御网 |
| 测试报告 | Allure | 可视化 Dashboard,支持按严重等级分类用例,嵌入请求参数、响应体和日志附件 | 提升报告可读性,加速 Bug 排查流程 |
结果输出层 Output
核心封装层 Common & Utils
数据层 Data Driven
配置层 Configuration
业务测试层 TestCases
用户模块
test_user
文章模块
test_article
板块模块
test_board
Fixture 管理层
conftest.py
全局配置
login_fixtures.py
request_fixtures.py
config.yaml
logging.yaml
YAML Test Data
JSON Schema Definitions
BaseRequest
Requests封装
CookieManager
鉴权管理
DataExtractor
数据提取
Logger
日志记录
Allure Report
可视化报告
Runtime Logs
运行日志
2.2 框架设计思想
本项目采用了分层架构设计,将配置、数据、逻辑、用例进行解耦,目录结构如下(精简版):
forum_api_test/
├── config/ # 全局配置 & 日志配置
├── data/ # YAML 测试数据(按模块分类)
├── common/ # 公共组件(请求封装、Cookie管理、Schema校验)
├── fixtures/ # Pytest Fixture 库
├── testcases/ # 测试用例(业务逻辑)
├── utils/ # 工具类(文件、时间、随机数)
└── conftest.py # 全局钩子与配置
当业务逻辑变更时,只需修改 YAML 数据或 common 层代码,无需大规模改动测试用例。
三. 核心功能与亮点
3.1 统一的 Cookie 鉴权管理
论坛系统的核心操作(如发帖、点赞)都需要登录态。为了避免在每个用例中重复登录,我封装了 CookieManager 类。
python
"""
Cookie管理类(从登录接口获取并存储Cookie)
"""
from typing import Optional
import requests
from common.logger import get_logger

logger = get_logger(__name__)


class CookieManager:
    """Cookie管理类"""

    def __init__(self):
        """初始化Cookie管理器"""
        self._cookie: Optional[str] = None

    def save_cookie_from_response(self, response: requests.Response):
        """
        从响应中提取并保存Cookie

        Args:
            response: HTTP响应对象
        """
        if 'Set-Cookie' in response.headers:
            cookie_value = response.headers['Set-Cookie']
            self._cookie = cookie_value
            logger.info(f"保存Cookie: {cookie_value[:50]}...")
        elif response.cookies:
            # 如果响应中有cookies,也保存
            cookie_dict = {}
            for cookie in response.cookies:
                cookie_dict[cookie.name] = cookie.value
            self._cookie = '; '.join([f"{k}={v}" for k, v in cookie_dict.items()])
            logger.info(f"保存Cookie: {self._cookie[:50]}...")

    def get_cookie(self) -> Optional[str]:
        """
        获取当前保存的Cookie

        Returns:
            Cookie字符串,如果不存在则返回None
        """
        return self._cookie

    def clear_cookie(self):
        """清除Cookie"""
        self._cookie = None
        logger.info("清除Cookie")
3.2 数据驱动 (YAML + Pytest)
为了让非开发人员也能维护用例,我将测试数据抽离到 data/ 目录下的 YAML 文件中。 例如 create_article_data.yaml:
python
# 新增文章测试数据
# 字段说明:
# - title: 文章标题
# - content: 文章内容
test_cases:
  - name: 正常新增
    title: 博客标题
    content: 博客内容
    expected_status: 200
    expected_code: 0

  - name: 标题为空
    title: ""
    content: 博客内容
    expected_status: 200
    expected_code: 1002

  - name: 内容为空
    title: 博客标题
    content: ""
    expected_status: 200
    expected_code: 1002

  - name: 标题和内容都为空
    title: ""
    content: ""
    expected_status: 200
    expected_code: 1002

  - name: 标题超长
    title: 超长
    content: 博客内容
    expected_status: 200
    expected_code: 1000

  - name: 内容超长
    title: 博客标题
    content: 超长
    expected_status: 200
    expected_code: 0

#  xss攻击
  - name: 标题包含特殊字符
    title: "<script>alert('xss')</script>"
    content: 博客内容
    expected_status: 200
    expected_code: 0

  - name: 标题为空格
    title: "   "
    content: 博客内容
    expected_status: 200
    expected_code: 0

  - name: 内容为空格
    title: 博客标题
    content: "   "
    expected_status: 200
    expected_code: 0
在测试用例中,配合 @pytest.mark.parametrize 动态读取 YAML,实现了一条脚本覆盖 N 种测试场景。
python
"""
新增文章测试用例
"""
import pytest
from utils.yaml_utils import get_test_data
from common.logger import get_logger
from common.schema_validator import SchemaValidator
from schemas.article_schemas import create_article_schema

logger = get_logger(__name__)


@pytest.mark.article
@pytest.mark.order(4)  # 接口4:新增帖子
@pytest.mark.parametrize('test_case', get_test_data('data/article/create_article_data.yaml'))
def test_create_article(request_client, auto_login, test_case):
    """
    测试新增文章接口

    Args:
        request_client: 请求客户端fixture
        auto_login: 自动登录fixture
        test_case: 测试用例数据
    """
    # 准备测试数据
    # 字段映射:
    # json_data['content'] = test_case的content(内容)
    # json_data['title'] = test_case的title(标题)
    json_data = {}

    # 处理文章标题
    title = test_case.get('title')
    if title and title != "超长":
        json_data['title'] = title
    elif title == "超长":
        json_data['title'] = "fasfsaf31fsafasfsaf31fsafasfsaf31fsafasfsaf31fsafasfsaf31fsafasfsagagadsfaaf31fsafasfsaf31fsafasfsaf31fsfafaf"
    else:
        if title is not None:
            json_data['title'] = title

    # 处理文章内容
    content = test_case.get('content')
    if content and content != "超长":
        json_data['content'] = content
    elif content == "超长":
        # 生成超长内容
        json_data['content'] = "超长" * 10000
    else:
        if content is not None:
            json_data['content'] = content

    # 发送请求(使用form-data,boardId作为查询参数)
    response = request_client.post('/article/create?boardId=1', data=json_data)

    # 断言状态码
    assert response.status_code == test_case.get('expected_status'), \
        f"状态码不符合预期,实际: {response.status_code}, 预期: {test_case.get('expected_status')}"

    # 验证响应code和Schema
    if response.status_code == 200:
        try:
            response_data = response.json()
            expected_code = test_case.get('expected_code')
            actual_code = response_data.get('code')
            assert actual_code == expected_code, \
                f"响应code不符合预期,实际: {actual_code}, 预期: {expected_code}, 消息: {response_data.get('message')}"

            # Schema验证
            is_valid, error_msg = SchemaValidator.validate(response_data, create_article_schema)
            assert is_valid, f"响应结构验证失败: {error_msg}"
        except Exception as e:
            logger.error(f"解析响应失败: {e}, 响应内容: {response.text}")
            raise
3.3 解决接口依赖:动态数据提取
在测试"文章详情"或"点赞"接口时,必须依赖上一步查询到或者生成的 articleId,文章是有可能被删除的,如果写死的话,很有可能在不久的将来查询不到文章ID。
- 痛点:ID 是动态生成的,无法硬编码。
- 解决方案 :编写 DataExtractor 类和 article_fixtures.py。通过调用"获取板块文章列表"接口,实时提取最新的 articleId 并注入到下游用例中,形成了闭环的接口测试链。
python
"""
数据提取类(从接口响应中提取articleId等)
"""
from typing import Any, Optional, List
from common.logger import get_logger

logger = get_logger(__name__)


class DataExtractor:
    """数据提取类"""

    @staticmethod
    def extract_article_id(response_data: Any) -> Optional[int]:
        """
        从响应数据中提取articleId(或id字段)

        Args:
            response_data: 接口响应数据(字典或列表)

        Returns:
            articleId,如果不存在则返回None
        """
        try:
            if isinstance(response_data, dict):
                # 如果是字典,直接获取id或articleId
                if 'id' in response_data:
                    article_id = response_data['id']
                    logger.info(f"提取到id: {article_id}")
                    return article_id
                if 'articleId' in response_data:
                    article_id = response_data['articleId']
                    logger.info(f"提取到articleId: {article_id}")
                    return article_id
                # 如果是列表响应,取第一个
                if 'data' in response_data:
                    data = response_data['data']
                    if isinstance(data, list) and len(data) > 0:
                        if 'id' in data[0]:
                            article_id = data[0]['id']
                            logger.info(f"提取到id: {article_id}")
                            return article_id
                        if 'articleId' in data[0]:
                            article_id = data[0]['articleId']
                            logger.info(f"提取到articleId: {article_id}")
                            return article_id

            elif isinstance(response_data, list):
                # 如果是列表,取第一个元素的id或articleId
                if response_data and isinstance(response_data[0], dict):
                    if 'id' in response_data[0]:
                        article_id = response_data[0]['id']
                        logger.info(f"提取到id: {article_id}")
                        return article_id
                    if 'articleId' in response_data[0]:
                        article_id = response_data[0]['articleId']
                        logger.info(f"提取到articleId: {article_id}")
                        return article_id

            logger.warning("未找到articleId或id")
            return None
        except Exception as e:
            logger.error(f"提取articleId失败: {e}")
            return None

    @staticmethod
    def extract_user_id(response_data: Any) -> Optional[int]:
        """
        从响应数据中提取userId

        Args:
            response_data: 接口响应数据

        Returns:
            userId,如果不存在则返回None
        """
        try:
            if isinstance(response_data, dict):
                if 'userId' in response_data:
                    user_id = response_data['userId']
                    logger.info(f"提取到userId: {user_id}")
                    return user_id
                if 'data' in response_data and isinstance(response_data['data'], dict):
                    if 'userId' in response_data['data']:
                        user_id = response_data['data']['userId']
                        logger.info(f"提取到userId: {user_id}")
                        return user_id

            logger.warning("未找到userId")
            return None
        except Exception as e:
            logger.error(f"提取userId失败: {e}")
            return None

    @staticmethod
    def extract_field(response_data: Any, field_name: str) -> Optional[Any]:
        """
        从响应数据中提取指定字段

        Args:
            response_data: 接口响应数据
            field_name: 字段名

        Returns:
            字段值,如果不存在则返回None
        """
        try:
            if isinstance(response_data, dict):
                if field_name in response_data:
                    value = response_data[field_name]
                    logger.info(f"提取到{field_name}: {value}")
                    return value
                if 'data' in response_data:
                    return DataExtractor.extract_field(response_data['data'], field_name)

            elif isinstance(response_data, list):
                if response_data and isinstance(response_data[0], dict):
                    return DataExtractor.extract_field(response_data[0], field_name)

            logger.warning(f"未找到字段: {field_name}")
            return None
        except Exception as e:
            logger.error(f"提取字段{field_name}失败: {e}")
            return None
python
"""
文章相关fixture函数(获取articleId等)
"""
import pytest
from common.data_extractor import DataExtractor
from common.logger import get_logger

logger = get_logger(__name__)


@pytest.fixture(scope="function")
def get_article_id(request_client, auto_login):
    """
    获取文章ID的fixture(从getAllByBoardId接口获取)

    Args:
        request_client: 请求客户端fixture
        auto_login: 自动登录fixture

    Returns:
        articleId
    """
    # 调用获取文章列表接口
    response = request_client.get('/article/getAllByBoardId')

    if response.status_code == 200:
        try:
            response_data = response.json()
            if response_data.get('code') == 0:
                # 从响应中提取articleId
                data = response_data.get('data', [])
                if isinstance(data, list) and len(data) > 0:
                    article_id = data[0].get('id')
                    if article_id:
                        logger.info(f"获取到articleId: {article_id}")
                        return article_id
                logger.warning("文章列表为空,未获取到articleId")
                return None
            else:
                logger.warning(f"获取文章列表失败: {response_data.get('message')}")
                return None
        except Exception as e:
            logger.error(f"解析文章列表响应失败: {e}")
            return None
    else:
        logger.error(f"获取文章列表失败: {response.text}")
        return None


@pytest.fixture(scope="function")
def create_article(request_client, auto_login):
    """
    创建文章的fixture

    Args:
        request_client: 请求客户端fixture
        auto_login: 自动登录fixture

    Returns:
        创建的文章信息(包含articleId)
    """
    # 使用JSON格式发送请求(注意:content是标题,title是内容)
    response = request_client.post('/article/create', json={
        'content': '测试文章标题',
        'title': '这是测试文章的内容'
    })

    if response.status_code == 200:
        try:
            response_data = response.json()
            if response_data.get('code') == 0:
                logger.info(f"创建文章成功")
                return response_data
            else:
                logger.error(f"创建文章失败: {response_data.get('message')}")
                return None
        except Exception as e:
            logger.error(f"解析创建文章响应失败: {e}")
            return None
    else:
        logger.error(f"创建文章失败: {response.text}")
        return None
3.4 JSON Schema 结构校验
除了校验 HTTP 状态码,我还引入了 Jsonschema 库。
- 在 schemas/ 目录下定义接口的预期 JSON 结构。
- 测试时,不仅校验字段值,还校验字段类型、必需字段是否存在。这能有效发现后端私自修改字段类型导致的隐蔽 Bug。
python
"""
文章相关接口响应Schema
"""
from typing import Dict, Any

# 文章对象Schema
article_item_schema = {
    "type": "object",
    "properties": {
        "id": {"type": "integer"},
        "title": {"type": "string"},
        "boardId": {"type": "integer"},
        "userId": {"type": "integer"},
        "visitCount": {"type": "integer"},
        "replyCount": {"type": "integer"},
        "likeCount": {"type": "integer"},
        "state": {"type": "integer"},
        "createTime": {"type": "string"},
        "updateTime": {"type": "string"},
        "user": {
            "type": "object",
            "properties": {
                "id": {"type": "integer"},
                "nickname": {"type": "string"},
                "avatarUrl": {"type": ["null", "string"]}
            },
            "required": ["id", "nickname"]
        }
    },
    "required": ["id", "title", "boardId", "userId"]
}

# 创建文章响应Schema(data通常为null)
create_article_schema: Dict[str, Any] = {
    "type": "object",
    "properties": {
        "code": {"type": "integer"},
        "message": {"type": "string"},
        "data": {"type": ["null", "object"]}
    },
    "required": ["code", "message"]
}

# 文章列表响应Schema(data为数组或null)
article_list_schema: Dict[str, Any] = {
    "type": "object",
    "properties": {
        "code": {"type": "integer"},
        "message": {"type": "string"},
        "data": {
            "type": ["null", "array"],
            "items": article_item_schema
        }
    },
    "required": ["code", "message"]
}

# 文章详情响应Schema(data可能为null)
article_details_schema: Dict[str, Any] = {
    "type": "object",
    "properties": {
        "code": {"type": "integer"},
        "message": {"type": "string"},
        "data": {
            "type": ["null", "object"],
            "properties": {
                "id": {"type": "integer"},
                "boardId": {"type": "integer"},
                "userId": {"type": "integer"},
                "title": {"type": "string"},
                "visitCount": {"type": "integer"},
                "replyCount": {"type": "integer"},
                "likeCount": {"type": "integer"},
                "state": {"type": "integer"},
                "createTime": {"type": "string"},
                "updateTime": {"type": "string"},
                "content": {"type": "string"},
                "own": {"type": "boolean"},
                "user": {"type": "object"},
                "board": {"type": "object"}
            }
        }
    },
    "required": ["code", "message"]
}

# 编辑文章响应Schema(data通常为null)
modify_article_schema: Dict[str, Any] = {
    "type": "object",
    "properties": {
        "code": {"type": "integer"},
        "message": {"type": "string"},
        "data": {"type": ["null", "object"]}
    },
    "required": ["code", "message"]
}

# 点赞响应Schema(data通常为null)
thumbs_up_schema: Dict[str, Any] = {
    "type": "object",
    "properties": {
        "code": {"type": "integer"},
        "message": {"type": "string"},
        "data": {"type": ["null", "object"]}
    },
    "required": ["code", "message"]
}
四. 遇到的bug
python
#  xss攻击
  - name: 标题包含特殊字符
    title: "<script>alert('xss')</script>"
    content: 博客内容
    expected_status: 200
    expected_code: 0
能成功插入带xss攻击标题文章并在前端页面成功展示出来,前后端没有对其作出相应的拦截。
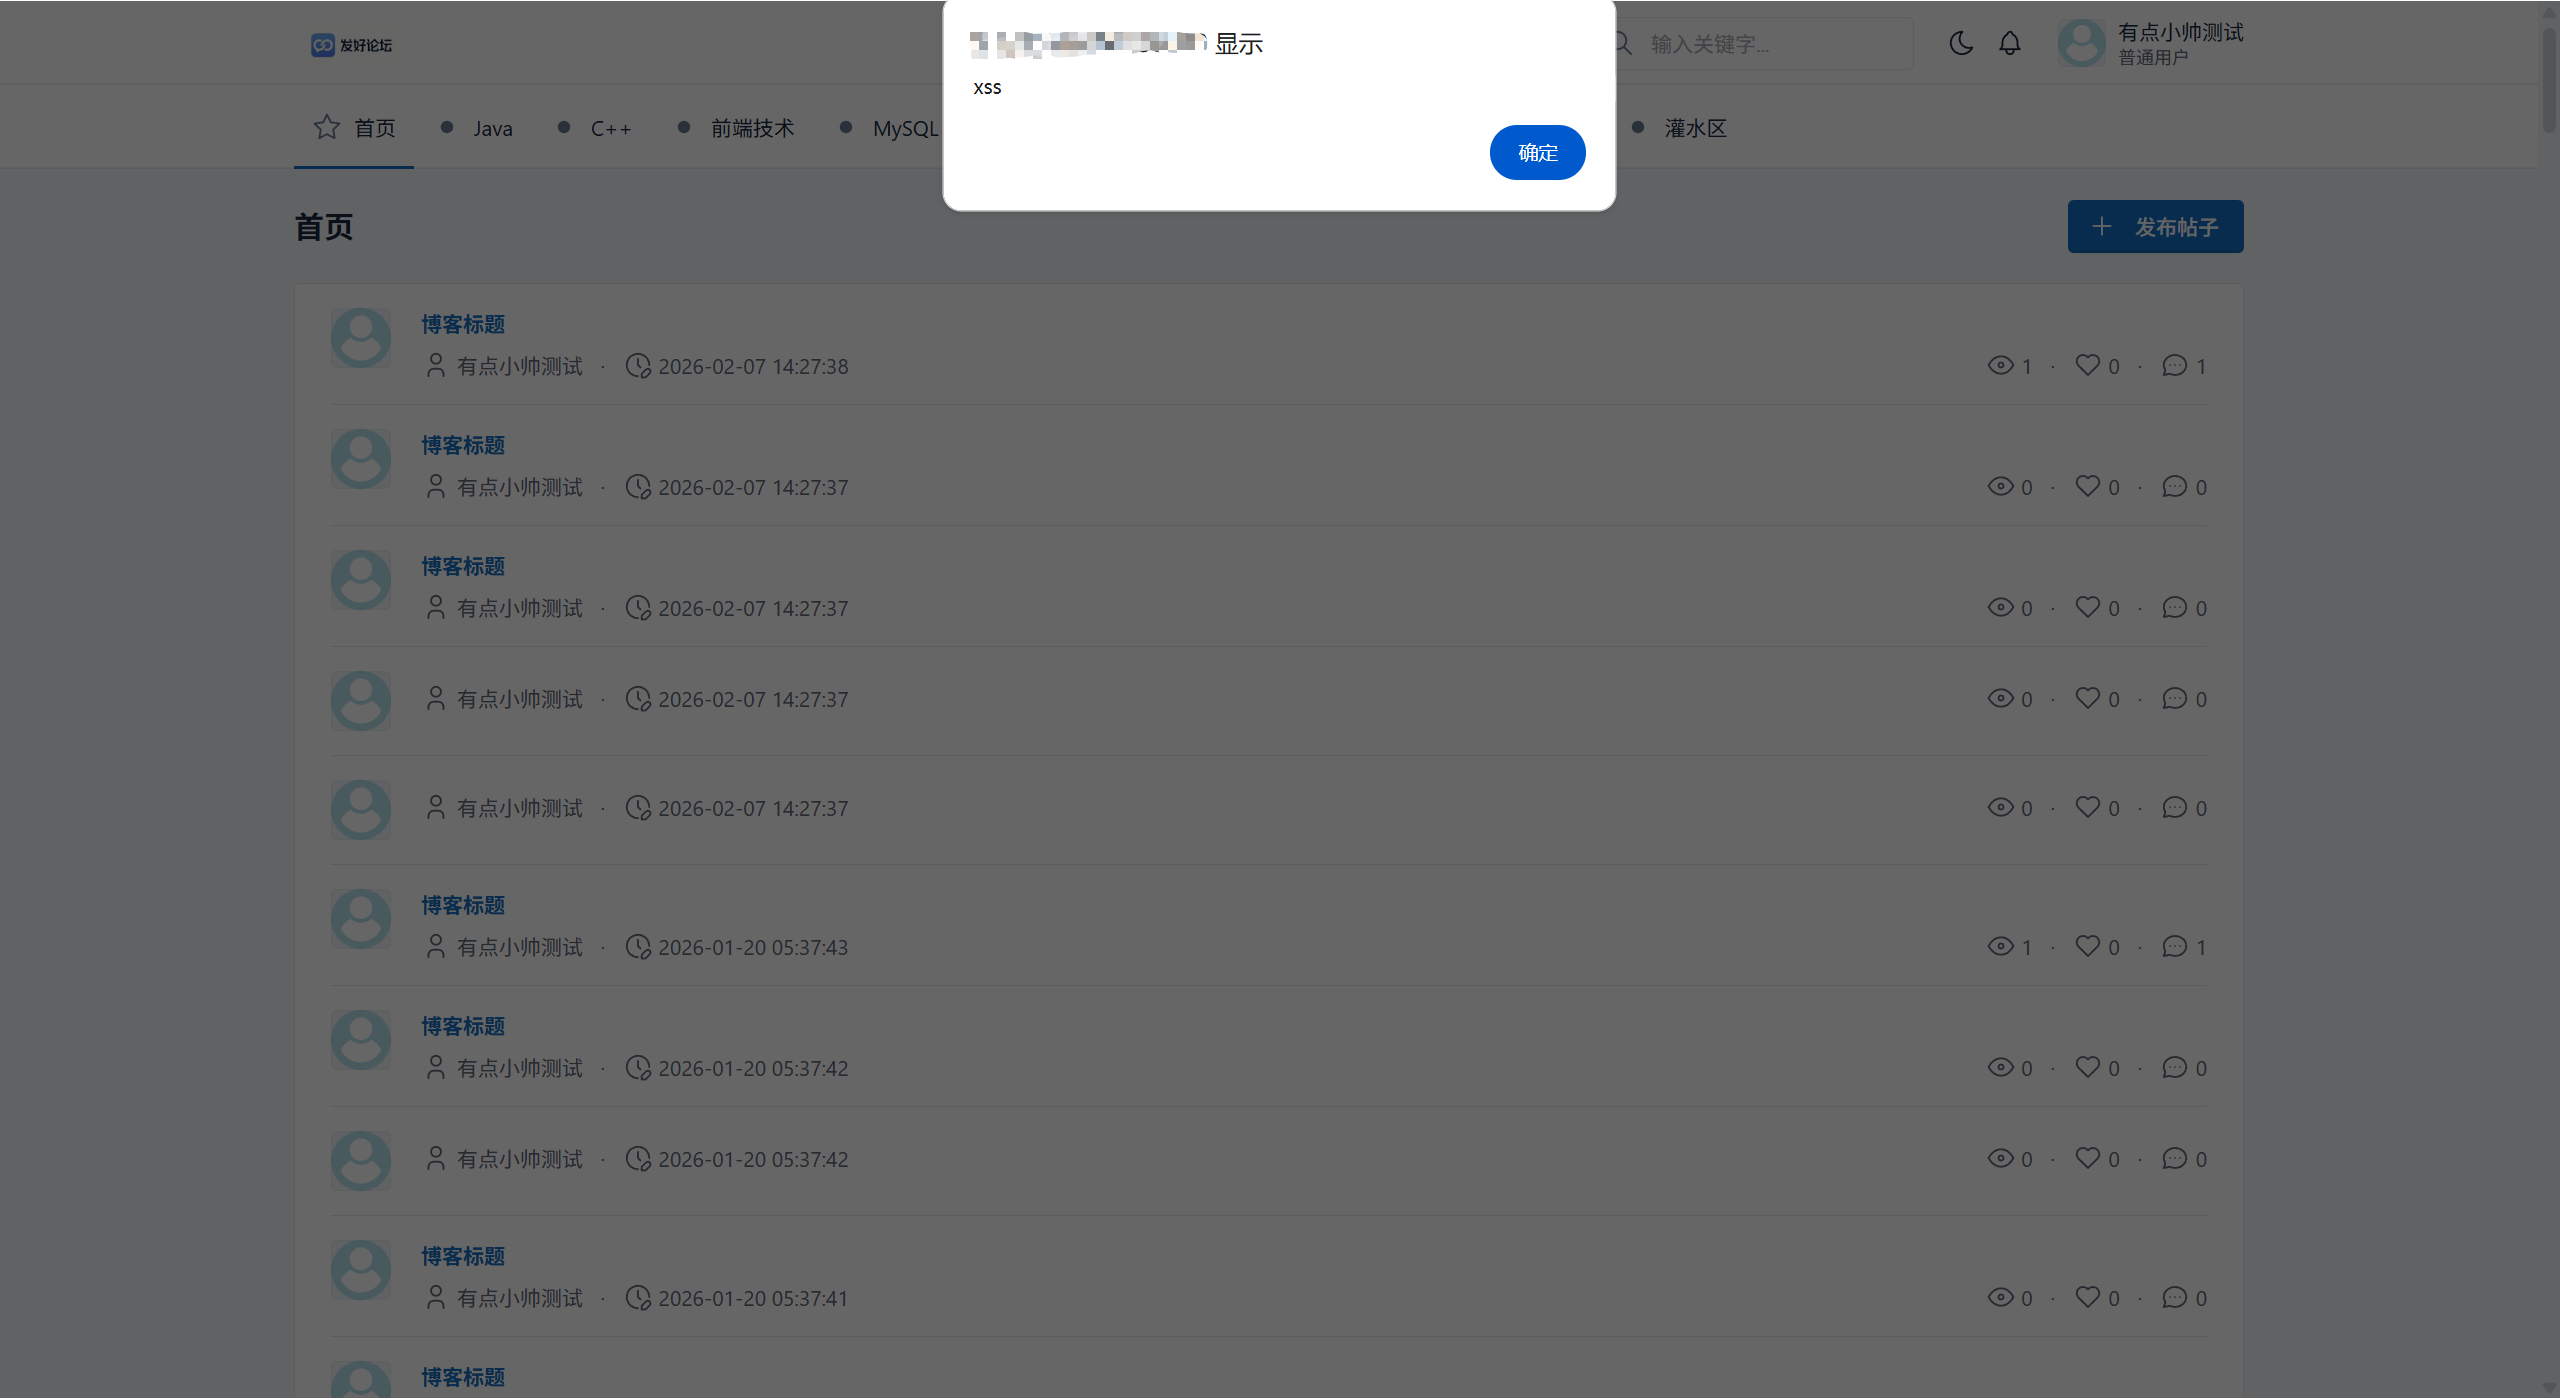
解决方案:后端将 < script > 标签清洗,写入数据库的只剩文本,从而前端不会执行脚本。
五. 效果展示
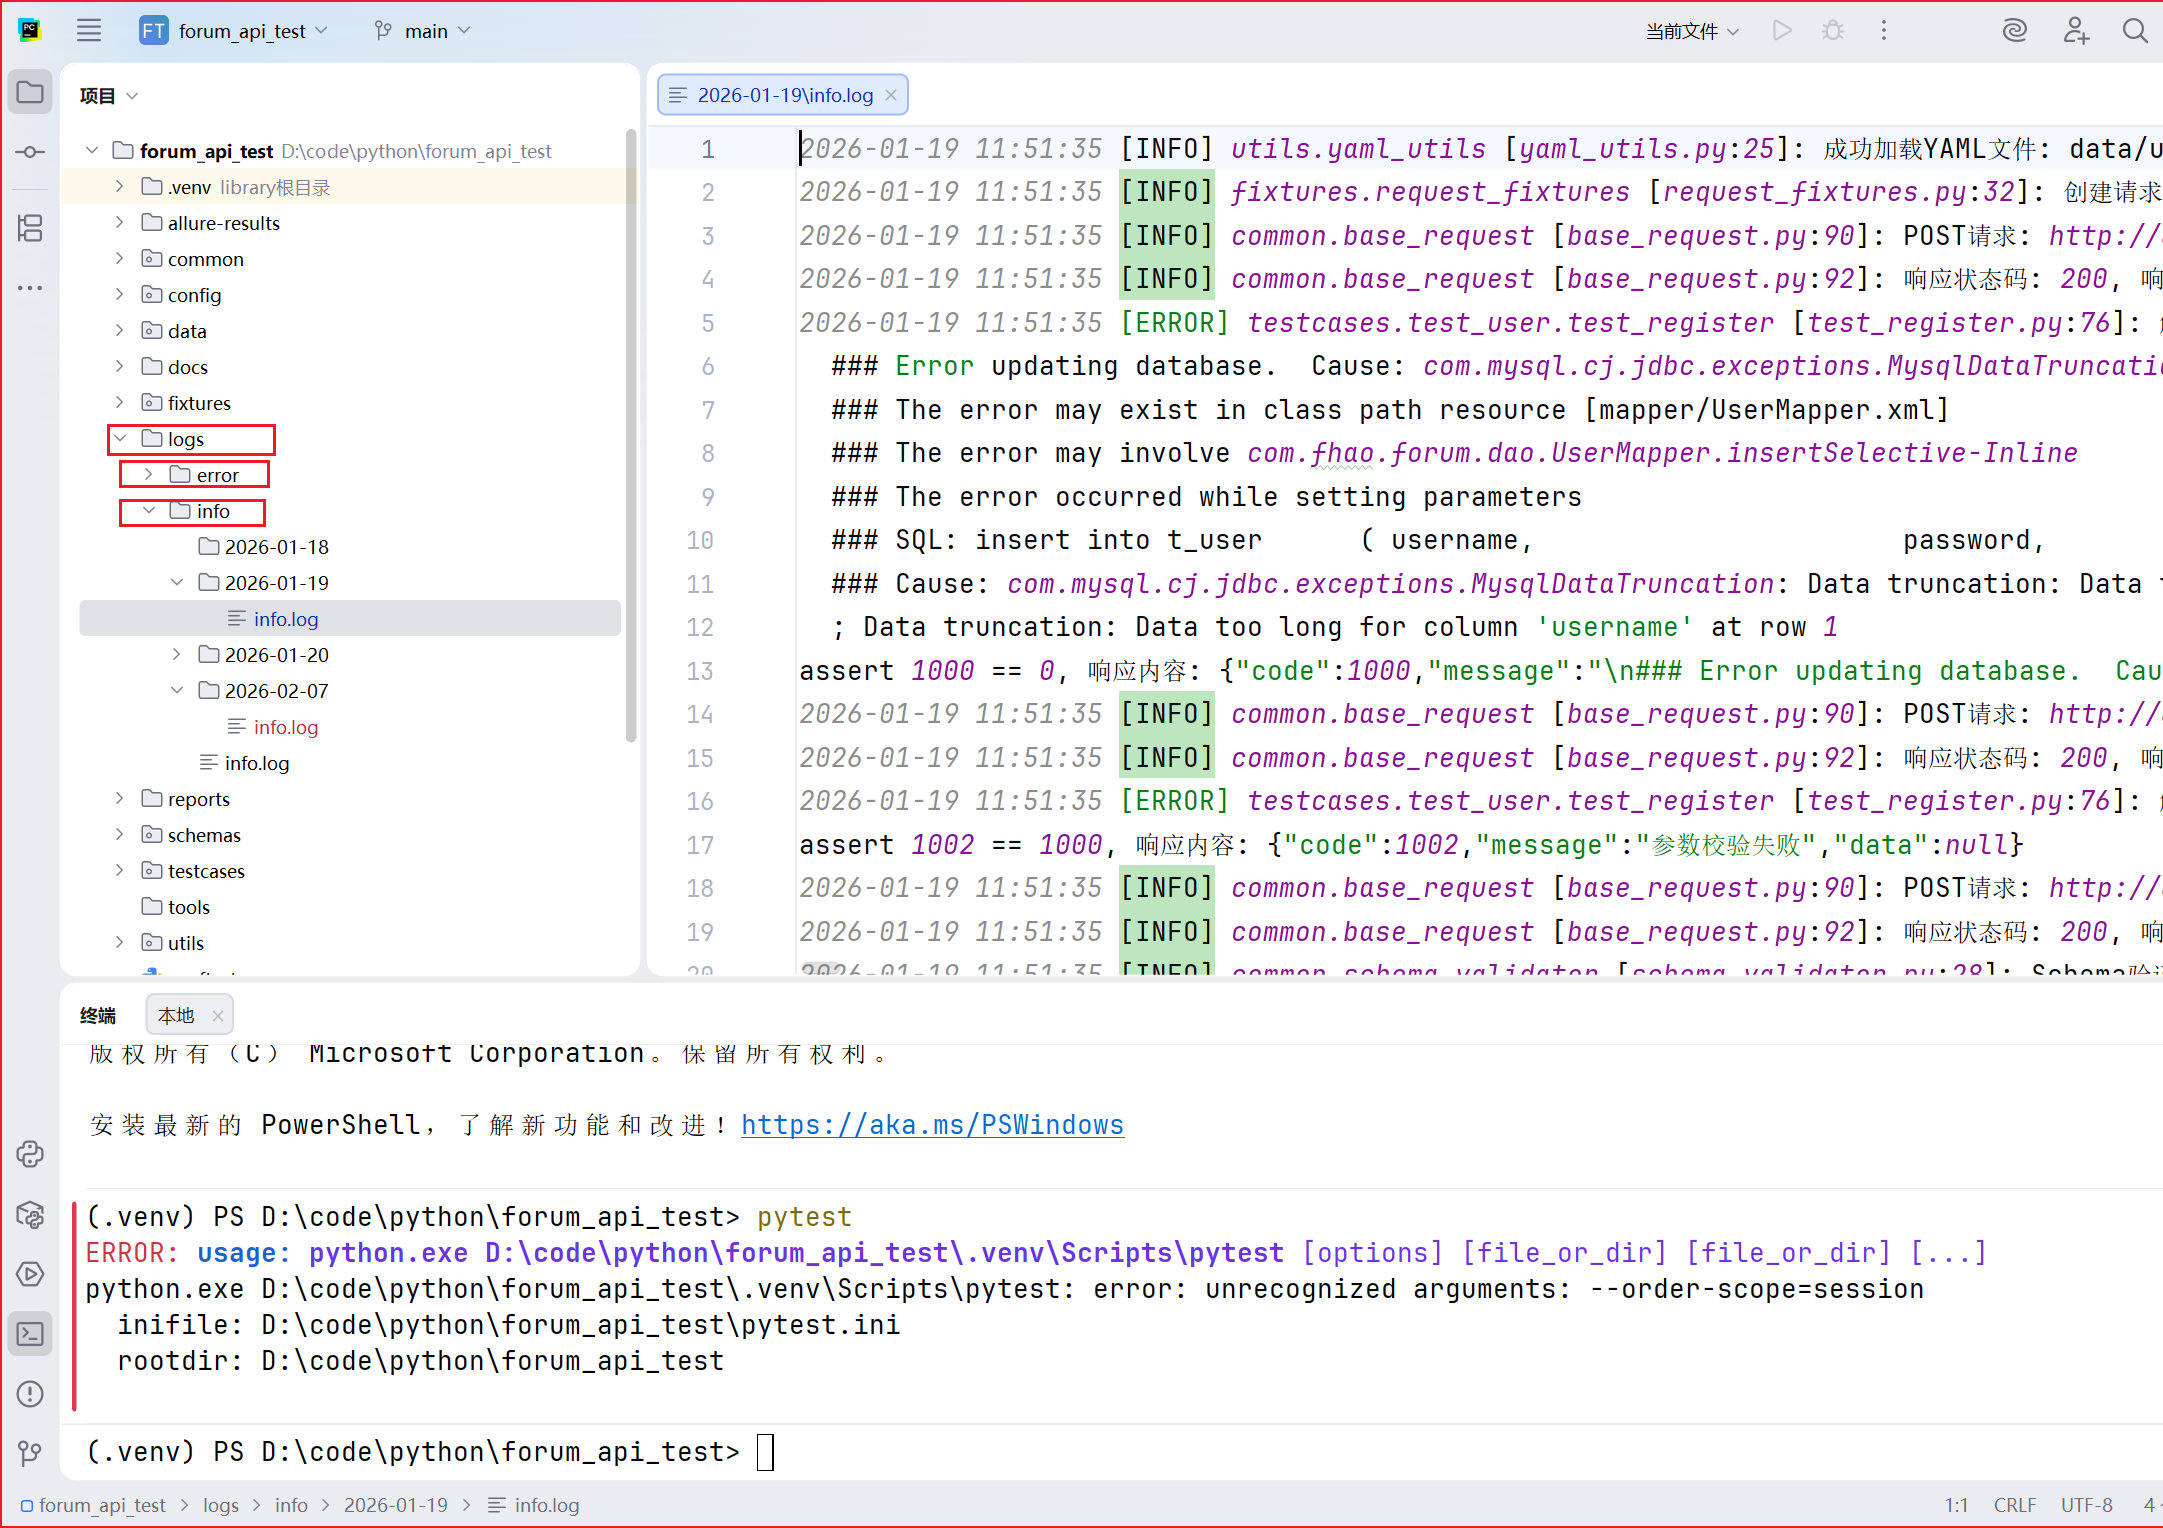
5.1 自动生成的日志
日志系统按bug分两个子目录,每一个目录按天分割,存储在 logs/ 目录。每次请求的 URL、Method、Payload 以及 Response 都会被完整记录,方便 Bug 定位。
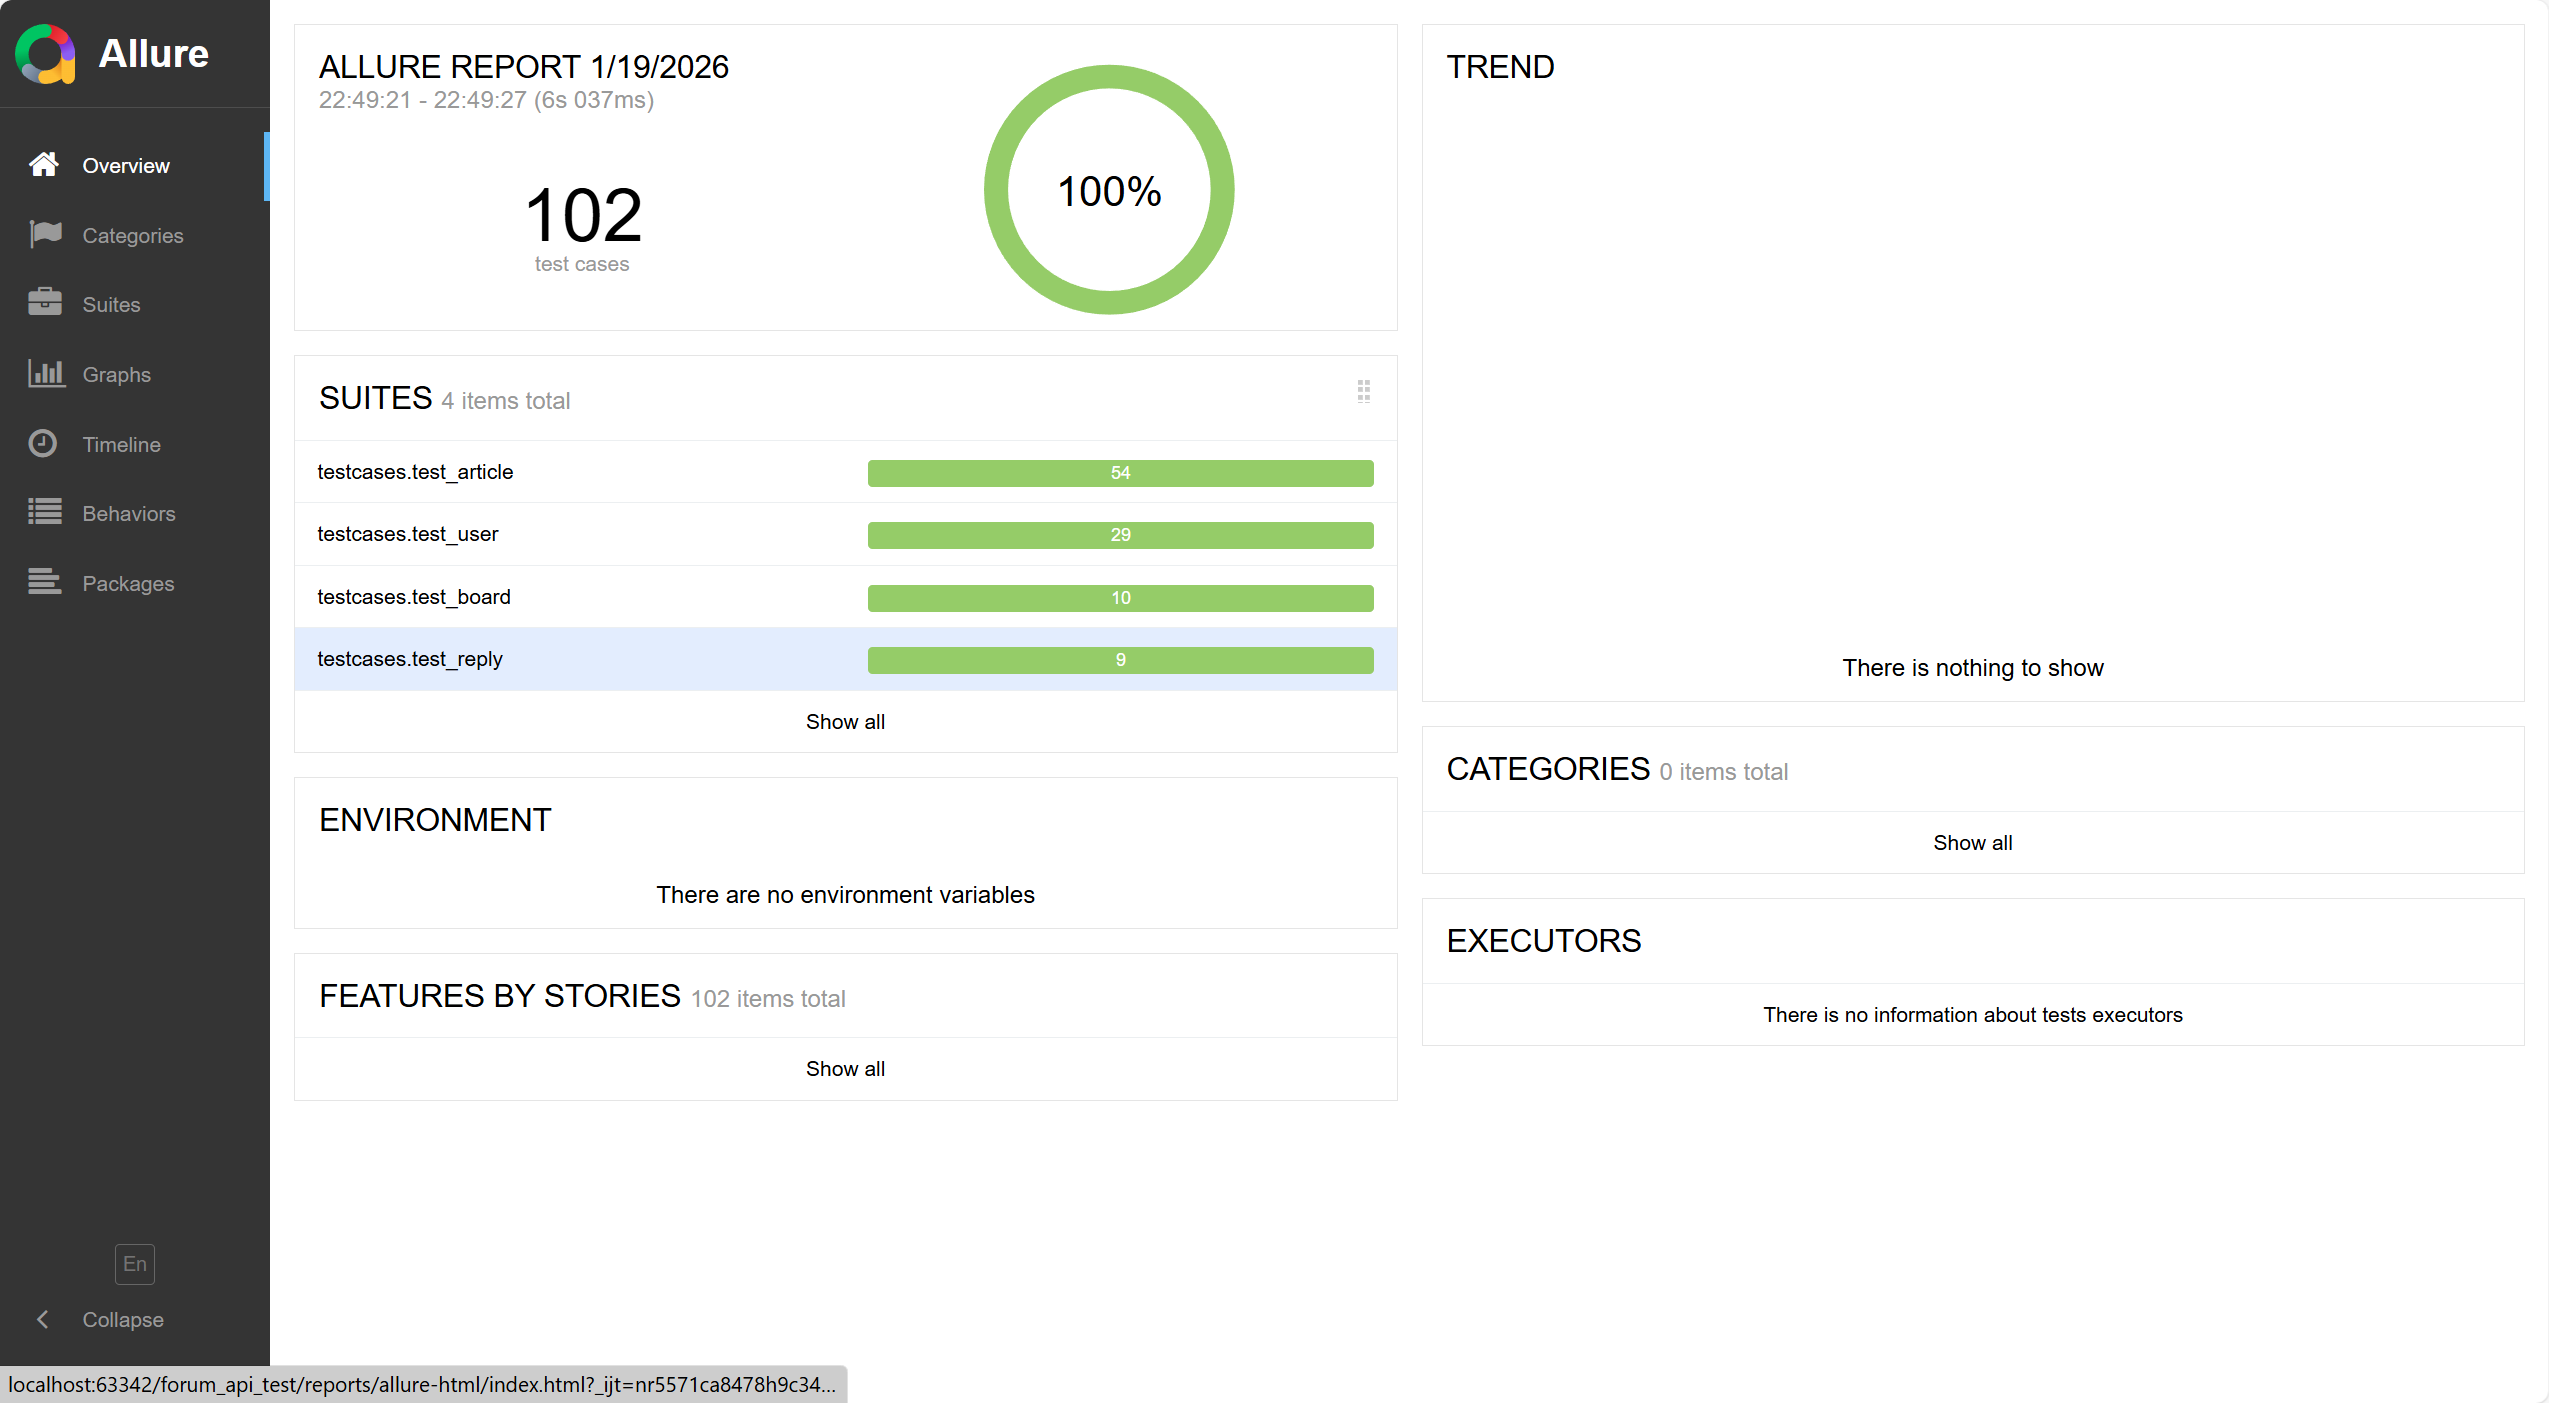
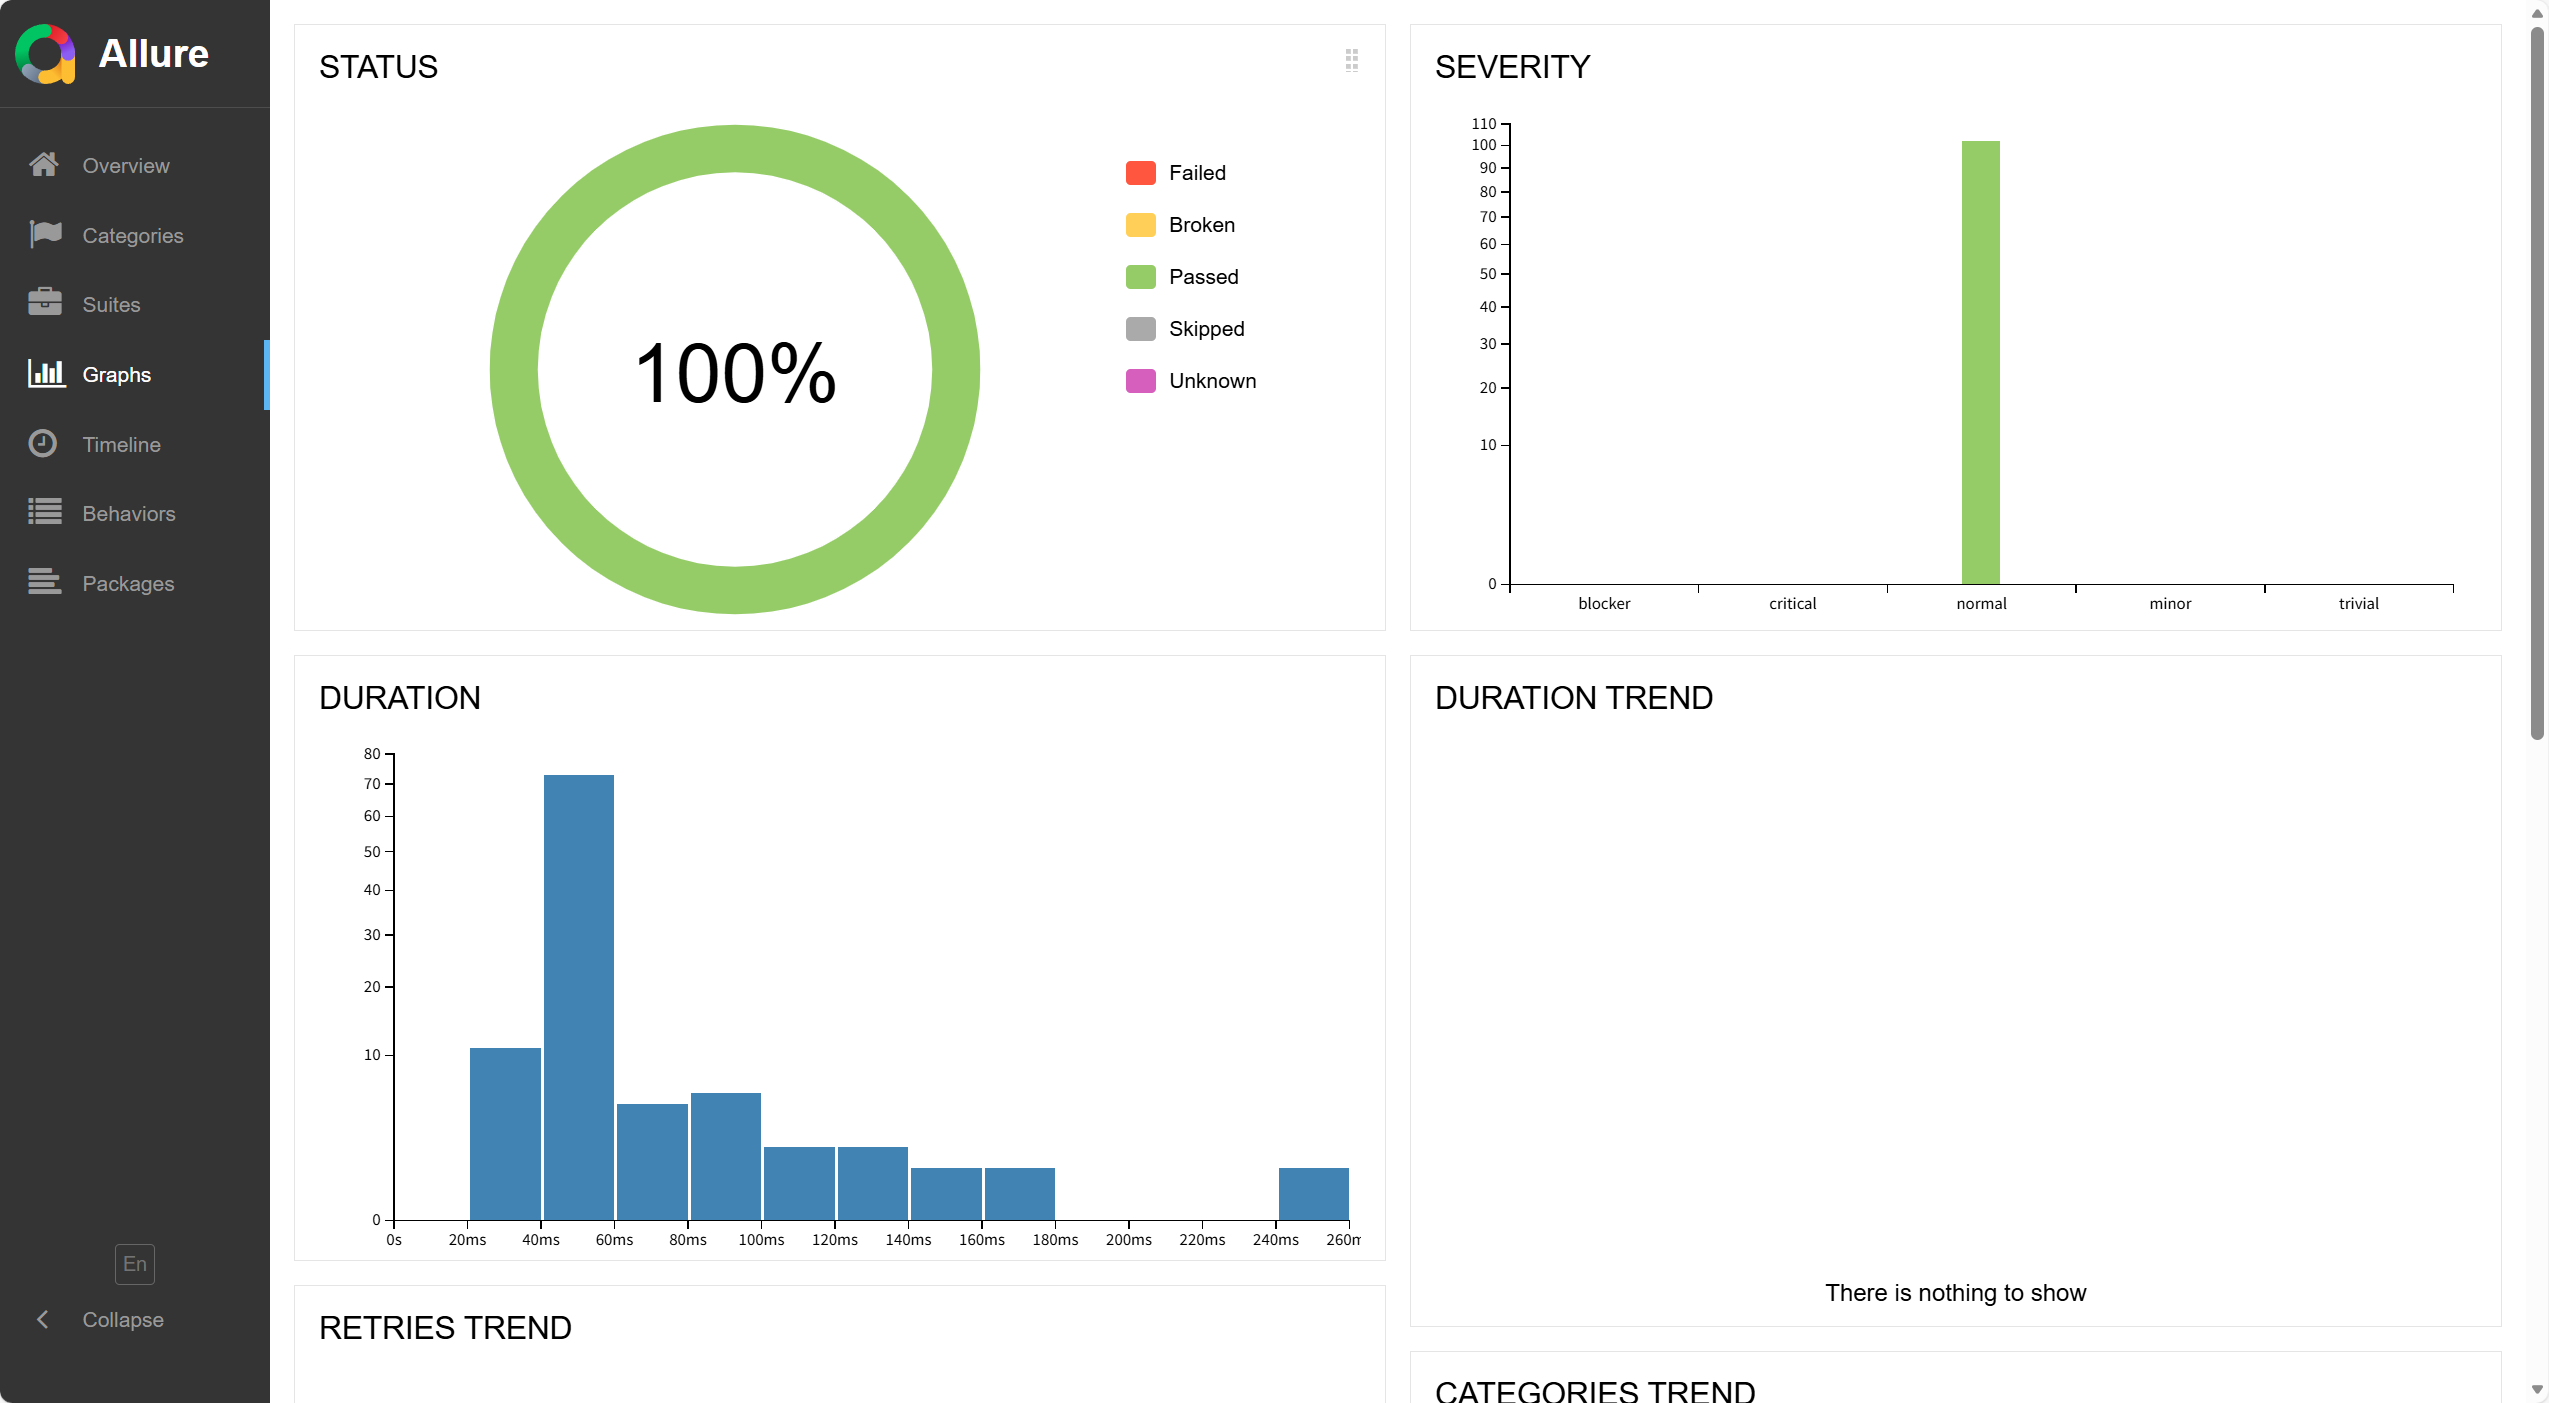
5.2 Allure 可视化报告
六. 后续优化
- 接入 Jenkins 实现 CI/CD 持续集成。
- 实现多线程并发执行,进一步提升效率。
本篇博客到这里就结束啦, 感谢观看 ❤❤❤
🐎期待与你的下一次相遇😊😊😊