一、整体流程
bash
Bootloader → Linux Kernel → init → SurfaceFlinger → bootanimation 服务 → 解析 bootanimation.zip → 播放动画分层看是这样的:
bash
硬件上电
  ↓
Bootloader(厂商)
  ↓
Linux Kernel
  ↓
init(pid=1)
  ↓
启动 SurfaceFlinger
  ↓
启动 bootanimation 服务
  ↓
BootAnimation.cpp 播放动画
二、从init开始:bootanimation 是怎么被拉起来的
1. init 启动
Kernel 启动完成后,会执行:
bash
start_kernel()
  -> run_init_process("/init")
init 是 Android 的 1 号进程。
源码:
bash
system/core/init/2. init.rc 里定义了 bootanimation 服务
文件位置:
bash
frameworks/base/cmds/bootanimation/bootanimation.rc内容:
bash
service bootanim /system/bin/bootanimation
    class core animation
    user graphics
    group graphics audio
    disabled
    oneshot
    ioprio rt 0
task_profiles MaxPerformance1️⃣service bootanim /system/bin/bootanimation
定义一个 init service:
服务名 :
bootanim可执行文件 :
/system/bin/bootanimationinit 后续通过:
start bootanim来启动它。
2️⃣**
class core animation**含义
这个 service 属于 两个 class:
core animationclass 是干嘛的?
class 是 service 分组机制,可以整体启停:
class_start core class_stop animation在 bootanimation 场景下:
class 作用 core最早启动的一批核心服务(SurfaceFlinger 也在这里) animation专门给动画用,系统 ready 后会整体 stop 📌 Android 13 以后引入
animationclass,方便在系统 ready 时统一关闭动画类服务。3️⃣
user graphics含义
进程运行的 Linux 用户:
uid = graphics为什么是 graphics?
访问
/dev/graphics/*访问 HWC / DRM / FB
创建 Surface
比
root权限小,更安全。4️⃣
group graphics audio含义
进程附加的 Linux group:
gid = graphics additional gid = audio为什么要 audio?
bootanimation 可以:
播放 开机音效
控制 AudioFlinger
有些厂商 bootanimation.zip 里带音频。
5️⃣**
disabled**含义
默认不启动
init 在解析 rc 时:
不会自动拉起
必须显式:
start bootanim为什么必须 disabled?
因为:
SurfaceFlinger 没起来前不能启动
启动时机由 property 精确控制:
on property:init.svc.surfaceflinger=running start bootanim6️⃣
oneshot含义
只运行一次
行为是:
进程退出 → init 不会重启
即使 crash 也不拉起
为什么 bootanimation 要 oneshot?
播放完就该退出
crash 重启会造成死循环 / 闪屏
7️⃣
ioprio rt 0含义
设置 I/O 调度优先级
拆开看:
rt → real-time I/O class 0 → 最高优先级等价于 Linux 命令:
ionice -c 1 -n 0为什么给 bootanimation 这么高的 IO 权限?
解压 bootanimation.zip
加载 PNG/JPEG
避免 IO 卡顿导致动画掉帧
📌 这不是 CPU,而是磁盘 IO 优先级
8️⃣
task_profiles MaxPerformance(Android 13 重点)含义
应用 Task Profile :
MaxPerformanceTask profile 是 Android 的 调度 / 性能模板。
MaxPerformance里一般包含什么?在:
system/core/libprocessgroup/profiles/task_profiles.json典型内容(简化):
"MaxPerformance": { "SchedPolicy": "SCHED_FIFO", "SchedPriority": 2, "Cpusets": "top-app", "TimerSlack": 1 }对 bootanimation 的实际效果:
项 影响 SCHED_FIFO 实时调度 高优先级 不易被抢占 top-app cpuset 跑在大核 TimerSlack 定时更精准 👉 目的只有一个:动画必须流畅
9️⃣ 合在一起:bootanim 的"系统级待遇"
把这些参数合起来看,你会发现:
bootanimation 是 Android 启动阶段优先级最高的普通进程之一
它拥有:
高 CPU 调度优先级
最高 IO 优先级
大核绑定
SurfaceFlinger 直连
不被重启(oneshot)
3、什么时候触发 bootanimation?
在 SurfaceFlinger 启动完成后。
这一步非常关键:
-
必须先有 SurfaceFlinger
-
否则没法画动画(没合成器)
(1)SurfaceFlinger启动过程
内核启动后会先加载init.rc: system/core/rootdir/init.rc
Init.rc 文件在加载的时候会加载所有的core服务
surfaceflinger.rc 属于 class core animation
bash
class_start coresurfaceflinger.rc
路径
bash
frameworks/native/services/surfaceflinger/surfaceflinger.rc内容:
bash
service surfaceflinger /system/bin/surfaceflinger
    class core animation
    user system
    group graphics drmrpc readproc
    capabilities SYS_NICE
    onrestart restart --only-if-running zygote
    task_profiles HighPerformance
    socket pdx/system/vr/display/client     stream 0666 system graphics u:object_r:pdx_display_client_endpoint_socket:s0
    socket pdx/system/vr/display/manager    stream 0666 system graphics u:object_r:pdx_display_manager_endpoint_socket:s0
    socket pdx/system/vr/display/vsync      stream 0666 system graphics u:object_r:pdx_display_vsync_endpoint_socket:s0
Surfaceflinger.rc中可以看到class core,所以Init.rc 中 class_start core ,就会执行surfaceflinger.rc这个文件。之后会执行main_surfaceflinger.cpp
bash
frameworks/native/services/surfaceflinger/main_surfaceflinger.cppsurfaceflinger进程的代码:
bash
//main_sufaceflinger.cpp

int main(int, char**) {

    ........省略

    flinger->init();

    ........省略

    flinger->run();

    return 0;
}
cpp
// SurfaceFlinger.cpp

void SurfaceFlinger::init() {

    ......省略

   //这里会创建一个线程
    if (getHwComposer().hasCapability(
            HWC2::Capability::PresentFenceIsNotReliable)) {
        mStartPropertySetThread = new StartPropertySetThread(false);
    } else {
        mStartPropertySetThread = new StartPropertySetThread(true);
    }

    //启动线程
    if (mStartPropertySetThread->Start() != NO_ERROR) {
        ALOGE("Run StartPropertySetThread failed!");
    }

    ALOGV("Done initializing");
}
当调用mStartPropertySetThread->Start() 之后会启动这个线程,启动线程之后,就会触发threadLoop()方法执行,执行了property_set("ctl.start", "bootanim") 这条语句就会去启动BootAnimation了
cpp
// StartPropertySetThread.cpp

//threadLoop()相当于java线程类中runable(),当调用StartPropertySetThread的时候就会触发该方法执行

bool StartPropertySetThread::threadLoop() {
    // Set property service.sf.present_timestamp, consumer need check its readiness
    property_set(kTimestampProperty, mTimestampPropertyValue ? "1" : "0");
    // Clear BootAnimation exit flag
    property_set("service.bootanim.exit", "0");
    // Start BootAnimation if not started
    property_set("ctl.start", "bootanim");
    // Exit immediately
    return false;
}
问题1:为什么执行了property_set("ctl.start", "bootanim")语句,设置了属性之后,就会启动BootAnimation了呢?
回答:在init.cpp的main方法中,会调用start_property_service() 来创建一个socket来进行跨进程通信,当我们在surfaceflinger进程中设置了property_set("ctl.start", "bootanim")之后,就会触发init进程中的handle_property_set_fd方法的执行
cpp
//property_service.cpp

void start_property_service() {
    property_set("ro.property_service.version", "2");

    property_set_fd = CreateSocket(PROP_SERVICE_NAME, SOCK_STREAM | SOCK_CLOEXEC | SOCK_NONBLOCK,
                                   false, 0666, 0, 0, nullptr, sehandle);
    if (property_set_fd == -1) {
        PLOG(ERROR) << "start_property_service socket creation failed";
        exit(1);
    }

    listen(property_set_fd, 8);

    register_epoll_handler(property_set_fd, handle_property_set_fd);
}
在 handle_property_set_fd方法中,会执行handle_property_set方法
cpp
//property.service.cpp

//最终会执行了handle_property_set方法

static void handle_property_set_fd() {

   .......省略

    switch (cmd) {
    case PROP_MSG_SETPROP: {
        .....省略

        handle_property_set(socket, prop_value, prop_value, true);
        break;
      }

    case PROP_MSG_SETPROP2: {
         .....省略

        handle_property_set(socket, name, value, false);
        break;
      }

    default:
        LOG(ERROR) << "sys_prop: invalid command " << cmd;
        socket.SendUint32(PROP_ERROR_INVALID_CMD);
        break;
    }
}
cpp
//property_service.cpp

/*
* 通过StartsWith(name, "ctl.")判断是否以ctr.l开头,而启动BootAnimation的时候,设置了属性
*  property_set("ctl.start", "bootanim"),刚好是ctl.开头,所以进入了if判断逻辑,执行
*  handle_control_message方法
*/

static void handle_property_set(SocketConnection& socket,
                                const std::string& name,
                                const std::string& value,
                                bool legacy_protocol) {

  ......省略

  if (android::base::StartsWith(name, "ctl.")) {
    if (check_control_mac_perms(value.c_str(), source_ctx, &cr)) {
       //property_set("ctl.start", "bootanim"),刚好是ctl.开头,所以执行到这里

      handle_control_message(name.c_str() + 4, value.c_str());

    } else {

      .....省略

    }
  } else {

    .....省略

  }

  freecon(source_ctx);
}
在handle_control_message中,执行了 svc->Start()之后,会fork出进程,然后调用ExpandArgsAndExecve方法启动BootAnimation进程
cpp
// init.cpp

void handle_control_message(const std::string& msg, const std::string& name) {
    Service* svc = ServiceManager::GetInstance().FindServiceByName(name);
    if (svc == nullptr) {
        LOG(ERROR) << "no such service '" << name << "'";
        return;
    }
    if (msg == "start") {
        //执行这里,将会启动进程
        svc->Start();
    } else if (msg == "stop") {
        svc->Stop();
    } else if (msg == "restart") {
        svc->Restart();
    } else {

    }
}
至此,BootAnimation启动完成,总的来说,BootAnimation是还是由init进程fork出来的
问题2:bootanim 进程启动为何这么绕?
1️⃣ 只有 init 能启动系统进程
Android 规定 PID 1(init)是唯一的进程管理者。
负责 fork / exec
设置 UID / GID / SELinux
管理 service 生命周期
👉 SurfaceFlinger 不能直接启动 bootanimation,只能请求 init。
2️⃣ SurfaceFlinger 最清楚"什么时候能画"
bootanimation 必须在 SurfaceFlinger 完全就绪之后 才能启动。
init 不懂显示系统状态
SurfaceFlinger 才知道自己 ready 了
👉 由 SF 决定时机,由 init 执行启动
3️⃣ property 是启动期唯一可靠的 IPC
启动早期:
Binder 未完全可用
system_server 未启动
Java 世界不可依赖
👉 property 是 init 原生支持、最稳定的通信方式
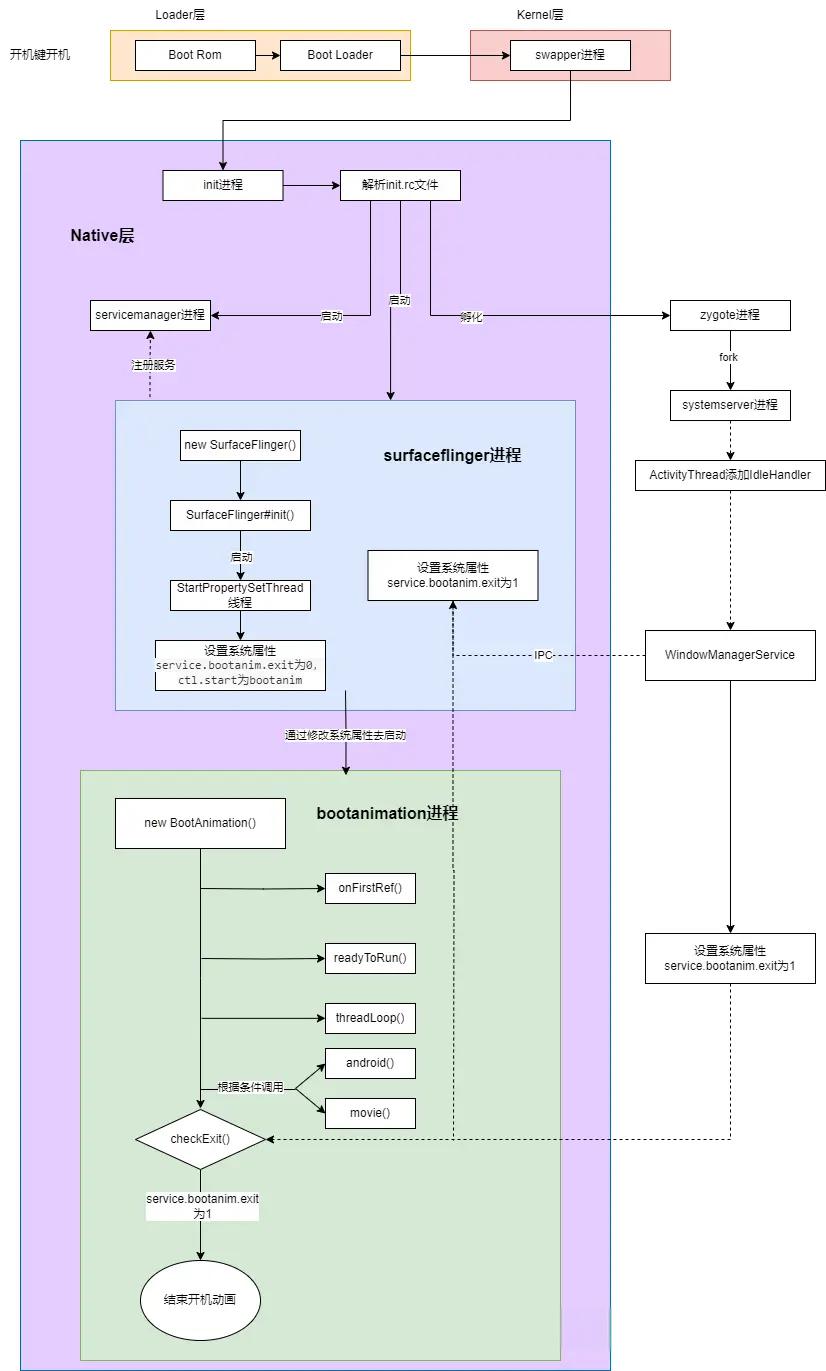
三、开机动画绘制流程
bootanimation服务启动后会先进入bootanimation_main.cpp的main函数
cpp
@frameworks/base/cmds/bootanimation/bootanimation_main.cpp
int main()
{
    setpriority(PRIO_PROCESS, 0, ANDROID_PRIORITY_DISPLAY);

    bool noBootAnimation = bootAnimationDisabled();
    ALOGI_IF(noBootAnimation,  "boot animation disabled");
    if (!noBootAnimation) {

        sp<ProcessState> proc(ProcessState::self());
        ProcessState::self()->startThreadPool();

        // create the boot animation object (may take up to 200ms for 2MB zip)
        sp<BootAnimation> boot = new BootAnimation(audioplay::createAnimationCallbacks());

        waitForSurfaceFlinger();

        boot->run("BootAnimation", PRIORITY_DISPLAY);

        ALOGV("Boot animation set up. Joining pool.");

        IPCThreadState::self()->joinThreadPool();
    }
    return 0;
}
frameworks/base/cmds/bootanimation/bootanimation_main.cpp 通过bootAnimationDisabled()函数判断系统是否跳过开机动画。需要显示开机动画时,先去创建一个BootAnimation线程实例,同时需要等待surfaceflinger启动完成后,调用run方法启动线程。
上面代码中boot变量为sp<BootAnimation>类型,为sp<T>强智能指针,其在初始化的时候会触发onFirstRef()方法调用
@/frameworks/base/cmds/bootanimation/BootAnimation.cpp#onFirstRef
void BootAnimation::onFirstRef() {
    status_t err = mSession->linkToComposerDeath(this);
    SLOGE_IF(err, "linkToComposerDeath failed (%s) ", strerror(-err));
    if (err == NO_ERROR) {
        // Load the animation content -- this can be slow (eg 200ms)
        // called before waitForSurfaceFlinger() in main() to avoid wait
        ALOGD("%sAnimationPreloadTiming start time: %" PRId64 "ms",
                mShuttingDown ? "Shutdown" : "Boot", elapsedRealtime());
        preloadAnimation();
        ALOGD("%sAnimationPreloadStopTiming start time: %" PRId64 "ms",
                mShuttingDown ? "Shutdown" : "Boot", elapsedRealtime());
    }
}
preloadAnimation方法会去预加载动画资源。
因为BootAnimation继承于Thread,当线程被执行run()函数时,Thread会先调用readyToRun()方法做一些初始化工作
@/frameworks/base/cmds/bootanimation/BootAnimation.cpp#readyToRun
status_t BootAnimation::TimeCheckThread::readyToRun() {
    mInotifyFd = inotify_init();
    if (mInotifyFd < 0) {
        SLOGE("Could not initialize inotify fd");
        return NO_INIT;
    }

    mBootAnimWd = inotify_add_watch(mInotifyFd, BOOTANIM_DATA_DIR_PATH, IN_CREATE | IN_ATTRIB);
    if (mBootAnimWd < 0) {
        close(mInotifyFd);
        mInotifyFd = -1;
        SLOGE("Could not add watch for %s: %s", BOOTANIM_DATA_DIR_PATH, strerror(errno));
        return NO_INIT;
    }

    addTimeDirWatch();

    if (mBootAnimation->updateIsTimeAccurate()) {
        close(mInotifyFd);
        mInotifyFd = -1;
        return ALREADY_EXISTS;
    }

    return NO_ERROR;
}在调用readyToRun()方法后,线程再执行threadLoop()方法:
@/frameworks/base/cmds/bootanimation/BootAnimation.cpp#threadLoop
bool BootAnimation::threadLoop() {
    bool result;
    initShaders();

    // We have no bootanimation file, so we use the stock android logo
    // animation.
    if (mZipFileName.isEmpty()) {
        ALOGD("No animation file");
        result = android();
    } else {
        result = movie();
    }

    mCallbacks->shutdown();
    eglMakeCurrent(mDisplay, EGL_NO_SURFACE, EGL_NO_SURFACE, EGL_NO_CONTEXT);
    eglDestroyContext(mDisplay, mContext);
    eglDestroySurface(mDisplay, mSurface);
    mFlingerSurface.clear();
    mFlingerSurfaceControl.clear();
    eglTerminate(mDisplay);
    eglReleaseThread();
    IPCThreadState::self()->stopProcess();
    return result;
}当配置了动画资源,会执行movie()方法进行播放,当没有配置动画资源,会执行android()方法去播放原生的logo图片。
在movie()方法中,会去加载动画,播放动画和释放动画。
@/frameworks/base/cmds/bootanimation/BootAnimation.cpp#movie
bool BootAnimation::movie() {
    if (mAnimation == nullptr) {
        mAnimation = loadAnimation(mZipFileName);
    }

    //opengl
    ...
    playAnimation(*mAnimation);
    ...
    releaseAnimation(mAnimation);
    return false;
}在播放动画函数playAnimation()中,会通过循环一帧一帧的展示图片,同时每一帧都会通过checkExit()监测是否可以退出显示了
for (int r=0 ; !part.count || r<part.count || fadedFramesCount > 0 ; r++) {

    for (int r=0 ; !part.count || r<part.count ; r++) {
           ...
            for (size_t j=0 ; j<fcount && (!exitPending() || part.playUntilComplete) ; j++) {
                ...
                checkExit();
            }
        }
   ...
    return true;
}在android()方法中,会先去初始化需要显示的图片纹理,然后在一个循环中去绘制出来,同时每次都会通过checkExit()监测是否可以退出显示了。
@/frameworks/base/cmds/bootanimation/BootAnimation.cpp#android
bool BootAnimation::android() {
    ...
    initTexture(&mAndroid[0], mAssets, "images/android-logo-mask.png");
    initTexture(&mAndroid[1], mAssets, "images/android-logo-shine.png");
    ...
    do {
        ...
        drawTexturedQuad(xc, yc, mAndroid[0].w, mAndroid[0].h);

        ...

        checkExit();
    } while (!exitPending());

    return false;
}监测退出函数checkExit()通过获取service.bootanim.exit属性值,来判断是否退出播放线程
static const char EXIT_PROP_NAME[] = "service.bootanim.exit";

@/frameworks/base/cmds/bootanimation/BootAnimation.cpp#checkExit
void BootAnimation::checkExit() {
    // Allow surface flinger to gracefully request shutdown
    char value[PROPERTY_VALUE_MAX];
    property_get(EXIT_PROP_NAME, value, "0");
    int exitnow = atoi(value);
    if (exitnow) {
        requestExit();
    }
}
因此,init进程会去加载各种rc文件,启动对应的各种服务,因为bootanim.rc的service设置为disabled而不会在init阶段去启动bootanimation服务(进程);而当bootanimation启动时,会先在创建的线程运行之前去加载配置的资源文件,从而在线程运行时显示对应的资源动画,同时在显示动画的时候去检查是否需要退出动画显示。
四、什么时候结束开机动画
bootanimation如何启动的已经分析,那bootanimation如何结束呢?上文提到checkExit()函数,bootanimation服务通过不断获取系统属性service.bootanim.exit的值来判断是否需要结束动画。
framework源码全局搜索系统哪些地方对此属性赋值:
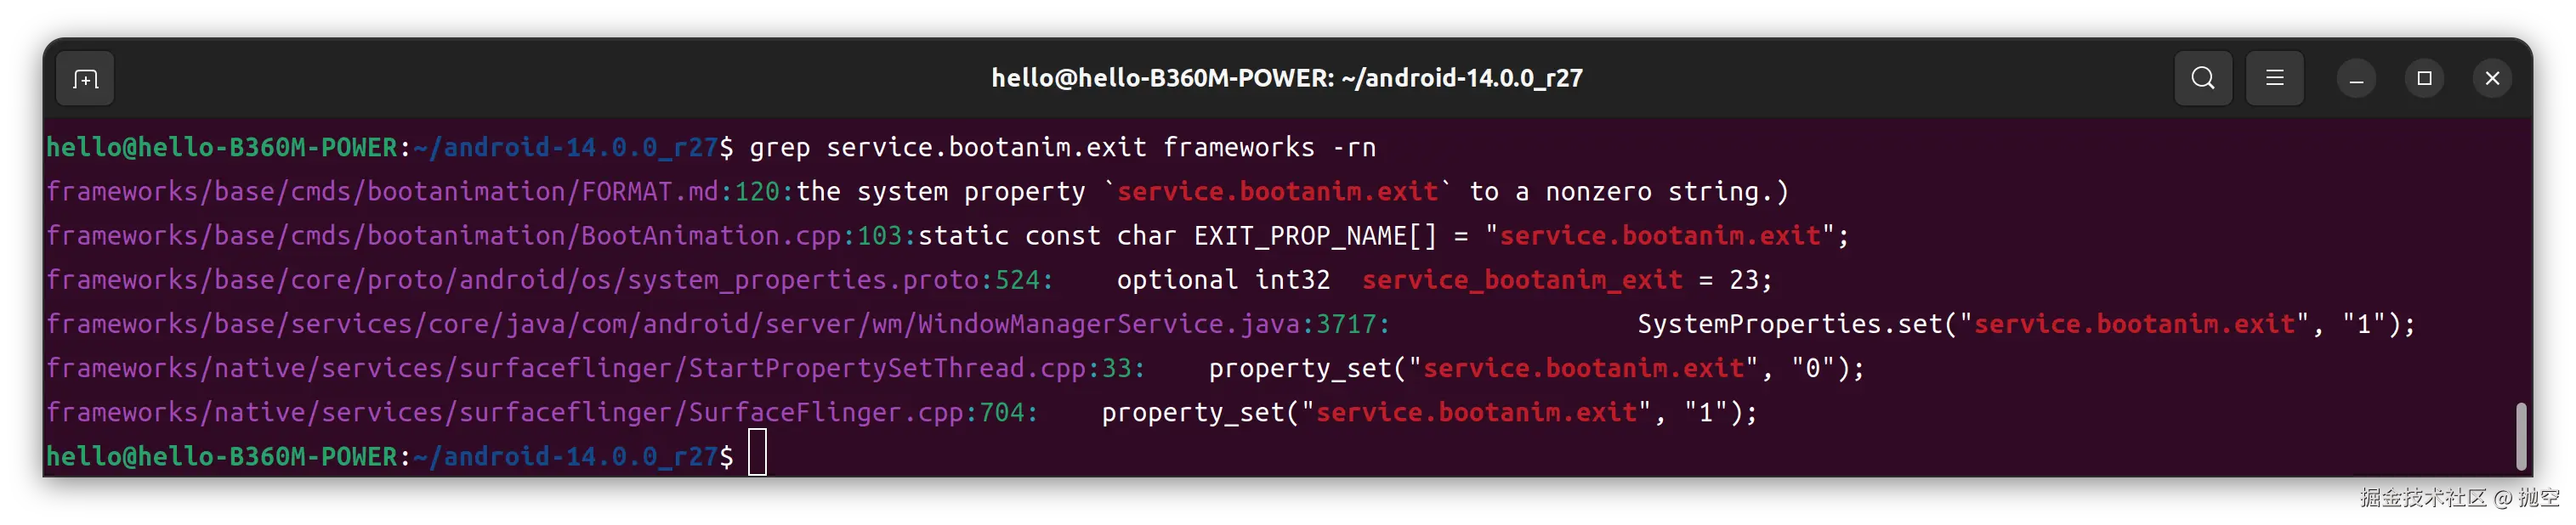
发现有两处对service.bootanim.exit设置为1,表示退出开机动画。
先来看SurfaceFlinger.cpp中是如何发起关闭动画行为的:
@frameworks/native/services/surfaceflinger/SurfaceFlinger.cpp
void SurfaceFlinger::bootFinished() {
    if (mBootFinished == true) {
        ALOGE("Extra call to bootFinished");
        return;
    }
    mBootFinished = true;
    ...

    // stop boot animation
    // formerly we would just kill the process, but we now ask it to exit so it
    // can choose where to stop the animation.
    property_set("service.bootanim.exit", "1");
    ...
}在SurfaceFlinger.cpp的bootFinished()函数中修改service.bootanim.exit属性,bootanimation服务会不断获取此属性的值从而达到关闭开机动画的目的,而SurfaceFlinger::bootFinished()函数会在SurfaceComposerAIDL::bootFinished()函数中被调用:
@frameworks/native/services/surfaceflinger/SurfaceFlinger.cpp
// gui::ISurfaceComposer
binder::Status SurfaceComposerAIDL::bootFinished() {
    status_t status = checkAccessPermission();
    if (status != OK) {
        return binderStatusFromStatusT(status);
    }
    mFlinger->bootFinished();
    return binder::Status::ok();
}SurfaceComposerAIDL::bootFinished()函数是在SurfaceComposerAIDL类中声明的函数:
@frameworks/native/services/surfaceflinger/SurfaceFlinger.h
class SurfaceComposerAIDL : public gui::BnSurfaceComposer {
public:
    SurfaceComposerAIDL(sp<SurfaceFlinger> sf) : mFlinger(std::move(sf)) {}

    binder::Status bootFinished() override;
}
通过在framework文件夹中搜索关键字bootFinished的结果来看:
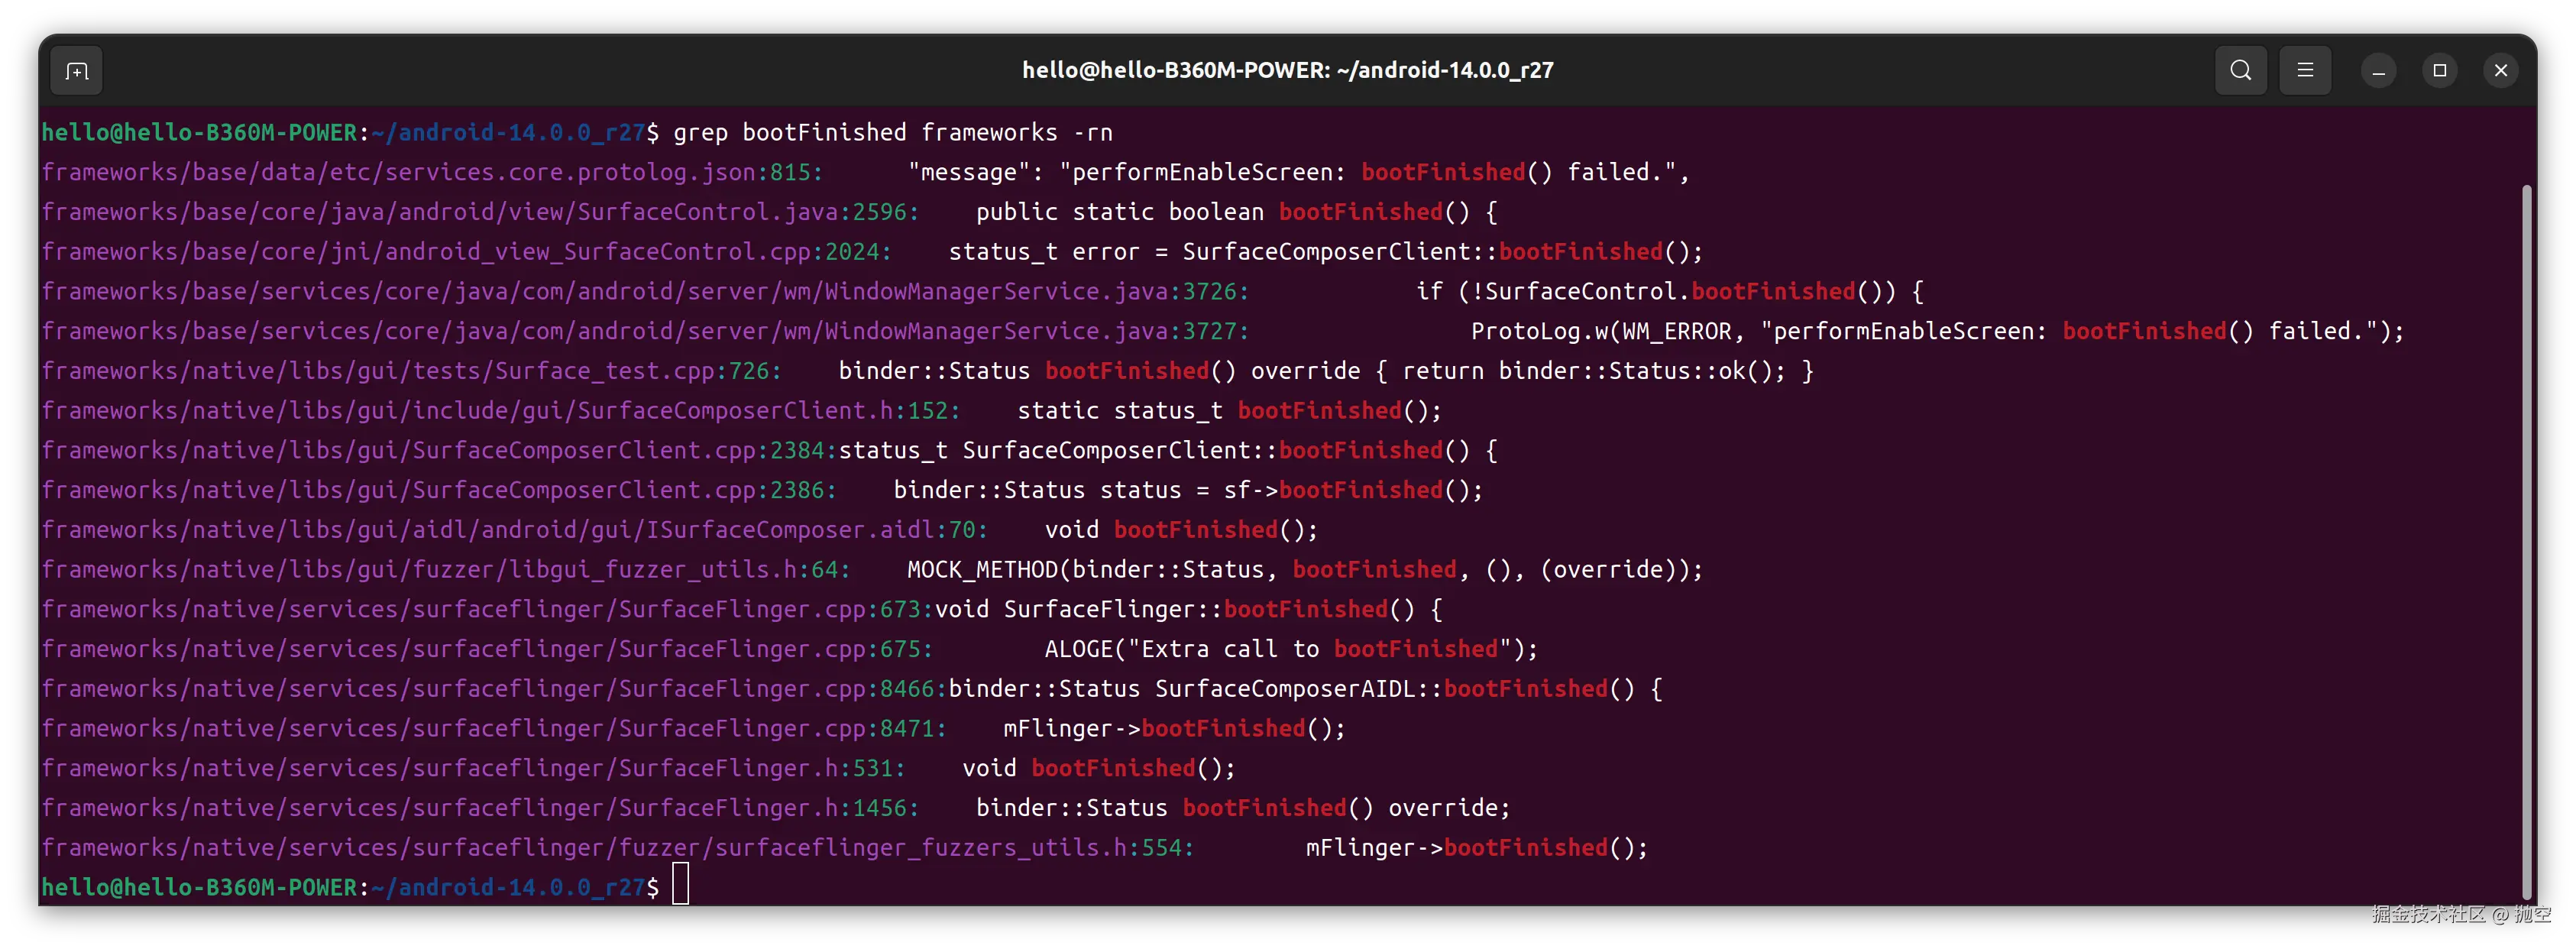
SurfaceComposerAIDL::bootFinished()函数是在SurfaceComposerClient.cpp中被调用的:
@frameworks/native/libs/gui/SurfaceComposerClient.cpp
status_t SurfaceComposerClient::bootFinished() {
    sp<gui::ISurfaceComposer> sf(ComposerServiceAIDL::getComposerService());
    binder::Status status = sf->bootFinished();
    return statusTFromBinderStatus(status);
}
SurfaceComposerClient::bootFinished() 函数在android_view_SurfaceControl.cpp的nativeBootFinished函数被调用:
cpp
@frameworks/base/core/jni/android_view_SurfaceControl.cpp
static jboolean nativeBootFinished(JNIEnv* env, jclass clazz) {
    status_t error = SurfaceComposerClient::bootFinished();
    return error == OK ? JNI_TRUE : JNI_FALSE;
}
继续往上则是从SurfaceControl.java的bootFinished()方法,通过JNI与原生方法nativeBootFinished()交互:
cpp
@frameworks/base/core/java/android/view/SurfaceControl.java
public static boolean bootFinished() {
    return nativeBootFinished();
}
private static native boolean nativeBootFinished();
SurfaceControl.java的静态方法bootFinished()明显是从WindowManagerService.java中调用起来的:
cpp
private void performEnableScreen() {
    synchronized (mGlobalLock) {
        ...
        if (!mBootAnimationStopped) {
            Trace.asyncTraceBegin(TRACE_TAG_WINDOW_MANAGER, "Stop bootanim", 0);
            // stop boot animation
            // formerly we would just kill the process, but we now ask it to exit so it
            // can choose where to stop the animation.
            SystemProperties.set("service.bootanim.exit", "1");
            mBootAnimationStopped = true;
        }
        ...
        if (!SurfaceControl.bootFinished()) {
            ProtoLog.w(WM_ERROR, "performEnableScreen: bootFinished() failed.");
            return;
        }
        ...
    }
}发现在调用SurfaceControl.bootFinished()之前,还会通过SystemProperties.set("service.bootanim.exit", "1")设置系统属性来通知系统关闭开机动画
因此目前观察到开机动画的停止动作发起点在WMS:
- 先通过设置service.bootanim.exit系统属性为1,bootanimation服务检测到后则关闭开机动画
- 而后再次判断开机动画是否结束,如果没有,则通过静态函数,JNI接口等一系列操作,最后在SurfaceFlinger中,设置service.bootanim.exit系统属性为1来关闭开机动画
五、OpenGL绘制分析与实战
5.1 原理分析
默认的开机动画在Bootanimation.cpp 中的android() 方法中实现了绘制
cpp
bool BootAnimation::threadLoop() {
    bool result;
    initShaders();

    // We have no bootanimation file, so we use the stock android logo
    // animation.
    if (mZipFileName.isEmpty()) {
        ALOGD("No animation file");
        result = android();
    } else {
        result = movie();
    }

    mCallbacks->shutdown();
    eglMakeCurrent(mDisplay, EGL_NO_SURFACE, EGL_NO_SURFACE, EGL_NO_CONTEXT);
    eglDestroyContext(mDisplay, mContext);
    eglDestroySurface(mDisplay, mSurface);
    mFlingerSurface.clear();
    mFlingerSurfaceControl.clear();
    eglTerminate(mDisplay);
    eglReleaseThread();
    IPCThreadState::self()->stopProcess();
    return result;
}
在android()方法中,首先看到的是initTexture 初始化纹理:
cpp
    //初始化纹理 加载图片 frameworks/base/core/res/assets/images/....
    initTexture(&mAndroid[0], mAssets, "images/android-logo-mask.png");
    initTexture(&mAndroid[1], mAssets, "images/android-logo-shine.png");
将两个图片加载了进来,那么这两个图片是什么呢?
aosp/frameworks/base/core/res/assets/images/android-logo-mask.png 可以看到 文字是透明的镂空的

aosp/frameworks/base/core/res/assets/images/android-logo-shine.png

其实看到这两个图片就是到要干什么了, android-logo-shine.png 是作为一个扫光的效果 不断的移动,android-logo-mask.png 遮盖到android-logo-shine.png 图片的上面,就是默认的开机动画效果。
cpp
// clear screen 清理下屏幕
    glShadeModel(GL_FLAT);
    glDisable(GL_DITHER);
    glDisable(GL_SCISSOR_TEST);
    glClearColor(0,0,0,1);
    glClear(GL_COLOR_BUFFER_BIT);
    eglSwapBuffers(mDisplay, mSurface);

    glEnable(GL_TEXTURE_2D);
    glTexEnvx(GL_TEXTURE_ENV, GL_TEXTURE_ENV_MODE, GL_REPLACE);
继续看下面的代码:设置了一块裁剪区域,用来绘制android 动画,同时设置了允许两个图片的融合,才能实现闪光的效果
cpp
 const GLint xc = (mWidth  - mAndroid[0].w) / 2;
    const GLint yc = (mHeight - mAndroid[0].h) / 2;
    //修改裁剪区域 否则 只会绘制android
    const Rect updateRect(xc, yc, xc + mAndroid[0].w, yc + mAndroid[0].h);
    //裁剪一块区域
    glScissor(updateRect.left, mHeight - updateRect.bottom, updateRect.width(),
            updateRect.height());
    // Blend state 允许两个图片的融合
    glBlendFunc(GL_SRC_ALPHA, GL_ONE_MINUS_SRC_ALPHA);
    glTexEnvx(GL_TEXTURE_ENV, GL_TEXTURE_ENV_MODE, GL_REPLACE);
继续看下面的代码,开始了绘制:扫光的图片位于底部并且不断的移动,遮罩图片位于扫光图片的上方,这样就绘制出了开机动画
cpp
const nsecs_t startTime = systemTime();
    do {
        nsecs_t now = systemTime();
        double time = now - startTime;
        float t = 4.0f * float(time / us2ns(16667)) / mAndroid[1].w;
        GLint offset = (1 - (t - floorf(t))) * mAndroid[1].w;
        GLint x = xc - offset;//扫光图片不断的移动

        glDisable(GL_SCISSOR_TEST);
        glClear(GL_COLOR_BUFFER_BIT);

        glEnable(GL_SCISSOR_TEST);
        glDisable(GL_BLEND);
        glBindTexture(GL_TEXTURE_2D, mAndroid[1].name);
        glDrawTexiOES(x,                 yc, 0, mAndroid[1].w, mAndroid[1].h);//对扫光的图进行绘制
        glDrawTexiOES(x + mAndroid[1].w, yc, 0, mAndroid[1].w, mAndroid[1].h);

        glEnable(GL_BLEND);//开启融合
        glBindTexture(GL_TEXTURE_2D, mAndroid[0].name);//绘制遮罩的图 带有Android的图
        glDrawTexiOES(xc, yc, 0, mAndroid[0].w, mAndroid[0].h);

        EGLBoolean res = eglSwapBuffers(mDisplay, mSurface);//显示到屏幕上
        if (res == EGL_FALSE)
            break;

        // 12fps: don't animate too fast to preserve CPU 为了不让CPU过重,1S 中绘制12张图片
        const nsecs_t sleepTime = 83333 - ns2us(systemTime() - now);
        if (sleepTime > 0)
            usleep(sleepTime);

        checkExit();
    } while (!exitPending());
当动画退出时候的扫尾工作,释放纹理:
cpp
  glDeleteTextures(1, &mAndroid[0].name);
  glDeleteTextures(1, &mAndroid[1].name);
5.2 绘制实战
了解了默认的动画绘制实现原理,如何在原有的基础上绘制一个时钟呢?
首先BootAnimation中默认有实现drawClock方法:此方法就是绘制时钟,这个方法中主要是获取当前的时间转换,通过Font 进行绘制
cpp
void BootAnimation::drawClock(const Font& font, const int xPos, const int yPos) {
    static constexpr char TIME_FORMAT_12[] = "%l:%M";
    static constexpr char TIME_FORMAT_24[] = "%H:%M";
    static constexpr int TIME_LENGTH = 6;

    time_t rawtime;
    time(&rawtime);
    struct tm* timeInfo = localtime(&rawtime);

    char timeBuff[TIME_LENGTH];
    const char* timeFormat = mTimeFormat12Hour ? TIME_FORMAT_12 : TIME_FORMAT_24;
    size_t length = strftime(timeBuff, TIME_LENGTH, timeFormat, timeInfo);

    if (length != TIME_LENGTH - 1) {
        SLOGE("Couldn't format time; abandoning boot animation clock");
        mClockEnabled = false;
        return;
    }

    char* out = timeBuff[0] == ' ' ? &timeBuff[1] : &timeBuff[0];
    int x = xPos;
    int y = yPos;
    drawText(out, font, false, &x, &y);
}
这个Font 是什么呢?Font是一个结构体内部有Texture就是用来绘制的
cpp
struct Font {
        FileMap* map;
        Texture texture;
        int char_width;
        int char_height;
};那么如何初始化Font呢?drawClock 需要Font的实例 initFont 对font进行了初始化:
cpp
status_t BootAnimation::initFont(Font* font, const char* fallback) {
    status_t status = NO_ERROR;

    if (font->map != nullptr) {
        glGenTextures(1, &font->texture.name);
        glBindTexture(GL_TEXTURE_2D, font->texture.name);

        status = initTexture(font->map, &font->texture.w, &font->texture.h);

        glTexParameterx(GL_TEXTURE_2D, GL_TEXTURE_MIN_FILTER, GL_NEAREST);
        glTexParameterx(GL_TEXTURE_2D, GL_TEXTURE_MAG_FILTER, GL_NEAREST);
        glTexParameterx(GL_TEXTURE_2D, GL_TEXTURE_WRAP_S, GL_REPEAT);
        glTexParameterx(GL_TEXTURE_2D, GL_TEXTURE_WRAP_T, GL_REPEAT);
    } else if (fallback != nullptr) {
        status = initTexture(&font->texture, mAssets, fallback);
    } else {
        return NO_INIT;
    }

    if (status == NO_ERROR) {
        font->char_width = font->texture.w / FONT_NUM_COLS;
        font->char_height = font->texture.h / FONT_NUM_ROWS / 2;  // There are bold and regular rows
    }

    return status;
}
当 fallback 不为空时就会初始化纹理,那么这个fallback 是什么呢?其实就是图片 ,opengl要想渲染时钟上的数据,不能直接设置字符 ,只能通过图片来进行绘制文件,可以在aosp/frameworks/base/core/res/assets/images/clock_font.png 找到时钟的一个图片,正是导入这个图片opengl才可以去绘制时钟上的文字

可以来看下initTexture 方法如下:传递参数会对texture进行初始化,AssetManager 资源的管理类,name就是资源的名称,initTexture方法主要是将资源文件转换为bitmap 获取了资源文件的信息,并且生成纹理进行绑定
cpp
status_t BootAnimation::initTexture(Texture* texture, AssetManager& assets,
        const char* name) {
    Asset* asset = assets.open(name, Asset::ACCESS_BUFFER);
    if (asset == nullptr)
        return NO_INIT;
    SkBitmap bitmap;//将文件转换为bitmap
    sk_sp<SkData> data = SkData::MakeWithoutCopy(asset->getBuffer(false),
            asset->getLength());
    sk_sp<SkImage> image = SkImage::MakeFromEncoded(data);
    image->asLegacyBitmap(&bitmap, SkImage::kRO_LegacyBitmapMode);
    asset->close();
    delete asset;
    //获取图片的宽高数据
    const int w = bitmap.width();
    const int h = bitmap.height();
    const void* p = bitmap.getPixels();

    GLint crop[4] = { 0, h, w, -h };
    texture->w = w;
    texture->h = h;
    //opengl生成纹理
    glGenTextures(1, &texture->name);
    glBindTexture(GL_TEXTURE_2D, texture->name);//绑定这个纹理 后面的操作都是针对这个纹理的
    ........
    return NO_ERROR;
}从上述可以知道drawClock方法,首先会initFont 通过资源文件,初始化纹理,然后获取当前的时间转换为固定格式的字符,通过drawText方法绘制时钟的文字,drawText 方法如下:
主要是将需要绘制的字符串,for循环字符串中的字符,对资源文件转换的纹理进行裁减,比如1 会找到图片的中1进行裁减
cpp
void BootAnimation::drawText(const char* str, const Font& font, bool bold, int* x, int* y) {
    glEnable(GL_BLEND);  // Allow us to draw on top of the animation
    glBindTexture(GL_TEXTURE_2D, font.texture.name);
    const int len = strlen(str);
    const int strWidth = font.char_width * len;
    if (*x == TEXT_CENTER_VALUE) {
        *x = (mWidth - strWidth) / 2;
    } else if (*x < 0) {
        *x = mWidth + *x - strWidth;
    }
    if (*y == TEXT_CENTER_VALUE) {
        *y = (mHeight - font.char_height) / 2;
    } else if (*y < 0) {
        *y = mHeight + *y - font.char_height;
    }
    int cropRect[4] = { 0, 0, font.char_width, -font.char_height };
    for (int i = 0; i < len; i++) {//对纹理的裁减
        char c = str[i];
        if (c < FONT_BEGIN_CHAR || c > FONT_END_CHAR) {
            c = '?';
        }
        // Crop the texture to only the pixels in the current glyph
        const int charPos = (c - FONT_BEGIN_CHAR);  // Position in the list of valid characters
        const int row = charPos / FONT_NUM_COLS;
        const int col = charPos % FONT_NUM_COLS;
        cropRect[0] = col * font.char_width;  // Left of column
        cropRect[1] = row * font.char_height * 2; // Top of row
        // Move down to bottom of regular (one char_heigh) or bold (two char_heigh) line
        cropRect[1] += bold ? 2 * font.char_height : font.char_height;
        glTexParameteriv(GL_TEXTURE_2D, GL_TEXTURE_CROP_RECT_OES, cropRect);
        glDrawTexiOES(*x, *y, 0, font.char_width, font.char_height);
        *x += font.char_width;
    }
    glDisable(GL_BLEND);  // Return to the animation's default behaviour
    glBindTexture(GL_TEXTURE_2D, 0);
}
ok,上述一系列分析中,已经知道了如何绘制时钟了,那么开始写代码:
- 首先需要一个Font的变量,用来保存绘制时钟的纹理
cpp
--- a/cmds/bootanimation/BootAnimation.h
+++ b/cmds/bootanimation/BootAnimation.h
@@ -166,6 +166,7 @@ private:
     sp<SurfaceComposerClient>       mSession;
     AssetManager mAssets;
     Texture     mAndroid[2];
+    Font        mClockFont;
     int         mWidth;
     int         mHeight;
int mCurrentInset;- 在android()方法中初始化Font 以及绘制时钟,CLOCK_FONT_ASSET 就是资源文件的位置
cpp
@@ -398,12 +402,20 @@ bool BootAnimation::android()
 {
     SLOGD("%sAnimationShownTiming start time: %" PRId64 "ms", mShuttingDown ? "Shutdown" : "Boot",
             elapsedRealtime());
+    //初始化纹理 加载图片 frameworks/base/core/res/assets/images/....
     initTexture(&mAndroid[0], mAssets, "images/android-logo-mask.png");
     initTexture(&mAndroid[1], mAssets, "images/android-logo-shine.png");

     mCallbacks->init({});
+    //初始化initFont
+    bool hasInitFont = false;
+    //CLOCK_FONT_ASSET 是一个图片 opengl不支持直接字符显示, opengl需要根据图片的纹理来进行绘制 将图片加载了近来 bitmap
+    if (initFont(&mClockFont,CLOCK_FONT_ASSET) == NO_ERROR){
+        hasInitFont = true;
+        ALOGD("android init Font ok,font name = %u",mClockFont.texture.name);
+    }
修改裁减区域,默认的裁减区域只有android区域,需要扩大区域,如果不扩大就看不到绘制的时钟:
cpp
@@ -416,12 +428,13 @@ bool BootAnimation::android()

     const GLint xc = (mWidth  - mAndroid[0].w) / 2;
     const GLint yc = (mHeight - mAndroid[0].h) / 2;
-    const Rect updateRect(xc, yc, xc + mAndroid[0].w, yc + mAndroid[0].h);
-
+    //修改裁剪区域 否则 只会绘制android区域,时钟区域就显示不出来
+    const Rect updateRect(xc, yc, xc + mAndroid[0].w, yc + mAndroid[0].h * 2);
+    //裁剪一块区域
     glScissor(updateRect.left, mHeight - updateRect.bottom, updateRect.width(),
-            updateRect.height());
+            updateRect.height() * 2);
然后在do-while循环中添加时钟绘制方法:
cpp
+        drawClock(mClockFont,TEXT_CENTER_VALUE,yc + mAndroid[0].h);//绘制时钟,位置在水平居中,在Android的上面
+        EGLBoolean res = eglSwapBuffers(mDisplay, mSurface);//显示到屏幕上
         if (res == EGL_FALSE)
             break;

-        // 12fps: don't animate too fast to preserve CPU
+        // 12fps: don't animate too fast to preserve CPU 为了不让CPU过重,1S 中绘制12张图片
         const nsecs_t sleepTime = 83333 - ns2us(systemTime() - now);
         if (sleepTime > 0)
             usleep(sleepTime);
do-while循环结束,退出开机动画的时候需要释放纹理:
cpp
@@ -460,13 +474,18 @@ bool BootAnimation::android()

     glDeleteTextures(1, &mAndroid[0].name);
     glDeleteTextures(1, &mAndroid[1].name);
+    //释放时钟的纹理
+    if (hasInitFont){
+        ALOGD("clear clock gl delete texture");
+        glDeleteTextures(1,&mClockFont.texture.name);
+    }
     return false;
 }
这里就完成了添加时钟的绘制,编译启动模拟器查看是否成功:
cpp
make
emulator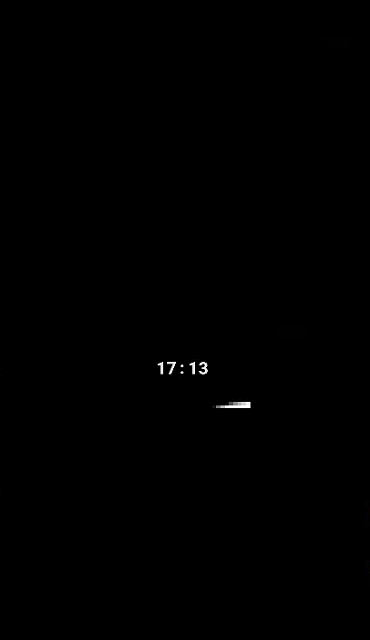
六、开机动画zip绘制分析与实战
6.1 如何使用zip
进入到源码的bootanimation目录会发现里面有一个FORMAT.md这个文件就是告诉你如何通过zip去绘制开机动画。
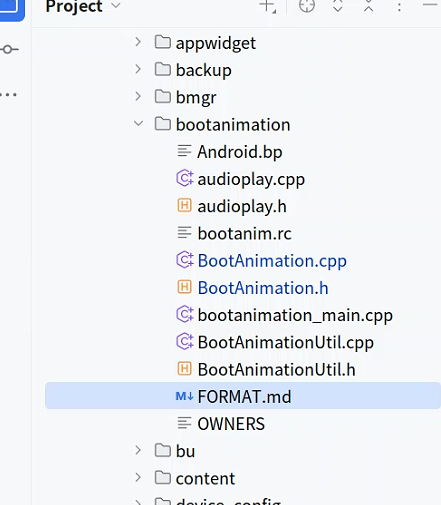
这个文件的内容如下:里面已经告诉你zip这个文件放到哪里,以及zip文件中的内容布局等等.
cpp
## zipfile paths

The system selects a boot animation zipfile from the following locations, in order:

    /system/media/bootanimation-encrypted.zip (if getprop("vold.decrypt") = '1')
    /system/media/bootanimation.zip
    /oem/media/bootanimation.zip
zipfile paths 这个就不用说了,这个是告诉你zip文件可以放到哪里,一般都会放到/system/media/中。模拟器中存放在 /product/media/bootanimation.zip
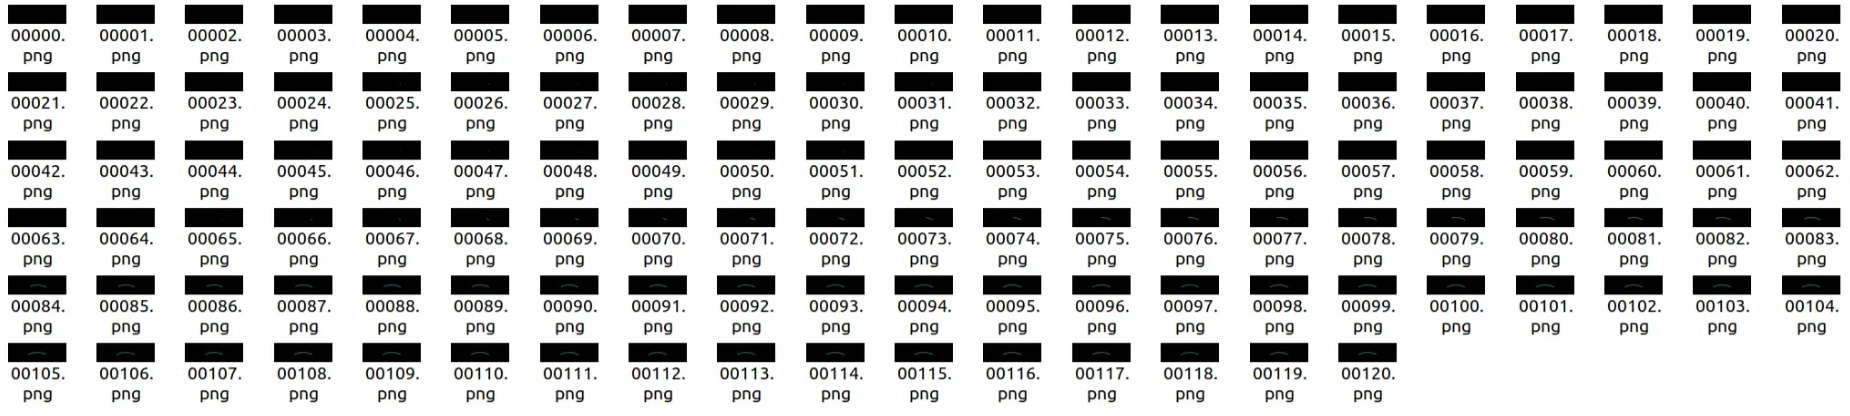
在来看zipfile layout 部分,这就是zip的资源文件,part0 .... partN 是图片帧,里面保存的就是一帧帧图片,desc.txt 是描述文件
cpp
## zipfile layout

The `bootanimation.zip` archive file includes:

    desc.txt - a text file
    part0  \
    part1   \  directories full of PNG frames
    ...     /
    partN  /
desc.txt 的描述格式,FPS 就是帧率,例如part0 里面有120张图片,例如1S 120fps,1S中就会执行120张帧图片
bash
1080 360 60
# ↑ 动画分辨率:宽1080px,高360px,帧率60FPS(横向条形启动动画)

c 1 0 part0 #ffee00 c c
# TYPE=c        :该段必须完整播放(不可被系统启动完成打断)
# COUNT=1       :播放 1 次
# PAUSE=0       :播放结束后不暂停
# part0         :使用 part0 目录里的 PNG 帧
# #ffee00       :背景颜色 = 黄色
# c c           :时钟 X=居中,Y=居中(时间显示在屏幕正中央)

c 0 0 part1 #ffee00 c c
# TYPE=c        :完整播放
# COUNT=0       :无限循环(直到系统启动完成)
# PAUSE=0       :不暂停
# part1         :主 loading 动画目录
# #ffee00       :黄色背景
# c c           :时钟居中显示
# 👉 这是核心等待动画段

c 1 0 part2 #ffee00 c c
# TYPE=c        :完整播放
# COUNT=1       :播放一次
# PAUSE=0
# part2         :启动完成后的过渡动画
# #ffee00       :黄色背景
# c c           :时钟居中

c 1 1 part3 #ffee00 c c
# TYPE=c        :完整播放
# COUNT=1       :播放一次
# PAUSE=1       :播放完后停 1 帧
# part3         :第二段收尾动画
# #ffee00       :黄色背景
# c c           :时钟居中

c 1 0 part4 #ffee00 c c
# TYPE=c        :完整播放
# COUNT=1       :播放一次
# PAUSE=0
# part4         :最终结束动画
# #ffee00       :黄色背景
# c c           :时钟居中
6.2 实现原理
前文分析了bootanimation的原理,在 开机动画的整体流程 中,可以指导当mZipFileName 不为空的时候执行moive方法。
cpp
bool BootAnimation::movie()
{
    if (mAnimation == nullptr) {
        mAnimation = loadAnimation(mZipFileName);
    }

    if (mAnimation == nullptr)
        return false;

    // mCallbacks->init() may get called recursively,
    // this loop is needed to get the same results
    for (const Animation::Part& part : mAnimation->parts) {
        if (part.animation != nullptr) {
            mCallbacks->init(part.animation->parts);
        }
    }
    mCallbacks->init(mAnimation->parts);

   ...... opengl 初始化纹理

    playAnimation(*mAnimation);
   .......

    releaseAnimation(mAnimation);
    mAnimation = nullptr;

    return false;
}在上述代码中,会先执行loadAnimation方法,解析zip文件的内容,当mZipFileName不为空的时候调用了loadAnimation方法,并且mAnimation 赋值了,到执行到moive方法可以直接开始动画,这里做了一些小优化,继续看loadAnimation 如何解析zip文件的
- 打开zip压缩文件
- 构造Animation对象
parseAnimationDesc解析描述文件desc.txt,记录执行规则preloadZip将所有的图片加载进来
cpp
BootAnimation::Animation* BootAnimation::loadAnimation(const String8& fn)
{
    if (mLoadedFiles.indexOf(fn) >= 0) {
        SLOGE("File "%s" is already loaded. Cyclic ref is not allowed",
            fn.string());
        return nullptr;
    }
    //打开zip文件
    ZipFileRO *zip = ZipFileRO::open(fn);
    if (zip == nullptr) {
        SLOGE("Failed to open animation zip "%s": %s",
            fn.string(), strerror(errno));
        return nullptr;
    }
    //构造Animation对象
    Animation *animation =  new Animation;
    animation->fileName = fn;
    animation->zip = zip;
    animation->clockFont.map = nullptr;
    mLoadedFiles.add(animation->fileName);
    parseAnimationDesc(*animation);//解析描述文件desc.txt
    if (!preloadZip(*animation)) {//加载所有的图片进来
        return nullptr;
    }
    mLoadedFiles.remove(fn);
    return animation;
}如下parseAnimationDesc,解析后的文本按照行数进行解析,这部分代码很简单:
cpp
bool BootAnimation::parseAnimationDesc(Animation& animation)
{
    String8 desString;

    if (!readFile(animation.zip, "desc.txt", desString)) {
        return false;
    }
    char const* s = desString.string();
    // Parse the description file
    for (;;) {
        const char* endl = strstr(s, "\n");
        if (endl == nullptr) break;
        String8 line(s, endl - s);
        const char* l = line.string();
        int fps = 0;
        int width = 0;
        int height = 0;
        int count = 0;
        int pause = 0;
        char path[ANIM_ENTRY_NAME_MAX];
        char color[7] = "000000"; // default to black if unspecified
        char clockPos1[TEXT_POS_LEN_MAX + 1] = "";
        char clockPos2[TEXT_POS_LEN_MAX + 1] = "";
        char pathType;
        if (sscanf(l, "%d %d %d", &width, &height, &fps) == 3) {
            // SLOGD("> w=%d, h=%d, fps=%d", width, height, fps);
            animation.width = width;
            animation.height = height;
            animation.fps = fps;
        } else if (sscanf(l, " %c %d %d %s #%6s %16s %16s",
                          &pathType, &count, &pause, path, color, clockPos1, clockPos2) >= 4) {
            //SLOGD("> type=%c, count=%d, pause=%d, path=%s, color=%s, clockPos1=%s, clockPos2=%s",
            //    pathType, count, pause, path, color, clockPos1, clockPos2);
            Animation::Part part;
            part.playUntilComplete = pathType == 'c';
            part.count = count;
            part.pause = pause;
            part.path = path;
            part.audioData = nullptr;
            part.animation = nullptr;
            if (!parseColor(color, part.backgroundColor)) {
                SLOGE("> invalid color '#%s'", color);
                part.backgroundColor[0] = 0.0f;
                part.backgroundColor[1] = 0.0f;
                part.backgroundColor[2] = 0.0f;
            }
            parsePosition(clockPos1, clockPos2, &part.clockPosX, &part.clockPosY);
            animation.parts.add(part);
        }
       ......
        s = ++endl;
    }

    return true;
}然后看preloadZip 核心代码:Animation 中有变量 Vector<Part> parts,用来存储每个part的图片帧,Part结构体中有SortedVector<Frame> frames; 每一帧的图片都会存储到frames中,同时也可以看到leaf == "audio.wav" 说明开机动画是支持音频的
cpp
for (size_t j = 0; j < pcount; j++) {
                if (path == animation.parts[j].path) {
                    uint16_t method;
                    // supports only stored png files
                    if (zip->getEntryInfo(entry, &method, nullptr, nullptr, nullptr, nullptr, nullptr)) {
                        if (method == ZipFileRO::kCompressStored) {
                            FileMap* map = zip->createEntryFileMap(entry);
                            if (map) {
                                Animation::Part& part(animation.parts.editItemAt(j));
                                if (leaf == "audio.wav") {
                                    // a part may have at most one audio file
                                    part.audioData = (uint8_t *)map->getDataPtr();
                                    part.audioLength = map->getDataLength();
                                } else if (leaf == "trim.txt") {
                                    part.trimData.setTo((char const*)map->getDataPtr(),
                                                        map->getDataLength());
                                } else {
                                    Animation::Frame frame;
                                    frame.name = leaf;
                                    frame.map = map;
                                    frame.trimWidth = animation.width;
                                    frame.trimHeight = animation.height;
                                    frame.trimX = 0;
                                    frame.trimY = 0;
                                    part.frames.add(frame);
                                }
                            }
                        } else {
                            SLOGE("bootanimation.zip is compressed; must be only stored");
                        }
                    }
                }
}loadAnimation方法执行完毕,这时候zip的文件资源的信息已经全部知道了,继续分析movie方法,下面就是playAnimation 播放开机动画:
cpp
for (size_t i=0 ; i<pcount ; i++) {//part0 --- partN
        const Animation::Part& part(animation.parts[i]);// 获取Part实例
        const size_t fcount = part.frames.size();//获取图片的帧数
        .....
           //desc.txt COUNT如果配置为0 表示一直循环
           for (int r=0 ; !part.count || r<part.count ; r++) {
            ......
            //desc.txt RGBHEX配置,背景颜色
            glClearColor(
                    part.backgroundColor[0],
                    part.backgroundColor[1],
                    part.backgroundColor[2],
                    1.0f);

            for (size_t j=0 ; j<fcount && (!exitPending() || part.playUntilComplete) ; j++) {
                const Animation::Frame& frame(part.frames[j]);//获取每个图片帧开始绘制
                nsecs_t lastFrame = systemTime();
                 //使用opengl 进行绘制
                  if (r > 0) {
                      glBindTexture(GL_TEXTURE_2D, frame.tid);
                  } else {
                      if (part.count != 1) {
                          glGenTextures(1, &frame.tid);
                          glBindTexture(GL_TEXTURE_2D, frame.tid);
                          glTexParameterx(GL_TEXTURE_2D, GL_TEXTURE_MIN_FILTER, GL_LINEAR);
                          glTexParameterx(GL_TEXTURE_2D, GL_TEXTURE_MAG_FILTER, GL_LINEAR);
                      }
                      int w, h;
                      initTexture(frame.map, &w, &h);
                  }
                  .......
                  checkExit();//检查开机动画结束标记
                }
                usleep(part.pause * ns2us(frameDuration));//执行完一个part 停留的帧数
                ...
           }
           .....
}
6.3 实战自定义的zip开机动画
准备开机动画资源,编写desc.txt 文件:
cpp
1080 360 60

c 1 0 part0 #000000 c c
c 0 0 part1 #000000 c c
c 1 0 part2 #000000 c c
c 1 1 part3 #000000 c c
c 1 0 part4 #000000 c c
注意打包zip要使用存储方式命令如下:
bash
zip -r -X -Z store bootanimation part*/* desc.txt接着我们把 bootanimation.zip 动画文件预制到/aosp13/out/target/product/emulator_x86_64/product/media 目录下(模拟器)。
删除
bash
aosp13/out/target/product/emulator_x86_64/product.img
aosp13/out/target/product/emulator_x86_64/product-qemu.img
aosp13/out/target/product/emulator_x86_64/system.img
aosp13/out/target/product/emulator_x86_64/system-qemu.img
编译后运行