继上一篇https://blog.csdn.net/whmdsb5201314/article/details/157685283?spm=1001.2014.3001.5501
一、项目背景
在内容安全与舆情分析领域,如何高效地从海量对话数据中识别敏感信息、挖掘可疑对话,是许多企业面临的共性挑战。本文将深入剖析一个基于Vue + Element UI构建的黑词分析与可疑对话挖掘组件的核心实现,该组件通过黑词管理、可疑对话组、上下文查看等功能,为用户提供完整的内容安全解决方案。
二、组件概览
技术栈
前端框架:Vue 2
UI组件库:Element UI
状态管理:组件内状态管理
HTTP客户端:Axios
特色组件:自定义弹窗(AbyDialog)、分页组件
核心功能模块
黑词管理模块 - 黑词列表展示、搜索、批量操作
可疑对话组模块 - 私聊/群聊切换、对话展示、上下文查看
关键词管理模块 - 私有关键词/公有关键词添加
话题总结模块 - 对话上下文分析与话题挖掘
三、核心组件设计
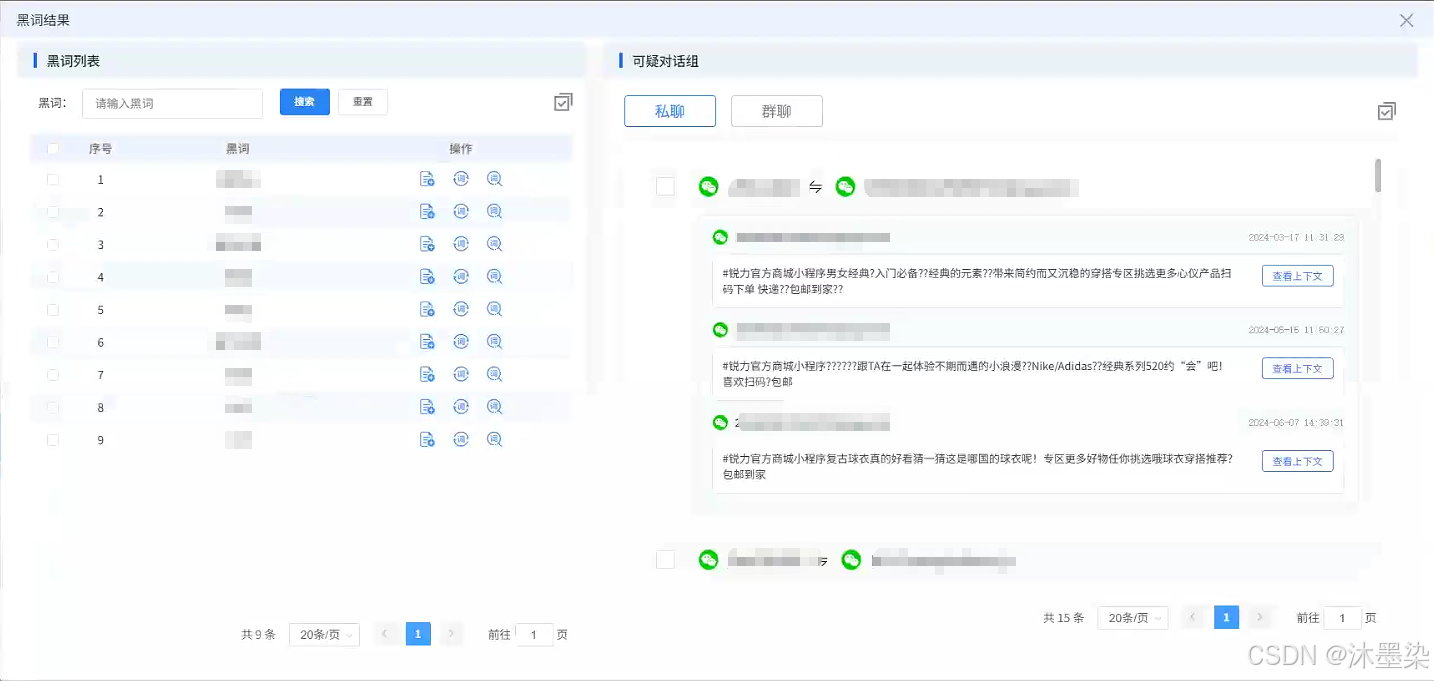
1. 双面板布局设计
组件采用左右分栏的布局设计,左侧为黑词管理区,右侧为可疑对话展示区。这种布局符合用户"先选择黑词,后查看对话"的操作体验。
html
<div class="black-word-analysis">
  <!-- 左侧:黑词列表 -->
  <div class="left-panel">
    <div class="panel-header">
      <div class="panel-icon"></div>
      <h2 class="panel-title">黑词列表</h2>
    </div>
    <!-- 表格区域 -->
  </div>

  <!-- 右侧:可疑对话组 -->
  <div class="right-panel">
    <div class="panel-header">
      <div class="panel-icon"></div>
      <h2 class="panel-title">可疑对话组</h2>
    </div>
    <!-- 对话列表 -->
  </div>
</div>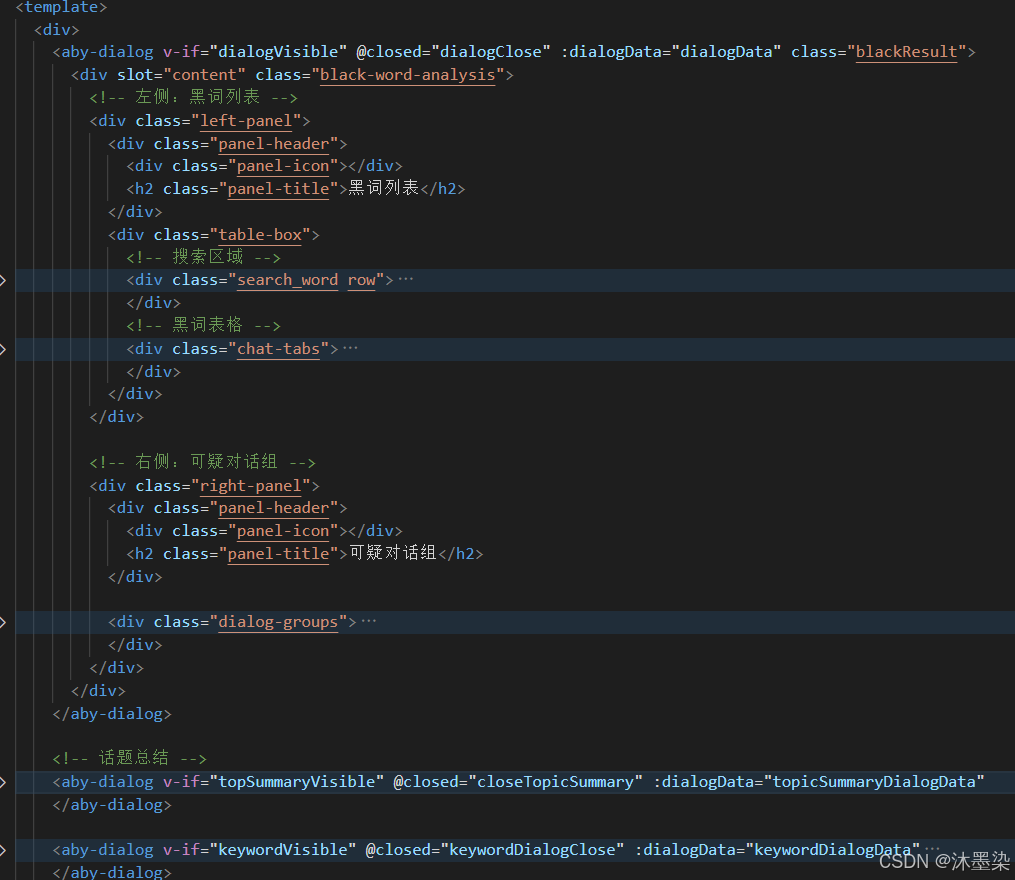
2. 黑词管理模块
黑词模块包含搜索、表格展示、批量操作三大核心功能。特别值得注意的是,我们通过el-dropdown实现了批量操作的优雅交互:
html
<div class="search_word row">
  <div class="left-search row">
    <div class="search-con row">
      <div class="black_word">黑词:</div>
      <el-input v-model="searchKeyword" placeholder="请输入黑词"
        @keyup.enter.native="handleSearch"></el-input>
    </div>
    <div class="search_btn_box">
      <el-button type="primary" size="small" @click="handleSearch">搜索</el-button>
      <el-button size="small" @click="handleReset">重置</el-button>
    </div>
  </div>

  <!-- 批量操作下拉菜单 -->
  <el-dropdown @command="handleCommand">
    <div class="right-box">
      <img src="@/assets/blackWord/ic_batch.png" alt="">
    </div>
    <el-dropdown-menu slot="dropdown">
      <el-dropdown-item command="2">批量加入私有关键词</el-dropdown-item>
      <el-dropdown-item command="3">批量加入公有关键词</el-dropdown-item>
    </el-dropdown-menu>
  </el-dropdown>
</div>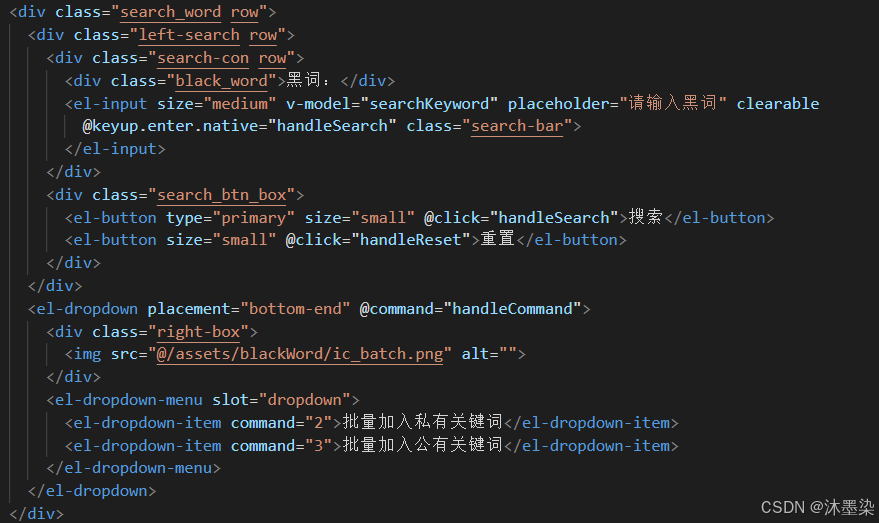
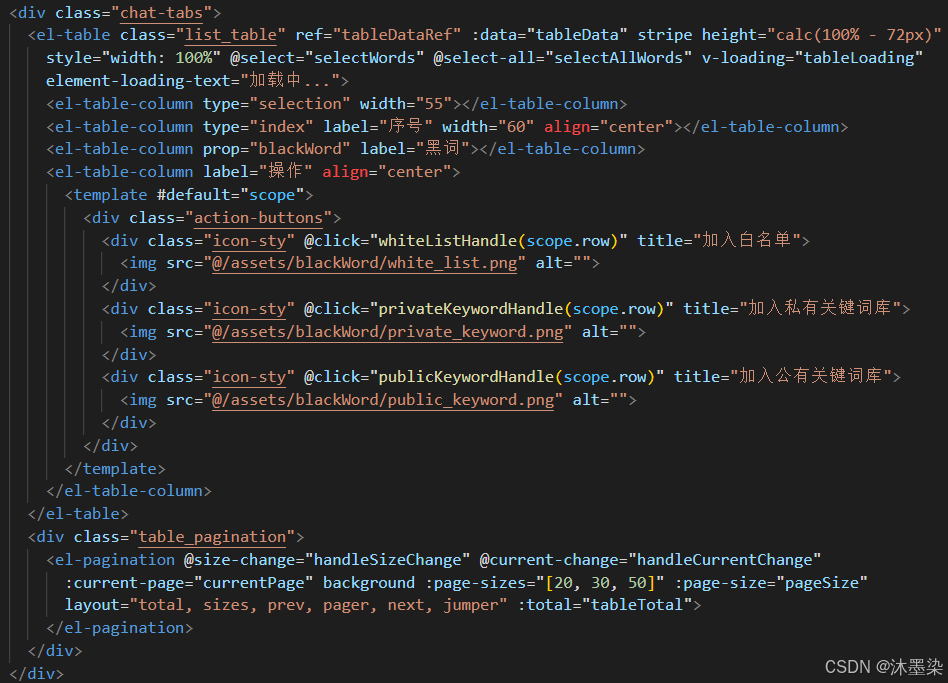
关键技术点 :el-dropdown的command模式可以优雅地处理多个批量操作指令,避免编写重复的事件处理逻辑。
3. 分页管理
组件针对左侧黑词和右侧对话分别维护了两套独立的分页逻辑,但采用了统一的设计模式:
javascript
// 左侧黑词分页
handleSizeChange(val) {
  this.pageSize = val;
  this.currentPage = 1;
  this.updateTableData();
},

handleCurrentChange(val) {
  this.currentPage = val;
  this.updateTableData();
},

// 根据当前页码和搜索条件更新表格数据
updateTableData() {
  let filteredData = this.allTableData;
  if (this.searchKeyword) {
    filteredData = this.allTableData.filter(item =>
      item.blackWord.includes(this.searchKeyword)
    );
  }
  this.tableTotal = filteredData.length;
  const start = (this.currentPage - 1) * this.pageSize;
  const end = start + this.pageSize;
  this.tableData = filteredData.slice(start, end);
}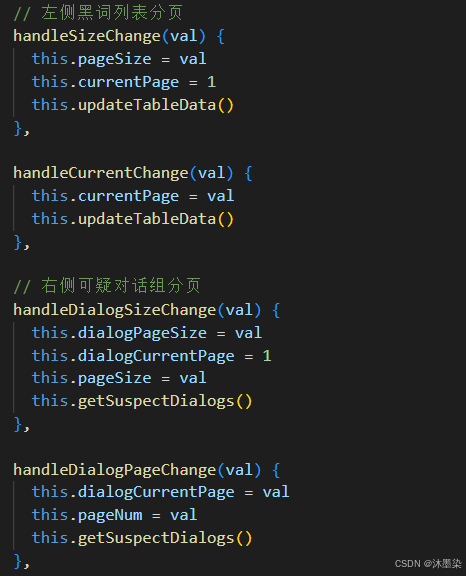
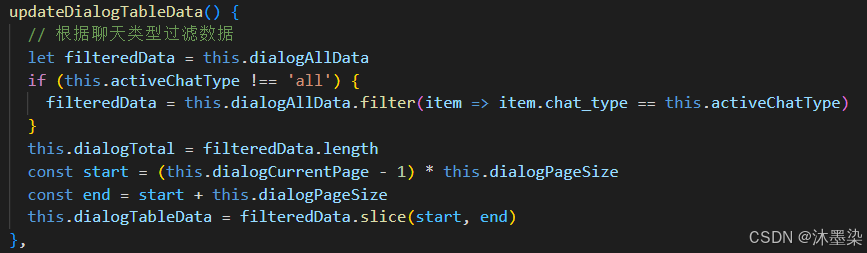
设计亮点 :采用前端分页+过滤的策略,避免对后端的频繁请求。allTableData存储完整数据,tableData存储当前页展示数据,两者分离维护,性能优异。
4. 可疑对话展示
对话展示是组件的核心交互模块,我们设计了差异化的展示逻辑:
html
<div class="table_item_title">
  <!-- 发送者账号(所有类型都显示) -->
  <img src="@/assets/caseScreen/wx.png" alt="" class="wechat_icon">
  <div class="accout_name">
    {{ item.account1_number }}{{ item.nickname1 ? '(' + item.nickname1 + ')' : '' }}
  </div>

  <!-- 只有私聊才显示箭头和接收者账号 -->
  <template v-if="item.chat_type == 1">
    <div class="accout_icon">
      <i class="el-icon-sort"></i>
    </div>
    <img src="@/assets/caseScreen/wx.png" alt="" class="wechat_icon">
    <div class="accout_name">
      {{ item.account2_number }}{{ item.nickname2 ? '(' + item.nickname2 + ')' : '' }}
    </div>
  </template>
</div>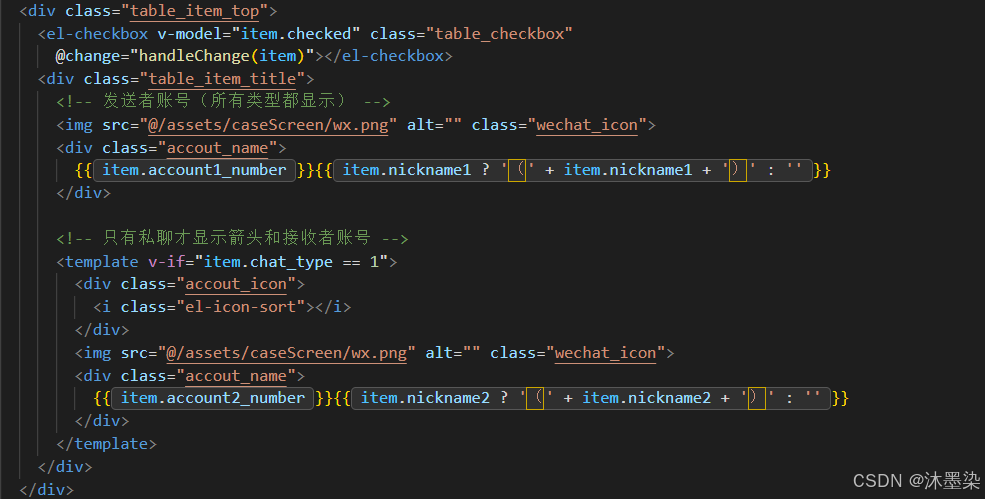
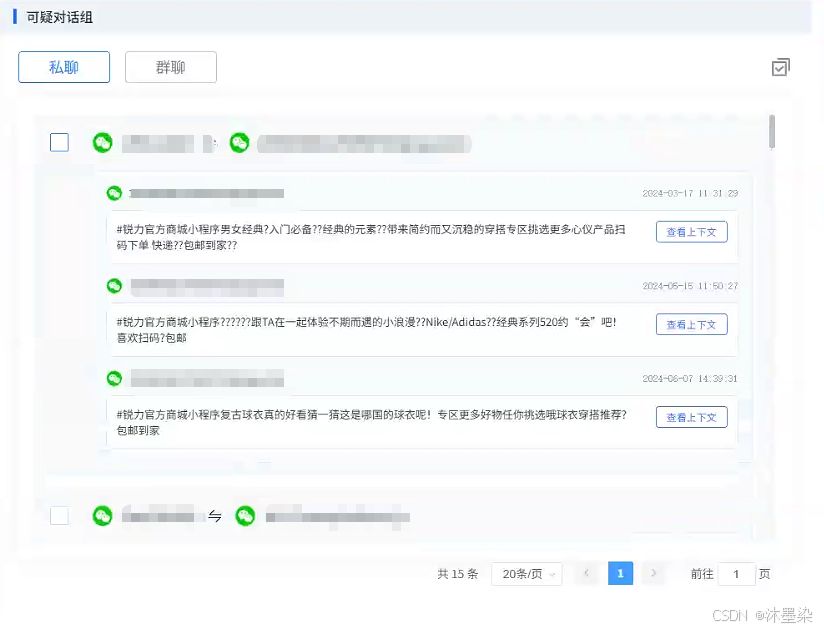
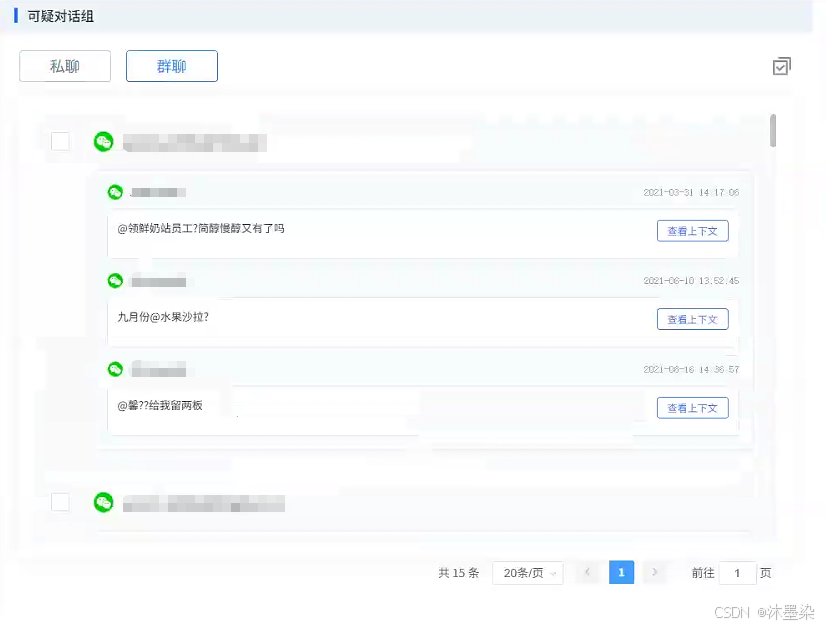
设计思考:私聊需要展示双向关系,群聊只需展示发送者,这种差异化展示大大提升了用户体验和信息密度。
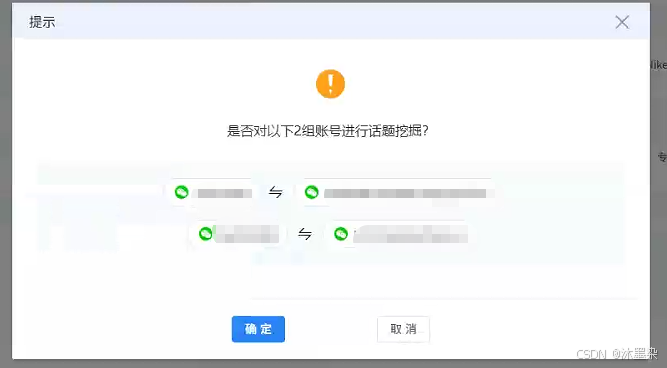
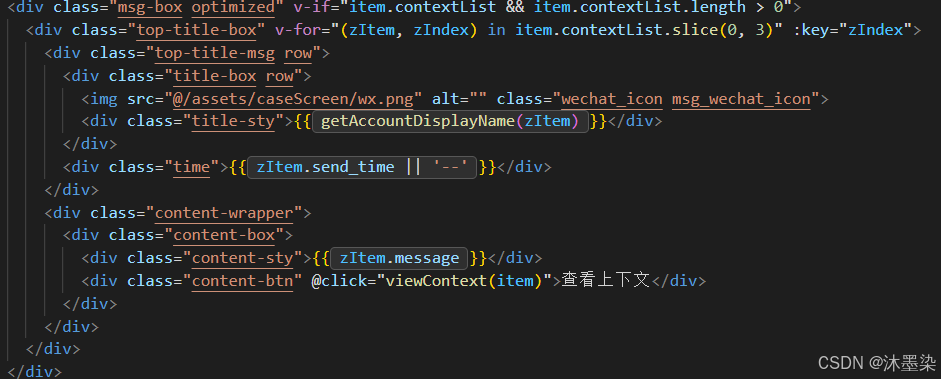
5. 上下文消息展示与查看完整的对话上下文
对话消息展示区域采用了三段式设计:时间轴、发送者、消息内容。特别设计了消息内容的三行截断功能:
html
.content-sty {
  /* 多行文本截断 - 显示3行 */
  display: -webkit-box;
  -webkit-line-clamp: 3;
  line-clamp: 3;
  -webkit-box-orient: vertical;
  max-height: 4.5em; /* 3行 * 1.5行高 */
  overflow: hidden;
}
javascript
// 查看上下文
    async viewContext(dialogItem) {
      try {
        // 显示加载状态
        this.currentSelectedDialog = {
          ...dialogItem,
          loading: true
        }

        // 构建请求参数
        const params = {
          recordId: this.taskUuid || '',  // 修改这里:使用 recordId
          chatType: dialogItem.chat_type || this.activeChatType || 1,  // 聊天类型
          pageNum: 1,
          pageSize: 20
        }

        // 重要:添加groupID参数(如果是群聊)
        if (dialogItem.groupID) {
          params.groupID = dialogItem.groupID;
        }

        // 如果是私聊,需要添加账号信息
        if (dialogItem.chat_type == 1) {
          // 根据您的数据结构,可能需要传递发送方和接收方账号
          if (dialogItem.account1_number) {
            params.account1Number = dialogItem.account1_number;
          }
          if (dialogItem.account2_number) {
            params.account2Number = dialogItem.account2_number;
          }
        }


        // 调用获取上下文和话题总结的接口
        const res = await suspiciousDialogueGroup(params);

        if (res.data.code === 1) {
          const responseData = res.data.data;

          let contextList = [];
          let topicSummary = '';

          // 根据实际数据结构处理
          if (Array.isArray(responseData) && responseData.length > 0) {
            // 如果是数组,取第一个元素
            const firstItem = responseData[0];
            contextList = firstItem.contextList || [];

            // 如果没有topicSummary,可以生成一个简单的总结
            topicSummary = firstItem.topicSummary || firstItem.summary ||
              `对话涉及 ${contextList.length} 条消息`;
          } else if (responseData && typeof responseData === 'object') {
            // 如果是对象,直接使用
            contextList = responseData.contextList || [];
            topicSummary = responseData.topicSummary || responseData.summary || '';
          }

          // 更新当前选中的对话数据,添加上下文信息
          this.currentSelectedDialog = {
            ...dialogItem,
            taskUuid: this.taskUuid,  // 保留原 taskUuid(如果需要)
            recordId: this.taskUuid,  // 添加 recordId
            keywordsName: this.keywordsName,  // 添加keywordsName
            chat_type: dialogItem.chat_type || this.activeChatType || 1,  // 确保有chat_type
            groupID: dialogItem.groupID || '',  // 确保有groupID
            account1_number: dialogItem.account1_number || dialogItem.sendUser || '',
            account2_number: dialogItem.account2_number || dialogItem.recvUser || '',
            contextList: contextList,  // 上下文消息列表
            topicSummary: topicSummary,  // 话题总结
            totalCount: contextList.length,  // 总条数
            currentPage: params.pageNum,
            pageSize: params.pageSize,
            loading: false
          };

          // 显示话题总结弹窗
          this.topSummaryVisible = true;
        } else {
          this.$message.error(res.data.message || '获取上下文失败');
          this.currentSelectedDialog.loading = false;
        }
      } catch (error) {
        console.error('获取上下文失败:', error);
        this.$message.error('获取上下文失败');
        this.currentSelectedDialog.loading = false;
      }
},配合"查看上下文"按钮,实现了"查看+详情"的优雅交互。
6. 私聊-群聊 账号显示逻辑
组件需要处理私聊、群聊不同场景下的账号显示规则,我们封装了专用的计算逻辑:
javascript
getAccountDisplayName(item) {
  // 群聊且是接收方时,显示群成员的账号
  if (item.chat_type == 2) {
    if (item.send_or_accept === "2") {
      // 接收方消息,显示被@的账号
      return item.group_involved_account || item.account2_number || '未知账号';
    } else {
      // 发送方消息,显示发送者账号
      return item.account1_number || '未知账号';
    }
  }

  // 私聊逻辑:发送方显示account1,接收方显示account2
  const isSender = item.send_or_accept === "1";
  return isSender ? item.account1_number : item.account2_number || '未知账号';
}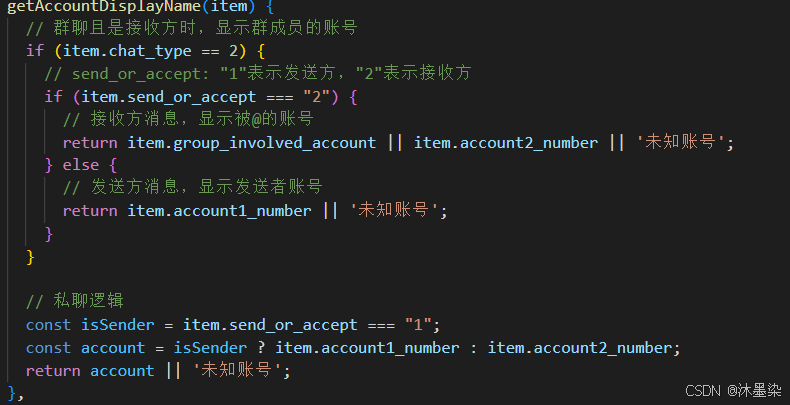
技术价值:将复杂的业务逻辑封装在方法中,模板保持简洁,易于维护和测试。
7. 弹窗组件复用
组件实现了弹窗组件的统一管理,通过v-if动态创建/销毁,避免内存泄漏:
html
<!-- 主弹窗 -->
<aby-dialog v-if="dialogVisible" @closed="dialogClose" :dialogData="dialogData">
<!-- 内容区域 -->
</aby-dialog>
<!-- 话题总结弹窗 -->
<aby-dialog v-if="topSummaryVisible" @closed="closeTopicSummary">
<TopSumary ref="topicSummaryRef" :currentDialog="currentSelectedDialog" />
</aby-dialog>
<!-- 关键词添加弹窗 -->
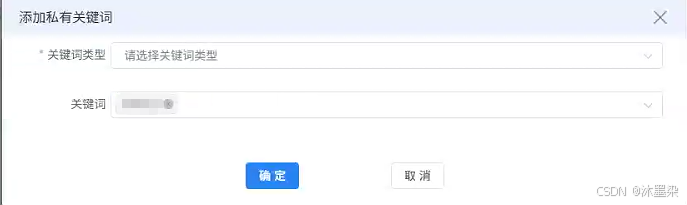
<aby-dialog v-if="keywordVisible" @closed="keywordDialogClose">
<!-- 表单内容 -->
</aby-dialog>这种设计使弹窗职责单一,互不干扰,并通过ref实现子组件方法调用。
8. 批量操作
系统支持批量选择黑词、批量选择对话组两种批量场景
javascript
// 黑词单选/全选回调
selectWords(selection) {
  this.selectWordsList = selection.map(item => item.blackWord);
},

selectAllWords(selection) {
  this.selectWordsList = selection.map(item => item.blackWord);
},

// 批量账号选择
handleAccount() {
  this.accountPairs = this.dialogTableData.filter(e => e.checked);
  if (this.accountPairs.length > 0) {
    this.$refs.group_visible.open();
  } else {
    this.$message.warning("请选择需要批量添加的账号");
  }
}设计要点:批量操作前必须进行空值校验,并提供明确的用户反馈。
9. 下拉框远程搜索与懒加载
关键词类型选择是一个典型的"大数据量+搜索"场景,我们实现了下拉框的懒加载和远程搜索:
javascript
// 滚动加载更多
loadMore(n) {
  if (this.isFirstLoadType) {
    this.rangeNumber += 5;
    this.keywordTypeList = this.caseTypeAllList.slice(0, this.rangeNumber);
  }
},

// 远程搜索
selectRemote(query) {
  if (query === "") {
    this.isFirstLoadType = true;
    this.rangeNumber = 10;
    this.keywordTypeList = this.caseTypeAllList.slice(0, 10);
    return;
  }

  this.isFirstLoadType = false;
  this.caseTypeSelectList = this.caseTypeAllList.filter(item =>
    item.item.indexOf(query) > -1
  );

  // 分段加载搜索结果
  clearInterval(this.timer);
  this.loadNum = 10;
  this.timer = setInterval(() => {
    this.keywordTypeList = this.caseTypeSelectList.slice(0, this.loadNum);
    this.loadNum += 10;
  });
}性能优化:采用增量加载策略,避免一次性渲染千条下拉选项导致的页面卡顿。
四、项目总结
本文通过Vue + Element UI构建了一个功能完善、交互流畅的黑词分析与对话挖掘组件。核心价值体现在:
模块解耦:黑词管理、对话列表、关键词维护各自独立
交互友好:批量操作、上下文预览、差异化展示
性能优化:前端分页、懒加载、定时器清理
扩展性:弹窗复用、批量操作统一处理
该组件已在实际项目中稳定运行,可快速适配各类内容安全分析场景。希望本文对正在构建类似系统的开发者有所启发。