一、ref和reactive
1、ref可以定义基本数据类型和对象类型的响应式数据;
2、reactive可以定义对象类型的响应式数据;
3、在script中使用ref定义的数据必须要加.value,在template中可以直接使用,即不需要添加.value(有插件可以自动添加.value);
4、reactive重新分配一个新对象,会失去响应式,可以使用Object.assign去整体替换;而ref可以直接修改,因为.value直接就是响应式的;
<template>
    <div>{{ name }}</div>
    <div>{{ food.name }} 的价钱是{{ food.price }}元</div>
    <button @click="changeName">改变食物的名称</button>
    <button @click="changePrice">改变食物的价格</button>
    <button @click="changeAllFood">改变整个食物</button>
</template>
<script setup>
    import {reactive, ref} from 'vue'
    let name = ref('张三')
    let food = ref({name:'麻辣烫',price:18})
    function changeName(){
        food.value.name = '冒菜'
    }
    function changePrice(){
        food.value.price = 28
    }
    function changeAllFood(){
        food.value = {name:'麻辣香锅',price:66}
    }
</script>

<template>
    <div>{{ food.name }} 的价钱是{{ food.price }}元</div>
    <button @click="changeName">改变食物的名称</button>
    <button @click="changePrice">改变食物的价格</button>
    <button @click="changeAllFood">改变整个食物</button>
</template>
<script setup>
    import {reactive, ref} from 'vue'
    let food = reactive({name:'麻辣烫',price:18})
    function changeName(){
        food.name = '冒菜'
    }
    function changePrice(){
        food.price = 28
    }
    function changeAllFood(){
        Object.assign(food,{name:'麻辣香锅',price:66})
    }
</script>
二、toRefs和toRef
1、将一个响应式对象中的每一个属性,转换为 ref 对象
<template>
    <div>{{ name }} 的价钱是{{ price }}元</div>
    <button @click="changeName">改变食物的名称</button>
    <button @click="changePrice">改变食物的价格</button>
</template>
<script setup>
    import {reactive, toRef,toRefs} from 'vue'
    let food = reactive({name:'麻辣烫',price:18})
    let {name,price} = toRefs(food)
    function changeName(){
        name.value= '冒菜'
    }
    function changePrice(){
        price.value = 28
    }
</script>
2、将一个响应式对象中的某个属性,转换为 ref 对象。
<template>
    <div>{{ name }}</div>
    <button @click="changeName">改变食物的名称</button>
</template>
<script setup>
    import {reactive, toRef} from 'vue'
    let food = reactive({name:'麻辣烫',price:18})
    let name = toRef(food,'name')
    function changeName(){
        name.value= '火锅啊'
    }

</script>
三、计算属性-computed(有缓存)
<template>
    <input type="text" v-model="firstName">
    <br>
    <input type="text" v-model="lastName">
    <div>{{ fullName }}</div>
    <button @click="changePersonName">改变名字</button>
</template>
<script setup>
import {ref, computed } from 'vue';
let firstName = ref('zhang')
let lastName = ref('san')
// 可读不可编辑
// let fullName = computed(()=>{
//     console.log('执行了1111111111')
//     return firstName.value.slice(0,1).toUpperCase() +firstName.value.slice(1)+'-'+ lastName.value
// })

// 可读可编辑
let fullName = computed({
    get(){
        return firstName.value.slice(0,1).toUpperCase() +firstName.value.slice(1)+'-'+ lastName.value
    },
    set(val){
        firstName.value = val.split('-')[0]
        lastName.value = val.split('-')[1]
    }
})
function changePersonName(){
    fullName.value = 'li-xian'
}
</script>
四、watch监视
watch可以监视以下四类数据:
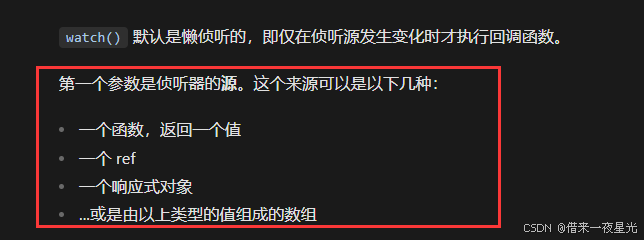
1、监视ref定义的基本类型数据
<template>
    <div class="person">
        当前求和为{{ sum }}
        <button @click="total">点击求和</button>
    </div>
</template>

<script setup lang="ts">
    import { ref,watch } from 'vue'
    let sum = ref(0)
    function total() {
        sum.value++;
    }
    watch(sum, (newValue, oldValue) => {
        console.log('watch', newValue, oldValue);
    })
</script>

<style>
.person {
    padding: 20px;
}
</style>
2、监视ref定义的引用类型
注意:
(1) 直接写数据名,监视的是对象的【地址值】,若想监视对象内部的数据,要开启深度监视。
(2) 若修改的是 ref 定义对象的属性,newValue 和 oldValue 都是新值,因为它们是同一个对象。
(3) 若修改整个 ref 定义的对象,newValue 是新值, oldValue 是旧值,因为不是同一个对象了。
<template>
    <div class="person">
      <h1>情况二:监视【ref】定义的【对象类型】数据</h1>
      <h2>姓名:{{ person.name }}</h2>
      <h2>年龄:{{ person.age }}</h2>
      <button @click="changeName">修改名字</button>
      <button @click="changeAge">修改年龄</button>
      <button @click="changePerson">修改整个人</button>
    </div>
  </template>

  <script lang="ts" setup name="Person">
    import {ref,watch} from 'vue'
    // 数据
    let person = ref({
      name:'张三',
      age:18
    })
    // 方法
    function changeName(){
      person.value.name += '~'
    }
    function changeAge(){
      person.value.age += 1
    }
    function changePerson(){
      person.value = {name:'李四',age:90}
    }
    watch(person,(newValue,oldValue)=>{
      console.log('person变化了',newValue,oldValue)
    },{deep:true})

  </script>
3、监视reactive定义的数据
注意:
watch 监听 reactive 定义的数据默认是开启深度监视的,也就是不需要手动写 deep换句话说就是 隐式的创建了深层监听
<template>
    <div class="person">
      <h1>情况三:监视【reactive】定义的【对象类型】数据</h1>
      <h2>姓名:{{ person.name }}</h2>
      <h2>年龄:{{ person.age }}</h2>
      <button @click="changeName">修改名字</button>
      <button @click="changeAge">修改年龄</button>
      <button @click="changePerson">修改整个人</button>
      <hr>
      <h2>测试:{{obj.a.b.c}}</h2>
      <button @click="test">修改obj.a.b.c</button>
    </div>
  </template>

  <script lang="ts" setup name="Person">
    import {reactive,watch} from 'vue'
    // 数据
    let person = reactive({
      name:'张三',
      age:18
    })
    let obj = reactive({
      a:{
        b:{
          c:666
        }
      }
    })
    // 方法
    function changeName(){
      person.name += '~'
    }
    function changeAge(){
      person.age += 1
    }
    function changePerson(){
      Object.assign(person,{name:'李四',age:80})
    }
    function test(){
      obj.a.b.c = 888
    }
    watch(person,(newValue,oldValue)=>{
      console.log('person变化了',newValue,oldValue)
    })
    watch(obj,(newValue,oldValue)=>{
      console.log('Obj变化了',newValue,oldValue)
    })
  </script>
4、 监视ref 和 reactive定义的对象类型中的某个属性
一个对象类型中的属性可以基本类型,也可以是对象类型(引用类型)。所以,这节我们需要分成两部分。
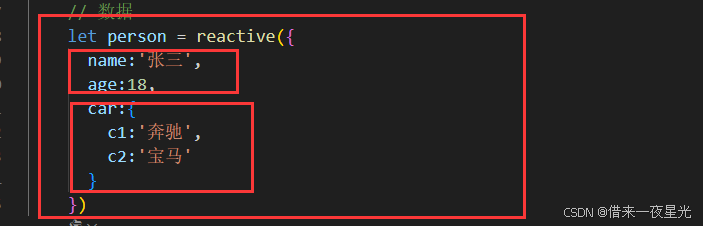
4.1、属性值为基本类型
当监视响应式对象中的某个属性,且该属性是基本类型的,要写成函数式------也就是一开始所说的Vue3中点的watch只能监视的四种类型中的 函数返回一个值(getter函数)
假如我只想监听属性 name的变化,其他都不监听。
<template>
    <div class="person">
      <h1>情况三:监视【reactive】定义的【对象类型】数据</h1>
      <h2>姓名:{{ person.name }}</h2>
      <h2>年龄:{{ person.age }}</h2>
      <h2>车:{{ person.car.c1 }}、{{ person.car.c2 }}</h2>
      <button @click="changeName">修改名字</button>
      <button @click="changeAge">修改年龄</button>
      <button @click="changeCar">修改车</button>
      <button @click="changePerson">修改整个人</button>
      <hr>
    </div>
  </template>

  <script lang="ts" setup name="Person">
    import {reactive,watch} from 'vue'
    // 数据
    let person = reactive({
      name:'张三',
      age:18,
      car:{
        c1:'奔驰',
        c2:'宝马'
      }
    })
    // 方法
    function changeName(){
      person.name += '~'
    }
    function changeAge(){
      person.age += 1
    }
    function changePerson(){
      Object.assign(person,{name:'李四',age:80})
    }
    function changeCar(){
      person.car = {c1:'保时捷',c2:'兰博基尼'}
    }

    watch(()=>person.name,(newValue,oldValue)=>{
      console.log('person变化了',newValue,oldValue)
    })
  </script>
4.2、属性值为引用类型
当监听的属性式引用类型的时候,可直接编,也可写成函数,但建议写成函数。
注意:若是对象监视的是地址值,需要关注对象内部,需要手动开启深度监视。
监听car属性代码(直接编写)
<template>
    <div class="person">
      <h2>姓名:{{ person.name }}</h2>
      <h2>年龄:{{ person.age }}</h2>
      <h2>车:{{ person.car.c1 }}、{{ person.car.c2 }}</h2>
      <button @click="changeName">修改名字</button>
      <button @click="changeAge">修改年龄</button>
      <button @click="changeFirstCar">修改第一台车</button>
      <button @click="changeSecondCar">修改第二台车</button>
      <button @click="changeCar">修改车</button>
      <hr>
    </div>
  </template>

  <script lang="ts" setup name="Person">
    import {reactive,watch} from 'vue'
    // 数据
    let person = reactive({
      name:'张三',
      age:18,
      car:{
        c1:'奔驰',
        c2:'宝马'
      }
    })
    // 方法
    function changeName(){
      person.name += '~'
    }
    function changeAge(){
      person.age += 1
    }
    function changeFirstCar(){
      person.car.c1 = '保时捷'
    }
    function changeSecondCar(){
      person.car.c2 = '兰博基尼'
    }
    function changeCar(){
      person.car = {c1:'保时捷',c2:'兰博基尼'}
    }

   //点击 "修改车"按钮,控制台没输出,说明没监视到。而点击第一台车、第二台车按钮,是可以监视的。

    watch(person.car,(newValue,oldValue)=>{
      console.log('person变化了',newValue,oldValue)
    },{deep:true})
  </script>
监听car属性代码(函数式)
 watch(()=>person.car,(newValue,oldValue)=>{
      console.log('person变化了',newValue,oldValue)
    },{deep:true})
这样写的话,不仅car的属性变化可以监测,整体变化是可以监视到person.car的变化的。
因为分析源码可知,当你传入的是一个函数时,vue内部每次数据发生变化,watch都会主动跟踪捕获,然后触发对用的callback。
5、 监视上述多个数据
想要监视多个数据,可以写成数组形式。
 watch([()=>person.name,person.car],(newValue,oldValue)=>{
    console.log('person.car变化了',newValue,oldValue)
  },{deep:true})
**注意:**这样写,监听的 person.car 就不是通过一个返回值的函数的形式了。点击修改第一台、第二台车可以监听到,但点击修改整个车,就监听不到了。
五、watch 和 watchEffect对比
(1) 都能监听响应式数据的变化,不同的是监听数据变化的方式不同。
(2) **watch:**要明确指出监视的数据。
(3) **watchEffect:**不用明确指出监视的数据(函数用到哪些属性,就监视哪些属性
watchEffect代码举例:
<template>
<div class="person">
<div class="person">
<h1>需求:水温达到50℃,或水位达到20cm,则联系服务器</h1>
<h2 id="demo">水温:{{ temp }}</h2>
<h2>水位:{{ height }}</h2>
<button @click="changeTemp">水温+10</button>
<button @click="changeHeight">水位+1</button>
</div>
</div>
</template>
<script lang="ts" setup name="Person">
import {ref,watchEffect} from 'vue'
// 数据
let temp = ref(0)
let height = ref(15)
// 方法
function changeTemp(){
temp.value += 10
}
function changeHeight(){
height.value += 1
}
watchEffect(()=>{
if(temp.value >= 50 || height.value >= 20){
console.log('联系服务器')
}
})
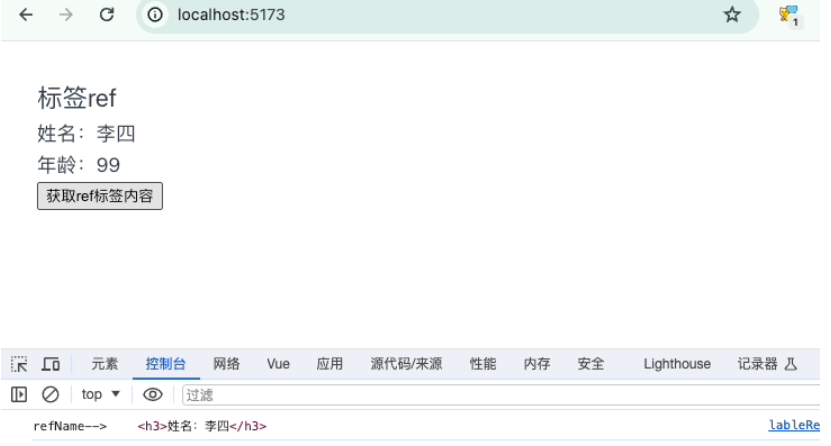
</script>六、标签的ref属性
标签里的ref,可以在普通html元素标签上,也可以用在vue组件标签上。用在html元素标签上时,返回的是该html元素的DOM;用在vue组件标签上时,返回的是该子组件(也就是当前vue是父组件)暴露给父组件的对象,暴露哪些,在返回的对象里就包含哪些,不暴露不包含。
6.1、作用在普通html标签上
<template>
    <div class="person">
        <h2>标签ref</h2>
        <h3 ref="refName">姓名:{{ person.name }}</h3>
        <h3>年龄:{{ person.age }}</h3>
        <button @click="getRef">获取ref标签内容</button>
    </div>
</template>
<script lang='ts' setup name="LableRef">
import { reactive, ref } from 'vue'
let person = reactive(
    {
        name: "李四",
        age: 99,
        bmi: {
            high: 173,
            weight: 82
        }
    }
)
let refName = ref()
function getRef() {
    console.log('refName--> ', refName.value);
}
</script>
示例效果:
6.2、作用在vue组件标签上
示例代码:
父组件:person.vue
<template>
    <div class="person">
        <h2>标签ref</h2>
        <h3 ref="refName">姓名:{{ person.name }}</h3>
        <h3>年龄:{{ person.age }}</h3>
        <hr>
        <h2>ref子组件:LableRefSon</h2>
        <LableRefSon ref="refSon"></LableRefSon>
        <button @click="getRef">获取ref标签内容</button>
    </div>
</template>
<script lang='ts' setup name="LableRef">
import { reactive, ref } from 'vue'
import LableRefSon from './lableRefSon.vue';

let person = reactive(
    {
        name: "李四",
        age: 99,
        bmi: {
            high: 173,
            weight: 82
        }
    }
)

let refName = ref()
let refSon = ref()

function getRef() {
    console.log('refName--> ', refName.value);
    console.log('refSon--> ', refSon.value);
}
</script>
子组件:son.vue
<template>
    <div class="person">
        <h2>标签ref-Son</h2>
        <h3>姓名:{{ son.name }}</h3>
        <h3>年龄:{{ son.age }}</h3>
        <h3>恋爱日记:{{ sonDiary }}</h3>
    </div>
</template>
<script lang='ts' setup name="LableRefSon">
import { reactive, ref } from 'vue'
let son = reactive(
    {
        name: "李儿子",
        age: 18,
    }
)
// 儿子日记
let sonDiary = ref('恋爱日记:今天我.....')
</script>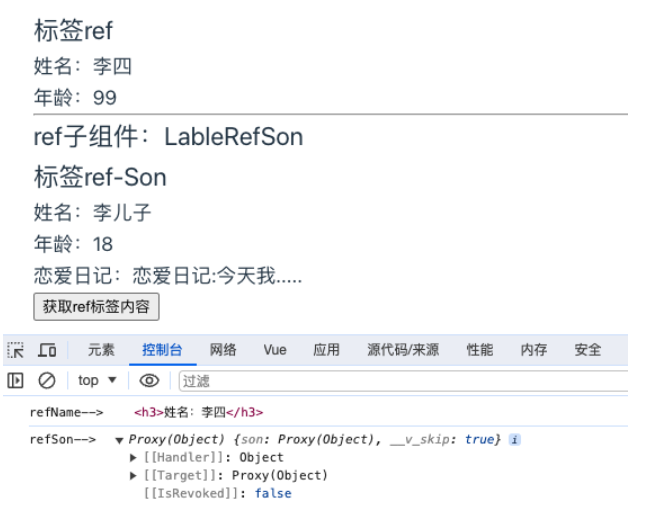
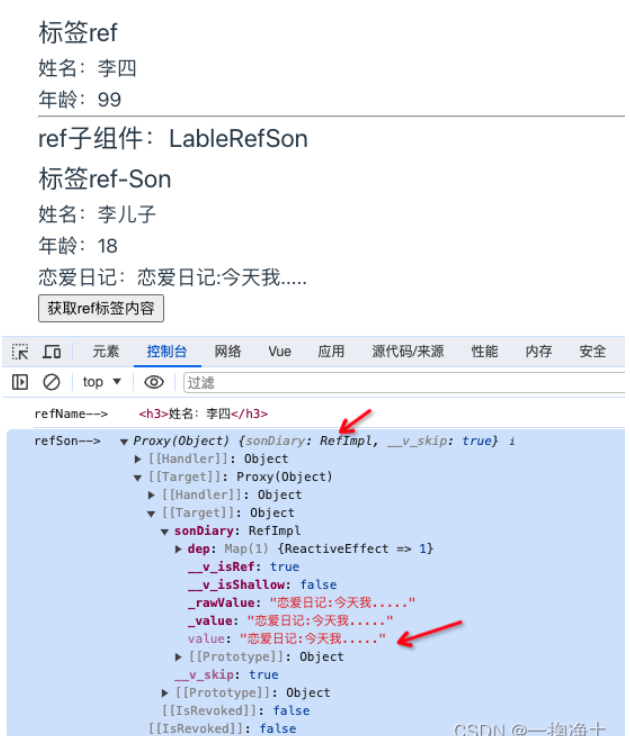
☆ 从上图可以看到,默认情况下,如果只是在子组件上加上ref属性的话,输出的对象里是没有任何数据的。这个是vue3对子组件数据的一种保护。需要子组件主动暴露数据才可以获取。
那么需要子组件做如下修改:将需要暴露给父组件的数据,暴露一下defineExpose({sonDiary})
<template>
    <div class="person">
        <h2>标签ref-Son</h2>
        <h3>姓名:{{ son.name }}</h3>
        <h3>年龄:{{ son.age }}</h3>
        <h3>恋爱日记:{{ sonDiary }}</h3>
    </div>
</template>
<script lang='ts' setup name="LableRefSon">
import { reactive, ref, defineExpose } from 'vue'
let son = reactive(
    {
        name: "李儿子",
        age: 18,
    }
)
// 儿子日记
let sonDiary = ref('恋爱日记:今天我.....')
// 将日记暴露给父级,个人信息不暴露
defineExpose({sonDiary})
</script>
示例效果:
第六版块的内容来自CSDN博主「一掬净土」的原创文章,遵循CC 4.0 BY-SA版权协议,转载请附上原文出处链接及本声明。
原文链接:https://blog.csdn.net/wdy_2099/article/details/135648626