Linux进程及通信机制实验方案------LED作业与按键作业交互
- 一、基础知识
- [二、 具体实验相关](#二、 具体实验相关)
一、基础知识
进程相关
1.main
无参数形式
c
int main(void);或
c
int main();这两种形式都表示main函数不接收命令行参数。在C99标准之前,main函数没有参数的形式被写为int main(),这在某些情况下可能导致与int main(void)行为不完全相同的问题,因为int main()在老式的C语言标准中不明确指出函数是否接受参数。从C99标准开始,推荐使用int main(void)明确指明main函数不接受任何参数,以提高代码的可读性和一致性。
有参数形式
c
int main(int argc, char *argv[]); argc:传递给程序的命令行参数的数量
argv:指向字符串数组的指针,存储了命令行参数
argv0通常是程序的名称
argv1到argvargc-1是实际的命令行参数
2.fork
(1)pid_t 表示进程 ID 的数据类型(本质是整数)
(2)fork()创建子进程,父进程返回子进程 PID,子进程返回 0,失败返回 - 1
(3)getpid()获取当前进程自己的 PID 的函数
(4)getppid()获取当前进程的父进程 PID 的函数
测试例程
c
#include <stdio.h>
#include <sys/types.h>
#include <unistd.h>
int main()
{
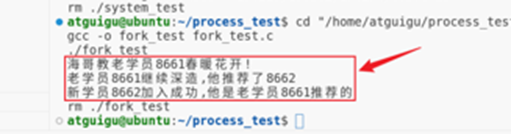
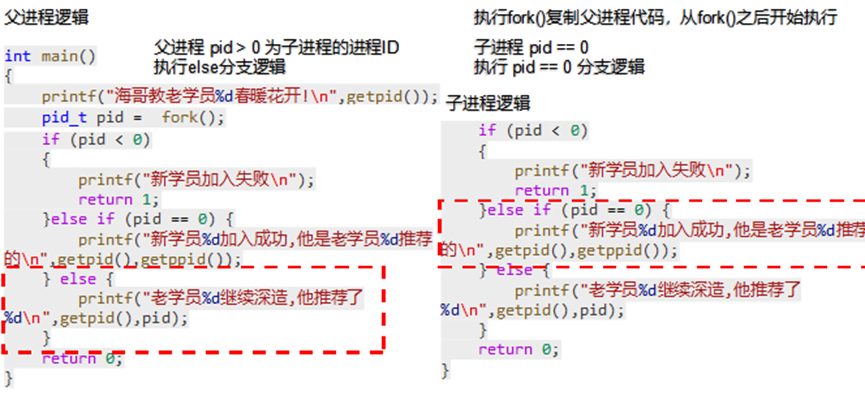
printf("海哥教老学员%d春暖花开!\n",getpid());
pid_t pid = fork();
if (pid < 0)
{
// 创建新进程失败
printf("新学员加入失败\n");
return 1;
}else if (pid == 0){
// 这里往下的代码都是新的子进程的
printf("新学员%d加入成功,他是老学员%d推荐的\n",getpid(),getppid());
}else{
// 这里往下继续运行父进程
printf("老学员%d继续深造,他推荐了%d\n",getpid(),pid);
}
return 0;
}
3.文件描述符的引用计数和close()
测试例程
c
#include <sys/stat.h>
#include <stdio.h>
#include <stdlib.h>
#include <unistd.h>
#include <fcntl.h>
#include <string.h>
int main(int argc, char const *argv[])
{
// fork之前
// 打开一个文件
int fd = open("io.txt",O_CREAT | O_WRONLY | O_APPEND ,0644);
if (fd == -1)
{
perror("open");
exit(EXIT_FAILURE);
}
char buffer[1024];//缓冲区存放写出的数据
pid_t pid = fork();
if (pid < 0)
{
perror("fork");
exit(EXIT_FAILURE);
}else if (pid == 0){
// 子进程代码
strcpy(buffer,"这是子进程写入的数据!\n");
}else {
// 父进程代码
sleep(1);
strcpy(buffer,"这是父进程写入的数据!\n");
}
// 父子进程都要执行的代码
ssize_t bytes_write = write(fd,buffer,strlen(buffer));
if (bytes_write == -1)
{
perror("write");
close(fd);
exit(EXIT_FAILURE);
}
printf("写入数据成功\n");
// 使用完毕之后关闭
close(fd);
if (pid == 0)
{
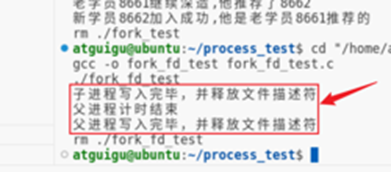
printf("子进程写入完毕,并释放文件描述符\n");
}else{
printf("父进程写入完毕,并释放文件描述符\n");
}
return 0;
}通过open()以写入追加的模式打开了io.txt文件,如果这个文件不存在则创建。上述程序的逻辑是:打开io.txt文件,获得文件描述符后,执行fork()创建子进程。分别在父子进程中向文件追加写入,并在写入完成后关闭。为了区分父子进程的操作,在父进程中通过sleep()休眠1s。
"引用次数(引用计数)",核心是Linux 内核中用来统计 "有多少个文件描述符正指向同一个打开的文件结构体" 的数值,引用次数 = 这扇门当前有多少个 "把手"(文件描述符)能操控它。
• 引用次数 = 这扇门当前有多少个 "把手"(文件描述符)能操控它;
• 你代码中父进程open后,只有 1 个把手(父进程的fd),引用次数 = 1;
• fork创建子进程后,子进程复制了这个把手,现在有 2 个把手(父 fd + 子 fd),引用次数 = 2;
• 子进程close(fd) = 拆掉子进程的把手,引用次数减 1(变成 1);
• 父进程close(fd) = 拆掉父进程的把手,引用次数减 1(变成 0);
• 引用次数 = 0 时,这扇门(文件结构体)才会被内核 "拆掉"(释放文件资源)。
4.execve
创建erlou.c
c
#include <stdio.h>
#include <stdlib.h>
#include <unistd.h>
int main(int argc, char *argv[])
{
if (argc < 2) {
printf("参数不够,上不了二楼.\n");
return 1; // 当没有传入参数时,应返回非零值表示错误
}
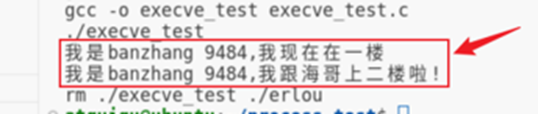
printf("我是%s %d,我跟海哥上二楼啦!\n", argv[1], getpid());
return 0;
}创建execve_test.c
c
#include <stdio.h>
#include <stdlib.h>
#include <unistd.h>

int main()
{
    /*exec系列函数  父进程跳转进入一个新进程
推荐使用execve
    char *__path: 需要执行程序的完整路径名
    char *const __argv[]: 指向字符串数组的指针 需要传入多个参数
        (1) 需要执行的程序命令(同*__path)
        (2) 执行程序需要传入的参数
        (3) 最后一个参数必须是NULL
    char *const __envp[]: 指向字符串数组的指针 需要传入多个环境变量参数
        (1) 环境变量参数 固定格式 key=value
        (2) 最后一个参数必须是NULL
    return: 成功就回不来了 下面的代码都没有意义
            失败返回-1
    int execve (const char *__path, char *const __argv[], char *const __envp[])
    */
    char *name = "banzhang";
    printf("我是%s %d,我现在在一楼\n",name,getpid());
    // 参数没填写够也能完成跳转,错误信息会在新程序中
    // char *argv[] = {"/home/atguigu/process_test/erlou",NULL};
    char *args[] = {"/home/atguigu/process_test/erlou",name,NULL};
    // 环境变量可以不传
    // char *envp[] = {NULL};
    char *envs[] = {"PATH=/usr/local/sbin:/usr/local/bin:/usr/sbin:/usr/bin:/sbin:/bin:/usr/games:/usr/local/games:/snap/bin",NULL};
    int re = execve(argv[0],args,envs);
    if (re == -1)
    {
        printf("你没机会上二楼\n");
        return -1;
    }

    return 0;
}
操作系统内核(execve系统调用)
↓
加载erlou程序到当前进程内存
↓
执行erlou程序的_start函数(C运行时库提供)
↓
_start函数做初始化(比如解析命令行参数、设置环境变量)
↓
_start调用erlou.c的main(argc, argv)(把参数传递进去)
↓
执行你写的main函数里的代码(打印"上二楼")
↓
main返回后,_start调用exit()结束进程
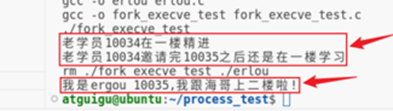
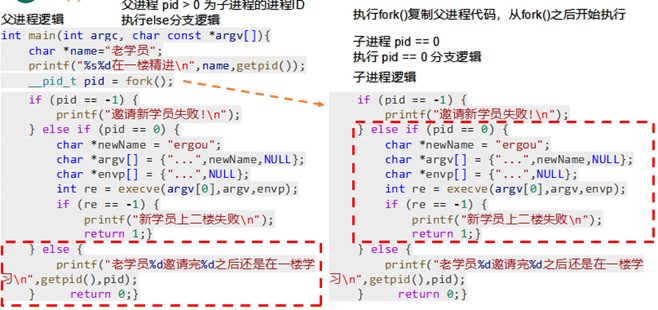
5. execve+fork
同样的erlou.c
c
#include <stdio.h>
#include <stdlib.h>
#include <unistd.h>

int main(int argc, char *argv[])
{
    if (argc < 2) {
        printf("参数不够,上不了二楼.\n");
        return 1; // 当没有传入参数时,应返回非零值表示错误
    }
    printf("我是%s %d,我跟海哥上二楼啦!\n", argv[1], getpid());
    return 0;
}
fork_execve_test.c,
c
#include <stdio.h>
#include <unistd.h>
#include <stdlib.h>
#include <sys/types.h>
int main(int argc, char const *argv[])
{
    char *name="老学员";
    printf("%s%d在一楼精进\n",name,getpid());
    __pid_t pid = fork();
    if (pid == -1)
    {
        printf("邀请新学员失败!\n");
    }else if (pid == 0)
    {
        // 新学员在这里
        char *newName = "ergou";
        char *args[] = {"/home/atguigu/process_test/erlou",newName,NULL};
        char *envs[] = {"PATH=/usr/local/sbin:/usr/local/bin:/usr/sbin:/usr/bin:/sbin:/bin:/usr/games:/usr/local/games:/snap/bin",NULL};
        int re = execve(argv[0],args,envs);
        if (re == -1)
        {
            printf("新学员上二楼失败\n");
            return 1;
        }

    }else{
        // 老学员在这里
        printf("老学员%d邀请完%d之后还是在一楼学习\n",getpid(),pid);

    }
    return 0;
}
6.waitpid
Linux中父进程除了可以启动子进程,还要负责回收子进程的状态。如果子进程结束后父进程没有正常回收,那么子进程就会变成一个僵尸进程------即程序执行完成,但是进程没有完全结束,其内核中PCB结构体(下文介绍)没有释放。在上面的例子中,父进程在子进程结束前就结束了,那么其子进程的回收工作就交给了父进程的父进程的父进程(省略若干父进程)。
wait()
wait () 是 waitpid () 的简化版,两者都是父进程用来 "回收" 子进程资源、获取子进程退出状态的工具,只是 waitpid () 功能更灵活。
c
#include <stdio.h>
#include <stdlib.h>
#include <sys/wait.h>
#include <unistd.h>

int main() {
    pid_t pid = fork(); // 创建子进程
    if (pid == 0) {
        // 子进程逻辑:运行5秒后退出
        printf("子进程(PID:%d)运行中...\n", getpid());
        sleep(5);
        exit(10); // 退出码设为10
    } else if (pid > 0) {
        // 父进程逻辑:等待子进程退出
        int status;
        pid_t dead_pid = wait(&status); // 阻塞等待任意子进程退出
        printf("回收了子进程PID:%d\n", dead_pid);

        // 解析退出状态:判断是否正常退出,以及退出码
        if (WIFEXITED(status)) { // 宏:判断是否正常退出(比如调用exit/return)
            printf("子进程正常退出,退出码:%d\n", WEXITSTATUS(status)); // 提取退出码
        }
    }
    return 0;
}
子进程(PID:1234)运行中...
回收了子进程PID:1234
子进程正常退出,退出码:10
waitpid ()
• wait () 只能等 "任意子进程",waitpid () 可以指定等某个 / 某组子进程;
• wait () 只能 "阻塞等",waitpid () 可以 "非阻塞查"(问一下就走,不卡着)。
PS:记住
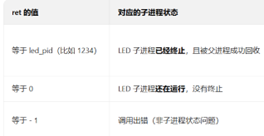
• 子进程中:led_pid 是 0(但子进程里我们不会调用 waitpid,因为 waitpid 是父进程用来等子进程的);
• 父进程中:led_pid 是子进程的真实 PID(比如 1234)------ 这才是我们在 waitpid(led_pid, &status, WNOHANG) 里用的变量值!
c
#include <stdio.h>
#include <stdlib.h>
#include <sys/wait.h>
#include <unistd.h>

int main() {
    pid_t led_pid = fork(); // 创建LED子进程
    if (led_pid == 0) {
        printf("LED子进程(PID:%d)运行...\n", getpid());
        sleep(3); // 模拟运行3秒
        exit(1); // 退出码1
    }

    pid_t key_pid = fork(); // 创建按键子进程
    if (key_pid == 0) {
        printf("按键子进程(PID:%d)运行...\n", getpid());
        sleep(5); // 模拟运行5秒
        exit(2); // 退出码2
    }
c
   // 父进程:非阻塞监控两个子进程
    int status;
    while (1) {
        // 先查LED子进程
        pid_t ret = waitpid(led_pid, &status, WNOHANG); // 非阻塞
        if (ret == led_pid) { // LED子进程退出了
            printf("LED子进程退出,退出码:%d\n", WEXITSTATUS(status));
            led_pid = -1; // 标记已处理,下次不查了
        }

        // 再查按键子进程
        ret = waitpid(key_pid, &status, WNOHANG);
        if (ret == key_pid) { // 按键子进程退出了
            printf("按键子进程退出,退出码:%d\n", WEXITSTATUS(status));
            key_pid = -1; // 标记已处理
        }

        // 两个子进程都处理完了,退出循环
        if (led_pid == -1 && key_pid == -1) break;

        // 没子进程退出,父进程干点别的(比如打印日志)
        printf("父进程:两个子进程还在运行,我先忙别的...\n");
        sleep(1);
    }

    printf("父进程:所有子进程都回收完毕,退出\n");
    return 0;
}
LED子进程(PID:1234)运行...
按键子进程(PID:1235)运行...
父进程:两个子进程还在运行,我先忙别的...
父进程:两个子进程还在运行,我先忙别的...
父进程:两个子进程还在运行,我先忙别的...
LED子进程退出,退出码:1
父进程:两个子进程还在运行,我先忙别的...
父进程:两个子进程还在运行,我先忙别的...
按键子进程退出,退出码:2
父进程:所有子进程都回收完毕,退出
6.进程间通信
msgget():创建 / 获取消息队列(掌握 key_t 键值生成,比如 ftok() 或 IPC_PRIVATE);
• msgsnd():按键进程发送消息(比如把 "LED_ON""LED_OFF" 封装成消息结构体);
• msgrcv():LED 进程接收消息(按消息类型过滤,只处理自己关心的指令);
• msgctl():实验结束销毁消息队列(避免系统资源泄漏);
c
#include <stdio.h>
#include <stdlib.h>
#include <string.h>
#include <sys/msg.h>
#include <sys/wait.h>
#include <unistd.h>

// 1. 定义消息结构体(必须以long mtype开头!)
// mtype:消息类型(>0),用于过滤消息;mtext:消息内容
struct msg_buf {
    long mtype;          // 消息类型,必须是long型
    char mtext[128];     // 消息内容,可自定义长度
};

int main() {
    // 2. 第一步:创建消息队列
    // key_t key:队列的唯一标识(用IPC_PRIVATE表示私有队列,仅父子进程可用)
    // 0666:队列权限(可读可写)
    // IPC_CREAT:如果队列不存在则创建,存在则获取
    int msgid = msgget(IPC_PRIVATE, 0666 | IPC_CREAT);
    if (msgid == -1) {  // 错误判断:创建/获取失败
        perror("msgget failed");  // 打印错误原因
        exit(1);
    }
    printf("父进程:消息队列创建成功,msgid=%d\n", msgid);

    // 3. 创建子进程(模拟按键进程/LED进程)
    pid_t pid = fork();
    if (pid == -1) {
        perror("fork failed");
        exit(1);
    }

    // ===== 子进程逻辑(生产者:发送消息)=====
    if (pid == 0) {
        struct msg_buf msg;
        // 设置消息类型(必须>0,比如1代表LED指令)
        msg.mtype = 1;
        // 填充消息内容(比如模拟按键按下:"LED_ON")
        strcpy(msg.mtext, "LED_ON");

        // 发送消息到队列
        // 参数:队列ID、消息结构体、消息内容长度、发送选项(0=阻塞)
        int ret = msgsnd(msgid, &msg, strlen(msg.mtext), 0);
        if (ret == -1) {
            perror("msgsnd failed");
            exit(1);
        }
        printf("子进程(PID:%d):发送消息成功 → 类型:%ld,内容:%s\n",
               getpid(), msg.mtype, msg.mtext);

        // 子进程发送完消息后退出
        exit(0);
    }

    // ===== 父进程逻辑(消费者:接收消息)=====
    if (pid > 0) {
        // 先等子进程发送完消息(也可以不用等,msgsnd/msgrcv会阻塞)
        wait(NULL);

        struct msg_buf msg;
        // 接收消息:只接收类型为1的消息
        // 参数:队列ID、消息结构体、缓冲区长度、消息类型、接收选项(0=阻塞)
        int ret = msgrcv(msgid, &msg, sizeof(msg.mtext), 1, 0);
        if (ret == -1) {
            perror("msgrcv failed");
            exit(1);
        }
        printf("父进程(PID:%d):接收消息成功 → 类型:%ld,内容:%s\n",
               getpid(), msg.mtype, msg.mtext);

        // 4. 销毁消息队列(避免资源泄漏)
        // IPC_RMID:删除队列;NULL:不需要获取队列属性
        ret = msgctl(msgid, IPC_RMID, NULL);
        if (ret == -1) {
            perror("msgctl failed");
            exit(1);
        }
        printf("父进程:消息队列销毁成功\n");
    }

    return 0;
}
父进程:消息队列创建成功,msgid=12345(msgid是系统分配的,每个人不一样)
子进程(PID:6789):发送消息成功 → 类型:1,内容:LED_ON
父进程(PID:6788):接收消息成功 → 类型:1,内容:LED_ON
父进程:消息队列销毁成功
LED相关
1.普适的 GPIO 引脚操作方法
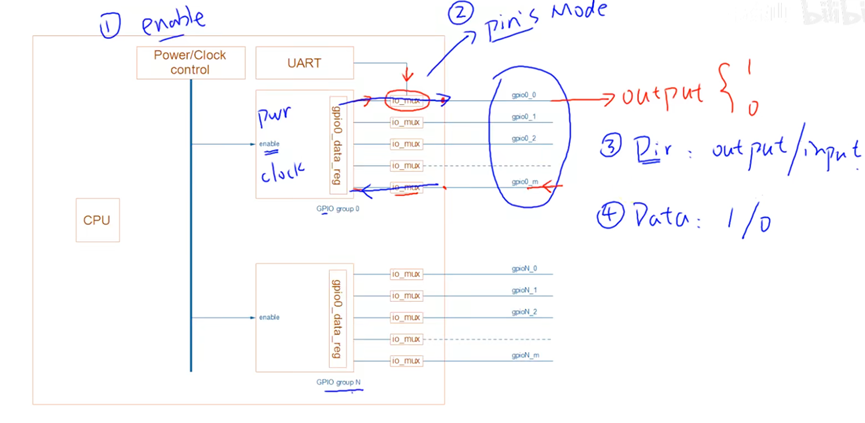
1.使能模块(Enable Power/Clock)
• 操作目标:让 GPIO 模块从休眠状态被唤醒,获得电源和时钟信号。
• 原因:为了省电,芯片里的外设模块默认是关闭的,必须先通过 Power/Clock control 寄存器给目标 GPIO 组供电、提供时钟,它才能开始工作。
2.设置引脚模式(Pin Mode Selection)
• 操作目标:通过 io_mux(多路选择器)把引脚切换到 GPIO 功能。
• 原因:芯片上的很多引脚是 "复用" 的,比如一个引脚既可以当 GPIO,也可以当 UART 串口。你需要配置 io_mux 寄存器,明确告诉芯片这个引脚现在要作为 GPIO 使用。
3.设置方向(Direction: Input/Output)
• 操作目标:在 GPIO 模块内部,通过 gpio_dir_reg 寄存器设置引脚是输入还是输出。
• 原因:GPIO 既可以 "对外输出" 高低电平,也可以 "读取外部" 的电平信号,必须先确定它的工作方向。
4.读写数据(Data Read/Write)
• 如果是输出模式:通过 gpio_data_reg 寄存器写入 1 或 0,让引脚输出高电平或低电平。
• 如果是输入模式:通过 gpio_data_reg 寄存器读取当前引脚的电平状态(1 为高,0 为低),从而获取外部设备的信号。
c
#include <stdio.h>
#include <stdlib.h>
#include <string.h>
#include <unistd.h>

// 替换为验证通过的引脚编号:131
#define LED_PIN 131

// 封装:向指定文件写入内容(GPIO操作核心)
static int write_gpio_file(const char *file_path, const char *content)
{
    FILE *fp = fopen(file_path, "w");
    if (fp == NULL) {
        perror("fopen failed");
        return -1;
    }
    fwrite(content, 1, strlen(content), fp);
    fclose(fp);
    return 0;
}

int main(int argc, char *argv[])
{
    char pin_str[16] = {0};
    char gpio_path[64] = {0};

    // 1. 导出GPIO引脚
    snprintf(pin_str, sizeof(pin_str), "%d", LED_PIN);
    if (write_gpio_file("/sys/class/gpio/export", pin_str) != 0) {
        printf("导出引脚%d失败\n", LED_PIN);
        return -1;
    }
    usleep(100000); // 给系统100ms响应时间

    // 2. 设置GPIO为输出模式
    snprintf(gpio_path, sizeof(gpio_path), "/sys/class/gpio/gpio%d/direction", LED_PIN);
    if (write_gpio_file(gpio_path, "out") != 0) {
        printf("设置输出模式失败\n");
        return -1;
    }

    // 3. 控制LED闪烁3次(亮1秒,灭1秒)
    snprintf(gpio_path, sizeof(gpio_path), "/sys/class/gpio/gpio%d/value", LED_PIN);
    for (int i = 0; i < 3; i++) {
        // 点亮LED(低电平亮,写0)
        write_gpio_file(gpio_path, "0");
        printf("第%d次:LED亮\n", i+1);
        sleep(1);

        // 熄灭LED(高电平灭,写1)
        write_gpio_file(gpio_path, "1");
        printf("第%d次:LED灭\n", i+1);
        sleep(1);
    }

    // 4. 释放GPIO引脚
    write_gpio_file("/sys/class/gpio/unexport", pin_str);
    printf("测试完成,释放引脚%d\n", LED_PIN);

    return 0;
}
按键相关
极简的key_code_dump.c,只做一件事:打印/dev/input/event1的所有按键事件,找到按键编码:
c
#include <stdio.h>
#include <stdlib.h>
#include <unistd.h>
#include <fcntl.h>
#include <linux/input.h>

#define KEY_DEV "/dev/input/event1"

int main(void)
{
    int fd = open(KEY_DEV, O_RDONLY);
    if (fd < 0) {
        perror("打开按键设备失败");
        return -1;
    }
    printf("开始读取按键事件(按Ctrl+C退出)...\n");
    printf("格式:type=xxx, code=xxx, value=xxx\n");
    printf("说明:value=1=按下,value=0=松开,value=2=重复\n\n");

    struct input_event ev;
    while (read(fd, &ev, sizeof(ev)) == sizeof(ev)) {
        // 只打印按键相关事件(EV_KEY)
        if (ev.type == EV_KEY) {
            printf("type=%d, code=%d, value=%d\n", ev.type, ev.code, ev.value);
        }
    }

    close(fd);
    return 0;
}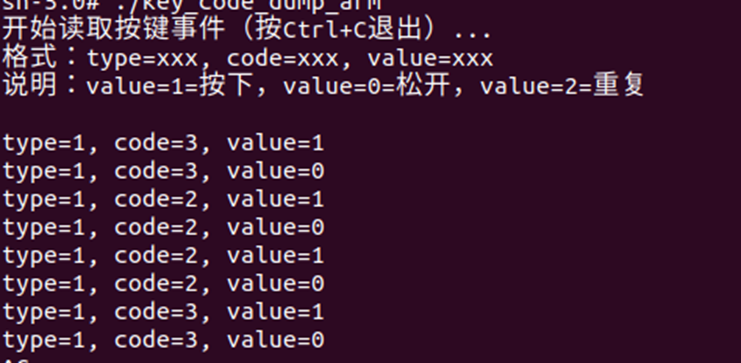
可以确定一个是2一个是3
检测按键控制LED
c
#include <stdio.h>
#include <unistd.h>
#include <fcntl.h>
#include <linux/input.h>
#include <string.h>

#define LED_PIN 131
#define KEY_DEV "/dev/input/event1"
#define TARGET_KEY_CODE 3

// LED控制
void led_switch(int on) {
    char val_path[64];
    snprintf(val_path, sizeof(val_path), "/sys/class/gpio/gpio%d/value", LED_PIN);
    FILE *fp = fopen(val_path, "w");
    if (fp == NULL) return;
    fwrite(on ? "0" : "1", 1, 1, fp);
    fclose(fp);
}

int main(void) {
    // 初始化LED
    char pin_str[16];
    snprintf(pin_str, sizeof(pin_str), "%d", LED_PIN);

    FILE *fp = fopen("/sys/class/gpio/export", "w");
    if (fp != NULL) {
        fwrite(pin_str, 1, strlen(pin_str), fp);
        fclose(fp);
    }
    usleep(100000);

    char dir_path[64];
    snprintf(dir_path, sizeof(dir_path), "/sys/class/gpio/gpio%d/direction", LED_PIN);
    fp = fopen(dir_path, "w");
    if (fp != NULL) {
        fwrite("out", 1, 3, fp);
        fclose(fp);
    }

    // 按键控制核心
    int fd = open(KEY_DEV, O_RDONLY);
    if (fd < 0) return -1;

    struct input_event ev;
    while (read(fd, &ev, sizeof(ev)) == sizeof(ev)) {
        if (ev.type == EV_KEY && ev.code == TARGET_KEY_CODE && ev.value != 2) {
            led_switch(ev.value == 1);
        }
    }

    // 释放资源
    close(fd);
    fp = fopen("/sys/class/gpio/unexport", "w");
    if (fp != NULL) {
        fwrite(pin_str, 1, strlen(pin_str), fp);
        fclose(fp);
    }
    return 0;
}
二、具体实验相关

二、 具体实验相关
parent.c
c
#include <stdio.h>
#include <stdlib.h>
#include <unistd.h>
#include <sys/msg.h>
#include <sys/wait.h>
#include <signal.h>
#define MSG_KEY 0x56789
pid_t pid_led = -1, pid_key = -1;
int msgid = -1;
/* 实验结束处理:Ctrl+C */
void sig_handler(int sig) {
if (sig == SIGINT) {
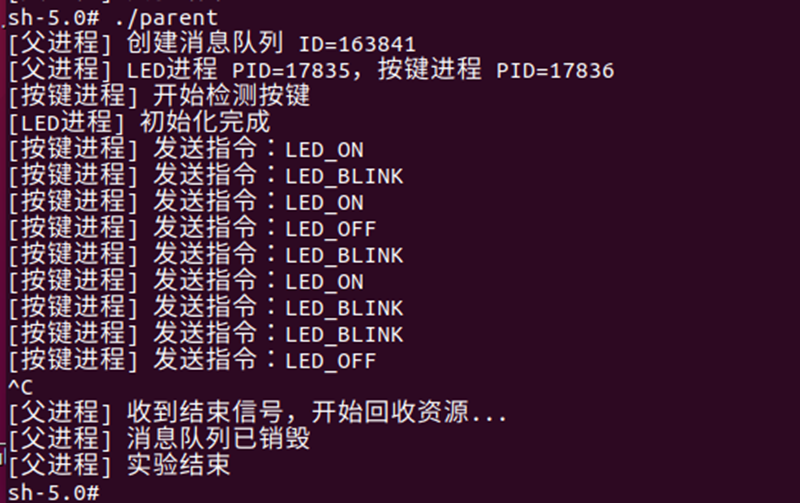
printf("\n[父进程] 收到结束信号,开始回收资源...\n");
if (pid_led > 0) kill(pid_led, SIGTERM);
if (pid_key > 0) kill(pid_key, SIGTERM);
while (wait(NULL) > 0); // 回收子进程
if (msgid != -1) {
msgctl(msgid, IPC_RMID, NULL);
printf("[父进程] 消息队列已销毁\n");
}
printf("[父进程] 实验结束\n");
exit(0);
}
}
int main() {
signal(SIGINT, sig_handler);
/* 1. 创建消息队列 */
msgid = msgget(MSG_KEY, IPC_CREAT | 0666);
if (msgid == -1) {
perror("msgget");
exit(1);
}
printf("[父进程] 创建消息队列 ID=%d\n", msgid);
char msgid_str[16];
// 把msgid = 163841变成msgid_str = "163841"为了后面exec传参
sprintf(msgid_str, "%d", msgid);
/* 2. fork + exec LED 作业进程 */
pid_led = fork();
if (pid_led == 0) {
execl("./led_process", "led_process", msgid_str, NULL);
perror("exec led_process");
exit(1);
}
/* 3. fork + exec 按键作业进程 */
pid_key = fork();
if (pid_key == 0) {
execl("./key_process", "key_process", msgid_str, NULL);
perror("exec key_process");
exit(1);
}
printf("[父进程] LED进程 PID=%d,按键进程 PID=%d\n", pid_led, pid_key);
/* 4. 实验监控 */
while (1) {
sleep(1);
}
}led_process.c
c
在这里插入代码片
c
#include <stdio.h>
#include <stdlib.h>
#include <unistd.h>
#include <sys/msg.h>
#include <string.h>
#include <signal.h>

#define LED_PIN 131

struct msgbuf {
    long mtype;
    char mtext[32];
};

typedef enum {
    LED_OFF,
    LED_ON,
    LED_BLINK
} led_mode_t;

volatile led_mode_t mode = LED_OFF;

/* GPIO 写电平 */
void led_write(int on) {
    char path[64];
    sprintf(path, "/sys/class/gpio/gpio%d/value", LED_PIN);
    FILE *fp = fopen(path, "w");
    if (!fp) return;
    fwrite(on ? "0" : "1", 1, 1, fp);
    fclose(fp);
}

/* GPIO 初始化 */
void led_init() {
    FILE *fp = fopen("/sys/class/gpio/export", "w");
    if (fp) {
        fprintf(fp, "%d", LED_PIN);
        fclose(fp);
    }
    usleep(100000);

    char dir[64];
    sprintf(dir, "/sys/class/gpio/gpio%d/direction", LED_PIN);
    fp = fopen(dir, "w");
    if (fp) {
        fwrite("out", 1, 3, fp);
        fclose(fp);
    }

    led_write(0);
}

/* 优雅退出 */
void sig_handler(int sig) {
    led_write(0);
    exit(0);
}

int main(int argc, char *argv[]) {
    if (argc < 2) exit(1);
    int msgid = atoi(argv[1]);
//对应execl("./led_process", "led_process", msgid_str, NULL);
//相当于./led_process 163841
//argv[0] = "led_process",argv[1] = "163841"
    signal(SIGTERM, sig_handler);
    signal(SIGINT, sig_handler);

    led_init();
    printf("[LED进程] 初始化完成\n");

    struct msgbuf msg;

    while (1) {
        /* 非阻塞接收消息 */
        if (msgrcv(msgid, &msg, sizeof(msg.mtext), 1, IPC_NOWAIT) > 0) {
            if (strcmp(msg.mtext, "LED_ON") == 0)
                mode = LED_ON;
            else if (strcmp(msg.mtext, "LED_OFF") == 0)
                mode = LED_OFF;
            else if (strcmp(msg.mtext, "LED_BLINK") == 0)
                mode = LED_BLINK;
        }

        /* 根据状态执行 */
        switch (mode) {
            case LED_ON:
                led_write(1);
                usleep(200000);
                break;
            case LED_OFF:
                led_write(0);
                usleep(200000);
                break;
            case LED_BLINK:
                led_write(1);
                usleep(500000);
                led_write(0);
                usleep(500000);
                break;
        }
    }
}
key_process.c
c
#include <stdio.h>
#include <stdlib.h>
#include <unistd.h>
#include <sys/msg.h>
#include <linux/input.h>
#include <fcntl.h>
#include <string.h>
#include <time.h>

#define KEY_DEV "/dev/input/event1"
#define TARGET_KEY_CODE 3

struct msgbuf {
    long mtype;
    char mtext[32];
};

int main(int argc, char *argv[]) {
    if (argc < 2) exit(1);
    int msgid = atoi(argv[1]);

    int fd = open(KEY_DEV, O_RDONLY);
    if (fd < 0) {
        perror("open key device");
        exit(1);
    }

    struct msgbuf msg;
    msg.mtype = 1;

    struct input_event ev;
    time_t press_time = 0;
    time_t last_release = 0;
    int click_count = 0;

    printf("[按键进程] 开始检测按键\n");

    while (read(fd, &ev, sizeof(ev)) == sizeof(ev)) {
        if (ev.type == EV_KEY && ev.code == TARGET_KEY_CODE) {

            if (ev.value == 1) {           // 按下
                press_time = time(NULL);
            }
            else if (ev.value == 0) {      // 松开
                time_t now = time(NULL);
                int dur = now - press_time;

                if (now - last_release < 1)
                    click_count++;
                else
                    click_count = 1;

                last_release = now;

                if (click_count == 2) {
                    strcpy(msg.mtext, "LED_OFF");
                    click_count = 0;
                } else {
                    if (dur < 1)
                        strcpy(msg.mtext, "LED_ON");
                    else
                        strcpy(msg.mtext, "LED_BLINK");
                }

                msgsnd(msgid, &msg, sizeof(msg.mtext), 0);
                printf("[按键进程] 发送指令:%s\n", msg.mtext);
            }
        }
    }

    close(fd);
}
整体梳理
一、按键输入事件产生流程(硬件 → 用户态)
1️⃣ 用户按下实体按键
↓
2️⃣ 按键 GPIO 引脚电平变化,触发硬件中断
↓
3️⃣ GPIO / 按键驱动程序响应中断
↓
4️⃣ 驱动将按键事件封装为 input_event 结构
↓
5️⃣ Linux 输入子系统将事件写入 /dev/input/event1 设备队列
↓
6️⃣ 按键作业进程调用 read() 阻塞等待事件
↓
7️⃣ 有事件到来,read() 立即返回,struct input_event ev 被内核填充
二、按键语义识别流程(短按 / 长按 / 双击)
1️⃣ 按键进程检测到 EV_KEY + TARGET_KEY_CODE 事件
↓
2️⃣ 当 ev.value == 1 时,记录按键按下时间 press_time
↓
3️⃣ 当 ev.value == 0 时,记录松开时间并计算按下持续时间
↓
4️⃣ 根据持续时间判断短按(<1s)或长按(≥1s)
↓
5️⃣ 结合前一次松开时间,判断是否构成双击操作
三、进程间通信流程(按键进程 → 消息队列)
1️⃣ 按键作业进程根据按键操作类型生成控制指令字符串
↓
2️⃣ 将指令填入 msgbuf.mtext,设置消息类型 mtype = 1
↓
3️⃣ 调用 msgsnd() 将消息发送到 System V 消息队列
↓
4️⃣ 消息暂存于内核消息队列中,等待 LED 作业进程读取
四、LED 控制流程(消息队列 → GPIO)
1️⃣ LED 作业进程通过 msgrcv() 非阻塞读取消息队列
↓
2️⃣ 若读取到消息,则解析 msg.mtext 中的控制指令
↓
3️⃣ 根据指令更新 LED 当前工作模式(亮 / 灭 / 闪烁)
↓
4️⃣ LED 作业进程根据当前模式循环控制 GPIO 电平
↓
5️⃣ 通过 /sys/class/gpio/gpio131/value 文件实时驱动 LED 状态变化
五、实验结束与资源回收流程(父进程)
1️⃣ 用户按下 Ctrl + C,父进程收到 SIGINT 信号
↓
2️⃣ 父进程向 LED 和按键作业进程发送 SIGTERM 信号
↓
3️⃣ 子进程执行信号处理函数,安全退出并关闭设备
↓
4️⃣ 父进程调用 msgctl(..., IPC_RMID) 销毁消息队列
↓
5️⃣ 父进程调用 wait() 回收子进程资源,实验结束