前言
值此新年之际,祝愿大家做科研的马到成功、一马当先,做生意的门前车水马龙,做学生的立下汗马功劳,祝所有人马年大吉!
- 作者:RosettaCommons
- 作者主页:
https://www.youtube.com/@RosettaCommons
- 视频链接:
https://www.youtube.com/watch?v=LVN2l587C3M\&t=3s
- 视频题目:Protein Binder Design with RFDiffusion3
- 发布时间:2026年1月30日
===========================================
Slide1/10
===========================================
Hi everyone, I'm Rafi, I'm a second year PhD student in the Baker Lab, and I'm one of the developers of RFDiffusion3. And so the idea here is really just to tell people a little bit about RFD3 and give some examples of how you might be able to use it for your protein binder design workflows.
大家好,我是 Rafi,贝克实验室的二年级博士生,也是 RFDiffusion3 的开发者之一。今天主要想向大家简单介绍一下 RFD3,并举例说明如何将其应用到你们的蛋白结合剂设计流程中。
===========================================
Slide2/10
===========================================
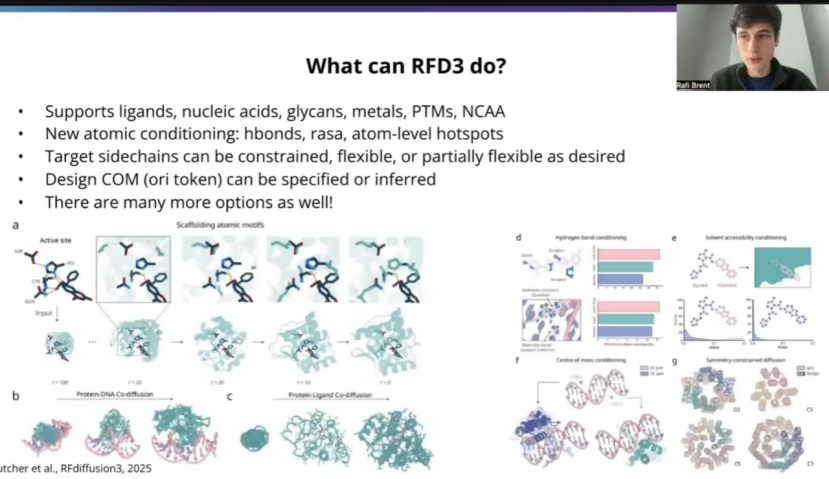
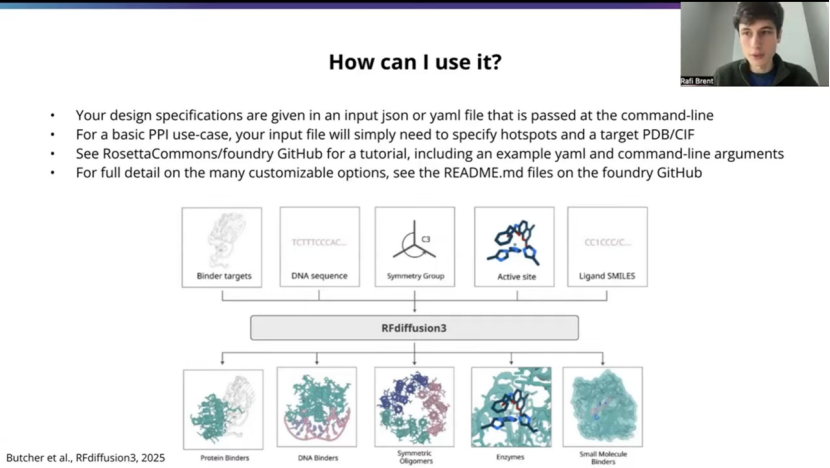
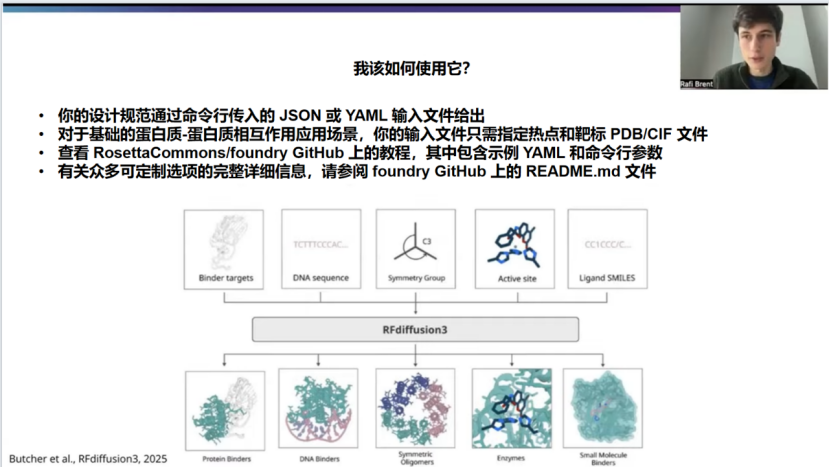
To get started, just as an introduction to RFD3 in case people might not be super familiar, in contrast to previous versions of RFDiffusion, RFD3 is an all atom protein design model. What this means is you get out not only backbone coordinates, but also precise atomic coordinates for all of the side chain atoms. So you're getting out both sequences and roters from the model as well. Another thing that's exciting about RFD3 is that we train on the entire PDB except for basically crystallization aids or bad structures and so we can support all the modalities that we commonly found in the PDB. So this includes ligands, nucleic acids, glycans, metals, ptms, non-canonical. You know, of course things that are less represented in the PDB will probably be harder for the model just because there's less training data. But overall, all of this stuff should be in distribution for RFD3. Which is pretty exciting to us.
Another nice thing about this all atom formulation is that you can give atom level conditioning. So this could be hydrogen bonds. You maybe have a particular atom on your target that you want to be a donor or an acceptor. This is rasa conditiong both for ligands but also for particular residues perhaps. And also you can give atom level hotsopts, which is perhaps most relevant for PPI and which I'll talk about a little bit later on. Then in terms of how to, you know, what doors this unlocks, you can decide how to handle your target side chains, so you can make them totally constrained. You can make them flexible, you can make them partially flexible, and maybe depending on how you want to do this, you could, you know, mirror what's going on in solution even a little bit better than just a rigid crystal structure. You can also specify a center of mass for your designed protein. So this is similar to previous versions of RF diffusion. It's an approximate center of mass, so you don't have to worry about getting, you know, precise sub angstrom precision on your center of mass. It's just an approximate region for where you would like the model to put the protein in many PPI workflows, this is actually already determined by the hotspots and so there are nice ways to infer this, which I'll talk about a little bit later.
And of course this was not an exhaustive list, there's really cool things you can do with symmetry and with flexible ligands and DNA and I encourage people to check out the paper and documentation for more on all of that.
为了让不熟悉RFDiffusion的听众有个初步了解,先简单介绍一下RFD3。与之前版本的RFDiffusion不同,RFD3是一个全原子蛋白质设计模型。这意味着你得到的不仅仅是主链坐标,而是包括所有侧链原子的精确原子坐标。也就是说,你可以从模型中得到序列和侧链旋转异构体。RFD3另一个令人兴奋的地方是,我们在整个PDB(蛋白质结构数据库)上进行训练,基本上排除了结晶助剂或不良结构,因此我们可以支持PDB中常见的所有类型。这包括配体、核酸、聚糖、金属、翻译后修饰、非标准残基等。当然,那些在PDB中较少出现的类型对模型来说可能难度更大,因为训练数据较少。但总的来说,所有这些类型都应该在RFD3的分布范围内。这对我们来说非常令人兴奋。
这种全原子表述的另一个优点是,你可以进行原子级别的条件控制。例如,可以是氢键。你可能在目标蛋白上有一个特定的原子,希望它成为氢键供体或受体。这不仅适用于配体的条件控制,也适用于特定残基。此外,你还可以提供原子级别的热点,这可能与蛋白质-蛋白质相互作用最相关,稍后我会谈到这一点。至于这开启了哪些可能性,你可以决定如何处理目标蛋白的侧链,你可以完全约束它们,也可以让它们灵活可变,或者部分灵活。也许根据你的需求,你可以比刚性晶体结构更好地模拟溶液中的实际情况。你还可以为设计的蛋白质指定质心。这与之前版本的RFDiffusion类似。这是一个近似的质心,因此你不必担心达到亚埃级的精确质心。它只是一个近似区域,指示你希望模型将蛋白质放置在何处。在许多蛋白质-蛋白质相互作用工作流程中,这实际上已经由热点决定了,因此有一些很好的方法来推断这一点,稍后我会谈到。
当然,这并不是RFD3能做的所有事。你还可以利用对称性、柔性配体和DNA做很多很酷的事情。我鼓励大家查阅论文和文档以了解更多相关信息。
===========================================
Slide3/10
===========================================
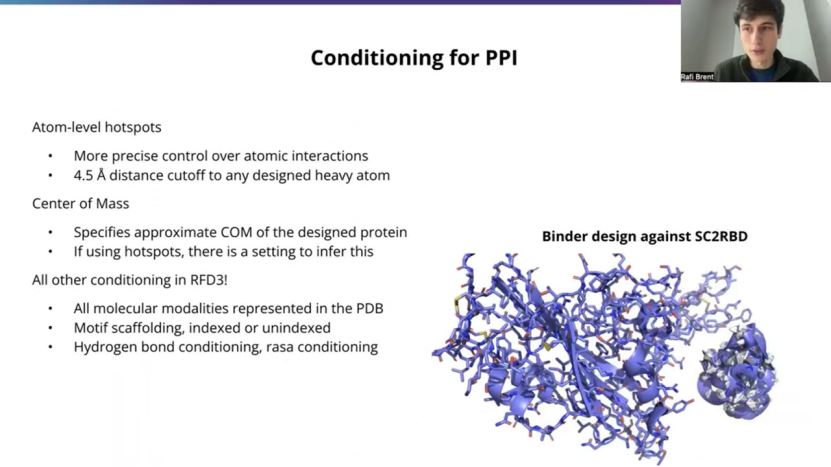
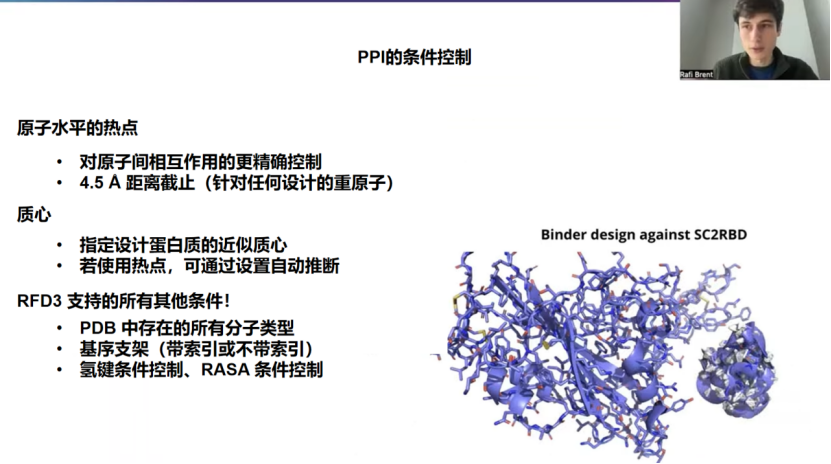
This is a PPI talk, a protein binder design talk, so drilling down a little bit in how you'll want to do this, to ultimately get a trajectory like you see on the right here, which is a passing AF3 or passing RFD3 design passing refolding filters against a COVID RBD.
And so a couple of these things I mentioned, just want to give a bit more detail on one of these is the atom level hotspots. So previous versions of RFdiffusion used hotspots at the residue level. And here we can actually specify more precise atomic interactions that you want to have. This is a harder constraint and the model's not perfect at is, especially if you have many different atom level hotspots. But typically what I've found is that you can get about two thirds adherence to the precise atom at four and a half angst streams, and you'll almost always get an interaction with some atom in that residue at the precise four and a half angle from distance. So you will get close interactions. Most of the time it's exactly where you specified.
The model is not perfect, but what's also really nice about RFD3 that people may not be aware of is that it's much, much faster than previous version of RFdiffusion. So it can be about an order of magnitude faster. Then RFD1 and RFD2, depending on the length of your system. And what's nice about that is you can specify really difficult constraints and then filter out based on constrain satisfaction before spending all the time to go through a Refolding model so you can actually satisfy more difficult constraints, even if the model doesn't get it every time. Just through this kind of efficient design and filtering workflow.
There's also this center of mass conditioning, which I mentioned briefly. This can be useful if you don't have any hotspots and you just want guide to a rough region, one side of your target. For example. Most commonly you will have hotspots in a PPI case in particular, and so we can infer the ORI token, I'll specify how to do this a bit later on, but what it'll do, is it'll take the center of mass of your hotspots and move outwards, normally outwards about 10 stroms. And in-house, we've found this to be a pretty reasonable way. I would recommend this for people getting started. If you don't have a precise center of massing mind, this is a good place for most mini binder design workflow. And of course you know you can also use all the other kinds of conditioning that I mentioned in the previous slide.
So there's no like different tech points or different models, there's no hidden adapters. This is just one model for RFD3 that can do everything. And so what's really nice about that is you don't have to worry about, you know, getting out of distribution of PPI, maybe you've got a ligand that you want present in youre system or a peptide or some DNA nearby and that's totally supported. And you can also do other kinds of conditioning that are less common in PPI workflows. So you can do, you know, motif scaffolding indexed or unindexed. You can do ti adam motif scaffolding. You can do thses h bond and rasa conditioning. So, again, you know, as the constraints sets get more complicated, inevitably fewer of the designs will start passing. But, in principle, all of this stuff should be in distribution for the model.
这是一个关于蛋白质-蛋白质相互作用和蛋白结合剂设计的报告,所以我们将深入探讨具体操作方法,最终目标是获得如右图所示的结果轨迹------一个通过了AF3或RFD3再折叠筛选的、靶向COVID RBD的设计。
关于我之前提到的几点,这里想更详细地介绍一下其中一项:原子水平热点。之前版本的RFDiffusion使用的是残基水平的热点。而现在,我们可以指定更精确的、你想要的原子间相互作用。这是一个更严格的约束,模型在这方面并非完美,尤其是当你设置了许多不同的原子水平热点时。但根据我的经验,大约有三分之二的设计能在4.5埃的距离内精确遵循指定的原子,并且几乎总是能确保该残基中的某个原子在精确的4.5埃距离内与你指定的原子产生相互作用。所以,你会得到近距离的相互作用。大多数情况下,它都发生在你指定的确切位置。
模型并非完美,但人们可能没有意识到的是,RFD3还有一个非常好的优点:它比之前版本的RFDiffusion快得多。根据系统长度的不同,它可能比RFD1和RFD2快一个数量级。它的优点是,你可以设置非常苛刻的约束,然后在投入所有时间进行再折叠模型筛选之前,根据约束满足情况进行初步过滤。这样,即使模型不能每次都满足,你也可以通过这种高效的设计和过滤流程来实现更难的约束。
还有我简要提过的质心条件控制。如果你没有任何热点,只是想引导设计到目标的大致区域(例如一侧),这会很有用。最常见的是,在蛋白质-蛋白质相互作用的情况下,你通常会有关键热点,因此我们可以推断出ORI token(质心标记),稍后我会说明具体操作方法。它的作用是,它会取你所有热点的质心,然后向外移动,通常向外移动约10埃。在我们内部,我们发现这是一个相当合理的方法。对于刚开始接触这个领域的人来说,我会推荐这样做。如果你没有一个精确的质心想法,对于大多数微型结合剂设计流程来说,这是一个很好的起点。当然,你也可以使用我在上一张幻灯片中提到的所有其他类型的条件控制。
所以,没有不同的技术要点,没有不同的模型,也没有隐藏的适配器。RFD3就是一个统一的模型,可以完成所有任务。它的美妙之处在于,你不用担心设计会偏离蛋白质-蛋白质相互作用的分布范围。也许你希望系统中存在一个配体、一段肽段或一些DNA,这完全支持。你还可以进行在蛋白质-蛋白质相互作用流程中不太常见的其他类型的条件控制。例如,你可以进行有索引或无索引的基序支架设计,可以进行TI AMD基序支架设计,还可以进行氢键和RASA条件控制。再次说明,随着约束集变得越来越复杂,能通过筛选的设计不可避免地会越来越少。但原则上,所有这些类型都应该在模型的分布范围内。
===========================================
Slide4/10
===========================================
So of course, the purpose of this talk is how you can go about using it practically, and so what is gonna look like is, and I'll give a specific example on the next slide, but just at a high level. You;re gonna have a file that's gonna be an input file. It'll be adjacent or a yaml, and it'll be passed to RFD3 at the command line, and it'll contain all the information about your particular system of interest, the problem you're trying to solve.
And so for a very standard basic PPI use case, it's mostly just gonna specify where the hotspots are. And also, you know, a PDB or CIF file that contains the, structure of the target, so that, of course the model has to be aware of what your target looks like.
And again, I'll go into more details, but just wanted to shout out right here on our Github page is at RosettaCommons/foundry. There are a bunch of tutorials, both for PPI and other use cases. Have been put together by the Rosetta Common folks, and they're really fantastic. So thank you to them for putting that together. And I encourage people to check out those resources. The Readme documentation will be more comprehensive and , we'll cover all of the flags and somethings I didn't mention here.
当然,本次分享的目的是介绍如何实际应用它。具体流程我将在下一张幻灯片中给出一个具体示例,但先从宏观层面来说。你需要准备一个输入文件,可以是JSON 或 YAML 格式,通过命令行传递给 RFD3。这个文件包含了你所关注的特定系统以及你想解决的所有相关信息。
对于一个非常标准、基础的蛋白质-蛋白质相互作用应用场景来说,它主要就是指定热点所在的位置。同时,还需要提供一个包含靶标结构的 PDB 或 CIF 文件,这样模型当然得知道你的靶标长什么样。
稍后我会更详细地介绍,但这里想先提一下,在我们的GitHub 页面(地址是 RosettaCommons/foundry)上,Rosetta Commons 的伙伴们已经整理了许多教程,涵盖了蛋白质-蛋白质相互作用以及其他应用场景。这些教程真的非常棒,所以在此感谢他们的付出。我鼓励大家去查阅这些资源。其中的 README 文档会更全面,会涵盖这里没提到的所有参数和功能。
===========================================
Slide5/10
===========================================
OK, so here's gonna be an example command. And again, there's examples on the Github, but this is, you know, a pretty basic PPI design work flow and what it's gonna look like. So what we've got here is on the left, the design specification file that I mentioned, this is in YAML format. You can also use json. They're both just nested data structures and the file format looks a little different, but the nesting and the names of all the arguments and flags to RFD3 are exactly the same between the two files. So it's kind of, it just whatever format you prefer to work with. So in a yaml, for people who aren't familiar, the nesting goes by tabs. So, that's what this structure looks like here.
And at the top level we've got our task name. There can be multiple tasks in a single input file, so you can specify several different design problems and have RFD3 design against all of them in a single run command. You know, sequentially, of course, here I've only got one for simplicity. It's gonna be against the insulin receptor, so I've named it accordingly. But you can name it whatever you like. And of course, a primary thing here is gonna be this input file. So it can be a PDB or a SIF file. You can sue relative or absolute paths. And here I've got this cropped file from the PDB that contains the insulin receptor.
Next up is gonna be your context string. So this is kind of the core way in which inputs gets specified to RFD3. And there's kind of three main types of components you'll see here.
(1) So you can have diffused residues, Which are just regions that will be completely designed by the model. So that's on the left here. There's no chain ID because they're being newly instantiated residues. So this 40-120 indicated that you'll sample a length between 40 and 120, and the model will design at that length for the given batch.
(2) Next up, we've got a chain break that's just /0 syntax, and of course, we want our mini binder to be on a different chain from our target. So that's why we've got a chain break here.
(3) And then lastly, we're actually loading from our input file. And so what this is gonna look like is a chain ID that indicates it's from an input file and then the residue IDs. So this is chain E residue 6-155 inclusive on both bounds. And those are the particular residues we're gonna load from this file design against.
Next up, you've got some optional flags. This length flag is probably not necessary for the most basic PPI workflows, but thought I would mention it, in case people are doing something slightly more complex. So for example, if you were doing motif scaffolding as part of your PPI use case, and let's say you've got a motif that's flanked by two diffused regions, and let's say they can both be length 60-80, for example. But you want your total mini binder to be length less than 150. So you can do that by specifying the length constraint where either one of these two diffuse ranges can go up to length 80, but they won't both go up that high. Probably not necessary for the most basic PPI use cases, but thought I would shout it out in case it becomes useful for people.
Next up is something that's very common in PPI cases. These are your hotspot atoms. And so what we've got here is a little bit of a sub nested structure. So at the top level you've got the select hotspot block, and then we're specifying particular residues in the fixed region that we've loaded from our input file. So I've got chain ID and then res id. So this is chain E residue 64, load from the input file. You'll notice that this is part of the same range that I loaded from the input file. So RFD3 is aware of it, and then I'm specifying these particular atom names for each of these residues to get that four and a half angstrom atom level hotspot conditioning.
Next up, we've got the center of mass thing. You know, as I mentioned, you can totally give 3D coordinates, and there's examples of how to do that in the documentation on Github. Probably the easiest thing to start out is just inferring based on the hotspots, as I mentioned, and so that's what this line dose here. And we found it to be pretty good. I'd recommend people get started with that unless you have something particular in mind.
And then lastly, there's this flag that's pretty interesting. This is_non_loopy flag, and I'll talk about it more quantitatively on the next slide. But what this does will bias towards more secondary structures in your outputs. And this can be useful because actually in the PDB, quite a lot of proteins that from protein-protein interfaces can be pretty loopy. And the issue with this is that refolding models such as AF3 or RF3 are gonna be less confident at folding very loopy, very disordered things. And so your pass rate will be much less. And again, we'll look at that quantitatively on the next slide. But in general, I'd recommend people probably use this flag unless, you know, there's particular reason that you would like to go with the full range of secondary structures.
And then we've got this "run command" here, so once you've cloned the repository and installed it and download the checkpoint as specified in the docs. You'll run something like RFD3 design, give your output directory. So this is where the both the output design files and also the metadata will be saved. You'll have an input that will point to this JS or YAML file that give your design specifications. You'll have the path to the checkpoint that you've downloaded.
And then we've got a couple of these optional flags here that what these two serve to do, they're not required, but they lower the temperature of sampling. And what that means intuitively is that you're less likely to sample from the fringes of the distribution that the model has learned. So overall protein space, you're less likely to sample from the fringes and more likely to sample towards the center towards kind of more like normal looking proteins, more ordered and structured things. And this may be desirable or not, depending on your use case, but it's definitely something to keep in mind as an option
好的,这里是一个示例命令。同样,GitHub 上有示例,但这展示的是一个非常基础的PPI 设计工作流程及其大致样子。左边是我提到的设计规范文件,这里是 YAML 格式。你也可以使用JSON。它们都只是嵌套的数据结构,文件格式看起来略有不同,但传递给RFD3 的所有参数和标志的嵌套方式及名称在两个文件中是完全相同的。所以,你可以选择自己喜欢使用的格式。对于不熟悉YAML 的人来说,它的嵌套是通过缩进来实现的。这就是这里的结构。
在第一行,我们有任务名称。一个输入文件中可以包含多个任务,因此你可以指定几个不同的设计问题,让RFD3 在一次运行命令中依次针对所有问题进行设计。当然,这里为了简单起见,我只有一个任务。这是针对胰岛素受体的设计,所以我相应地命名了它。你可以随意命名。当然,这里最主要的是输入文件。它可以是PDB 或CIF 文件。你可以使用相对路径或绝对路径。这里我有一个从 PDB 下载的、包含胰岛素受体的裁剪后文件。
接下来是你的上下文字符串(context string)。这是向RFD3 指定输入的核心方式。你在这里会看到三种主要类型的组件。:
(1)扩散残基,这些是将由模型完全设计的区域。就像左边这里,没有链 ID,因为它们是新生成的残基。这里的40-120 表示你将采样一个40 到120 之间的长度,模型将针对给定的批次以该长度进行设计。
(2)接下来是一个链中断,用"/0 "表示。当然,我们希望我们的微型结合剂与靶标在不同的链上,所以我们在这里设置了一个链中断。
(3)最后,我们从输入文件中实际加载。这看起来像是一个链ID,表明它来自输入文件,然后是残基ID。这里是链E 的6 到155 号残基(包含两端)。这些是我们将从该文件中加载并进行针对设计的特定残基。
接下来,你有一些可选标志。对于最基础的PPI 工作流程来说,这个长度标志可能不是必需的,但我想提一下,以防有人要做稍微复杂一点的事情。例如,如果你在PPI 应用场景中要做基序支架设计,假设你有一个基序,其两侧是两个扩散区域,再假设这两个区域的长度都可能在60-80 之间。但你希望你的微型结合剂总长度小于150。那么,你可以通过指定长度约束来实现,这样这两个扩散范围中的任何一个都可以达到80 的长度,但它们不会同时都达到那么高。对于最基础的PPI 应用场景来说,这可能不是必需的,但我想提一下,以防它对某些人有帮助。
接下来是在PPI 场景中非常常见的东西:你的热点原子。这里有一个稍微嵌套的子结构。顶层是热点选择块,然后我们指定从输入文件中加载的固定区域中的特定残基。这里有链ID 和残基ID。这是链E 的64 号残基,从输入文件加载。你会注意到,这是我刚才从输入文件中加载的同一个范围的一部分,所以RFD3 知道它。然后,我为这些残基中的每一个指定了特定的原子名称,以实现那个4.5 埃原子水平的热点条件控制。
接下来是质心部分。正如我提到的,你完全可以给出3D 坐标,GitHub 上的文档中有如何操作的示例。对于初学者来说,最简单的方法可能就像我提到的那样,直接基于热点进行推断,这就是这一行代码的作用。我们发现效果相当不错。我建议人们以此作为起点,除非你有特别的想法。
最后,有一个非常有趣的标志:is_non_loopy。我将在下一张幻灯片中更定量地讨论它。它的作用是使输出偏向于更多的二级结构。这很有用,因为实际上在PDB 中,相当多形成蛋白质-蛋白质界面的蛋白质可能具有较多的环区。问题在于,像AF3 或RF3 这样的再折叠模型对于折叠非常松散、非常无序的结构会缺乏信心。因此,你的通过率会低得多。同样,我们将在下一张幻灯片中定量地看这个。但总的来说,我建议人们可能使用这个标志,除非你有特别的原因想要保留完整的二级结构范围。
然后这里有一个运行命令(run command)。一旦你按照文档中的说明克隆了代码库、安装了依赖项并下载了检查点,你就可以运行类似python rfd3 design 的命令,指定输出目录(输出设计文件和元数据都将保存在这里),指定指向你的设计规范(JSON 或 YAML 文件)的输入,以及你下载的检查点路径。
然后这里还有几个可选标志。这两个标志不是必需的,但它们会降低采样的温度。直观上这意味着,你从模型学习到的分布的边缘进行采样的可能性会降低。在整个蛋白质空间中,你不太可能从边缘采样,而更可能向中心采样,得到更接近正常、更有序和结构化的蛋白质。这可能是可取的,也可能不是,具体取决于你的应用场景,但绝对值得记住这是一个可选方案。
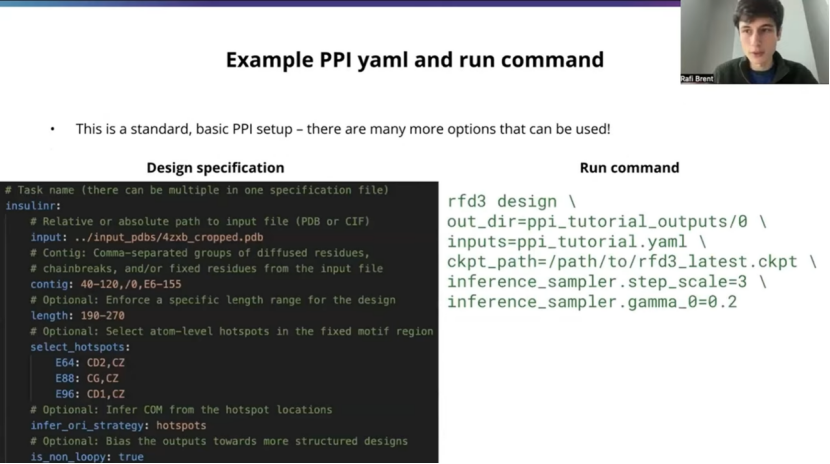
文中YAML文件(ppi_tutorial.yaml):
bash
# Task name (there can be multiple in one specification file)
insulinr:
  # Relative or absolute path to input file (PDB or CIF)
  input: ../input_pdbs/4zxb_cropped.pdb
  # Contig: Comma-separated groups of diffused residues,
  # chainbreaks, and/or fixed residues from the input file
  contig: 40-120,/0,E6-155
  # Optional: Enforce a specific length range for the design
  length: 190-270
  # Optional: Select atom-level hotspots in the fixed motif region
  select_hotspots:
    E64: CD2,CZ
    E88: CG,CZ
    E96:CD1,CZ
  # Optional: Infer COM from the hotspot locations
  infer_ori_strategy:hotspots
  # Optional: Bias the outputs towards more structured desgins
  is_non_loopy: true
文中运行命令:
bash
rfd3 design \
out_dir=ppi_tutorial_outputs/0 \
inputs=ppi_tutorial.yaml \
ckpt_path=/path/to/rfd3_latest.ckpt \
inference_sampler.step_scale=3 \
inference_sampler.gamma_0=0.2
(未完待续...)
作者:bioinforiver
2026年2月16日
本内容仅供学习交流,未经许可不许转载。
( 本人系原作者,原文见:mp.weixin.qq.com/s/AoNofzwKODAUIKYTA7z6WQ)