平滑升级与回滚
在进行之前先了解这三组信号的用途
| 信号 | 核心用途 | 作用对象 | 执行后关键结果 | 核心特性 |
|---|---|---|---|---|
| kill -USR2 | 启动新版本升级 | 旧 Nginx 主进程 | 新旧进程共存,新进程接管新请求 | 升级启动,不中断服务 |
| kill -WINCH | 平滑切流到新版本 | 旧 Nginx 主进程 | 旧 worker 优雅退出,新进程独占请求 | 切流核心,保留回滚兜底 |
| kill -HUP | 紧急回滚到旧版本 | 旧 Nginx 主进程 | 旧主进程重启旧 worker,接管所有请求 | 回滚核心,秒级切回,无中断 |
先下载高版本的nginx
bash
[root@nginx ~]# wget https://nginx.org/download/nginx-1.29.4.tar.gz隐藏版本并自定义名称
bash
#编译nginx隐藏版本
[root@nginx ~]# tar zxf nginx-1.29.4.tar.gz
[root@nginx ~]# cd nginx-1.29.4/src/core/
[root@nginx core]# vim nginx.h
#define nginx_version      1029004
#define NGINX_VERSION      ""
#define NGINX_VER          "牛逼哈拉少/" NGINX_VERSION
#文件编辑完成后进行源码编译即可

[root@nginx core]# cd ../../
[root@nginx nginx-1.29.4]# ./configure   --prefix=/usr/local/nginx --user=nginx --group=nginx --with-http_ssl_module --with-http_v2_module --with-http_realip_module --with-http_stub_status_module --with-http_gzip_static_module --with-pcre --with-stream --with-stream_ssl_module --with-stream_realip_module

[root@nginx nginx-1.29.4]# make
[root@nginx nginx-1.29.4]# cd objs/
[root@nginx objs]# ls
autoconf.err  nginx    ngx_auto_config.h   ngx_modules.c  src
Makefile      nginx.8  ngx_auto_headers.h  ngx_modules.o


[root@Nginx objs]# cd /usr/local/nginx/sbin/
[root@Nginx sbin]# ls
nginx

#对旧版本进行备份
[root@nginx sbin]# cp nginx nginx.old

[root@Nginx sbin]# \cp -f /root/nginx-1.29.4/objs/nginx  /usr/local/nginx/sbin/nginx
升级
bash
[root@nginx sbin]# ls /usr/local/nginx/logs/
access.log  error.log  nginx.pid

[root@nginx sbin]# ps aux | grep nginx
root        5577  0.0  0.0  11148  2072 ?        Ss   10:19   0:00 nginx: master process /usr/local/nginx/sbin/nginx
nginx       5578  0.0  0.1  15424  5016 ?        S    10:19   0:00 nginx: worker process
root        5649  0.0  0.0   6636  2176 pts/0    S+   10:38   0:00 grep --color=auto nginx

#开启新版本的进程,生成就进程pid的oldbin
[root@nginx sbin]# kill -USR2 5577
[root@nginx sbin]# ps aux | grep nginx
root        5577  0.0  0.0  11148  2456 ?        Ss   10:19   0:00 nginx: master process /usr/local/nginx/sbin/nginx
nginx       5578  0.0  0.1  15424  5016 ?        S    10:19   0:00 nginx: worker process
root        5650  0.0  0.1  11188  6656 ?        S    10:38   0:00 nginx: master process /usr/local/nginx/sbin/nginx
nginx       5651  0.0  0.1  15464  5280 ?        S    10:38   0:00 nginx: worker process
root        5653  0.0  0.0   6636  2176 pts/0    S+   10:38   0:00 grep --color=auto nginx

[root@nginx sbin]# ls /usr/local/nginx/logs/
access.log  error.log  nginx.pid  nginx.pid.oldbin

[root@nginx sbin]# nginx -V
nginx version: 牛逼哈拉少/
......

#回收旧版本的进程
[root@nginx sbin]# kill -WINCH 5577
[root@nginx sbin]# ps aux | grep nginx
root        5577  0.0  0.0  11148  2456 ?        Ss   10:19   0:00 nginx: master process /usr/local/nginx/sbin/nginx
root        5650  0.0  0.1  11188  6656 ?        S    10:38   0:00 nginx: master process /usr/local/nginx/sbin/nginx
nginx       5651  0.0  0.1  15464  5280 ?        S    10:38   0:00 nginx: worker process
root        5660  0.0  0.0   6636  2176 pts/0    S+   10:40   0:00 grep --color=auto nginx
回滚
bash
[root@nginx sbin]# cp nginx nginx.new -p
[root@nginx sbin]# \cp nginx.old nginx -pf

[root@nginx sbin]# ps aux | grep nginx
root        5577  0.0  0.0  11148  2456 ?        Ss   10:19   0:00 nginx: master process /usr/local/nginx/sbin/nginx
root        5650  0.0  0.1  11188  6656 ?        S    10:38   0:00 nginx: master process /usr/local/nginx/sbin/nginx
nginx       5651  0.0  0.1  15464  5280 ?        S    10:38   0:00 nginx: worker process
root        5679  0.0  0.0   6636  2176 pts/0    S+   10:41   0:00 grep --color=auto nginx

#唤醒旧版本的进程
[root@nginx sbin]# kill -HUP 5577
[root@nginx sbin]# nginx -V
nginx version: nginx/1.28.1
......

#回收新版本存在的进程
[root@nginx sbin]# kill -WINCH 5650
[root@nginx sbin]# ps aux | grep nginx
root        5577  0.0  0.0  11148  2456 ?        Ss   10:19   0:00 nginx: master process /usr/local/nginx/sbin/nginx
root        5650  0.0  0.1  11188  6656 ?        S    10:38   0:00 nginx: master process /usr/local/nginx/sbin/nginx
nginx       5680  0.0  0.1  15424  5016 ?        S    10:41   0:00 nginx: worker process
root        5683  0.0  0.0   6636  2176 pts/0    S+   10:42   0:00 grep --color=auto nginx

#如果旧版本的进程没用的话就可以kill -9删除了
[root@nginx sbin]# kill -9 5650
编写Nginx启动文件systemd
bash
#百度搜索模板
systemd site:nginx.org    #搜索内容 site:搜索网址

[root@nginx ~]# cd /lib/systemd/system
[root@nginx system]# vim nginx.service
[Unit]
Description=The NGINX HTTP and reverse proxy server
After=syslog.target network.target remote-fs.target nss-lookup.target

[Service]
Type=forking
PIDFile=/usr/local/nginx/logs/nginx.pid			#指定nginx启动的pid
ExecStartPre=/usr/local/nginx/sbin/nginx -t		#指定nginx -t检查配置文件命令
ExecStart=/usr/local/nginx/sbin/nginx			#指定nginx启动命令
ExecReload=/bin/kill -s HUP $MAINPID
ExecStop=/bin/kill -s QUIT $MAINPID
PrivateTmp=true

[Install]
WantedBy=multi-user.target

#使编写的配置生效
[root@nginx system]# systemctl daemon-reload
#在启动时要确保nginx已经关闭不然会冲突导致报错
[root@nginx system]# systemctl enable --now nginx
Nginx配置文件参数详解
1.nginx主配置文件说明
主配置文件结构:四部分
main block:主配置段,即全局配置段

#事件驱动相关的配置
event {
...
}

#http/https 作为web服务器相关配置段
http {
...
}

#默认配置文件不包括下面两个部分
#mail 作为邮件服务器相关配置段
mail {
...
}

#stream 反向代理相关配置段
stream {
...
}
2.全局配置块参数
默认打开全局配置参数
user nginx nginx; 						#启动Nginx工作进程的用户和组
worker_processes [number | auto]; 		#启动Nginx工作进程的数量,一般设为和CPU核心数相同,可以设置为auto同步cpu核心数
worker_cpu_affinity 00000001 00000010 00000100 00001000 | auto ;	#将worker进程与cpu核数绑定,避免进程在不同核心上来回切换造成消耗

#示例
CPU MASK: 	00000001:0号CPU
			00000010:1号CPU
			10000000:7号CPU
worker_cpu_affinity 0001 0010 0100 1000;第0号---第3号CPU
worker_cpu_affinity 0101 1010;

worker_rlimit_nofile 100000;  # 所有worker最多打开100000个文件描述符
							  # 最好与ulimit -n 或者limits.conf的值保持一致

#错误日志记录配置,语法:error_log file [debug | info | notice | warn | error | crit
| alert | emerg]
#error_log  logs/error.log;
#error_log  logs/error.log  notice;
#error_log  logs/error.log  info;

#pid文件保存路径
#pid        logs/nginx.pid;
示例:cpu与核心绑定示例
bash
worker_processes  auto;
worker_cpu_affinity 01 10;

[root@nginx ~]# cat /proc/cpuinfo
cpu cores       : 6
[root@nginx ~]# vim /usr/local/nginx/conf/nginx.conf
worker_processes  auto;
worker_cpu_affinity 000001 000010 000100 001000 010000 100000;
[root@nginx ~]# nginx -t
[root@nginx ~]# nginx -s reload
[root@nginx ~]# ps aux | grep nginx
root         881  0.0  0.0  11148  3352 ?        Ss   15:18   0:00 nginx: master process /usr/local/nginx/sbin/nginx
nginx       1450  0.0  0.1  15456  5132 ?        S    15:20   0:00 nginx: worker process
nginx       1451  0.0  0.1  15456  5004 ?        S    15:20   0:00 nginx: worker process
nginx       1452  0.0  0.1  15456  5132 ?        S    15:20   0:00 nginx: worker process
nginx       1453  0.0  0.1  15456  5004 ?        S    15:20   0:00 nginx: worker process
nginx       1454  0.0  0.1  15456  5004 ?        S    15:20   0:00 nginx: worker process
nginx       1455  0.0  0.1  15456  5004 ?        S    15:20   0:00 nginx: worker process
root        1457  0.0  0.0   6636  2304 pts/0    S+   15:20   0:00 grep --color=auto nginx
[root@nginx ~]# ps axo pid,cmd,psr | grep nginx
    881 nginx: master process /usr/   4
   1450 nginx: worker process         0
   1451 nginx: worker process         1
   1452 nginx: worker process         2
   1453 nginx: worker process         3
   1454 nginx: worker process         4
   1455 nginx: worker process         5
   1459 grep --color=auto nginx       3
3.events块配置参数
bash
[root@nginx ~]# vim /usr/local/nginx/conf/nginx.conf
events {
    worker_connections  10000;		#单个woker工作进程最大并发数

    use epoll;						#使用epoll机制来实现高并发
									#Nginx支持众多的事件驱动,
									#比如:select、poll、epoll,只能设置在events模块中设置

	accept_mutex on;			   #同一时刻一个请求访问只激活一个work进程赖处理
									#不开启则一个请求到来唤醒所有worker,称为"惊群"
									#默认为off,on为开启


	multi_accept on;				#把数据缓存多个到一定程度,同时发送给worker处理
									#不开启则实时发送,打开后worker进程可以同时接受多个网络请求
									#默认为off,on为开启
}
示例:实现nginx高并发配置
bash
[root@nginx ~]# vim /usr/local/nginx/conf/nginx.conf
worker_rlimit_nofile 100000;
events {
    use epoll;
    worker_connections  10000;
}

[root@nginx ~]# nginx -s reload

#测试并发
[root@nginx ~]# dnf install httpd-tools -y

[root@Nginx ~]# ab  -n 100000 -c10000 http://172.25.254.100/index.html
This is ApacheBench, Version 2.3 <$Revision: 1913912 $>
Copyright 1996 Adam Twiss, Zeus Technology Ltd, http://www.zeustech.net/
Licensed to The Apache Software Foundation, http://www.apache.org/

Benchmarking 172.25.254.100 (be patient)
socket: Too many open files (24)				#并发数量过多导致访问失败

#处理本地文件系统的并发文件数量
[root@nginx ~]# vim /etc/security/limits.conf	#永久生效但要重启
*               -       nofile          100000		#打开文件最大个数
*               -       noproc          100000		#打开程序最大个数
[root@nginx ~]# ulimit  -n 100000				#临时生效
[root@nginx ~]# ulimit  -n
100000


[root@bginx ~]# ab  -n 100000 -c10000 http://172.25.254.100/index.html
This is ApacheBench, Version 2.3 <$Revision: 1913912 $>
Copyright 1996 Adam Twiss, Zeus Technology Ltd, http://www.zeustech.net/
Licensed to The Apache Software Foundation, http://www.apache.org/

Benchmarking 172.25.254.100 (be patient)
Completed 10000 requests
Completed 20000 requests
Completed 30000 requests
Completed 40000 requests
Completed 50000 requests
4.http块配置参数
http块是Nginx服务器配置中的重要部分,缓存、代理和日志格式定义等绝大多数功能和第三方模块都可以在这设置,http块可以包含多个server块,而一个server块中又可以包含多个location块。
bash
[root@nginx ~]# vim /usr/local/nginx/conf/nginx.conf
http {
	#在响应报文中将指定的文件扩展名映射至MIME对应的类型
	include       mime.types;				#可以识别文本,图像,音频,视频等其他的数据
    default_type  application/octet-stream;	#没有识别的默认类型,例如php,ngxin不识别需要安装php才能渲染呈现

    log_format  main  '$remote_addr - $remote_user [$time_local] "$request" '
                      '$status $body_bytes_sent "$http_referer" '
                      '"$http_user_agent" "$http_x_forwarded_for"';

    access_log  logs/access.log  main;		#使用定义为main的日志格式,存放在根目录的logs/access.log中

    sendfile        on;						#零拷贝功能,sendfile系统调用在两个文件描述符之间直接传递数据(完全在内核中操作)

    #tcp_nopush     on;

    #keepalive_timeout  0;
    keepalive_timeout  65;					#长连接超时时间,单位是s

    #gzip  on;								#开启压缩功能
	server {
	#web服务配置
	}
	include "/usr/local/nginx/conf.d/*.conf";	#导入其他路径的配置文件,子配置文件
												#要放在默认发布文件目录下,不然会覆盖默认
}
示例:识别php文件为text/html类型
bash
[root@nginx ~]# vim /usr/local/nginx/html/index.php
<?php
    phpinfo()
?>
[root@nginx ~]# curl -I 172.25.254.100/index.php
HTTP/1.1 200 OK
Server: nginx/1.26.1
Date: Sun, 03 Aug 2025 12:31:48 GMT
Content-Type: application/octet-stream			#php不属于mime类型中,所以使用默认
Content-Length: 23
Last-Modified: Sun, 03 Aug 2025 11:17:36 GMT
Connection: keep-alive
ETag: "688f4550-17"
Accept-Ranges: bytes

[root@Nginx ~]# vim /usr/local/nginx/conf/nginx.conf
default_type text/html;
[root@nginx ~]# curl -I 172.25.254.100/index.php
HTTP/1.1 200 OK
Server: nginx/1.26.1
Date: Sun, 03 Aug 2025 12:35:22 GMT
Content-Type: text/html							#将识别类型改为text/html
Content-Length: 23
Last-Modified: Sun, 03 Aug 2025 11:17:36 GMT
Connection: keep-alive
ETag: "688f4550-17"
Accept-Ranges: bytes

[root@Nginx ~]# vim /usr/local/nginx/conf/nginx.conf
default_type test/php;
[root@nginx ~]# curl -I 172.25.254.100/index.php
HTTP/1.1 200 OK
Server: nginx/1.26.1
Date: Sun, 03 Aug 2025 12:35:22 GMT
Content-Type: test/php								#可以自定义将识别不出来的设为想要的类型
Content-Length: 23
Last-Modified: Sun, 03 Aug 2025 11:17:36 GMT
Connection: keep-alive
ETag: "688f4550-17"
Accept-Ranges: bytes
基于域名的web站点发布
bash
#创建基于域名的发布根目录
[root@nginx ~]# mkdir /webdata/nginx/fjwyyy.org/fjw/html -p
#生成发布文件
[root@nginx ~]# echo fjw.fjwyyy.org > /webdata/nginx/fjwyyy.org/fjw/html/index.html
#创建子配置目录
[root@nginx ~]# mkdir /usr/local/nginx/conf.d
#创建子配置文件
[root@nginx ~]# vim /usr/local/nginx/conf.d/vhosts.conf
server {
    listen  80;
    server_name www.fjwyyy.org;
    root /webdata/nginx/fjwyyy.org/fjw/html/;
}

[root@nginx ~]# vim /usr/local/nginx/conf/nginx.conf
http {
......
include "/usr/local/nginx/conf.d/*.conf";	#放在server{}下面防止识别有误
}

[root@nginx ~]# nginx -t
[root@nginx ~]# nginx -s reload

#添加本地解析
[root@nginx ~]# vim /etc/hosts

#测试
[root@nginx ~]# curl www.fjwyyy.org
fjw.fjwyyy.org
location中的root与alias
- root:指定web的家目录,在定义location的时候,文件的绝对路径等于 root+location
- alias:定义路径别名,会把访问的路径重新定义到其指定的路径,文档映射的另一种机制;
- 访问路径为文件指定路径也要为文件则相当于软连接
- 访问路径为指定路径也要为目录然后查看目录下的index.html
root示例
bash
[root@nginx ~]# vim /usr/local/nginx/conf.d/vhosts.conf
server {
    listen 80;
    server_name www.fjw.org;

    location / {
        root /webdata/nginx/fjwyyy.org/fjw/html/;
    }

    location /login {
        root /webdata/nginx/fjwyyy.org/fjw/html/;
    }
}

[root@nginx ~]# nginx -t
[root@nginx ~]# nginx -s reload
#测试
[root@nginx ~]# curl www.fjw.org
www.fjwyyy.org
[root@nginx ~]# curl www.fjw.org/login/
login
alias示例
bash
[root@nginx ~]# vim /usr/local/nginx/conf.d/vhosts.conf
server {
    listen 80;
    server_name www.fjw.org;

    location /passwd {		#指定为文件下面路径也要为文件,相当于软连接
        alias /etc/passwd;
    }

    location /passwd/ {		#指定为目录下面也要为目录,/mnt/下的index.html,重定向到目录查找底下的默认发布文件
        alias /mnt;
    }
}

[root@nginx ~]# nginx -t
[root@nginx ~]# nginx -s reload
#测试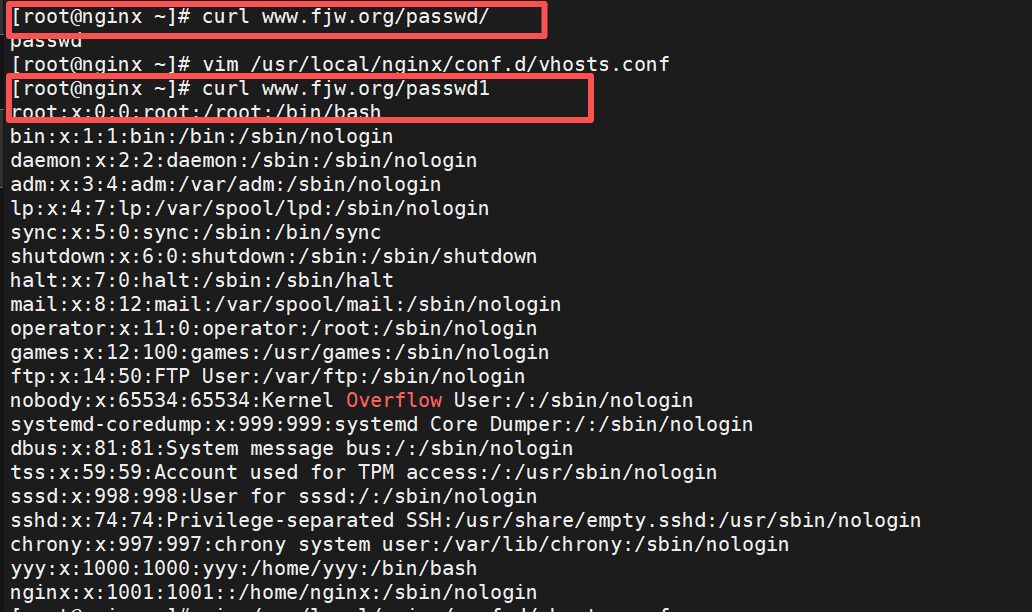
location字符匹配
location是用于匹配请求 URI(统一资源标识符)的核心配置指令,它可以根据不同的 URI 路径设置不同的处理规则(如反向代理、静态文件访问、重定向等)。
修饰符与匹配规则
Nginx 的location匹配遵循 "优先匹配特定规则,再匹配通用规则" 的原则,不同修饰符对应不同的优先级(从高到低排序):
| 修饰符 | 名称 | 匹配规则 | 优先级 |
|---|---|---|---|
= |
精确匹配 | 仅匹配与匹配路径完全一致的 URI。 |
最高 |
^~ |
前缀匹配(优先) | 匹配以匹配路径为前缀的 URI,且一旦匹配成功,不再检查其他正则匹配,区分大小写,也包含正则。 |
次高 |
| 无 | 一般匹配(普通) | 匹配以匹配路径为前缀的 URI,但优先级低于正则匹配,不识别正则表达式。 |
较低 |
~ |
正则匹配(区分大小写) | 按正则表达式匹配 URI,区分大小写。 | 较高 |
~* |
正则匹配(不区分大小写) | 按正则表达式匹配 URI,不区分大小写(如匹配.html和.HTML)。 |
较高 |
#匹配优先级从高到低:
"=" > "^~" > "/*",不带符号
1.示例-精准匹配
bash
[root@nginx ~]# vim /usr/local/nginx/conf.d/vhosts.conf
server {
    listen  80;
    server_name www.fy.org;
    root    /web/html;
    index   index.html;

    location = /test {
        return 200 "punct = \n";	#returun 200.只要访问/test无论是否存在都会返回200存在成功,并输出"punct = \n"
    }
}


#测试
[root@nginx ~]# curl www.fy.org/test
punct =

[root@nginx ~]# curl www.fy.org/test1
<html>
<head><title>404 Not Found</title></head>

[root@nginx ~]# curl www.fy.org/1test
<html>
<head><title>404 Not Found</title></head>
<body>
<center><h1>404 Not Found</h1></center>
2.示例-正则前缀匹配
bash
[root@nginx ~]# vim /usr/local/nginx/conf.d/vhosts.conf
server {
    listen  80;
    server_name www.fy.org;
    root    /web/html;
    index   index.html;

#   location = /test {
#       return 200 "punct = \n";
#   }

    location ^~ /test {
        return 200 "punct = ^~\n";
    }
}

#测试
[root@nginx ~]# curl www.fy.org/test
punct = ^~
[root@nginx ~]# curl www.fy.org/test/a/b
punct = ^~
[root@nginx ~]# curl www.fy.org/testc
punct = ^~
[root@nginx ~]# curl www.fy.org/aatestc
\<html>
<head><title>404 Not Found</title></head>
<body>
<center><h1>404 Not Found</h1></center>
<hr><center>nginx/1.26.1</center>
</body>
</html>
[root@nginx ~]# curl www.fy.org/TEST		#区分大小写
<html>
<head><title>404 Not Found</title></head>
<body>
<center><h1>404 Not Found</h1></center>
<hr><center>nginx/1.26.1</center>
</body>
</html>
3.示例-正则匹配(区分大小写)
bash
[root@nginx ~]# vim /usr/local/nginx/conf.d/vhosts.conf
server {
    listen  80;
    server_name www.fy.org;
    root    /web/html;
    index   index.html;

#   location = /test {
#       return 200 "punct = \n";
#   }

#   location ^~ /test {
#       return 200 "punct = ^~\n";
#   }

    location ~ /test {
        return 200 "punct = ~\n";
    }
}

#测试
[root@nginx ~]# curl www.fy.org/test
punct = ~
[root@nginx ~]# curl www.fy.org/testa
punct = ~
[root@nginx ~]# curl www.fy.org/test/a/
punct = ~
[root@nginx ~]# curl www.fy.org/atest
<html>
<head><title>404 Not Found</title></head>
<body>
<center><h1>404 Not Found</h1></center>
<hr><center>nginx/1.26.1</center>
</body>
</html>
[root@nginx ~]# curl www.fy.org/a/test		#匹配的是url要加/
punct = ~
[root@nginx ~]# curl www.fy.org/a/TEST		#也区分大小写
<html>
<head><title>404 Not Found</title></head>
4.示例-正则匹配(不区分大小写)
bash
[root@nginx ~]# vim /usr/local/nginx/conf.d/vhosts.conf
server {
    listen  80;
    server_name www.fy.org;
    root    /web/html;
    index   index.html;

#   location = /test {
#       return 200 "punct = \n";
#   }

#   location ^~ /test {
#       return 200 "punct = ^~\n";
#   }

#   location ~ /test {
#       return 200 "punct = ~\n";
#   }

    location ~* /test {
        return 200 "punct = ~*\n";
    }
}

#测试
#效果基本与正则匹配一致,只是不区分大小写
[root@nginx ~]# curl www.fy.org/test
punct = ~*
[root@nginx ~]# curl www.fy.org/TEST
punct = ~*
[root@nginx ~]# curl www.fy.org/a/TEST
punct = ~*
[root@nginx ~]# curl www.fy.org/aTEST
<html>
<head><title>404 Not Found</title></head>
5.示例-一般匹配
bash
[root@nginx ~]# vim /usr/local/nginx/conf.d/vhosts.conf
server {
    listen  80;
    server_name www.fy.org;
    root    /web/html;
    index   index.html;

#   location = /test {
#       return 200 "punct = \n";
#   }

#   location ^~ /test {
#       return 200 "punct  ^~\n";
#   }

#   location ~ /test {
#       return 200 "punct  ~\n";
#   }

#   location ~* /test {
#       return 200 "punct  ~*\n";
#   }

    location /test {
        return 200 "punct \'\' \n";
    }
}

#测试
#类似前缀匹配^~
[root@nginx ~]# curl www.fy.org/test
punct ''
[root@nginx ~]# curl www.fy.org/test/a
punct ''
[root@nginx ~]# curl www.fy.org/testa
punct ''
[root@nginx ~]# curl www.fy.org/atest
<html>
<head><title>404 Not Found</title></head>
[root@nginx ~]# curl www.fy.org/a/test/a
<html>
<head><title>404 Not Found</title></head>
6.示例-"\"的作用
bash
[root@nginx ~]# vim /usr/local/nginx/conf.d/vhosts.conf
server {
    listen  80;
    server_name www.fy.org;
    root    /web/html;
    index   index.html;

#   location = /test {
#       return 200 "punct = \n";
#   }

#   location ^~ /test {
#       return 200 "punct  ^~\n";
#   }

#   location ~ /test {
#       return 200 "punct  ~\n";
#   }

#   location ~* /test {
#       return 200 "punct  ~*\n";
#   }

#   location /test {
#       return 200 "punct \'\' \n";
#   }

    location ~* \.(png|JPG|CSS)$ {			#命中结尾的文件,且不区分大小写
        return 200 "punct ~\n";
    }
}

#测试
[root@nginx ~]# curl www.fy.org/fjw.css
punct ~
[root@nginx ~]# curl www.fy.org/fjw.png
punct ~
[root@nginx ~]# curl www.fy.org/fjw.PNG
punct ~
[root@nginx ~]# curl www.fy.org/fjw
<html>
<head><title>404 Not Found</title></head>
7.示例-检测优先级
bash
[root@nginx ~]# vim /usr/local/nginx/conf.d/vhosts.conf
server {
    listen  80;
    server_name www.fy.org;
    root    /web/html;
    index   index.html;

    location = /test {
        return 200 "=\n";
    }

    location ^~ /test {
        return 200 "^~\n";
    }

    location ~* /test {				#~*与~优先级一致,谁在上面谁优先级就高,区别就是~*区分大小写
        return 200 "~*\n";
    }

    location ~ /test {
        return 200 "~\n";
    }
}
#测试
[root@nginx ~]# curl www.fy.org/test
=
[root@nginx ~]# curl www.fy.org/testa
^~
[root@nginx ~]# curl www.fy.org/a/test
~
[root@nginx ~]# curl www.fy.org/a/TEST
~*
[root@nginx ~]# curl www.fy.org/TEST
~*
补充
bash
#^~ 与 无符号 不能同时存在不然会报错只能存在其一
#由于无符号的前缀匹配优先级最低
server {
    listen  80;
    server_name www.fy.org;
    root    /web/html;
    index   index.html;

    location /test {
        return 200 "haha\n";			#优先级最低
    }

    location = /test {
        return 200 "=\n";
    }

    location ~ /test {
        return 200 "~\n";
    }

    location ~* /test {
        return 200 "~*\n";
    }
}
#测试
[root@nginx ~]# curl www.fy.org/test
=
[root@nginx ~]# curl www.fy.org/testa
~
[root@nginx ~]# curl www.fy.org/Testa
~*
#当把其他location注释后剩下无符号的前缀匹配才能生效
[root@nginx ~]# curl www.fy.org/test
haha
长链接优化
长连接配置一般在主配置文件设置,在http块中设置,设置后子配置文件的全部站点都生效;
参数配置
#默认配置
http {
	#keepalive_timeout  0;			#长连接超时次数,在长连接期间发送三次请求就超时断开
	keepalive_timeout  65;			#长连接超时时间

}
#示例
keepalive_timeout  3;
keepalive_timeout  65 60;
#开启长连接后,显示给客户端的会话保持时间为60s,单次长连接累计请求达到指定次数请求或65秒就会被断开,第二个数字60为发送给客户端应答报文头部中显示的超时时间设置为60s:如不设置客户端将不显示超时时间。
设定长连接时间
bash
#安装测试软件
[root@nginx ~]# dnf install telnet -y

[root@nginx ~]# vim /usr/local/nginx/conf/nginx.conf
keepalive_timeout   5;
[root@Nginx ~]# nginx -s reload

#测试
[root@nginx ~]# telnet www.fjw.org 80
设定超时次数
bash
[root@nginx ~]# vim /usr/local/nginx/conf/nginx.conf
keepalive_requests 3;
keepalive_timeout  65 60;
[root@Nginx ~]# nginx -s reload

#测试
[root@nginx ~]# telnet www.fjw.org 80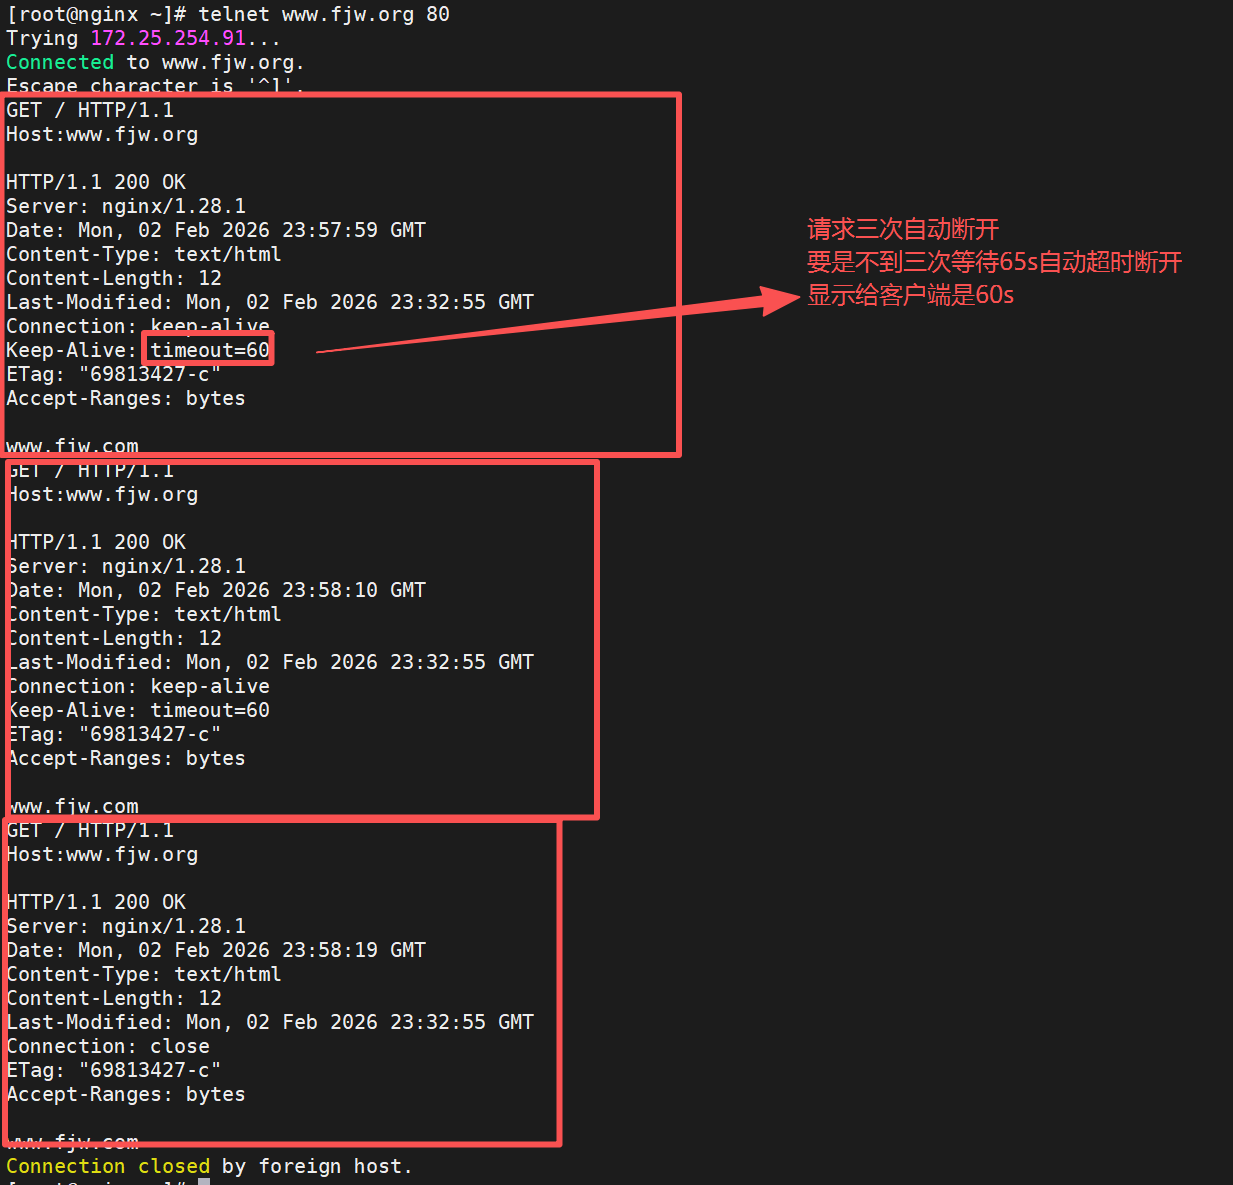
NginxWeb页面账户认证
由 ngx_http_auth_basic_module 模块提供此功能
创建加密信息
bash
#使用不了htpasswd时要下载httpd-tools包
#创建加密信息,-c创建,-m使用md5加密,-b非交互生成
[root@nginx ~]# htpasswd -cmb /usr/local/nginx/.htpasswd fjw fjw
#进行创建后,想要添加用户认证信息不用加-c,-c参数会覆盖
[root@nginx ~]# htpasswd -mb /usr/local/nginx/.htpasswd yyy yyy

[root@nginx ~]# cat /usr/local/nginx/.htpasswd
fjw:$apr1$rYDpBBuw$x701q1axSqvBDgXFV81QM/
yyy:$apr1$OZHKwo15$YKoStu20qFtVls5la9fz50
编辑配置文件
bash
[root@nginx ~]# vim /usr/local/nginx/conf.d/vhosts.conf
server {
    listen 80;
    server_name www.fjwyyy.org;
    root /webdata/nginx/fjwyyy.org/fjw/html;

    location /admin {
        root /usr/local/nginx/html;
        auth_basic "login passwd";
        auth_basic_user_file "/usr/local/nginx/.htpasswd";
    }
}

[root@nginx ~]# systemctl restart nginx.service

[root@nginx ~]# mkdir /usr/local/nginx/html/admin/
[root@nginx ~]# echo admin > /usr/local/nginx/html/admin/index.html
测试
bash
[root@nginx ~]# curl www.fjwyyy.org/admin/
[root@nginx ~]# curl www.fjwyyy.org/admin/ -ufjw:fjw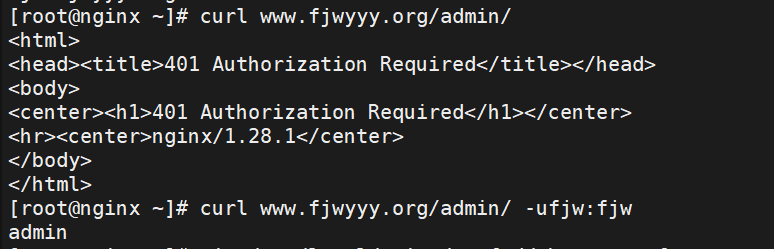
自定义错误页面
生成测试错误页面
bash
[root@nginx ~]# mkdir  /usr/local/nginx/errorpage
[root@nginx ~]# echo "太不巧了,你要访问的页面辞职了!!" > /usr/local/nginx/errorpage/errormessage
编辑配置
bash
[root@nginx ~]# vim /usr/local/nginx/conf.d/vhosts.conf
server {
    listen 80;
    server_name www.fjw.org;
    error_page 404 405 503 502 /error;	#指定location的位置
    location /fjw/ {					#不存在页面
        root /usr/local/nginx/html;
    }

    location /error {
        alias /usr/local/nginx/errorpage/errormessage;
    }
}

#测试
[root@nginx ~]# curl www.fjw.org/fjw/
太不巧了,你要访问的页面辞职了!!
使用root的写法
bash
[root@nginx ~]# vim /usr/local/nginx/conf.d/vhosts.conf
server {
    listen 80;
    server_name www.fjw.org;
    error_page 404 405 503 502 /errorpage/errormessage;
    location /fjw/ {
        root /usr/local/nginx/html;
    }

    location /errorpage/ {
        root /usr/local/nginx/;
    }
}

#效果一致要注意对root与alias的理解
自定义错误日志
编辑配置参数
bash
[root@nginx ~]# mkdir -p /usr/local/nginx/logs/fjw.org/
[root@nginx ~]# vim /usr/local/nginx/conf.d/vhosts.conf
server {
    listen 80;
    server_name www.fjw.org;
    error_page 404 405 503 502 /errorpage/errormessage;
    access_log  logs/fjw.org/fjw.access;	#这里的默认发布目录是主配置文件指定的默认发布目录,相对路径指定日志路径,可加main参数指定日志格式要在主配置文件开启日志格式参数
    error_log   logs/fjw.org/fjw.error error;	#error为日志错误日志级别
    location /fjw/ {
        root /usr/local/nginx/html;
    }

    location /errorpage/ {
        root /usr/local/nginx/;
    }
}

#测试
Nginx的文件检测
- try_files会按顺序检查文件是否存在,返回第一个找到的文件或文件夹(结尾加斜线表示为文件夹),如 果所有文件或文件夹都找不到,会进行一个内部重定向到最后一个参数。
- 只有最后一个参数可以引起一 个内部重定向,之前的参数只设置内部URI的指向。
- 最后一个参数是回退URI且必须存在,否则会出现内 部500错误。
- 一般为最后一个参数创建一个默认页面
创建测试页面
bash
[root@nginx ~]# echo default > /usr/local/nginx/errorpage/default.html编辑参数
bash
[root@nginx ~]# vim /usr/local/nginx/conf.d/vhosts.conf
server {
    listen 80;
    server_name www.fjw.org;
    root /webdata/nginx/fjw.org/fjw/html/;
    error_page 404 405 503 502 /errorpage/errormessage;
    access_log  logs/fjw.org/fjw.access;
    error_log   logs/fjw.org/fjw.error error;
    try_files $uri $uri.html $uri/index.html /errorpage/default.html; #如果都不存在就看default.html,而不是跳转到错误页面

    location /errorpage/ {
        root /usr/local/nginx/;
    }
}

#测试
#随便访问不存在的路径不是跳转错误页面了
[root@nginx ~]# curl www.fjw.org/fjw
default
[root@nginx ~]# curl www.fjw.org/abcadad
default
Nginx中建立下载服务器
生成测试文件
bash
[root@nginx ~]# mkdir  -p /usr/local/nginx/download
[root@nginx ~]# cp /etc/passwd  /usr/local/nginx/download/
[root@nginx ~]# dd if=/dev/zero of=/usr/local/nginx/download/bigfile bs=1M count=100
编辑配置参数
bash
[root@nginx ~]# cat /usr/local/nginx/conf.d/vhosts.conf
server {
        listen 80;
        server_name www.fjw.org;
        root /webdata/nginx/fjw.org/fjw/html/;
        error_page 404 405 503 502 /errorpage/errormessage;
        access_log  logs/fjw.org/fjw.access;
        error_log       logs/fjw.org/fjw.error error;
        try_files $uri $uri.html $uri/index.html /errorpage/default.html;

        location /errorpage/ {
                root /usr/local/nginx/;
        }

        location /download {
                root /usr/local/nginx;
        }
}
访问
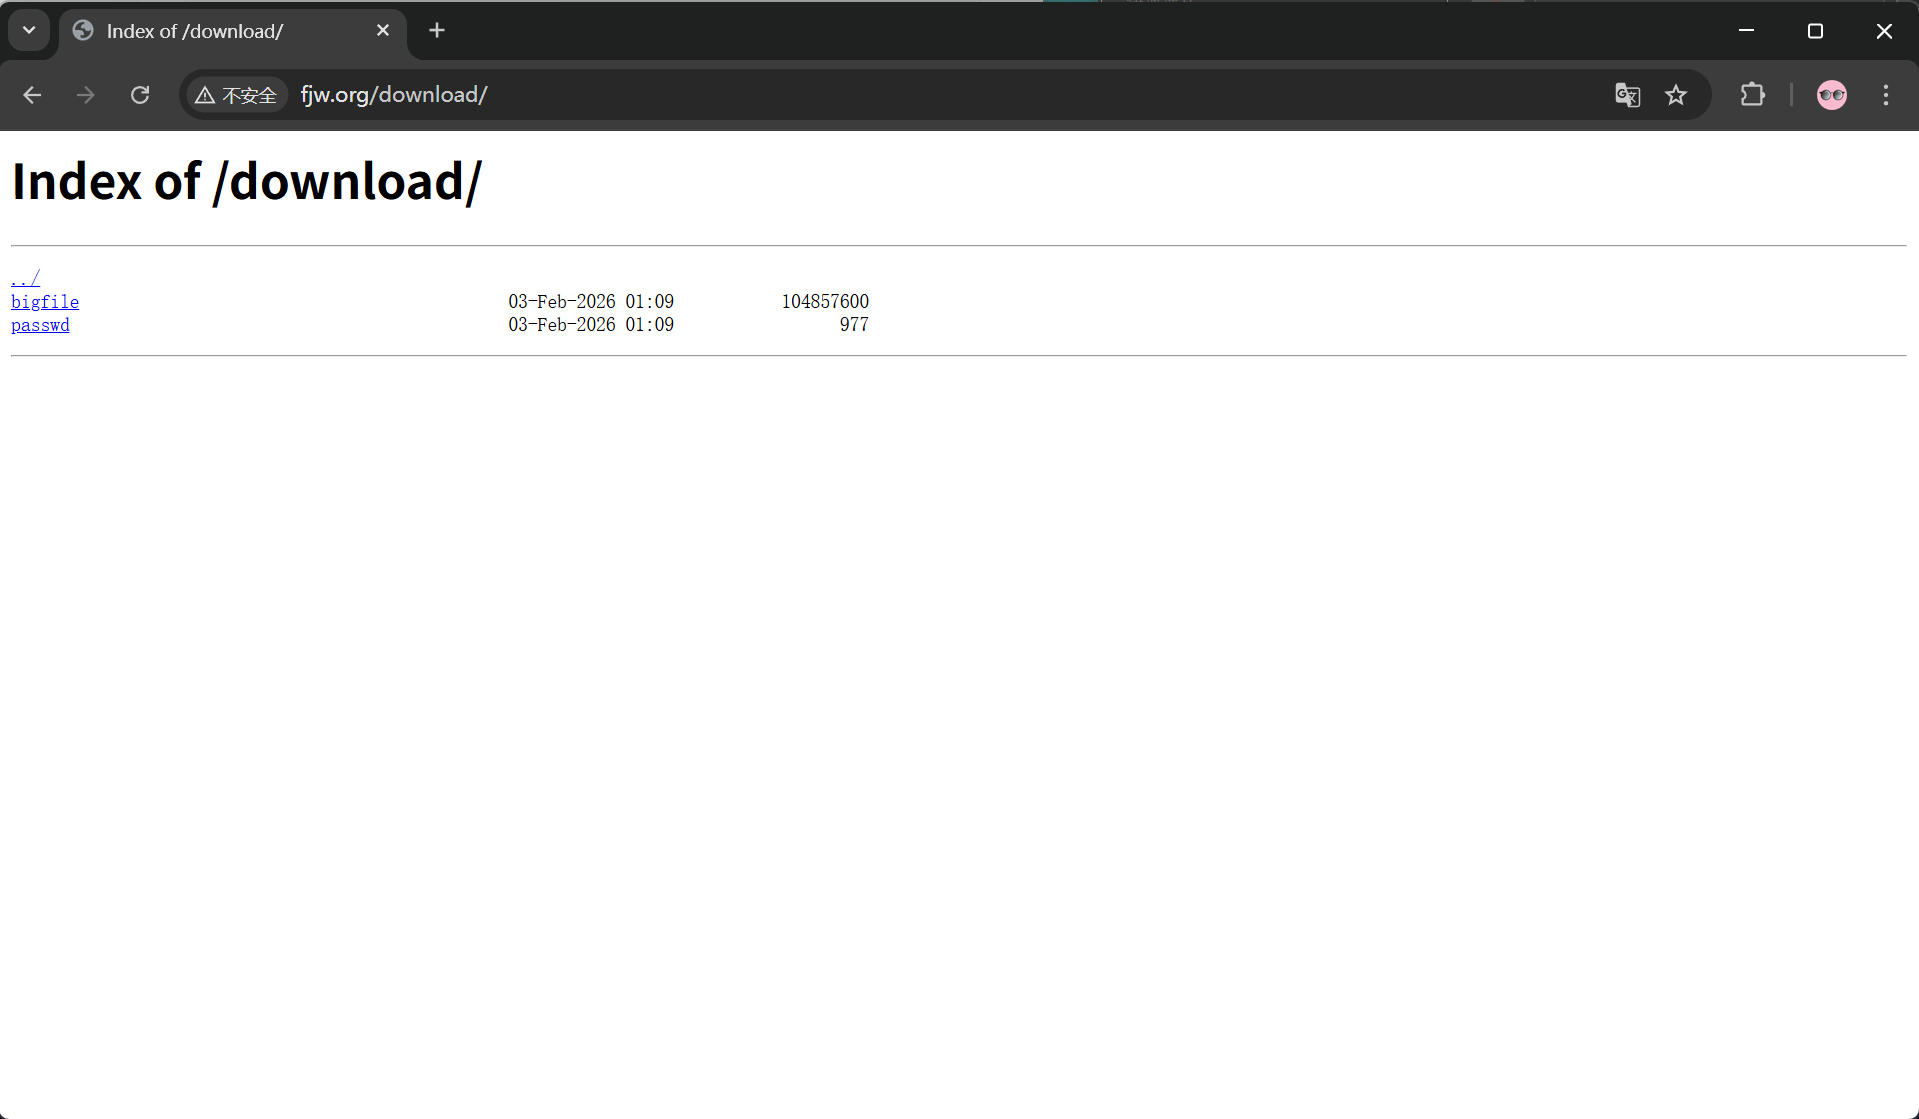
开启列表功能
bash
[root@nginx ~]# vim /usr/local/nginx/conf.d/vhosts.conf
......
	location /download {
        root /usr/local/nginx;
        autoindex on;
        #开启自动索引功能,由于没默认发布文件,要想作为下载服务器就要自动索引存在的文件便于显示
    }
......
再次访问
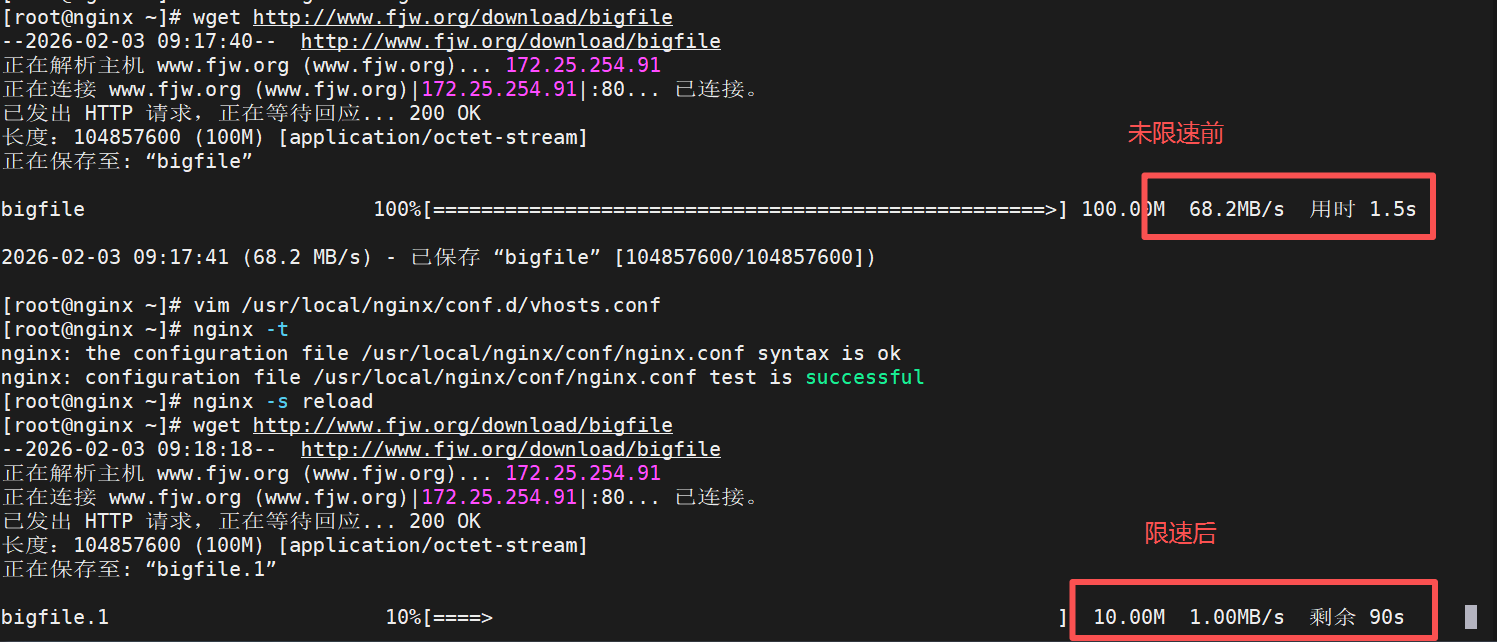
下载控速配置
bash
[root@nginx ~]# vim /usr/local/nginx/conf.d/vhosts.conf
......
location /download {
        root /usr/local/nginx;
        autoindex on;
        limit_rate 1024k; #限制下载速度/s,默认不限速
    }
......
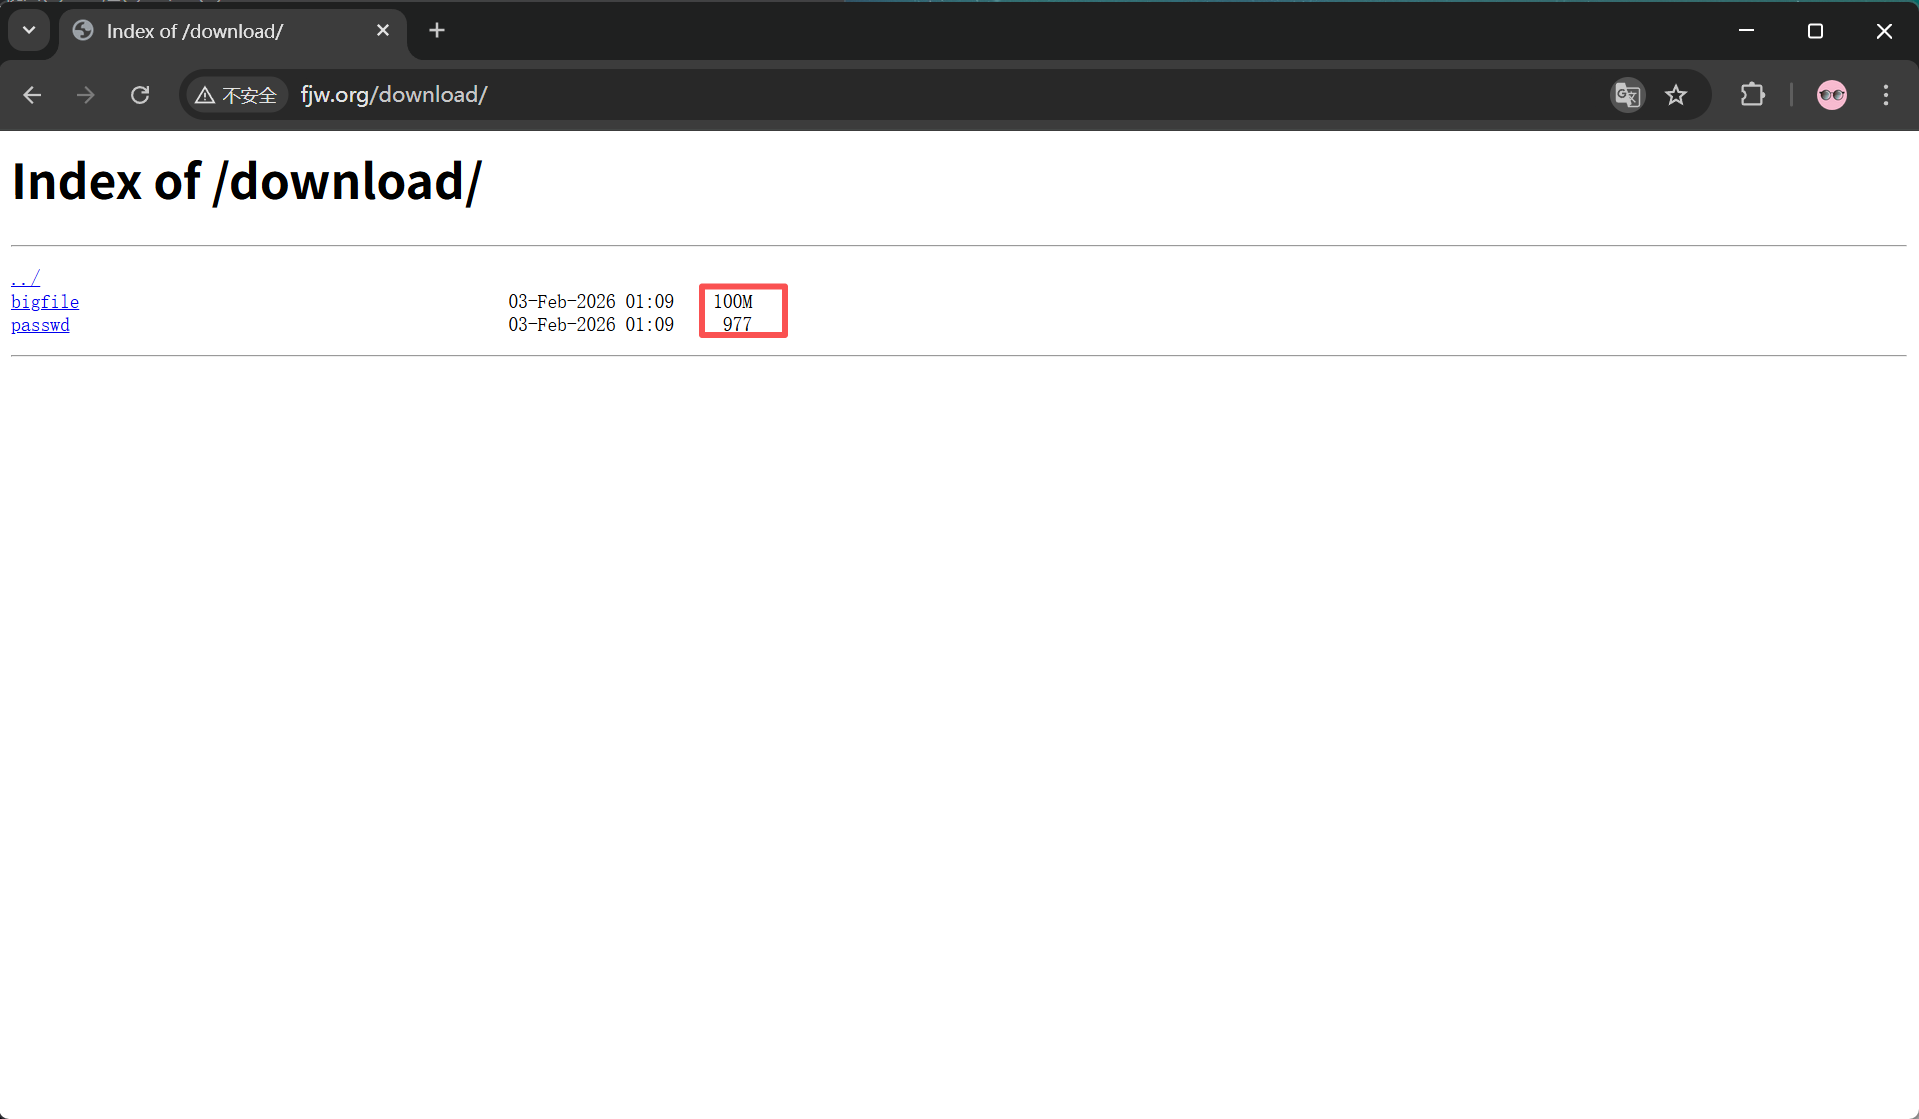
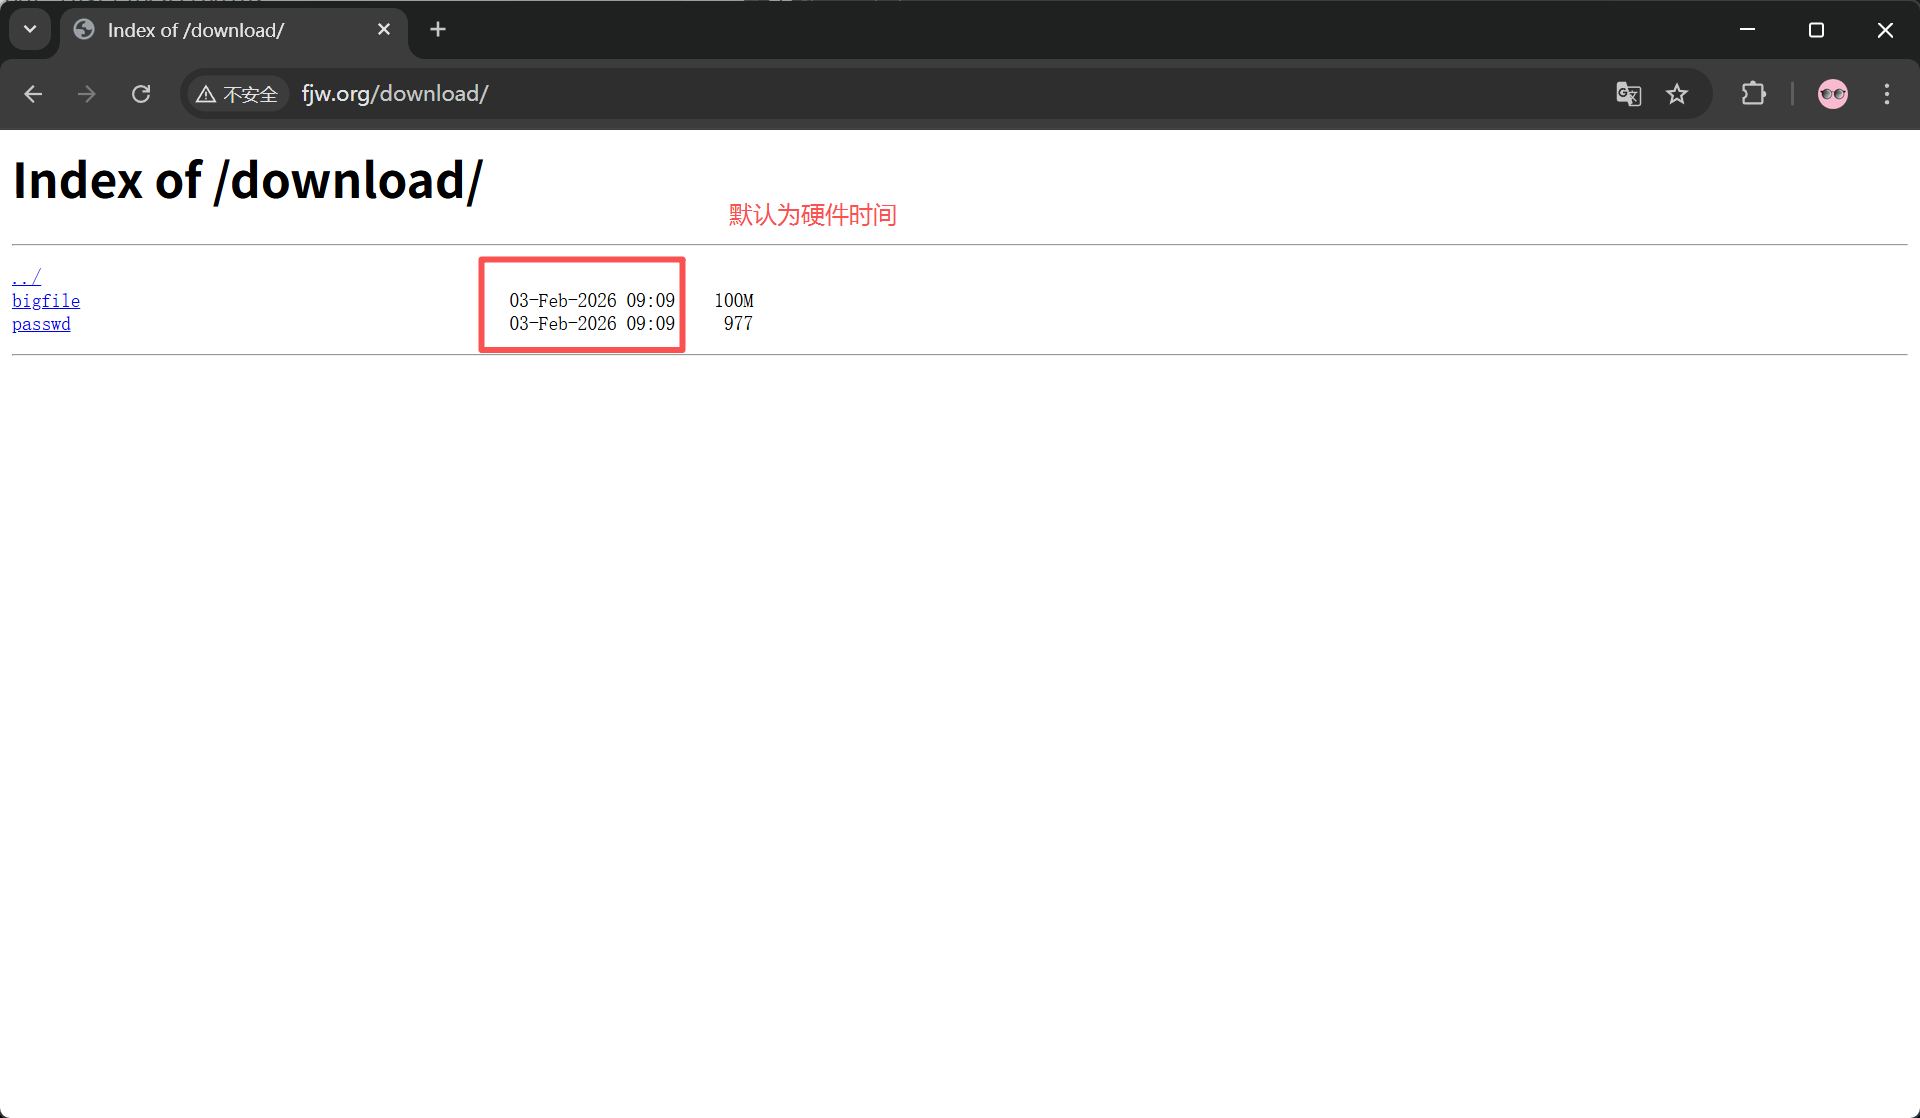
显示文件大小优化
bash
[root@nginx ~]# vim /usr/local/nginx/conf.d/vhosts.conf
......
location /download {
        root /usr/local/nginx;
        autoindex on;
        limit_rate 1024k;
        autoindex_exact_size off;	#计算文件确切大小,off为显示大概大小(kb,mb,gb)
    }
......
时间显示调整
bash
[root@nginx ~]# vim /usr/local/nginx/conf.d/vhosts.conf
......
location /download {
        root /usr/local/nginx;
        autoindex on;
        limit_rate 1024k;
        autoindex_exact_size off;
        autoindex_localtime on;		#on显示本机时间而不是格林威治时间
    }
......
设定页面风格
bash
[root@nginx ~]# vim /usr/local/nginx/conf.d/vhosts.conf
......
location /download {
        root /usr/local/nginx;
        autoindex on;
        limit_rate 1024k;
        autoindex_exact_size off;
        autoindex_localtime on;
        autoindex_format html | xml | json | jsonp;	#设置网页显示风格,指定一种显示风格
    }
......
xml风格

json风格

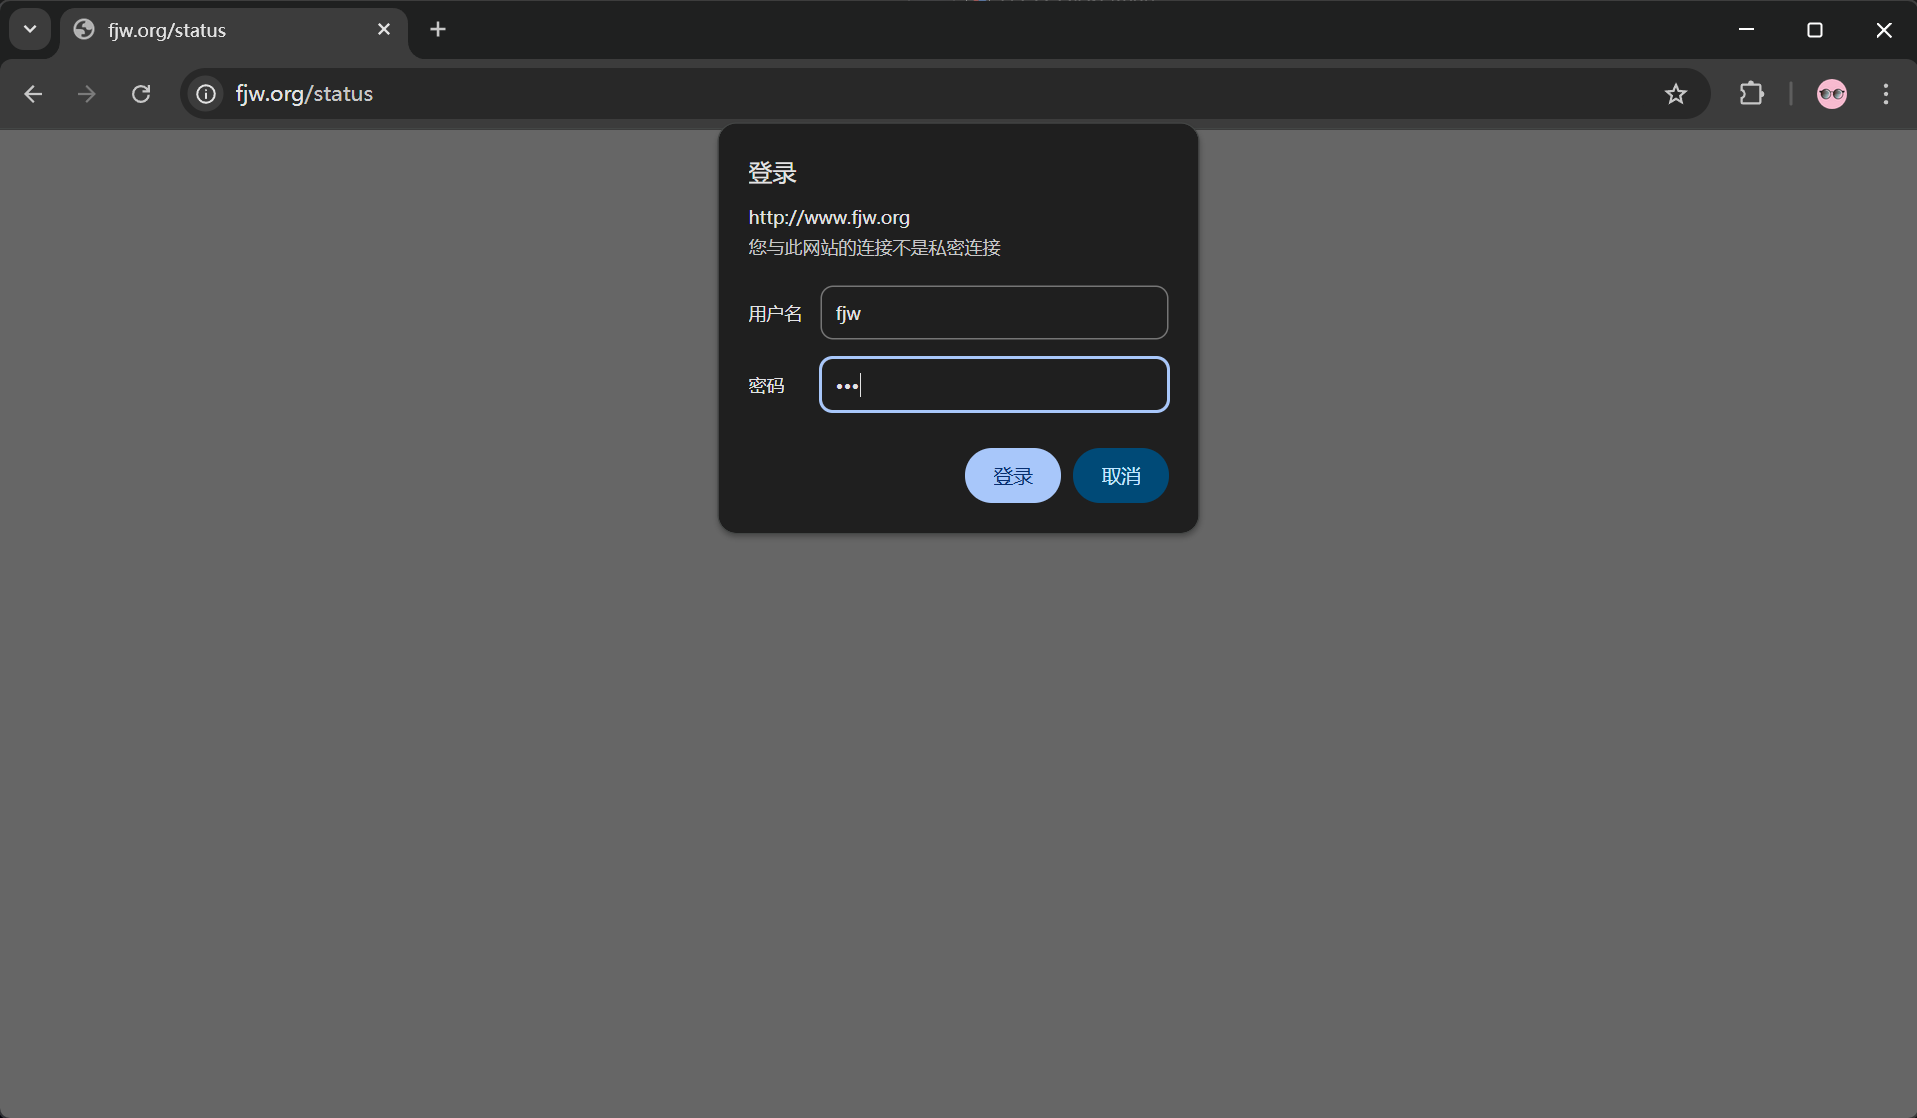
Nginx的状态页

bash
#建议创建认证用户来访问,一般状态页要认证才能查看不是所有人都能看
[root@nginx ~]# htpasswd -cmb /usr/local/nginx/.htpasswd fjw fjw

[root@nginx ~]# vim /usr/local/nginx/conf.d/vhosts.conf
server {
    listen 80;
    server_name www.fjw.org;

    location /status {
        stub_status;		#开启状态页功能
        auth_basic "status page";
        auth_basic_user_file "/usr/local/nginx/.htpasswd";
        allow 172.25.254.0/24;
        deny all;
    }
}

[root@nginx ~]# nginx -t
[root@nginx ~]# nginx -s reload
在访问浏览器测试
状态页面
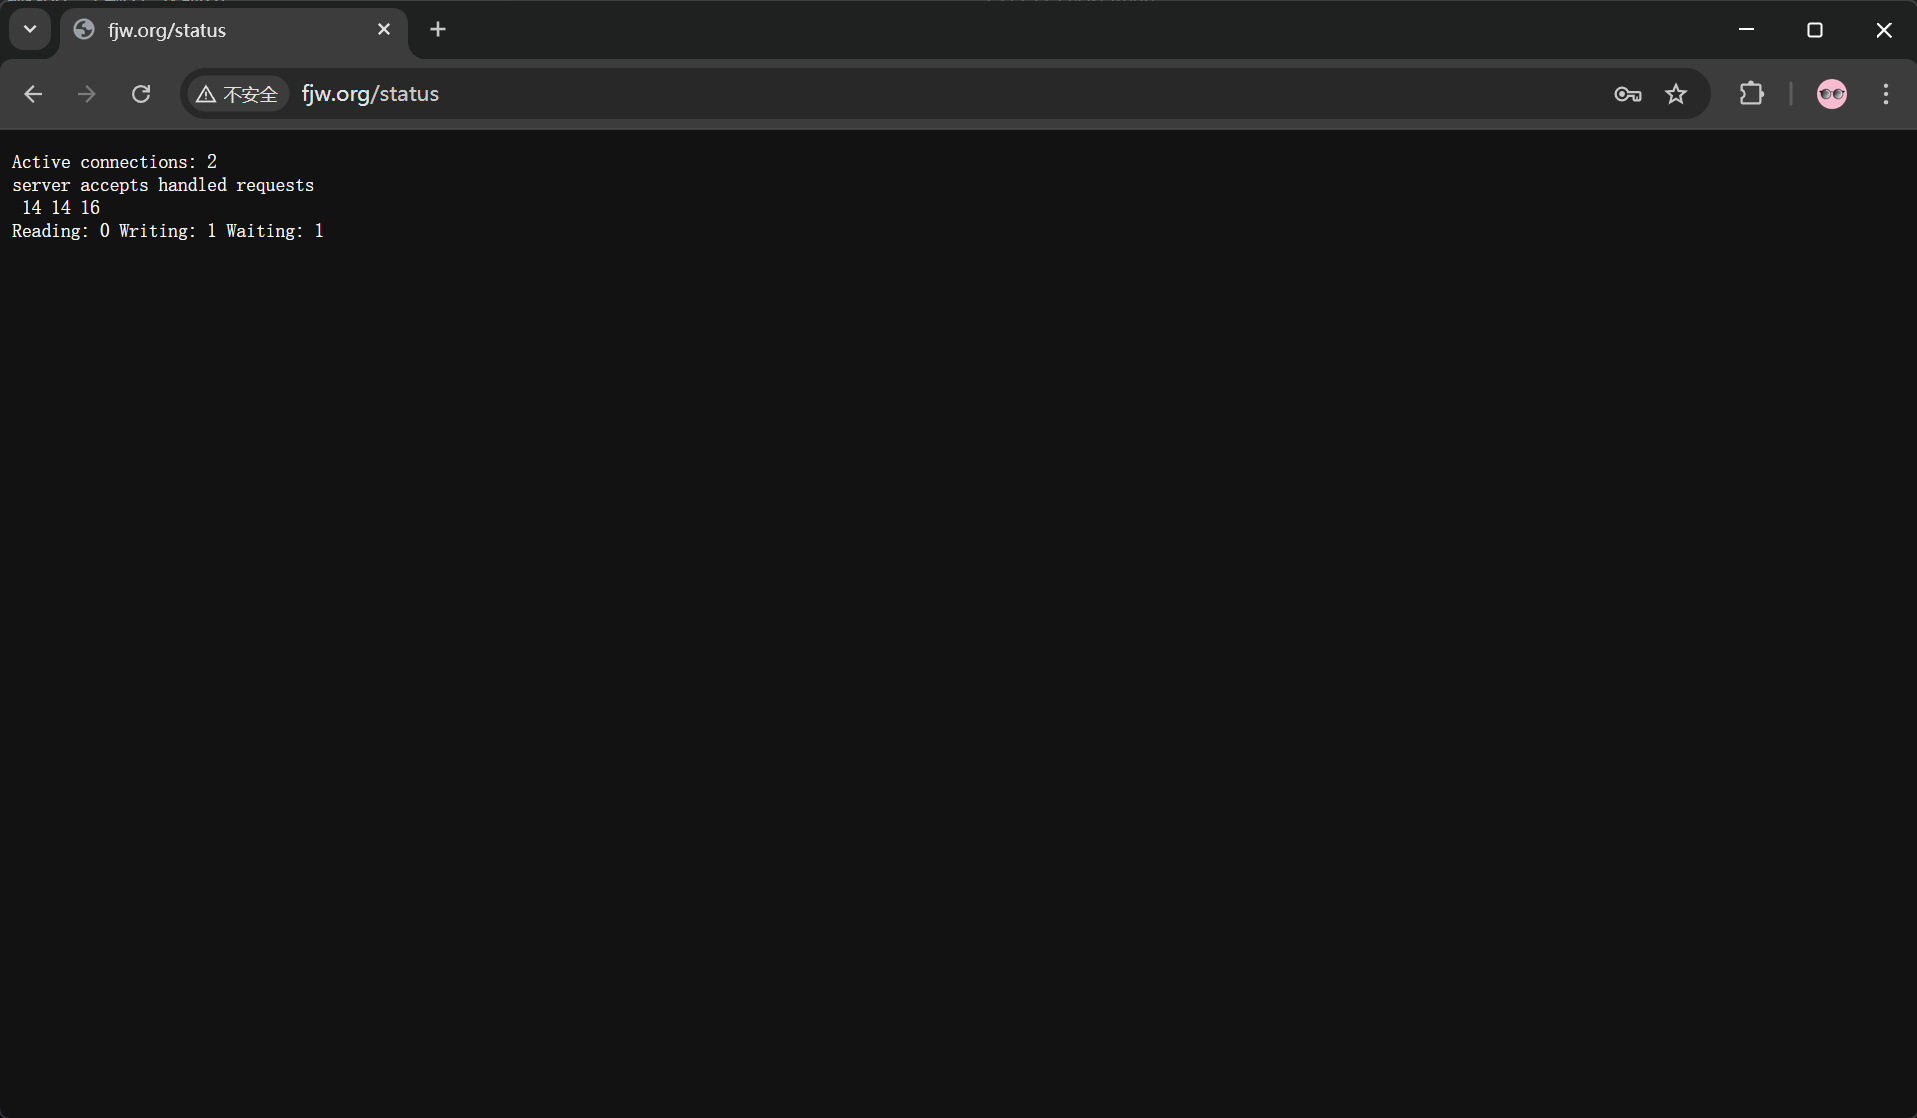
bash
#状态页信息参数
Active connections: 	#当前处于活动状态的客户端连接数
						#包括连接等待空闲连接数=reading+writing+waiting

accepts:			    #统计总值,Nginx自启动后已经接受的客户端请求连接的总数。

handled:				#统计总值,Nginx自启动后已经处理完成的客户端请求连接总数
						#通常等于accepts,除非有因worker_connections限制等被拒绝的连接

requests:				#统计总值,Nginx自启动后客户端发来的总的请求数

Reading:				#当前状态,正在读取客户端请求报文首部的连接的连接数
						#数值越大,说明排队现象严重,性能不足

Writing:				#当前状态,正在向客户端发送响应报文过程中的连接数,数值越大,说明访问量很大

Waiting: 				#当前状态,正在等待客户端发出请求的空闲连接数开启 keep-alive的情况下,这个值等于active -- (reading+writing)
Nginx的压缩功能
Nginx支持对指定类型的文件进行压缩然后再传输给客户端,而且压缩还可以设置压缩比例,压缩后的文 件大小将比源文件显著变小,样有助于降低出口带宽的利用率,降低企业的IT支出,不过会占用相 应的CPU资源。
Nginx对文件的压缩功能是依赖于模块 ngx_http_gzip_module,默认是内置模块。
配置参数如下
#启用或禁用gzip压缩,默认关闭
gzip on | off;

#压缩比由低到高从1到9,默认为1,值越高压缩后文件越小,但是消耗cpu比较高。基本设定未4或者5
gzip_comp_level 4;

#禁用IE6 gzip功能,早期的IE6之前的版本不支持压缩
gzip_disable "MSIE [1-6]\.";

#gzip压缩的最小文件,小于设置值的文件将不会压缩
gzip_min_length 1k;

#启用压缩功能时,协议的最小版本,默认HTTP/1.1
gzip_http_version 1.0 | 1.1;

#指定Nginx服务需要向服务器申请的缓存空间的个数和大小,平台不同,默认:32 4k或者16 8k;
gzip_buffers number size;

#指明仅对哪些类型的资源执行压缩操作;默认为gzip_types text/html,不用显示指定,否则出错
gzip_types mime-type ...;

#如果启用压缩,是否在响应报文首部插入"Vary: Accept-Encoding",一般建议打开
gzip_vary on | off;

#预压缩,即直接从磁盘找到对应文件的gz后缀的式的压缩文件返回给用户,无需消耗服务器CPU
#注意: 来自于ngx_http_gzip_static_module模块
gzip_static on | off;
生成测试文件
bash
[root@nginx ~]# echo smallfile > /usr/local/nginx/html/small.html
[root@nginx ~]# cp /usr/local/nginx/logs/access.log /usr/local/nginx/html/bigfile.txt		#大文件后缀为txt才能被识别
开启压缩功能
bash
[root@nginx ~]# vim /usr/local/nginx/conf/nginx.conf
......
	gzip  on;
    gzip_comp_level 4;
    gzip_disable "MSIE [1-6]\.";
    gzip_min_length 1024k;
    gzip_buffers 32 1024k;
    gzip_types text/plain application/javascript application/x-javascript text/css  application/xml text/javascript application/x-httpd-php image/gif image/png;
    gzip_vary on;
    gzip_static on;
......

[root@nginx ~]# nginx -t
[root@nginx ~]# nginx -s reload

#做好主机的解析
[root@nginx ~]# vim /etc/hosts
测试
bash
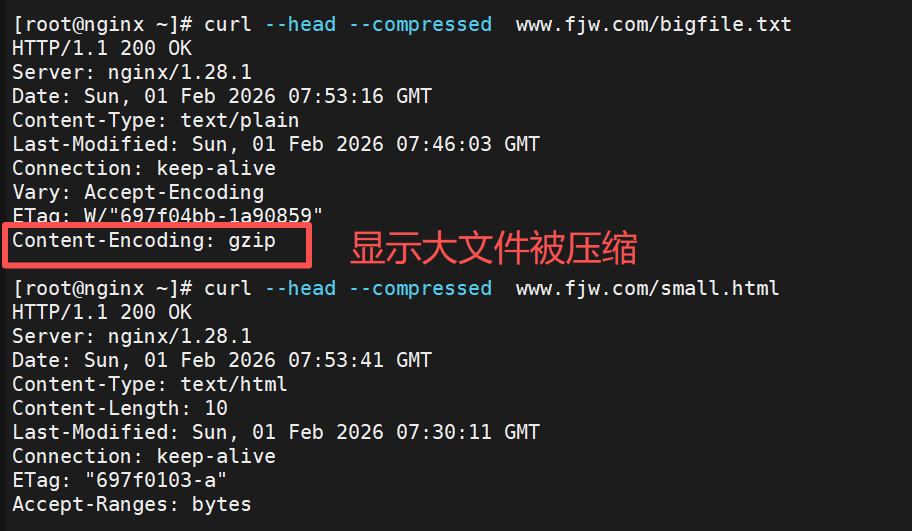
#--head 仅获取响应头,不下载正文	--compressed告知服务器可接受压缩格式的响应
[root@nginx ~]# curl --head --compressed  www.fjw.com/bigfile.txt
[root@nginx ~]# curl --head --compressed  www.fjw.com/small.html