使用神经模型和 Elasticsearch inference API 改善 Hebrew、 German、 Arabic 以及其他形态复杂语言的搜索。
Elasticsearch 与业界领先的 Gen AI 工具和提供商具有原生集成。查看我们关于超越 RAG 基础的网络研讨会,或使用 Elastic 向量数据库构建可用于生产的应用。
为了为你的使用场景构建最佳搜索解决方案,现在就开始免费的 cloud 试用,或在本地机器上试用 Elastic。
如果你处理的是 English 搜索,标准的文本分析通常就能正常工作。你索引 "running",分析器会去掉后缀并存储为 "run",用户搜索 "run" 就能找到该文档。很简单。
但如果你处理的是 Hebrew、 Arabic、 German 或 Polish 等语言,你就会知道标准的基于规则的分析器往往会失败。它们要么分析不足(错过相关匹配),要么过度分析(返回无用结果)。
 在形态复杂语言中搜索 "A black and white carpet/一块黑白地毯" 时出现错误结果。(照片来自 Unsplash,摄影师 yaed。)
多年来,我们不得不依赖复杂的词典和脆弱的正则规则。今天,我们可以做得更好。通过用用于文本分析的神经模型(小型、高效、能够理解上下文的语言模型)替代基于规则的逻辑,我们可以大幅提升搜索质量。
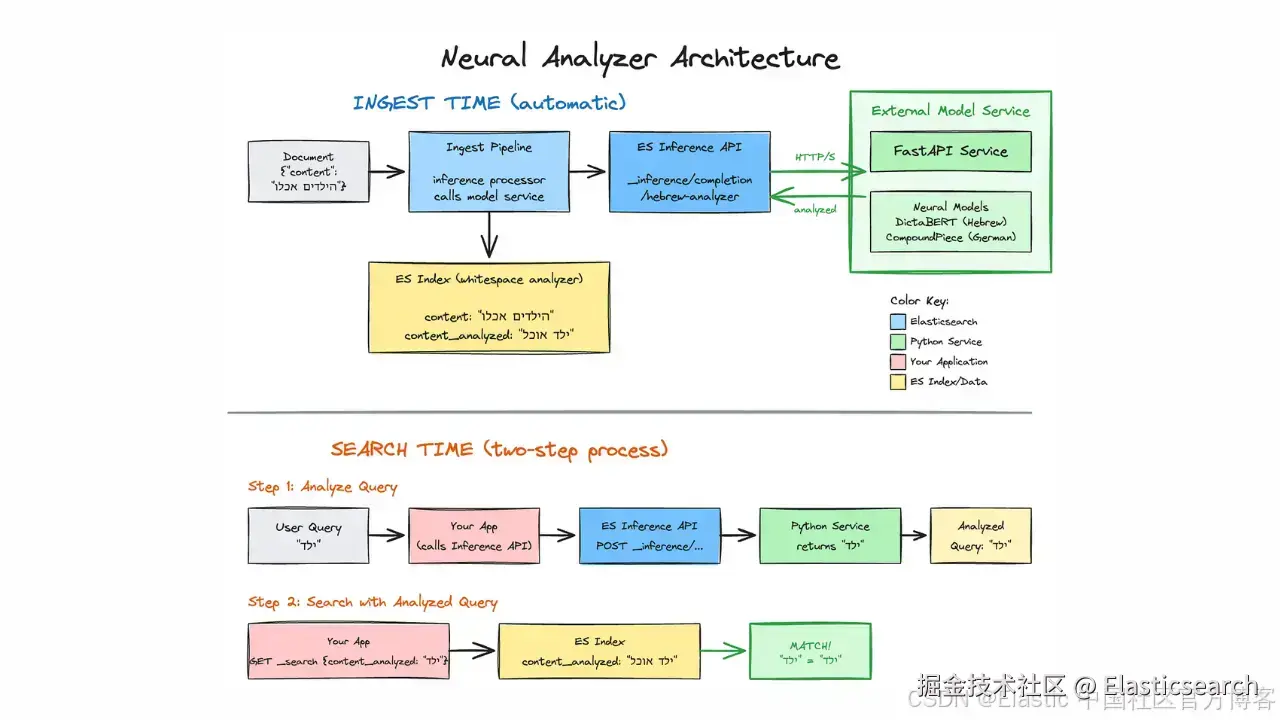
下面介绍如何使用 Elasticsearch inference API 和自定义模型服务来解决形态学挑战。
问题:为什么规则会失败
大多数标准分析器都是无上下文的。它们一次只看一个词,并应用一组静态规则。
- 算法分析器(如 Snowball)基于模式去除后缀。
- 词典分析器(如 Hunspell)在词表中查找单词。
当一个词的结构(词根和词缀)会根据所在句子而变化时,这种方法就会失效。
1)闪米特语歧义(词根与前缀)
像 Hebrew 和 Arabic 这样的闪米特语是建立在词根系统上的,并且经常将介词(如 in、to 或 from)直接附加到词上。这会产生基于规则的系统无法解决的歧义 token。
- 单词: בצל (B-Tz-L)
- 上下文 A:"The soup tastes better with onion (batzal)."
- 上下文 B:"We sat in the shadow (ba-tzel) of the tree."
在上下文 A 中, בצל 是名词(onion)。在上下文 B 中,它是介词 ב (in) 附加在名词 צל (shadow) 上。
标准分析器被迫猜测。如果它激进地去掉 ב 前缀,就会把 "onion" 变成 "shadow"。如果它保守地保留前缀,用户搜索 "shadow" (tzel) 就找不到包含 "in the shadow" (batzel) 的文档。神经模型通过读取句子判断 ב 是词根的一部分还是独立的介词,从而解决了这个问题。
2)复合词问题(German、Dutch 等)
像 German、 Dutch、 Swedish 和 Finnish 等语言将名词无空格连接形成新概念。这导致理论上无限的词汇量。要有效搜索,必须将这些词拆分(decompound)。
- 单词: Wachstube
- 拆分 A:Wach (guard) + Stube (room) = guardroom
- 拆分 B:Wachs (wax) + Tube (tube) = wax tube
基于词典的拆分器是盲目的。如果 "Wach" 和 "Wachs" 都在词典中,它可能选错拆分,从而污染索引,产生无关 token。
用 English 举例:一个天真的算法可能把 "carpet" 拆成 "car" + "pet"。在不了解含义的情况下,规则就会失败。
 Photo by Bob Brewer on Unsplash.
解决方案:"Neural analyzers"(用于文本分析的神经模型)
我们不需要放弃倒排索引。我们只需要提供更好的 token。
不使用正则规则,而是使用神经模型(如 BERT 或 T5)来进行分析。因为这些模型经过大规模数据集训练,它们能够理解上下文。它们会查看周围的词来判断 בצל 是 "onion" 还是 "in shadow",或者 Wachstube 属于军事还是化妆品语境。
架构:inference sidecar
我们可以使用 inference API 将这些基于 Python 的模型直接集成到 Elasticsearch 的 ingestion 流水线中。
模式:
- External model service:一个简单的 Python 服务(例如 FastAPI)托管模型。
- Elasticsearch inference API:在 Elasticsearch 中将此服务定义为自定义模型。
- Ingest pipeline :将文本发送到 inference processor,由它调用你的 Python 服务。
- Index mapping:为分析后的文本创建一个 whitespace 目标字段。
- Indexing:服务返回清理后的文本,Elasticsearch 将其存储在目标字段中。
- Search:查询在匹配之前通过 inference API 进行分析。
实现指南
让我们为 Hebrew(使用 DictaBERT)和 German(使用 CompoundPiece)构建这个方案。
要跟随操作,你需要:
- Python 3.10+。
- Elasticsearch 8.9.x+。
- 安装 Python 依赖:
go
`pip3 install fastapi uvicorn torch transformers`AI写代码步骤 1:外部模型服务
要将 Elasticsearch 连接到我们的神经模型,我们需要一个简单的 API 服务,它可以:
- 接收来自 Elasticsearch inference API 的文本。
- 将文本传入神经模型进行处理。
- 返回 Elasticsearch 可理解的分析文本。
该服务将 Elasticsearch 与神经模型连接。在索引时,Elasticsearch 管道调用此 API 来分析并存储文档字段;在搜索时,应用程序调用它来处理用户查询。你可以将其部署在任意基础设施上,包括 EC2、Lambda 或 SageMaker。
下面的代码在启动时加载两个模型,并暴露 /analyze/hebrew 和 /analyze/german 端点:
python
`
1. from fastapi import FastAPI, HTTPException
2. from pydantic import BaseModel
3. from typing import List, Union
4. from transformers import AutoTokenizer, AutoModel, AutoModelForSeq2SeqLM
5. from contextlib import asynccontextmanager
6. import torch
8. # Global models (loaded once at startup)
9. he_model = None
10. he_tokenizer = None
11. de_model = None
12. de_tokenizer = None
15. @asynccontextmanager
16. async def lifespan(app: FastAPI):
17. """Load models at startup."""
18. global he_model, he_tokenizer, de_model, de_tokenizer
20. print("Loading Hebrew model (DictaBERT-Lex)...")
21. he_tokenizer = AutoTokenizer.from_pretrained("dicta-il/dictabert-lex")
22. he_model = AutoModel.from_pretrained("dicta-il/dictabert-lex", trust_remote_code=True)
23. he_model.eval()
25. print("Loading German model (CompoundPiece)...")
26. de_tokenizer = AutoTokenizer.from_pretrained("benjamin/compoundpiece")
27. de_model = AutoModelForSeq2SeqLM.from_pretrained("benjamin/compoundpiece")
29. if torch.cuda.is_available():
30. he_model.to("cuda")
31. de_model.to("cuda")
33. print("Models loaded successfully!")
34. yield
35. print("Shutting down...")
38. app = FastAPI(
39. title="Neural Text Analyzer",
40. description="Multi-language text normalization service",
41. version="1.0.0",
42. lifespan=lifespan
43. )
46. class InferenceRequest(BaseModel):
47. """ES Inference API sends: {"input": ["text1", "text2"]} or {"input": "text"}"""
48. input: Union[str, List[str]]
51. def format_response(normalized_text: str) -> dict:
52. """
53. Normalize output to OpenAI-compatible format for ES Inference API.
54. ES extracts: $.choices[*].message.content You do not need to stick
55. with the OpenAI output format.
56. Using it here for consistency reasons, since using the completions API.
57. """
58. return {
59. "choices": [
60. {"message": {"content": normalized_text}}
61. ]
62. }
65. @app.post("/analyze/hebrew")
66. async def analyze_hebrew(request: InferenceRequest):
67. """Hebrew lemmatization using DictaBERT-Lex."""
68. global he_model, he_tokenizer
70. if he_model is None:
71. raise HTTPException(status_code=503, detail="Model not loaded")
73. # Handle input (can be string or list)
74. if isinstance(request.input, str):
75. texts = [request.input]
76. else:
77. texts = request.input
79. # Run prediction
80. with torch.no_grad():
81. results = he_model.predict(texts, he_tokenizer)
83. # results format: [[[word, lemma], [word, lemma], ...]]
84. if results and results[0]:
85. lemmas = []
86. for word, lemma in results[0]:
87. if lemma == '[BLANK]':
88. lemma = word
89. lemmas.append(lemma)
90. normalized = " ".join(lemmas)
91. else:
92. normalized = ""
94. return format_response(normalized)
97. @app.post("/analyze/german")
98. async def analyze_german(request: InferenceRequest):
99. """German decompounding using CompoundPiece (supports 56 languages)."""
100. global de_model, de_tokenizer
102. if de_model is None:
103. raise HTTPException(status_code=503, detail="Model not loaded")
105. # Handle input
106. if isinstance(request.input, str):
107. text = request.input
108. else:
109. text = request.input[0] if request.input else ""
111. # Format: "de: <word>" for German
112. input_text = f"de: {text}"
114. inputs = de_tokenizer(input_text, return_tensors="pt")
115. if torch.cuda.is_available():
116. inputs = {k: v.to("cuda") for k, v in inputs.items()}
118. with torch.no_grad():
119. outputs = de_model.generate(**inputs, max_length=128)
121. # IMPORTANT: decode outputs[0], not outputs
122. result = de_tokenizer.decode(outputs[0], skip_special_tokens=True)
124. # Clean up: "de: Donau-Dampf-Schiff" -> "Donau Dampf Schiff"
125. # Note: model returns "de: " (with space after colon)
126. if result.startswith("de: "):
127. clean_result = result[4:].replace("-", " ")
128. elif result.startswith("de:-"):
129. clean_result = result[4:].replace("-", " ")
130. elif result.startswith("de:"):
131. clean_result = result[3:].replace("-", " ")
132. else:
133. clean_result = result.replace("-", " ")
135. return format_response(clean_result.strip())
138. @app.get("/health")
139. async def health():
140. return {"status": "healthy"}
`AI写代码收起代码块将上面的代码保存到一个文件(例如 analyzer_service.py),然后运行:
go
`python3 -m uvicorn analyzer_service:app --port 8000`AI写代码等待 "Models loaded successfully!"(首次运行下载模型大约需要 30--60 秒)。
本地测试:
bash
`

1.  #Hebrew
2.  curl -X POST http://localhost:8000/analyze/hebrew \
3.   -H "Content-Type: application/json" \
4.   -d '{"input": "הילדים אכלו גלידה בגינה"}'

`AI写代码
bash
`

1.  #German
2.  curl -X POST http://localhost:8000/analyze/german \
3.   -H "Content-Type: application/json" \
4.   -d '{"input": "Donaudampfschifffahrt"}'

`AI写代码
预期输出:
css
``

1.  - Hebrew: `{"choices":[{"message":{"content":"ילד אוכל גלידה גינה"}}]}`
2.  - German: `{"choices":[{"message":{"content":"Donau Dampf Schiff Fahrt"}}]}`

``AI写代码
第 2 步:配置 Elasticsearch inference API
我们将使用自定义 inference endpoint。这允许我们定义 Elasticsearch 如何与我们的 Python endpoint 通信。
注意 :使用 response.json_parser 从标准化的 JSON 结构中提取内容。你不需要遵循 OpenAI 的输出格式。这里使用它仅是为了保持一致性,因为我们使用的是 completion 任务类型,即 text to text。
暴露本地服务
为了测试,我们将使用 ngrok 将本地 Python 服务暴露到互联网。这允许任何 Elasticsearch 部署(自托管、Elastic Cloud 或 Elastic Cloud Serverless)访问你的服务。
安装并运行 ngrok:
java
`

1.  # Install ngrok (macOS) (Or download from https://ngrok.com/download)
2.  brew install ngrok

`AI写代码
暴露你的本地服务:
go
`ngrok http 8000`AI写代码ngrok 会显示一个转发 URL,如:
Forwarding abc123.ngrok.io -> http://localhost:8000
复制这个 HTTPS URL,你将在 Elasticsearch 配置中使用它。
配置 inference 端点
bash
`1. PUT _inference/completion/hebrew-analyzer
2. {
3. "service": "custom",
4. "service_settings": {
5. "url": "https://abc123.ngrok.io/analyze/hebrew",
6. "headers": {
7. "Content-Type": "application/json"
8. },
9. "request": "{\"input\": ${input}}",
10. "response": {
11. "json_parser": {
12. "completion_result": "$.choices[*].message.content"
13. }
14. }
15. }
16. }`AI写代码将 abc123.ngrok.io 替换为你实际的 ngrok URL。
注意:这里使用 ngrok 仅用于快速测试和开发。免费版有请求限制,并且 URL 重启后会变化。生产环境中,应将服务部署到持久的基础设施上。
生产环境(使用 API Gateway)
在生产环境中,将 Python 服务部署到安全、持久的端点(例如 AWS API Gateway + Lambda、EC2、ECS 或其他云服务)。使用 secret_parameters 安全存储 API key。
bash
`1. PUT _inference/completion/hebrew-analyzer
2. {
3. "service": "custom",
4. "service_settings": {
5. "url": "https://your-api-gateway.execute-api.region.amazonaws.com/prod/analyze/hebrew",
6. "headers": {
7. "x-api-key": "${api_key}",
8. "Content-Type": "application/json"
9. },
10. "secret_parameters": {
11. "api_key": "YOUR-API-KEY"
12. },
13. "request": "{\"input\": ${input}}",
14. "response": {
15. "json_parser": {
16. "completion_result": "$.choices[*].message.content"
17. }
18. }
19. }
20. }`AI写代码步骤 3:Ingest pipeline
创建一个 pipeline,将原始文本字段传递给我们的 model,并将结果存储到一个新字段中。
bash
`
1. PUT _ingest/pipeline/hebrew_analysis_pipeline
2. {
3. "description": "Lemmatizes Hebrew text using a custom inference endpoint",
4. "processors": [
5. {
6. "inference": {
7. "model_id": "hebrew-analyzer",
8. "input_output": {
9. "input_field": "content",
10. "output_field": "content_analyzed"
11. }
12. }
13. }
14. ]
15. }
`AI写代码步骤 4:Index mapping
这是最关键的一步。我们的 neural model 输出已经经过分析,我们不希望标准 analyzer 再次破坏它。我们使用 whitespace analyzer 来简单地对接收到的文本进行 tokenization。
bash
`
1. PUT /my-hebrew-index
2. {
3. "mappings": {
4. "properties": {
5. "content": {
6. "type": "text",
7. "analyzer": "standard"
8. },
9. "content_analyzed": {
10. "type": "text",
11. "analyzer": "whitespace"
12. }
13. }
14. }
15. }
`AI写代码步骤 5:Indexing
选项 A:单个 document
bash
`

1.  POST /my-hebrew-index/_doc?pipeline=hebrew_analysis_pipeline
2.  {
3.  "content": "הילדים אכלו גלידה בגינה"
4.  }

`AI写代码
选项 B:重新索引已有数据
如果你在另一个 index 中已有数据,可以通过 pipeline 重新索引:
bash
`
1. POST _reindex
2. {
3. "source": {
4. "index": "my-old-index"
5. },
6. "dest": {
7. "index": "my-hebrew-index",
8. "pipeline": "hebrew_analysis_pipeline"
9. }
10. }
`AI写代码选项 C:为 index 设置默认 pipeline。
让所有未来文档自动使用该 pipeline:
bash
`

1.  PUT /my-hebrew-index/_settings
2.  {
3.  "index.default_pipeline": "hebrew_analysis_pipeline"
4.  }

`AI写代码
然后正常索引(不需要 ?pipeline=):
bash
`

1.  POST /my-hebrew-index/_doc
2.  {
3.  "content": "הילדים אכלו גלידה בגינה"
4.  }

`AI写代码
步骤 6:搜索
在 Elasticsearch 中使用神经分析器搜索是一个两步过程,首先使用 inference API 分析查询,然后使用结果进行搜索:
A. 分析查询
bash
 `1.   POST _inference/completion/hebrew-analyzer
2.   {
3.     "input": "הילדים אכלו גלידה בגינה"
4.   }`AI写代码
B. 使用分析结果进行搜索
bash
 `1.   GET /my-hebrew-index/_search
2.   {
3.     "query": {
4.       "match": {
5.         "content_analyzed": "ילד אוכל גלידה גינה"
6.       }
7.     }
8.   }`AI写代码
在生产环境中,将这两个调用封装到你的应用代码中以获得无缝体验。
可用模型
上述架构适用于任何语言。你只需替换 Python 模型并调整输出的后处理。以下是常见复杂语言的验证模型:
- 希伯来语 :上下文感知词形还原。处理前缀歧义(ב、ה、ל 等) dicta-il/dictabert-lex。
- 德语 :生成性复合词拆分。支持 56 种语言,包括荷兰语、瑞典语、芬兰语和土耳其语。 benjamin/compoundpiece。
- 阿拉伯语 :基于 BERT 的现代标准阿拉伯语歧义消解和词形还原。 CAMeL Tools。
- 波兰语 :针对波兰语屈折的大小写敏感词形还原。 amu-cai/polemma-large。
结论
你不需要在词汇搜索的精度和 AI 的智能之间做选择。通过将"智能"部分移动到分析阶段并使用 inference API,你可以解决复杂语言中搜索相关性差的根本原因。
工具已经准备好。模型是开源的。管道是可配置的。现在是时候让我们的搜索引擎学会"阅读"了。
代码
本文的所有代码片段均可在 github.com/noamschwart... 获取。
参考链接:
www.elastic.co/docs/api/do...
www.elastic.co/docs/manage...
ngrok.com
huggingface.co/dicta-il/di...
huggingface.co/benjamin/co...
arxiv.org/pdf/2305.14...