为了让选中工厂之后可以显示我们工厂的名称,我们修改代码如下。
HomePage
swift
/// old
Text("请选择工厂")
/// new
Text(viewModel.currentFactory.factoryName ?? "请选择工厂")
@Published sink监听值的变化
但是我们想把选中的工厂编码保存到本地,用于下次启动可以显示上次选中的工厂。我们直接使用 @AppStorage吗?但是我们是一个模型呀,不行,我们怎么能够坚挺到值的变化进行操作呢?。
我们直接通过操作 @Published sink进行值更新的监听。
swift
class HomePageViewModel: BaseViewModel {
    ....
    @Published var currentFactory:FactoryListResponseModel = FactoryListResponseModel(factoryCode: nil,
                                                                                      factoryName: nil)
    private var factorySink:AnyCancellable?

    override init() {
        super.init()
        factorySink = $currentFactory.sink { model in
            print("sink \(model.factoryName)")
        }
    }

    ....
}
这里有一个坑,不要直接进行这样的操作。
swift
$currentFactory.sink { model in
    print("sink \(model.factoryName)")
}
通过 didSet 监听值更新
没有强保留返回结果,是不能够监听后续值更新操作的。使用起来这么麻烦吗?其实不然,我们可以通过 Swift中对于值更新的 didSet 方法进行监听值更新。
swift
class HomePageViewModel: BaseViewModel {
    ...
    @Published var currentFactory:FactoryListResponseModel = FactoryListResponseModel(factoryCode: nil,
                                                                                      factoryName: nil) {
        didSet {
            print("didset \(currentFactory.factoryName)")
        }
    }
   ....
}
这种使用起来十分的方便,我推荐使用这一种方式。我们已经可以拿到选中工厂的代码了,那么我们就可以新增一个属性用于保存。
swift
class AppConfig: ObservableObject {
		...
    /// 当前选中的工厂代码
    @AppStorage("currentFactoryCode")
    var currentFactoryCode:String?

}
我们接收到用户选中工厂之后,将最新选中的工厂代码进行保存。
swift
class HomePageViewModel: BaseViewModel {
    ...
    @Published var currentFactory:FactoryListResponseModel = FactoryListResponseModel(factoryCode: nil,
                                                                                      factoryName: nil) {
        didSet {
            AppConfig.share.currentFactoryCode = currentFactory.factoryCode
        }
    }
    ...
} 我们将选中的工厂代码保存到了本地,下次启动我们需要在最新的工厂代码寻找,如果找到,就用对应模型,否则就用第一个模型。
swift
class HomePageViewModel: BaseViewModel {
    /// 工厂列表
    @Published var factoryList:[FactoryListResponseModel] = []
    @Published var currentFactory:FactoryListResponseModel = FactoryListResponseModel(factoryCode: nil,
                                                                                      factoryName: nil) {
        didSet {
            AppConfig.share.currentFactoryCode = currentFactory.factoryCode
        }
    }

    /// 请求工厂列表
    func requestFactoryList() async {
        ...
        factoryList = model.data ?? []
        if let factoryModel = findFactory() {
            currentFactory = factoryModel
        } else if let firstModel = factoryList.first {
            currentFactory = firstModel
        }
    }
    /// 查找保存的工厂代码对应最新工厂列表的模型
    private func findFactory() -> FactoryListResponseModel? {
        return factoryList.first { model in
            guard let currentFactoryCode = AppConfig.share.currentFactoryCode else {return false}
            guard let factoryCode = model.factoryCode else {return false}
            return currentFactoryCode == factoryCode
        }
    }
}
接下来我们就要编写首页功能组件了。

首页布局
我们发现一个功能组件大概有这样的特征。
- 高度随着组件数量变化
- 周围有圆角
- 左侧按钮垂直居左并各自居中对齐
- 中间居中
- 右侧按钮垂直巨右并且各自居中对齐
我们画一下模板就清楚了。
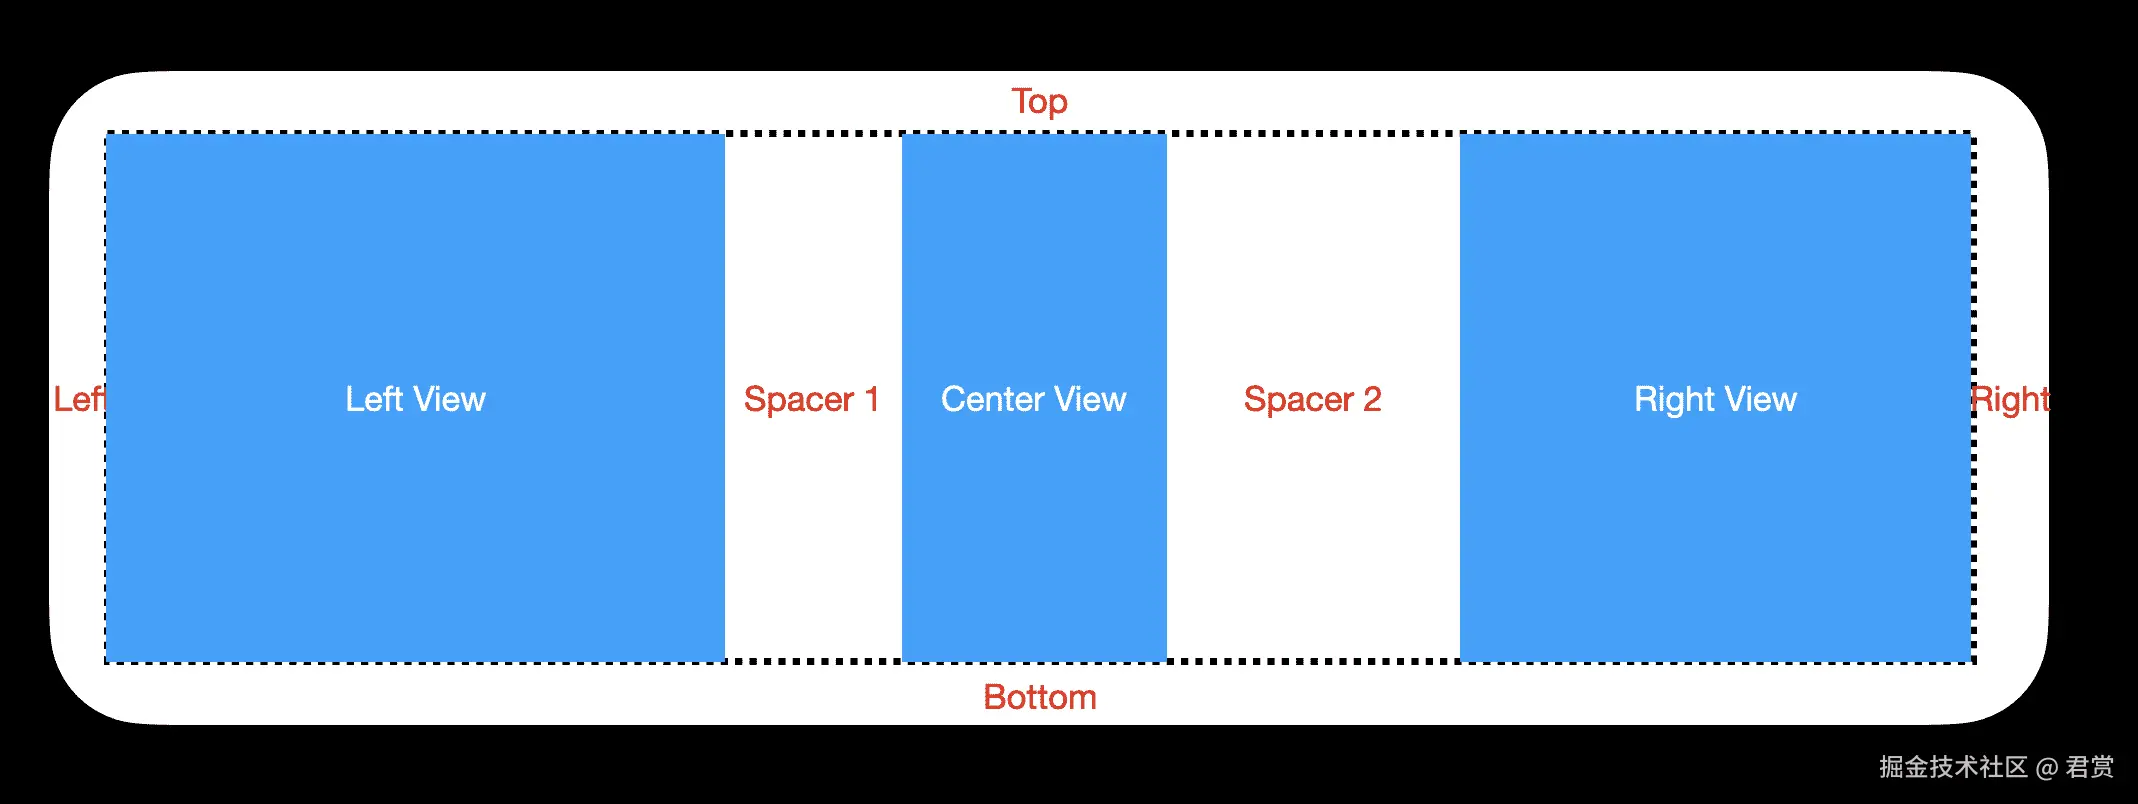
我们讲一个功能模块按照左侧功能区域,中间功能区域,和右侧功能区域进行布局。如果按照一行一行的布局按钮,会导致和下面的组件无法对齐。
如果直接使用 GridView,感觉也是不行,他们又不是均匀分布的,我觉得目前可行的布局方案就是按照模板进行布局,后续遇到问题再解决。
我们先来制作首页功能按钮

swift
struct ActionButton: View {
    var body: some View {
        VStack {
            Image("物料绑定托盘")
                .frame(width:40, height: 40)
                .background(Color(uiColor: UIColor("#209090")))
                .cornerRadius(8.5)
            Text("物料绑定托盘")
                .foregroundColor(Color(uiColor: UIColor("#666666")))
        }
    }
}
因为图标和文本是动态,我们修改代码支持动态生成。
swift
struct ActionButton: View {
    let icon:String
    let iconColor:UIColor
    let title:String
    var body: some View {
        VStack {
            Image(icon)
                ...
                .background(Color(uiColor: iconColor))
                ...
            Text(title)
                ...
        }
    }
}
我们功能组件封装完毕,接下来我们封装功能视图组件。
swift
struct ActionView: View {
    var body: some View {
        VStack {
            ActionButton(icon: "物料绑定托盘",
                         iconColor: UIColor("#209090"),
                         title: "物料绑定托盘")
            ActionButton(icon: "托盘绑定箱号",
                         iconColor: UIColor("#F19037"),
                         title: "托盘绑定箱号")
            ActionButton(icon: "灭菌",
                         iconColor: UIColor("#0EA1DA"),
                         title: "灭菌")
        }
    }
}
我们不确定我们一列到底显示多少个,所以我们需要动态的进行配置。
swift
struct ActionItem: Hashable {
    /// 图标名称
    let icon:String
    /// 图标背景色
    let iconColor:UIColor
    /// 按钮文本
    let title:String
}

struct ActionView: View {
    let actionItems:[ActionItem]
    var body: some View {
        VStack {
            ForEach(actionItems, id: \.self) { item in
                ActionButton(icon: item.icon,
                             iconColor: item.iconColor,
                             title: item.title)
            }
        }
    }
}
我们一列按钮视图做好之后,我们封装一整块的功能。
swift
struct ActionCardView: View {
    var body: some View {
        VStack {
            HStack {
                Text("生产执行")
                    .foregroundColor(Color(uiColor: UIColor("#333333")))
                    .fontWeight(.medium)
                    .font(.system(size: 14))
                Spacer()
            }
            Spacer()
                .frame(height:15)
            HStack {
                ActionView(actionItems: [
                    ...
                ])
                ActionView(actionItems: [
                    ...
                ])
                ActionView(actionItems: [
                    ...
                ])
            }
        }
        .frame(maxWidth:.infinity)
        .padding(15)
        .background(.white)
        .cornerRadius(10)
    }
}
总是感觉这界面有点乖乖的,和我们设计图一点都不搭。我们给 ActionView 添加一个背景颜色看一下。
swift
struct ActionView: View {
    ...
    var body: some View {
        VStack {
            ...
        }
        .background(.red)
    }
}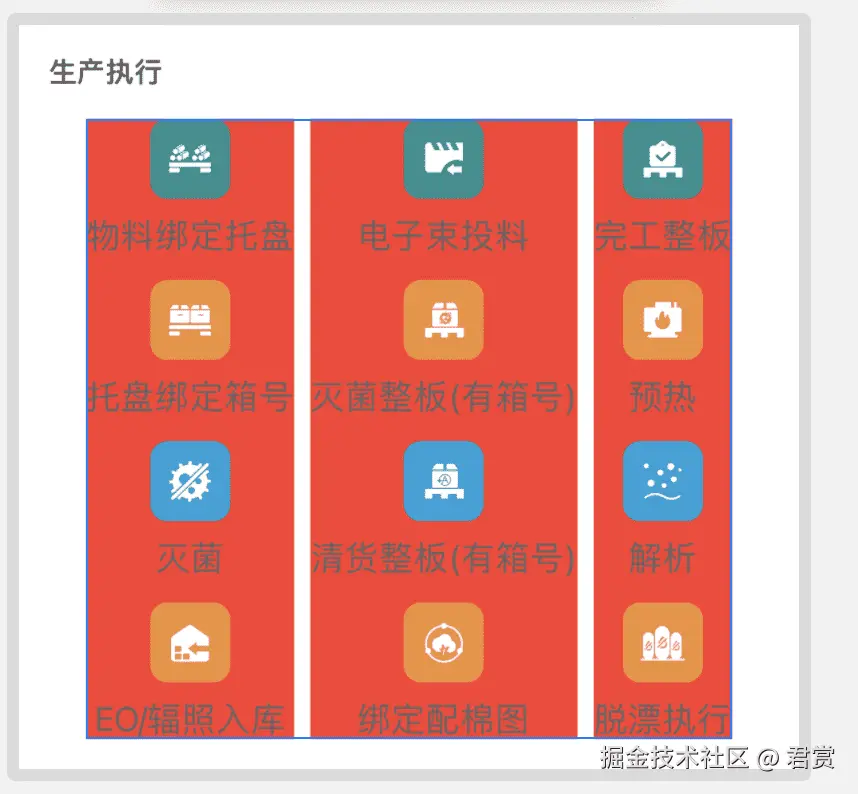
我们中间功能区域没有宽度没有完全的充满,我们先设置一下。
swift
struct ActionCardView: View {
    var body: some View {
        VStack {
            ...
            HStack() {
                ...
            }
            .frame(maxWidth:.infinity)
        }
        ...
    }
}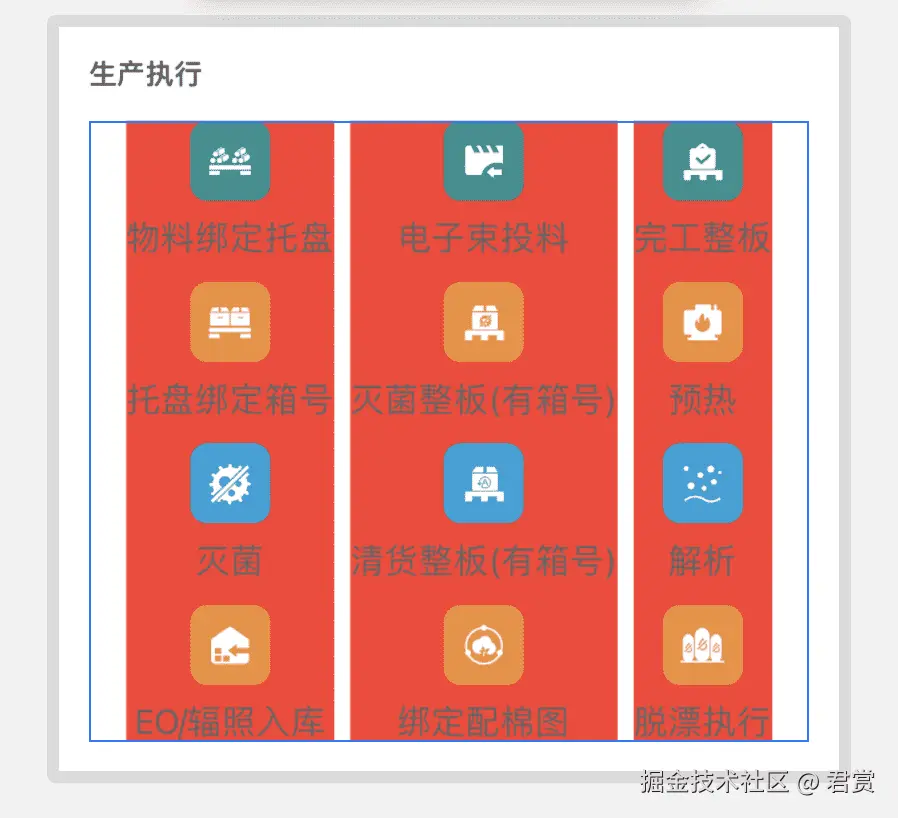
组件最大宽度已经发生了变化,但是三个没有充满,我们需要在组件的中间添加Spacer。
swift
struct ActionCardView: View {
    var body: some View {
        VStack {
            ...
            HStack() {
                ActionView(actionItems: [
                    ...
                ])
                Spacer()
                ActionView(actionItems: [
                    ...
                ])
                Spacer()
                ActionView(actionItems: [
                    ...
                ])
            }
            ...
        }
        ...
    }
}
此时看起来好多了,但是中间的间隙是平分的,按照中间视图居中原则,当左侧和右侧视图宽度一致,那么间隙才可能宽度相等。
此时左侧和右侧的宽度不等,那么此时平分的话,中间视图一定偏右侧了。
那么我们就需要计算 左侧视图宽度,中间视图宽度,右侧视图宽度,总宽度。
swift
struct ActionCardView: View {
    @State private var leftViewWidth:CGFloat = 0
    @State private var centerViewWidth:CGFloat = 0
    @State private var rightViewWidth:CGFloat = 0
    @State private var contentViewWidth:CGFloat = 0
    var body: some View {
        VStack {
            ...
            HStack() {
                ActionView(actionItems: [
                    ...
                ])
                    .getWidth(width: $leftViewWidth)
                Spacer()
                    .frame(width:spacer1Width)
                ActionView(actionItems: [
                    ...
                ])
                    .getWidth(width: $centerViewWidth)
                Spacer()
                    .frame(width:spacer2Width)
                ActionView(actionItems: [
                    ...
                ])
                    .getWidth(width: $rightViewWidth)
            }
            ...
            .getWidth(width: $contentViewWidth)
        }
        ...
    }

    private var spacer1Width:CGFloat {
        let width = contentViewWidth / 2 - leftViewWidth - centerViewWidth / 2
        return max(width, 0)
    }

    private var spacer2Width:CGFloat {
        let width = contentViewWidth / 2 - rightViewWidth - centerViewWidth / 2
        return max(width, 0)
    }
}

fileprivate extension View {
    func getWidth(width:Binding<CGFloat>) -> some View {
        self.background {
            GeometryReader { geometry in
                _getWidth(width: width, geometry: geometry)
            }
        }
    }

    private func _getWidth(width:Binding<CGFloat>, geometry:GeometryProxy) -> some View {
        width.wrappedValue = geometry.size.width
        return Color.clear
    }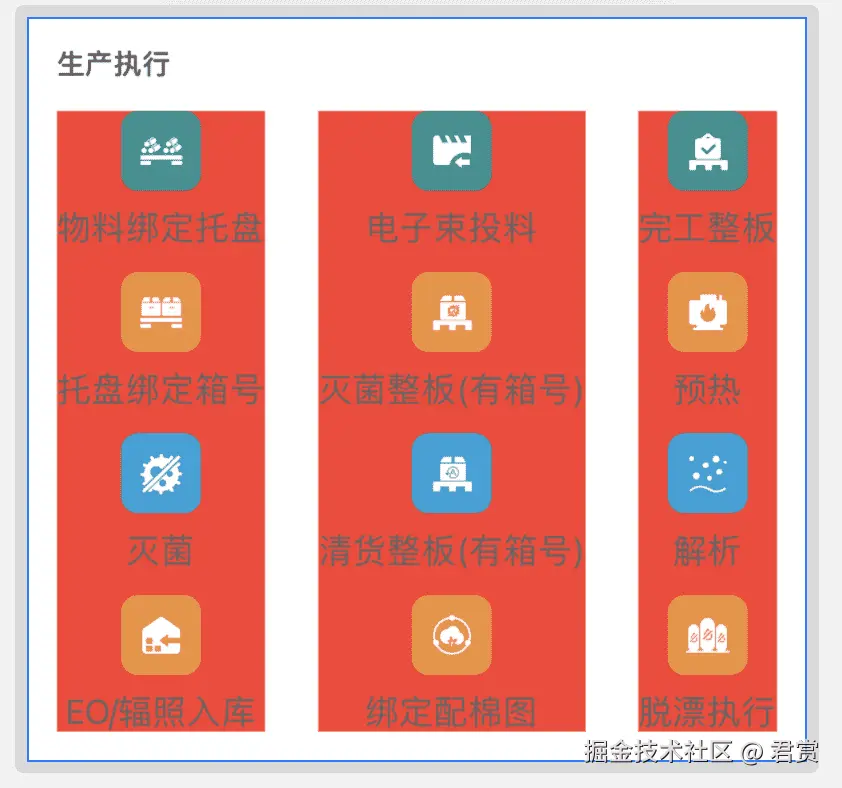
}我们通过设置计算出当第二个试图居中显示,第一个和第三个分别居左和居右的时候,Spacer1和Spacer2的宽度,来达到居中的目的。间隙不可能存在负数,如果存在就是重叠了,这在显示上面是不允许的。

此时布局已经分别居左 居中和居右显示了。从目前来看,的确没什么问题,但是我们如果按钮的标题十分的长,是怎么样的一个显示呢?
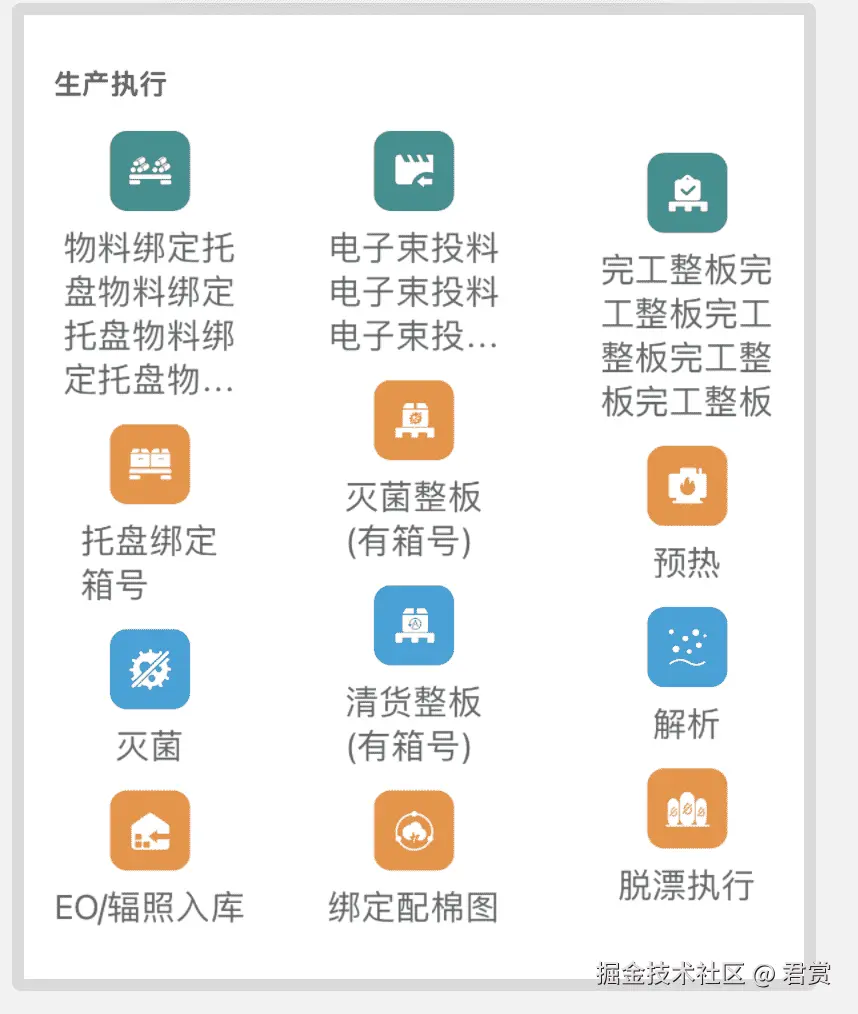
虽然按钮分组项目没有影响,但是按钮标题的环境导致横向的没有对齐,十分的难看,我们设置一下按钮的标题最大智能显示一行。
swift
struct ActionButton: View {
		...
    var body: some View {
        VStack {
            ...
            Text(title)
                ...
                .lineLimit(1)
        }
    }
}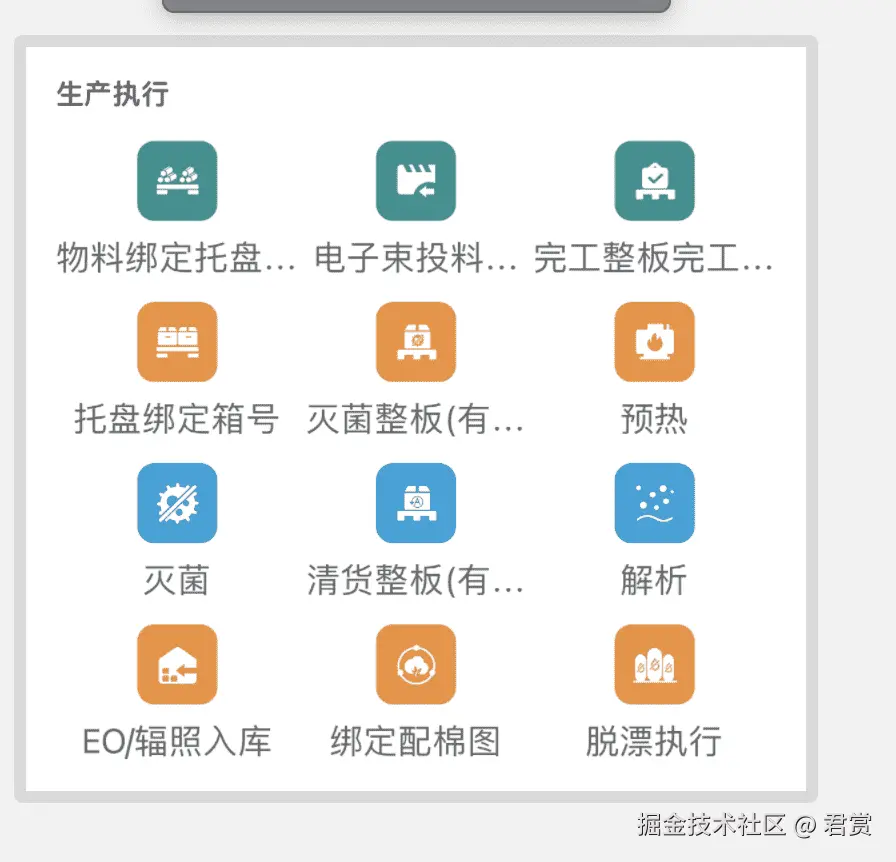
这样看来感觉正常了。为了将功能模块可以一自定义的新增和删除,我们需要对于 ActionCardView进行提炼和封装。
swift
struct ActionCardView: View {
    let title:String
    let actions:[ActionItem]
    ...
    var body: some View {
        VStack {
            HStack {
                Text(title)
                    ...
            }
            ...
            HStack() {
                ActionView(actionItems: actions(index: .left))
                    ...
                ActionView(actionItems: actions(index: .center))
                    ...
                ActionView(actionItems: actions(index: .right))
                    ...
            }
            ...
        }
				...
    }

		...

    /// 根据索引获取对应的功能列表
    /// - Parameter index: 功能索引
    /// - Returns: 功能分组
    private func actions(index:ActionIndex) -> [ActionItem] {
        var actionItems:[ActionItem] = []
        var itemInex = index.rawValue
        while itemInex < actions.count {
            actionItems.append(actions[itemInex])
            itemInex += 3
        }
        return actionItems
    }

    /// 功能索引
    private enum ActionIndex:Int {
        /// 左侧功能区域
        case left
        /// 中间功能区域
        case center
        /// 右侧功能区域
        case right
    }
}
看起来我们已经提炼完毕了,但是目前我们的数据是对称的,因为是配置的,所以存在多多稍稍的情况。我们去掉两个看一下情况。

缺少之后我们的按钮瞬间就乱了顺序,我们设置顶部对齐。
swift
struct ActionCardView: View {
    ...
    var body: some View {
        VStack {
            ...
            HStack(alignment:.top) {
                ...
            }
            ...
        }
        ...
    }

    ...
}
当我只剩下三四个功能的时候,竟然之前的布局不工作了,我干脆就让三等分,左侧就设置居左,中间的就居中,右侧就居右显示。
swift
struct ActionCardView: View {
    ...
    var body: some View {
        VStack {
            ...
            HStack(alignment:.top) {
                HStack {
                    ActionView(actionItems: actions(index: .left))
                    Spacer()
                }
                .frame(maxWidth:.infinity)
                HStack {
                    ActionView(actionItems: actions(index: .center))
                }
                .frame(maxWidth:.infinity)
                HStack {
                    Spacer()
                    ActionView(actionItems: actions(index: .right))
                }
                .frame(maxWidth:.infinity)
            }
            ...
        }
        ...
    }

    ...
}
我们把生产执行的功能添加到首页里面。
swift
struct HomePage: View {
		...
    var body: some View {
        NavigationView {
            navigationBar {
                ZStack {
                    Color(uiColor: appColor.c_efefef)
                    VStack {
                        ActionCardView(
                            title: "生产执行",
                            actions: [
                                ...
                            ])
                            .padding(EdgeInsets(top: 10, leading: 10, bottom: 0, trailing: 10))
                        Spacer()
                    }
                }
            }
        }
        ...
    }

    ...
}