一、消息队列
消息队列:
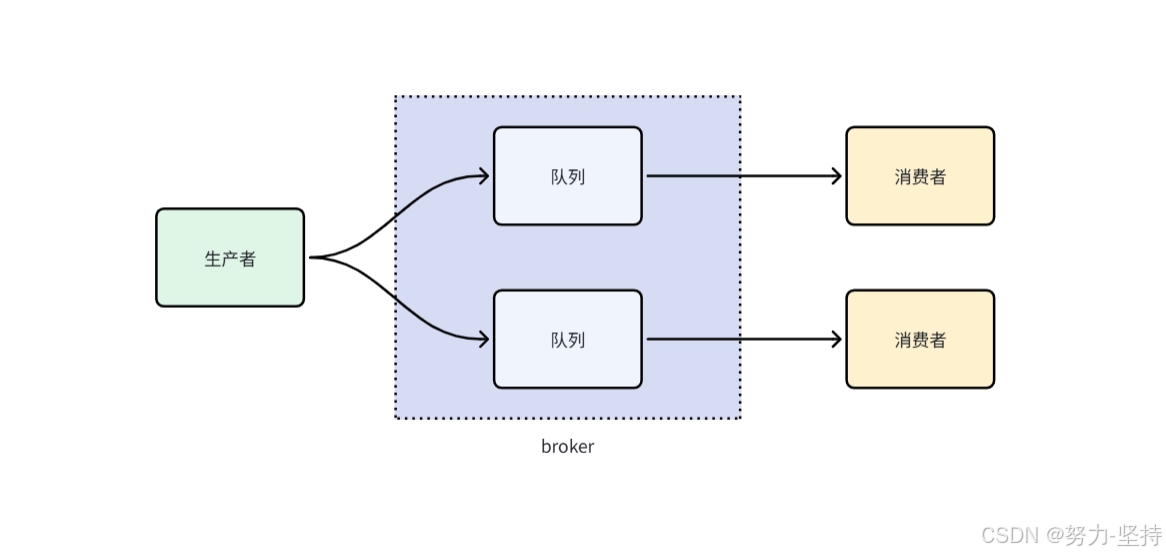
- 生产者:负责将消息发送到消息队列中。
- 消费者:负责从消息队列中获取消息并进行处理。
- 队列:存储消息。
- broker:负责接收、存储和分发消息的中间件组件,实现了发送者和接收者之间的解耦和异步通信。
- topic:消息的分类。
IOT中数据流转是这样的:
- 生产者:设备负责将消息发送到IOT中(队列)。
- 每个产品可以绑定不同的topic来进行消息分类,比如有手表topic、烟雾topic。
- IOT本身相当于是一个队列。
- 消费者可以从指定的topic中获取数据。
- 如果有多个消费者都要接收同一类消息,可以设置多个消费者,称为消费者组。
二、AMQP
AMQP全称Advanced Message Queuing Protocol,是一种网络协议,用于在应用程序之间传递消息。它是一种开放标准的消息传递协议,可以在不同的系统之间实现可靠、安全、高效的消息传递。
AMQP协议的实现包括多种消息队列软件,例如RabbitMQ、Apache ActiveMQ、Apache Qpid等。这些软件提供了可靠、高效的消息传递服务,广泛应用于分布式系统、云计算、物联网等领域。
三、环境集成
IOT平台提供了完整的SDK,我们可以快速集成到项目进行接口的调用,集成方式:官方说明
step1.导入坐标。
xml
<dependency>
    <groupId>com.huaweicloud.sdk</groupId>
    <artifactId>huaweicloud-sdk-core</artifactId>
    <version>3.1.76</version>
</dependency>
<dependency>
    <groupId>com.huaweicloud.sdk</groupId>
    <artifactId>huaweicloud-sdk-iotda</artifactId>
    <version>3.1.76</version>
</dependency>
step2.在application-dev.yml文件中添加IOT的配置。
yml
huaweicloud:
  ak: UTVLYVJKVGYVEFFWG
  sk: WkEWqfwZoFlLwKq5NmWTLmj71WhRXe
  #如果是上海一,请填写"cn-east-3";如果是北京四,请填写"cn-north-4";
  regionId: cn-east-3
  endpoint: 38e7abf.st1.iotda-app.cn-east-3.myhuaweicloud.com
  projectId: 57ee9b4827a44c19a0770fe7cb
  #amqp相关配置 接收设备数据使用
  host: 38e7abedbf.st1.iotda-app.cn-east-3.myhuaweicloud.com
  accessKey: S5ZTC5
  accessCode: a4fKpE5k0nbGNJU0d1bKkJNRQzlp
  queueName: DefaultQueue   #默认无需改动
step3.新增HuaWeiIotConfigProperties来读取配置文件。
java
package com.yyyl.framework.config.properties;

import lombok.Data;
import lombok.NoArgsConstructor;
import org.springframework.boot.context.properties.ConfigurationProperties;
import org.springframework.context.annotation.Configuration;

import java.util.Map;


@Data
@NoArgsConstructor
@Configuration
@ConfigurationProperties(prefix = "huaweicloud")
public class HuaWeiIotConfigProperties {

    /**
     * 访问Key
     */
    private String ak;

    /**
     * 访问秘钥
     */
    private String sk;

    /**
     * 区域id
     */
    private String regionId;

    /**
     * 应用侧https接入地址
     */
    private String endpoint;

    /**
     * 项目id
     */
    private String projectId;

    /**
     * 应用侧amqp接入地址
     */
    private String host;

    /**
     * amqp连接端口
     */
    private int port = 5671;

    /**
     * amqp接入凭证键值
     */
    private String accessKey;

    /**
     * amqp接入凭证密钥
     */
    private String accessCode;

    // 指定单个进程启动的连接数
    // 单个连接消费速率有限,请参考使用限制,最大64个连接
    // 连接数和消费速率及rebalance相关,建议每500QPS增加一个连接
    //可根据实际情况自由调节,目前测试和正式环境资源有限,限制更改为4
    private int connectionCount = 4;

    /**
     * 队列名称
     */
    private String queueName;

    /**
     * 开门命令所属服务id
     */
    private String smartDoorServiceId;

    /**
     * 开门记录属性
     */
    private String doorOpenPropertyName;

    /**
     * 开门命令
     */
    private String doorOpenCommandName;

    /**
     * 设置临时密码命令
     */
    private String passwordSetCommandName;

    /**
     * 仅支持true
     */
    private boolean useSsl = true;

    /**
     * IoTDA仅支持default
     */
    private String vhost = "default";

    /**
     * IoTDA仅支持PLAIN
     */
    private String saslMechanisms = "PLAIN";

    /**
     * true: SDK自动ACK(默认)
     * false:收到消息后,需要手动调用message.acknowledge()
     */
    private boolean isAutoAcknowledge = true;

    /**
     * 重连时延(ms)
     */
    private long reconnectDelay = 3000L;

    /**
     * 最大重连时延(ms),随着重连次数增加重连时延逐渐增加
     */
    private long maxReconnectDelay = 30 * 1000L;

    /**
     * 最大重连次数,默认值-1,代表没有限制
     */
    private long maxReconnectAttempts = -1;

    /**
     * 空闲超时,对端在这个时间段内没有发送AMQP帧则会导致连接断开。默认值为30000。单位:毫秒。
     */
    private long idleTimeout = 30 * 1000L;

    /**
     * The values below control how many messages the remote peer can send to the client and be held in a pre-fetch buffer for each consumer instance.
     */
    private int queuePrefetch = 1000;

    /**
     * 扩展参数
     */
    private Map<String, String> extendedOptions;
}
step4.添加配置。
java
import com.huaweicloud.sdk.core.auth.BasicCredentials;
import com.huaweicloud.sdk.core.auth.ICredential;
import com.huaweicloud.sdk.core.region.Region;
import com.huaweicloud.sdk.iotda.v5.IoTDAClient;
import com.yyyl.framework.config.properties.HuaWeiIotConfigProperties;
import org.springframework.beans.factory.annotation.Autowired;
import org.springframework.context.annotation.Bean;
import org.springframework.context.annotation.Configuration;

@Configuration
public class IotClientConfig {

    @Autowired
    private HuaWeiIotConfigProperties huaWeiIotConfigProperties;

    @Bean
    public IoTDAClient huaWeiIotInstance() {
        ICredential auth = new BasicCredentials()
                .withAk(huaWeiIotConfigProperties.getAk())
                .withSk(huaWeiIotConfigProperties.getSk())
                // 标准版/企业版需要使用衍生算法,基础版请删除配置"withDerivedPredicate"
                .withDerivedPredicate(BasicCredentials.DEFAULT_DERIVED_PREDICATE)
                .withProjectId(huaWeiIotConfigProperties.getProjectId());

        return IoTDAClient.newBuilder()
                .withCredential(auth)
                // 标准版/企业版:需自行创建Region对象,基础版:请使用IoTDARegion的region对象,如"withRegion(IoTDARegion.CN_NORTH_4)"
                .withRegion(new Region(huaWeiIotConfigProperties.getRegionId(), huaWeiIotConfigProperties.getEndpoint()))
                // .withRegion(IoTDARegion.CN_NORTH_4)
                .build();
    }
}
setp5.创建单元测试,查询产品列表。
java
import com.huaweicloud.sdk.iotda.v5.IoTDAClient;
import com.huaweicloud.sdk.iotda.v5.model.ListProductsRequest;
import com.huaweicloud.sdk.iotda.v5.model.ListProductsResponse;
import com.huaweicloud.sdk.iotda.v5.model.Page;
import com.huaweicloud.sdk.iotda.v5.model.ProductSummary;
import org.junit.jupiter.api.Test;
import org.springframework.beans.factory.annotation.Autowired;
import org.springframework.boot.test.context.SpringBootTest;

import java.util.List;

@SpringBootTest
public class IoTDeviceTest {


    @Autowired
    private IoTDAClient client;

    /**
     * 查询公共实例下的所有产品
     * @throws Exception
     */
    @Test
    public void selectProduceList() throws Exception {

        ListProductsRequest listProductsRequest = new ListProductsRequest();
        listProductsRequest.setLimit(50);
        ListProductsResponse response = client.listProducts(listProductsRequest);
        List<ProductSummary> products = response.getProducts();
        System.out.println(products);
    }

}
四、AMQP设备数据转发
修改链接参数:
java
package com.iot.amqp;


public interface AmqpConstants {
    /**
     * AMQP接入域名
     * 参考:https://support.huaweicloud.com/usermanual-iothub/iot_01_00100_2.html#section2
     */
    String HOST = "38e7abedbf.st1.iotda-app.cn-east-3.myhuaweicloud.com";   // eg: "****.iot-amqps.cn-north-4.myhuaweicloud.com";

    /**
     * AMQP接入端口
     * 参考:https://support.huaweicloud.com/usermanual-iothub/iot_01_00100_2.html#section2
     */
    int PORT = 5671;

    /**
     * 接入凭证键值
     * 参考:https://support.huaweicloud.com/usermanual-iothub/iot_01_00100_2.html#section3
     */
    String ACCESS_KEY = "S2DSSeTC5";

    /**
     * 接入凭证密钥
     * 参考:https://support.huaweicloud.com/usermanual-iothub/iot_01_00100_2.html#section3
     */
    String ACCESS_CODE = "61xLTVTzppmBi62h5my2TT2LIXpU";

    /**
     * 默认队列,无需改动
     */
    String DEFAULT_QUEUE = "DefaultQueue";
}
实现思路:
- 1.导入对应的依赖。
- 2.所有的可变参数,如HOST、ACCESS_KEY、ACCESS_CODE、DEFAULT_QUEUE这些统一在配置文件中维护。
- 3.在项目中根据项目需求配置线程池。
- 1.让spring进行管理和监听,一旦有数据变化之后,就可以马上消费,可以让这个类实现ApplicationRunner接口,重新run方法。
step1.导入依赖
xml
<!-- amqp 1.0 qpid client -->
<dependency>
    <groupId>org.apache.qpid</groupId>
    <artifactId>qpid-jms-client</artifactId>
    <version>0.61.0</version>
</dependency>
step2. 在application.yml文件添加iot配置。
step3. 实现ApplicationRunner接口之后的AmqpClient.
让AmqpClient 实现ApplicationRunner接口,重写run方法,然后调用处理数据方法。
java
package com.zzyl.nursing.job;

import cn.hutool.core.text.CharSequenceUtil;
import com.zzyl.framework.config.properties.HuaWeiIotConfigProperties;
import lombok.extern.slf4j.Slf4j;
import org.apache.qpid.jms.*;
import org.apache.qpid.jms.message.JmsInboundMessageDispatch;
import org.apache.qpid.jms.transports.TransportOptions;
import org.apache.qpid.jms.transports.TransportSupport;
import org.springframework.beans.factory.annotation.Autowired;
import org.springframework.boot.ApplicationArguments;
import org.springframework.boot.ApplicationRunner;
import org.springframework.scheduling.concurrent.ThreadPoolTaskExecutor;
import org.springframework.stereotype.Component;

import javax.jms.*;
import java.net.InetAddress;
import java.net.URI;
import java.net.UnknownHostException;
import java.text.MessageFormat;
import java.util.HashMap;
import java.util.Map;
import java.util.UUID;
import java.util.stream.Collectors;


@Slf4j
@Component
public class AmqpClient implements ApplicationRunner {

    @Autowired
    private HuaWeiIotConfigProperties huaWeiIotConfigProperties;

    //业务处理异步线程池,线程池参数可以根据您的业务特点调整,或者您也可以用其他异步方式处理接收到的消息。
    @Autowired
    private ThreadPoolTaskExecutor threadPoolTaskExecutor;

    //控制台服务端订阅中消费组状态页客户端ID一栏将显示clientId参数。
    //建议使用机器UUID、MAC地址、IP等唯一标识等作为clientId。便于您区分识别不同的客户端。
    private static String clientId;

    static {
        try {
            clientId = InetAddress.getLocalHost().getHostAddress();
        } catch (UnknownHostException e) {
            e.printStackTrace();
        }
    }

    @Override
    public void run(ApplicationArguments args) throws Exception {
        start();
    }

    public void start() throws Exception {
        //参数说明,请参见AMQP客户端接入说明文档。
        for (int i = 0; i < huaWeiIotConfigProperties.getConnectionCount(); i++) {
            //创建amqp连接
            Connection connection = getConnection();

            //加入监听者
            ((JmsConnection) connection).addConnectionListener(myJmsConnectionListener);
            // 创建会话。
            // Session.CLIENT_ACKNOWLEDGE: 收到消息后,需要手动调用message.acknowledge()。
            // Session.AUTO_ACKNOWLEDGE: SDK自动ACK(推荐)。
            Session session = connection.createSession(false, Session.AUTO_ACKNOWLEDGE);
            connection.start();

            // 创建Receiver连接。
            MessageConsumer consumer = newConsumer(session, connection, huaWeiIotConfigProperties.getQueueName());
            consumer.setMessageListener(messageListener);
        }

        log.info("amqp  is started successfully, and will exit after server shutdown ");
    }

    /**
     * 创建amqp连接
     *
     * @return amqp连接
     */
    private Connection getConnection() throws Exception {
        String connectionUrl = generateConnectUrl();
        JmsConnectionFactory cf = new JmsConnectionFactory(connectionUrl);
        // 信任服务端
        TransportOptions to = new TransportOptions();
        to.setTrustAll(true);
        cf.setSslContext(TransportSupport.createJdkSslContext(to));
        String userName = "accessKey=" + huaWeiIotConfigProperties.getAccessKey();
        cf.setExtension(JmsConnectionExtensions.USERNAME_OVERRIDE.toString(), (connection, uri) -> {
            // IoTDA的userName组成格式如下:"accessKey=${accessKey}|timestamp=${timestamp}"
            String newUserName = userName;
            if (connection instanceof JmsConnection) {
                newUserName = ((JmsConnection) connection).getUsername();
            }
            return newUserName + "|timestamp=" + System.currentTimeMillis();
        });

        // 创建连接。
        return cf.createConnection(userName, huaWeiIotConfigProperties.getAccessCode());
    }

    /**
     * 生成amqp连接地址
     *
     * @return amqp连接地址
     */
    public String generateConnectUrl() {
        String uri = MessageFormat.format("{0}://{1}:{2}",
                (huaWeiIotConfigProperties.isUseSsl() ? "amqps" : "amqp"),
                huaWeiIotConfigProperties.getHost(),
                String.valueOf(huaWeiIotConfigProperties.getPort()));
        Map<String, String> uriOptions = new HashMap<>();
        uriOptions.put("amqp.vhost", huaWeiIotConfigProperties.getVhost());
        uriOptions.put("amqp.idleTimeout", String.valueOf(huaWeiIotConfigProperties.getIdleTimeout()));
        uriOptions.put("amqp.saslMechanisms", huaWeiIotConfigProperties.getSaslMechanisms());

        Map<String, String> jmsOptions = new HashMap<>();
        jmsOptions.put("jms.prefetchPolicy.queuePrefetch", String.valueOf(huaWeiIotConfigProperties.getQueuePrefetch()));
        if (CharSequenceUtil.isNotBlank(clientId)) {
            jmsOptions.put("jms.clientID", clientId);
        } else {
            jmsOptions.put("jms.clientID", UUID.randomUUID().toString());
        }
        jmsOptions.put("failover.reconnectDelay", String.valueOf(huaWeiIotConfigProperties.getReconnectDelay()));
        jmsOptions.put("failover.maxReconnectDelay", String.valueOf(huaWeiIotConfigProperties.getMaxReconnectDelay()));
        if (huaWeiIotConfigProperties.getMaxReconnectAttempts() > 0) {
            jmsOptions.put("failover.maxReconnectAttempts", String.valueOf(huaWeiIotConfigProperties.getMaxReconnectAttempts()));
        }
        if (huaWeiIotConfigProperties.getExtendedOptions() != null) {
            for (Map.Entry<String, String> option : huaWeiIotConfigProperties.getExtendedOptions().entrySet()) {
                if (option.getKey().startsWith("amqp.") || option.getKey().startsWith("transport.")) {
                    uriOptions.put(option.getKey(), option.getValue());
                } else {
                    jmsOptions.put(option.getKey(), option.getValue());
                }
            }
        }
        StringBuilder stringBuilder = new StringBuilder();
        stringBuilder.append(uriOptions.entrySet().stream()
                .map(option -> MessageFormat.format("{0}={1}", option.getKey(), option.getValue()))
                .collect(Collectors.joining("&", "failover:(" + uri + "?", ")")));
        stringBuilder.append(jmsOptions.entrySet().stream()
                .map(option -> MessageFormat.format("{0}={1}", option.getKey(), option.getValue()))
                .collect(Collectors.joining("&", "?", "")));
        return stringBuilder.toString();
    }

    /**
     * 创建消费者
     *
     * @param session    session
     * @param connection amqp连接
     * @param queueName  队列名称
     * @return 消费者
     */
    public MessageConsumer newConsumer(Session session, Connection connection, String queueName) throws Exception {
        if (connection == null || !(connection instanceof JmsConnection) || ((JmsConnection) connection).isClosed()) {
            throw new Exception("create consumer failed,the connection is disconnected.");
        }

        return session.createConsumer(new JmsQueue(queueName));
    }

    private final MessageListener messageListener = message -> {
        try {
            //异步处理收到的消息,确保onMessage函数里没有耗时逻辑
            threadPoolTaskExecutor.submit(() -> processMessage(message));
        } catch (Exception e) {
            log.error("submit task occurs exception ", e);
        }
    };

    /**
     * 在这里处理您收到消息后的具体业务逻辑。
     */
    private void processMessage(Message message) {
        String contentStr;
        try {
            contentStr = message.getBody(String.class);
            String topic = message.getStringProperty("topic");
            String messageId = message.getStringProperty("messageId");
            log.info("receive message,\n topic = {},\n messageId = {},\n content = {}", topic, messageId, contentStr);
        } catch (JMSException e) {
            throw new RuntimeException("服务器错误");
        }

    }

    private final JmsConnectionListener myJmsConnectionListener = new JmsConnectionListener() {
        /**
         * 连接成功建立。
         */
        @Override
        public void onConnectionEstablished(URI remoteURI) {
            log.info("onConnectionEstablished, remoteUri:{}", remoteURI);
        }

        /**
         * 尝试过最大重试次数之后,最终连接失败。
         */
        @Override
        public void onConnectionFailure(Throwable error) {
            log.error("onConnectionFailure, {}", error.getMessage());
        }

        /**
         * 连接中断。
         */
        @Override
        public void onConnectionInterrupted(URI remoteURI) {
            log.info("onConnectionInterrupted, remoteUri:{}", remoteURI);
        }

        /**
         * 连接中断后又自动重连上。
         */
        @Override
        public void onConnectionRestored(URI remoteURI) {
            log.info("onConnectionRestored, remoteUri:{}", remoteURI);
        }

        @Override
        public void onInboundMessage(JmsInboundMessageDispatch envelope) {
        }

        @Override
        public void onSessionClosed(Session session, Throwable cause) {
        }

        @Override
        public void onConsumerClosed(MessageConsumer consumer, Throwable cause) {
        }

        @Override
        public void onProducerClosed(MessageProducer producer, Throwable cause) {
        }
    };
}
五、接收设备数据
接收到的数据是一个json字符串,我们可以定义一个类来转换接收数据:
json
{
  "resource": "device.property",
  "event": "report",
  "event_time": "20250217T083248Z",
  "event_time_ms": "2026-02-17T08:32:48.938Z",
  "request_id": "57f53c8e-9f20-4ce8-aceb-83953391c6c2",
  "notify_data": {
    "header": {
      "app_id": "d51bfac701644b9daa4363cf76c661af",
      "device_id": "67ad95860c504e29c72b2436_watch88",
      "node_id": "watch88",
      "product_id": "67ad95860c504e29c72b2436",
      "gateway_id": "67ad95860c504e29c72b2436_watch88"
    },
    "body": {
      "services": [
        {
          "service_id": "watch_services",
          "properties": {
            "BodyTemp": 1,
            "HeartRate": 87.6276,
            "xueyang": 93.12909,
            "BatteryPercentage": 6.9553375
          },
          "event_time": "20260217T083248Z"
        }
      ]
    }
  }
}
修改AmqpClient类,解析json数据并调用设备数据的业务层,批量添加数据。
1)定义接口:
java
/**
 * 批量保存数据
 * @param iotMsgNotifyData
 */
void batchInsertDeviceData(IotMsgNotifyData iotMsgNotifyData);
2)实现方法:
bash
@Autowired
private DeviceMapper deviceMapper;

/**
 * 批量保存数据
 * @param iotMsgNotifyData
 */
@Override
public void batchInsertDeviceData(IotMsgNotifyData iotMsgNotifyData) {
    //判断设备是否存在
    String iotId = iotMsgNotifyData.getHeader().getDeviceId();
    Device device = deviceMapper.selectOne(Wrappers.<Device>lambdaQuery().eq(Device::getIotId, iotId));
    if(device == null){
        //日志的记录,方便后期查找问题
        log.error("设备不存在,iotId:{}",iotId);
        return;
    }
    //获取到设备上报的数据,一个设备可以有多个service
    iotMsgNotifyData.getBody().getServices().forEach(s->{

        //所有数据都已经装入到map中
        Map<String, Object> properties = s.getProperties();
        if (ObjectUtil.isEmpty(properties)){
            return;
        }
        //处理上报时间日期
        LocalDateTime eventTime =  LocalDateTimeUtil.parse(s.getEventTime(), "yyyyMMdd'T'HHmmss'Z'");
        //日期时区转换
        LocalDateTime alarmTime = eventTime.atZone(ZoneId.from(ZoneOffset.UTC))
                .withZoneSameInstant(ZoneId.of("Asia/Shanghai"))
                .toLocalDateTime();

        //转入多个设备数据
        List<DeviceData> deviceDataList = new ArrayList<>();

        //遍历map集合,批量新增数据
        properties.forEach((key, value)->{
            DeviceData deviceData = DeviceData.builder()
                    .iotId(iotId)
                    .deviceName(device.getDeviceName())
                    .productKey(device.getProductKey())
                    .productName(device.getProductName())
                    .functionId(key)
                    .accessLocation(device.getRemark())
                    .locationType(device.getLocationType())
                    .physicalLocationType(device.getPhysicalLocationType())
                    .deviceDescription(device.getDeviceDescription())
                    .alarmTime(alarmTime)
                    .dataValue(value + "")
                    .build();
            deviceDataList.add(deviceData);

        });

        //批量保存
        saveBatch(deviceDataList);

    });

}
3)修改AmqpClient类,解析json数据并调用设备数据的业务层,批量添加数据。