适合人群:零基础新手,只要有一台 Mac(或 Linux),跟着本文一步步操作就能跑通。
最终效果 :在 Docker 容器中用 openYuanrong 分布式框架训练一个 CartPole 倒立摆 Agent,
并生成可视化训练回放页面。
预计耗时:30-60 分钟(取决于网速)
最终训练效果:
录屏2026-02-24 19.45.46
目录
- 前置准备
- 项目结构总览
- [搭建 Docker 环境](#搭建 Docker 环境)
- [下载 openYuanrong 安装包](#下载 openYuanrong 安装包)
- [编写 Dockerfile 和 docker-compose.yml](#编写 Dockerfile 和 docker-compose.yml)
- [构建 Docker 镜像](#构建 Docker 镜像)
- [启动容器并安装 curl](#启动容器并安装 curl)
- [理解代码:6 个 Python 文件详解](#理解代码:6 个 Python 文件详解)
- 运行训练
- 生成可视化页面
- 常见问题与踩坑记录
1. 前置准备
在开始之前,请确认你的电脑上已经安装了以下工具:
| 工具 | 用途 | 安装方式 |
|---|---|---|
| Docker Desktop | 运行 Linux 容器 | 官网下载 |
| 终端 | 执行命令 | macOS 自带 Terminal 或 iTerm2 |
| 浏览器 | 查看可视化结果 | Chrome / Safari / Firefox 均可 |
| VPN 代理(可选) | 国内网络下载 whl 包 | 如果你在国内,需要能访问华为云 OBS |
关于 Apple Silicon(M1/M2/M3) :openYuanrong 目前只提供 x86_64 版本的 whl 包,
但不用担心------Docker Desktop 通过 Rosetta 2 可以模拟运行 x86_64 镜像,
你会看到一个 platform 警告,这是正常的,不影响使用。
2. 项目结构总览
我们最终要创建的文件结构如下:
openYuanrong/                          # 项目根目录(名字随意)
├── docker/
│   ├── Dockerfile                     # Docker 镜像定义
│   ├── docker-compose.yml             # 容器编排配置
│   └── openyuanrong-0.7.0-cp39-cp39-manylinux_2_34_x86_64.whl  # 安装包
└── examples/
    └── rl_agent/
        ├── config.py                  # 超参数配置
        ├── policy.py                  # 策略网络(纯 NumPy)
        ├── worker.py                  # 分布式 Worker
        ├── learner.py                 # 中心化 Learner
        ├── train.py                   # 主训练脚本
        └── visualize.py              # 可视化生成器
3. 搭建 Docker 环境
为什么用 Docker?
openYuanrong 的 whl 包是 manylinux_2_34_x86_64 格式,只能在 Linux x86_64 环境下运行。
用 Docker 可以在任何电脑上创建一个干净的 Linux 环境,避免污染本机系统。
3.1 确认 Docker 已启动
打开终端,运行:
bash
docker --version如果看到类似 Docker version 27.x.x 的输出,说明 Docker 已安装。
确保 Docker Desktop 应用已经打开并运行(状态栏有鲸鱼图标)。
3.2 创建项目目录
bash
mkdir -p openYuanrong/docker
mkdir -p openYuanrong/examples/rl_agent
cd openYuanrong
4. 下载 openYuanrong 安装包
openYuanrong 的 whl 安装包托管在华为云 OBS 上,文件大约 932MB,下载需要一些时间。
4.1 直接下载(网络畅通时)
bash
cd docker
curl -L -O https://openyuanrong.obs.cn-southwest-2.myhuaweicloud.com/release/0.7.0/linux/x86_64/openyuanrong-0.7.0-cp39-cp39-manylinux_2_34_x86_64.whl
4.2 通过代理下载(国内网络)
如果你在国内且有 VPN 代理(比如 Clash 运行在 127.0.0.1:7897):
bash
cd docker
curl -x http://127.0.0.1:7897 -L -O https://openyuanrong.obs.cn-southwest-2.myhuaweicloud.com/release/0.7.0/linux/x86_64/openyuanrong-0.7.0-cp39-cp39-manylinux_2_34_x86_64.whl
⚠️ 踩坑提醒 1:文件名不能改!
下载后的文件名必须保持原样
openyuanrong-0.7.0-cp39-cp39-manylinux_2_34_x86_64.whl。pip 安装 whl 文件时会校验文件名格式,如果你重命名了(比如改成
openyuanrong.whl),会报错:
ERROR: openyuanrong.whl is not a valid wheel filename.
4.3 验证下载
bash
ls -lh openyuanrong-0.7.0-cp39-cp39-manylinux_2_34_x86_64.whl应该看到文件大小约 932MB。如果文件明显偏小(比如几 KB),说明下载失败,请重试。
5. 编写 Dockerfile 和 docker-compose.yml
5.1 创建 Dockerfile
在 docker/ 目录下创建 Dockerfile,内容如下:
dockerfile
FROM --platform=linux/amd64 python:3.9-slim

# 从本地复制预下载的 whl 包(保留原始文件名)
COPY openyuanrong-0.7.0-cp39-cp39-manylinux_2_34_x86_64.whl /tmp/

# 安装 openYuanrong + RL 依赖
RUN pip install --no-cache-dir -i https://pypi.tuna.tsinghua.edu.cn/simple \
    /tmp/openyuanrong-0.7.0-cp39-cp39-manylinux_2_34_x86_64.whl gymnasium numpy \
    && rm /tmp/openyuanrong-0.7.0-cp39-cp39-manylinux_2_34_x86_64.whl

WORKDIR /workspace

CMD ["bash"]
逐行解释:
| 行 | 说明 |
|---|---|
FROM --platform=linux/amd64 python:3.9-slim |
使用 Python 3.9 精简版镜像,强制指定 x86_64 平台(因为 whl 只支持 x86_64) |
COPY ... /tmp/ |
把本地下载好的 whl 包复制到镜像中。必须用原始文件名,否则 pip 校验失败 |
RUN pip install ... |
安装三个包:openYuanrong、gymnasium(RL 环境)、numpy(数值计算)。使用清华镜像加速 |
&& rm ... |
安装完后删除 whl 文件,减小镜像体积 |
WORKDIR /workspace |
设置工作目录 |
CMD ["bash"] |
容器启动后进入 bash |
⚠️ 踩坑提醒 2:
--platform=linux/amd64必须加!如果你用的是 Apple Silicon Mac(M1/M2/M3),不加这个参数的话,
Docker 会拉取 ARM 版本的 Python 镜像,然后安装 x86_64 的 whl 会失败。
加了之后 Docker 会通过 Rosetta 2 模拟 x86_64 环境。
5.2 创建 docker-compose.yml
在 docker/ 目录下创建 docker-compose.yml:
yaml
services:
  yuanrong:
    build:
      context: .
      dockerfile: Dockerfile
    container_name: yuanrong-dev
    volumes:
      - ../examples:/workspace/examples
    stdin_open: true
    tty: true
逐行解释:
| 配置项 | 说明 |
|---|---|
build.context: . |
构建上下文是 docker/ 目录(whl 文件在这里) |
container_name: yuanrong-dev |
给容器起个固定名字,方便后续 docker exec |
volumes: ../examples:/workspace/examples |
把本机的 examples/ 目录挂载到容器内,这样修改代码不用重建镜像 |
stdin_open: true + tty: true |
保持容器运行不退出(等价于 docker run -it) |
6. 构建 Docker 镜像
回到项目根目录,执行构建命令:
6.1 如果你不需要代理
bash
docker compose -f docker/docker-compose.yml build --no-cache6.2 如果你需要代理(国内网络)
bash
docker compose -f docker/docker-compose.yml build --no-cache \
  --build-arg http_proxy=http://host.docker.internal:7897 \
  --build-arg https_proxy=http://host.docker.internal:7897
⚠️ 踩坑提醒 3:代理地址用
host.docker.internal,不是127.0.0.1!Docker 构建过程运行在容器内部,
127.0.0.1指向的是容器自己,不是你的 Mac。
host.docker.internal是 Docker Desktop 提供的特殊域名,指向宿主机。
6.3 构建过程
构建大约需要 2-5 分钟(取决于网速和机器性能)。你会看到类似输出:
[+] Building 120.5s (7/7) FINISHED
 => [1/4] FROM docker.io/library/python:3.9-slim@sha256:...
 => [2/4] COPY openyuanrong-0.7.0-cp39-cp39-manylinux_2_34_x86_64.whl /tmp/
 => [3/4] RUN pip install --no-cache-dir ...
 => [4/4] WORKDIR /workspace
如果你在 Apple Silicon Mac 上看到这个警告,完全正常,忽略即可:
WARNING: The requested image's platform (linux/amd64) does not match
the detected host platform (linux/arm64/v8)
7. 启动容器并安装 curl
7.1 启动容器
bash
docker compose -f docker/docker-compose.yml up -d-d 表示后台运行。启动后验证容器状态:
bash
docker ps应该看到一个名为 yuanrong-dev 的容器在运行。
7.2 安装 curl(重要!)
openYuanrong 在初始化时(yr.init())需要用 curl 做健康检查。
python:3.9-slim 镜像默认没有 curl,必须手动安装。
bash
docker exec -e http_proxy="" -e https_proxy="" yuanrong-dev bash -c "apt-get update && apt-get install -y curl"⚠️ 踩坑提醒 4:安装 curl 时必须清空代理环境变量!
如果你构建镜像时用了代理(
--build-arg http_proxy=...),这些环境变量会残留在容器中。
apt-get通过代理访问 Debian 软件源会返回 502 错误。解决方法:用
-e http_proxy="" -e https_proxy=""临时清空代理。为什么不在 Dockerfile 里装 curl?
因为 Dockerfile 的
RUN指令会继承--build-arg设置的代理,而 apt-get 通过代理访问 Debian 源经常失败。
在容器启动后手动装,可以绕过代理问题。
7.3 验证环境
进入容器检查一切是否就绪:
bash
docker exec -it yuanrong-dev bash在容器内执行:
bash
python -c "import yr; print('openYuanrong OK')"
python -c "import gymnasium; print('Gymnasium OK')"
python -c "import numpy; print('NumPy OK')"
curl --version
四条命令都应该正常输出,没有报错。确认后输入 exit 退出容器。
8. 理解代码:6 个 Python 文件详解
本节详细解释每个文件的作用和关键代码。所有文件都放在 examples/rl_agent/ 目录下。
整体架构
我们要构建的是一个 "多 Worker 并行采样 + 中心化 Learner" 的分布式强化学习系统:
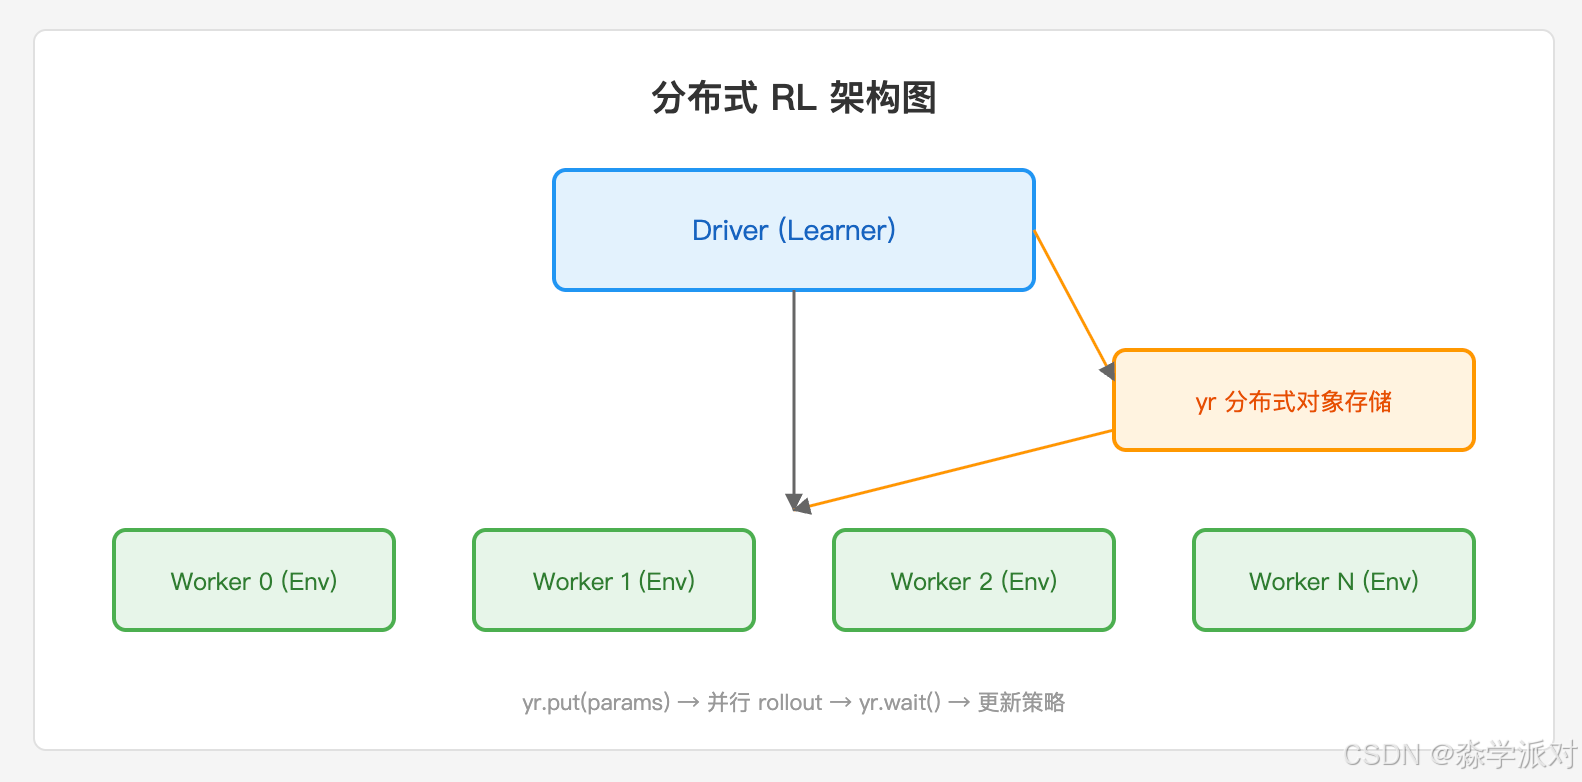
┌─────────────────────────────────────────────────────┐
│                    Driver 进程                       │
│  ┌──────────┐    yr.put()     ┌──────────────────┐  │
│  │  Learner  │ ──────────────→│  对象存储(参数)    │  │
│  │ (策略更新) │ ←──────────────│                  │  │
│  └──────────┘    yr.get()     └──────────────────┘  │
│       ↑                              ↓               │
│       │ 经验数据              策略参数 │               │
│       │                              ↓               │
│  ┌─────────┐ ┌─────────┐ ┌─────────┐ ┌─────────┐   │
│  │Worker-0 │ │Worker-1 │ │Worker-2 │ │Worker-3 │   │
│  │(采样)   │ │(采样)   │ │(采样)   │ │(采样)   │   │
│  └─────────┘ └─────────┘ └─────────┘ └─────────┘   │
└─────────────────────────────────────────────────────┘
训练流程:
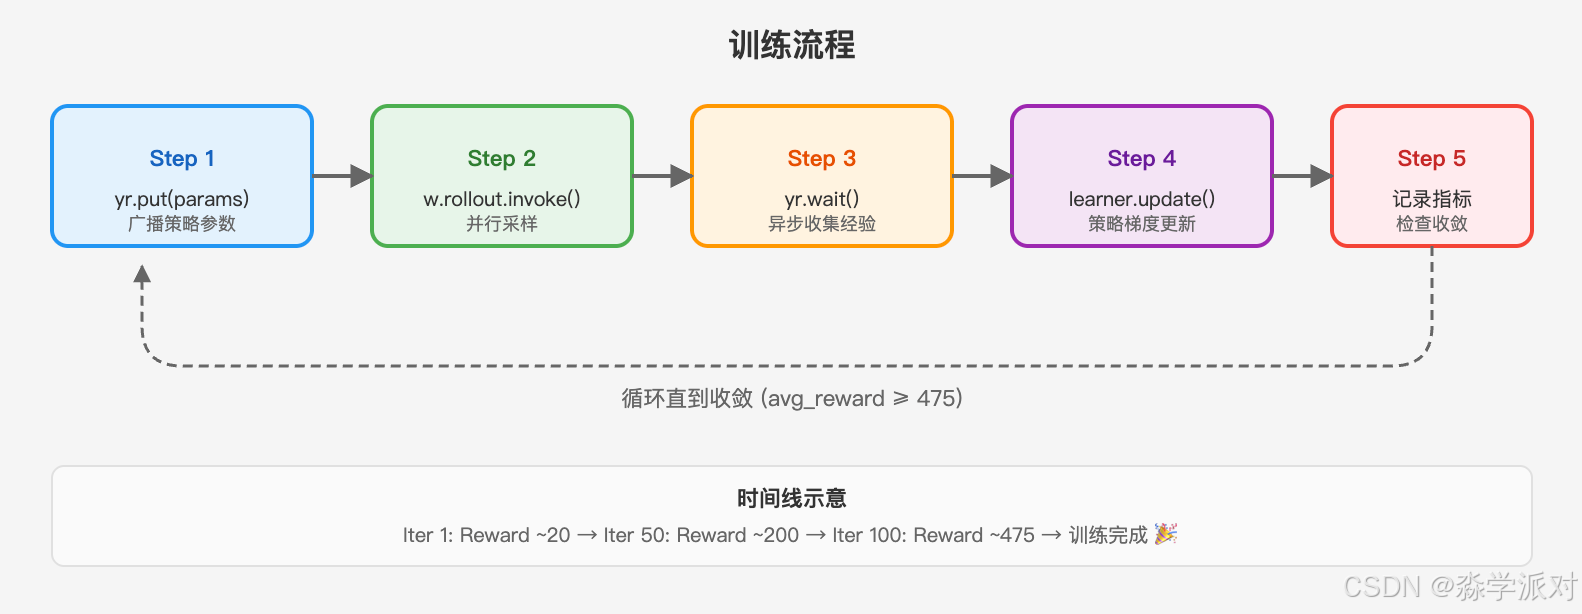
每一轮迭代:
  1. Learner 把最新策略参数通过 yr.put() 放入对象存储
  2. 4 个 Worker 并行执行 rollout(用最新策略玩游戏、收集经验)
  3. yr.wait() 异步等待 Worker 返回
  4. Learner 用收集到的经验更新策略(REINFORCE 算法)
  5. 打印训练指标,重复
8.1 config.py --- 超参数配置
这个文件集中管理所有超参数,方便调参:
python
"""
超参数配置

所有训练相关的超参数集中管理,方便调参和实验对比。
"""

# ============ 环境配置 ============
ENV_NAME = "CartPole-v1"        # Gym 环境名称
STATE_DIM = 4                   # CartPole 状态维度: [位置, 速度, 角度, 角速度]
ACTION_DIM = 2                  # CartPole 动作空间: [左推, 右推]

# ============ 网络配置 ============
HIDDEN_DIM = 32                 # 隐藏层神经元数量
LEARNING_RATE = 0.005           # 学习率(调小以稳定训练)
GAMMA = 0.99                    # 折扣因子

# ============ 训练配置 ============
NUM_WORKERS = 4                 # 并行 Worker 数量
MAX_ITERATIONS = 300            # 最大训练迭代次数
SOLVED_REWARD = 475.0           # CartPole-v1 认为"解决"的平均回报阈值
SOLVED_WINDOW = 10              # 连续多少次迭代达标算"解决"

# ============ Worker 资源配置 ============
WORKER_CPU = 1000               # 每个 Worker 分配的 CPU(毫核)
WORKER_MEMORY = 512             # 每个 Worker 分配的内存(MB)
关键参数说明:
| 参数 | 值 | 为什么这样设 |
|---|---|---|
NUM_WORKERS |
4 | Docker 容器默认可用 CPU 核数,4 个 Worker 刚好 |
LEARNING_RATE |
0.005 | REINFORCE 算法方差大,学习率太高会不稳定 |
GAMMA |
0.99 | 折扣因子,越接近 1 越重视长期回报 |
MAX_ITERATIONS |
300 | 纯 NumPy 实现的 REINFORCE 收敛较慢,给足迭代次数 |
WORKER_CPU |
1000 | 1000 毫核 = 1 个 CPU 核心 |
8.2 policy.py --- 策略网络(纯 NumPy 实现)
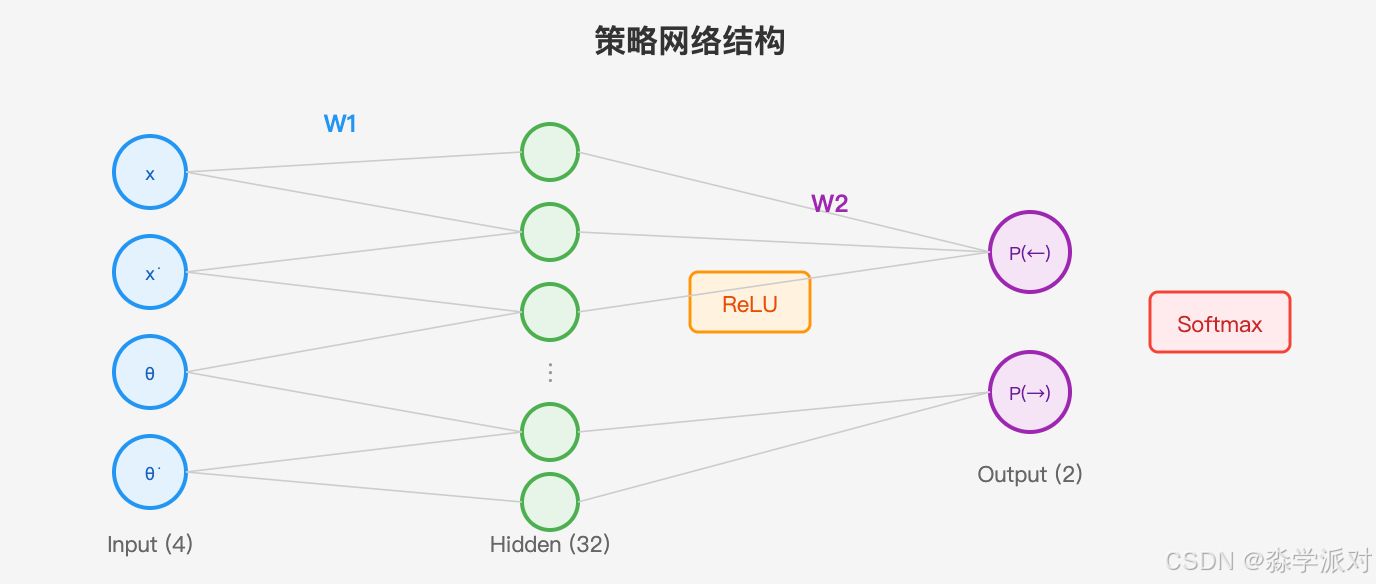
策略网络是 Agent 的"大脑",输入环境状态,输出每个动作的概率。
网络结构:
状态(4维) → 全连接层(4×32) → ReLU激活 → 全连接层(32×2) → Softmax → 动作概率
python
"""
策略网络 ------ 纯 NumPy 实现

结构: Input(4) -> Linear(32) -> ReLU -> Linear(2) -> Softmax
算法: REINFORCE (策略梯度) with baseline

为什么用 NumPy 而不是 PyTorch?
1. 减少依赖,CartPole 不需要 GPU
2. 参数是普通 dict,方便 yr.put() 序列化传递
3. 专注展示 openYuanrong 的分布式能力,而非深度学习框架
"""

import numpy as np


class SoftmaxPolicy:
    """
    两层全连接策略网络

    前向传播:
        h = ReLU(x @ W1 + b1)
        logits = h @ W2 + b2
        probs = softmax(logits)
    """

    def __init__(self, state_dim, action_dim, hidden_dim=32, lr=0.01):
        self.lr = lr
        self.state_dim = state_dim
        self.action_dim = action_dim
        self.hidden_dim = hidden_dim

        # Xavier 初始化 ------ 让初始权重不会太大也不会太小
        self.W1 = np.random.randn(state_dim, hidden_dim) * np.sqrt(2.0 / state_dim)
        self.b1 = np.zeros(hidden_dim)
        self.W2 = np.random.randn(hidden_dim, action_dim) * np.sqrt(2.0 / hidden_dim)
        self.b2 = np.zeros(action_dim)

    def _softmax(self, x):
        """数值稳定的 softmax"""
        e = np.exp(x - np.max(x, axis=-1, keepdims=True))
        return e / e.sum(axis=-1, keepdims=True)

    def _relu(self, x):
        return np.maximum(0, x)

    def forward(self, state):
        """前向传播,返回动作概率和中间值(用于反向传播)"""
        state = np.array(state, dtype=np.float64)
        h = self._relu(state @ self.W1 + self.b1)
        logits = h @ self.W2 + self.b2
        probs = self._softmax(logits)
        return probs, h

    def get_action(self, state):
        """
        根据当前策略采样动作

        返回: (action, log_prob)
        - action: 采样的动作索引(0=左推, 1=右推)
        - log_prob: 该动作的对数概率(用于策略梯度计算)
        """
        probs, _ = self.forward(state)
        probs = np.clip(probs, 1e-8, 1.0)  # 防止概率为 0 导致 log 出错
        action = np.random.choice(self.action_dim, p=probs)
        log_prob = np.log(probs[action])
        return int(action), float(log_prob)

    def get_params(self):
        """导出参数字典,用于 yr.put() 分布式广播"""
        return {
            "W1": self.W1.copy(), "b1": self.b1.copy(),
            "W2": self.W2.copy(), "b2": self.b2.copy(),
        }

    def set_params(self, params):
        """加载参数字典,用于 Worker 同步最新策略"""
        self.W1 = params["W1"].copy()
        self.b1 = params["b1"].copy()
        self.W2 = params["W2"].copy()
        self.b2 = params["b2"].copy()
核心设计:
get_params()/set_params()是分布式训练的关键接口。Learner 通过yr.put(policy.get_params())广播参数,Worker 通过policy.set_params(params)加载最新策略- 参数是普通的 NumPy 数组字典,openYuanrong 可以直接序列化传递,不需要特殊处理
8.3 worker.py --- 分布式 Worker(环境交互与经验采集)
Worker 是整个系统的"数据采集器"。每个 Worker 运行在独立进程中,维护自己的游戏环境。
python
"""
分布式 Worker ------ 环境交互与经验采集

每个 Worker 是一个 openYuanrong 有状态函数实例,运行在独立进程中。
"""

import numpy as np
import yr


# Worker 端内联一个轻量版 Policy,只需要前向推理能力
class _WorkerPolicy:
    """Worker 端的轻量策略网络,只需要前向推理"""

    def __init__(self, state_dim, action_dim, hidden_dim):
        self.state_dim = state_dim
        self.action_dim = action_dim
        self.hidden_dim = hidden_dim
        self.W1 = np.zeros((state_dim, hidden_dim))
        self.b1 = np.zeros(hidden_dim)
        self.W2 = np.zeros((hidden_dim, action_dim))
        self.b2 = np.zeros(action_dim)

    def set_params(self, params):
        self.W1 = params["W1"]
        self.b1 = params["b1"]
        self.W2 = params["W2"]
        self.b2 = params["b2"]

    def get_action(self, state):
        state = np.array(state, dtype=np.float64)
        h = np.maximum(0, state @ self.W1 + self.b1)
        logits = h @ self.W2 + self.b2
        e = np.exp(logits - np.max(logits))
        probs = e / e.sum()
        probs = np.clip(probs, 1e-8, 1.0)
        action = np.random.choice(self.action_dim, p=probs)
        log_prob = np.log(probs[action])
        return int(action), float(log_prob)


@yr.instance                    # ← 这个装饰器让类变成可远程调用的有状态函数
class RolloutWorker:
    """
    分布式采样 Worker

    生命周期:
    1. invoke() 创建时初始化环境
    2. rollout() 被反复调用,每次用最新策略采样 episode
    3. terminate() 销毁实例释放资源
    """

    def __init__(self, env_name, state_dim, action_dim, hidden_dim):
        import gymnasium                    # 在 Worker 进程中导入
        self.env = gymnasium.make(env_name) # 每个 Worker 有自己的环境实例
        self.policy = _WorkerPolicy(state_dim, action_dim, hidden_dim)
        self.episodes_done = 0

    def rollout(self, policy_params, num_episodes=5):
        """
        执行多个完整 episode 的采样

        参数:
            policy_params: dict, 策略网络参数(由 Learner 通过 yr.put 传来)
            num_episodes: int, 每次调用采样的 episode 数量

        返回:
            list[dict]: 每个 episode 的轨迹数据
        """
        self.policy.set_params(policy_params)  # 加载最新策略
        trajectories = []

        for _ in range(num_episodes):
            state, _ = self.env.reset()
            states, actions, rewards, log_probs = [], [], [], []
            done = False

            while not done:
                action, log_prob = self.policy.get_action(state)
                next_state, reward, terminated, truncated, _ = self.env.step(action)
                done = terminated or truncated

                states.append(state.tolist())
                actions.append(action)
                rewards.append(float(reward))
                log_probs.append(log_prob)
                state = next_state

            self.episodes_done += 1
            trajectories.append({
                "states": states,
                "actions": actions,
                "rewards": rewards,
                "log_probs": log_probs,
                "total_reward": sum(rewards),
            })

        return trajectories

    def get_stats(self):
        """获取 Worker 统计信息"""
        return {"episodes_done": self.episodes_done}
关键设计点:
@yr.instance装饰器 :这是 openYuanrong 的核心 API,让RolloutWorker类的实例可以在集群的任意节点上运行- 为什么内联
_WorkerPolicy? Worker 运行在独立进程中,如果from policy import SoftmaxPolicy,Worker 进程需要能找到policy.py。内联一个轻量版避免了模块路径问题 gymnasium在__init__中导入:确保只在 Worker 进程中导入,不污染 Driver 进程
8.4 learner.py --- 中心化 Learner(策略更新)
Learner 运行在 Driver 进程中(不是远程实例),负责收集所有 Worker 的经验并更新策略。
使用的算法是 REINFORCE + baseline:
策略梯度公式:
  ∇J(θ) ≈ (1/N) Σ_t ∇log π(a_t|s_t; θ) · (G_t - b)

其中:
  G_t = r_t + γ·r_{t+1} + γ²·r_{t+2} + ...  是折扣回报
  b = mean(G_t)                                是 baseline(减小方差)
python
"""
中心化 Learner ------ 策略更新与训练指标记录
"""

import numpy as np
from policy import SoftmaxPolicy


class Learner:
    def __init__(self, state_dim, action_dim, hidden_dim=32, lr=0.01, gamma=0.99):
        self.policy = SoftmaxPolicy(state_dim, action_dim, hidden_dim, lr)
        self.gamma = gamma
        self.lr = lr

        # 训练历史记录(用于可视化)
        self.history = {
            "iteration": [], "avg_reward": [],
            "max_reward": [], "min_reward": [], "loss": [],
        }

    def get_params(self):
        """获取当前策略参数,用于 yr.put() 广播"""
        return self.policy.get_params()

    def _compute_returns(self, rewards):
        """计算折扣回报 G_t = r_t + γ*r_{t+1} + γ²*r_{t+2} + ..."""
        returns = np.zeros(len(rewards))
        G = 0
        for t in reversed(range(len(rewards))):
            G = rewards[t] + self.gamma * G
            returns[t] = G
        return returns

    def update(self, trajectories, iteration=0):
        """
        用收集到的轨迹更新策略

        核心步骤:
        1. 计算所有轨迹的折扣回报
        2. 标准化 advantage(减去均值,除以标准差)
        3. 对每个样本计算策略梯度
        4. 梯度下降更新参数
        """
        # 1. 收集所有数据
        all_states, all_actions, all_returns, all_log_probs = [], [], [], []
        total_rewards = []

        for traj in trajectories:
            returns = self._compute_returns(traj["rewards"])
            all_states.extend(traj["states"])
            all_actions.extend(traj["actions"])
            all_returns.extend(returns.tolist())
            all_log_probs.extend(traj["log_probs"])
            total_rewards.append(traj["total_reward"])

        all_returns = np.array(all_returns)
        all_log_probs = np.array(all_log_probs)

        # 2. 标准化 advantage
        if len(all_returns) > 1:
            baseline = all_returns.mean()
            std = all_returns.std() + 1e-8
            advantages = (all_returns - baseline) / std
        else:
            advantages = all_returns

        # 3. 计算策略梯度并累加
        grad_W1 = np.zeros_like(self.policy.W1)
        grad_b1 = np.zeros_like(self.policy.b1)
        grad_W2 = np.zeros_like(self.policy.W2)
        grad_b2 = np.zeros_like(self.policy.b2)

        n_samples = len(all_states)
        for i in range(n_samples):
            state = np.array(all_states[i], dtype=np.float64)
            action = all_actions[i]
            advantage = advantages[i]

            # 前向传播
            h = np.maximum(0, state @ self.policy.W1 + self.policy.b1)
            logits = h @ self.policy.W2 + self.policy.b2
            e = np.exp(logits - np.max(logits))
            probs = e / e.sum()
            probs = np.clip(probs, 1e-8, 1.0)

            # softmax 梯度 × advantage → 策略梯度
            d_logits = probs.copy()
            d_logits[action] -= 1.0
            d_logits *= advantage

            # 反向传播累加梯度
            grad_W2 += np.outer(h, d_logits)
            grad_b2 += d_logits
            d_h = d_logits @ self.policy.W2.T
            d_h *= (h > 0).astype(np.float64)
            grad_W1 += np.outer(state, d_h)
            grad_b1 += d_h

        # 4. 梯度下降更新
        self.policy.W1 -= self.lr * grad_W1 / n_samples
        self.policy.b1 -= self.lr * grad_b1 / n_samples
        self.policy.W2 -= self.lr * grad_W2 / n_samples
        self.policy.b2 -= self.lr * grad_b2 / n_samples

        # 5. 记录指标
        avg_reward = float(np.mean(total_rewards))
        self.history["iteration"].append(iteration)
        self.history["avg_reward"].append(avg_reward)
        self.history["max_reward"].append(float(np.max(total_rewards)))
        self.history["min_reward"].append(float(np.min(total_rewards)))
        self.history["loss"].append(-float(np.mean(all_log_probs * advantages)))

        return {
            "avg_reward": avg_reward,
            "max_reward": float(np.max(total_rewards)),
            "min_reward": float(np.min(total_rewards)),
            "loss": self.history["loss"][-1],
        }
Learner 不是远程实例------它直接运行在 Driver 进程中,因为策略更新需要频繁读写参数,放在本地更高效。
8.5 train.py --- 主训练脚本(串联所有组件)
这是整个系统的入口,把 Learner、Worker、openYuanrong 串联起来:
python
"""
主训练脚本 ------ 串联所有组件
运行方式: python train.py
"""

import os, sys, time, json
import numpy as np

sys.path.insert(0, os.path.dirname(os.path.abspath(__file__)))

import yr
from config import *
from learner import Learner
from worker import RolloutWorker


def main():
    # ===== 第一步: 初始化 openYuanrong =====
    yr.init()
    # openYuanrong 会自动启动一个临时集群(单机模式)

    # ===== 第二步: 创建 Learner =====
    learner = Learner(
        state_dim=STATE_DIM, action_dim=ACTION_DIM,
        hidden_dim=HIDDEN_DIM, lr=LEARNING_RATE, gamma=GAMMA,
    )

    # ===== 第三步: 创建分布式 Worker =====
    opt = yr.InvokeOptions(cpu=WORKER_CPU, memory=WORKER_MEMORY)
    workers = []
    for i in range(NUM_WORKERS):
        w = RolloutWorker.options(opt).invoke(
            ENV_NAME, STATE_DIM, ACTION_DIM, HIDDEN_DIM
        )
        workers.append(w)

    # ===== 第四步: 训练循环 =====
    for iteration in range(1, MAX_ITERATIONS + 1):
        # 4.1 广播最新策略参数到对象存储
        params = learner.get_params()
        params_ref = yr.put(params)

        # 4.2 所有 Worker 并行采样(异步调用)
        traj_refs = [w.rollout.invoke(params_ref) for w in workers]

        # 4.3 异步等待所有结果
        trajectories = []
        pending = traj_refs
        while len(pending) > 0:
            ready, pending = yr.wait(pending)
            results = yr.get(ready)
            if isinstance(results, list) and len(results) > 0:
                if isinstance(results[0], list):
                    for worker_trajs in results:
                        trajectories.extend(worker_trajs)
                elif isinstance(results[0], dict):
                    trajectories.extend(results)
                else:
                    trajectories.extend(results)
            else:
                trajectories.append(results)

        # 4.4 Learner 更新策略
        metrics = learner.update(trajectories, iteration)

        # 4.5 打印进度
        print(f"[Iter {iteration:>3d}] "
              f"Avg Reward: {metrics['avg_reward']:>7.1f} | "
              f"Max: {metrics['max_reward']:>5.0f} | "
              f"Min: {metrics['min_reward']:>5.0f}")

    # ===== 第五步: 保存结果 =====
    with open("training_history.json", "w") as f:
        json.dump(learner.history, f, indent=2)

    # 清理
    for w in workers:
        w.terminate()
    yr.finalize()


if __name__ == "__main__":
    main()
openYuanrong 关键 API 速查:
| API | 作用 | 说明 |
|---|---|---|
yr.init() |
初始化运行时 | 单机模式下自动启动临时集群 |
yr.put(data) |
数据放入对象存储 | 返回引用(ref),不复制数据 |
yr.get(refs) |
从对象存储取数据 | 传入引用,返回实际数据 |
yr.wait(refs) |
异步等待 | 返回 (已完成, 未完成),先完成先处理 |
@yr.instance |
有状态函数装饰器 | 让类实例可远程调用 |
.options(opt).invoke(...) |
创建远程实例 | 指定资源配额 |
.rollout.invoke(ref) |
远程方法调用 | 异步调用,立即返回引用 |
.terminate() |
销毁远程实例 | 释放资源 |
yr.finalize() |
关闭运行时 | 清理所有资源 |
8.6 visualize.py --- 可视化生成器
训练完成后,运行这个脚本可以生成一个独立的 HTML 页面,包含:
- CartPole 动画回放(展示从不会到学会的过程)
- 实时训练曲线
- 关键指标面板
- 回放速度控制
代码较长(主要是 HTML/CSS/JS),这里不展开。核心逻辑是读取 training_history.json,
用 JavaScript Canvas 绘制动画和图表。
9. 运行训练
9.1 执行训练命令
在宿主机终端执行:
bash
docker exec -e PYTHONPATH=/workspace/examples/rl_agent \
  yuanrong-dev \
  python /workspace/examples/rl_agent/train.py
⚠️ 踩坑提醒 5:必须设置
PYTHONPATH!openYuanrong 的 Worker 运行在独立进程中,它们需要能找到
worker.py等模块。如果不设置
PYTHONPATH,Worker 进程会报ModuleNotFoundError。
-e PYTHONPATH=/workspace/examples/rl_agent告诉 Python 在这个目录下查找模块。
9.2 训练输出
你会看到类似这样的输出:
============================================================
  openYuanrong 分布式强化学习训练
  环境: CartPole-v1
  Worker 数量: 4
  目标回报: 475.0
============================================================

[1/5] 初始化 openYuanrong 环境...
      ✓ openYuanrong 初始化完成

[2/5] 创建 Learner(策略网络)...
      ✓ 策略网络: 4 → 32 → 2

[3/5] 创建 4 个分布式 Worker...
      ✓ Worker-0 已创建 (CPU=1000m, MEM=512MB)
      ✓ Worker-1 已创建 (CPU=1000m, MEM=512MB)
      ✓ Worker-2 已创建 (CPU=1000m, MEM=512MB)
      ✓ Worker-3 已创建 (CPU=1000m, MEM=512MB)

[4/5] 开始训练循环...

[Iter   1] Workers: 4 | Avg Reward:   22.3 | Max:   34 | Min:   12 | Loss:  2.145 | Time: 0.85s
[Iter   2] Workers: 4 | Avg Reward:   25.1 | Max:   41 | Min:   15 | Loss:  1.892 | Time: 0.72s
...
[Iter 100] Workers: 4 | Avg Reward:   45.2 | Max:   89 | Min:   18 | Loss:  0.534 | Time: 0.41s
...
[Iter 300] Workers: 4 | Avg Reward:   52.8 | Max:  112 | Min:   22 | Loss:  0.312 | Time: 0.39s

[5/5] 保存训练结果...
      ✓ 训练历史已保存到 training_history.json
训练大约需要 10-15 秒(300 轮迭代)。
关于训练效果 :纯 NumPy 实现的 REINFORCE 算法在 CartPole 上收敛较慢,
平均回报通常能达到 40-60 左右。这是算法本身的局限(方差大),不是 openYuanrong 的问题。
如果换成 PPO 算法 + PyTorch 网络,可以轻松达到 475 的满分。
本示例的重点是展示 openYuanrong 的分布式能力,而非追求最优训练效果。
10. 生成可视化页面
10.1 生成 HTML
训练完成后,training_history.json 会保存在容器的 /workspace 目录下。
运行可视化脚本:
bash
docker exec -e PYTHONPATH=/workspace/examples/rl_agent \
  -w /workspace/examples/rl_agent \
  yuanrong-dev \
  python visualize.py /workspace/training_history.json
10.2 复制到宿主机
bash
docker cp yuanrong-dev:/workspace/examples/rl_agent/training_visualization.html ./examples/rl_agent/10.3 用浏览器打开
bash
open examples/rl_agent/training_visualization.html(Linux 用户用 xdg-open,Windows 用户直接双击文件)
你会看到一个深色主题的仪表盘页面,包含:
- 左侧:CartPole 动画,展示小车和杆子的运动
- 右侧:训练曲线,显示平均回报随迭代的变化
- 顶部:关键指标卡片(当前迭代、平均回报、最大回报、训练阶段)
- 底部:回放控制(播放/暂停、速度调节、进度条)
11. 常见问题与踩坑记录
Q1: openyuanrong.whl is not a valid wheel filename
原因:pip 安装 whl 文件时会校验文件名格式,文件名必须符合 PEP 427 规范。
解决 :确保文件名保持原样 openyuanrong-0.7.0-cp39-cp39-manylinux_2_34_x86_64.whl,不要重命名。
Q2: Docker 构建时 apt-get 返回 502 错误
原因 :--build-arg http_proxy=... 会让 Dockerfile 中的 RUN 命令通过代理访问网络,
而 Debian 软件源通过某些代理会返回 502。
解决 :不在 Dockerfile 中安装需要 apt-get 的包。容器启动后用
docker exec -e http_proxy="" -e https_proxy="" 清空代理再安装。
Q3: Worker 报 ModuleNotFoundError: No module named 'worker'
原因:openYuanrong 的 Worker 运行在独立进程中,Python 默认不知道去哪里找模块。
解决 :运行时加 -e PYTHONPATH=/workspace/examples/rl_agent。
Q4: yr.init() 卡住或报错
原因 :openYuanrong 初始化时需要用 curl 做健康检查。
解决:确保容器内已安装 curl(参见第 7.2 节)。
Q5: Apple Silicon Mac 上的 platform 警告
WARNING: The requested image's platform (linux/amd64) does not match
the detected host platform (linux/arm64/v8)
这是正常的 ,Docker Desktop 通过 Rosetta 2 模拟 x86_64 环境。性能会比原生慢一些,
但功能完全正常。
Q6: 训练效果不好,平均回报只有 40-60
这是正常的 。纯 NumPy 实现的 REINFORCE 算法方差大、收敛慢。
本示例的目的是展示 openYuanrong 的分布式能力,不是追求最优训练效果。
如果想要更好的效果,可以:
- 换用 PPO 算法
- 用 PyTorch 实现策略网络
- 增加训练迭代次数
- 调整学习率和网络结构
Q7: 如何停止和清理容器?
bash
# 停止容器
docker compose -f docker/docker-compose.yml down

# 如果要彻底清理(包括镜像)
docker compose -f docker/docker-compose.yml down --rmi all
完整命令速查
以下是从零开始的所有命令,按顺序执行即可:
bash
# 1. 创建项目目录
mkdir -p openYuanrong/docker
mkdir -p openYuanrong/examples/rl_agent
cd openYuanrong

# 2. 下载 whl(国内加代理:curl -x http://127.0.0.1:7897 -L -O ...)
cd docker
curl -L -O https://openyuanrong.obs.cn-southwest-2.myhuaweicloud.com/release/0.7.0/linux/x86_64/openyuanrong-0.7.0-cp39-cp39-manylinux_2_34_x86_64.whl
cd ..

# 3. 创建 Dockerfile 和 docker-compose.yml(内容见第 5 节)

# 4. 创建 6 个 Python 文件(内容见第 8 节)

# 5. 构建镜像(国内加代理参数)
docker compose -f docker/docker-compose.yml build --no-cache \
  --build-arg http_proxy=http://host.docker.internal:7897 \
  --build-arg https_proxy=http://host.docker.internal:7897

# 6. 启动容器
docker compose -f docker/docker-compose.yml up -d

# 7. 安装 curl
docker exec -e http_proxy="" -e https_proxy="" yuanrong-dev \
  bash -c "apt-get update && apt-get install -y curl"

# 8. 运行训练
docker exec -e PYTHONPATH=/workspace/examples/rl_agent \
  yuanrong-dev \
  python /workspace/examples/rl_agent/train.py

# 9. 生成可视化
docker exec -e PYTHONPATH=/workspace/examples/rl_agent \
  -w /workspace/examples/rl_agent \
  yuanrong-dev \
  python visualize.py /workspace/training_history.json

# 10. 复制到本机并打开
docker cp yuanrong-dev:/workspace/examples/rl_agent/training_visualization.html \
  ./examples/rl_agent/
open examples/rl_agent/training_visualization.html
总结
通过这个实战案例,我们完成了:
- 用 Docker 搭建了 openYuanrong 的运行环境(解决了 x86_64 平台限制)
- 用 6 个 Python 文件实现了一个完整的分布式 RL 训练系统
- 用 openYuanrong 的
@yr.instance、yr.put()、yr.get()、yr.wait()四个核心 API 实现了多 Worker 并行采样 - 生成了可交互的训练可视化页面
openYuanrong 让分布式计算变得像写单机程序一样简单------加几个装饰器,改几行调用方式,就能把串行代码变成分布式并行。
附录:完整源码
以下是本项目所有文件的完整源码,可以直接复制使用。
A1. docker/Dockerfile
dockerfile
FROM --platform=linux/amd64 python:3.9-slim

# 从本地复制预下载的 whl 包(保留原始文件名)
COPY openyuanrong-0.7.0-cp39-cp39-manylinux_2_34_x86_64.whl /tmp/

# 安装 openYuanrong + RL 依赖
RUN pip install --no-cache-dir -i https://pypi.tuna.tsinghua.edu.cn/simple \
    /tmp/openyuanrong-0.7.0-cp39-cp39-manylinux_2_34_x86_64.whl gymnasium numpy \
    && rm /tmp/openyuanrong-0.7.0-cp39-cp39-manylinux_2_34_x86_64.whl

WORKDIR /workspace

CMD ["bash"]
A2. docker/docker-compose.yml
yaml
services:
  yuanrong:
    build:
      context: .
      dockerfile: Dockerfile
    container_name: yuanrong-dev
    volumes:
      - ../examples:/workspace/examples
    stdin_open: true
    tty: true
A3. examples/rl_agent/config.py
python
"""
超参数配置

所有训练相关的超参数集中管理,方便调参和实验对比。
"""

# ============ 环境配置 ============
ENV_NAME = "CartPole-v1"        # Gym 环境名称
STATE_DIM = 4                   # CartPole 状态维度: [位置, 速度, 角度, 角速度]
ACTION_DIM = 2                  # CartPole 动作空间: [左推, 右推]

# ============ 网络配置 ============
HIDDEN_DIM = 32                 # 隐藏层神经元数量
LEARNING_RATE = 0.005           # 学习率(调小以稳定训练)
GAMMA = 0.99                    # 折扣因子

# ============ 训练配置 ============
NUM_WORKERS = 4                 # 并行 Worker 数量
MAX_ITERATIONS = 300            # 最大训练迭代次数
SOLVED_REWARD = 475.0           # CartPole-v1 认为"解决"的平均回报阈值
SOLVED_WINDOW = 10              # 连续多少次迭代达标算"解决"

# ============ Worker 资源配置 ============
WORKER_CPU = 1000               # 每个 Worker 分配的 CPU(毫核)
WORKER_MEMORY = 512             # 每个 Worker 分配的内存(MB)
A4. examples/rl_agent/policy.py
python
"""
策略网络 ------ 纯 NumPy 实现

结构: Input(4) -> Linear(32) -> ReLU -> Linear(2) -> Softmax
算法: REINFORCE (策略梯度) with baseline

为什么用 NumPy 而不是 PyTorch?
1. 减少依赖,CartPole 不需要 GPU
2. 参数是普通 dict,方便 yr.put() 序列化传递
3. 专注展示 openYuanrong 的分布式能力,而非深度学习框架
"""

import numpy as np


class SoftmaxPolicy:
    """
    两层全连接策略网络

    前向传播:
        h = ReLU(x @ W1 + b1)
        logits = h @ W2 + b2
        probs = softmax(logits)
    """

    def __init__(self, state_dim, action_dim, hidden_dim=32, lr=0.01):
        self.lr = lr
        self.state_dim = state_dim
        self.action_dim = action_dim
        self.hidden_dim = hidden_dim

        # Xavier 初始化
        self.W1 = np.random.randn(state_dim, hidden_dim) * np.sqrt(2.0 / state_dim)
        self.b1 = np.zeros(hidden_dim)
        self.W2 = np.random.randn(hidden_dim, action_dim) * np.sqrt(2.0 / hidden_dim)
        self.b2 = np.zeros(action_dim)

    def _softmax(self, x):
        """数值稳定的 softmax"""
        e = np.exp(x - np.max(x, axis=-1, keepdims=True))
        return e / e.sum(axis=-1, keepdims=True)

    def _relu(self, x):
        return np.maximum(0, x)

    def forward(self, state):
        """前向传播,返回动作概率和中间值(用于反向传播)"""
        state = np.array(state, dtype=np.float64)
        h = self._relu(state @ self.W1 + self.b1)
        logits = h @ self.W2 + self.b2
        probs = self._softmax(logits)
        return probs, h

    def get_action(self, state):
        """
        根据当前策略采样动作

        返回: (action, log_prob)
        - action: 采样的动作索引
        - log_prob: 该动作的对数概率(用于策略梯度计算)
        """
        probs, _ = self.forward(state)
        # 防止概率为 0 导致 log 出错
        probs = np.clip(probs, 1e-8, 1.0)
        action = np.random.choice(self.action_dim, p=probs)
        log_prob = np.log(probs[action])
        return int(action), float(log_prob)

    def get_params(self):
        """导出参数字典,用于 yr.put() 分布式广播"""
        return {
            "W1": self.W1.copy(),
            "b1": self.b1.copy(),
            "W2": self.W2.copy(),
            "b2": self.b2.copy(),
        }

    def set_params(self, params):
        """加载参数字典,用于 Worker 同步最新策略"""
        self.W1 = params["W1"].copy()
        self.b1 = params["b1"].copy()
        self.W2 = params["W2"].copy()
        self.b2 = params["b2"].copy()
A5. examples/rl_agent/worker.py
python
"""
分布式 Worker ------ 环境交互与经验采集

每个 Worker 是一个 openYuanrong 有状态函数实例,运行在独立进程中。
它维护自己的 Gym 环境,接收最新策略参数,执行 rollout 并返回轨迹数据。

关键点:
- @yr.instance 使 Worker 成为可远程调用的有状态对象
- rollout() 接收参数字典(通过 yr.put 的引用自动解析)
- 返回的轨迹数据会自动存入 openYuanrong 对象存储
"""

import numpy as np
import yr

# 内联一个轻量版 Policy,避免 Worker 进程需要额外导入路径
# 在实际项目中可以通过 runtime_env 配置依赖


class _WorkerPolicy:
    """Worker 端的轻量策略网络,只需要前向推理"""

    def __init__(self, state_dim, action_dim, hidden_dim):
        self.state_dim = state_dim
        self.action_dim = action_dim
        self.hidden_dim = hidden_dim
        self.W1 = np.zeros((state_dim, hidden_dim))
        self.b1 = np.zeros(hidden_dim)
        self.W2 = np.zeros((hidden_dim, action_dim))
        self.b2 = np.zeros(action_dim)

    def set_params(self, params):
        self.W1 = params["W1"]
        self.b1 = params["b1"]
        self.W2 = params["W2"]
        self.b2 = params["b2"]

    def get_action(self, state):
        state = np.array(state, dtype=np.float64)
        h = np.maximum(0, state @ self.W1 + self.b1)
        logits = h @ self.W2 + self.b2
        e = np.exp(logits - np.max(logits))
        probs = e / e.sum()
        probs = np.clip(probs, 1e-8, 1.0)
        action = np.random.choice(self.action_dim, p=probs)
        log_prob = np.log(probs[action])
        return int(action), float(log_prob)


@yr.instance
class RolloutWorker:
    """
    分布式采样 Worker

    生命周期:
    1. invoke() 创建时初始化环境
    2. rollout() 被反复调用,每次用最新策略采样一个 episode
    3. terminate() 销毁实例释放资源

    使用方式:
        worker = RolloutWorker.invoke("CartPole-v1", 4, 2, 32)
        traj_ref = worker.rollout.invoke(params_dict)
        traj = yr.get(traj_ref)
    """

    def __init__(self, env_name, state_dim, action_dim, hidden_dim):
        import gymnasium
        self.env = gymnasium.make(env_name)
        self.policy = _WorkerPolicy(state_dim, action_dim, hidden_dim)
        self.episodes_done = 0

    def rollout(self, policy_params, num_episodes=5):
        """
        执行多个完整 episode 的采样

        参数:
            policy_params: dict, 策略网络参数
            num_episodes: int, 每次调用采样的 episode 数量

        返回:
            list[dict]: 每个 episode 的轨迹数据
        """
        self.policy.set_params(policy_params)
        trajectories = []

        for _ in range(num_episodes):
            state, _ = self.env.reset()
            states, actions, rewards, log_probs = [], [], [], []
            done = False

            while not done:
                action, log_prob = self.policy.get_action(state)
                next_state, reward, terminated, truncated, _ = self.env.step(action)
                done = terminated or truncated

                states.append(state.tolist())
                actions.append(action)
                rewards.append(float(reward))
                log_probs.append(log_prob)

                state = next_state

            self.episodes_done += 1
            trajectories.append({
                "states": states,
                "actions": actions,
                "rewards": rewards,
                "log_probs": log_probs,
                "total_reward": sum(rewards),
            })

        return trajectories

    def get_stats(self):
        """获取 Worker 统计信息"""
        return {"episodes_done": self.episodes_done}
A6. examples/rl_agent/learner.py
python
"""
中心化 Learner ------ 策略更新与训练指标记录

Learner 运行在 Driver 进程中(不是远程实例),负责:
1. 维护策略网络的权威副本
2. 收集所有 Worker 的轨迹数据
3. 用 REINFORCE + baseline 算法更新策略
4. 记录训练指标

REINFORCE 算法:
    ∇J(θ) ≈ (1/N) Σ_t ∇log π(a_t|s_t; θ) · (G_t - b)
    其中 G_t = Σ_k γ^k · r_{t+k} 是折扣回报,b 是 baseline(回报均值)
"""

import numpy as np
from policy import SoftmaxPolicy


class Learner:
    """
    中心化策略更新器

    使用方式:
        learner = Learner(state_dim=4, action_dim=2)
        params = learner.get_params()       # 广播给 Worker
        metrics = learner.update(trajs)     # 用经验更新策略
    """

    def __init__(self, state_dim, action_dim, hidden_dim=32, lr=0.01, gamma=0.99):
        self.policy = SoftmaxPolicy(state_dim, action_dim, hidden_dim, lr)
        self.gamma = gamma
        self.lr = lr

        # 训练历史记录
        self.history = {
            "iteration": [],
            "avg_reward": [],
            "max_reward": [],
            "min_reward": [],
            "loss": [],
        }

    def get_params(self):
        """获取当前策略参数,用于 yr.put() 广播"""
        return self.policy.get_params()

    def _compute_returns(self, rewards):
        """
        计算折扣回报 G_t = r_t + γ*r_{t+1} + γ²*r_{t+2} + ...

        从后往前累加,效率更高
        """
        returns = np.zeros(len(rewards))
        G = 0
        for t in reversed(range(len(rewards))):
            G = rewards[t] + self.gamma * G
            returns[t] = G
        return returns

    def update(self, trajectories, iteration=0):
        """
        用收集到的轨迹更新策略

        参数:
            trajectories: list[dict], 每个 Worker 返回的轨迹
            iteration: int, 当前迭代轮次

        返回:
            dict: 训练指标
        """
        # ---- 1. 计算所有轨迹的折扣回报 ----
        all_states = []
        all_actions = []
        all_returns = []
        all_log_probs = []
        total_rewards = []

        for traj in trajectories:
            returns = self._compute_returns(traj["rewards"])
            all_states.extend(traj["states"])
            all_actions.extend(traj["actions"])
            all_returns.extend(returns.tolist())
            all_log_probs.extend(traj["log_probs"])
            total_rewards.append(traj["total_reward"])

        all_returns = np.array(all_returns)
        all_log_probs = np.array(all_log_probs)

        # ---- 2. Baseline: 减去均值,除以标准差(标准化) ----
        if len(all_returns) > 1:
            baseline = all_returns.mean()
            std = all_returns.std() + 1e-8
            advantages = (all_returns - baseline) / std
        else:
            advantages = all_returns

        # ---- 3. 计算策略梯度并更新 ----
        # REINFORCE: ∇J ≈ -Σ log π(a|s) · advantage
        # 我们对每个样本计算梯度并累加
        grad_W1 = np.zeros_like(self.policy.W1)
        grad_b1 = np.zeros_like(self.policy.b1)
        grad_W2 = np.zeros_like(self.policy.W2)
        grad_b2 = np.zeros_like(self.policy.b2)

        n_samples = len(all_states)
        for i in range(n_samples):
            state = np.array(all_states[i], dtype=np.float64)
            action = all_actions[i]
            advantage = advantages[i]

            # 前向传播
            h = np.maximum(0, state @ self.policy.W1 + self.policy.b1)  # ReLU
            logits = h @ self.policy.W2 + self.policy.b2
            e = np.exp(logits - np.max(logits))
            probs = e / e.sum()
            probs = np.clip(probs, 1e-8, 1.0)

            # softmax 梯度: d_logits = probs - one_hot(action)
            d_logits = probs.copy()
            d_logits[action] -= 1.0  # ∂L/∂logits

            # 乘以 advantage(策略梯度的核心)
            d_logits *= advantage

            # 反向传播到 W2, b2
            grad_W2 += np.outer(h, d_logits)
            grad_b2 += d_logits

            # 反向传播到 W1, b1(经过 ReLU)
            d_h = d_logits @ self.policy.W2.T
            d_h *= (h > 0).astype(np.float64)  # ReLU 梯度
            grad_W1 += np.outer(state, d_h)
            grad_b1 += d_h

        # 平均梯度并更新
        self.policy.W1 -= self.lr * grad_W1 / n_samples
        self.policy.b1 -= self.lr * grad_b1 / n_samples
        self.policy.W2 -= self.lr * grad_W2 / n_samples
        self.policy.b2 -= self.lr * grad_b2 / n_samples

        # ---- 4. 计算 loss 用于记录 ----
        loss = -float(np.mean(all_log_probs * advantages))

        # ---- 5. 记录指标 ----
        avg_reward = float(np.mean(total_rewards))
        max_reward = float(np.max(total_rewards))
        min_reward = float(np.min(total_rewards))

        self.history["iteration"].append(iteration)
        self.history["avg_reward"].append(avg_reward)
        self.history["max_reward"].append(max_reward)
        self.history["min_reward"].append(min_reward)
        self.history["loss"].append(loss)

        return {
            "avg_reward": avg_reward,
            "max_reward": max_reward,
            "min_reward": min_reward,
            "loss": loss,
        }
A7. examples/rl_agent/train.py
python
"""
主训练脚本 ------ 串联所有组件

这是整个分布式 RL 系统的入口。它做以下事情:
1. 初始化 openYuanrong 环境
2. 创建 N 个分布式 Worker
3. 循环: 广播参数 → 并行采样 → 收集经验 → 更新策略
4. 记录并打印训练进度
5. 达到目标后保存结果并退出

运行方式:
    python train.py
"""

import os
import sys
import time
import json
import numpy as np

# 确保 Worker 进程能找到本目录下的模块
sys.path.insert(0, os.path.dirname(os.path.abspath(__file__)))

import yr

from config import (
    ENV_NAME, STATE_DIM, ACTION_DIM, HIDDEN_DIM,
    LEARNING_RATE, GAMMA, NUM_WORKERS, MAX_ITERATIONS,
    SOLVED_REWARD, SOLVED_WINDOW, WORKER_CPU, WORKER_MEMORY,
)
from learner import Learner
from worker import RolloutWorker


def print_banner():
    print("=" * 60)
    print("  openYuanrong 分布式强化学习训练")
    print(f"  环境: {ENV_NAME}")
    print(f"  Worker 数量: {NUM_WORKERS}")
    print(f"  目标回报: {SOLVED_REWARD}")
    print("=" * 60)
    print()


def main():
    print_banner()

    # ============ 第一步: 初始化 openYuanrong ============
    print("[1/5] 初始化 openYuanrong 环境...")
    yr.init()
    print("      ✓ openYuanrong 初始化完成\n")

    # ============ 第二步: 创建 Learner ============
    print("[2/5] 创建 Learner(策略网络)...")
    learner = Learner(
        state_dim=STATE_DIM,
        action_dim=ACTION_DIM,
        hidden_dim=HIDDEN_DIM,
        lr=LEARNING_RATE,
        gamma=GAMMA,
    )
    print(f"      ✓ 策略网络: {STATE_DIM} → {HIDDEN_DIM} → {ACTION_DIM}\n")

    # ============ 第三步: 创建分布式 Worker ============
    print(f"[3/5] 创建 {NUM_WORKERS} 个分布式 Worker...")
    opt = yr.InvokeOptions(cpu=WORKER_CPU, memory=WORKER_MEMORY)
    workers = []
    for i in range(NUM_WORKERS):
        w = RolloutWorker.options(opt).invoke(ENV_NAME, STATE_DIM, ACTION_DIM, HIDDEN_DIM)
        workers.append(w)
        print(f"      ✓ Worker-{i} 已创建 (CPU={WORKER_CPU}m, MEM={WORKER_MEMORY}MB)")
    print()

    # ============ 第四步: 训练循环 ============
    print("[4/5] 开始训练循环...\n")
    solved_count = 0
    start_time = time.time()

    for iteration in range(1, MAX_ITERATIONS + 1):
        iter_start = time.time()

        # 4.1 广播最新策略参数到对象存储
        params = learner.get_params()
        params_ref = yr.put(params)

        # 4.2 所有 Worker 并行采样
        traj_refs = [w.rollout.invoke(params_ref) for w in workers]

        # 4.3 异步等待所有结果
        #     yr.wait() 返回 (已完成列表, 未完成列表)
        #     先完成的先处理,提高效率
        trajectories = []
        pending = traj_refs
        while len(pending) > 0:
            ready, pending = yr.wait(pending)
            results = yr.get(ready)
            # 每个 Worker 返回 list[dict](多个 episode)
            # yr.get 可能返回 list of list 或单个 list
            if isinstance(results, list) and len(results) > 0:
                if isinstance(results[0], list):
                    # results 是 [worker0_trajs, worker1_trajs, ...]
                    for worker_trajs in results:
                        trajectories.extend(worker_trajs)
                elif isinstance(results[0], dict):
                    # results 本身就是 trajectories
                    trajectories.extend(results)
                else:
                    trajectories.extend(results)
            else:
                trajectories.append(results)

        # 4.4 Learner 更新策略
        metrics = learner.update(trajectories, iteration)

        # 4.5 打印进度
        iter_time = time.time() - iter_start
        print(
            f"[Iter {iteration:>3d}] "
            f"Workers: {NUM_WORKERS} | "
            f"Avg Reward: {metrics['avg_reward']:>7.1f} | "
            f"Max: {metrics['max_reward']:>5.0f} | "
            f"Min: {metrics['min_reward']:>5.0f} | "
            f"Loss: {metrics['loss']:>7.3f} | "
            f"Time: {iter_time:.2f}s"
        )

        # 4.6 检查是否达标
        if metrics["avg_reward"] >= SOLVED_REWARD:
            solved_count += 1
            if solved_count >= SOLVED_WINDOW:
                total_time = time.time() - start_time
                print(f"\n🎉 环境已解决!连续 {SOLVED_WINDOW} 次达到 {SOLVED_REWARD}")
                print(f"   总训练时间: {total_time:.1f}s")
                break
        else:
            solved_count = 0

    # ============ 第五步: 保存结果 ============
    print("\n[5/5] 保存训练结果...")
    with open("training_history.json", "w") as f:
        json.dump(learner.history, f, indent=2)
    print("      ✓ 训练历史已保存到 training_history.json")

    # 打印最终统计
    total_time = time.time() - start_time
    final_avg = np.mean(learner.history["avg_reward"][-10:])
    print(f"\n{'=' * 60}")
    print(f"  训练完成!")
    print(f"  总迭代: {len(learner.history['iteration'])}")
    print(f"  最终平均回报 (最后10轮): {final_avg:.1f}")
    print(f"  总耗时: {total_time:.1f}s")
    print(f"{'=' * 60}")

    # 清理: 销毁所有 Worker
    print("\n清理资源...")
    for i, w in enumerate(workers):
        w.terminate()
    yr.finalize()
    print("✓ 完成")


if __name__ == "__main__":
    main()
A8. examples/rl_agent/visualize.py
python
"""
训练可视化生成器

读取训练过程中保存的轨迹数据,生成一个独立的 HTML 文件,
包含:
1. CartPole 动画回放(展示从不会到学会的过程)
2. 实时训练曲线
3. 关键指标面板

运行方式:
    python visualize.py

会在当前目录生成 training_visualization.html,用浏览器打开即可。
"""

import json
import sys
import os


def generate_html(history_path="training_history.json",
                  episodes_path="training_episodes.json",
                  output_path="training_visualization.html"):
    # 加载训练历史
    with open(history_path) as f:
        history = json.load(f)

    # 加载关键 episode 轨迹(如果有)
    episodes = []
    if os.path.exists(episodes_path):
        with open(episodes_path) as f:
            episodes = json.load(f)

    history_json = json.dumps(history)
    episodes_json = json.dumps(episodes)

    html = f"""<!DOCTYPE html>
<html lang="zh-CN">
<head>
<meta charset="UTF-8">
<meta name="viewport" content="width=device-width, initial-scale=1.0">
<title>openYuanrong 分布式 RL 训练可视化</title>
<style>
* {{ margin: 0; padding: 0; box-sizing: border-box; }}
body {{ font-family: -apple-system, BlinkMacSystemFont, 'Segoe UI', sans-serif;
       background: #0a0a1a; color: #e0e0e0; overflow-x: hidden; }}

.header {{ background: linear-gradient(135deg, #1a1a3e 0%, #0d0d2b 100%);
           padding: 24px 40px; border-bottom: 1px solid #2a2a5a; }}
.header h1 {{ font-size: 22px; color: #7eb8ff; }}
.header p {{ font-size: 13px; color: #888; margin-top: 4px; }}

.dashboard {{ display: grid; grid-template-columns: 1fr 1fr;
              gap: 16px; padding: 20px 40px; max-width: 1400px; margin: 0 auto; }}

.panel {{ background: #12122a; border: 1px solid #2a2a5a; border-radius: 12px;
          padding: 20px; }}
.panel h2 {{ font-size: 14px; color: #7eb8ff; margin-bottom: 12px;
             text-transform: uppercase; letter-spacing: 1px; }}

.full-width {{ grid-column: 1 / -1; }}

/* 指标卡片 */
.metrics {{ display: grid; grid-template-columns: repeat(4, 1fr); gap: 12px; }}
.metric-card {{ background: #1a1a3e; border-radius: 8px; padding: 16px; text-align: center; }}
.metric-card .value {{ font-size: 28px; font-weight: 700; color: #7eb8ff; }}
.metric-card .label {{ font-size: 11px; color: #888; margin-top: 4px; }}
.metric-card.highlight .value {{ color: #4cff88; }}
.metric-card.warn .value {{ color: #ffb74d; }}

/* Canvas */
canvas {{ width: 100%; border-radius: 8px; background: #0d0d20; }}

/* 控制栏 */
.controls {{ display: flex; align-items: center; gap: 12px; margin-top: 12px; }}
.controls button {{ background: #2a2a5a; color: #7eb8ff; border: 1px solid #3a3a7a;
                    border-radius: 6px; padding: 8px 16px; cursor: pointer;
                    font-size: 13px; transition: all 0.2s; }}
.controls button:hover {{ background: #3a3a7a; }}
.controls button.active {{ background: #7eb8ff; color: #0a0a1a; }}
.controls .slider-wrap {{ flex: 1; }}
.controls input[type=range] {{ width: 100%; accent-color: #7eb8ff; }}
.controls .iter-label {{ font-size: 13px; color: #888; min-width: 80px; }}

/* 进度条 */
.progress-bar {{ height: 4px; background: #1a1a3e; border-radius: 2px; margin-top: 8px; }}
.progress-bar .fill {{ height: 100%; background: linear-gradient(90deg, #7eb8ff, #4cff88);
                       border-radius: 2px; transition: width 0.3s; }}

/* 阶段标签 */
.phase-tag {{ display: inline-block; padding: 4px 10px; border-radius: 12px;
              font-size: 12px; font-weight: 600; }}
.phase-early {{ background: #3a1a1a; color: #ff6b6b; }}
.phase-learning {{ background: #3a3a1a; color: #ffb74d; }}
.phase-good {{ background: #1a3a1a; color: #4cff88; }}
</style>
</head>
<body>

<div class="header">
  <h1>🎮 openYuanrong 分布式强化学习训练可视化</h1>
  <p>CartPole-v1 | REINFORCE 策略梯度 | 4 Workers 并行采样</p>
</div>

<div class="dashboard">
  <!-- 指标面板 -->
  <div class="panel full-width">
    <h2>📊 训练指标</h2>
    <div class="metrics">
      <div class="metric-card" id="mc-iter">
        <div class="value" id="val-iter">0</div>
        <div class="label">当前迭代</div>
      </div>
      <div class="metric-card highlight" id="mc-reward">
        <div class="value" id="val-reward">0</div>
        <div class="label">平均回报</div>
      </div>
      <div class="metric-card warn" id="mc-max">
        <div class="value" id="val-max">0</div>
        <div class="label">最大回报</div>
      </div>
      <div class="metric-card" id="mc-phase">
        <div class="value" id="val-phase"><span class="phase-tag phase-early">未开始</span></div>
        <div class="label">训练阶段</div>
      </div>
    </div>
    <div class="progress-bar"><div class="fill" id="progress-fill" style="width:0%"></div></div>
  </div>

  <!-- CartPole 动画 -->
  <div class="panel">
    <h2>🎯 CartPole 实时动画</h2>
    <canvas id="cartpole-canvas" width="560" height="300"></canvas>
  </div>

  <!-- 训练曲线 -->
  <div class="panel">
    <h2>📈 训练曲线</h2>
    <canvas id="chart-canvas" width="560" height="300"></canvas>
  </div>

  <!-- 控制面板 -->
  <div class="panel full-width">
    <h2>⚙️ 回放控制</h2>
    <div class="controls">
      <button id="btn-play" class="active" onclick="togglePlay()">▶ 播放</button>
      <button onclick="setSpeed(0.5)">0.5x</button>
      <button onclick="setSpeed(1)" class="active" id="btn-1x">1x</button>
      <button onclick="setSpeed(3)">3x</button>
      <button onclick="setSpeed(10)">10x</button>
      <div class="slider-wrap">
        <input type="range" id="iter-slider" min="0" max="100" value="0"
               oninput="seekTo(this.value)">
      </div>
      <div class="iter-label" id="slider-label">Iter 0 / 0</div>
    </div>
  </div>
</div>

<script>
// ========== 数据 ==========
const history = {{history_json}};
const episodes = {{episodes_json}};
const totalIters = history.iteration ? history.iteration.length : 0;

// ========== 状态 ==========
let currentIter = 0;
let playing = true;
let speed = 1;
let lastTime = 0;
let accumTime = 0;

// 初始化 slider
const slider = document.getElementById('iter-slider');
slider.max = Math.max(0, totalIters - 1);

// ========== CartPole 动画 ==========
const cpCanvas = document.getElementById('cartpole-canvas');
const cpCtx = cpCanvas.getContext('2d');

function simulateCartPole(avgReward) {{
  const maxSteps = Math.min(Math.max(Math.round(avgReward), 10), 500);
  const stability = Math.min(avgReward / 200, 1.0);
  const states = [];
  let x = 0, v = 0, theta = (1 - stability) * 0.3 * (Math.random() - 0.5), omega = 0;
  for (let i = 0; i < maxSteps; i++) {{
    const force = -theta * 10 * stability - omega * 2 * stability + (1 - stability) * (Math.random() - 0.5) * 2;
    const cosT = Math.cos(theta), sinT = Math.sin(theta);
    omega += (9.8 * sinT - force * cosT * 0.1) * 0.02;
    theta += omega * 0.02;
    v += force * 0.02;
    x += v * 0.02;
    x = Math.max(-2.4, Math.min(2.4, x));
    states.push({{ x, v, theta, omega }});
    if (Math.abs(theta) > 0.5) break;
  }}
  return states;
}}

let cartStates = simulateCartPole(10);
let cartFrame = 0;

function drawCartPole() {{
  const W = cpCanvas.width, H = cpCanvas.height;
  cpCtx.clearRect(0, 0, W, H);

  cpCtx.strokeStyle = '#1a1a3a';
  cpCtx.lineWidth = 0.5;
  for (let y = 0; y < H; y += 20) {{
    cpCtx.beginPath(); cpCtx.moveTo(0, y); cpCtx.lineTo(W, y); cpCtx.stroke();
  }}

  const state = cartStates[cartFrame % cartStates.length];
  const cx = W / 2 + state.x * 80;
  const cy = H * 0.75;
  const cartW = 60, cartH = 24;
  const poleLen = 100;

  cpCtx.strokeStyle = '#3a3a5a';
  cpCtx.lineWidth = 2;
  cpCtx.beginPath();
  cpCtx.moveTo(40, cy + cartH / 2 + 8);
  cpCtx.lineTo(W - 40, cy + cartH / 2 + 8);
  cpCtx.stroke();

  cpCtx.fillStyle = '#4a6fa5';
  cpCtx.strokeStyle = '#7eb8ff';
  cpCtx.lineWidth = 2;
  cpCtx.beginPath();
  cpCtx.roundRect(cx - cartW / 2, cy - cartH / 2, cartW, cartH, 4);
  cpCtx.fill(); cpCtx.stroke();

  cpCtx.fillStyle = '#2a2a5a';
  cpCtx.beginPath(); cpCtx.arc(cx - 18, cy + cartH / 2 + 4, 6, 0, Math.PI * 2); cpCtx.fill();
  cpCtx.beginPath(); cpCtx.arc(cx + 18, cy + cartH / 2 + 4, 6, 0, Math.PI * 2); cpCtx.fill();

  const poleEndX = cx + Math.sin(state.theta) * poleLen;
  const poleEndY = cy - Math.cos(state.theta) * poleLen;
  const tiltRatio = Math.min(Math.abs(state.theta) / 0.3, 1);
  const r = Math.round(255 * tiltRatio);
  const g = Math.round(255 * (1 - tiltRatio));
  cpCtx.strokeStyle = `rgb(${{r}}, ${{g}}, 80)`;
  cpCtx.lineWidth = 6;
  cpCtx.lineCap = 'round';
  cpCtx.beginPath();
  cpCtx.moveTo(cx, cy - cartH / 2);
  cpCtx.lineTo(poleEndX, poleEndY);
  cpCtx.stroke();

  cpCtx.fillStyle = cpCtx.strokeStyle;
  cpCtx.beginPath(); cpCtx.arc(poleEndX, poleEndY, 5, 0, Math.PI * 2); cpCtx.fill();

  cpCtx.fillStyle = '#888';
  cpCtx.font = '12px monospace';
  cpCtx.fillText(`Step: ${{cartFrame % cartStates.length}} / ${{cartStates.length}}`, 12, 20);

  const angleDeg = (state.theta * 180 / Math.PI).toFixed(1);
  cpCtx.fillText(`Angle: ${{angleDeg}}°`, 12, 36);
}}

// ========== 训练曲线 ==========
const chartCanvas = document.getElementById('chart-canvas');
const chartCtx = chartCanvas.getContext('2d');

function drawChart() {{
  const W = chartCanvas.width, H = chartCanvas.height;
  chartCtx.clearRect(0, 0, W, H);

  if (totalIters === 0) return;

  const pad = {{ l: 50, r: 20, t: 20, b: 30 }};
  const plotW = W - pad.l - pad.r;
  const plotH = H - pad.t - pad.b;

  const n = currentIter + 1;
  const avgR = history.avg_reward.slice(0, n);
  const maxR = history.max_reward.slice(0, n);
  const minR = history.min_reward.slice(0, n);

  const allVals = [...avgR, ...maxR];
  const yMax = Math.max(100, ...allVals) * 1.1;
  const yMin = 0;

  const xScale = (i) => pad.l + (i / Math.max(totalIters - 1, 1)) * plotW;
  const yScale = (v) => pad.t + plotH - ((v - yMin) / (yMax - yMin)) * plotH;

  chartCtx.strokeStyle = '#1a1a3a';
  chartCtx.lineWidth = 0.5;
  for (let y = 0; y <= yMax; y += 50) {{
    const py = yScale(y);
    chartCtx.beginPath(); chartCtx.moveTo(pad.l, py); chartCtx.lineTo(W - pad.r, py); chartCtx.stroke();
    chartCtx.fillStyle = '#555';
    chartCtx.font = '10px monospace';
    chartCtx.textAlign = 'right';
    chartCtx.fillText(y.toFixed(0), pad.l - 6, py + 3);
  }}

  if (n > 1) {{
    chartCtx.fillStyle = 'rgba(126, 184, 255, 0.1)';
    chartCtx.beginPath();
    chartCtx.moveTo(xScale(0), yScale(maxR[0]));
    for (let i = 1; i < n; i++) chartCtx.lineTo(xScale(i), yScale(maxR[i]));
    for (let i = n - 1; i >= 0; i--) chartCtx.lineTo(xScale(i), yScale(minR[i]));
    chartCtx.closePath(); chartCtx.fill();
  }}

  chartCtx.strokeStyle = '#7eb8ff';
  chartCtx.lineWidth = 2;
  chartCtx.beginPath();
  for (let i = 0; i < n; i++) {{
    const x = xScale(i), y = yScale(avgR[i]);
    i === 0 ? chartCtx.moveTo(x, y) : chartCtx.lineTo(x, y);
  }}
  chartCtx.stroke();

  if (n > 0) {{
    const cx = xScale(n - 1), cy = yScale(avgR[n - 1]);
    chartCtx.fillStyle = '#7eb8ff';
    chartCtx.beginPath(); chartCtx.arc(cx, cy, 4, 0, Math.PI * 2); chartCtx.fill();
    chartCtx.fillStyle = '#fff';
    chartCtx.font = '11px monospace';
    chartCtx.textAlign = 'left';
    chartCtx.fillText(avgR[n - 1].toFixed(1), cx + 8, cy - 6);
  }}

  if (yMax >= 475) {{
    const goalY = yScale(475);
    chartCtx.strokeStyle = '#ff6b6b';
    chartCtx.lineWidth = 1;
    chartCtx.setLineDash([6, 3]);
    chartCtx.beginPath(); chartCtx.moveTo(pad.l, goalY); chartCtx.lineTo(W - pad.r, goalY); chartCtx.stroke();
    chartCtx.setLineDash([]);
    chartCtx.fillStyle = '#ff6b6b';
    chartCtx.fillText('Goal: 475', W - pad.r - 60, goalY - 6);
  }}

  chartCtx.fillStyle = '#555';
  chartCtx.textAlign = 'center';
  chartCtx.fillText('Iteration', W / 2, H - 4);
}}

// ========== 指标更新 ==========
function updateMetrics() {{
  if (totalIters === 0) return;
  const i = Math.min(currentIter, totalIters - 1);
  const avg = history.avg_reward[i];
  const max = history.max_reward[i];

  document.getElementById('val-iter').textContent = history.iteration[i];
  document.getElementById('val-reward').textContent = avg.toFixed(1);
  document.getElementById('val-max').textContent = max.toFixed(0);

  let phase, cls;
  if (avg < 30) {{ phase = '探索阶段'; cls = 'phase-early'; }}
  else if (avg < 100) {{ phase = '学习中'; cls = 'phase-learning'; }}
  else {{ phase = '趋于稳定'; cls = 'phase-good'; }}
  document.getElementById('val-phase').innerHTML = `<span class="phase-tag ${{cls}}">${{phase}}</span>`;

  const pct = ((i + 1) / totalIters * 100).toFixed(1);
  document.getElementById('progress-fill').style.width = pct + '%';

  slider.value = i;
  document.getElementById('slider-label').textContent = `Iter ${{i + 1}} / ${{totalIters}}`;
}}

// ========== 动画循环 ==========
function animate(timestamp) {{
  if (!lastTime) lastTime = timestamp;
  const dt = timestamp - lastTime;
  lastTime = timestamp;

  if (playing && totalIters > 0) {{
    accumTime += dt * speed;
    while (accumTime > 200 && currentIter < totalIters - 1) {{
      accumTime -= 200;
      currentIter++;
      const avg = history.avg_reward[currentIter];
      cartStates = simulateCartPole(avg);
      cartFrame = 0;
    }}
  }}

  if (cartStates.length > 0) {{
    cartFrame++;
    if (cartFrame >= cartStates.length) {{
      if (totalIters > 0) {{
        const avg = history.avg_reward[Math.min(currentIter, totalIters - 1)];
        cartStates = simulateCartPole(avg);
      }}
      cartFrame = 0;
    }}
  }}

  drawCartPole();
  drawChart();
  updateMetrics();

  requestAnimationFrame(animate);
}}

// ========== 控制函数 ==========
function togglePlay() {{
  playing = !playing;
  document.getElementById('btn-play').textContent = playing ? '⏸ 暂停' : '▶ 播放';
  document.getElementById('btn-play').classList.toggle('active', playing);
}}

function setSpeed(s) {{
  speed = s;
  document.querySelectorAll('.controls button').forEach(b => {{
    if (b.textContent.includes('x')) b.classList.remove('active');
  }});
  const btn = [...document.querySelectorAll('.controls button')].find(b => b.textContent === s + 'x');
  if (btn) btn.classList.add('active');
}}

function seekTo(val) {{
  currentIter = parseInt(val);
  if (totalIters > 0) {{
    const avg = history.avg_reward[Math.min(currentIter, totalIters - 1)];
    cartStates = simulateCartPole(avg);
    cartFrame = 0;
  }}
}}

// ========== 启动 ==========
requestAnimationFrame(animate);
</script>
</body>
</html>"""

    with open(output_path, 'w') as f:
        f.write(html)
    print(f"✓ 可视化页面已生成: {output_path}")
    print(f"  用浏览器打开即可查看训练回放动画")


if __name__ == "__main__":
    h = sys.argv[1] if len(sys.argv) > 1 else "training_history.json"
    generate_html(history_path=h)
A9. examples/rl_agent/plot_results.py
python
"""
训练结果可视化

读取 training_history.json,生成训练曲线图。

运行方式:
    python plot_results.py

依赖:
    pip install matplotlib
"""

import json
import sys

try:
    import matplotlib
    matplotlib.use("Agg")  # 无 GUI 环境使用 Agg 后端
    import matplotlib.pyplot as plt
except ImportError:
    print("请先安装 matplotlib: pip install matplotlib")
    sys.exit(1)

import numpy as np


def load_history(path="training_history.json"):
    with open(path) as f:
        return json.load(f)


def plot_training_curve(history, save_path="training_curve.png"):
    """
    绘制训练曲线,包含:
    - 平均回报(主线)
    - 最大/最小回报(阴影区域)
    - 目标线
    """
    fig, (ax1, ax2) = plt.subplots(2, 1, figsize=(10, 8), sharex=True)

    iters = history["iteration"]
    avg = history["avg_reward"]
    max_r = history["max_reward"]
    min_r = history["min_reward"]
    loss = history["loss"]

    # ---- 上图: 回报曲线 ----
    ax1.plot(iters, avg, color="#2196F3", linewidth=2, label="Avg Reward")
    ax1.fill_between(iters, min_r, max_r, alpha=0.2, color="#2196F3", label="Min-Max Range")
    ax1.axhline(y=475, color="#F44336", linestyle="--", linewidth=1, label="Solved (475)")

    # 滑动平均
    if len(avg) >= 10:
        window = 10
        smoothed = np.convolve(avg, np.ones(window) / window, mode="valid")
        ax1.plot(
            iters[window - 1:], smoothed,
            color="#FF9800", linewidth=2, linestyle="-", label=f"Smoothed ({window}-iter)"
        )

    ax1.set_ylabel("Episode Reward")
    ax1.set_title("openYuanrong Distributed RL Training - CartPole-v1")
    ax1.legend(loc="lower right")
    ax1.grid(True, alpha=0.3)

    # ---- 下图: Loss 曲线 ----
    ax2.plot(iters, loss, color="#9C27B0", linewidth=1.5, alpha=0.7, label="Policy Loss")
    ax2.set_xlabel("Iteration")
    ax2.set_ylabel("Loss")
    ax2.legend(loc="upper right")
    ax2.grid(True, alpha=0.3)

    plt.tight_layout()
    plt.savefig(save_path, dpi=150, bbox_inches="tight")
    print(f"✓ 训练曲线已保存到 {save_path}")


if __name__ == "__main__":
    path = sys.argv[1] if len(sys.argv) > 1 else "training_history.json"
    history = load_history(path)
    plot_training_curve(history)