一.Keepalived实验环境设定
1.环境设定图
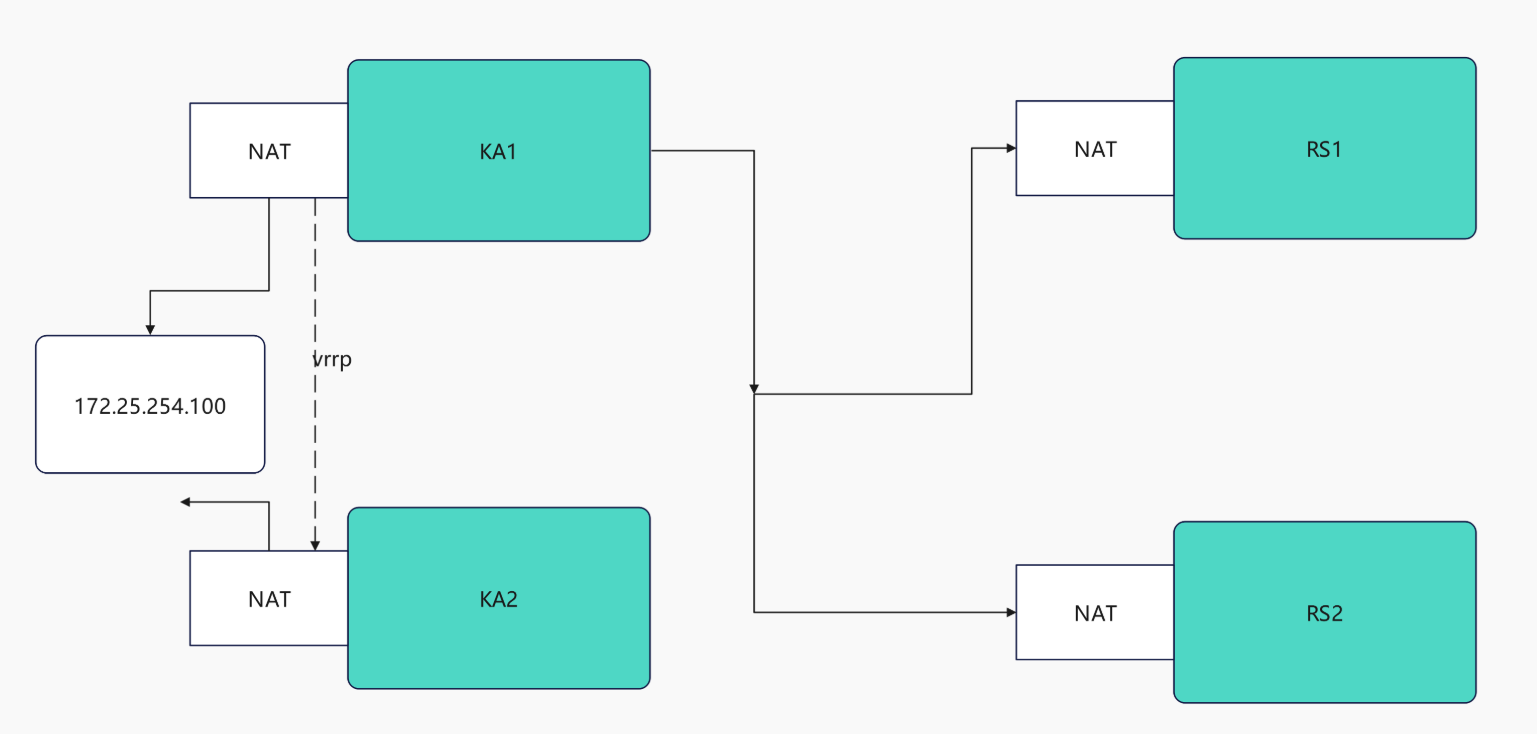
2.环境设定
部署rs1和rh2(单网卡NAT模式)
root@rs1 \~# vmset.sh eth0 172.25.254.10 rs1
root@rs1 \~# dnf install httpd -y
root@rs1 \~# echo RS1 - 172.25.254.10 > /var/www/html/index.html
root@rs1 \~# systemctl enable --now httpd
root@rs2 \~# vmset.sh eth0 172.25.254.20 rs2
root@rs2 \~# dnf install httpd -y
root@rs2 \~# echo RS2 - 172.25.254.20 > /var/www/html/index.html
root@rs2 \~# systemctl enable --now httpd
测试:
Administrator.DESKTOP-VJ307M3 ➤ curl 172.25.254.10
RS1 - 172.25.254.10
Administrator.DESKTOP-VJ307M3 ➤ curl 172.25.254.20
RS2 - 172.25.254.20
设定ka1和ka2
root@KA1 \~# vmset.sh eth0 172.25.254.50 KA1
root@KA2 \~# vmset.sh eth0 172.25.254.60 KA6
设定本地解析
root@KA1 \~# vim /etc/hosts
127.0.0.1 localhost localhost.localdomain localhost4 localhost4.localdomain4
::1 localhost localhost.localdomain localhost6 localhost6.localdomain6
172.25.254.50 KA1
172.25.254.60 KA2
172.25.254.10 rs1
172.25.254.20 rs2
root@KA1 \~# for i in 60 10 20
> do
> scp /etc/hosts 172.25.254.$i:/etc/hosts
> done
在所有主机中查看/etc/hosts
在ka1中开启时间同步服务
root@KA1 \~# vim /etc/chrony.conf
26 allow 0.0.0.0/0
29 local stratum 10
root@KA1 \~# systemctl restart chronyd
root@KA1 \~# systemctl enable --now chronyd
在ka2中使用ka1的时间同步服务
root@KA2 \~# vim /etc/chrony.conf
pool 172.25.254.50 iburst
root@KA2 \~# systemctl restart chronyd
root@KA2 \~# systemctl enable --now chronyd
root@KA2 \~# chronyc sources -v
.-- Source mode '^' = server, '=' = peer, '#' = local clock.
/ .- Source state '*' = current best, '+' = combined, '-' = not combined,
| / 'x' = may be in error, '~' = too variable, '?' = unusable.
|| .- xxxx yyyy +/- zzzz
|| Reachability register (octal) -. | xxxx = adjusted offset,
|| Log2(Polling interval) --. | | yyyy = measured offset,
|| \ | | zzzz = estimated error.
|| | | \
MS Name/IP address Stratum Poll Reach LastRx Last sample
===============================================================================
^* KA1 3 6 17 13 +303ns+6125ns +/- 69ms
二、Keepalived虚拟路由配置
1.Keepalived安装
root@KA1 \~# dnf install keepalived.x86_64 -y
root@KA2 \~# dnf install keepalived.x86_64 -y
2.配置虚拟路由
在master
root@KA1 \~# vim /etc/keepalived/keepalived.conf
global_defs {
notification_email {
}
notification_email_from timinglee_zln@163.com
smtp_server 127.0.0.1
smtp_connect_timeout 30
router_id KA1
vrrp_skip_check_adv_addr
#vrrp_strict
vrrp_garp_interval 1
vrrp_gna_interval 1
vrrp_mcast_group4 224.0.0.44
}
vrrp_instance WEB_VIP {
state MASTER
interface eth0
virtual_router_id 51
priority 100
advert_int 1
authentication {
auth_type PASS
auth_pass 1111
}
virtual_ipaddress {
172.25.254.100/24 dev eth0 label eth0:0
}
}
root@KA1 \~# systemctl enable --now keepalived.service
Created symlink /etc/systemd/system/multi-user.target.wants/keepalived.service → /usr/lib/systemd/system/keepalived.service.
在KA2中设定
root@KA2 \~# vim /etc/keepalived/keepalived.conf
global_defs {
notification_email {
}
notification_email_from timinglee_zln@163.com
smtp_server 127.0.0.1
smtp_connect_timeout 30
router_id KA1
vrrp_skip_check_adv_addr
#vrrp_strict
vrrp_garp_interval 1
vrrp_gna_interval 1
vrrp_mcast_group4 224.0.0.44
}
vrrp_instance WEB_VIP {
state BACKUP
interface eth0
virtual_router_id 51
priority 80
advert_int 1
authentication {
auth_type PASS
auth_pass 1111
}
virtual_ipaddress {
172.25.254.100/24 dev eth0 label eth0:0
}
}
root@KA2 \~# systemctl enable --now keepalived.service
Created symlink /etc/systemd/system/multi-user.target.wants/keepalived.service → /usr/lib/systemd/system/keepalived.service.
验证
root@KA1 \~# tcpdump -i eth0 -nn host 224.0.0.44
11:38:46.183386 IP 172.25.254.50 > 224.0.0.44: VRRPv2, Advertisement, vrid 51, prio 100, authtype simple, intvl 1s, length 20
11:38:47.184051 IP 172.25.254.50 > 224.0.0.44: VRRPv2, Advertisement, vrid 51, prio 100, authtype simple, intvl 1s, length 20
11:38:48.184610 IP 172.25.254.50 > 224.0.0.44: VRRPv2, Advertisement, vrid 51, prio 100, authtype simple, intvl 1s, length 20
11:38:49.185084 IP 172.25.254.50 > 224.0.0.44: VRRPv2, Advertisement, vrid 51, prio 100, authtype simple, intvl 1s, length 20
root@KA1 \~# ifconfig
eth0: flags=4163<UP,BROADCAST,RUNNING,MULTICAST> mtu 1500
inet 172.25.254.50 netmask 255.255.255.0 broadcast 172.25.254.255
inet6 fe80::3901:aeea:786a:7227 prefixlen 64 scopeid 0x20<link>
ether 00:0c:29:26:33:d9 txqueuelen 1000 (Ethernet)
RX packets 5847 bytes 563634 (550.4 KiB)
RX errors 0 dropped 0 overruns 0 frame 0
TX packets 5224 bytes 698380 (682.0 KiB)
TX errors 0 dropped 0 overruns 0 carrier 0 collisions 0
eth0:0: flags=4163<UP,BROADCAST,RUNNING,MULTICAST> mtu 1500
inet 172.25.254.100 netmask 255.255.255.0 broadcast 0.0.0.0
ether 00:0c:29:26:33:d9 txqueuelen 1000 (Ethernet)
lo: flags=73<UP,LOOPBACK,RUNNING> mtu 65536
inet 127.0.0.1 netmask 255.0.0.0
inet6 ::1 prefixlen 128 scopeid 0x10<host>
loop txqueuelen 1000 (Local Loopback)
RX packets 42 bytes 3028 (2.9 KiB)
RX errors 0 dropped 0 overruns 0 frame 0
TX packets 42 bytes 3028 (2.9 KiB)
TX errors 0 dropped 0 overruns 0 carrier 0 collisions 0
测试故障
#在一个独立的shell中执行
root@KA1 \~# tcpdump -i eth0 -nn host 224.0.0.44
在kA1中模拟故障
root@KA1 \~# systemctl stop keepalived.service
在KA2中看vip是否被迁移到当前主机
root@KA2 \~# ifconfig
eth0: flags=4163<UP,BROADCAST,RUNNING,MULTICAST> mtu 1500
inet 172.25.254.60 netmask 255.255.255.0 broadcast 172.25.254.255
inet6 fe80::26df:35e5:539:56bc prefixlen 64 scopeid 0x20<link>
ether 00:0c:29:1e:fd:7a txqueuelen 1000 (Ethernet)
RX packets 2668 bytes 237838 (232.2 KiB)
RX errors 0 dropped 0 overruns 0 frame 0
TX packets 2229 bytes 280474 (273.9 KiB)
TX errors 0 dropped 0 overruns 0 carrier 0 collisions 0
eth0:0: flags=4163<UP,BROADCAST,RUNNING,MULTICAST> mtu 1500
inet 172.25.254.100 netmask 255.255.255.0 broadcast 0.0.0.0
ether 00:0c:29:1e:fd:7a txqueuelen 1000 (Ethernet)
lo: flags=73<UP,LOOPBACK,RUNNING> mtu 65536
inet 127.0.0.1 netmask 255.0.0.0
inet6 ::1 prefixlen 128 scopeid 0x10<host>
loop txqueuelen 1000 (Local Loopback)
RX packets 52 bytes 3528 (3.4 KiB)
RX errors 0 dropped 0 overruns 0 frame 0
TX packets 52 bytes 3528 (3.4 KiB)
TX errors 0 dropped 0 overruns 0 carrier 0 collisions 0
三、Keepalived日志分离
默认情况下。keepalived的日志会被保存在/var/log/messages文件中,这个文件中除了含有keepalived的日志外,还有其他服务的日志信息,这样不利于对于keepalived的日志进行查看
root@KA1 \~# vim /etc/sysconfig/keepalived
KEEPALIVED_OPTIONS="-D -S 6"
root@KA1 \~# systemctl restart keepalived.service
root@KA1 \~# vim /etc/rsyslog.conf
local6.* /var/log/keepalived.log
root@KA1 \~# systemctl restart rsyslog.service
测试
root@KA1 log# ls -l /var/log/keepalived.log
ls: 无法访问 'keepalived.log': 没有那个文件或目录
root@KA1 log# ls keepalived.log
keepalived.log
四、Keepalived的子配置文件设定
在主配置文件中如果写入过多的配置不利于对于主配置文件的阅读
root@KA1 \~# vim /etc/keepalived/keepalived.conf
! Configuration File for keepalived
global_defs {
notification_email {
}
notification_email_from timinglee_zln@163.com
smtp_server 127.0.0.1
smtp_connect_timeout 30
router_id KA1
vrrp_skip_check_adv_addr
#vrrp_strict
vrrp_garp_interval 1
vrrp_gna_interval 1
vrrp_mcast_group4 224.0.0.44
}
include /etc/keepalived/conf.d/*.conf #指定独立子配置文件
root@KA1 \~# mkdir /etc/keepalived/conf.d -p
root@KA1 \~# vim /etc/keepalived/conf.d/webvip.conf
vrrp_instance WEB_VIP {
state MASTER
interface eth0
virtual_router_id 51
priority 100
advert_int 1
authentication {
auth_type PASS
auth_pass 1111
}
virtual_ipaddress {
172.25.254.100/24 dev eth0 label eth0:0
}
}
root@KA1 \~# keepalived -t -f /etc/keepalived/keepalived.conf
root@KA1 \~# systemctl restart keepalived.service
root@KA1 \~# ifconfig
eth0: flags=4163<UP,BROADCAST,RUNNING,MULTICAST> mtu 1500
inet 172.25.254.50 netmask 255.255.255.0 broadcast 172.25.254.255
inet6 fe80::3901:aeea:786a:7227 prefixlen 64 scopeid 0x20<link>
ether 00:0c:29:26:33:d9 txqueuelen 1000 (Ethernet)
RX packets 17383 bytes 1417554 (1.3 MiB)
RX errors 0 dropped 0 overruns 0 frame 0
TX packets 32593 bytes 3135052 (2.9 MiB)
TX errors 0 dropped 0 overruns 0 carrier 0 collisions 0
eth0:0: flags=4163<UP,BROADCAST,RUNNING,MULTICAST> mtu 1500
inet 172.25.254.100 netmask 255.255.255.0 broadcast 0.0.0.0
ether 00:0c:29:26:33:d9 txqueuelen 1000 (Ethernet)
lo: flags=73<UP,LOOPBACK,RUNNING> mtu 65536
inet 127.0.0.1 netmask 255.0.0.0
inet6 ::1 prefixlen 128 scopeid 0x10<host>
loop txqueuelen 1000 (Local Loopback)
RX packets 118 bytes 6828 (6.6 KiB)
RX errors 0 dropped 0 overruns 0 frame 0
TX packets 118 bytes 6828 (6.6 KiB)
TX errors 0 dropped 0 overruns 0 carrier 0 collisions 0
五、keepalived的单播模式
为什么要单播,组播模式使用的网址资源最少,但是不能跨网络,如果主备两台主机是跨网络的,那么只能启用单播来实现vrrp通告
在KA1中
root@KA1 \~# vim /etc/keepalived/keepalived.conf
! Configuration File for keepalived
global_defs {
notification_email {
}
notification_email_from timinglee_zln@163.com
smtp_server 127.0.0.1
smtp_connect_timeout 30
router_id KA1
vrrp_skip_check_adv_addr
#vrrp_strict
vrrp_garp_interval 1
vrrp_gna_interval 1
#vrrp_mcast_group4 224.0.0.44 #关闭组播
}
vrrp_instance WEB_VIP {
state MASTER
interface eth0
virtual_router_id 51
priority 100
advert_int 1
unicast_src_ip 172.25.254.50 #指定单播源地址,通常是本机IP
unicast_peer {
172.25.254.60 #指定单播接收地址
}
authentication {
auth_type PASS
auth_pass 1111
}
virtual_ipaddress {
172.25.254.100/24 dev eth0 label eth0:0
}
}
在KA2中
root@KA2 \~# vim /etc/keepalived/keepalived.conf
! Configuration File for keepalived
global_defs {
notification_email {
}
notification_email_from timinglee_zln@163.com
smtp_server 127.0.0.1
smtp_connect_timeout 30
router_id KA1
vrrp_skip_check_adv_addr
#vrrp_strict
vrrp_garp_interval 1
vrrp_gna_interval 1
#vrrp_mcast_group4 224.0.0.44 #关闭组播
}
vrrp_instance WEB_VIP {
state MASTER
interface eth0
virtual_router_id 51
priority 100
advert_int 1
unicast_src_ip 172.25.254.60 #指定单播源地址,通常是本机IP
unicast_peer {
172.25.254.50 #指定单播接收地址
}
authentication {
auth_type PASS
auth_pass 1111
}
virtual_ipaddress {
172.25.254.100/24 dev eth0 label eth0:0
}
}
root@KA1 \~# systemctl restart keepalived.service
root@KA2 \~# systemctl restart keepalived.service
测试
#在KA1中开启独立shell监控播报信息
root@KA1 \~# tcpdump -i eth0 -nn src host 172.25.254.50 and dst 172.25.254.60
在KA2中开启独立shell监控播报信息
root@KA2 \~# tcpdump -i eth0 -nn src host 172.25.254.60 and dst 172.25.254.50
在KA1正常时
ka2播报信息不显示通告内容
root@KA1 \~# systemctl stop keepalived.service
vip会被迁移到KA2,KA2上开始显示播报内容
root@KA1 \~# systemctl start keepalived.service
vip因为优先级被KA1抢占,KA2中播报停止
六、Keepalived业务vip迁移告警
1.邮件告警环境构建
安装邮件软件
root@KA1 \~# dnf install s-nail postfix -y
root@KA2 \~# dnf install s-nail postfix -y
启动邮件代理
root@KA1 \~# systemctl start postfix.service
root@KA2 \~# systemctl start postfix.service
设定sendmail可以通过公网邮箱发送邮件下面方式人选其一
在Linux主机中配置mailrc(KA1+KA2)
root@KA1+KA2 \~# vim /etc/mail.rc
set smtp-auth=login
set smtp-auth-user=timinglee_zln@163.com
set smtp-auth-password=TGfdKaJT7EB
set from=timinglee_zln@163.com
set ssl-verify=ignore
测试邮件
root@KA1 mail# echo hello | mailx -s test 1122334455@qq.com
root@KA1 mail# mailq #查看邮件队列
Mail queue is empty
root@KA1 mail# mail #查看是否又退信
s-nail version v14.9.22. Type `?' for help
/var/spool/mail/root: 1 message
▸ 1 Mail Delivery Subsys 2026-01-28 16:26 69/2210 "Returned mail: see transcript for details "
&q 退出
查看对应邮箱是否有邮件收到
2.设定keepalived告警脚本
root@KA1 \~# mkdir -p /etc/keepalived/scripts
root@KA2 \~# mkdir -p /etc/keepalived/scripts
编写告警脚本
root@KA1+2 \~# vim /etc/keepalived/scripts/waring.sh
#!/bin/bash
mail_dest='594233887@qq.com'
mail_send()
{
mail_subj="HOSTNAME to be 1 vip 转移"
mail_mess="`date +%F\ %T`: vrrp 转移,HOSTNAME 变为 1"
echo "mail_mess" \| mail -s "mail_subj" $mail_dest
}
case $1 in
master)
mail_send master
;;
backup)
mail_send backup
;;
fault)
mail_send fault
;;
*)
exit 1
;;
esac
root@KA1+2 \~# chmod +x /etc/keepalived/scripts/waring.sh
root@KA1 \~# /etc/keepalived/scripts/waring.sh master
对应邮箱中会出现邮件
3.配置keepalived告警
在KA1和KA2中设定配置文件
! Configuration File for keepalived
global_defs {
notification_email {
}
notification_email_from timinglee_zln@163.com
smtp_server 127.0.0.1
smtp_connect_timeout 30
router_id KA1
vrrp_skip_check_adv_addr
#vrrp_strict
vrrp_garp_interval 1
vrrp_gna_interval 1
vrrp_mcast_group4 224.0.0.44
enable_script_security
script_user root
}
vrrp_instance WEB_VIP {
state MASTER
interface eth0
virtual_router_id 51
priority 100
advert_int 1
unicast_src_ip 172.25.254.50
unicast_peer {
172.25.254.60
}
authentication {
auth_type PASS
auth_pass 1111
}
virtual_ipaddress {
172.25.254.100/24 dev eth0 label eth0:0
}
notify_master "/etc/keepalived/scripts/waring.sh master"
notify_backup "/etc/keepalived/scripts/waring.sh backup"
notify_fault "/etc/keepalived/scripts/waring.sh fault"
}
root@KA1+2 \~# systemctl restart keepalived.service
测试
root@KA1 \~# systemctl stop keepalived.service #停止服务后查看邮件
root@KA1 \~# systemctl start keepalived.service #开启服务后查看邮件
七、Keepalived双主模式
在KA1中
root@KA1 \~# vim /etc/keepalived/keepalived.conf
vrrp_instance WEB_VIP { #第一个虚拟路由,以master身份设定
state MASTER
interface eth0
virtual_router_id 51
priority 100
advert_int 1
authentication {
auth_type PASS
auth_pass 1111
}
virtual_ipaddress {
172.25.254.100/24 dev eth0 label eth0:0
}
}
vrrp_instance DB_VIP { #第二个虚拟路由。以backup身份设定
state BACKUP
interface eth0
virtual_router_id 52
priority 80
advert_int 1
authentication {
auth_type PASS
auth_pass 1111
}
virtual_ipaddress {
172.25.254.200/24 dev eth0 label eth0:1
}
}
KA2中
root@KA2 \~# vim /etc/keepalived/keepalived.conf
vrrp_instance WEB_VIP {
state BACKUP
interface eth0
virtual_router_id 51
preempt_delay 10
priority 80
advert_int 1
authentication {
auth_type PASS
auth_pass 1111
}
virtual_ipaddress {
172.25.254.100/24 dev eth0 label eth0:0
}
}
vrrp_instance DB_VIP {
state MASTER
interface eth0
virtual_router_id 52
preempt_delay 10
priority 100
advert_int 1
authentication {
auth_type PASS
auth_pass 1111
}
virtual_ipaddress {
172.25.254.200/24 dev eth0 label eth0:1
}
}
root@KA1 \~# systemctl restart keepalived.service
root@KA2 \~# systemctl restart keepalived.service
测试
root@KA1 \~# ifconfig
eth0: flags=4163<UP,BROADCAST,RUNNING,MULTICAST> mtu 1500
inet 172.25.254.50 netmask 255.255.255.0 broadcast 172.25.254.255
inet6 fe80::3901:aeea:786a:7227 prefixlen 64 scopeid 0x20<link>
ether 00:0c:29:26:33:d9 txqueuelen 1000 (Ethernet)
RX packets 38766 bytes 3548249 (3.3 MiB)
RX errors 0 dropped 0 overruns 0 frame 0
TX packets 67456 bytes 6209788 (5.9 MiB)
TX errors 0 dropped 2 overruns 0 carrier 0 collisions 0
eth0:0: flags=4163<UP,BROADCAST,RUNNING,MULTICAST> mtu 1500
inet 172.25.254.100 netmask 255.255.255.0 broadcast 0.0.0.0
ether 00:0c:29:26:33:d9 txqueuelen 1000 (Ethernet)
lo: flags=73<UP,LOOPBACK,RUNNING> mtu 65536
inet 127.0.0.1 netmask 255.0.0.0
inet6 ::1 prefixlen 128 scopeid 0x10<host>
loop txqueuelen 1000 (Local Loopback)
RX packets 782 bytes 60465 (59.0 KiB)
RX errors 0 dropped 0 overruns 0 frame 0
TX packets 782 bytes 60465 (59.0 KiB)
TX errors 0 dropped 0 overruns 0 carrier 0 collisions 0
root@KA2 \~# ifconfig
eth0: flags=4163<UP,BROADCAST,RUNNING,MULTICAST> mtu 1500
inet 172.25.254.60 netmask 255.255.255.0 broadcast 172.25.254.255
inet6 fe80::26df:35e5:539:56bc prefixlen 64 scopeid 0x20<link>
ether 00:0c:29:1e:fd:7a txqueuelen 1000 (Ethernet)
RX packets 46164 bytes 3559703 (3.3 MiB)
RX errors 0 dropped 0 overruns 0 frame 0
TX packets 38170 bytes 3306899 (3.1 MiB)
TX errors 0 dropped 0 overruns 0 carrier 0 collisions 0
eth0:1: flags=4163<UP,BROADCAST,RUNNING,MULTICAST> mtu 1500
inet 172.25.254.200 netmask 255.255.255.0 broadcast 0.0.0.0
ether 00:0c:29:1e:fd:7a txqueuelen 1000 (Ethernet)
lo: flags=73<UP,LOOPBACK,RUNNING> mtu 65536
inet 127.0.0.1 netmask 255.0.0.0
inet6 ::1 prefixlen 128 scopeid 0x10<host>
loop txqueuelen 1000 (Local Loopback)
RX packets 532 bytes 39588 (38.6 KiB)
RX errors 0 dropped 0 overruns 0 frame 0
TX packets 532 bytes 39588 (38.6 KiB)
TX errors 0 dropped 0 overruns 0 carrier 0 collisions 0
root@KA1 \~# systemctl stop keepalived.service
root@KA2 \~# ifconfig
eth0: flags=4163<UP,BROADCAST,RUNNING,MULTICAST> mtu 1500
inet 172.25.254.60 netmask 255.255.255.0 broadcast 172.25.254.255
inet6 fe80::26df:35e5:539:56bc prefixlen 64 scopeid 0x20<link>
ether 00:0c:29:1e:fd:7a txqueuelen 1000 (Ethernet)
RX packets 46204 bytes 3562823 (3.3 MiB)
RX errors 0 dropped 0 overruns 0 frame 0
TX packets 38240 bytes 3313319 (3.1 MiB)
TX errors 0 dropped 0 overruns 0 carrier 0 collisions 0
eth0:0: flags=4163<UP,BROADCAST,RUNNING,MULTICAST> mtu 1500
inet 172.25.254.100 netmask 255.255.255.0 broadcast 0.0.0.0
ether 00:0c:29:1e:fd:7a txqueuelen 1000 (Ethernet)
eth0:1: flags=4163<UP,BROADCAST,RUNNING,MULTICAST> mtu 1500
inet 172.25.254.200 netmask 255.255.255.0 broadcast 0.0.0.0
ether 00:0c:29:1e:fd:7a txqueuelen 1000 (Ethernet)
root@KA2 \~# systemctl stop keepalived.service
root@KA1 \~# ifconfig
eth0: flags=4163<UP,BROADCAST,RUNNING,MULTICAST> mtu 1500
inet 172.25.254.50 netmask 255.255.255.0 broadcast 172.25.254.255
inet6 fe80::3901:aeea:786a:7227 prefixlen 64 scopeid 0x20<link>
ether 00:0c:29:26:33:d9 txqueuelen 1000 (Ethernet)
RX packets 39277 bytes 3653121 (3.4 MiB)
RX errors 0 dropped 0 overruns 0 frame 0
TX packets 67902 bytes 6264989 (5.9 MiB)
TX errors 0 dropped 2 overruns 0 carrier 0 collisions 0
eth0:0: flags=4163<UP,BROADCAST,RUNNING,MULTICAST> mtu 1500
inet 172.25.254.100 netmask 255.255.255.0 broadcast 0.0.0.0
ether 00:0c:29:26:33:d9 txqueuelen 1000 (Ethernet)
eth0:1: flags=4163<UP,BROADCAST,RUNNING,MULTICAST> mtu 1500
inet 172.25.254.200 netmask 255.255.255.0 broadcast 0.0.0.0
ether 00:0c:29:26:33:d9 txqueuelen 1000 (Ethernet)
八、实现IPVS的高可用性
1.配置RS
root@rs1+2 \~# cd /etc/NetworkManager/system-connections/
root@rs1+2 system-connections# ls
eth0.nmconnection
root@rs1+2 system-connections# cp eth0.nmconnection lo.nmconnection -p
root@rs1+2 system-connections# vim lo.nmconnection
connection
id=lo
type=loopback
interface-name=lo
ipv4
method=manual
address1=127.0.0.1/8
address2=172.25.254.100/32
root@rs1+2 system-connections# nmcli connection reload
root@rs1+2 system-connections# nmcli connection up lo
root@rs1+2 system-connections# ip a
1: lo: <LOOPBACK,UP,LOWER_UP> mtu 65536 qdisc noqueue state UNKNOWN group default qlen 1000
link/loopback 00:00:00:00:00:00 brd 00:00:00:00:00:00
inet 127.0.0.1/8 scope host lo
valid_lft forever preferred_lft forever
inet 172.25.254.100/32 scope global lo
valid_lft forever preferred_lft forever
inet6 ::1/128 scope host
valid_lft forever preferred_lft forever
2: eth0: <BROADCAST,MULTICAST,UP,LOWER_UP> mtu 1500 qdisc mq state UP group default qlen 1000
link/ether 00:0c:29:1a:e2:01 brd ff:ff:ff:ff:ff:ff
altname enp3s0
altname ens160
inet 172.25.254.10/24 brd 172.25.254.255 scope global noprefixroute eth0
valid_lft forever preferred_lft forever
inet6 fe80::ac3b:5c1c:bb2a:628e/64 scope link noprefixroute
valid_lft forever preferred_lft forever
root@rs1+2 system-connections# vim /etc/sysctl.conf
net.ipv4.conf.all.arp_ignore=1
net.ipv4.conf.all.arp_announce=2
net.ipv4.conf.lo.arp_announce=2
net.ipv4.conf.lo.arp_ignore=1
root@rs1+2 system-connections# sysctl -p
net.ipv4.conf.all.arp_ignore = 1
net.ipv4.conf.all.arp_announce = 2
net.ipv4.conf.lo.arp_announce = 2
net.ipv4.conf.lo.arp_ignore = 1
安装ipvsadm
root@KA1+KA2 \~# dnf install ipvsadm -y
2.实现方式
在keepalived的所有主机中
root@KA1 \~# vim /etc/keepalived/keepalived.conf
virtual_server 172.25.254.100 80 {
delay_loop 6
lb_algo rr
lb_kind DR
protocol TCP
real_server 172.25.254.10 80 {
weight 1
HTTP_GET {
url {
path /
status_code 200
}
connect_timeout 1
retry 3
delay_before_retry 1
}
}
real_server 172.25.254.20 80 {
weight 1
TCP_CHECK {
connect_timeout 5
retry 3
delay_before_retry 3
connect_port 80
}
}
}
root@KA1 \~# systemctl restart keepalived.service
3.测试
友情提示:不要再KA1和KA2中访问vip,会检测不出效果
在ka1中开启独立的shell
root@KA1 \~# watch -n 1 ipvsadm -Ln
在RS1中关闭wen服务查看lvs策略是否变化
把ka1中的keepalived关闭查看ka2中是否自动生成lvs策略
九、双主模式代理不同业务实现高可用
1.实验环境
web服务设定再个实验已经设定完成
在rs中设定lo添加vip2 172.25.254.200:32
在rs中搭建数据库
root@rs1+2 \~# dnf install mariadb-server -y
root@rs1+2 \~# systemctl enable --now mariadb
root@rs1+2 \~# mysql
Welcome to the MariaDB monitor. Commands end with ; or \g.
Your MariaDB connection id is 3
Server version: 10.5.27-MariaDB MariaDB Server
Copyright (c) 2000, 2018, Oracle, MariaDB Corporation Ab and others.
Type 'help;' or '\h' for help. Type '\c' to clear the current input statement.
MariaDB (none)> CREATE USER lee@'%' identified by 'lee';
Query OK, 0 rows affected (0.001 sec)
MariaDB (none)> GRANT ALL ON *.* TO lee@'%';
Query OK, 0 rows affected (0.001 sec)
测试
root@rs1 \~# mysql -ulee -plee -h172.25.254.10
Welcome to the MariaDB monitor. Commands end with ; or \g.
Your MariaDB connection id is 4
Server version: 10.5.27-MariaDB MariaDB Server
Copyright (c) 2000, 2018, Oracle, MariaDB Corporation Ab and others.
Type 'help;' or '\h' for help. Type '\c' to clear the current input statement.
MariaDB (none)> quit
root@rs1 \~# mysql -ulee -plee -h172.25.254.20
Welcome to the MariaDB monitor. Commands end with ; or \g.
Your MariaDB connection id is 4
Server version: 10.5.27-MariaDB MariaDB Server
Copyright (c) 2000, 2018, Oracle, MariaDB Corporation Ab and others.
Type 'help;' or '\h' for help. Type '\c' to clear the current input statement.
MariaDB (none)> quit
2.实现不同vip代理不同业务
KA1和KA2
root@KA1+2 \~# vim /etc/keepalived/keepalived.conf
include /etc/keepalived/conf.d/webserver.conf
include /etc/keepalived/conf.d/datebase.conf
root@KA1+2 \~# vim /etc/keepalived/conf.d/webserver.conf
virtual_server 172.25.254.100 80 {
delay_loop 6
lb_algo rr
lb_kind DR
protocol TCP
real_server 172.25.254.10 80 {
weight 1
HTTP_GET {
url {
path /
status_code 200
}
connect_timeout 1
retry 3
delay_before_retry 1
}
}
real_server 172.25.254.20 80 {
weight 1
TCP_CHECK {
connect_timeout 5
retry 3
delay_before_retry 3
connect_port 80
}
}
}
root@KA1 \~# vim /etc/keepalived/conf.d/datebase.conf
virtual_server 172.25.254.200 3306 {
delay_loop 6
lb_algo rr
lb_kind DR
protocol TCP
real_server 172.25.254.10 3306 {
weight 1
TCP_CHECK {
connect_timeout 5
retry 3
delay_before_retry 3
connect_port 3306
}
}
real_server 172.25.254.20 3306 {
weight 1
TCP_CHECK {
connect_timeout 5
retry 3
delay_before_retry 3
connect_port 3306
}
}
}
root@KA1+2 \~# systemctl restart keepalived.service
3.测试
root@rs2 \~# mysql -ulee -plee -h172.25.254.200
Welcome to the MariaDB monitor. Commands end with ; or \g.
Your MariaDB connection id is 89
Server version: 10.5.27-MariaDB MariaDB Server
Copyright (c) 2000, 2018, Oracle, MariaDB Corporation Ab and others.
Type 'help;' or '\h' for help. Type '\c' to clear the current input statement.
MariaDB (none)>
Administrator.DESKTOP-VJ307M3 ➤ curl 172.25.254.100
RS1 - 172.25.254.10
Administrator.DESKTOP-VJ307M3 ➤ curl 172.25.254.100
RS2 - 172.25.254.20
十、利用VRRP Script 实现全能高可用
1.实验环境
#在KA1和KA2中安装haproxy
root@KA1+2 \~# dnf install haproxy-2.4.22-4.el9.x86_64 -y
root@KA1 \~# vim /etc/sysctl.conf
root@KA1+2 \~# vim /etc/sysctl.conf
net.ipv4.ip_nonlocal_bind=1
root@KA1+2 \~# vim /etc/haproxy/haproxy.cfg
listen webserver
bind 172.25.254.100:80
mode http
server web1 172.25.254.10:80 check
server web2 172.25.254.20:80 check
root@KA1+2 \~# systemctl enable --now haproxy.service
2.利用案例理解vrrp_scripts
#在KA1主机中
root@KA1 \~# vim /etc/keepalived/scripts/test.sh
#!/bin/bash
! -f "/mnt/lee"
root@KA1 \~# vim /etc/keepalived/keepalived.conf
vrrp_script check_lee {
script "/etc/keepalived/scripts/test.sh"
interval 1
weight -30
fall 2
rise 2
timeout 2
user root
}
vrrp_instance DB_VIP {
state MASTER
interface eth0
virtual_router_id 51
priority 100
advert_int 1
authentication {
auth_type PASS
auth_pass 1111
}
virtual_ipaddress {
172.25.254.100/24 dev eth0 label eth0:1
}
track_script {
check_lee
}
}
root@KA1 \~# systemctl restart keepalived.service
#测试:
root@KA1 \~# ifconfig
eth0: flags=4163<UP,BROADCAST,RUNNING,MULTICAST> mtu 1500
inet 172.25.254.50 netmask 255.255.255.0 broadcast 172.25.254.255
inet6 fe80::3901:aeea:786a:7227 prefixlen 64 scopeid 0x20<link>
ether 00:0c:29:26:33:d9 txqueuelen 1000 (Ethernet)
RX packets 98198 bytes 9235557 (8.8 MiB)
RX errors 0 dropped 0 overruns 0 frame 0
TX packets 145101 bytes 12247386 (11.6 MiB)
TX errors 0 dropped 9 overruns 0 carrier 0 collisions 0
eth0:0: flags=4163<UP,BROADCAST,RUNNING,MULTICAST> mtu 1500
inet 172.25.254.100 netmask 255.255.255.0 broadcast 0.0.0.0
ether 00:0c:29:26:33:d9 txqueuelen 1000 (Ethernet)
lo: flags=73<UP,LOOPBACK,RUNNING> mtu 65536
inet 127.0.0.1 netmask 255.0.0.0
inet6 ::1 prefixlen 128 scopeid 0x10<host>
loop txqueuelen 1000 (Local Loopback)
RX packets 932 bytes 72195 (70.5 KiB)
RX errors 0 dropped 0 overruns 0 frame 0
TX packets 932 bytes 72195 (70.5 KiB)
TX errors 0 dropped 0 overruns 0 carrier 0 collisions 0
root@KA1 \~# touch /mnt/lee
root@KA1 \~# ifconfig
eth0: flags=4163<UP,BROADCAST,RUNNING,MULTICAST> mtu 1500
inet 172.25.254.50 netmask 255.255.255.0 broadcast 172.25.254.255
inet6 fe80::3901:aeea:786a:7227 prefixlen 64 scopeid 0x20<link>
ether 00:0c:29:26:33:d9 txqueuelen 1000 (Ethernet)
RX packets 97968 bytes 9216259 (8.7 MiB)
RX errors 0 dropped 0 overruns 0 frame 0
TX packets 144858 bytes 12219108 (11.6 MiB)
TX errors 0 dropped 9 overruns 0 carrier 0 collisions 0
lo: flags=73<UP,LOOPBACK,RUNNING> mtu 65536
inet 127.0.0.1 netmask 255.0.0.0
inet6 ::1 prefixlen 128 scopeid 0x10<host>
loop txqueuelen 1000 (Local Loopback)
RX packets 932 bytes 72195 (70.5 KiB)
RX errors 0 dropped 0 overruns 0 frame 0
TX packets 932 bytes 72195 (70.5 KiB)
TX errors 0 dropped 0 overruns 0 carrier 0 collisions 0
root@KA1 \~# rm -fr /mnt/lee
root@KA1 \~# ifconfig
eth0: flags=4163<UP,BROADCAST,RUNNING,MULTICAST> mtu 1500
inet 172.25.254.50 netmask 255.255.255.0 broadcast 172.25.254.255
inet6 fe80::3901:aeea:786a:7227 prefixlen 64 scopeid 0x20<link>
ether 00:0c:29:26:33:d9 txqueuelen 1000 (Ethernet)
RX packets 98198 bytes 9235557 (8.8 MiB)
RX errors 0 dropped 0 overruns 0 frame 0
TX packets 145101 bytes 12247386 (11.6 MiB)
TX errors 0 dropped 9 overruns 0 carrier 0 collisions 0
eth0:0: flags=4163<UP,BROADCAST,RUNNING,MULTICAST> mtu 1500
inet 172.25.254.100 netmask 255.255.255.0 broadcast 0.0.0.0
ether 00:0c:29:26:33:d9 txqueuelen 1000 (Ethernet)
lo: flags=73<UP,LOOPBACK,RUNNING> mtu 65536
inet 127.0.0.1 netmask 255.0.0.0
inet6 ::1 prefixlen 128 scopeid 0x10<host>
loop txqueuelen 1000 (Local Loopback)
RX packets 932 bytes 72195 (70.5 KiB)
RX errors 0 dropped 0 overruns 0 frame 0
TX packets 932 bytes 72195 (70.5 KiB)
TX errors 0 dropped 0 overruns 0 carrier 0 collisions 0
3.keepalived + haproxy
root@KA1 \~# vim /etc/keepalived/scripts/haproxy_check.sh
#!/bin/bash
killall -0 haproxy &> /dev/null
root@KA1 \~# chmod +x /etc/keepalived/scripts/haproxy_check.sh
vrrp_script haporxy_check {
script "/etc/keepalived/scripts/haproxy_check.sh"
interval 1
weight -30
fall 2
rise 2
timeout 2
user root
}
vrrp_instance WEB_VIP {
state MASTER
interface eth0
virtual_router_id 51
priority 100
advert_int 1
authentication {
auth_type PASS
auth_pass 1111
}
virtual_ipaddress {
172.25.254.100/24 dev eth0 label eth0:0
}
track_script {
haporxy_check
}
}
root@KA1 \~# systemctl restart keepalived.service
#测试
通过关闭和开启haproxy来观察vip是否迁移