Wepack实现
webpack打包功能实现
webpack打包与模块加载原理(从JS入口文件出发如何进行简单打包 -> __webpack_require__具体实现 -> 一个最基础的bundle.js至少具备的内容 -> 实现一个基本的webpack打包功能)
一、从JS文件打包说起
1.1 基本打包过程
当我们有以下文件结构时:
js
src/
  ├── a.js (入口文件)
  └── b.js (依赖文件)
a.js (入口文件):
js
import { getValue } from './b.js';
console.log(getValue());
b.js (依赖文件):
js
export function getValue() {
  return 'Hello from b.js';
}
1.2 打包后的结果(自测:请说出打包后的代码形式)
以a.js为入口进行打包后,生成的bundle.js会将每个模块包装成函数形式:
js
// 简化版的打包结果
{
  "./src/a.js": function(module, exports, __webpack_require__) {
    eval(`
      const { getValue } = __webpack_require__("./src/b.js");
      console.log(getValue());
    `);
  },
  "./src/b.js": function(module, exports, __webpack_require__) {
    eval(`
      function getValue() {
        return 'Hello from b.js';
      }
      exports.getValue = getValue;
    `);
  }
}
关键变化:
- 原本的
import { getValue } from './b.js'被转换为__webpack_require__("./src/b.js") - 每个模块被包装在函数中,接收
module,exports,__webpack_require__参数
二、webpack_require 的实现原理(自测:说出核心代码实现)
2.1 函数签名与作用
js
function __webpack_require__(moduleId) {
  // 参数:moduleId - 模块的路径标识符(如 "./src/b.js")
  // 返回值:该模块的所有导出内容(exports对象)
}
2.2 完整实现过程
js
// 模块缓存对象
var __webpack_module_cache__ = {};

// 主要的模块加载函数
function __webpack_require__(moduleId) {
  // 1. 检查缓存,避免重复加载
  var cachedModule = __webpack_module_cache__[moduleId];
  if (cachedModule !== undefined) {
    return cachedModule.exports;
  }

  // 2. 创建新的模块对象并缓存
  var module = __webpack_module_cache__[moduleId] = {
    exports: {}
  };

  // 3. 执行模块函数,填充exports
  __webpack_modules__[moduleId](module, module.exports, __webpack_require__);

  // 4. 返回模块的导出内容
  return module.exports;
}
2.3 模块执行机制
关键在于这一行:
js
__webpack_modules__[moduleId](module, module.exports, __webpack_require__);执行过程:
- 从
__webpack_modules__对象中获取对应的模块函数 - 传入三个参数:
module(模块对象)、module.exports(导出对象)、__webpack_require__(加载函数) - 模块函数内部通过修改
module.exports来导出内容 - 执行完成后返回填充好的
module.exports
三、Bundle.js的基本结构(自测:说出结构是什么以及为什么)
一个完整的bundle.js至少需要包含以下内容:
3.1 核心组件
js
// 1. 模块存储对象 - 存放所有模块函数
var __webpack_modules__ = {
  "./src/a.js": function(module, exports, __webpack_require__) { /* ... */ },
  "./src/b.js": function(module, exports, __webpack_require__) { /* ... */ }
};

// 2. 模块缓存对象
var __webpack_module_cache__ = {};

// 3. 模块加载函数
function __webpack_require__(moduleId) { /* ... */ }

// 4. 启动应用程序
__webpack_require__("./src/a.js");
3.2 完整示例
js
(function() {
  "use strict";

  var __webpack_modules__ = {
    "./src/a.js": function(module, exports, __webpack_require__) {
      eval(`
        const { getValue } = __webpack_require__("./src/b.js");
        console.log(getValue());
      `);
    },
    "./src/b.js": function(module, exports, __webpack_require__) {
      eval(`
        function getValue() {
          return 'Hello from b.js';
        }
        exports.getValue = getValue;
      `);
    }
  };

  var __webpack_module_cache__ = {};

  function __webpack_require__(moduleId) {
    var cachedModule = __webpack_module_cache__[moduleId];
    if (cachedModule !== undefined) {
      return cachedModule.exports;
    }

    var module = __webpack_module_cache__[moduleId] = {
      exports: {}
    };

    __webpack_modules__[moduleId](module, module.exports, __webpack_require__);

    return module.exports;
  }

  // 启动入口模块
  __webpack_require__("./src/a.js");
})();
总结
Webpack的核心打包原理:
- 模块化处理 :将每个文件包装成函数,统一模块接口,并存储在全局
webpack------modules中。 - 依赖管理 :通过
__webpack_require__实现模块间的加载和缓存,获取文件导出内容,并且缓存导出结果下次复用。 - 代码整合 :将所有模块函数和运行时代码组装成单一文件
bundle.js用立即执行函数进行运行。
这种设计让浏览器能够执行原本不支持的ES6模块语法,同时实现了高效的模块缓存和按需加载机制。
实现Webpack依赖分析(自测:如何实现分析依赖,两种优缺点)
实现步骤
- 依赖分析:从入口文件开始,递归找到所有依赖的文件
- 代码转换:将每个文件转换为模块函数格式
- 生成bundle:将所有模块函数组装成最终的bundle.js
依赖分析的两种方法
方法一:正则表达式
js
function findDependenciesByRegex(code) {
  const importRegex = /import\s+.*?\s+from\s+['"](.*?)['"];?/g;
  const dependencies = [];
  let match;

  while ((match = importRegex.exec(code)) !== null) {
    dependencies.push(match[1]);
  }

  return dependencies;
}
优点:
- 实现简单,代码量少
- 执行速度快
缺点:
- 容易误匹配字符串中的内容
- 无法处理复杂的import语法
- 不够准确和可靠
问题示例:
js
// 这种情况会被错误匹配
const code = `
  console.log("import something from 'fake-module'");
  import { real } from './real-module';
`;
方法二:抽象语法树(AST)
js
const babel = require('@babel/core');
const traverse = require('@babel/traverse').default;

function findDependenciesByAST(code) {
  const dependencies = [];

  // 将代码解析为AST
  const ast = babel.parse(code, {
    sourceType: 'module'
  });

  // 遍历AST节点找到import的路径
  traverse(ast, {
    ImportDeclaration(path) {
      dependencies.push(path.node.source.value);
    }
  });

  return dependencies;
}
优点:
- 精确解析,不会误匹配字符串
- 能处理各种复杂的import语法
- 提供完整的语法信息
缺点:
- 实现复杂度较高
- 需要引入额外的解析库
- 执行速度相对较慢
为什么AST更准确:
- AST将代码解析为树形结构,每个import语句会生成专门的ImportDeclaration节点
- 字符串内容不会被解析为import节点,从根本上避免了误匹配
- 能够准确识别import语句的各个组成部分(导入内容、来源路径等)
手写实现抽象语法树与完整模块打包工具
一、获取JS文件依赖信息,获取依赖文件绝对路径:如何将代码解析为抽象语法树(AST)
1.1 使用@babel/parser解析代码
抽象语法树(Abstract Syntax Tree, AST)是源代码的抽象语法结构的树状表示。我们可以使用 @babel/parser(原名 Babylon)将 JavaScript 代码字符串解析为 AST 对象。
js
const parser = require('@babel/parser');

const code = `import React from 'react';`;
const ast = parser.parse(code, {
  sourceType: 'module' // 指定代码为模块化代码
});

console.log(ast);
解析后的 AST 本质上是一个 JavaScript 对象,其中包含描述代码结构的各种节点。当打印 AST 时,某些嵌套较深的属性会以其类型(如 Node、Position)代替显示,但直接转换为字符串可以看到完整结构。
1.2 手动遍历AST获取依赖
AST 的 program.body 属性是一个数组,包含了当前文件的所有顶级语句。我们可以遍历这个数组,找到所有类型为 ImportDeclaration 的节点,然后从中提取导入路径。
js
const dependencies = [];
ast.program.body.forEach(node => {
  if (node.type === 'ImportDeclaration') {
    dependencies.push(node.source.value);
  }
});

console.log(dependencies); // ['react']
这种方法虽然可行,但手动遍历 AST 结构繁琐且容易出错。
1.3 使用@babel/traverse简化遍历
@babel/traverse 提供了一个更便捷的方式来遍历 AST。我们可以使用它来查找特定类型的节点。
js
const traverse = require('@babel/traverse').default;

const dependencies = [];
traverse(ast, {
  ImportDeclaration(path) {
    dependencies.push(path.node.source.value);
  }
});

console.log(dependencies); // ['react']
这种方法更加简洁和可靠,我们只需要定义对特定节点类型的处理函数即可。
二、如何实现从入口文件开始自动化依赖分析所有依赖文件
2.1 单文件依赖分析
我们可以封装一个函数来分析单个文件的依赖:
js
const fs = require('fs');
const path = require('path');

function getDependencies(filename) {
  const content = fs.readFileSync(filename, 'utf-8');
  const ast = parser.parse(content, { sourceType: 'module' });

  const dependencies = [];
  traverse(ast, {
    ImportDeclaration(path) {
      const importPath = path.node.source.value;
      // 将相对路径转换为绝对路径
      const absolutePath = path.resolve(path.dirname(filename), importPath);
      dependencies.push(absolutePath);
    }
  });

  return {
    filename,
    dependencies
  };
}
2.2 广度优先搜索分析所有依赖
从入口文件开始,我们可以使用广度优先搜索(BFS)来分析整个项目的所有依赖:
js
function analyzeDependencies(entryFile) {
  const queue = [entryFile];
  const allDependencies = new Set();
  const dependencyGraph = new Map();

  while (queue.length > 0) {
    const currentFile = queue.shift();

    if (allDependencies.has(currentFile)) continue;
    allDependencies.add(currentFile);

    const { dependencies } = getDependencies(currentFile);
    dependencyGraph.set(currentFile, dependencies);

    dependencies.forEach(dep => {
      if (!allDependencies.has(dep)) {
        queue.push(dep);
      }
    });
  }

  return dependencyGraph;
}
这样我们就得到了一个包含所有模块及其依赖关系的映射表。
三、ES模块语法转换为CommonJS形式
为了使模块代码能在打包环境中运行,我们需要将 ES 模块语法转换为 CommonJS 形式。这包括处理 import 和 export 语句。
3.1 ImportDeclaration转换
对于不同类型的 import 语法,我们进行不同的转换:
js
const { transformFromAst } = require('@babel/core');
const t = require('@babel/types');

function transformImportDeclaration(ast, moduleIdMap) {
  traverse(ast, {
    ImportDeclaration(path) {
      const source = path.node.source.value;
      const absolutePath = path.resolve(path.dirname(path.hub.file.opts.filename), source);

      // 生成模块ID
      const moduleId = moduleIdMap.get(absolutePath) || generateModuleId(absolutePath);
      moduleIdMap.set(absolutePath, moduleId);

      const specifiers = path.node.specifiers;
      const imports = specifiers.map(spec => {
        if (t.isImportDefaultSpecifier(spec)) {
          // 默认导入:import foo from 'module' → const foo = webpack_require(moduleId)
          return t.variableDeclarator(
            t.identifier(spec.local.name),
            t.callExpression(t.identifier('webpack_require'), [t.numericLiteral(moduleId)])
          );
        } else if (t.isImportSpecifier(spec)) {
          // 命名导入:import { foo } from 'module' → const foo = webpack_require(moduleId).foo
          return t.variableDeclarator(
            t.identifier(spec.local.name),
            t.memberExpression(
              t.callExpression(t.identifier('webpack_require'), [t.numericLiteral(moduleId)]),
              t.identifier(spec.imported.name)
            )
          );
        }
      }).filter(Boolean);

      // 替换 import 语句为 const 声明
      path.replaceWith(t.variableDeclaration('const', imports));
    }
  });
}
3.2 ExportDefaultDeclaration转换
将 export default 语句转换为 CommonJS 形式:
js
function transformExportDefaultDeclaration(ast) {
  traverse(ast, {
    ExportDefaultDeclaration(path) {
      // 替换 export default foo 为 module.exports = foo
      path.replaceWith(
        t.expressionStatement(
          t.assignmentExpression(
            '=',
            t.memberExpression(t.identifier('module'), t.identifier('exports')),
            path.node.declaration
          )
        )
      );
    }
  });
}
3.3 ExportNamedDeclaration转换
将命名导出语句转换为 CommonJS 形式:
js
function transformExportNamedDeclaration(ast) {
  traverse(ast, {
    ExportNamedDeclaration(path) {
      // 替换 export { foo } 为 module.exports.foo = foo
      if (path.node.specifiers.length) {
        const exports = path.node.specifiers.map(spec => {
          return t.expressionStatement(
            t.assignmentExpression(
              '=',
              t.memberExpression(
                t.memberExpression(t.identifier('module'), t.identifier('exports')),
                t.identifier(spec.exported.name)
              ),
              t.identifier(spec.local.name)
            )
          );
        });
        path.replaceWithMultiple(exports);
      }
    }
  });
}
3.4 模块ID生成
我们使用一个简单的自增 ID 来标识每个模块:
js
const moduleIdMap = new Map();
let nextModuleId = 0;

function generateModuleId(modulePath) {
  if (!moduleIdMap.has(modulePath)) {
    moduleIdMap.set(modulePath, nextModuleId++);
  }
  return moduleIdMap.get(modulePath);
}
实际 Webpack 会使用更复杂的哈希算法生成模块 ID,以实现更好的缓存效果。
四、打包产物(bundle.js)工作原理,核心概念和结构
4.1 模块打包的核心概念
打包工具的核心功能包括:
- 模块作用域隔离:通过函数作用域将每个模块封装
- 模块导入导出:实现模块间的引用关系
- 模块缓存:避免重复执行模块代码
- 入口执行:从入口文件开始执行整个应用
4.2 简化版打包产物结构
一个简化版的打包产物(bundle.js)通常包含以下部分:
js
(function(modules) {
  // 模块缓存
  const installedModules = {};

  // 模拟webpack_require函数
  function webpack_require(moduleId) {
    // 检查缓存
    if (installedModules[moduleId]) {
      return installedModules[moduleId].exports;
    }

    // 创建新模块
    const module = installedModules[moduleId] = {
      exports: {}
    };

    // 执行模块函数
    modules[moduleId].call(
      module.exports,
      module,
      module.exports,
      webpack_require
    );

    return module.exports;
  }

  // 执行入口模块
  return webpack_require('<%= entryModuleId %>');
})({
  <% modules.forEach((module) => { %>
    '<%= module.id %>': function(module, exports, webpack_require) {
        <%= module.code %>
     },
  <% }); %>
});
注意:这里使用的是 webpack_require 而不是 require,以避免与 Node.js 的原生 require 混淆,他们不是一个函数
五、使用EJS动态生成打包产物
5.1 EJS模板基础
EJS 是一个简单的模板引擎,可以让我们用 JavaScript 生成 HTML 或其他文本格式。基本语法:
<%= variable %>:输出变量值<% code %>:执行 JavaScript 代码
5.2 创建打包模板
我们可以创建一个 EJS 模板来动态生成打包产物:
js
const ejs = require('ejs');

const template = `
(function(modules) {
  const installedModules = {};

  function webpack_require(moduleId) {
    if (installedModules[moduleId]) {
      return installedModules[moduleId].exports;
    }

    const module = installedModules[moduleId] = {
      exports: {}
    };

    modules[moduleId].call(
      module.exports,
      module,
      module.exports,
      webpack_require
    );

    return module.exports;
  }

  return webpack_require(<%= entryModuleId %>);
})({
  <% modules.forEach((module) => { %>
    <%= module.id %>: function(module, exports, webpack_require) {
      <%= module.code %>
    },
  <% }); %>
});
`;
5.3 渲染打包产物
使用 EJS 渲染模板并生成最终的打包文件:
js
function generateBundle(modules, entryId) {
  const moduleList = Array.from(modules.values()).map(mod => ({
    id: mod.id,
    code: mod.code
  }));

  const bundleCode = ejs.render(template, {
    entryModuleId: entryId,
    modules: moduleList
  });

  return bundleCode;
}
六、完整的打包流程实现
整合所有步骤,实现完整的打包流程:
js
const fs = require('fs');
const path = require('path');
const parser = require('@babel/parser');
const traverse = require('@babel/traverse').default;
const generate = require('@babel/generator').default;
const t = require('@babel/types');

// 模块 ID 映射表
const moduleIdMap = new Map();
let nextModuleId = 0;

// 生成模块 ID
function generateModuleId(modulePath) {
  if (!moduleIdMap.has(modulePath)) {
    moduleIdMap.set(modulePath, nextModuleId++);
  }
  return moduleIdMap.get(modulePath);
}

// 解析模块内容,提取依赖并转换代码
function parseModule(modulePath) {
  const filename = path.resolve(modulePath);
  const content = fs.readFileSync(filename, 'utf-8');

  // 解析 AST
  const ast = parser.parse(content, {
    sourceType: 'module',
  });

  const dependencies = [];

  // 遍历 AST,提取 import 依赖并转换为 webpack_require
  traverse(ast, {
    ImportDeclaration(p) {
      const source = p.node.source.value;
      const absolutePath = path.resolve(path.dirname(filename), source);

      // 记录依赖
      dependencies.push(absolutePath);

      // 生成模块 ID
      const moduleId = generateModuleId(absolutePath);

      // 替换 import 语句为 webpack_require
      const specifiers = p.node.specifiers;
      const imports = specifiers.map(spec => {
        if (t.isImportDefaultSpecifier(spec)) {
          // 默认导入:import foo from 'module' → const foo = webpack_require(moduleId)
          return t.variableDeclarator(
            t.identifier(spec.local.name),
            t.callExpression(t.identifier('webpack_require'), [t.numericLiteral(moduleId)])
          );
        } else if (t.isImportSpecifier(spec)) {
          // 命名导入:import { foo } from 'module' → const foo = webpack_require(moduleId).foo
          return t.variableDeclarator(
            t.identifier(spec.local.name),
            t.memberExpression(
              t.callExpression(t.identifier('webpack_require'), [t.numericLiteral(moduleId)]),
              t.identifier(spec.imported.name)
            )
          );
        }
      }).filter(Boolean);

      // 替换 import 语句为 const 声明
      p.replaceWith(t.variableDeclaration('const', imports));
    },

    ExportDefaultDeclaration(p) {
      // 替换 export default 为 module.exports
      p.replaceWith(
        t.expressionStatement(
          t.assignmentExpression(
            '=',
            t.memberExpression(t.identifier('module'), t.identifier('exports')),
            p.node.declaration
          )
        )
      );
    },

    ExportNamedDeclaration(p) {
      // 替换 export { foo } 为 module.exports.foo = foo
      if (p.node.specifiers.length) {
        const exports = p.node.specifiers.map(spec => {
          return t.expressionStatement(
            t.assignmentExpression(
              '=',
              t.memberExpression(
                t.memberExpression(t.identifier('module'), t.identifier('exports')),
                t.identifier(spec.exported.name)
              ),
              t.identifier(spec.local.name)
            )
          );
        });
        p.replaceWithMultiple(exports);
      }
    },
  });

  // 生成转换后的代码
  const { code } = generate(ast);

  return {
    id: generateModuleId(filename),
    filename,
    dependencies,
    code,
  };
}

// 递归分析所有依赖
function analyzeDependencies(entry) {
  const entryModule = parseModule(entry);
  const queue = [entryModule];
  const modules = new Map();

  modules.set(entryModule.id, entryModule);

  while (queue.length > 0) {
    const currentModule = queue.shift();

    currentModule.dependencies.forEach(depPath => {
      const depModule = parseModule(depPath);

      if (!modules.has(depModule.id)) {
        modules.set(depModule.id, depModule);
        queue.push(depModule);
      }
    });
  }

  return modules;
}

// 生成打包后的代码
function generateBundle(modules, entryId) {
  const moduleList = Array.from(modules.values()).map(mod => `
  ${mod.id}: function(module, exports, webpack_require) {
    ${mod.code}
  },
`).join('\n');

  return `
(function(modules) {
  const installedModules = {};

  function webpack_require(moduleId) {
    if (installedModules[moduleId]) {
      return installedModules[moduleId].exports;
    }

    const module = installedModules[moduleId] = {
      exports: {}
    };

    modules[moduleId].call(
      module.exports,
      module,
      webpack_require
    );

    return module.exports;
  }

  return webpack_require(${entryId});
})({
${moduleList}
});
`;
}

// 主打包函数
function bundle(entryFile, outputFile) {
  const modules = analyzeDependencies(entryFile);
  const entryModule = Array.from(modules.values()).find(mod => mod.filename === path.resolve(entryFile));
  const bundleCode = generateBundle(modules, entryModule.id);

  fs.writeFileSync(outputFile, bundleCode);
  console.log(`✅ 打包完成: ${outputFile}`);
}

// 使用示例
bundle('./src/index.js', './dist/bundle.js');
七、总结
通过以上步骤,我们实现了一个简化版的模块打包工具,核心流程包括:
- 使用 @babel/parser 将代码解析为 AST
- 使用 @babel/traverse 遍历 AST 提取依赖关系
- 将 ES 模块语法转换为 CommonJS 形式
-
- 处理默认导入:
import foo from 'module'→const foo = webpack_require(moduleId) - 处理命名导入:
import { foo } from 'module'→const foo = webpack_require(moduleId).foo - 处理默认导出:
export default foo→module.exports = foo - 处理命名导出:
export { foo }→module.exports.foo = foo
- 处理默认导入:
- 通过广度优先搜索分析整个项目的依赖图
- 使用模块 ID 优化和代码转换完善打包产物
- 动态生成最终的打包代码
Webpack Loader实现
一、Loader的基本概念
1.1 什么是Loader
Loader是Webpack的核心功能之一,它的作用是将非JavaScript文件转换为JavaScript模块 ,使得Webpack能够处理除了JS之外的各种类型的文件。
1.2 为什么需要Loader
原生Webpack的局限性
- Webpack原生只能理解
JavaScript和JSON文件 - 当遇到其他格式文件时,需要
转换为JavaScript语法才能被解析为AST(进行依赖分析也就是寻找import的子文件路径)
问题示例
js
// 以下代码会导致解析失败
import './styles.css';        // CSS文件不符合JS语法
import data from './data.json'; // JSON需要特殊处理解析失败的原因:
- CSS文件内容如
.button { color: red; }不符合JavaScript语法规范 - 直接解析会在AST生成阶段报错
- 需要先转换为
有效的JavaScript导出语句
1.3 Loader的工作原理
Loader本质上是一个转换函数,它接收源文件内容,返回转换后的JavaScript代码:
js
// Loader的基本结构
module.exports = function(source) {
  // source: 原始文件内容字符串
  // 返回: 转换后的JavaScript代码字符串
  return `export default ${JSON.stringify(source)}`;
};
二、Loader的配置与执行机制
2.1 Webpack配置中的Loader
js
// webpack.config.js
module.exports = {
  module: {
    rules: [
      {
        test: /.json$/,           // 正则匹配文件类型
        use: ['json-loader']       // 使用的loader数组
      },
      {
        test: /.css$/,
        use: ['style-loader', 'css-loader'] // 多个loader的执行顺序
      }
    ]
  }
};
2.2 Loader的执行顺序
关键特性:Loader从右到左(从后到前)执行
js
use: ['style-loader', 'css-loader']
// 执行顺序:
// 1. css-loader 处理 .css 文件
// 2. style-loader 处理 css-loader 的输出结果执行流程图:
原始CSS文件 → css-loader → JavaScript字符串 → style-loader → 最终JavaScript模块2.3 在打包器中集成Loader机制
修改文件分析逻辑
js
class SimpleWebpack {
  constructor(entry, output, config = {}) {
    this.entry = entry;
    this.output = output;
    this.loaders = config.module?.rules || []; // 获取loader配置
    // ... 其他属性
  }

  /**
   * 应用匹配的loaders处理文件内容
   */
  applyLoaders(filePath, source) {
    let transformedSource = source;

    // 遍历所有loader规则
    for (const rule of this.loaders) {
      // 检查文件是否匹配当前规则
      if (rule.test.test(filePath)) {
        // 从右到左执行loaders
        const loaders = Array.isArray(rule.use) ? [...rule.use].reverse() : [rule.use];

        for (const loaderName of loaders) {
          const loader = this.loadLoader(loaderName);
          transformedSource = loader(transformedSource);
        }
        break; // 匹配到规则后停止检查其他规则
      }
    }

    return transformedSource;
  }

  /**
   * 加载并返回loader函数
   */
  loadLoader(loaderName) {
    // 在实际应用中,这里会从node_modules加载loader
    // 为了演示,我们使用内置的loader映射
    const builtinLoaders = {
      'json-loader': this.jsonLoader,
      'css-loader': this.cssLoader,
      'style-loader': this.styleLoader
    };

    return builtinLoaders[loaderName] || ((source) => source);
  }

  /**
   * 修改后的文件分析方法
   */
  analyzeFile(filePath) {
    if (this.modules.has(filePath)) {
      return this.modules.get(filePath);
    }

    let sourceCode = fs.readFileSync(filePath, 'utf-8');

    // 关键步骤:在AST解析前应用loaders
    sourceCode = this.applyLoaders(filePath, sourceCode);

    // 现在sourceCode已经是有效的JavaScript代码,可以安全解析为AST
    const ast = parser.parse(sourceCode, {
      sourceType: 'module'
    });

    // ... 后续AST分析逻辑
  }
}
三、简单实现json-loader
3.1 JSON文件处理需求
js
// 原始JSON文件 data.json
{
  "name": "webpack-demo",
  "version": "1.0.0"
}

// 期望的转换结果(JavaScript模块)
export default {
  "name": "webpack-demo",
  "version": "1.0.0"
};
3.2 json-loader实现
js
/**
 * JSON Loader实现
 * 将JSON文件内容转换为JavaScript默认导出
 */
function jsonLoader(source) {
  // 验证JSON格式
  try {
    JSON.parse(source);
  } catch (error) {
    throw new Error(`Invalid JSON file: ${error.message}`);
  }

  // 转换为JavaScript模块导出语法
  return `export default ${source};`;
}
3.3 使用示例
js
// webpack配置
{
  test: /.json$/,
  use: ['json-loader']
}

// 在JavaScript中使用
import config from './config.json';
console.log(config.name); // "webpack-demo"
四、手写实现简易style-loader与css-loader
4.1 CSS文件处理的挑战
CSS文件无法直接被JavaScript引擎执行,需要通过DOM操作将样式注入到页面中。
处理策略:
- css-loader:读取CSS内容并返回字符串
- style-loader:将CSS字符串通过DOM操作插入到页面
4.2 css-loader实现
js
/**
 * CSS Loader实现
 * 将CSS文件内容转换为JavaScript字符串导出
 */
function cssLoader(source) {
  // 简单版本:直接返回CSS内容作为字符串
  const cssString = JSON.stringify(source);
  return `export default ${cssString};`;
}
4.3 style-loader实现
js
/**
 * Style Loader实现
 * 将CSS字符串通过DOM操作注入到页面中
 */
function styleLoader(source) {
  // 从css-loader的输出中提取CSS内容
  // css-loader输出格式:export default "css content here";

  return `
    // 从css-loader获取CSS内容
    ${source}

    // 创建并插入style标签的函数
    function insertCSS(css) {
      if (typeof document === 'undefined') return;

      const style = document.createElement('style');
      style.type = 'text/css';

      if (style.styleSheet) {
        // IE8及以下版本
        style.styleSheet.cssText = css;
      } else {
        // 现代浏览器
        style.innerHTML = css;
      }

      document.head.appendChild(style);
    }

    // 立即执行:将CSS插入页面
    insertCSS(__webpack_require__.default || __webpack_require__);
  `;
}
4.4 更完善的style-loader实现
js
function styleLoader(source) {
  return `
    ${source}

    (function() {
      // 获取CSS内容(来自css-loader的输出)
      const css = typeof exports === 'object' && exports.default || exports;

      if (typeof css === 'string') {
        // 创建style标签
        const style = document.createElement('style');
        style.type = 'text/css';

        // 添加CSS内容
        if (style.styleSheet) {
          style.styleSheet.cssText = css;
        } else {
          style.appendChild(document.createTextNode(css));
        }

        // 插入到head中
        document.head.appendChild(style);

        // 支持热更新时的样式移除
        if (module.hot) {
          module.hot.dispose(function() {
            document.head.removeChild(style);
          });
        }
      }
    })();

    // 导出空对象(CSS不需要导出内容)
    export default {};
  `;
}
4.5 CSS处理流程梳理
完整处理流程:
js
1. 遇到 import './styles.css'
2. 匹配到 test: /.css$/, use: ['style-loader', 'css-loader']
3. 执行顺序(右到左):

   原始CSS文件内容:
   ".button { color: red; background: blue; }"

   ↓ css-loader处理

   "export default ".button { color: red; background: blue; }";"

   ↓ style-loader处理

   "// 插入CSS到DOM的JavaScript代码
    const css = ".button { color: red; background: blue; }";
    const style = document.createElement('style');
    style.innerHTML = css;
    document.head.appendChild(style);
    export default {};"

4. 生成的JavaScript代码被webpack打包
5. 运行时执行,CSS被注入到页面中
五、总结与扩展
5.1 Loader机制的核心价值
- 扩展性:让Webpack能够处理任意类型的文件
- 模块化:每个Loader职责单一,可组合使用
- 标准化:统一的接口规范,便于开发和维护
5.2 常见Loader类型
- 转译类:babel-loader, typescript-loader
- 样式类:css-loader, style-loader, sass-loader
- 文件类:file-loader, url-loader
- 代码检查:eslint-loader
- 模板类:html-loader, vue-loader
5.3 开发Loader的最佳实践
- 单一职责:每个Loader只做一件事
- 链式调用:设计时考虑与其他Loader的配合
- 错误处理:提供清晰的错误信息
- 性能优化:缓存计算结果,避免重复处理
- 选项支持:通过loader-utils获取用户配置
5.4 实际应用场景
- 组件化开发:CSS Modules解决样式隔离问题
- 预处理器:Sass/Less编译为CSS
- 代码转换:ES6+转换为ES5兼容代码
- 资源优化:图片压缩、文件合并
Webpack热更新(HMR)原理与实现(自测:说出具体原理和实现流程)
一、HMR解决的具体问题
在没有HMR(Hot Module Replacement)时,修改代码后的开发体验如下:
全量刷新 (Live Reload) :修改代码 -> Webpack重新打包 -> 浏览器自动刷新页面 (window.location.reload())。
问题: 重新打包所有资源并在浏览器重新加载以及状态丢失
HMR的效果 :
修改代码 -> 浏览器不刷新 -> 仅替换修改的模块代码 -> 保持当前页面状态不变。
二、HMR核心流程拆解
HMR不是单一功能,而是Webpack编译器(服务端)与 浏览器运行时(客户端)配合的结果。
涉及的四个核心角色
- Webpack Compiler:负责监听文件,编译代码。
- HMR Server (通常集成在webpack-dev-server中):建立WebSocket连接,负责将更新通知推送到浏览器。
- Bundle Server :提供文件访问服务(http://localhost:8080/bundle.js)。
- HMR Runtime:注入到打包后的bundle.js中的一段JS代码,负责在浏览器端接收WebSocket消息,并执行代码替换。
完整更新流程
- 监听 :Webpack Compiler 监听到文件变化(如
style.css或math.js)。 - 增量编译:Webpack 不会重新打包所有文件,而是生成两个补丁文件:
- Manifest (JSON) :描述哪些模块变了,新的hash值是多少。
- Update Chunk (JS) :包含被修改模块的具体代码。
- 推送消息 :HMR Server 通过 WebSocket 向浏览器发送消息:
{"type": "hash", "data": "新的hash值"}和{"type": "ok"}。 - 检查更新:浏览器端的 HMR Runtime 收到消息,对比上一次的 hash,发现有更新。
- 请求补丁:Runtime 发起 AJAX 请求获取 Manifest,再通过 JSONP 请求获取 Update Chunk。
- 代码替换 :Runtime 执行新下载的代码,替换掉
__webpack_modules__中对应的旧函数。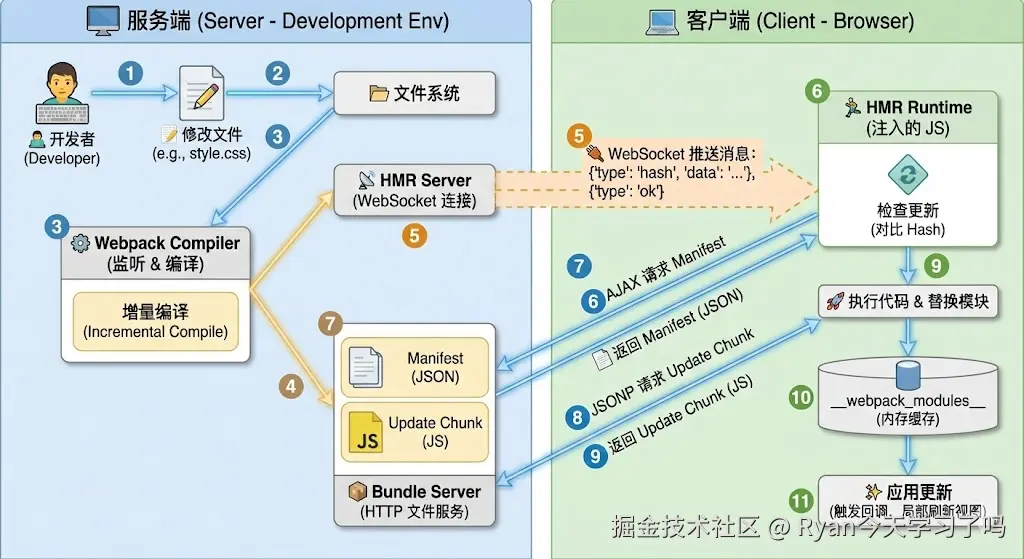
三、手写简易HMR实现逻辑
这里不展示完整的Webpack源码,而是实现HMR最核心的通信 与模块替换逻辑。
服务端:监听编译与WebSocket通知
在开发服务器启动时,需要注入WebSocket服务。
js
// server.js (模拟 webpack-dev-server)
const WebSocket = require('ws');
const webpack = require('webpack');
const config = require('./webpack.config.js');

const compiler = webpack(config);
const app = require('express')();
const server = require('http').createServer(app);

// 1. 启动 WebSocket 服务器
const wss = new WebSocket.Server({ server });

// 2. 监听 Webpack 编译完成钩子
compiler.hooks.done.tap('HMRPlugin', (stats) => {
  // 获取新生成的 hash
  const hash = stats.hash;

  // 3. 向所有连接的客户端广播消息
  wss.clients.forEach(client => {
    client.send(JSON.stringify({
      type: 'hash',
      data: hash
    }));
    client.send(JSON.stringify({
      type: 'ok'
    }));
  });
});

// 启动编译监视
compiler.watch({}, (err) => {
  console.log('Webpack is watching files...');
});

server.listen(8080);
客户端:Runtime代码注入
Webpack打包时,会将以下代码注入到 bundle.js 的入口处。
js
// bundle.js 中的注入代码 (简化版)

// 1. 建立连接
const socket = new WebSocket('ws://localhost:8080');
let currentHash = 'old_hash_value';

// 2. 监听消息
socket.onmessage = function(event) {
  const msg = JSON.parse(event.data);

  if (msg.type === 'hash') {
    currentHash = msg.data;
  } else if (msg.type === 'ok') {
    // 收到更新完成信号,开始热更新逻辑
    hotCheck();
  }
};

function hotCheck() {
  console.log('检测到更新,准备拉取新代码...');
  // 实际 Webpack 会在这里:
  // 1. fetch('/hash.hot-update.json') -> 拿到变动的模块ID
  // 2. loadScript('/hash.hot-update.js') -> 拿到新模块代码
  // 3. hotApply() -> 执行替换

  // 模拟热更新操作
  hotDownloadManifest().then(hotDownloadUpdateChunk);
}
核心:如何在浏览器端替换代码
这是HMR最关键的一步。回顾之前的打包结构,所有模块都存在 __webpack_modules__ 对象中。热更新的本质就是修改这个对象的键值对。
假设更新前的 bundle.js 运行时结构:
js
var __webpack_modules__ = {
  "./src/title.js": function(module, exports) {
    module.exports = "Old Title";
  }
};
// 缓存
var __webpack_module_cache__ = {
  "./src/title.js": { exports: "Old Title", loaded: true }
};
更新发生时 (hotApply 的简化逻辑):
js
// 这是一个由 JSONP 加载的新代码块
function webpackHotUpdateCallback(chunkId, moreModules) {
  // moreModules 包含了新的模块代码
  // 例如: { "./src/title.js": function() { module.exports = "New Title"; } }

  for (let moduleId in moreModules) {
    // 1. 覆盖旧的模块定义
    __webpack_modules__[moduleId] = moreModules[moduleId];

    // 2. 删除旧的缓存(关键)
    // 下次 require 这个模块时,会重新执行新函数
    delete __webpack_module_cache__[moduleId];

    // 3. 执行 accept 回调(如果有)
    if (hot._acceptedDependencies[moduleId]) {
      hot._acceptedDependencies[moduleId]();
    }
  }
}
总结操作:
- 覆盖 :用新函数覆盖
__webpack_modules__中的旧函数。 - 清缓存 :删除
__webpack_module_cache__中的缓存。 - 重执行 :当父模块再次执行
__webpack_require__('./src/title.js')时,会拿到最新的代码。
四、module.hot.accept 与 冒泡机制
仅仅替换模块定义是不够的,如果页面已经渲染了 "Old Title",仅仅替换函数的定义,页面文字不会自动变。需要代码主动响应这个变化。
开发者代码中的设置
在入口文件(如 index.js)中:
js
import title from './title.js';

document.body.innerText = title;

// 必须添加这段代码才能实现 HMR,否则会回退到整页刷新
if (module.hot) {
  // 注册回调:当 title.js 发生变化时执行
  module.hot.accept(['./title.js'], () => {
    // 重新获取新内容
    const newTitle = require('./title.js');
    // 执行具体的 DOM 更新逻辑
    document.body.innerText = newTitle;
  });
}
冒泡机制 (Bubbling)
如果 title.js 变了,但 title.js 没有 module.hot.accept,Webpack 会怎么做?
- 检查自身 :
title.js有accept吗?没有。 - 向上查找 :谁引用了
title.js?是index.js。 - 检查父级 :
index.js有没有accept('./title.js')?
-
- 有 :执行
index.js中定义的回调。更新结束。 - 没有 :继续向上查找
index.js的父级。
- 有 :执行
- 顶层失败 :如果一直冒泡到入口文件(Entry)都没有被
accept捕获,HMR 宣告失败,触发window.location.reload()进行全量刷新。
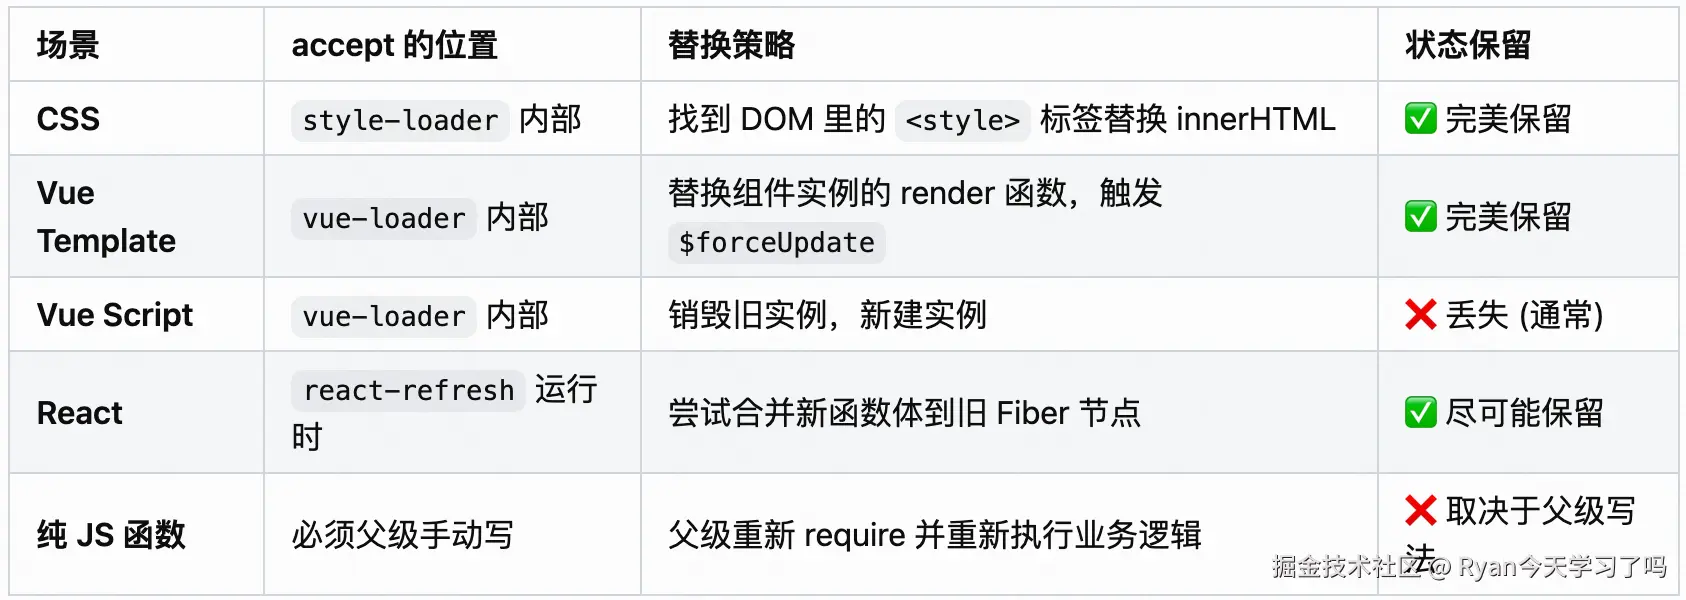
4.3 为什么Vue/React开发时不需要手写accept?
因为 vue-loader 或 react-refresh 自动在编译时注入了 module.hot.accept 代码。
例如 vue-loader 转换后的代码大致如下:
js
// vue-loader 自动注入的代码
import { render } from './App.vue?vue&type=template';
// ...
export default component.exports;

if (module.hot) {
  module.hot.accept(); // 接受自身更新
  module.hot.accept('./App.vue?vue&type=template', () => {
    // 当模板更新时,重新渲染组件,保留状态
    api.rerender('component-id', render);
  });
}
五、总结 Webpack HMR 实现链
- 监听:Compiler 监听到文件修改。
- 生成:Compiler 生成 Manifest 和 Update Chunk。
- 通知:Server 通过 WebSocket 通知 Client "有新 Hash"。
- 下载:Client 通过 JSONP 下载新代码块。
- 替换 :Client 运行时更新
__webpack_modules__并清除缓存。 - 响应 :通过
module.hot.accept定义的回调函数,执行具体的业务逻辑更新(如重绘 DOM)。
Webpack Plugin实现
一、Plugin的核心作用与Loader的区别
1.1 什么是Plugin
Plugin不处理具体的模块内容,而是监听Webpack构建过程中的生命周期事件(Hooks),在特定的时刻执行特定的逻辑,从而改变构建结果。
1.2 Plugin与Loader的直观对比
| 特性 | Loader | Plugin |
|---|---|---|
| 作用对象 | 单个文件 (如 .css, .vue) | 整个构建过程 (Compiler) |
| 功能 | 转换代码 (less -> css) | 打包优化、资源管理、环境变量注入 |
| 运行时机 | 解析模块依赖时 | 构建流程的任意时刻 (启动、编译、发射、结束) |
| 配置方式 | module.rules 数组 |
plugins 数组 |
1.3 常见的Plugin功能
- 打包前 :清除
dist目录 (CleanWebpackPlugin)。 - 编译中 :定义全局变量 (
DefinePlugin)。 - 打包后 :生成
index.html并自动插入JS脚本 (HtmlWebpackPlugin)。 - 结束时:压缩CSS/JS代码,上传资源到CDN。
二、Plugin的基本结构(自测:说出Plugin的固定格式)
2.1 基础代码结构
Webpack的Plugin是一个类(Class) ,它必须包含一个 apply 方法。
js
class MyPlugin {
  // 1. 接收配置参数
  constructor(options) {
    this.options = options;
  }

  // 2. 必须包含 apply 方法,接收 compiler 对象
  apply(compiler) {
    // 3. 注册钩子,监听事件 (例如 'done' 表示构建完成)
    compiler.hooks.done.tap('MyPlugin', (stats) => {
      console.log('构建完成!');
    });
  }
}

module.exports = MyPlugin;
2.2 使用方式
js
// webpack.config.js
const MyPlugin = require('./MyPlugin');

module.exports = {
  plugins: [
    new MyPlugin({ param: 'value' }) // 实例化插件
  ]
};
三、两个核心对象:Compiler与Compilation
在编写Plugin时,必须区分两个对象:
3.1 Compiler (编译器)
- 定义:代表了完整的 Webpack 环境配置。
- 生命周期:Webpack 启动时创建,直到进程结束。它是全局唯一的。
- 作用:可以访问所有的配置信息(entry, output, loaders等),用于注册全局级别的钩子。
3.2 Compilation (编译过程)
- 定义 :代表了一次具体的构建过程。
- 生命周期:每次检测到文件变化(热更新)时,都会创建一个新的 compilation 对象。
- 作用 :包含了当前的模块资源、编译生成的文件(assets)、依赖关系图。如果要修改打包输出的内容,必须操作 compilation。
四、手写实现一个文件清单插件 (FileListPlugin)
4.1 需求描述
我们需要实现一个插件,在打包生成文件之前,自动生成一个 file-list.md 文件。 该文件记录所有打包输出的文件名和文件大小。
4.2 实现步骤
- 监听钩子 :使用
emit钩子。这个时刻编译已完成,文件即将输出到磁盘,但还未输出。这是修改输出资源的最后机会。 - 获取资源 :从
compilation.assets获取所有待输出的文件。 - 生成内容:遍历资源,拼接文件名和大小。
- 添加资源 :将新生成的
file-list.md添加到compilation.assets中。
4.3 代码实现
js
class FileListPlugin {
  constructor(options) {
    // 允许用户配置输出的文件名,默认为 'file-list.md'
    this.filename = options && options.filename ? options.filename : 'file-list.md';
  }

  apply(compiler) {
    // 1. 注册 emit 钩子(这是一个异步钩子,使用 tapAsync)
    compiler.hooks.emit.tapAsync('FileListPlugin', (compilation, callback) => {

      let fileList = '# Bundled Files

';

      // 2. 遍历 compilation.assets (包含所有即将输出的文件)
      for (let filename in compilation.assets) {
        // 获取文件来源对象
        const source = compilation.assets[filename];
        // 获取文件大小
        const size = source.size();

        fileList += `- ${filename}: ${size} bytes
`;
      }

      // 3. 将生成的内容添加到输出资源列表
      compilation.assets[this.filename] = {
        // 返回文件内容
        source: function() {
          return fileList;
        },
        // 返回文件大小
        size: function() {
          return fileList.length;
        }
      };

      // 4. 异步处理完成,必须调用 callback 告诉 Webpack 继续执行
      callback();
    });
  }
}

module.exports = FileListPlugin;
4.4 模拟运行效果
假设打包输出了 bundle.js (1000 bytes) 和 style.css (500 bytes),配置插件后,dist 目录下会多出一个 file-list.md:
markdown
# Bundled Files

- bundle.js: 1000 bytes
- style.css: 500 bytes
五、常用生命周期钩子(Hooks)一览
Webpack 基于 Tapable 库实现了事件流。以下是开发 Plugin 最常用的几个钩子:
| 钩子名称 | 归属对象 | 时机 | 常用场景 | 同步/异步 |
|---|---|---|---|---|
| entryOption | compiler | 初始化配置后 | 读取或修改 Entry 配置 | Sync |
| compile | compiler | 开始编译前 | 提示"开始构建" | Sync |
| compilation | compiler | 编译过程创建时 | 注册更细粒度的 compilation 钩子 | Sync |
| emit | compiler | 生成资源到目录前 | 修改文件内容、添加新文件 (最常用) | Async |
| done | compiler | 编译完成 | 提示构建结束、上传资源、分析耗时 | Async |
注册方式的区别:
- 同步钩子 :
tap('PluginName', (params) => { ... }) - 异步钩子 :
tapAsync('PluginName', (params, callback) => { ... callback(); })tapPromise('PluginName', (params) => { return Promise.resolve(); })
六、总结
Webpack Plugin 的实现核心链条:
- 类结构 :定义一个类,包含
apply(compiler)方法。 - 事件监听 :通过
compiler.hooks监听 Webpack 的生命周期事件。 - 资源操作 :
- 如果只关注流程监控(如 build 进度),操作
compiler。 - 如果要修改产物(如添加文件、压缩代码),操作
compilation.assets。
- 如果只关注流程监控(如 build 进度),操作
- 流程控制 :如果是异步钩子,处理完逻辑后必须调用
callback或返回Promise,否则构建会卡死。
Webpack 模块联邦 (Module Federation) 实现
一、解决的具体问题
在模块联邦出现之前,跨项目共享代码主要有两种方式,各有明显的弊端:
-
NPM 包模式
- 流程 :项目 B 修改组件 -> 打包发布到 NPM -> 项目 A 更新
package.json-> 项目 A 重新安装依赖 -> 项目 A 重新打包发布。 - 缺点:更新流程长,无法实现热插拔,所有依赖在构建时必须确定。
- 流程 :项目 B 修改组件 -> 打包发布到 NPM -> 项目 A 更新
-
Iframe 或 Script 标签引入
- 流程:项目 A 直接加载项目 B 的打包文件。
- 缺点:完全隔离(Iframe)导致上下文不通;或者没有依赖共享机制(Script 标签),导致项目 A 和项目 B 各自加载了一份 React,页面体积倍增,且可能导致 React 实例冲突(Hooks 报错)。
模块联邦解决的问题: 在浏览器运行时,项目 A 可以直接引用 项目 B 构建好的代码,并且双方共享底层的依赖(如 React),避免重复加载。
二、基础配置与概念
模块联邦引入了三个核心概念:Host(消费者) 、Remote(提供者) 、Shared(共享依赖)。
假设场景:
- App 1 (Remote) : 端口 3001,提供一个
Button组件。 - App 2 (Host) : 端口 3002,想要使用 App 1 的
Button。
2.1 提供方 (App 1) 配置
javascript
// webpack.config.js (App 1)
const { ModuleFederationPlugin } = require('webpack').container;

module.exports = {
  // ...其他配置
  plugins: [
    new ModuleFederationPlugin({
      name: 'app1',                  // 唯一标识,对应全局变量 window.app1
      filename: 'remoteEntry.js',    // 暴露出的入口文件名称
      exposes: {
        './Button': './src/Button',  // 映射:外部引入路径 -> 内部文件路径
      },
      shared: { react: { singleton: true }, 'react-dom': { singleton: true } },
    }),
  ],
};
2.2 消费方 (App 2) 配置
javascript
// webpack.config.js (App 2)
const { ModuleFederationPlugin } = require('webpack').container;

module.exports = {
  plugins: [
    new ModuleFederationPlugin({
      name: 'app2',
      remotes: {
        // 键名 'app1':在代码中 import 的前缀
        // 键值 'app1@...':远程应用的 name + 远程应用的地址
        app1: 'app1@http://localhost:3001/remoteEntry.js',
      },
      shared: { react: { singleton: true }, 'react-dom': { singleton: true } },
    }),
  ],
};
2.3 消费方代码使用
javascript
// App 2 的业务代码
import React, { Suspense } from 'react';

// 像引入本地模块一样引入远程模块
// 'app1' 对应配置中的 remotes 键名
// 'Button' 对应 App 1 exposes 的键名
const RemoteButton = React.lazy(() => import('app1/Button'));

function App() {
  return (
    <Suspense fallback="Loading...">
      <RemoteButton />
    </Suspense>
  );
}
三、核心原理:remoteEntry.js 是什么?
当 App 1 构建时,Webpack 会生成一个特殊的入口文件 remoteEntry.js。这是模块联邦通信的桥梁。
这个文件包含三个主要部分:
- 模块映射表 (Module Map) :记录了
./Button对应的是哪个 chunk 文件(例如src_Button_js.js)。 - 获取函数 (Get):用于根据路径加载对应的模块。
- 初始化函数 (Init):用于接收 Host 传递过来的共享依赖(Shared Scope)。
浏览器运行时流程:
- App 2 加载
http://localhost:3001/remoteEntry.js。 remoteEntry.js执行,在全局window上挂载一个变量app1。- App 2 调用
window.app1.init(),将自己(App 2)的 React 版本放入共享作用域。 - App 2 调用
window.app1.get('./Button')。 - App 1 检查共享作用域,发现已有 React,便不再加载自己的 React,而是直接下载
Button的代码并返回。
四、手写简易模块联邦实现
为了理解 Webpack 内部是如何实现的,我们模拟一下 Host 和 Remote 在浏览器端的交互逻辑。
4.1 模拟 Remote (App 1) 的 remoteEntry.js
这是一个立即执行函数,目的是在全局注册接口。
javascript
// 模拟 app1/remoteEntry.js
var app1_modules = {
  './Button': () => {
    // 实际场景这里是通过 JSONP 加载真实文件
    console.log("加载 App1 的 Button 组件");
    return {
      default: "我是来自 App1 的按钮"
    };
  }
};

// 共享作用域容器
var sharedScope = {};

// 在 window 上挂载全局对象
window.app1 = {
  // 1. get: 供 Host 获取模块
  get: function(moduleName) {
    return new Promise((resolve) => {
      if (app1_modules[moduleName]) {
        // 返回模块的工厂函数
        resolve(() => app1_modules[moduleName]());
      } else {
        resolve(null);
      }
    });
  },

  // 2. init: 供 Host 初始化共享依赖
  init: function(scope) {
    // 将 Host 传来的 scope 合并到自己的 scope 中
    sharedScope = scope;
    console.log("App1 初始化完成,已接收共享依赖", scope);
    return Promise.resolve();
  }
};
4.2 模拟 Host (App 2) 的加载逻辑
Host 需要先加载远程脚本,然后按顺序调用 init 和 get。
javascript
// 模拟 Webpack 内部加载远程模块的逻辑

// 1. 定义加载脚本的辅助函数
function loadScript(url) {
  return new Promise((resolve, reject) => {
    const script = document.createElement('script');
    script.src = url;
    script.onload = resolve;
    script.onerror = reject;
    document.head.appendChild(script);
  });
}

// 2. 主流程
(async function() {
  // 步骤 A: 初始化 Host 自身的共享作用域
  const hostSharedScope = {
    react: { version: '17.0.2', loaded: true }
  };

  // 步骤 B: 加载 Remote 的入口文件
  await loadScript('http://localhost:3001/remoteEntry.js');

  // 此时 window.app1 已经存在
  const container = window.app1;

  // 步骤 C: 初始化容器 (交换共享依赖)
  // 告诉 app1:"我有这些依赖,你看看能不能用,别自己重复加载了"
  await container.init(hostSharedScope);

  // 步骤 D: 获取组件
  const factory = await container.get('./Button');
  const module = factory();

  console.log("最终获取到的模块:", module.default);
})();
五、依赖共享的具体逻辑 (Singleton)
在 shared 配置中,最关键的是版本控制。Webpack 运行时会进行如下判断:
- Host 端:我有 React 17.0.2。
- Remote 端:我需要 React ^16.8.0。
- 握手阶段 (
init) :Remote 检查 Host 提供的 React 17.0.2 是否满足^16.8.0。- 满足:Remote 丢弃自己的 React 依赖,使用 Host 提供的全局 React 对象。
- 不满足 :Remote 坚持加载自己打包的 React 副本(除非配置了
singleton: true且strictVersion: true,此时会报错)。
实现简述 : Webpack 维护了一个全局对象 __webpack_share_scopes__。init 函数的本质就是把不同应用的依赖对象合并到这个全局对象中,通过语义化版本(SemVer)比较函数来决定使用哪一个版本的库。
六、总结模块联邦
- 去中心化:没有所谓的"主应用",任何应用都可以同时是 Host 和 Remote。
- 运行时加载:不同于 NPM 的构建时集成,WMF 是在页面打开时动态下载代码。
- 双向接口 :
init(scope):输入接口,接收外部环境的共享依赖。get(path):输出接口,向外部暴露内部模块。
- 本质 :通过全局变量(
window.app_name)建立通信协议,实现不同构建产物之间的互操作。