在前面的文章中,我们深入探讨了虚拟DOM的创建和原生元素的挂载过程。但 Vue 真正的威力在于组件系统------它让我们能够将界面拆分成独立的、可复用的模块。本文将揭示 Vue3 如何将我们编写的组件,一步步渲染成真实的 DOM 节点。
前言:组件的魔法
当我们编写这样的Vue组件时:
javascript
<template>
  <div class="user-card">
    <h2>{{ user.name }}</h2>
    <p>{{ user.email }}</p>
    <button @click="sayHello">打招呼</button>
  </div>
</template>

<script>
export default {
  props: ['user'],
  setup(props) {
    const sayHello = () => {
      alert(`你好,我是${props.user.name}`);
    };

    return { sayHello };
  }
}
</script>
Vue内部经历了一系列复杂而有序的过程: 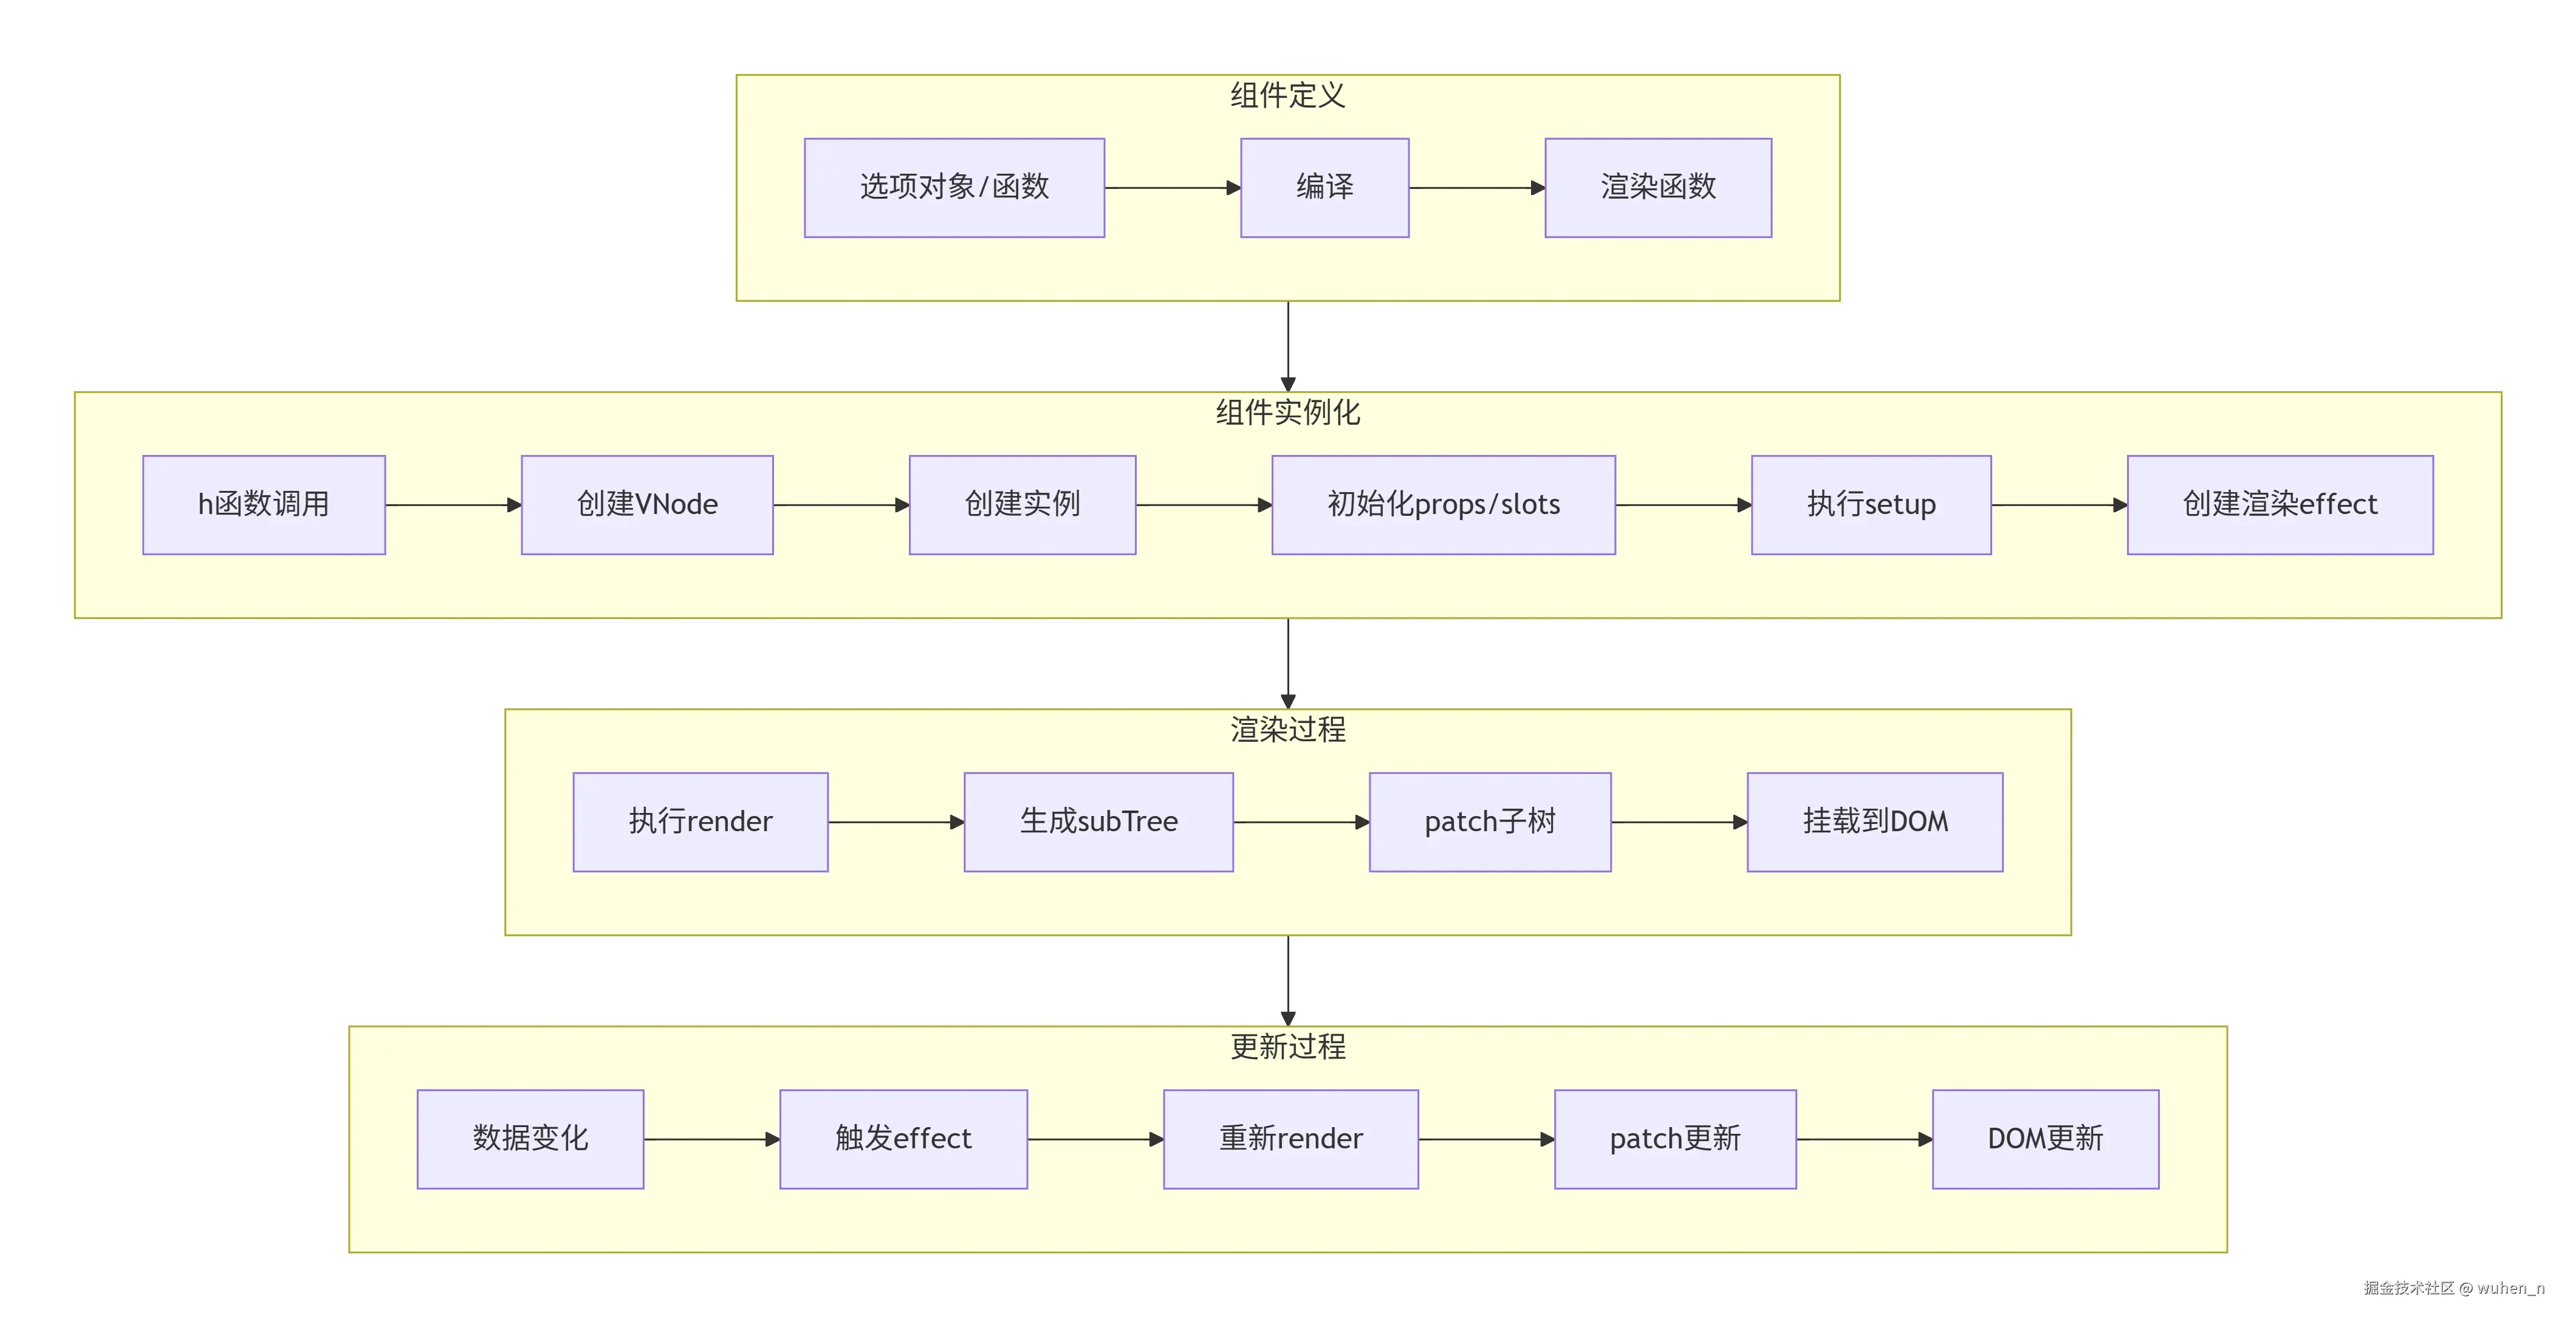 本文将带你一步步拆解这个过程,理解组件从定义到 DOM 的完整旅程。
组件的VNode结构
组件VNode的特殊性
与原生元素不同,组件的 VNode 有其独特的结构:
javascript
const componentVNode = {
  type: UserCard,                  // 对象/函数:表示组件定义
  props: { user: { name: '张三' } }, // 传递给组件的props
  children: {                       // 插槽内容
    default: () => h('span', '默认插槽'),
    header: () => h('h1', '头部')
  },
  shapeFlag: ShapeFlags.STATEFUL_COMPONENT, // 标记为组件

  // 组件特有属性
  key: null,
  ref: null,
  component: null,                  // 组件实例(挂载后填充)
  suspense: null,
  scopeId: null,
  slotScopeIds: null
};
组件类型的多样性
Vue3中的组件类型更加丰富:
1. 有状态组件(最常用)
javascript
const StatefulComponent = {
  data() { return { count: 0 } },
  template: `<div>{{ count }}</div>`
};
2. 函数式组件(无状态)
javascript
const FunctionalComponent = (props) => {
  return h('div', props.message);
};
3. 异步组件
javascript
const AsyncComponent = defineAsyncComponent(() =>
  import('./MyComponent.vue')
);
4. 内置组件
javascript
const KeepAliveComponent = {
  type: KeepAlive,
  props: { include: 'a,b' }
};
shapeFlag 标志
javascript
const enum ShapeFlags {
  ELEMENT = 1,
  FUNCTIONAL_COMPONENT = 1 << 1,  // 2
  STATEFUL_COMPONENT = 1 << 2,     // 4
  COMPONENT = ShapeFlags.FUNCTIONAL_COMPONENT | ShapeFlags.STATEFUL_COMPONENT // 6
}
组件VNode的创建过程
javascript
import UserCard from './UserCard.vue';

// 这行代码背后
const vnode = h(UserCard, { user: userInfo }, {
  default: () => h('span', 'children')
});

// 实际执行的是
function createComponentVNode(component, props, children) {
  // 规范化props
  props = normalizeProps(props);

  // 提取key和ref
  const { key, ref } = props || {};

  // 处理插槽
  let slots = null;
  if (children) {
    slots = normalizeSlots(children);
  }

  // 创建VNode
  const vnode = {
    type: component,
    props: props || {},
    children: slots,
    key,
    ref,
    shapeFlag: isFunction(component)
      ? ShapeFlags.FUNCTIONAL_COMPONENT
      : ShapeFlags.STATEFUL_COMPONENT,

    // 组件实例(稍后填充)
    component: null,

    // 其他内部属性
    el: null,
    anchor: null,
    appContext: null
  };

  return vnode;
}
组件实例的设计
为什么需要组件实例?
组件实例是组件的"活"的体现,它包含了组件的所有状态和功能: 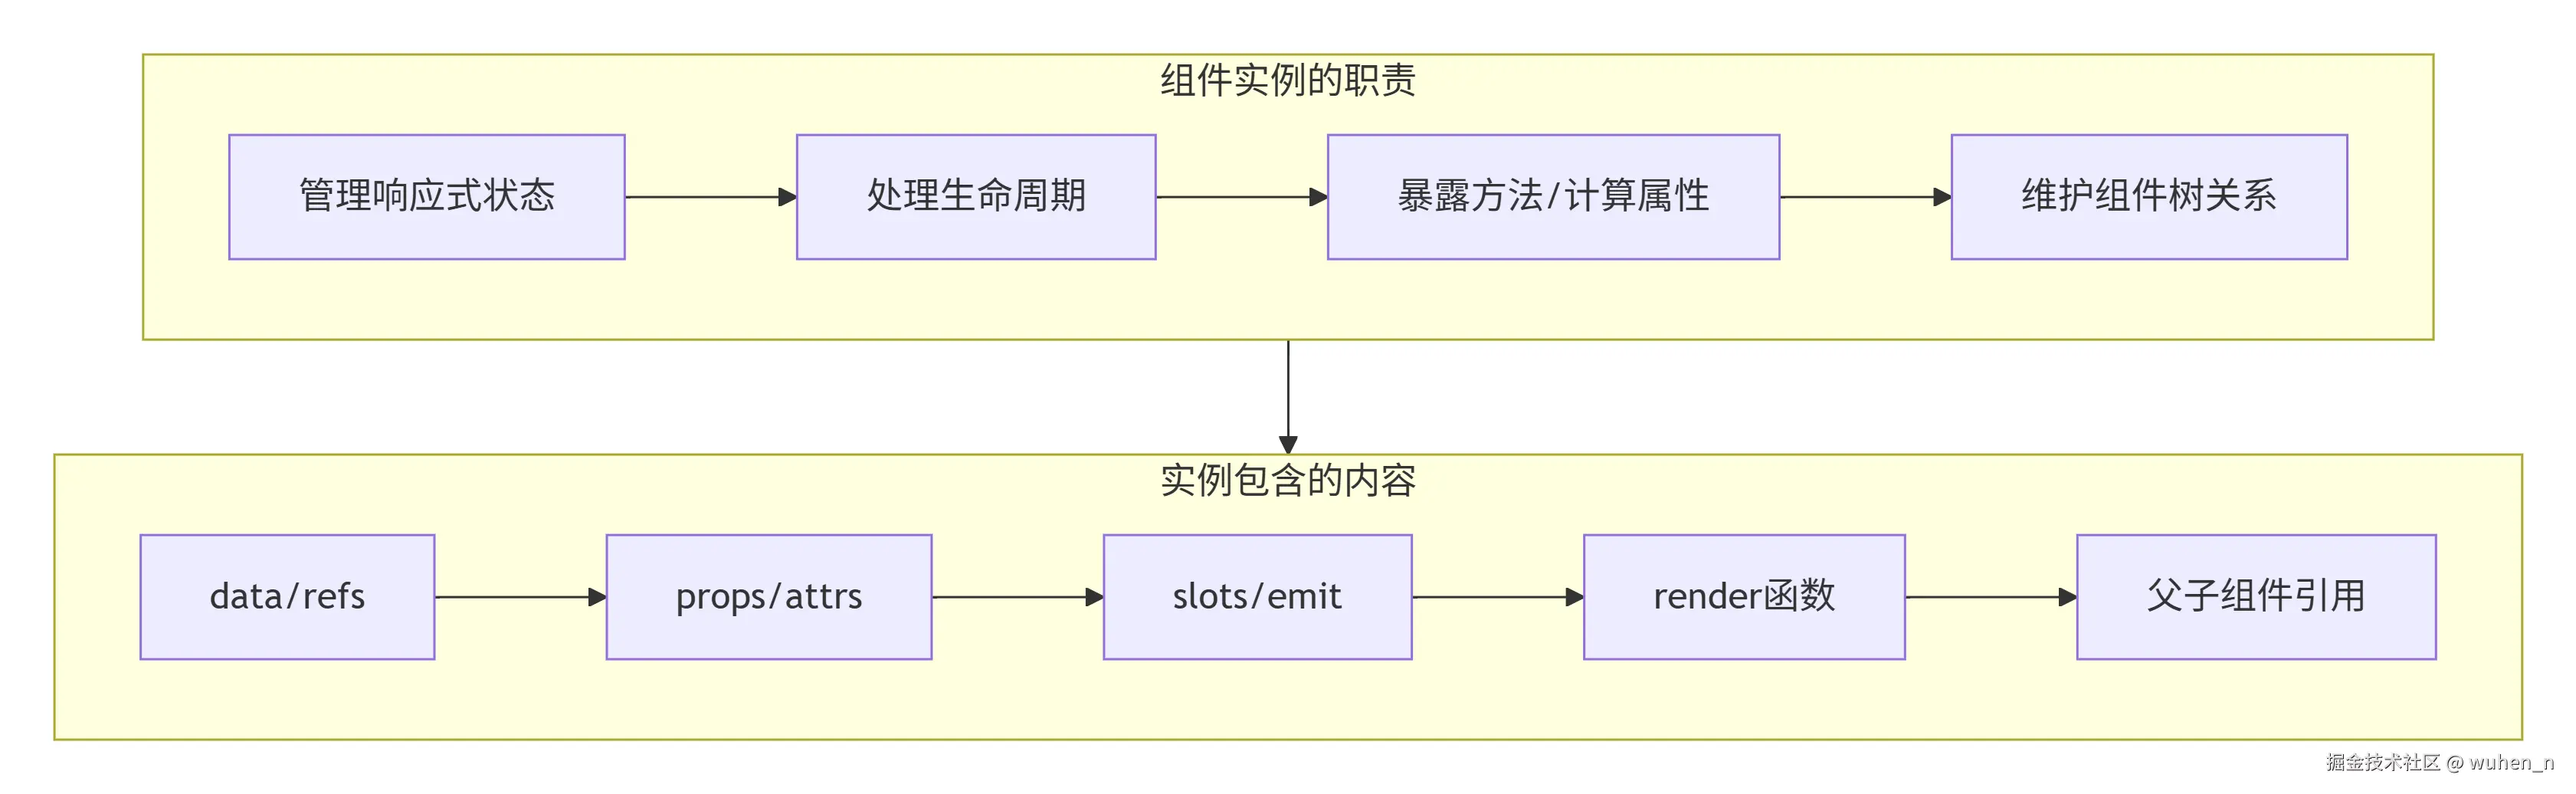
组件实例的结构
一个完整的组件实例包含以下核心部分:
javascript
class ComponentInstance {
  // 基础标识
  uid = ++uidCounter;           // 唯一ID
  type = null;                  // 组件定义对象
  parent = null;                 // 父组件实例
  appContext = null;             // 应用上下文

  // 状态相关
  props = null;                  // 解析后的props
  attrs = null;                  // 非prop属性
  slots = null;                  // 插槽
  emit = null;                   // 事件发射器

  // 响应式系统
  setupState = null;             // setup返回的状态
  data = null;                   // data选项
  computed = null;               // 计算属性
  refs = null;                   // 模板refs

  // 生命周期
  isMounted = false;              // 是否已挂载
  isUnmounted = false;            // 是否已卸载
  isDeactivated = false;          // 是否被keep-alive缓存

  // 渲染相关
  subTree = null;                // 渲染子树
  render = null;                  // 渲染函数
  proxy = null;                   // 渲染代理
  withProxy = null;               // 带with语句的代理

  // 依赖收集
  effects = null;                 // 组件级effects
  provides = null;                // 依赖注入
  components = null;              // 局部注册组件
  directives = null;              // 局部注册指令

  constructor(public vnode, parent) {
    this.type = vnode.type;
    this.parent = parent;
    this.appContext = parent ? parent.appContext : vnode.appContext;

    // 初始化空容器
    this.props = {};
    this.attrs = {};
    this.slots = {};
    this.setupState = {};

    // 创建代理
    this.proxy = new Proxy(this, PublicInstanceProxyHandlers);
  }
}
为什么需要代理?
组件实例的代理(proxy)是为了提供一个统一的访问接口:
javascript
// 实例代理处理函数
const PublicInstanceProxyHandlers = {
  get({ _: instance }, key) {
    const { setupState, props, data } = instance;

    // 优先从setupState获取
    if (key in setupState) {
      return setupState[key];
    }

    // 然后从props获取
    else if (key in props) {
      return props[key];
    }

    // 然后从data获取
    else if (data && key in data) {
      return data[key];
    }

    // 最后是内置属性
    else if (key === '$el') {
      return instance.subTree?.el;
    }
    // ... 其他内置属性
  },

  set({ _: instance }, key, value) {
    const { setupState, props, data } = instance;

    // 按照优先级设置
    if (key in setupState) {
      setupState[key] = value;
    } else if (key in props) {
      // props 是只读的
      console.warn(`Attempting to mutate prop "${key}"`);
      return false;
    } else if (data && key in data) {
      data[key] = value;
    }

    return true;
  }
};
这个代理让我们可以在模板中直接使用 count,而不需要写 $data.count 或 setupState.count。
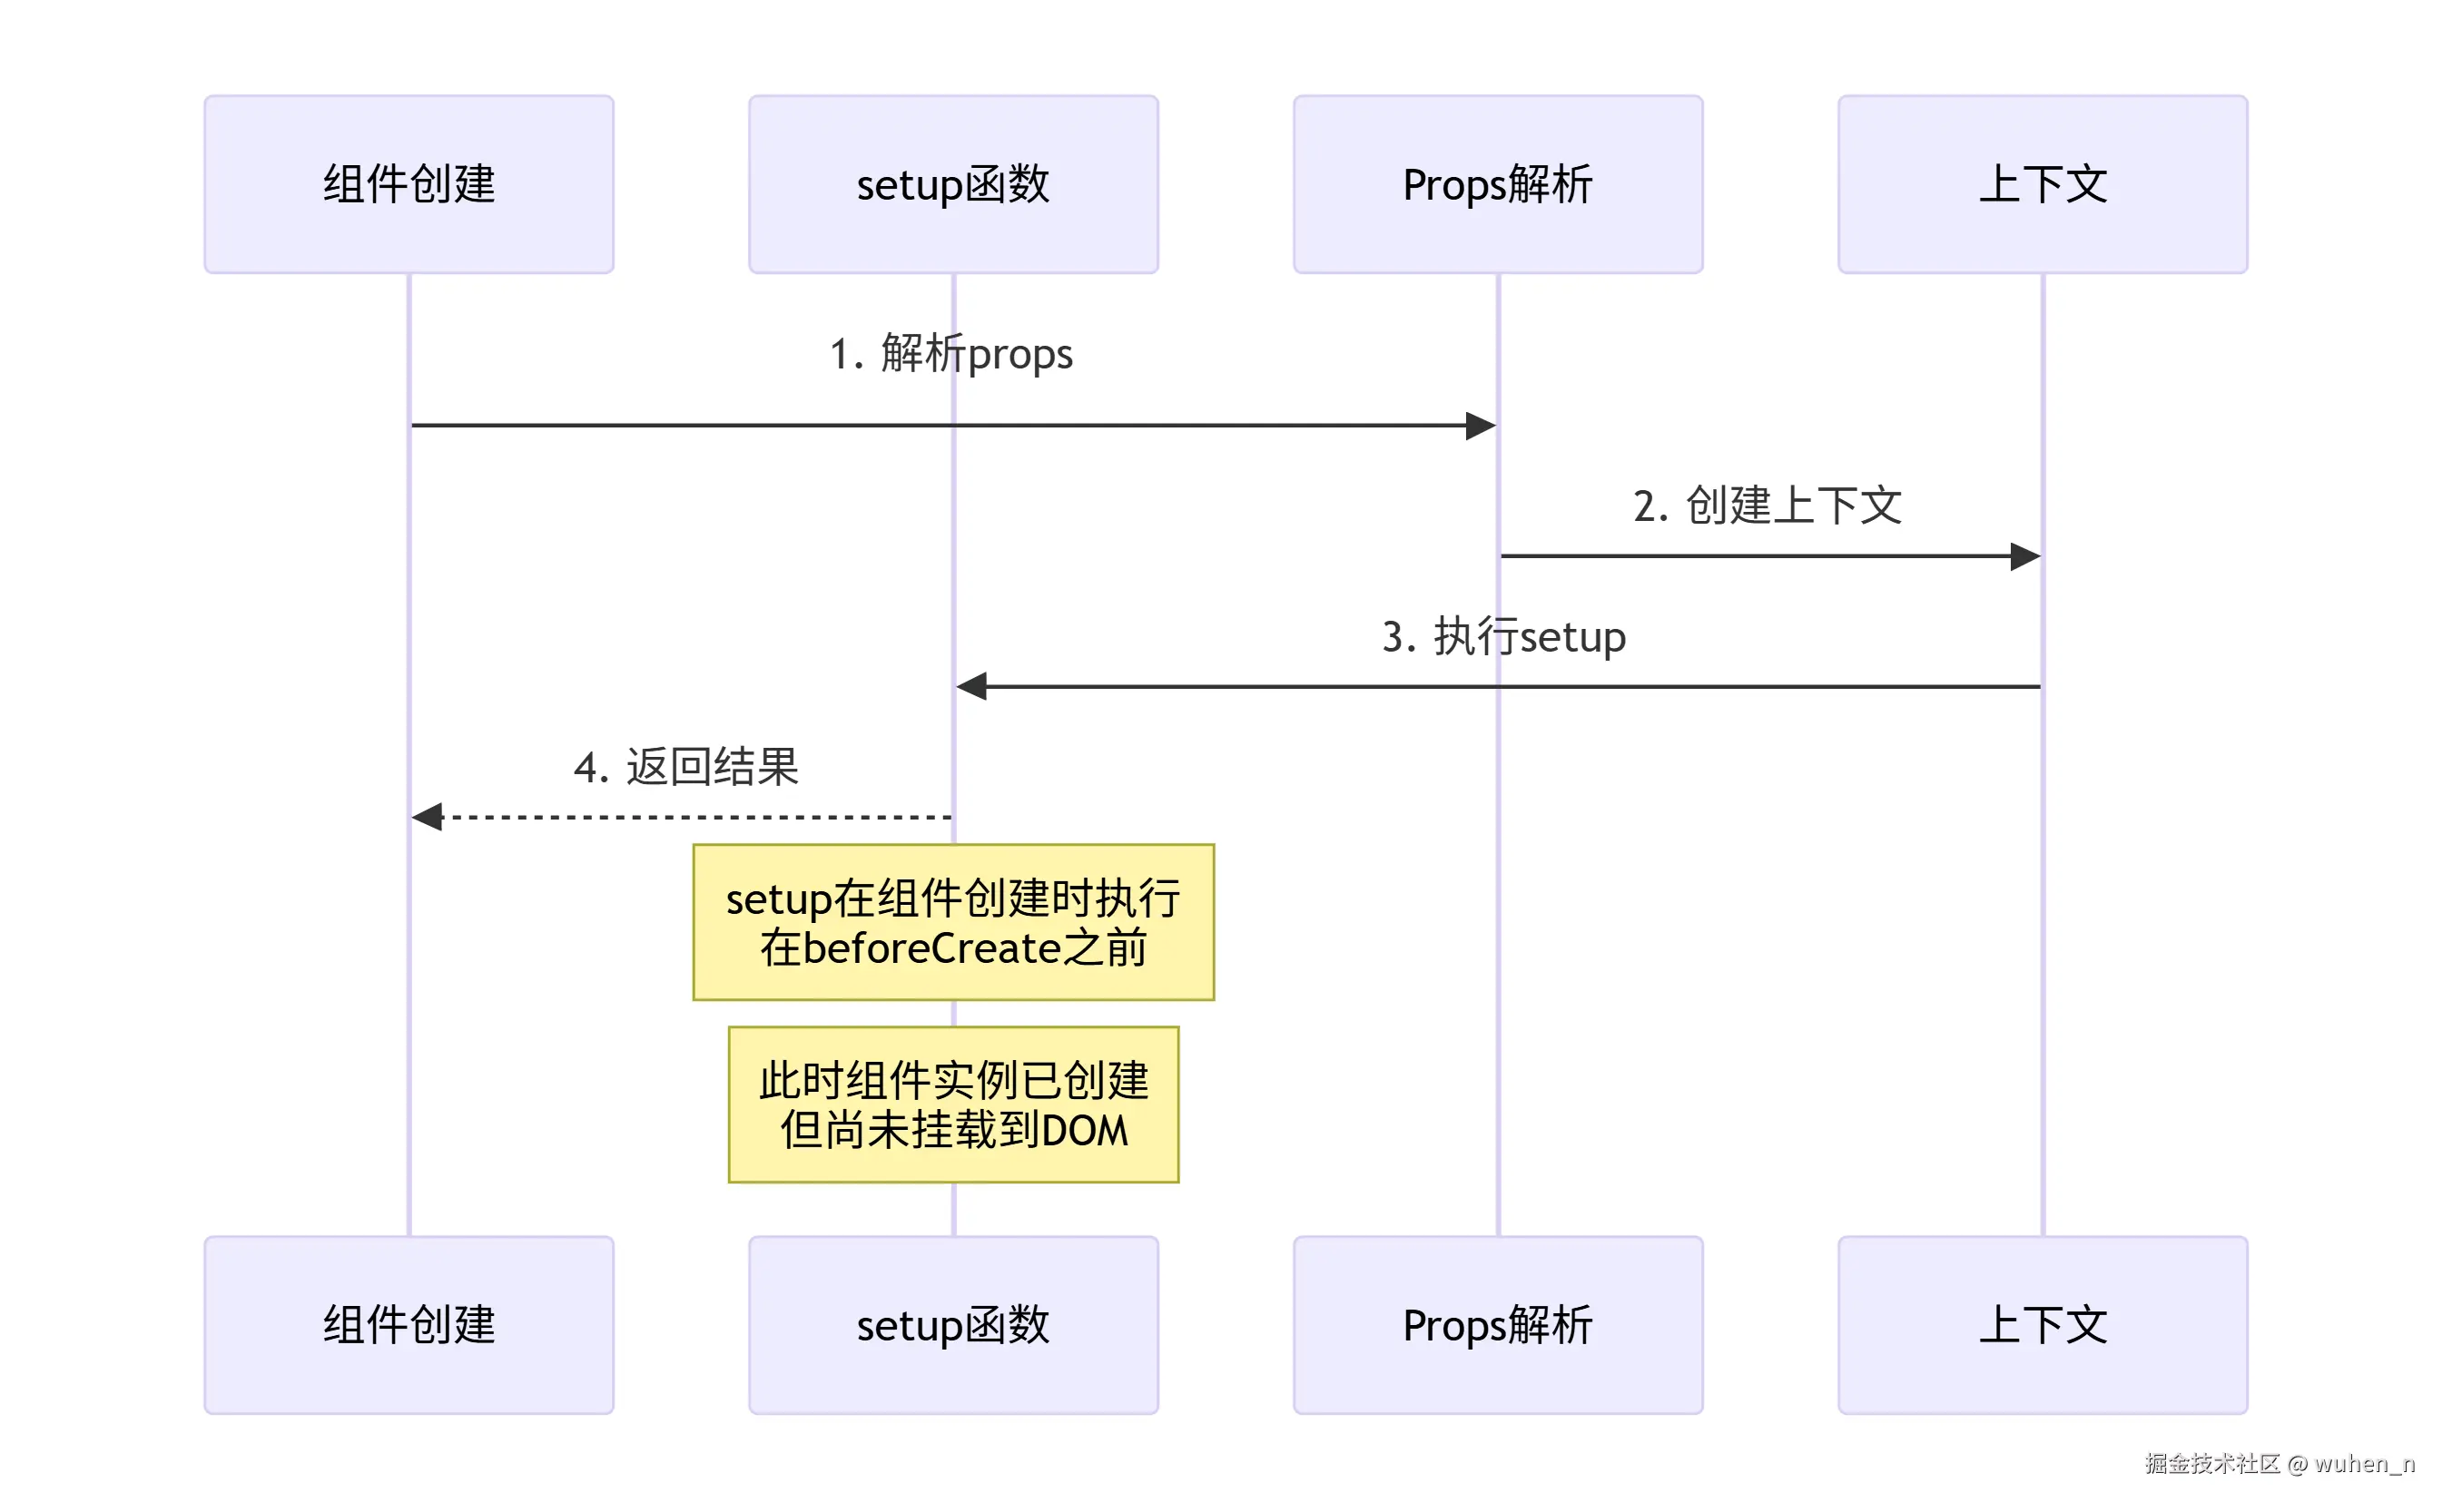
setup 函数的执行时机
setup 的执行时机图
setup 参数解析
setup函数接收两个参数:
javascript
setup(props, context) {
  // props: 响应式的props对象
  console.log(props.title);  // 自动解包,无需.value

  // context: 一个对象,包含有用的方法
  const {
    attrs,    // 非prop属性
    slots,    // 插槽
    emit,     // 事件发射
    expose    // 暴露公共方法
  } = context;

  // 返回对象,暴露给模板
  return {
    count: ref(0),
    increment() {
      this.count.value++;
    }
  };
}
setup 的内部实现
javascript
function setupComponent(instance) {
  const { type, props, children } = instance.vnode;
  const { setup } = type;

  if (setup) {
    // 创建setup上下文
    const setupContext = createSetupContext(instance);

    // 设置当前实例(用于getCurrentInstance)
    setCurrentInstance(instance);

    try {
      // 执行setup
      const setupResult = setup(
        props,           // 只读的props
        setupContext     // 上下文
      );

      // 处理返回值
      handleSetupResult(instance, setupResult);
    } finally {
      // 清理
      setCurrentInstance(null);
    }
  }

  // 完成组件初始化
  finishComponentSetup(instance);
}

function createSetupContext(instance) {
  return {
    // 非prop属性
    get attrs() {
      return instance.attrs;
    },

    // 插槽
    get slots() {
      return instance.slots;
    },

    // 事件发射
    emit: instance.emit,

    // 暴露公共方法
    expose: (exposed) => {
      instance.exposed = exposed;
    }
  };
}

function handleSetupResult(instance, setupResult) {
  if (setupResult && typeof setupResult === 'object') {
    // 返回对象:作为模板上下文
    instance.setupState = proxyRefs(setupResult);
  } else if (typeof setupResult === 'function') {
    // 返回函数:作为渲染函数
    instance.render = setupResult;
  }
}
render 函数的调用
从 setup 到 render
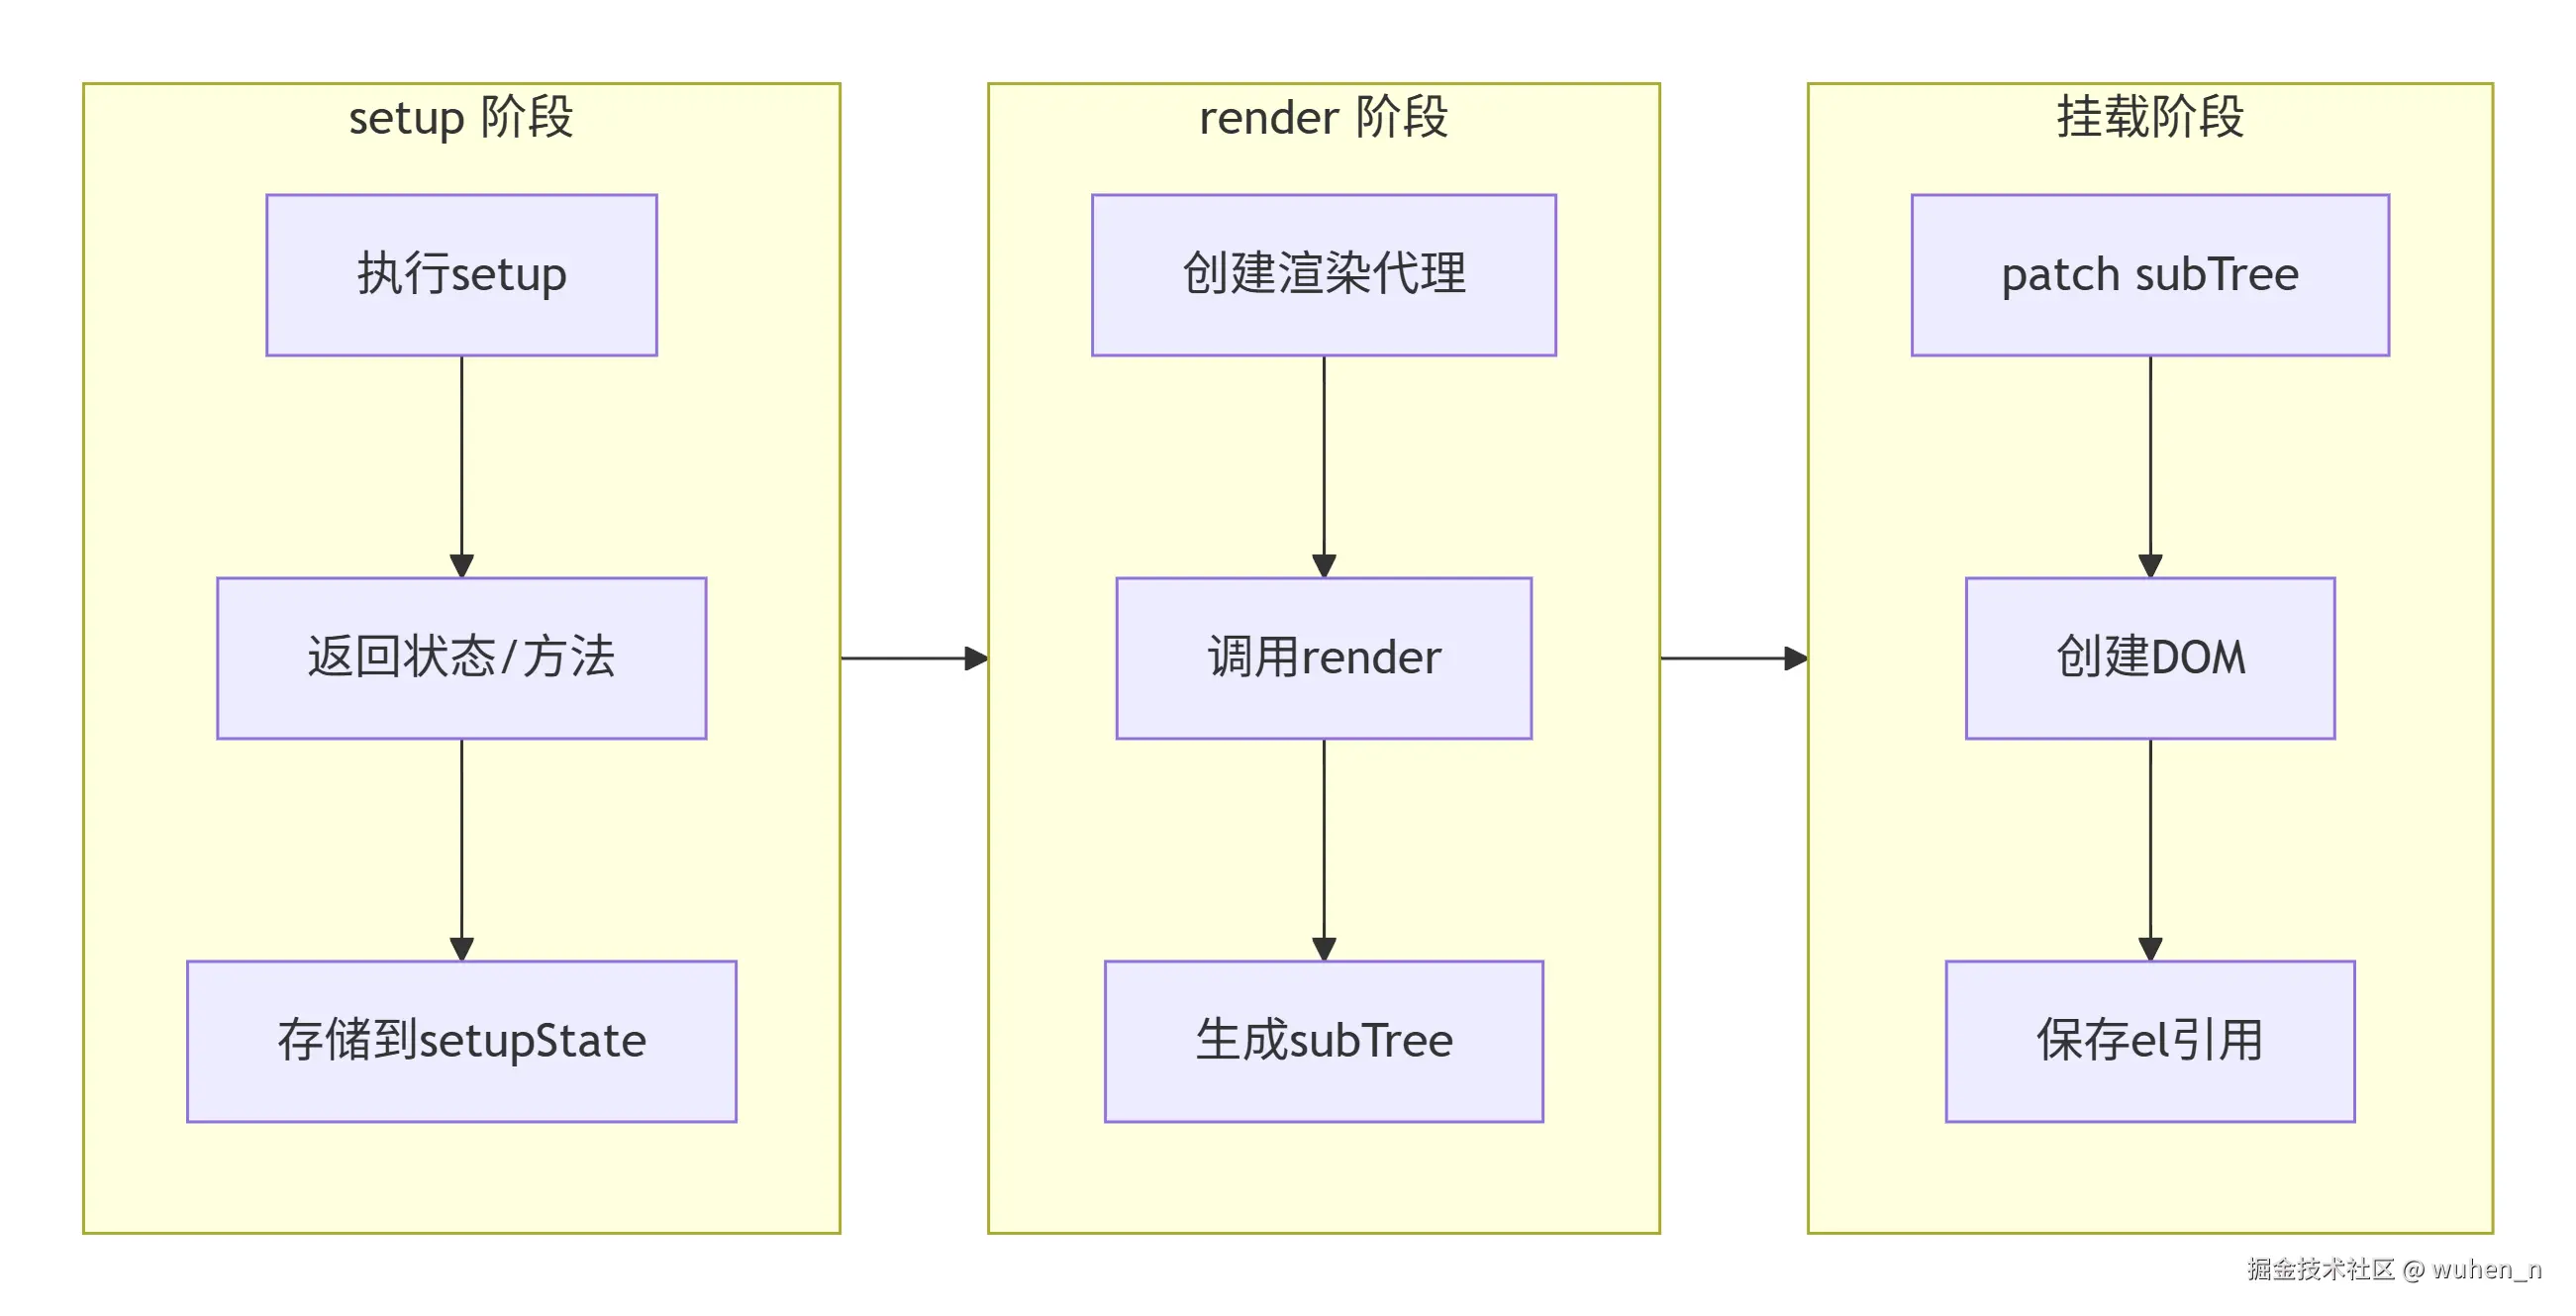
render 函数的创建
Vue3 中,render 函数可以通过多种方式获得:
javascript
function finishComponentSetup(instance) {
  const Component = instance.type;

  // 1. 优先使用setup返回的render函数
  if (!instance.render) {
    if (Component.render) {
      // 2. 使用组件选项中的render
      instance.render = Component.render;
    } else if (Component.template) {
      // 3. 编译模板为render函数
      instance.render = compile(Component.template);
    }
  }

  // 对函数式组件的处理
  if (!Component.render && !Component.template) {
    // 如果组件本身是函数,当作render函数
    if (typeof Component === 'function') {
      instance.render = Component;
    }
  }
}
渲染代理的工作机制
渲染代理让模板可以轻松访问各种状态:
javascript
const PublicInstanceProxyHandlers = {
  get(target, key) {
    const instance = target._;
    const { setupState, props, data } = instance;

    // 1. 特殊处理以$开头的内置属性
    if (key[0] === '$') {
      switch (key) {
        case '$el': return instance.subTree?.el;
        case '$props': return props;
        case '$slots': return instance.slots;
        case '$parent': return instance.parent?.proxy;
        case '$root': return instance.root?.proxy;
        case '$emit': return instance.emit;
        case '$refs': return instance.refs;
      }
    }

    // 2. 普通状态查找
    if (setupState && key in setupState) {
      return setupState[key];
    }
    if (props && key in props) {
      return props[key];
    }
    if (data && key in data) {
      return data[key];
    }

    // 3. 没找到返回undefined
    return undefined;
  }
};
手写实现:mountComponent
mountComponent的整体流程
- 创建组件实例:
const instance = createComponentInstance(vnode); - 初始化并执行组件:
setupComponent(instance); - 设置渲染effect:
setupRenderEffect(instance, container, anchor); - 返回组件实例:
return instance;
创建组件实例
javascript
let uidCounter = 0;

function createComponentInstance(vnode, parent = null) {
  const instance = {
    // 基础信息
    uid: ++uidCounter,
    vnode,
    type: vnode.type,
    parent,

    // 状态
    props: {},
    attrs: {},
    slots: {},
    setupState: {},

    // 渲染相关
    render: null,
    subTree: null,
    isMounted: false,

    // 生命周期
    isUnmounted: false,

    // 代理
    proxy: null,

    // emit函数
    emit: () => {},

    // 上下文
    appContext: parent ? parent.appContext : vnode.appContext,
    provides: parent ? Object.create(parent.provides) : {}
  };

  // 创建代理
  instance.proxy = new Proxy(instance, PublicInstanceProxyHandlers);

  // 绑定emit
  instance.emit = createEmit(instance);

  return instance;
}
设置渲染 effect
javascript
function setupRenderEffect(instance, container, anchor) {
  // 创建组件更新函数
  const componentUpdateFn = () => {
    if (!instance.isMounted) {
      // 首次挂载

      // 1. 执行render函数,生成子树VNode
      const subTree = instance.render.call(
        instance.proxy,    // this指向代理
        instance.proxy     // 第一个参数
      );

      // 2. 保存子树
      instance.subTree = subTree;

      // 3. 挂载子树
      patch(null, subTree, container, anchor);

      // 4. 保存根元素引用
      instance.vnode.el = subTree.el;

      // 5. 标记已挂载
      instance.isMounted = true;

      // 6. 触发mounted钩子
      invokeLifecycle(instance, 'mounted');
    } else {
      // 更新阶段

      // 1. 获取新子树
      const nextTree = instance.render.call(
        instance.proxy,
        instance.proxy
      );

      // 2. 保存旧子树
      const prevTree = instance.subTree;
      instance.subTree = nextTree;

      // 3. 执行更新
      patch(prevTree, nextTree, container, anchor);

      // 4. 更新元素引用
      instance.vnode.el = nextTree.el;

      // 5. 触发updated钩子
      invokeLifecycle(instance, 'updated');
    }
  };

  // 创建ReactiveEffect
  const effect = new ReactiveEffect(
    componentUpdateFn,
    // 调度器:异步更新
    () => queueJob(instance.update)
  );

  // 保存更新函数
  instance.update = effect.run.bind(effect);

  // 立即执行首次渲染
  instance.update();
}
完整的mountComponent实现
javascript
function mountComponent(vnode, container, anchor) {
  // 1. 创建组件实例
  const instance = createComponentInstance(vnode);

  // 2. 初始化 props 和 slots(如果有props 和 slots)
  initProps(instance, vnode.props);
  initSlots(instance, vnode.children);

  // 3. 初始化并执行组件
  setupComponent(instance);

  // 4. 创建渲染effect
  setupRenderEffect(instance, container, anchor);

  // 5. 返回组件实例
  return instance;
}

// 初始化props
function initProps(instance, rawProps) {
  const props = {};
  const attrs = {};

  const options = instance.type.props || {};

  // 根据组件定义的props进行过滤
  if (rawProps) {
    for (const key in rawProps) {
      if (options[key] !== undefined) {
        // 是定义的prop
        props[key] = rawProps[key];
      } else {
        // 是普通属性
        attrs[key] = rawProps[key];
      }
    }
  }

  instance.props = shallowReactive(props);
  instance.attrs = shallowReactive(attrs);
}

// 初始化slots
function initSlots(instance, children) {
  if (children) {
    instance.slots = normalizeSlots(children);
  }
}

// 规范化插槽
function normalizeSlots(children) {
  if (typeof children === 'function') {
    // 单个函数:默认插槽
    return { default: children };
  } else if (Array.isArray(children)) {
    // 数组:也是默认插槽
    return { default: () => children };
  } else if (typeof children === 'object') {
    // 对象:多个插槽
    const slots = {};
    for (const key in children) {
      const slot = children[key];
      slots[key] = (props) => normalizeSlot(slot, props);
    }
    return slots;
  }
  return {};
}
组件渲染的生命周期
完整的组件生命周期流程图
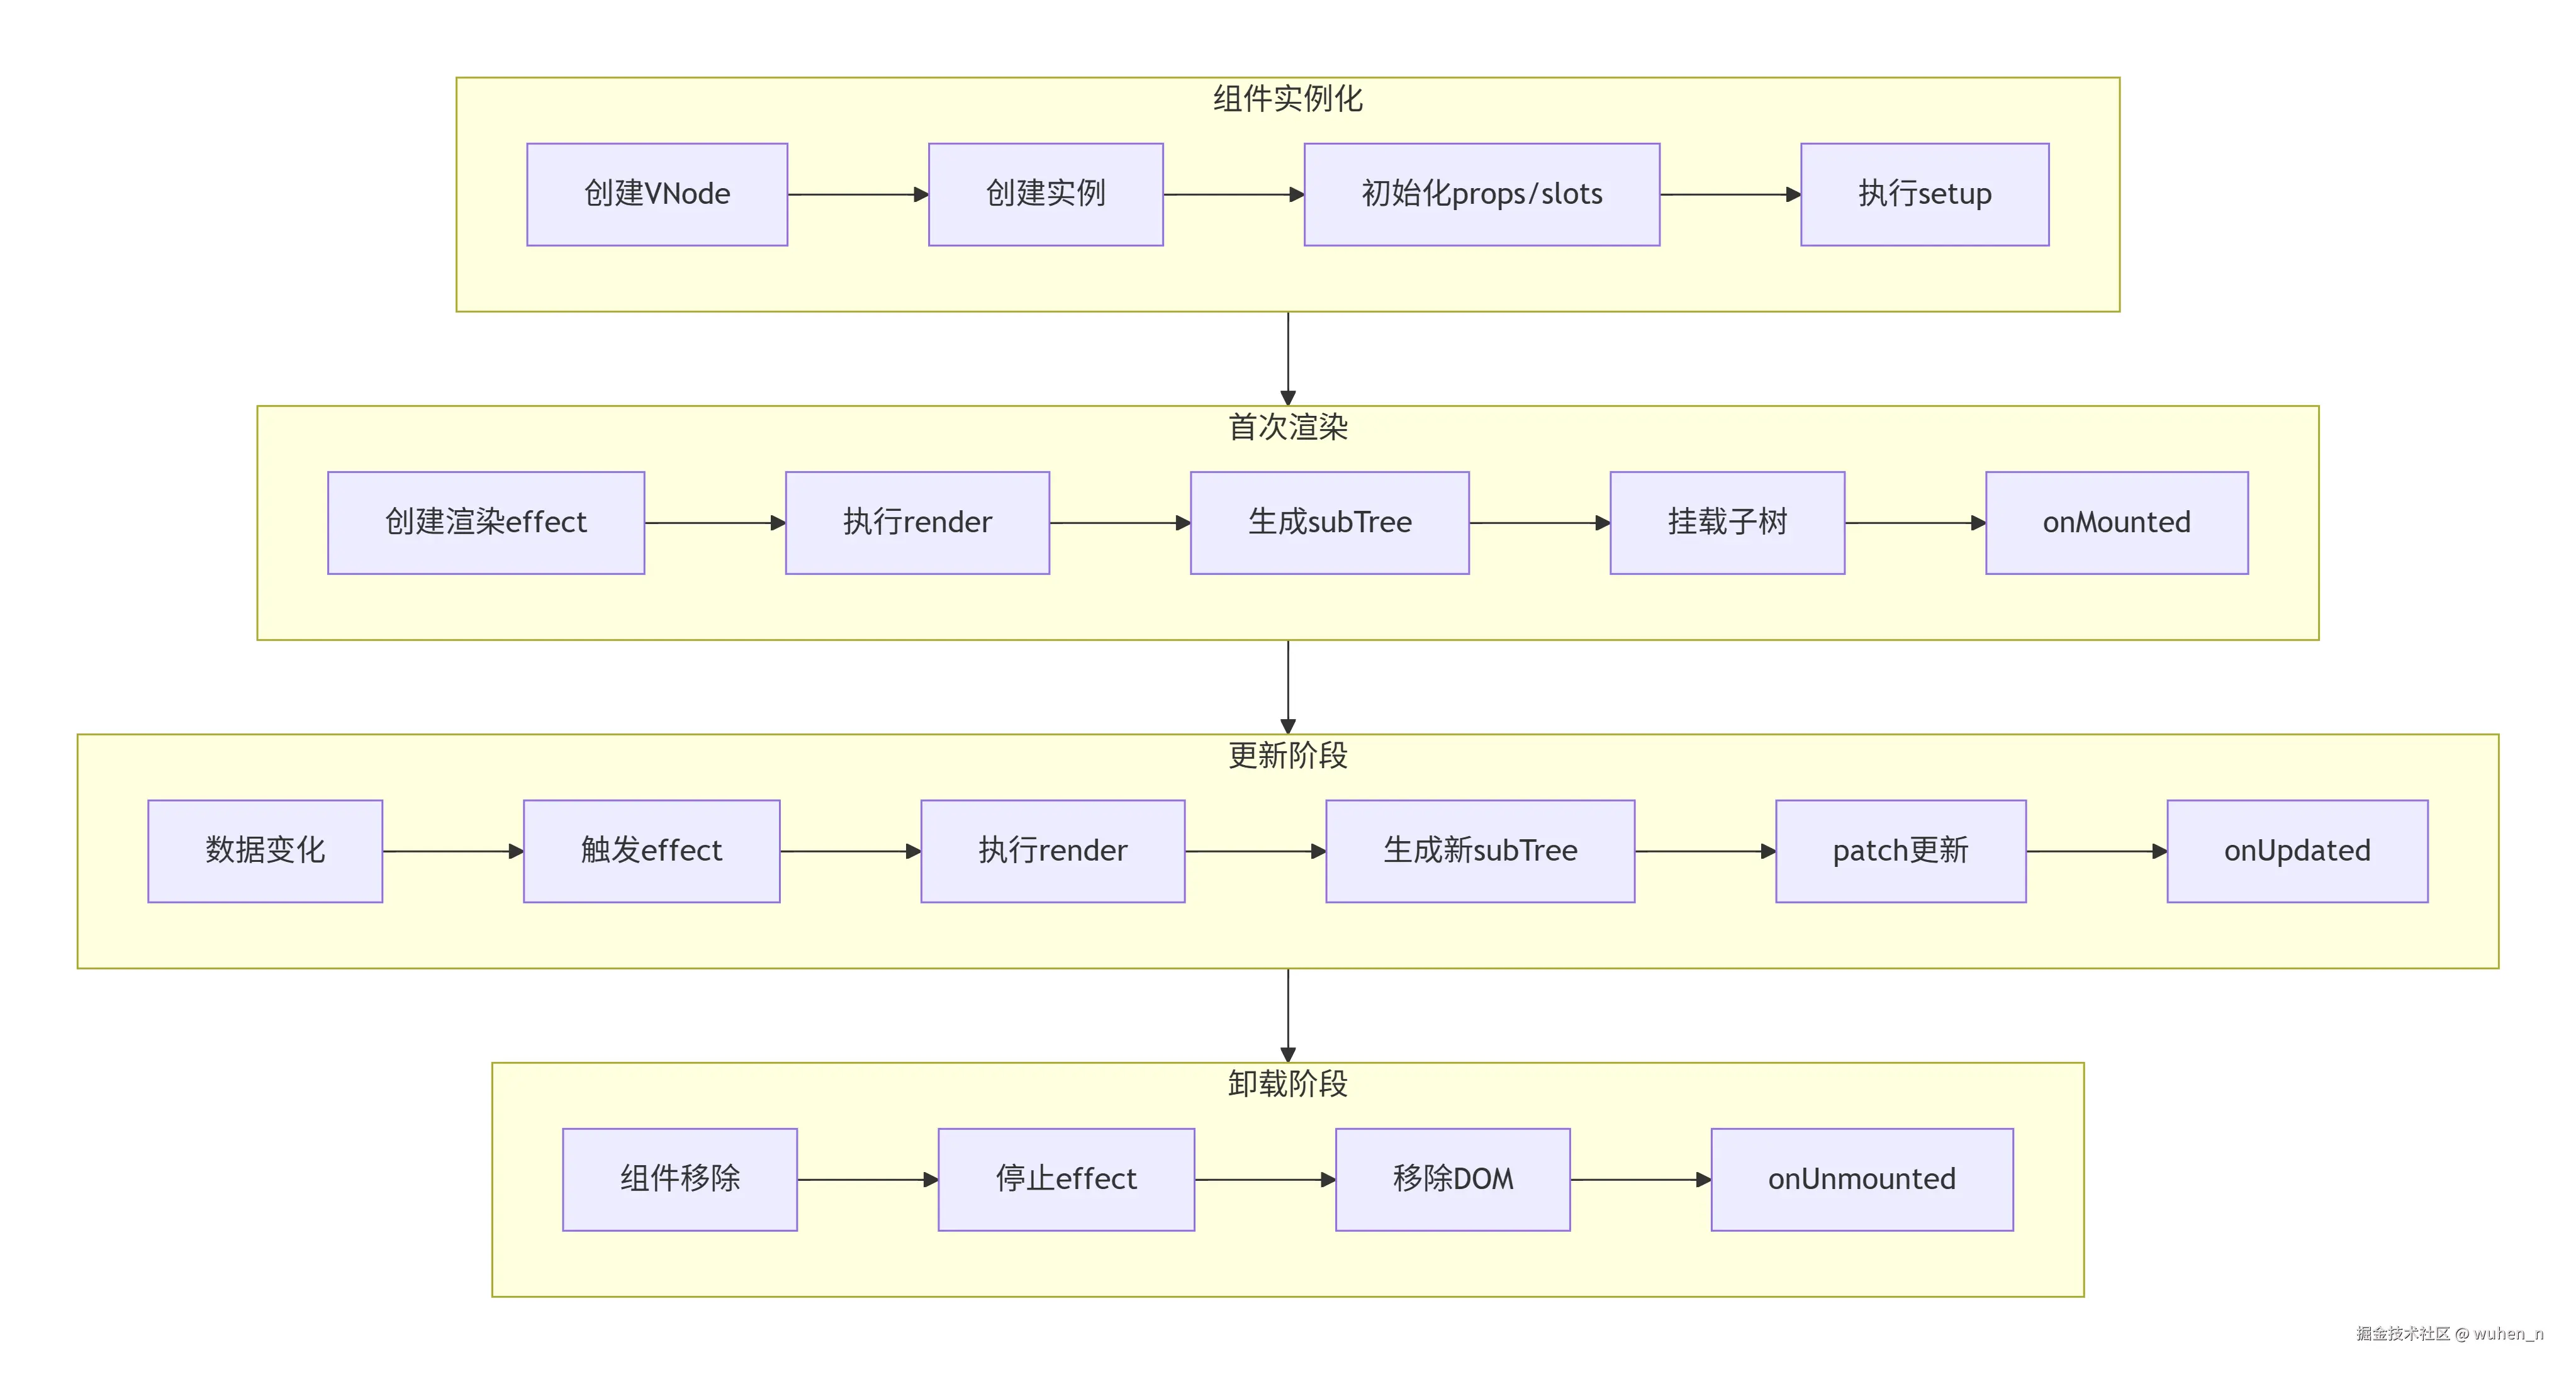
生命周期钩子的触发时机
javascript
// 生命周期钩子的内部实现
const LifecycleHooks = {
  BEFORE_CREATE: 'bc',
  CREATED: 'c',
  BEFORE_MOUNT: 'bm',
  MOUNTED: 'm',
  BEFORE_UPDATE: 'bu',
  UPDATED: 'u',
  BEFORE_UNMOUNT: 'bum',
  UNMOUNTED: 'um'
};

function invokeLifecycle(instance, hook) {
  const handlers = instance.type[hook];
  if (handlers) {
    // 设置当前实例
    setCurrentInstance(instance);

    // 执行钩子函数
    if (Array.isArray(handlers)) {
      handlers.forEach(handler => handler.call(instance.proxy));
    } else {
      handlers.call(instance.proxy);
    }

    // 清理
    setCurrentInstance(null);
  }
}
一个完整示例的渲染过程
javascript
// 示例:父子组件
const Child = {
  props: ['message'],
  setup(props) {
    console.log('Child setup');
    return {};
  },
  render() {
    console.log('Child render');
    return h('div', '子组件: ' + this.message);
  }
};

const Parent = {
  setup() {
    console.log('Parent setup');
    const msg = ref('Hello');

    setTimeout(() => {
      msg.value = 'World';
    }, 1000);

    return { msg };
  },
  render() {
    console.log('Parent render');
    return h('div', [
      h('h1', '父组件'),
      h(Child, { message: this.msg })
    ]);
  }
};

// 挂载
const vnode = h(Parent);
render(vnode, document.getElementById('app'));

// 控制台输出顺序:
// Parent setup
// Child setup
// Parent render
// Child render
// (1秒后)
// Parent render
// Child render
结语
本文深入剖析了Vue3组件渲染的完整过程,对于文章中错误的地方或有任何疑问,欢迎在评论区留言讨论!