在上一篇文章中,我们深入探讨了虚拟 DOM 的设计与创建。现在,我们有了描述界面的 VNode,接下来要做的就是将它们渲染到真实的页面上。这个过程就是渲染器的职责。本文将深入剖析 Vue3 渲染器的挂载(mount)过程,看看虚拟 DOM 如何一步步变成真实 DOM。
前言:从虚拟 DOM 到真实 DOM
当我们编写这样的 Vue 组件时:
javascript
const App = {
  render() {
    return h('div', { class: 'container' }, [
      h('h1', 'Hello Vue3'),
      h('p', '这是渲染器的工作')
    ]);
  }
};

// 创建渲染器并挂载
createApp(App).mount('#app');
在这背后发生了一系列复杂而有序的操作: 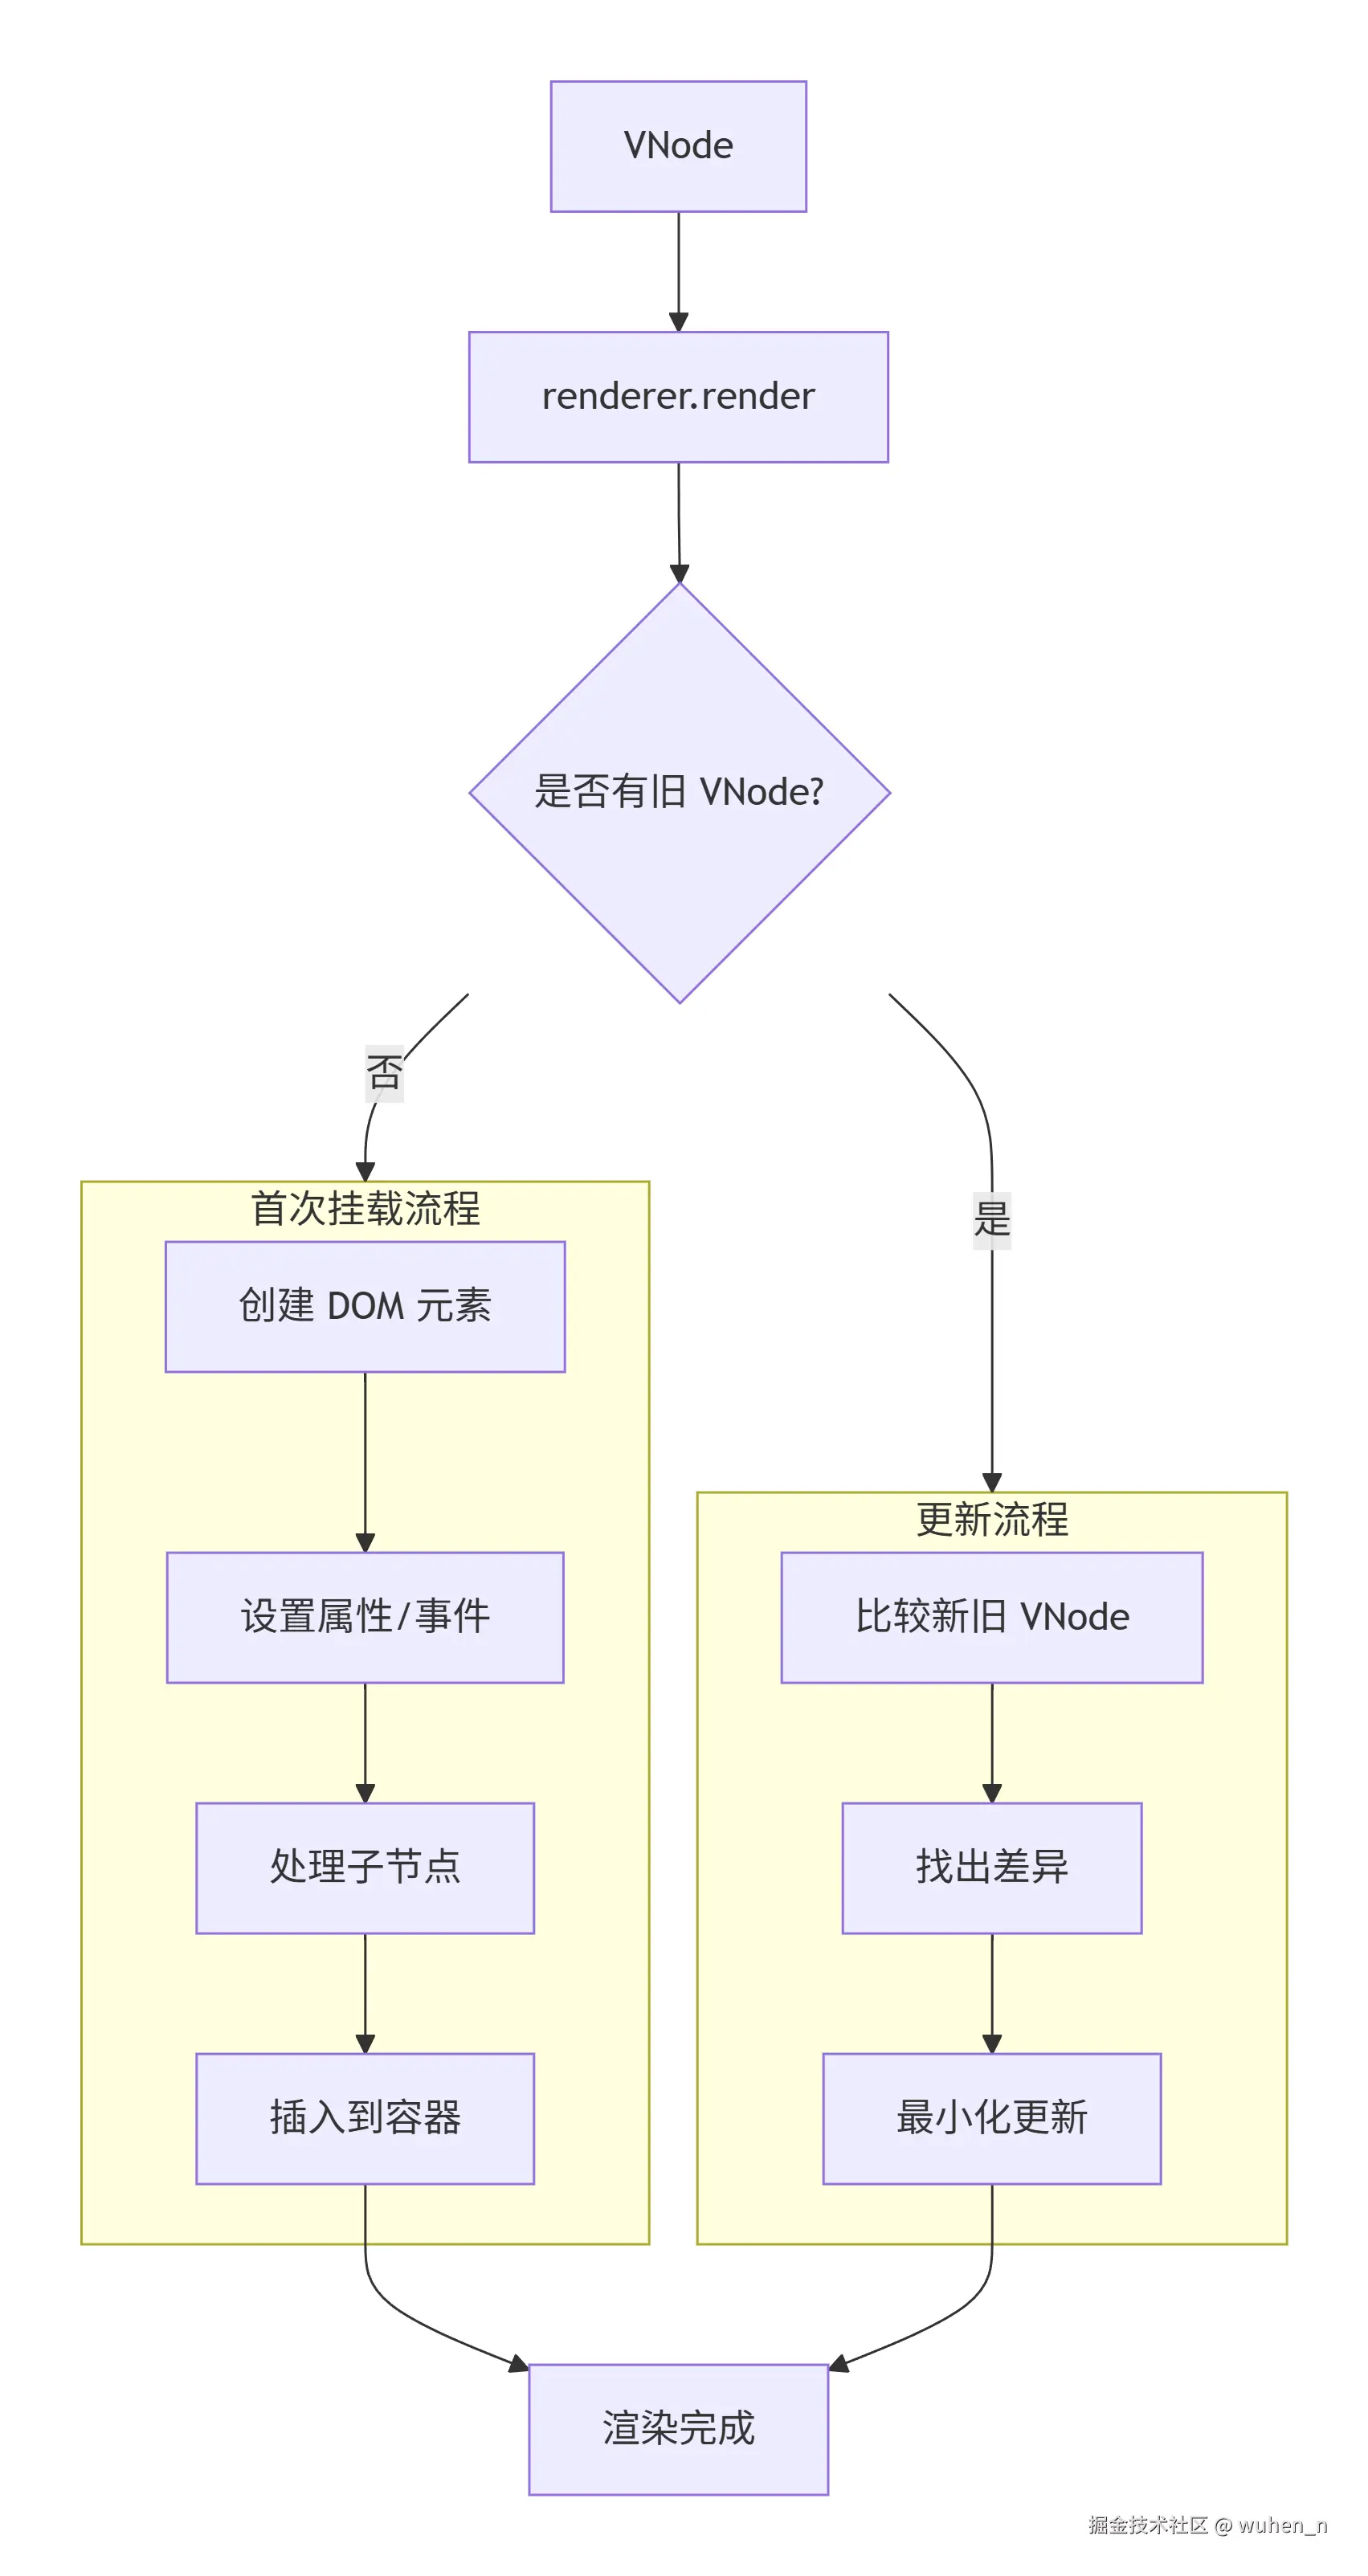
本文将聚焦于首次渲染(mount)的过程。
渲染器的设计思想
为什么需要渲染器?
在深入了解代码之前,我们先思考一个问题:为什么 Vue 不直接将模板编译成 DOM 操作指令,而是要引入虚拟 DOM 和渲染器这一层?答案是:解耦 与 跨平台。
javascript
// 如果直接编译成 DOM 操作
function render() {
  const div = document.createElement('div');
  div.className = 'container';
  // ... 只能运行在浏览器
}

// 通过渲染器抽象
function render(vnode, container) {
  // 具体的创建操作由渲染器实现
  // 浏览器渲染器:document.createElement
  // 小程序渲染器:wx.createView
  // Native 渲染器:createNativeView
}
渲染器的三层架构
Vue3 的渲染器采用了清晰的分层设计: 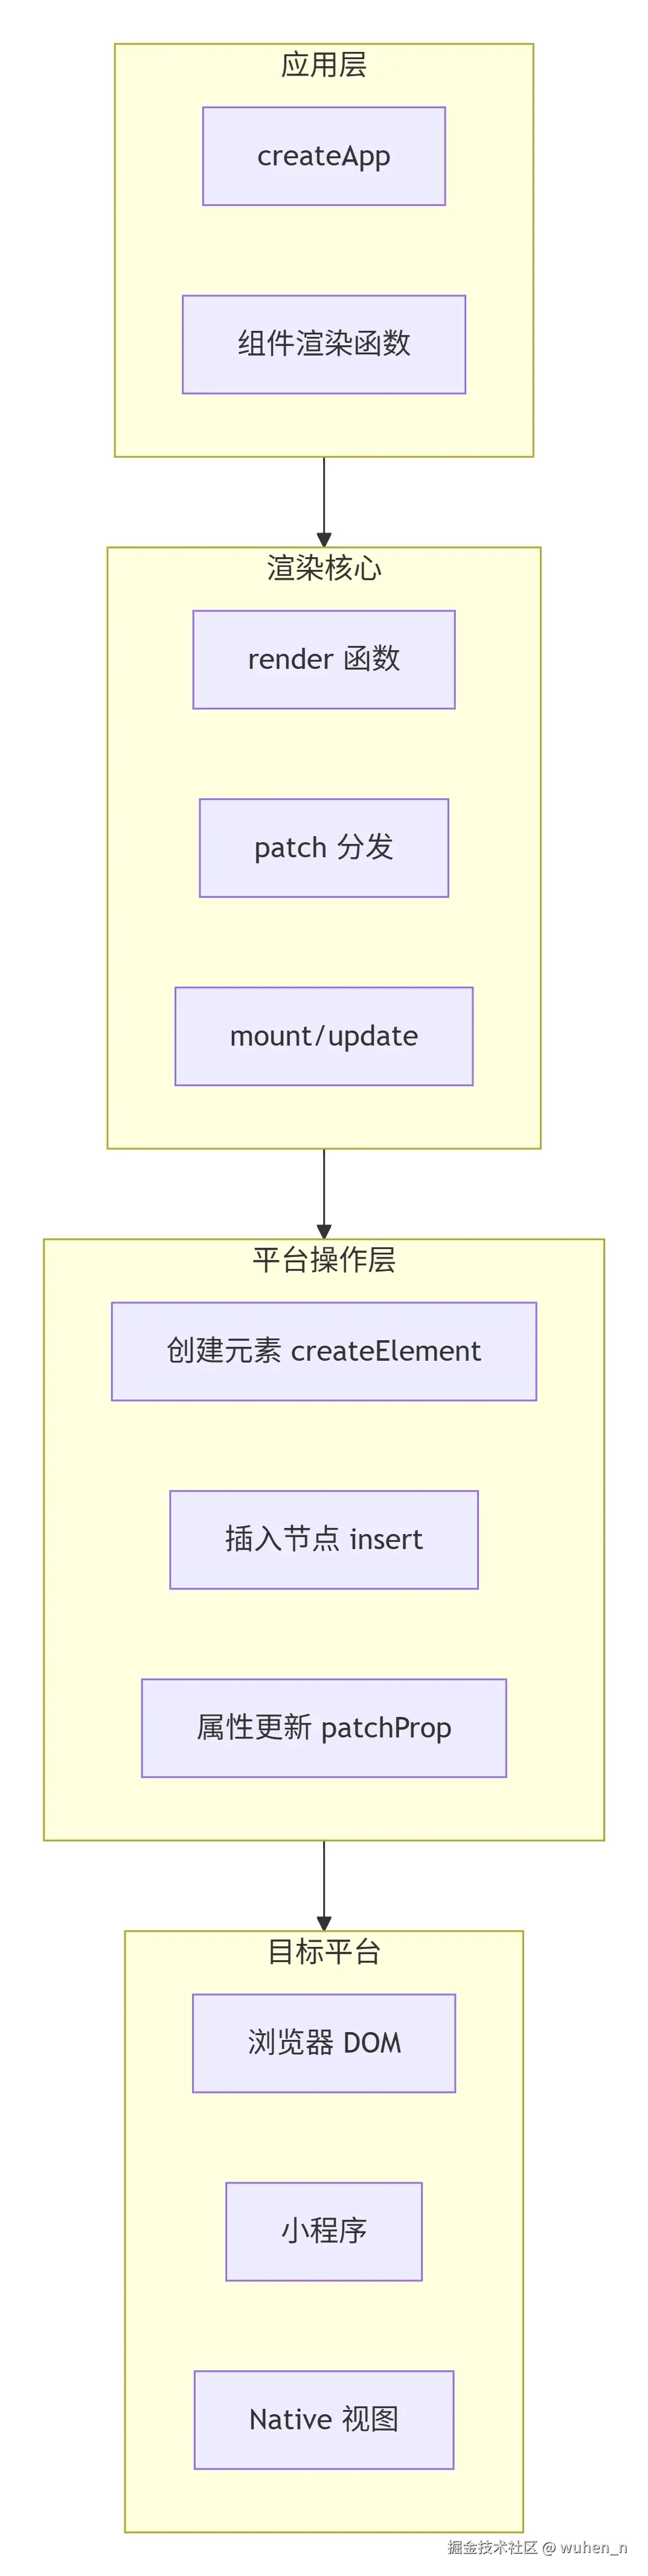 这种分层设计带来了极大的灵活性:
- 渲染核心:实现 diff 算法、生命周期等通用逻辑
- 平台操作层:提供统一的接口,由各平台实现
- 目标平台:浏览器、小程序、Weex 等
渲染器的创建过程
创建渲染器工厂
渲染器本身是一个工厂函数,它接收平台操作作为参数,返回一个渲染器对象:
javascript
/**
 * 创建渲染器
 * @param {Object} options - 平台操作选项
 * @returns {Object} 渲染器对象
 */
function createRenderer(options) {
  // 解构平台操作
  const {
    createElement,  // 创建元素
    createText,     // 创建文本节点
    createComment,  // 创建注释节点
    insert,         // 插入节点
    setText,        // 设置文本内容
    setElementText, // 设置元素文本
    patchProp       // 更新属性
  } = options;

  // ... 渲染核心逻辑

  return {
    render,        // 渲染函数
    createApp      // 创建应用
  };
}这种设计模式称为依赖注入,它将平台相关的操作从核心逻辑中抽离出来,使得渲染核心可以跨平台复用。
浏览器平台的实现
对于浏览器平台,Vue 提供了对应的 DOM 操作:
javascript
// 浏览器平台操作
const nodeOps = {
  // 创建元素:直接调用 document.createElement
  createElement(tag) {
    return document.createElement(tag);
  },

  // 创建文本节点
  createText(text) {
    return document.createTextNode(text);
  },

  // 创建注释节点
  createComment(text) {
    return document.createComment(text);
  },

  // 插入节点:使用 insertBefore 实现通用插入
  insert(child, parent, anchor = null) {
    parent.insertBefore(child, anchor);
  },

  // 设置元素文本内容
  setElementText(el, text) {
    el.textContent = text;
  },

  // 设置文本节点内容
  setText(node, text) {
    node.nodeValue = text;
  }
};
创建应用 API
渲染器还负责提供 createApp API,这是 Vue 应用的入口:
javascript
function createAppAPI(render) {
  return function createApp(rootComponent) {
    const app = {
      // 挂载方法
      mount(rootContainer) {
        // 1. 创建根 VNode
        const vnode = createVNode(rootComponent);

        // 2. 调用渲染器
        render(vnode, rootContainer);

        // 3. 返回组件实例
        return vnode.component;
      }
    };
    return app;
  };
}
首次渲染的完整流程
从 render 到 patch
当调用 app.mount('#app') 时,渲染器开始工作:
javascript
function render(vnode, container) {
  if (vnode) {
    // 存在新 VNode,进行 patch
    // container._vnode 存储上一次的 VNode,首次为 null
    patch(container._vnode || null, vnode, container);
  } else {
    // 没有新 VNode,卸载旧节点
    if (container._vnode) {
      unmount(container._vnode);
    }
  }
  // 保存当前 VNode
  container._vnode = vnode;
}
patch 的分发逻辑
patch 是整个渲染器的核心函数,它根据节点类型分发到不同的处理函数:
javascript
function patch(oldVNode, newVNode, container, anchor = null) {
  // 首次渲染,oldVNode 为 null
  if (oldVNode == null) {
    // 根据类型选择挂载方式
    const { type, shapeFlag } = newVNode;

    switch (type) {
      case Text:      // 文本节点
        mountText(newVNode, container, anchor);
        break;
      case Comment:   // 注释节点
        mountComment(newVNode, container, anchor);
        break;
      case Fragment:  // 片段
        mountFragment(newVNode, container, anchor);
        break;
      default:
        if (shapeFlag & ShapeFlags.ELEMENT) {
          // 原生元素
          mountElement(newVNode, container, anchor);
        } else if (shapeFlag & ShapeFlags.COMPONENT) {
          // 组件
          mountComponent(newVNode, container, anchor);
        }
    }
  }
}
下图展示了 patch 的分发流程: 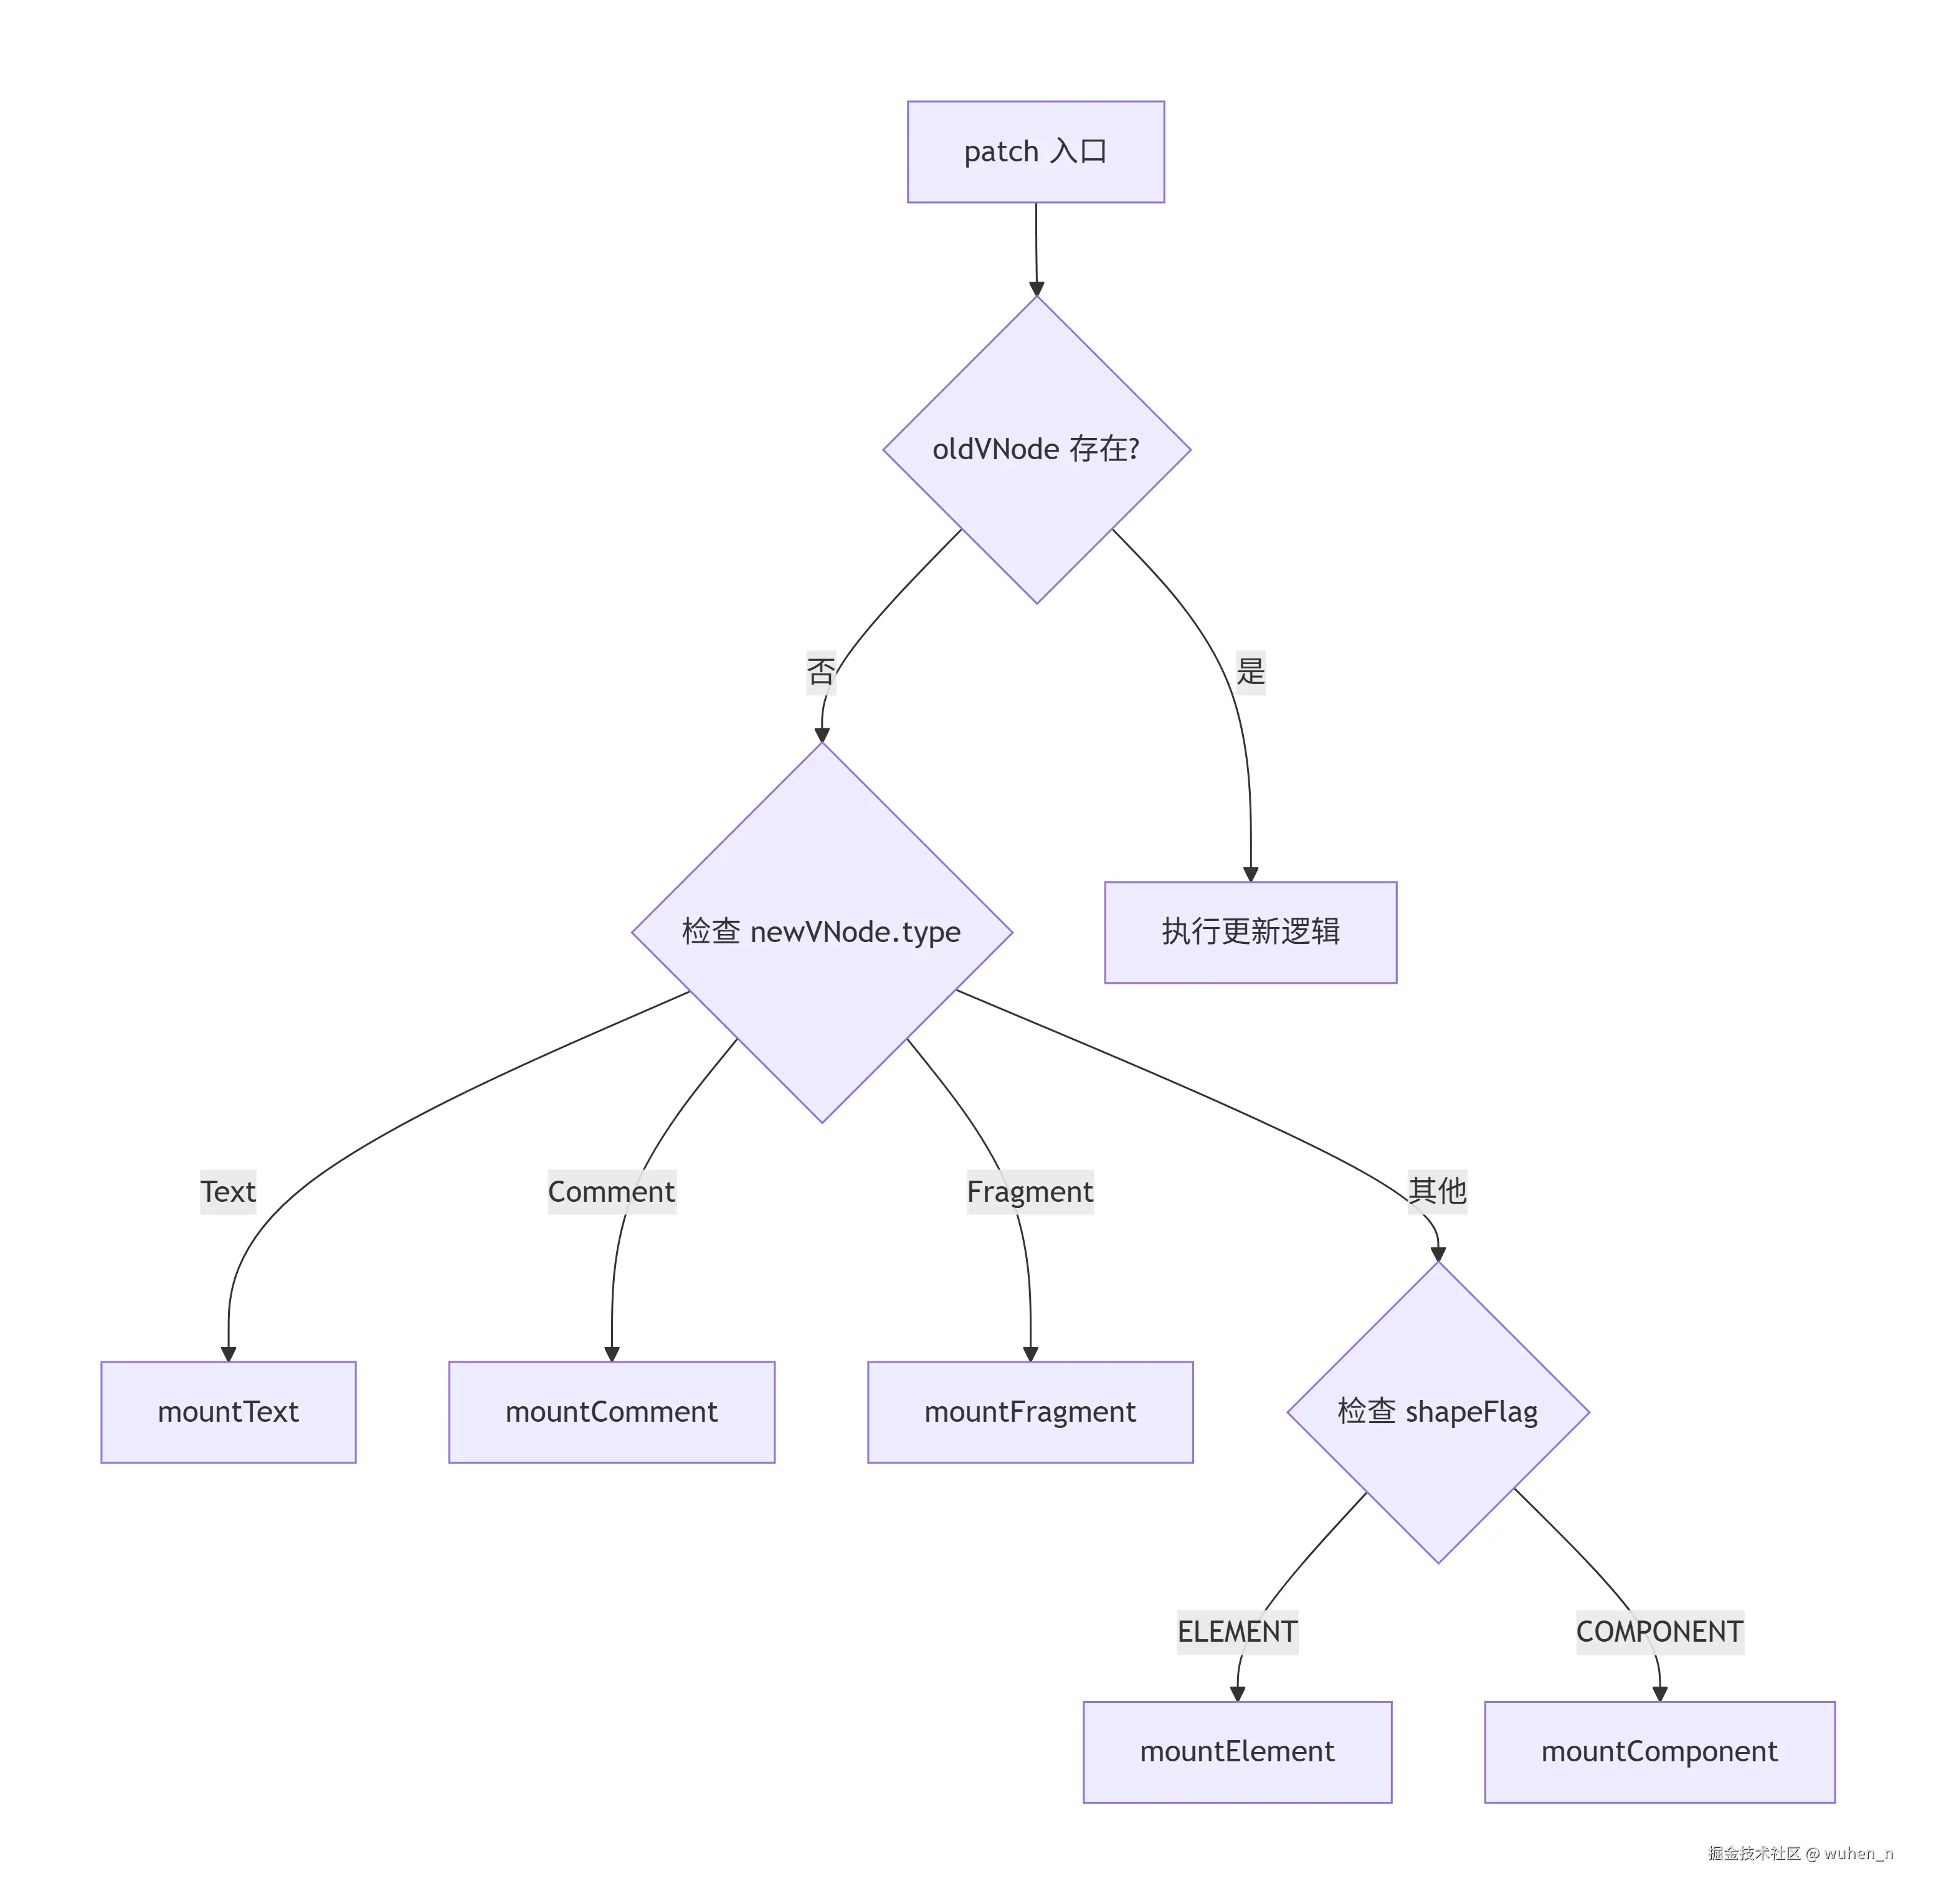
为什么需要这么多类型?
不同类型的节点在 DOM 中的表现完全不同:
| 节点类型 | 真实 DOM 表示 | 特点 |
|---|---|---|
| 元素节点 | HTMLElement | 有标签名、属性、子节点 |
| 文本节点 | TextNode | 只有文本内容 |
| 注释节点 | Comment | 用于注释,不影响渲染 |
| Fragment | 无对应节点 | 多个根节点的容器 |
原生元素的挂载详解
mountElement 的四个步骤
挂载一个原生元素需要四个核心步骤:
- 创建 DOM 元素
- 保存 DOM 元素引用
- 处理子节点和属性
- 插入到容器
javascript
function mountElement(vnode, container, anchor) {
  const { type, props, shapeFlag } = vnode;

  // 步骤1:创建 DOM 元素
  const el = hostCreateElement(type);

  // 步骤2:保存 DOM 元素引用
  vnode.el = el;

  // 步骤3:处理子节点和属性
  if (shapeFlag & ShapeFlags.TEXT_CHILDREN) {
    // 情况A:文本子节点
    hostSetElementText(el, vnode.children);
  } else if (shapeFlag & ShapeFlags.ARRAY_CHILDREN) {
    // 情况B:数组子节点
    mountChildren(vnode.children, el);
  }

  if (props) {
    for (const key in props) {
      hostPatchProp(el, key, null, props[key]);
    }
  }

  // 步骤4:插入到容器
  hostInsert(el, container, anchor);
}
子节点的递归挂载
数组子节点的挂载是一个递归过程:
javascript
function mountChildren(children, container) {
  for (let i = 0; i < children.length; i++) {
    const child = children[i];
    // 递归调用 patch 挂载每个子节点
    // 注意:这里传入的 oldVNode 为 null
    patch(null, child, container);
  }
}
一个完整的挂载示例
让我们通过一个具体例子,观察挂载的全过程:
javascript
// 示例 VNode
const vnode = {
  type: 'div',
  props: {
    class: 'card',
    id: 'card-1',
    'data-index': 0
  },
  children: [
    {
      type: 'h2',
      props: { class: 'title' },
      children: '标题',
      shapeFlag: ShapeFlags.ELEMENT | ShapeFlags.TEXT_CHILDREN
    },
    {
      type: 'p',
      props: { class: 'content' },
      children: '内容',
      shapeFlag: ShapeFlags.ELEMENT | ShapeFlags.TEXT_CHILDREN
    }
  ],
  shapeFlag: ShapeFlags.ELEMENT | ShapeFlags.ARRAY_CHILDREN
};

// 执行挂载
mountElement(vnode, document.getElementById('app'));

// 生成的真实 DOM:
// <div class="card" id="card-1" data-index="0">
//   <h2 class="title">标题</h2>
//   <p class="content">内容</p>
// </div>
属性的处理
属性的分类
在 Web 开发中,元素的属性分为以下几类:
- 普通属性:
<div id="app" title="标题"></div> - 类名:
<div class="container active"></div> - 样式:
<div style="color: red; font-size: 16px"></div> - 事件:
<div onclick="handleClick"></div> - DOM 属性:
<div hidden disabled></div>
属性的设置方式
不同类型的属性,设置方式也不同:
| 类型 | 设置方式 | 示例 |
|---|---|---|
| 普通属性 | setAttribute | el.setAttribute('id', 'app') |
| 类名 | className | el.className = 'container' |
| 样式 | style 对象 | el.style.color = 'red' |
| 事件 | addEventListener | el.addEventListener('click', handler) |
| DOM 属性 | 直接赋值 | el.hidden = true |
patchProp 的分发逻辑
Vue3 的 patchProp 函数需要处理以下这些情况:
- 处理事件:
patchEvent(el, key, prevValue, nextValue); - 处理 class:
patchClass(el, nextValue); - 处理 style:
patchStyle(el, prevValue, nextValue); - 处理 DOM 属性:
patchDOMProp(el, key, nextValue); - 处理普通属性:
patchAttr(el, key, nextValue);
事件处理的优化
事件处理有一个重要的优化点:避免频繁添加/移除事件监听。
不好的做法:每次更新都移除再添加
javascript
function patchEventBad(el, key, prevValue, nextValue) {
  const eventName = key.slice(2).toLowerCase();

  if (prevValue) {
    el.removeEventListener(eventName, prevValue);
  }
  if (nextValue) {
    el.addEventListener(eventName, nextValue);
  }
}
Vue3 的做法:使用 invoker 缓存
javascript
function patchEvent(el, rawKey, prevValue, nextValue) {
  const eventName = rawKey.slice(2).toLowerCase();

  // 使用 el._vei 存储事件调用器
  const invokers = el._vei || (el._vei = {});
  let invoker = invokers[eventName];

  if (nextValue && invoker) {
    // 有旧调用器:只更新值
    invoker.value = nextValue;
  } else if (nextValue && !invoker) {
    // 无旧调用器:创建新调用器
    invoker = createInvoker(nextValue);
    invokers[eventName] = invoker;
    el.addEventListener(eventName, invoker);
  } else if (!nextValue && invoker) {
    // 没有新值:移除监听
    el.removeEventListener(eventName, invoker);
    invokers[eventName] = null;
  }
}

function createInvoker(initialValue) {
  const invoker = (e) => {
    invoker.value(e);
  };
  invoker.value = initialValue;
  return invoker;
}
这种设计的优势在于:事件监听只添加一次,后续更新只改变回调函数: 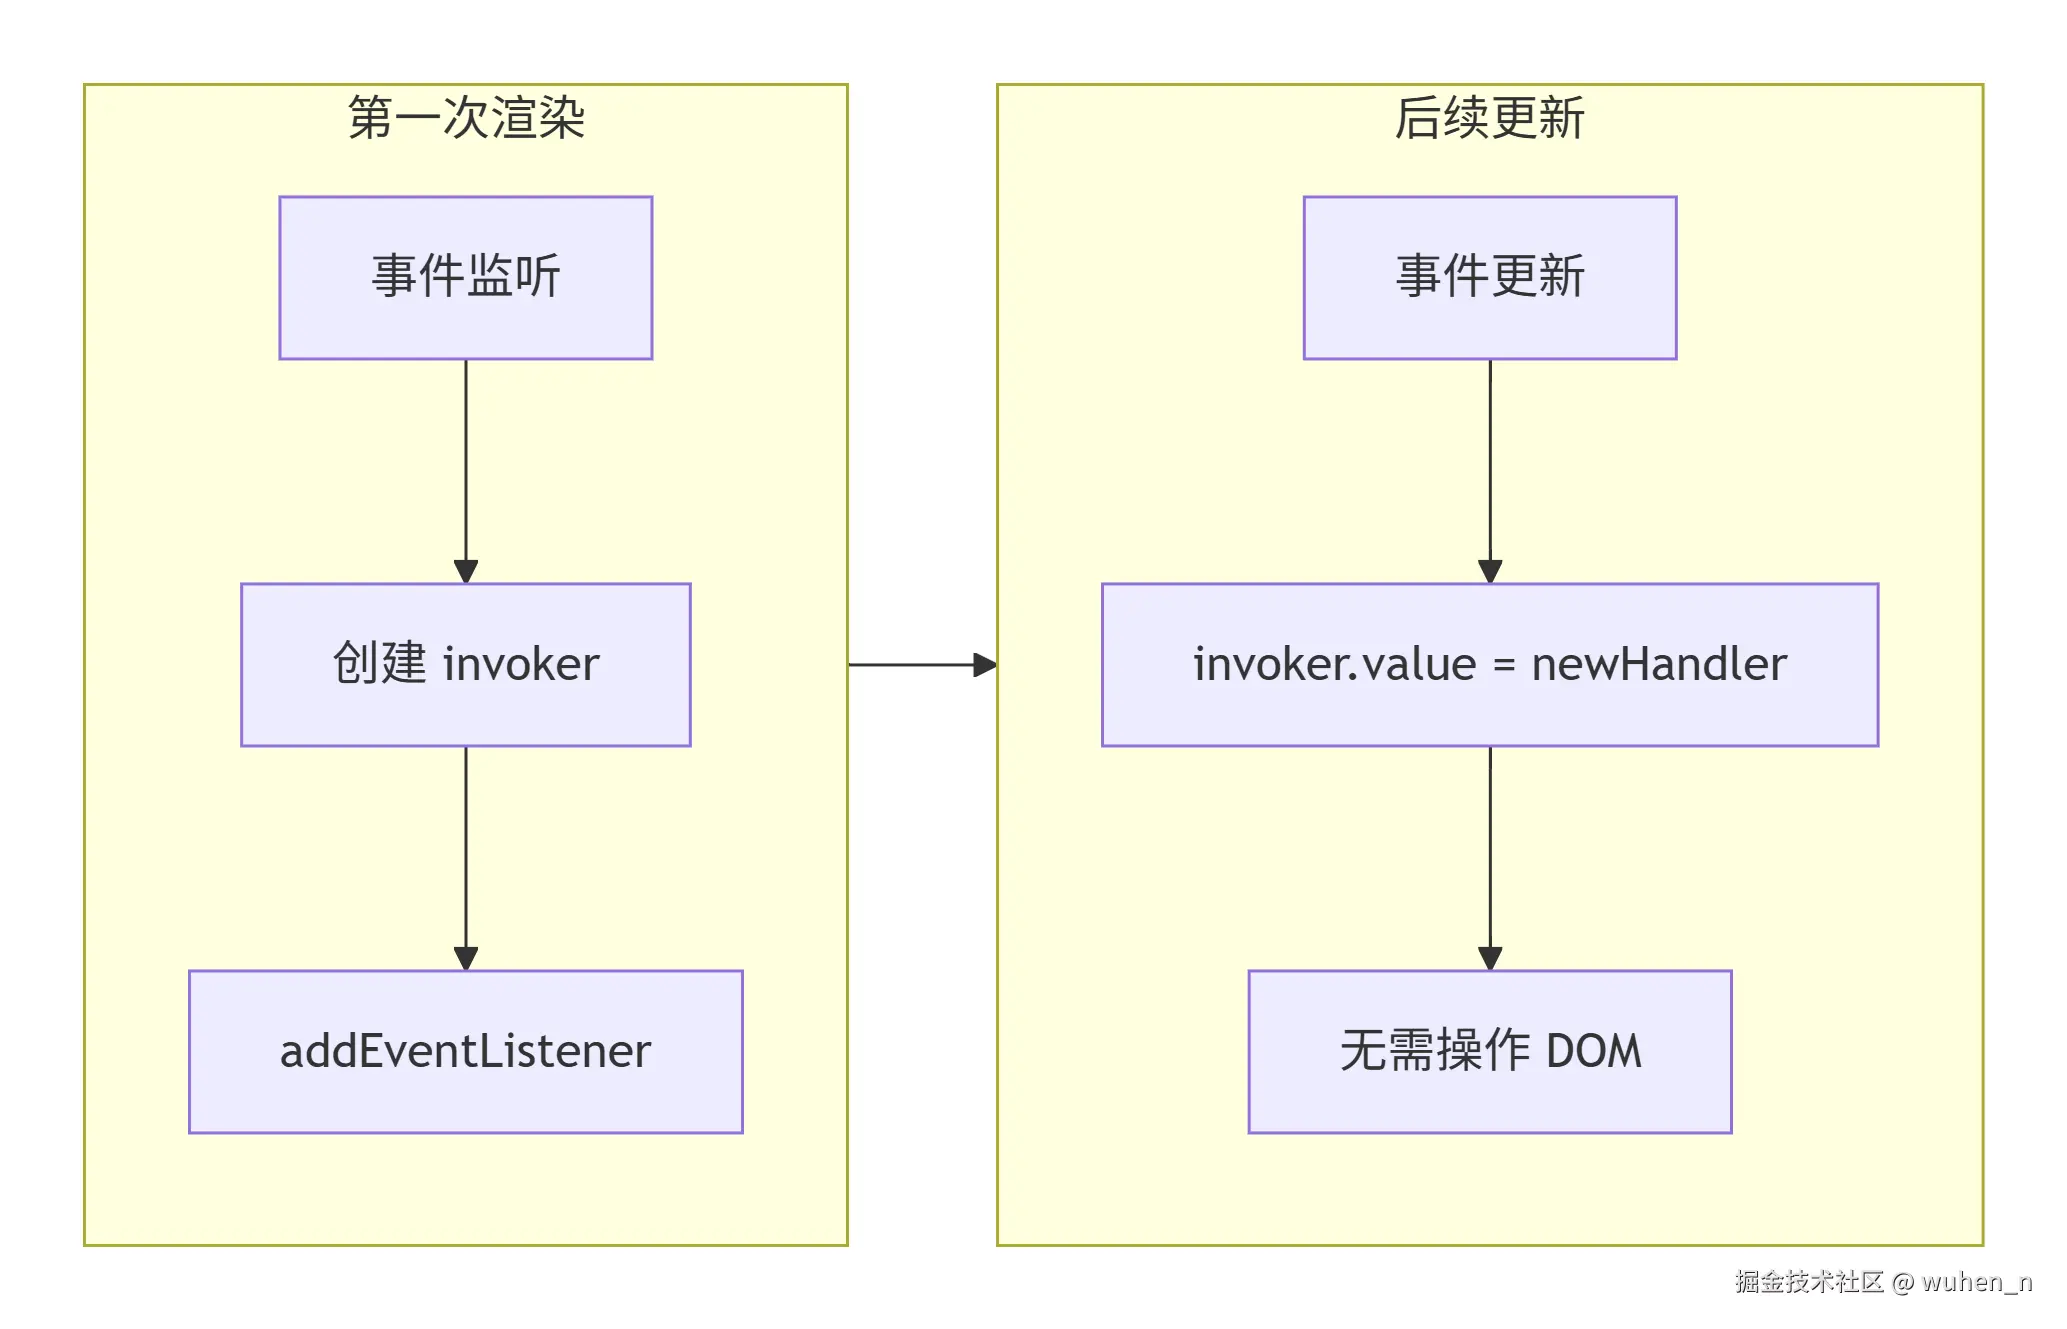
样式的合并处理
patchStyle 需要处理三种情况:
- 没有新样式:
el.removeAttribute('style'); - 新样式是字符串:
style.cssText = next; - 新样式是对象:
javascript
// 设置新样式
for (const key in next) {
  setStyle(style, key, next[key]);
}

// 移除旧样式中不存在于新样式的属性
if (prev && typeof prev !== 'string') {
  for (const key in prev) {
    if (next[key] == null) {
      setStyle(style, key, '');
    }
  }
}
文本节点和注释节点
文本节点的处理
文本节点是最简单的节点类型:
javascript
// 文本节点的类型标识(Symbol 保证唯一性)
const Text = Symbol('Text');
function mountText(vnode, container, anchor) {
  // 1. 创建文本节点
  const textNode = document.createTextNode(vnode.children);

  // 2. 保存真实节点引用
  vnode.el = textNode;

  // 3. 插入到容器
  container.insertBefore(textNode, anchor);
}
文本节点在 DOM 中的表现:
html
<!-- 文本节点没有标签,只有内容 -->
Hello World
注释节点的处理
注释节点用于调试和特殊场景:
javascript
const Comment = Symbol('Comment');

function mountComment(vnode, container, anchor) {
  // 创建注释节点
  const commentNode = document.createComment(vnode.children);
  vnode.el = commentNode;
  container.insertBefore(commentNode, anchor);
}
注释节点在 DOM 中的表现:
html
<!-- 这是一个注释节点,不会显示在页面上 -->Fragment 的处理
Fragment 是 Vue3 新增的特性,允许组件返回多个根节点:
javascript
const Fragment = Symbol('Fragment');

function mountFragment(vnode, container, anchor) {
  const { children, shapeFlag } = vnode;

  if (shapeFlag & ShapeFlags.TEXT_CHILDREN) {
    // 文本子节点:挂载为文本节点
    mountText(createTextVNode(children), container, anchor);
  } else if (shapeFlag & ShapeFlags.ARRAY_CHILDREN) {
    // 数组子节点:挂载所有子节点
    mountChildren(children, container);
  }

  // Fragment 本身没有真实 DOM
  // el 指向第一个子节点的 el
  vnode.el = children[0]?.el;
  // anchor 指向最后一个子节点的 el
  vnode.anchor = children[children.length - 1]?.el;
}
Fragment 的 DOM 表现:
html
<!-- 没有外层包裹元素 -->
<h1>标题</h1>
<p>段落1</p>
<p>段落2</p>
完整的渲染器实现
让我们将上述所有概念整合,实现一个可工作的简化版渲染器:
javascript
class Renderer {
  constructor(options) {
    // 注入平台操作
    this.createElement = options.createElement;
    this.createText = options.createText;
    this.createComment = options.createComment;
    this.insert = options.insert;
    this.setElementText = options.setElementText;
    this.patchProp = options.patchProp;
  }

  render(vnode, container) {
    if (vnode) {
      this.patch(null, vnode, container);
      container._vnode = vnode;
    } else if (container._vnode) {
      this.unmount(container._vnode);
    }
  }

  patch(oldVNode, newVNode, container, anchor = null) {
    if (oldVNode === newVNode) return;

    const { type, shapeFlag } = newVNode;

    // 根据类型分发
    if (type === Text) {
      this.processText(oldVNode, newVNode, container, anchor);
    } else if (type === Comment) {
      this.processComment(oldVNode, newVNode, container, anchor);
    } else if (type === Fragment) {
      this.processFragment(oldVNode, newVNode, container, anchor);
    } else if (shapeFlag & ShapeFlags.ELEMENT) {
      this.processElement(oldVNode, newVNode, container, anchor);
    } else if (shapeFlag & ShapeFlags.COMPONENT) {
      this.processComponent(oldVNode, newVNode, container, anchor);
    }
  }

  processElement(oldVNode, newVNode, container, anchor) {
    if (oldVNode == null) {
      this.mountElement(newVNode, container, anchor);
    } else {
      this.patchElement(oldVNode, newVNode);
    }
  }

  mountElement(vnode, container, anchor) {
    // 1. 创建元素
    const el = this.createElement(vnode.type);
    vnode.el = el;

    // 2. 处理属性
    if (vnode.props) {
      for (const key in vnode.props) {
        this.patchProp(el, key, null, vnode.props[key]);
      }
    }

    // 3. 处理子节点
    const { shapeFlag, children } = vnode;
    if (shapeFlag & ShapeFlags.TEXT_CHILDREN) {
      this.setElementText(el, children);
    } else if (shapeFlag & ShapeFlags.ARRAY_CHILDREN) {
      this.mountChildren(children, el);
    }

    // 4. 插入容器
    this.insert(el, container, anchor);
  }

  mountChildren(children, container) {
    for (let i = 0; i < children.length; i++) {
      this.patch(null, children[i], container);
    }
  }

  processText(oldVNode, newVNode, container, anchor) {
    if (oldVNode == null) {
      const textNode = this.createText(newVNode.children);
      newVNode.el = textNode;
      this.insert(textNode, container, anchor);
    } else {
      const el = (newVNode.el = oldVNode.el);
      if (newVNode.children !== oldVNode.children) {
        el.nodeValue = newVNode.children;
      }
    }
  }

  processComment(oldVNode, newVNode, container, anchor) {
    if (oldVNode == null) {
      const commentNode = this.createComment(newVNode.children);
      newVNode.el = commentNode;
      this.insert(commentNode, container, anchor);
    } else {
      newVNode.el = oldVNode.el;
    }
  }

  processFragment(oldVNode, newVNode, container, anchor) {
    if (oldVNode == null) {
      const { shapeFlag, children } = newVNode;
      if (shapeFlag & ShapeFlags.TEXT_CHILDREN) {
        this.patch(null, {
          type: Text,
          children
        }, container, anchor);
      } else if (shapeFlag & ShapeFlags.ARRAY_CHILDREN) {
        this.mountChildren(children, container);
      }
    } else {
      this.patchChildren(oldVNode, newVNode, container);
    }
  }

  unmount(vnode) {
    const parent = vnode.el.parentNode;
    if (parent) {
      parent.removeChild(vnode.el);
    }
  }
}
性能优化与最佳实践
避免不必要的挂载
在实际开发中,需要注意避免频繁的挂载和卸载:
javascript
// 不推荐:频繁切换导致反复挂载/卸载
function BadExample() {
  return show.value
    ? h(HeavyComponent)
    : null;
}

// 推荐:使用 keep-alive 缓存组件
function GoodExample() {
  return h(KeepAlive, null, [
    show.value ? h(HeavyComponent) : null
  ]);
}
合理使用 key
key 在 diff 算法中起着关键作用:
javascript
// 不推荐:使用索引作为 key
items.map((item, index) =>
  h('div', { key: index }, item.text)
);

// 推荐:使用唯一标识
items.map(item =>
  h('div', { key: item.id }, item.text)
);
为什么不推荐使用索引作为 key: 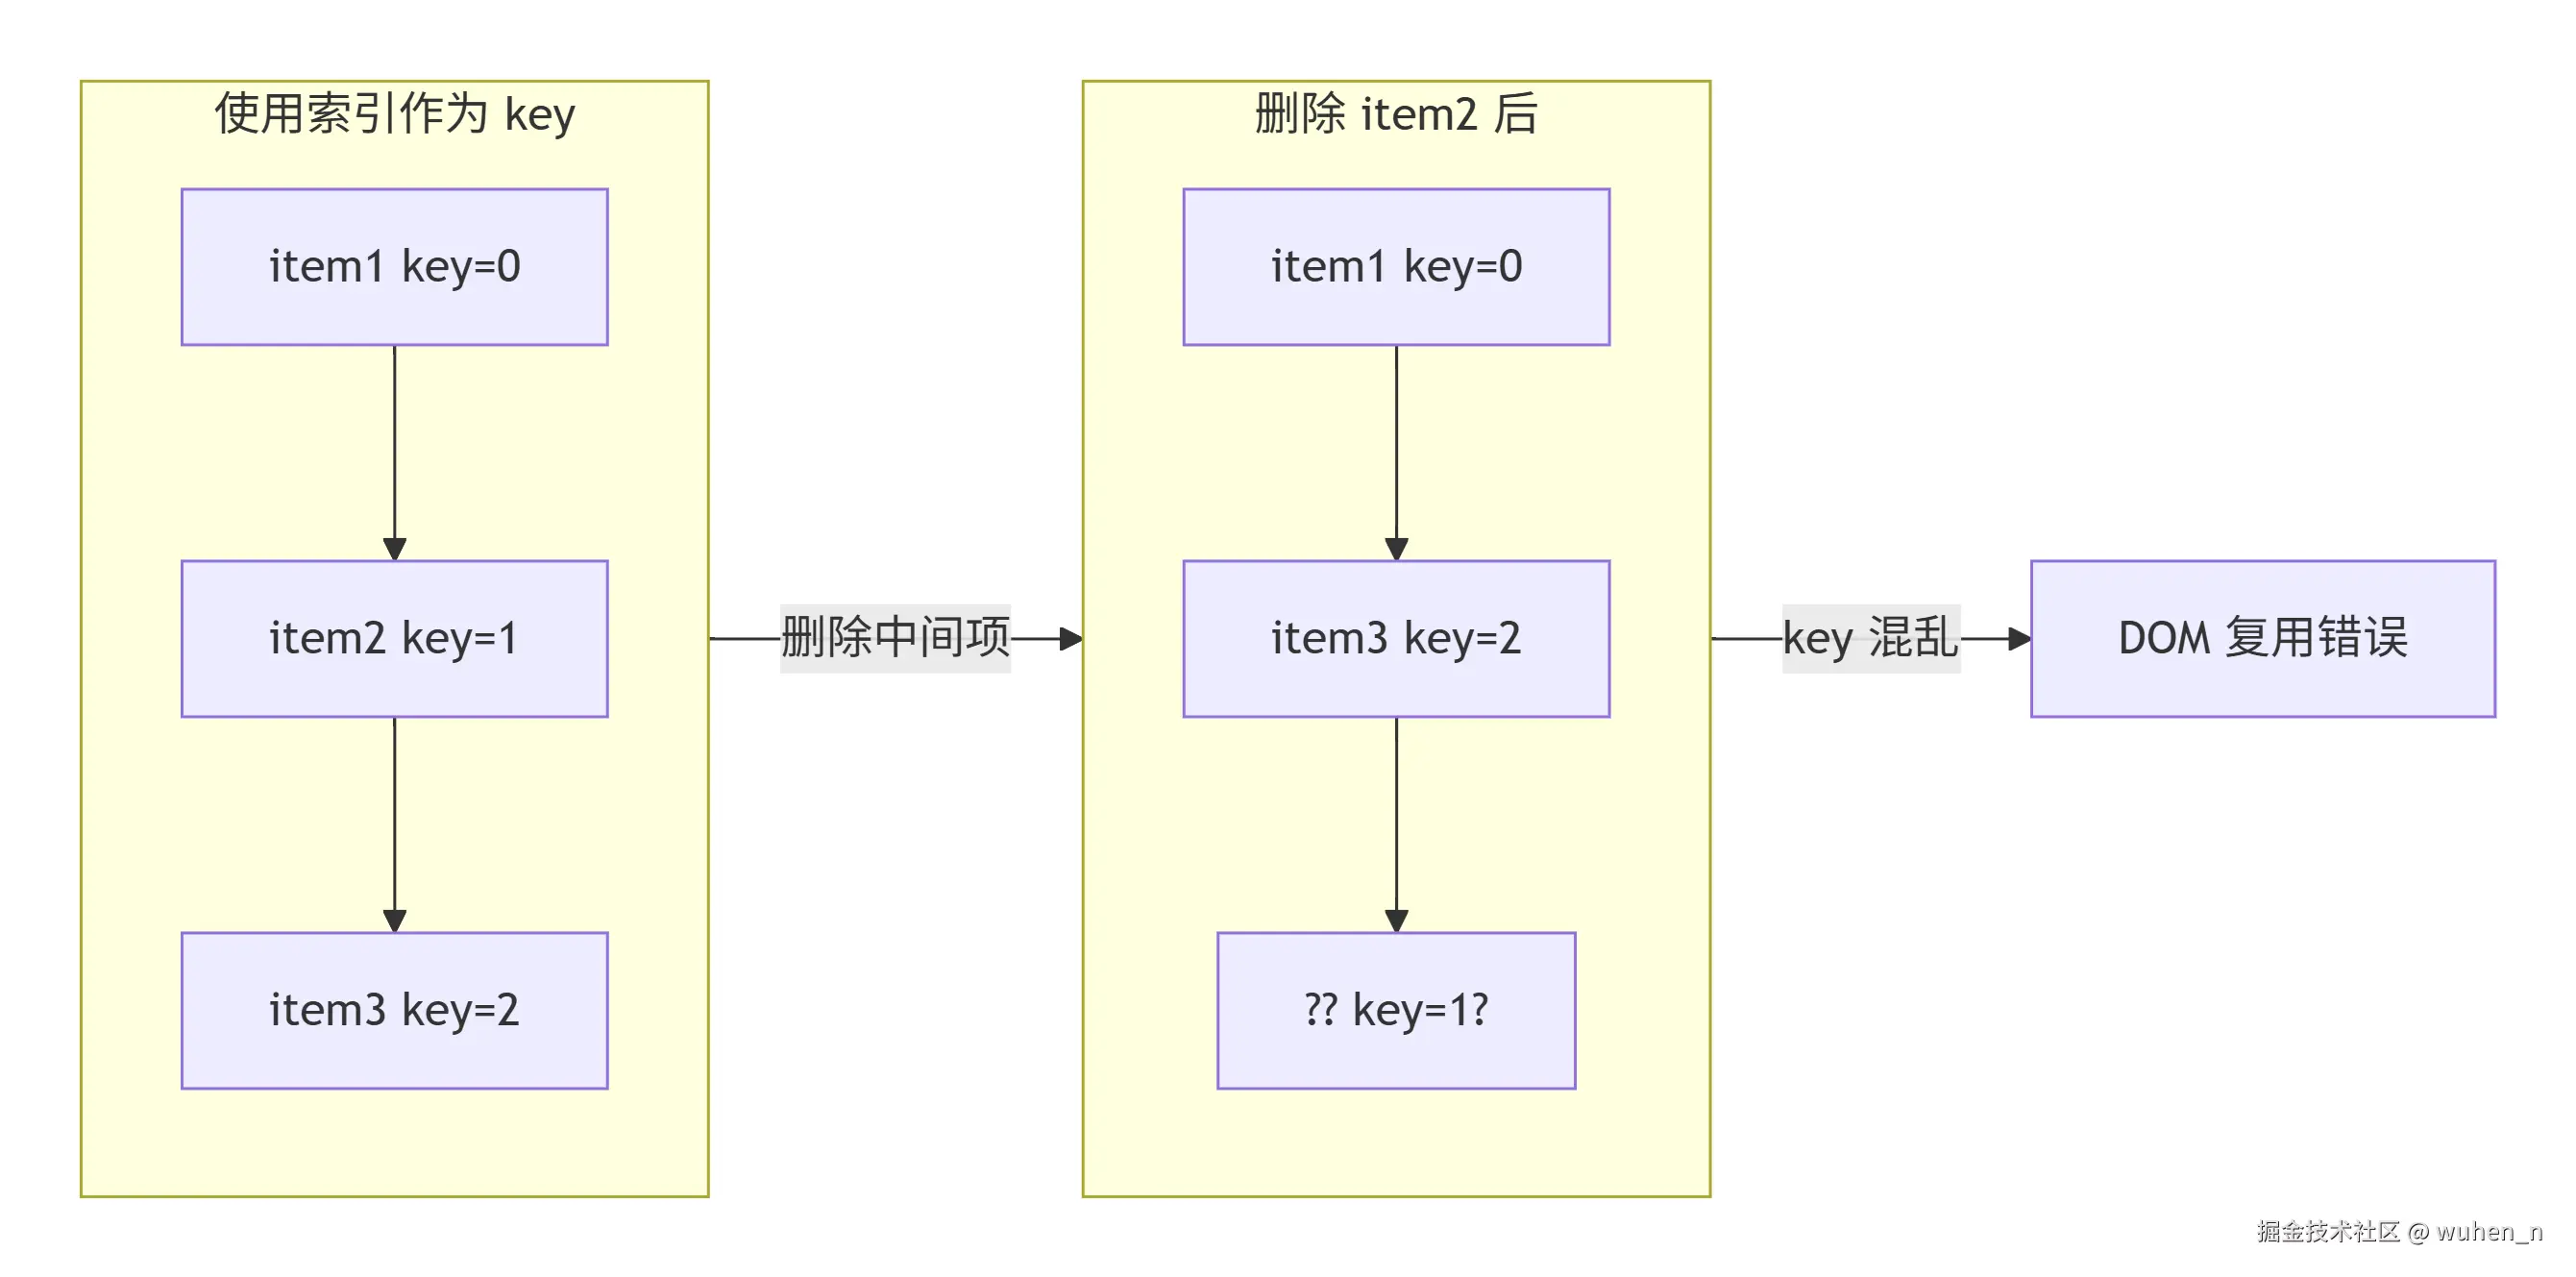
静态内容提升
对于不会变化的静态内容,应该避免重复创建 VNode:
javascript
// 编译器会自动优化
// 源码:
// <div>
//   <span>静态文本</span>
//   <span>{{ dynamic }}</span>
// </div>

// 编译后:
const _hoisted_1 = h('span', '静态文本');

function render(ctx) {
  return h('div', [
    _hoisted_1,  // 直接复用
    h('span', ctx.dynamic)
  ]);
}
事件委托优化
对于大量相似元素的交互,使用事件委托:
javascript
// 不推荐:每个元素独立事件
list.value.map(item =>
  h('button', {
    onClick: () => handleItem(item)
  }, item.name)
);

// 推荐:使用事件委托
function handleListClick(e) {
  const target = e.target;
  if (target.tagName === 'BUTTON') {
    const index = target.dataset.index;
    handleItem(list.value[index]);
  }
}

h('div', { onClick: handleListClick },
  list.value.map((item, index) =>
    h('button', {
      'data-index': index
    }, item.name)
  )
);
完整挂载流程图
下面是完整的挂载流程图: 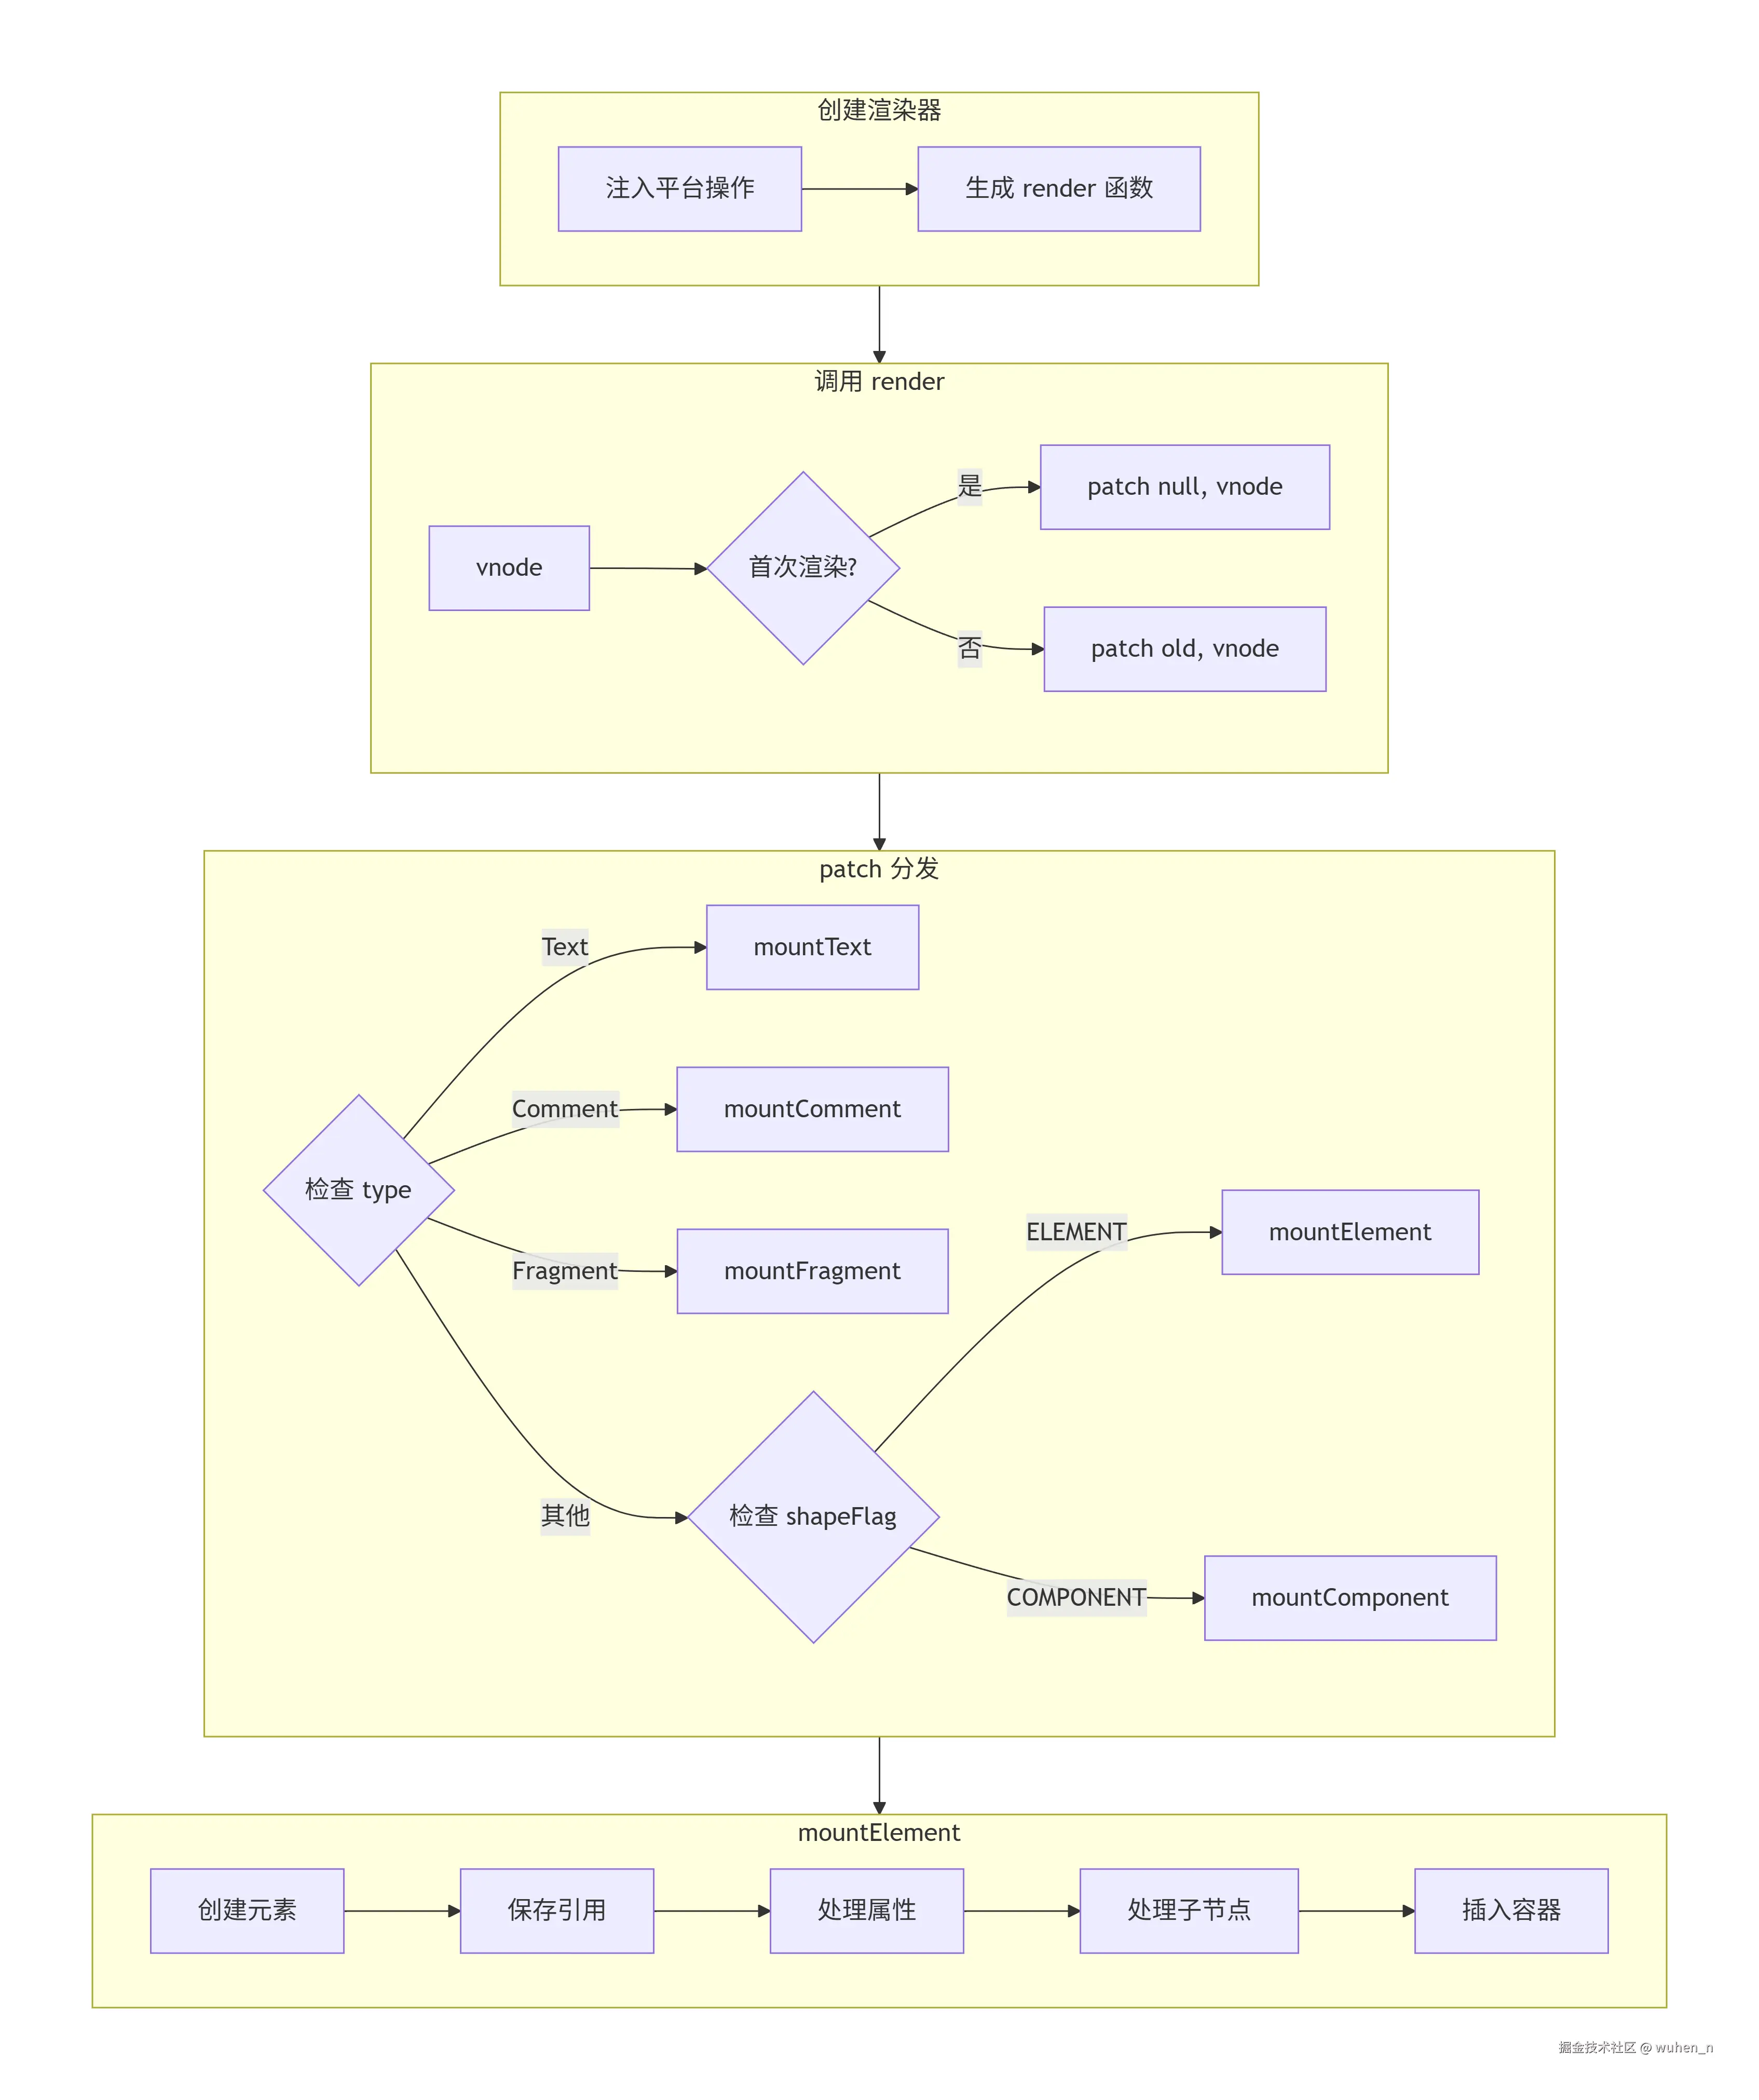
结语
本文主要介绍了 Vue3 渲染器的挂载全过程,对于文章中错误的地方或有任何疑问,欢迎在评论区留言讨论!