六、compute shader预计算
1、boundSphere计算
相比于平面地形,球形地形的包围盒看起来好像更麻烦一些,毕竟平面地形包围盒只需要考虑高度最大值和最小值,就能很轻松地构建出一个AABB包围盒了,但球形地形不行。经过考虑最终决定使用boundsphere,如果使用OBB包围盒的话,预计算包围盒的过程相对更复杂,而运行时裁剪的计算量也很高。而使用包围球,运行时裁剪计算和预计算包围盒的过程都相对简单,就是可能裁剪结果相对保守。
计算BoundSphere的在ObjectSpace的表示,用一个Vector4来存储,前三个分量存储球心的ObjectSpace坐标,第四个分量存储半径。
computeShader
//这个kernel处理的BoundingSphere各个lod层级的Bounding数量都不一样,因此,只采用x一个维度来计算
[numthreads(256,1,1)]
void CalculateBoundingSphere(uint3 idxyz : SV_DispatchThreadID)
{
uint index = idxyz.x;
//根据index计算出当前指向的patch对应的treeId、lod层级
//然后可以得到:主顶点位置、isTopVertexUp,
//然后遍历该patch所有顶点找到中心点,然后找到最远的点,得到boundingSphere半径
//截断超出的
if (index >= _PatchCountAllTree)
{
return;
}
uint lodLayer=0, facet_patch_index=0;
uint treeId = index / (uint)_PatchCountInOneTree;
uint temp = index % (uint)_PatchCountInOneTree;
[loop]
for (uint lod = 0; lod <= (uint)_MaxLOD; lod++)
{
uint currentLODPatchCount;
//通过查表得到currentLODPatchCount
// currentLODPatchCount = _PatchCountInLayer[lod];
//直接计算currentLODPatchCount
currentLODPatchCount = 1<<(_MaxLOD-lod);
currentLODPatchCount = currentLODPatchCount * currentLODPatchCount;
if (temp >= currentLODPatchCount)
{
temp -= currentLODPatchCount;
}else
{
lodLayer=lod;
facet_patch_index = temp;
break;
}
}
uint y_max = ((uint)1)<<(_MaxLOD-lodLayer);
uint temp2 = facet_patch_index;
uint patch_y=0,patch_x=0;
[loop]
for (int y=0; y<y_max; y++)
{
if (temp2 >= (y_max-y)*2-1 )
{
temp2 -= (y_max-y)*2-1;
}else
{
patch_x = temp2;
patch_y = y;
break;
}
}
uint2 mainVertexUW;
bool isTopVertexUp;
uint onePatchStep = _N_lod0_map<<lodLayer;
if (patch_x%2 == 0)
{//方向朝上的三角形patch
mainVertexUW = uint2((patch_x/2)*onePatchStep,patch_y*onePatchStep);
isTopVertexUp = true;
}else
{//方向朝下的三角形patch
mainVertexUW = uint2((patch_x/2+1)*onePatchStep,(patch_y+1)*onePatchStep);
isTopVertexUp = false;
}
//常规uw遍历采样点
int n_map_facet = _N_lod0_map << _MaxLOD;
//---------------------------------计算平均值---------------
//使用递推式计算平均值,避免数值爆炸
float3 PositionAvg=0,formerAvg=0;
int vertK=1;
[loop]
for (int w_rel = 0; w_rel <= _N_lod0_map; w_rel++)
{
[loop]
for (int u_rel=0; u_rel <= _N_lod0_map - w_rel; u_rel++)
{
int u_abs,w_abs;
int scale_lod = ((uint)1)<<lodLayer;
//得到绝对UW坐标
if (isTopVertexUp)
{
u_abs = u_rel * scale_lod + mainVertexUW.x;
w_abs = w_rel * scale_lod + mainVertexUW.y;
}else
{
u_abs = -u_rel * scale_lod + mainVertexUW.x;
w_abs = -w_rel * scale_lod + mainVertexUW.y;
}
float3 pos = _PositionBuffer[treeId*(n_map_facet+1)*(n_map_facet+1)+w_abs*(n_map_facet+1)+u_abs];
if (vertK==1)
{
PositionAvg = pos;
formerAvg = pos;
}else
{
PositionAvg = formerAvg + (pos - formerAvg)/vertK;
formerAvg = PositionAvg;
}
vertK++;
}
}
//---------------------------------计算平均值结束---------------
float maxDis=0;
[loop]
for (int w_rel = 0; w_rel <= _N_lod0_map; w_rel++)
{
[loop]
for (int u_rel=0; u_rel <= _N_lod0_map - w_rel; u_rel++)
{
int u_abs,w_abs;
int scale_lod = 1<<lodLayer;
//得到绝对UW坐标
if (isTopVertexUp)
{
u_abs = u_rel * scale_lod + mainVertexUW.x;
w_abs = w_rel * scale_lod + mainVertexUW.y;
}else
{
u_abs = -u_rel * scale_lod + mainVertexUW.x;
w_abs = -w_rel * scale_lod + mainVertexUW.y;
}
float3 pos = _PositionBuffer[treeId*(n_map_facet+1)*(n_map_facet+1)+w_abs*(n_map_facet+1)+u_abs];
maxDis = max(maxDis,distance(pos, PositionAvg));
}
}
_RWBoundingSphereBuffer[index] = float4(PositionAvg, maxDis);
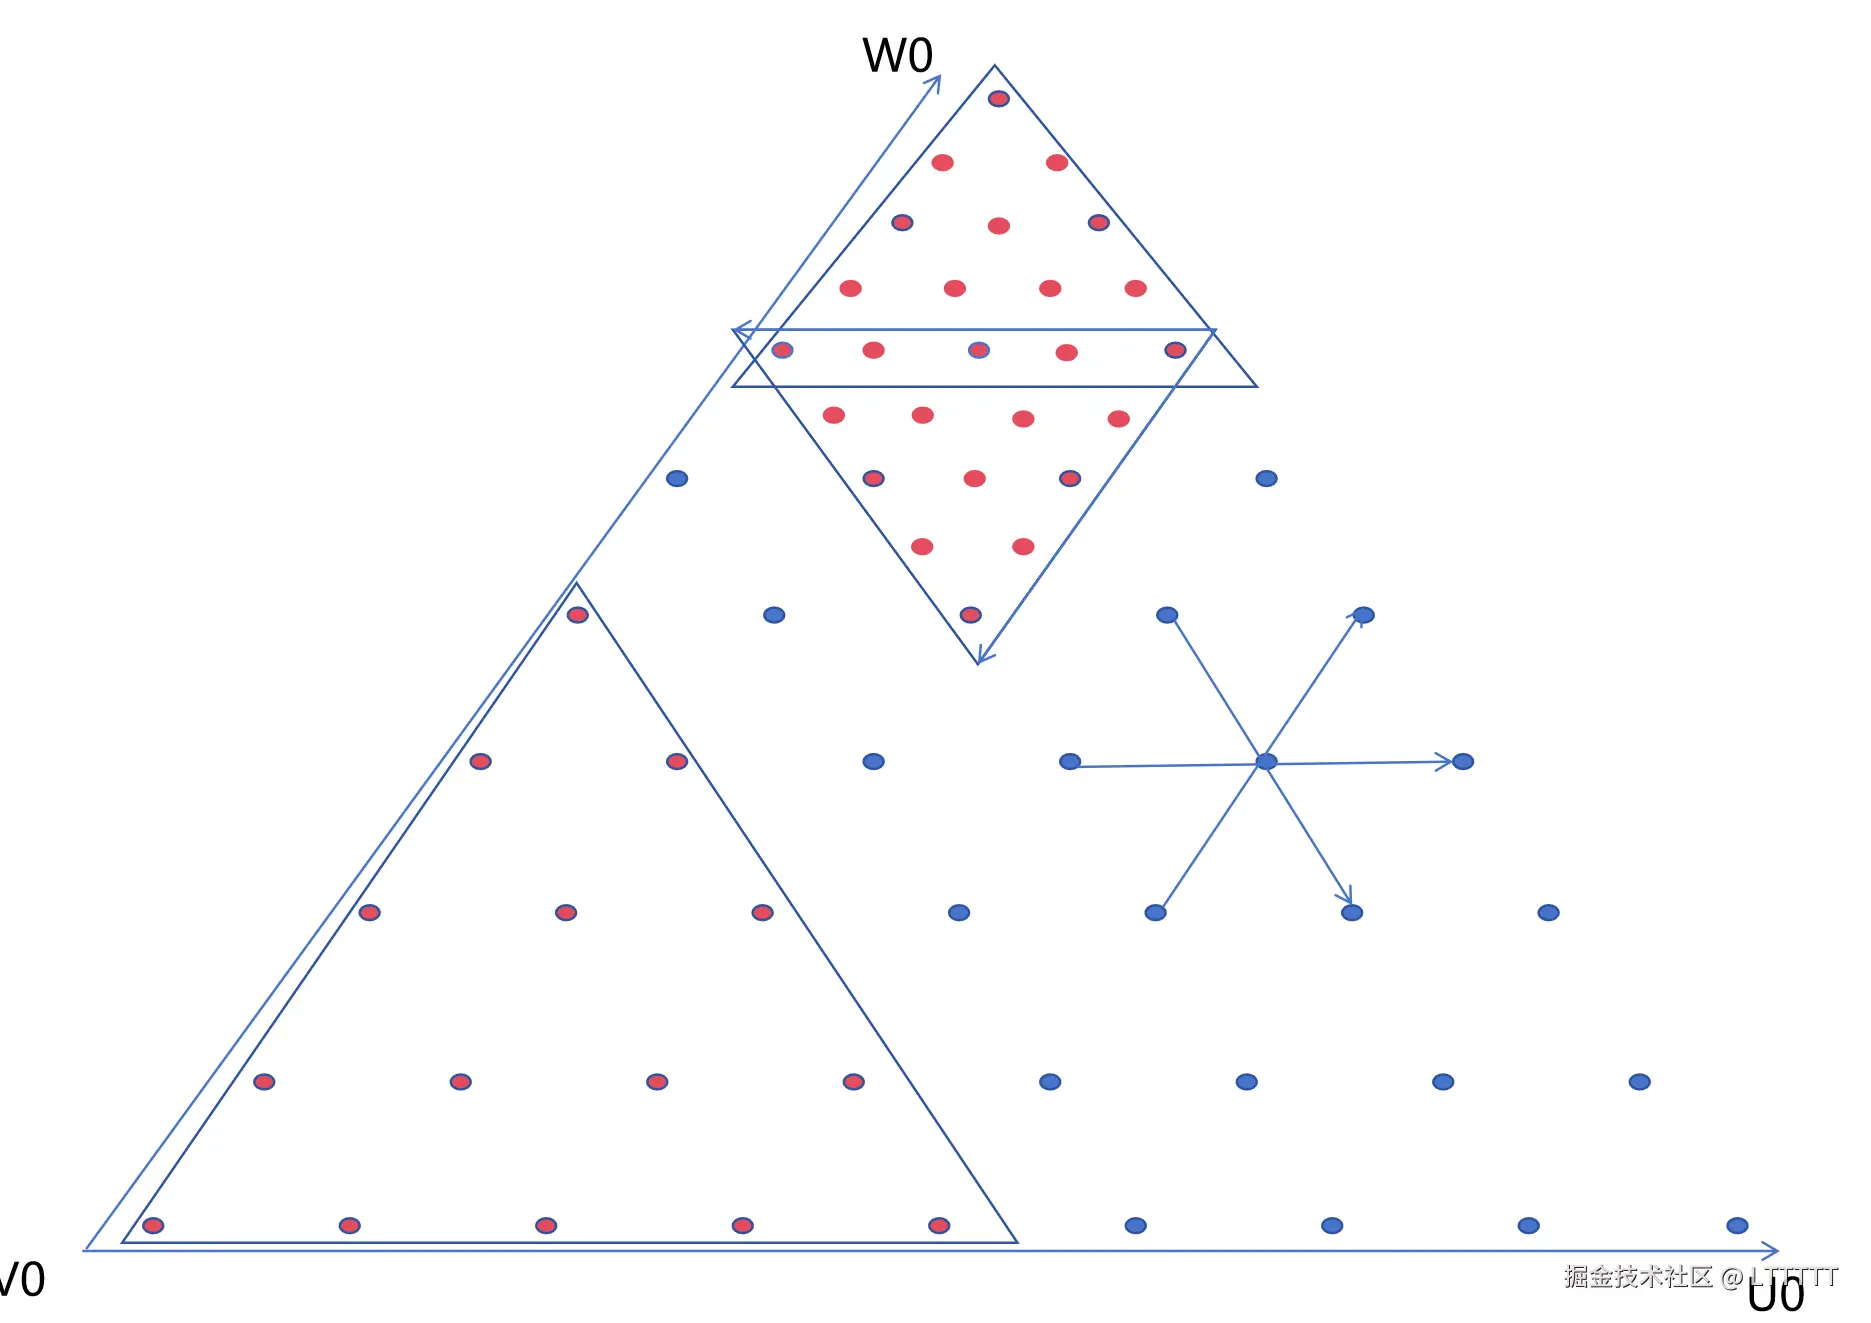
}在上面的代码中,唯一比较麻烦的就是,BoundSphere的索引问题,每个LOD层级的BoundSphere的数量都不一样,比如第MaxLOD层级,只有一个球,MaxLOD-1层就是4, MaxLOD-2层就是16,因此还得根据computeShader的id计算得到当前当前线程负责的是20面体的哪一个几何面的哪一个LOD层级的哪一个patch的boundSphere。而且,为了标注每一个patch的层级,还得引入另一个坐标,patch_x、patch_y,如下图所示,structuredBuffer的一个LOD层级内部的所有BoundSphere按照图中的曲线顺序排列。
所以在预计算阶段: 计算链条为:idxyz->index->(lodLayer/facet_patch_index)->(patch_y/patch_x)->mainVertexUW,接下来只需要根据mainVertexUW对整个patch的采样点进行遍历,计算平均点和离平均点最远的点到平均点的距离。

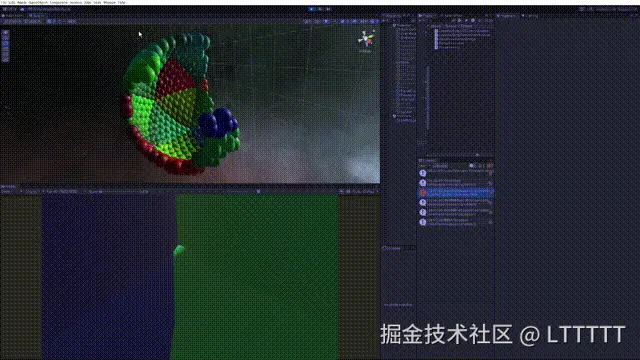
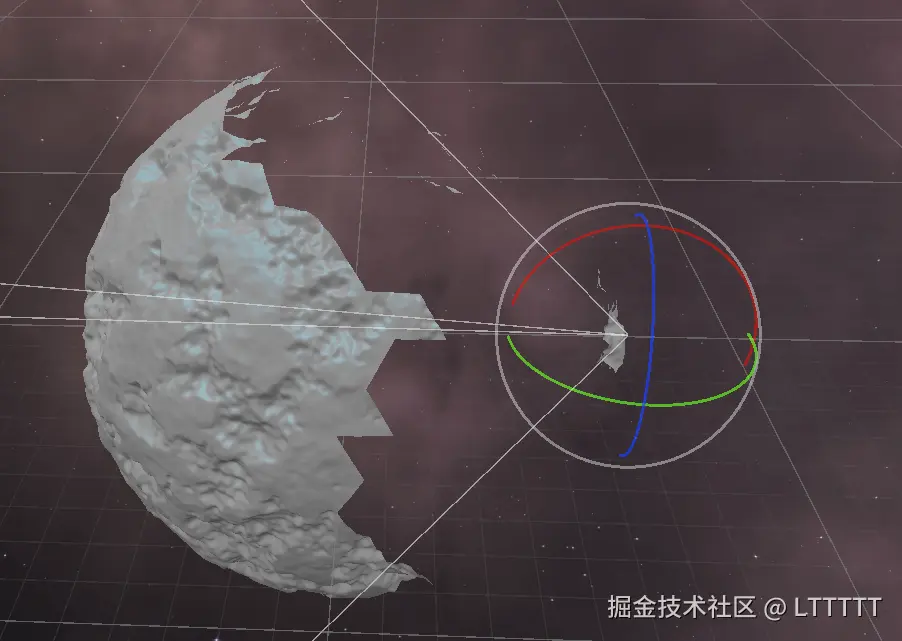
接下来,使用球体对GPU进行boundSphere预计算的结果进行可视化,验证boundSphere确实能够包裹住每个patch 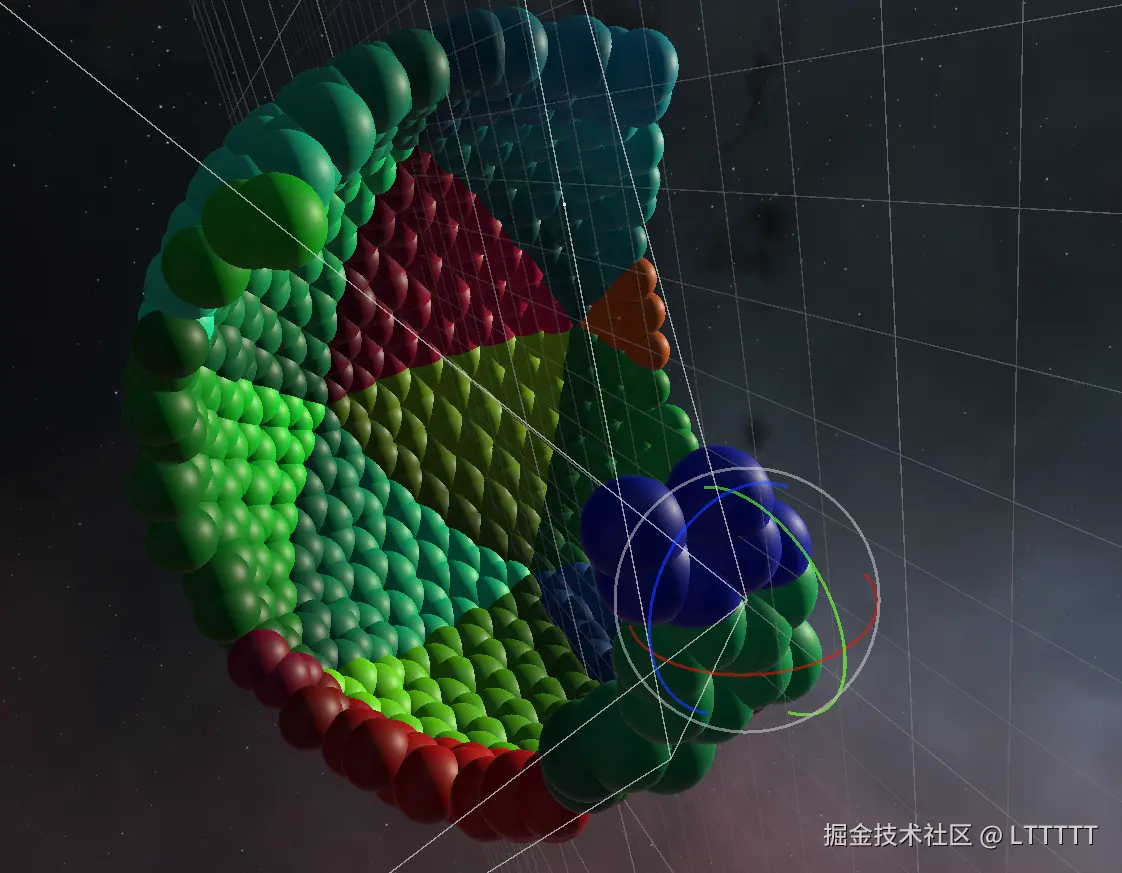
boundSphere看起来没问题,顺便也使用CPU验证了frustum culling的算法。 为了让星球在任何一个位置都能正常进行frustum culling,我们得将获取到的相机裁剪平面转换到ObjectSpace
ini
private void UpdateCameraObjectSpaceFrustumPlanes(Camera camera){
    GeometryUtility.CalculateFrustumPlanes(camera,_cameraFrustumPlanes);
    for(var i = 0; i < _cameraFrustumPlanes.Length; i ++){
        Vector4 v4 = (Vector4)_cameraFrustumPlanes[i].normal;
        v4.w = _cameraFrustumPlanes[i].distance;
        Matrix4x4 worldToLocal = this.transform.localToWorldMatrix.transpose;
        _cameraFrustumPlanesObjectSpaceV4[i] = worldToLocal * v4;//相当于WorldToLocal矩阵的转置矩阵,对平面变换必须这么做
        // _cameraFrustumPlanesObjectSpaceV4[i] = v4;
    }

    _computeShader.SetVectorArray(ShaderConstants.CameraFrustumPlanes,_cameraFrustumPlanesObjectSpaceV4);
}
为什么可以通过_cameraFrustumPlanesObjectSpaceV4i = worldToLocal * v4将平面方程从WorldSpace变换到ObjectSpace? 我们做个简单的推导,不妨设平面方程为:
ax+by+cz+d=0
对应四维向量:
π= abcd
平面上任意点X
X= xyz1
满足: πTX=0
已知WorldSpace到LocalSpace的变换矩阵为 MworldToLocal 任意点的变换为 Xlocal=MworldToLocalXworld
假设local空间平面为 πlocal, 则local的点满足 πlocalTXlocal=0,代入 Xlocal
得到 πlocalTMworldToLocalXworld=0
又因为 πworldTXworld=0
所以 πworldT=πlocalTMworldToLocal
即 πlocal=(MworldToLocal−1)Tπworld
也就是 πlocal=(MLocalToworld)Tπworld
那么判断一个BoundSphere是否在视锥内,只需要对unity返回的相机的6个视锥平面的法线(保证是单位向量,且朝向视锥内部)都计算一遍球心到平面的距离即可。
C#
bool IsBoundSphereOutSidePlane(Vector4 plane,Vector3 center,float radius)
{
    //计算球心到平面的距离,plane的法线朝向视锥外
    float dist = Vector3.Dot(center, new Vector3(plane.x, plane.y, plane.z)) + plane.w;//不需要除以一根号下A方+B方+C方,unity返回视锥平面的api保证平面法向量为单位向量
    if (dist < -radius - _BoundRedundancy) {//小于0,在平面法线朝向的那面的反面,也就是视锥外
        return true;
    }
    return false;
}

//使用时

shouldCull |= IsBoundSphereOutSidePlane(_cameraFrustumPlanesObjectSpaceV4[0], sphereCenter, sphereRadius)
    || IsBoundSphereOutSidePlane(_cameraFrustumPlanesObjectSpaceV4[1], sphereCenter, sphereRadius)
    || IsBoundSphereOutSidePlane(_cameraFrustumPlanesObjectSpaceV4[2], sphereCenter, sphereRadius)
    || IsBoundSphereOutSidePlane(_cameraFrustumPlanesObjectSpaceV4[3], sphereCenter, sphereRadius)
    || IsBoundSphereOutSidePlane(_cameraFrustumPlanesObjectSpaceV4[4], sphereCenter, sphereRadius)
    || IsBoundSphereOutSidePlane(_cameraFrustumPlanesObjectSpaceV4[5], sphereCenter, sphereRadius);
2、法线计算
由于GPU instancing的地形所有的实例都是同一个mesh,且我们也在顶点阶段把网格的顶点位置偏移到不知道哪里去了,自然不能够使用mesh自身的法线信息。因此,一个解决方案就是使用ComputeShader进行预计算,把计算结果放到ComputeBuffer里。 笔者采用了一种较为取巧的办法来计算法线。要计算某个点的法线,只需将其周围的六个点相连得到三个向量,再两两叉乘并取平均,就得到一个看上去还过得去的法线。
用简单的Bling-Phong光照验证一下法线计算结果,看上去还行。现在的问题就是在20面体的每个几何面的边界处都会有法线方向不一致的问题。这个以后再通过在计算法线时考虑相邻几何面来解决。 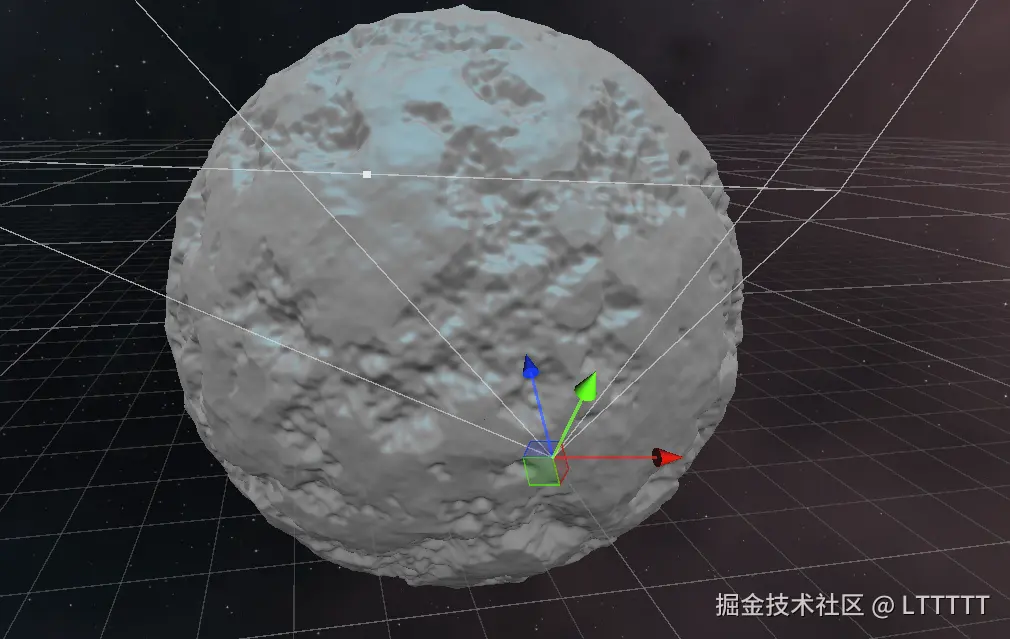
七、使用computeShader进行四叉树细分
回顾一下上篇文章的四叉树分割算法,为了高效细分,很显然一个lod层级内的任何节点之间的细分操作都是相互独立的,因此可以并行计算,我们要在computeShader中实现相同的功能。
1、四叉树细分GPU实现
computeShader
//用于四叉树分割的
[numthreads(1,1,1)]
void TraverseQuadTree (uint3 idxyz : SV_DispatchThreadID/*, uint3 groupThreadId : SV_GroupThreadID*/)
{
    /*if (groupThreadId.x > 0) return;*/
    uint n_map_facet = uint(_N_lod0_map)<<uint(_MaxLOD);
    //从ConsumeNodeList中读取
    PatchPreprocess patch = _ConsumeNodeList.Consume();

    uint boundIndex = GetBoundSphereBufferIndex(patch);
    float4 boundSphere= _BoundingSphereBuffer[boundIndex];
    float dummy = boundSphere.w+boundSphere.x;
    bool judge = patch._LODLayer>0 && Evaluate(patch._LODLayer, boundSphere/*float4(0,0,0,1)*/);
    int childTriN = n_map_facet >> (_MaxLOD-(int)(patch._LODLayer)+1);
    int temp = patch._IsTopVertexUp==1?childTriN:(-childTriN);

    if (judge)
    {//_PassLOD大于0且评价函数为真,则分割
        PatchPreprocess child0, child1, child2, child3;
        child0._treeId=patch._treeId;
        child0._LODLayer=patch._LODLayer-1;
        child0._IsTopVertexUp=patch._IsTopVertexUp;
        // child0._PatchPos=patch._PatchPos + uint2(temp,0);
        child0._PatchPos.x=patch._PatchPos.x+(uint)temp;
        child0._PatchPos.y=patch._PatchPos.y;

        child1._treeId=patch._treeId;
        child1._LODLayer=patch._LODLayer-1;
        child1._IsTopVertexUp=patch._IsTopVertexUp;
        child1._PatchPos=patch._PatchPos;

        child2._treeId=patch._treeId;
        child2._LODLayer=patch._LODLayer-1;
        child2._IsTopVertexUp=patch._IsTopVertexUp;
        // child2._PatchPos=patch._PatchPos+uint2(0, temp);
        child2._PatchPos.x=patch._PatchPos.x;
        child2._PatchPos.y=patch._PatchPos.y+(uint)temp;

        child3._treeId=patch._treeId;
        child3._LODLayer=patch._LODLayer-1;
        child3._IsTopVertexUp=patch._IsTopVertexUp==1?0:1;
        // child3._PatchPos=patch._PatchPos+uint2(temp,temp);
        child3._PatchPos.x=patch._PatchPos.x+(uint)temp;
        child3._PatchPos.y=patch._PatchPos.y+(uint)temp;

        _AppendNodeList.Append(child0);
        _AppendNodeList.Append(child1);
        _AppendNodeList.Append(child2);
        _AppendNodeList.Append(child3);
    }else if (patch._LODLayer==0)
    {
        _LOD0PatchList.Append(patch);
    }else
    {//不继续分割
        _AppendFinalNodeList.Append(patch);
    }
    // if (patch._LODLayer==0)//分割到lod0
    // {//如果lod层级为0,把这个patch 追加到一个buffer中,留待cpu那边通过gameObject的方式显示出来
    //     _LOD0PatchList.Append(patch);
    // }

}
上面的代码和之前的CPU版本几乎一样,唯一的不同的是,这段代码细分到LOD0时,将patch放到专门的_LOD0PatchList中,让C#端来让其变成GameObject,这样玩家才能精确地与近处的地形互动。
我们在C#端为所有lod0的gameObject维护一个对象池,当玩家离开一个区域时,该地区的地形gameObject不会被立即删除,当玩家回到原来的地方时,还会启用相同的gameObject,避免短时间内的重复计算。
csharp
/// <summary>
/// 保存LOD0的gameObject的mesh
/// </summary>
public class LOD0TerrainObjectPool
{
    // 对象池字典
    private Dictionary<Vector4Int, LOD0ResourceHolder> _poolDict = new Dictionary<Vector4Int, LOD0ResourceHolder>();

    // 用于缓存当前帧活跃的ID,解决反向查找 O(N*M) 问题
    private HashSet<Vector4Int> _activeThisFrame = new HashSet<Vector4Int>();

    // 对象回收延迟时间(秒)
    private readonly float _maxLifetime;

    // 父节点,用于场景管理
    private readonly Transform _rootTransform;

    // 委托:用于外部自定义 Mesh 和 GameObject 的生成逻辑
    public delegate GameObject CreateGameObjectDelegate(Vector4Int id, out Mesh mesh);
    private CreateGameObjectDelegate _createLogic;

    // 构造函数
    public LOD0TerrainObjectPool(float maxLifetime, Transform root, CreateGameObjectDelegate createLogic)
    {
        _maxLifetime = maxLifetime;
        _rootTransform = root;
        _createLogic = createLogic;
    }

    /// <summary>
    /// 每帧更新的主逻辑
    /// </summary>
    public void UpdatePool(Vector4Int[] lod0PatchArr)
    {
        // 1. 清空上一帧的记录,填充当前帧的活跃 ID
        _activeThisFrame.Clear();
        if (lod0PatchArr != null)
        {
            foreach (var patch in lod0PatchArr)
            {
                _activeThisFrame.Add(patch);
            }
        }

        // 2. 正向遍历:处理需要显示/创建的对象 (复杂度 O(N))
        foreach (var patchId in _activeThisFrame)
        {
            if (_poolDict.TryGetValue(patchId, out var holder))
            {
                // 对象存在:续命 + 激活
                holder.Lifetime = _maxLifetime;
                if (!holder.Go.activeSelf) holder.Go.SetActive(true);
            }
            else
            {
                // 对象不存在:创建
                CreateNewPatch(patchId);
            }
        }

        // 3. 反向遍历:处理需要隐藏/回收的对象 (复杂度 O(M))
        // 注意:遍历字典时不能修改字典,所以我们用一个临时列表记录死亡名单
        List<Vector4Int> toRemove = new List<Vector4Int>();

        foreach (var kvp in _poolDict)
        {
            var id = kvp.Key;
            var holder = kvp.Value;

            // 检查这个 ID 是否在当前帧的活跃列表中
            if (!_activeThisFrame.Contains(id)) // HashSet.Contains 是 O(1)
            {
                // 不活跃:扣血
                holder.Lifetime -= Time.deltaTime;
                holder.Go.SetActive(false);

                if (holder.Lifetime <= 0)
                {
                    toRemove.Add(id);
                }
            }
        }

        // 4. 彻底销毁超时对象
        foreach (var id in toRemove)
        {
            DestroyPatch(id);
        }
    }

    private void CreateNewPatch(Vector4Int id)
    {
        // 调用外部传入的生成逻辑
        Mesh mesh;
        GameObject go = _createLogic(id, out mesh);

        if (go.transform.parent == null)
        {
            go.transform.SetParent(_rootTransform);
            go.transform.localPosition = Vector3.zero;
            go.transform.localRotation = Quaternion.identity;
        }


        LOD0ResourceHolder holder = new LOD0ResourceHolder
        {
            Go = go,
            Mesh = mesh,
            Lifetime = _maxLifetime
        };

        _poolDict[id] = holder;
    }

    private void DestroyPatch(Vector4Int id)
    {
        if (_poolDict.TryGetValue(id, out var holder))
        {
            if (holder.Go != null) UnityEngine.Object.Destroy(holder.Go);
            if (holder.Mesh != null) UnityEngine.Object.Destroy(holder.Mesh);
            _poolDict.Remove(id);
        }
    }

    public void ClearAll()
    {
        foreach (var kvp in _poolDict)
        {
            if (kvp.Value.Go != null) UnityEngine.Object.Destroy(kvp.Value.Go);
            if (kvp.Value.Mesh != null) UnityEngine.Object.Destroy(kvp.Value.Mesh);
        }
        _poolDict.Clear();
        _activeThisFrame.Clear();
    }
}
2、裁剪
1、视锥裁剪
视锥裁剪的算法之前的文章已经讲过了,只要把相应的算法改为GPU版本就行。
computeShader
bool IsBoundSphereOutSidePlane(float4 plane,float4 boundSphere)
{
    //计算球心到平面的距离,plane的法线朝向视锥外
    float dist = dot(boundSphere.xyz, plane.xyz) + plane.w;//不需要除以一根号下A方+B方+C方,unity返回视锥平面的api保证平面法向量为单位向量
    if (dist < -boundSphere.w - _BoundRedundancy) {//小于0,在平面法线朝向的那面的反面,也就是视锥外
        return true;
    }
    return false;
}

bool FrustumCull(float4 planes[6], float4 boundSphere)
{//如果 boundSphere 在任意一个平面的负半空间完全外侧 → 则它在视锥外
    return IsBoundSphereOutSidePlane(planes[0], boundSphere) ||
        IsBoundSphereOutSidePlane(planes[1], boundSphere) ||
        IsBoundSphereOutSidePlane(planes[2], boundSphere) ||
        IsBoundSphereOutSidePlane(planes[3], boundSphere) ||
        IsBoundSphereOutSidePlane(planes[4], boundSphere) ||
        IsBoundSphereOutSidePlane(planes[5], boundSphere);
}
需要注意的地方是,如何根据patch信息来获取boundSphere在StructuredBuffer中的位置,需要将上面的链条idxyz->index->(lodLayer/facet_patch_index)->(patch_y/patch_x)->mainVertexUW反过来,其中一些数值可以通过数组输入computeShader。因为未知的原因,我给computeShader全局声明的uint数组总是会读取到零值,暂时没搞明白是什么原因,所以把它改成了StructuredBuffer。
ini
uint GetBoundSphereBufferIndex(PatchPreprocess patch)
{
    //根据patch._PatchPos、patch._IsTopVertexUp,patch._LODLayer推导出:
    //patch_y,patch_x,进而推导出:
    //facet_patch_index,
    //最后有了treeId、lodLayer、facet_patch_index,就可以得到_BoundingSphereBuffer的index
    uint patchPos_x,patchPos_y;
    uint n_currentLod_map = uint(_N_lod0_map)<<patch._LODLayer;
    if (patch._IsTopVertexUp)
    {
        patchPos_y = patch._PatchPos.y/n_currentLod_map;
        patchPos_x = patch._PatchPos.x/(n_currentLod_map)*2;
    }else
    {
        patchPos_y = (patch._PatchPos.y)/(n_currentLod_map)-1;
        patchPos_x = (patch._PatchPos.x/(n_currentLod_map))*2-1;
    }

    uint currLod_ASidePatchCount;uint belowLinesSum=0;
    //-----循环计算法belowLinesSum---------
    currLod_ASidePatchCount = 1<<(uint(_MaxLOD)-patch._LODLayer);
    [loop]
    for (int i=0;i<patchPos_y;i++)
    {
        belowLinesSum+=2*currLod_ASidePatchCount-1-i*2;
    }
    //-----循环计算法belowLinesSum结束---------


    //-------查表计算法算belowLinesSum----------
    // // uint belowLinesSum = patchPos_y > 0
    // //                          ? uint(_PatchCountBelowLinesSum[(patchPos_y - 1) * (_MaxLOD + 1) + patch._LODLayer])
    // //                          : (uint)0;
    // belowLinesSum = uint(_PatchCountBelowLinesSum[(patchPos_y) * (_MaxLOD + 1) + patch._LODLayer]);
    // belowLinesSum = _PatchCountBelowLinesSum[1];
    // // belowLinesSum=patchPos_y;
    //-------查表计算法算belowLinesSum结束----------


    uint facet_patch_index = belowLinesSum + patchPos_x;
    uint belowLayersSum;
    // for (int lod=0;lod<patch._LODLayer-1;lod++)
    // {
    //     belowLayersSum += _PatchCountInLayer[lod];
    // }
    // belowLayersSum = patch._LODLayer>0?_PatchCountBelowLayersSum[patch._LODLayer-1]:0;
    belowLayersSum = _PatchCountBelowLayersSum[patch._LODLayer];
    uint index = patch._treeId * _PatchCountInOneTree + belowLayersSum + facet_patch_index;
    // index=patch._treeId>19?1:0;
    return index;
}
裁剪效果,在摄像机朝下看的时候,星球背面就会被毫无必要地渲染出来,因此,仅靠视锥裁剪是不够的,我们还得引入Hi-z遮挡裁剪
2、Hi-z遮挡裁剪
Hi-z即 Hierarchical Z-Buffer,利用摄像机深度图,生成类似Mips的结构,取4个像素中最远的那个像素写入下一级Mip。最终得到1*1的贴图。通过FrameDebugger可以看到每个层级的计算过程。 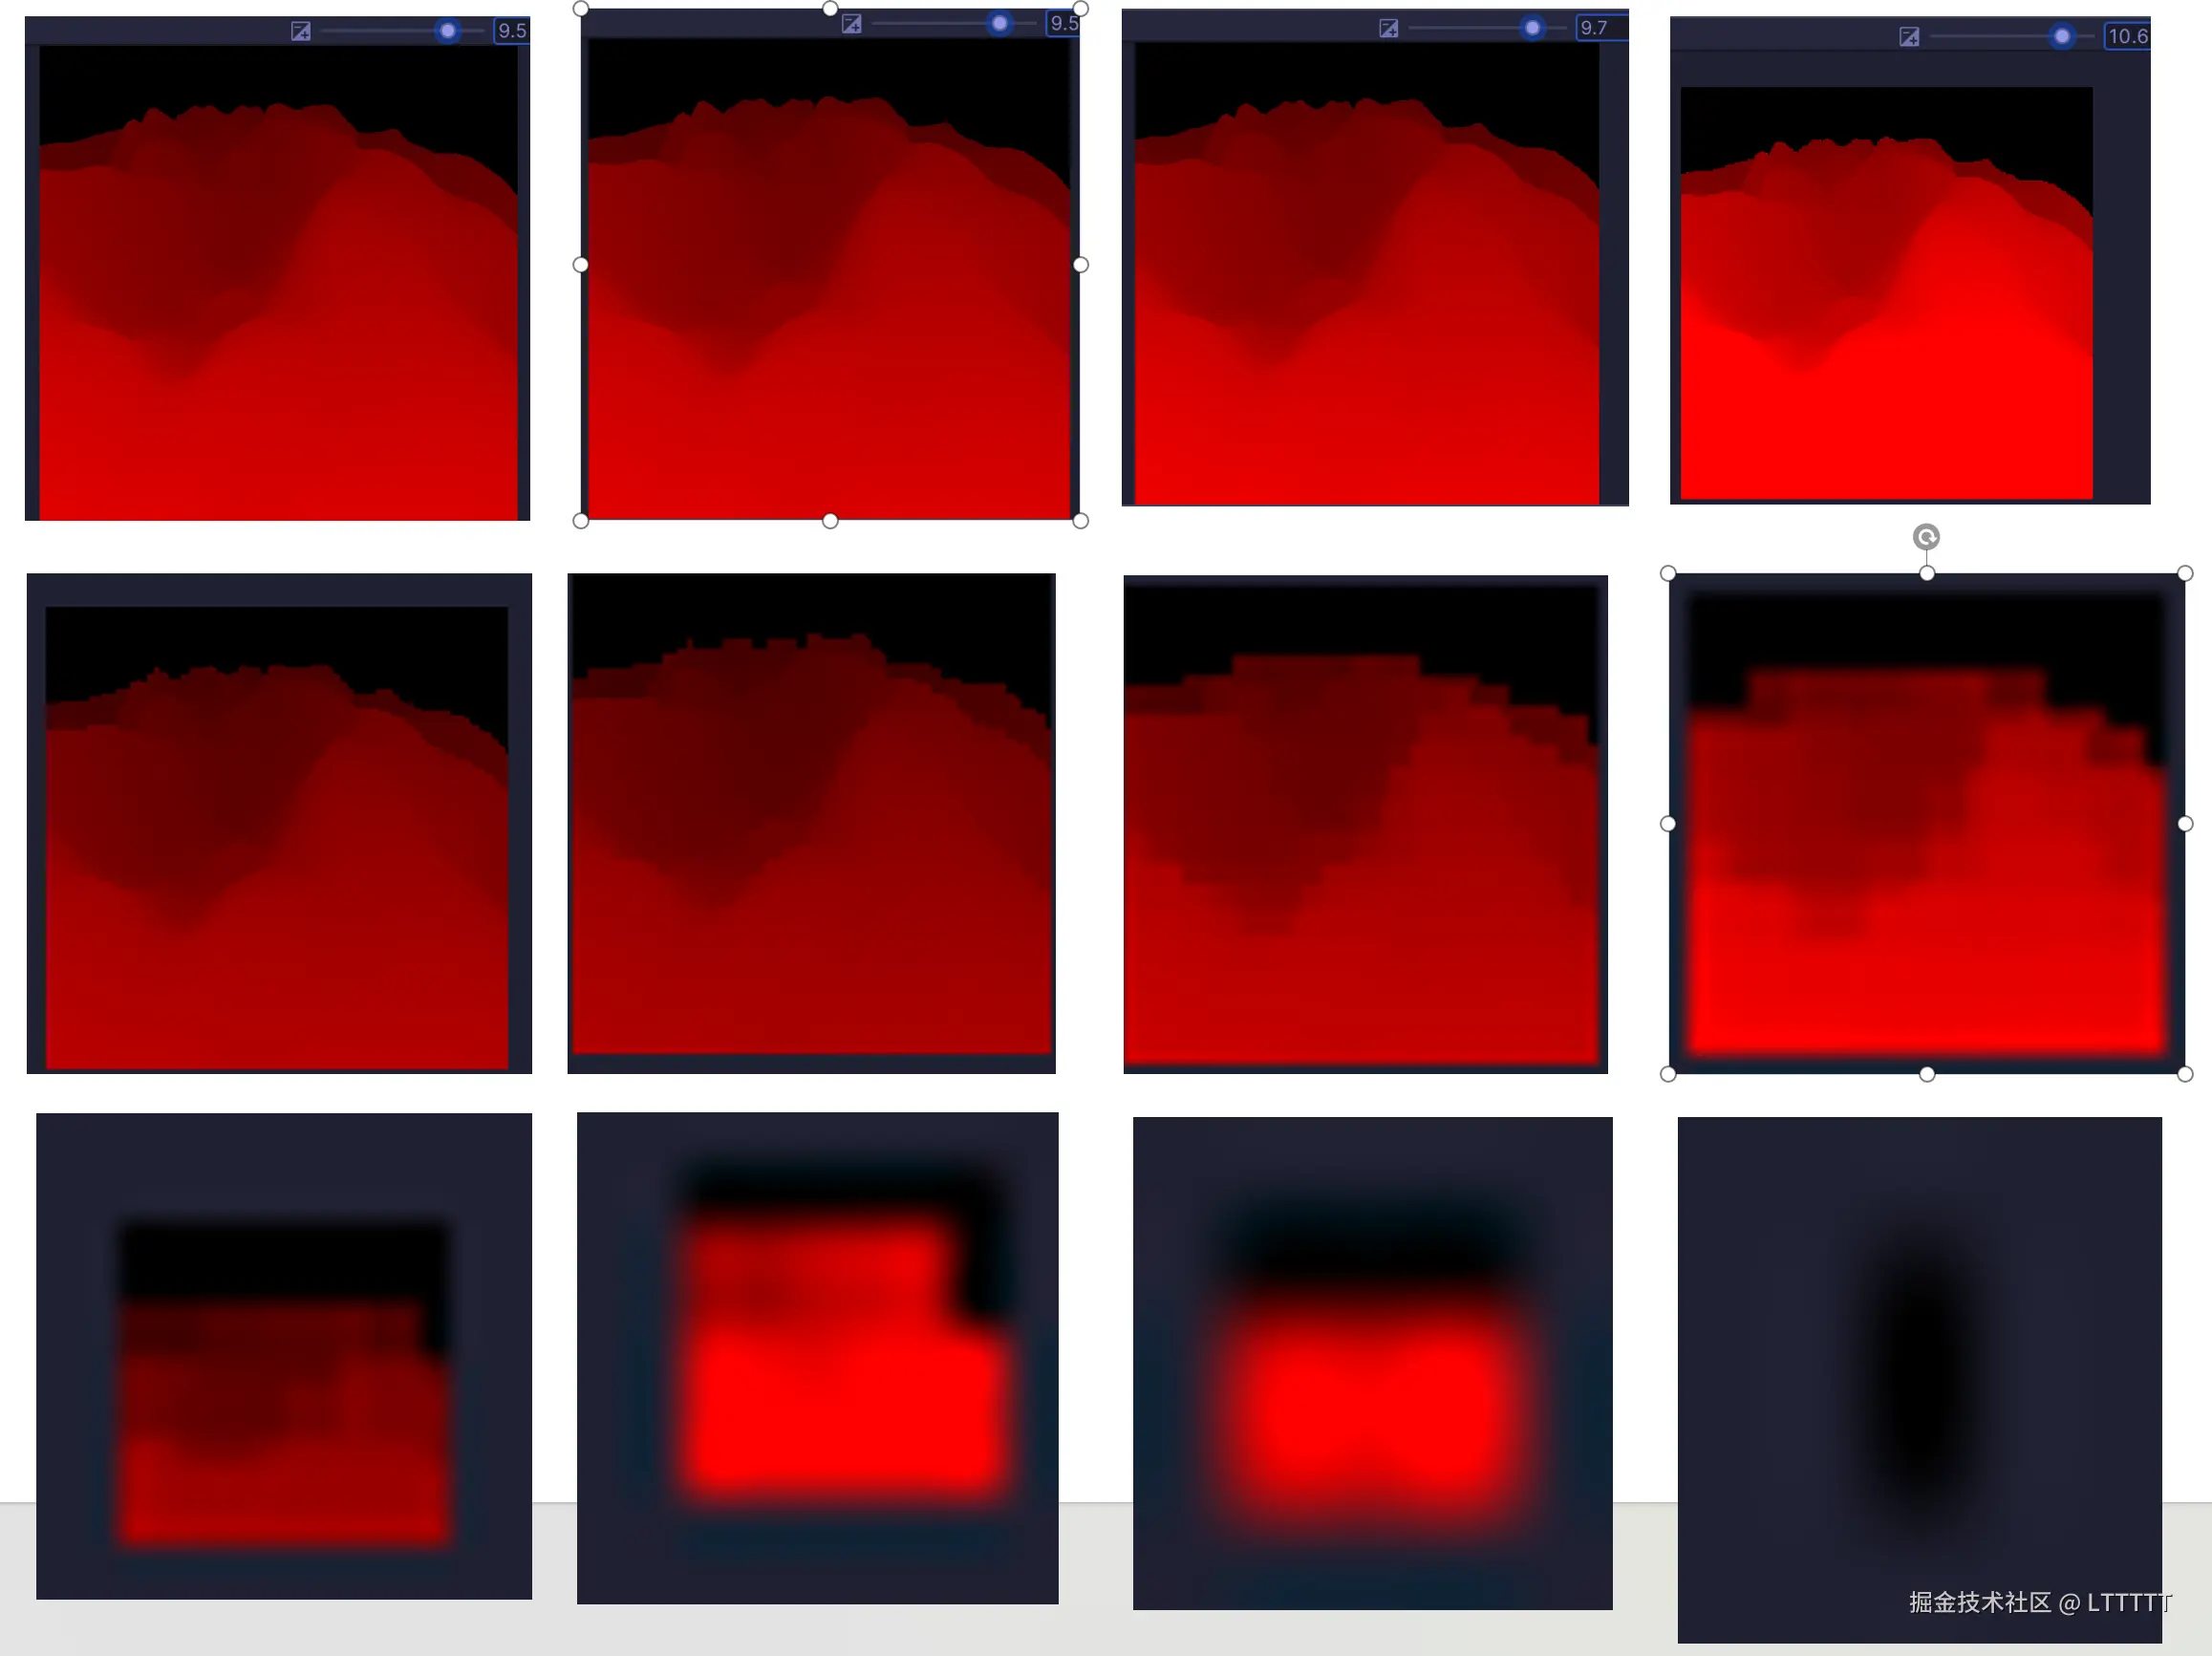 可以通过以下方式把boundSphere"放大"成一个AABB。从而可以复用AABB的Hiz遮挡代码。
ini
Bounds bounds;
float3 boundSphereCenterWS = mul(_ObjectToWorld, float4(boundSphere.xyz, 1)).xyz;
// float3 boundSphereCenterWS = boundSphere.xyz;
bounds.minPosition = boundSphereCenterWS - float3(boundSphere.w,boundSphere.w,boundSphere.w);
bounds.maxPosition = boundSphereCenterWS + float3(boundSphere.w,boundSphere.w,boundSphere.w);
然后把AABB转换到NDC空间,就可以得到一个正方形的"框",根据这个框的大小,选取Hiz map的合适的mip层级,然后再对这个"框"的四个点判断是否比Hiz map的场景深度更远,如果四个点都更远,那就说明当前BoundSphere所框住的patch一定被遮挡。
八、视觉效果
使用unity官方的PBR函数来给星球添加简单的光照。
接下来,创建一个planet Render Feature来给星球添加基本的视觉效果。
ini
public class PlanetRenderFeature : ScriptableRendererFeature
{
    public OceanSetting oceanSetting;
    public VolumeCloudSetting volumeCloudSetting;
    public AtmosphereSetting atmosphereSetting;
    public float PlanetRadius
    {
        get
        {
            return _planetRadius;
        }
        set
        {
            _planetRadius = value;
            settingUpToDate = false;
        }
    }
    private float _planetRadius=10f;
    public Vector3 PlanetCenter
    {
        set
        {
            settingUpToDate = false;
            _planetCenter = value;
        }
        get
        {
            return _planetCenter;
        }
    }
    private Vector3 _planetCenter;

    public float OceanRadius
    {
        set
        {
            settingUpToDate = false;
            _oceanRadius  = value;
        }
        get => _oceanRadius;
    }
    private float _oceanRadius;

    public Vector3 DirToSun
    {
        get => _dirToSun;
        set
        {
            lightUpToData = false;
            _dirToSun = value;
        }
    }
    private Vector3 _dirToSun;


    private PlanetVolume _volumeComponent;

    private AtmospherePass m_AtmospherePass;
    private OceanPass m_oceanPass;

    private bool settingUpToDate = false;
    private bool lightUpToData = false;

    public override void Create()
    {

    }

    // 这里将 Pass 加入渲染队列
    private bool atmosphereLastActiveState = false;
    private bool oceanLastActiveState = false;
    private bool volumeCloudLastActiveState = false;
    public override void AddRenderPasses(ScriptableRenderer renderer, ref RenderingData renderingData)
    {
        // Debug.Log("当前相机为"+renderingData.cameraData.cameraType);
        // 只对游戏相机生效,排除场景视图相机等
        if (renderingData.cameraData.cameraType != CameraType.Game)
            return;

        // 找到 Volume 组件
        var stack = VolumeManager.instance.stack;
        _volumeComponent = stack.GetComponent<PlanetVolume>();

        if (_volumeComponent == null || !_volumeComponent.IsActive())
        {
            return;
        }
        //按顺序,海洋、体积云、大气
        if (_volumeComponent.IsOcean())
        {
            if (!oceanLastActiveState)
            {
                settingUpToDate = false;
                oceanLastActiveState = true;
            }
            if (m_oceanPass == null)
                m_oceanPass = new OceanPass(oceanSetting.material);
            if (!settingUpToDate)
            {
                m_oceanPass.SetUp(oceanSetting, 0, false, _planetRadius, _planetCenter, _oceanRadius);
            }

            if (!lightUpToData)
            {
                m_oceanPass.RefreshLight(_dirToSun);
            }
            renderer.EnqueuePass(m_oceanPass);
        }else{oceanLastActiveState = false;}
        if (_volumeComponent.IsVolumeCloud())
        {

        }else {volumeCloudLastActiveState = false;}
        if (_volumeComponent.IsAtmosphere())
        {
            if (!atmosphereLastActiveState)
            {
                settingUpToDate = false;
                atmosphereLastActiveState = true;
            }
            if (m_AtmospherePass == null)
                m_AtmospherePass = new AtmospherePass(atmosphereSetting.material);
            if (!settingUpToDate)
            {
                m_AtmospherePass.SetUp(atmosphereSetting, _planetRadius, _planetCenter, _oceanRadius);
            }

            if (!lightUpToData)
            {
                m_AtmospherePass.RefreshLight(_dirToSun);
            }
            renderer.EnqueuePass(m_AtmospherePass);
        }else{ atmosphereLastActiveState = false; }

        settingUpToDate = true;
        lightUpToData = true;
    }

    private void OnValidate()
    {
        Debug.Log("OnValidate");
        settingUpToDate = false;
    }

    // /// <summary>
    // /// 供运行时调用,这个PlanetRenderFeature不会同时渲染多个星球,在初始化或者切换星球的时候要调用
    // /// </summary>
    // /// <param name="bodyRadius"></param>
    // public void SetUp(float bodyRadius)
    // {
    //     _planetRadius = bodyRadius;
    //     settingUpToDate = false;
    // }
}
未来展望
目前这个LOD地形仍然有一定的缺陷。
float下十进制有效数字只有6、7位左右,而double有15至16位,而所有patch的网格的pivot都在球心,换句话说,每个patch的网格顶点在顶点着色器中读取的position是相对于球心的,这就意味着,当星球大小达到五位数后,就会开始有精度问题,且使用简单的父物体偏移,把patch的网格移动到原点附近也是不能消除这个误差的。毕竟顶点着色器的返回值中的SV_Target只能返回float3,不能达到更高的精度。如果每个patch的顶点位置偏移是以球心为基准的,星球半径大了必然会有很大的误差,这注定了更大尺度的星球的patch不能以球心为pivot。
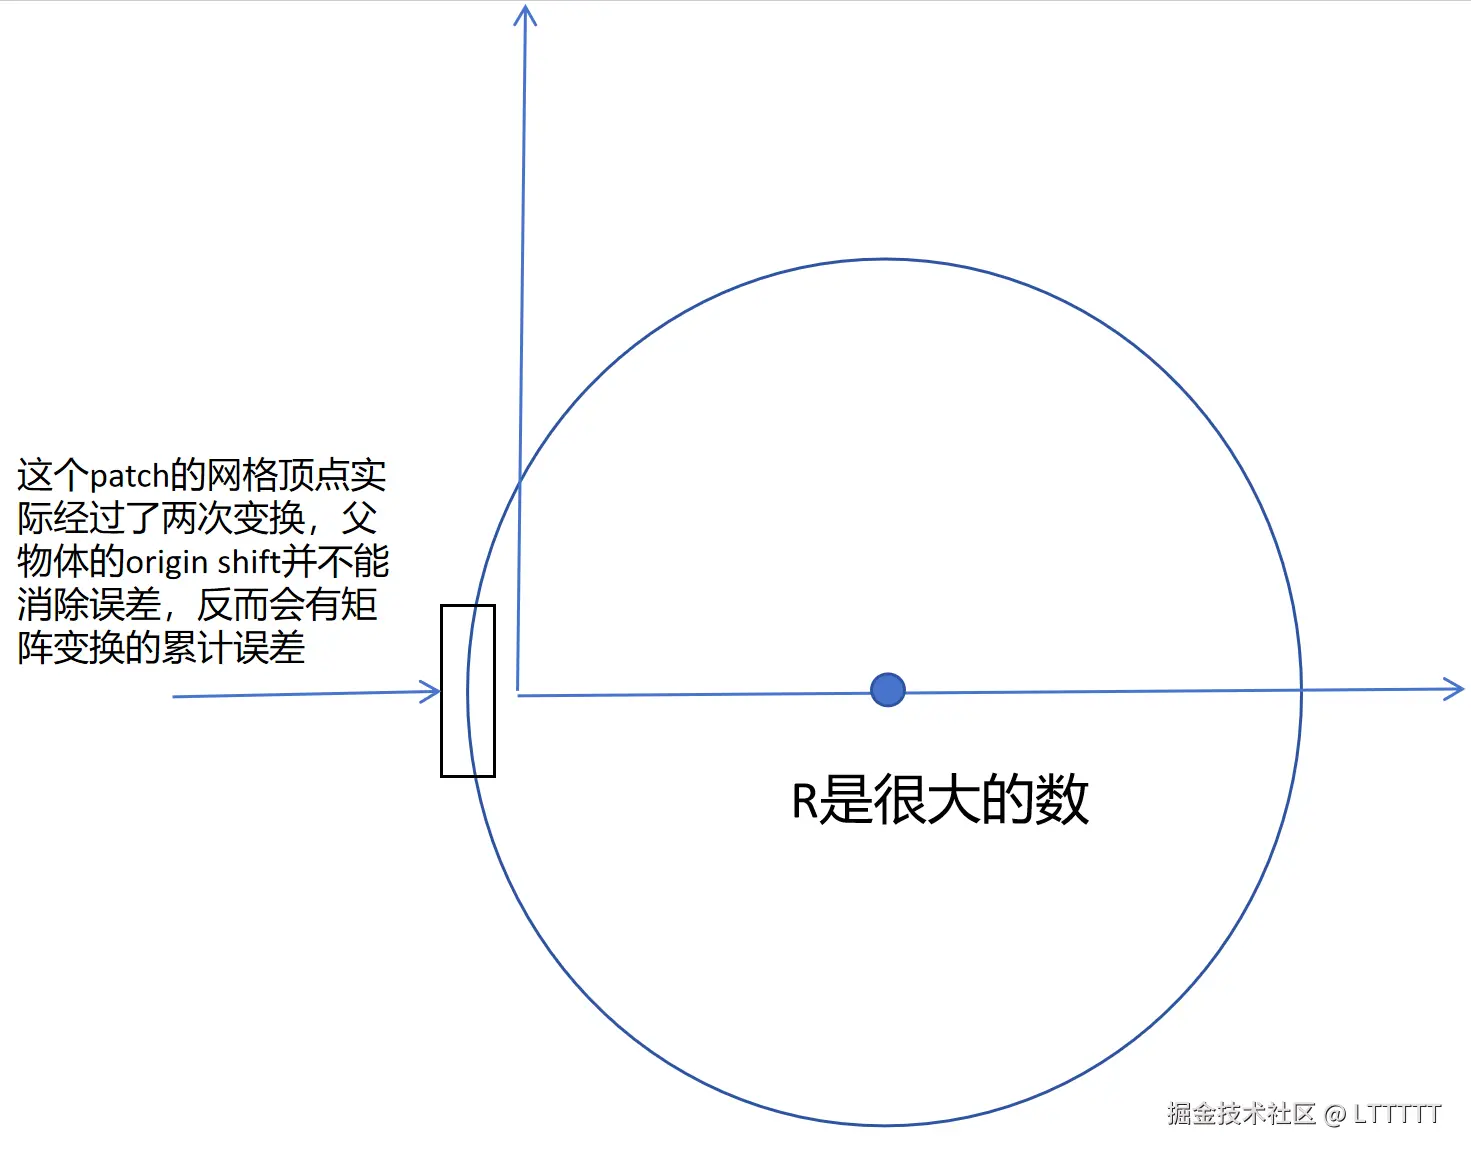
如果想要让星球达到更大的尺度,就必须在使用柏林噪声预计算噪声的时候就改用double,在运行时,使用double计算偏移,让patch网格的pivot移到离玩家更近的位置,类似下图所示,把星球分为一个个块,玩家跨过不同的块时,移动整个星球使得那个块移动到原点附近。
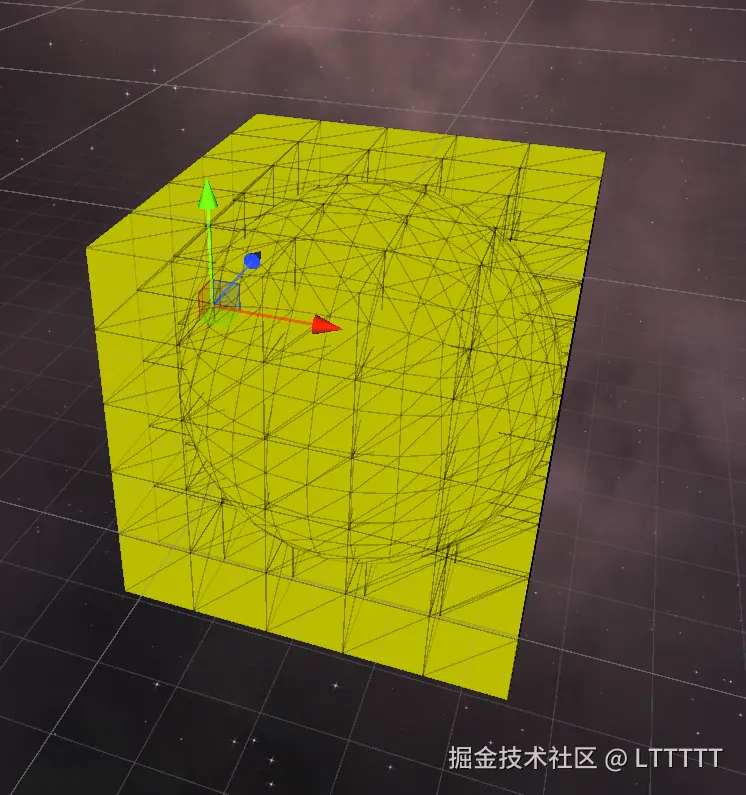 具体做法,就是要在运行时根据玩家的当前位置根据一定策略随时修改shader用于读取顶点位置的StructuredBuffer,使得玩家附近的patch的网格顶点保持在原点附近,相当于是要在一个星球的范围内使用原点偏移。原本我的设想是只需要在玩家离开星球的时候才需要进行原点偏移,但是做到后面才发现了这个问题。不过要改起来也相对容易。
完整代码
IcoSphereTerrainLODSystem: 实现了基于20面体球面网格的三角形四叉树细分星球LOD地形系统。
参考:
GPU驱动的四叉树地形以及参考了这个文章的代码
地形的噪声生成、海洋和大气层渲染参考了这个仓库的代码