本章涵盖以下内容:
- 使用 LangChain 实现 RAG
- 跨多份文档进行 Q&A
- 使用 LangSmith 跟踪 RAG 链的执行过程
- 使用 LangChain 专用 Q&A 功能的替代实现方式
既然你现在已经理解了检索增强生成(Retrieval-Augmented Generation,RAG) 这一设计模式,那么使用 LangChain 构建一个基于 RAG 的聊天机器人就会显得容易得多。在本章中,我会一步步带你学习如何使用 LangChain 的对象模型(object model) 来管理与源文档、向量存储以及 LLM 之间的交互。
我们还会探索如何使用 LangSmith 的 tracing 工具 来监控并排查聊天机器人工作流中的问题。除此之外,我也会演示几种替代实现方式,它们会用到 LangChain 中专门面向 Q&A 的类和函数。
到本章结束时,你将具备构建一个支持搜索、并能够无缝连接到私有数据源的聊天机器人的能力。不过,在真正进入实现之前,我们先花一点时间回顾一下:支撑 Q&A 聊天人应用场景的一些关键 LangChain 类到底是什么。
7.1 用于 Q&A 聊天机器人的 LangChain 对象模型
正如前面讨论过的那样,LangChain 对于基于 LLM 的应用来说,最大的优势之一,就是它能够在诸如数据加载器(data loaders) 、向量存储(vector stores) 和 LLM 等组件之间编排通信。你不需要直接和每一个底层 API 一一对接,而是通过 LangChain 提供的抽象层来完成,这使你能够在不破坏应用整体设计的前提下,把任意一个组件替换成其他提供商的实现。
除了抽象能力之外,LangChain 还为许多 LLM 开发中的常见任务提供了开箱即用的实现,例如切分源文本、从向量存储中检索相关上下文、生成提示、管理上下文窗口等等。
在 LangChain 的众多应用场景中,Q&A(问答) 是最基础也最核心的一个。Q&A 应用的工作流可以拆分为以下两个主要阶段,接下来我们会逐一讨论这两个阶段以及它们所涉及的组件:
- 内容摄取阶段(Content ingestion,也就是索引阶段 indexing)
- 问答阶段(Question-answering,Q&A;也就是检索与生成阶段 retrieval and generation)
7.1.1 内容摄取(索引)阶段
图 7.1 概括了 Q&A 用例在内容摄取阶段所对应的对象模型。图中涉及的组件如下:
Document ------ 对文本内容及其相关元数据进行建模。
BaseLoader ------ 从外部来源加载文本,并把它们导入到 Document 模型中。
TextSplitter ------ 把文档切分成更小的块,以便高效处理。因此,TextSplitter 的签名可以理解为:
Document -> list[Document]
VectorStore ------ 存储文本块及其对应的 embeddings,以便后续高效检索。
Embeddings ------ 将文本转换成 embeddings(也就是向量表示)。
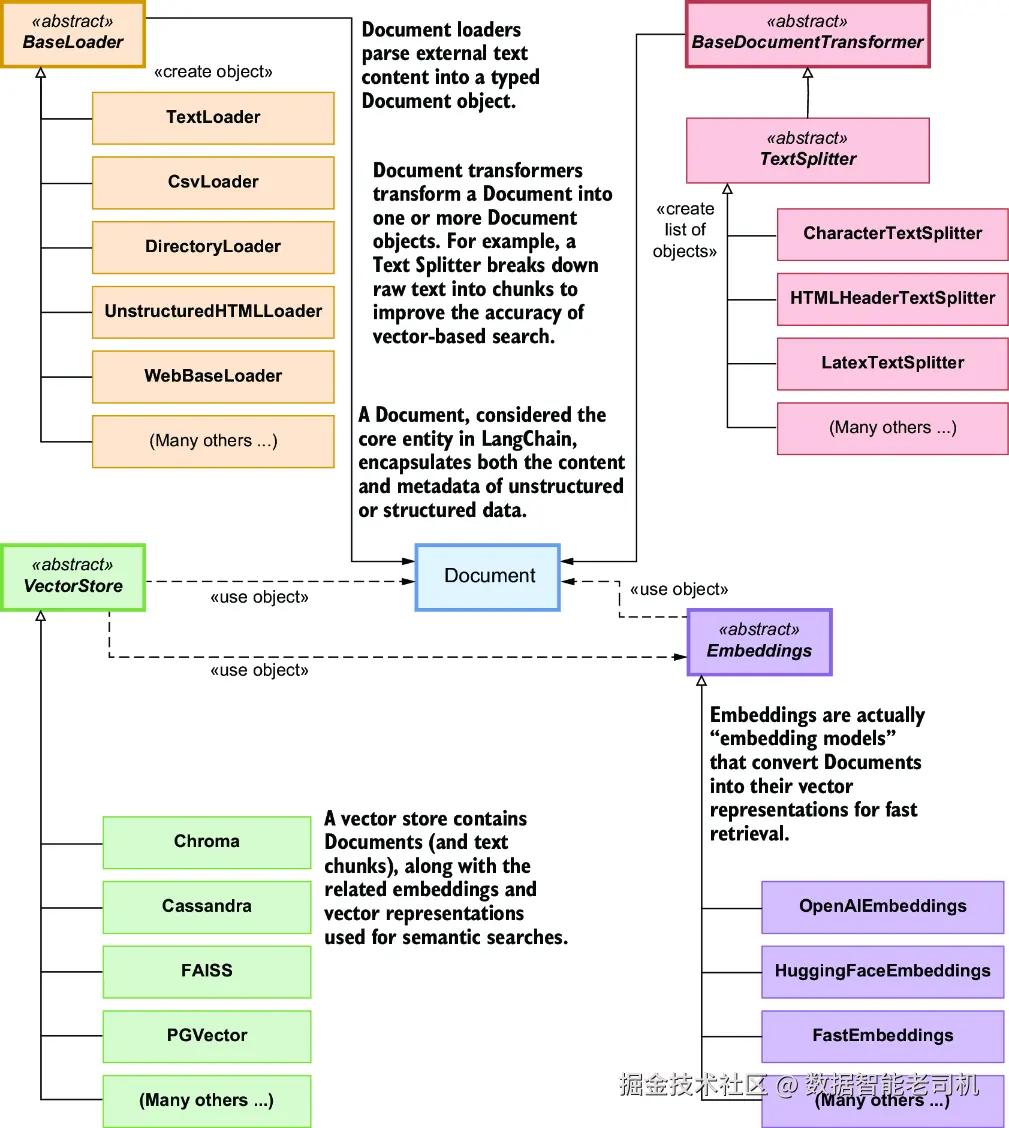
图 7.1 与内容摄取阶段相关联的对象模型
这是 LangChain 各个类族如何关联的一种静态视图。如果你想看动态过程,可以看图 7.2 的时序图,它展示了一个典型的内容摄取流程。
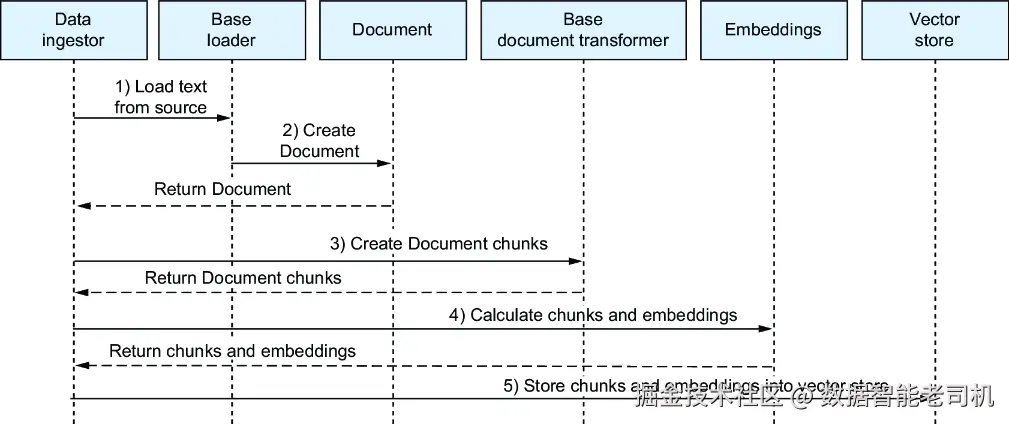
图 7.2 内容摄取时序图
下面是一个示例,展示 LangChain 中的各个类在内容摄取过程中是如何协作的:
- 数据摄取编排器(data ingestion orchestrator)初始化一个具体的 Loader ,用于从外部来源导入文本,例如针对 CSV 文件的
CsvLoader。 - Loader 解析文本,并将其转换成
Document对象。 - Document 被传递给一个
DocumentTransformer,通常这个 transformer 就是TextSplitter,它会把文档切分成更小的块。 - 这些文本块随后会被送入一个
Embeddings模型,以生成 embeddings。 - 文本块和对应的 embeddings 一起被发送到
VectorStore中存储。
注意 有些向量存储在实例化客户端时,如果你指定了 embedding 模型,它就可以自动计算 embeddings。在这种情况下,你不需要在把文本块加入存储之前先预计算 embeddings------第 4 步和第 5 步可以合并成一个操作。
7.1.2 Q&A(检索与生成)阶段
图 7.3 概括了 Q&A 用例在检索与生成阶段对应的对象模型。图中包含以下组件:
VectorStore ------ 存储并检索相关的文本块。
Retriever ------ 根据查询 embedding 与存储文本 embedding 之间的相似度,从向量存储中检索相关文本块。
Embeddings(embedding 模型) ------ 确保查询和文档使用一致的 embedding 表示。
Prompt / PromptTemplate ------ 构造传给语言模型的输入,通常由用户问题和检索到的文本块上下文共同组成。
LanguageModel ------ 基于给定上下文和查询生成答案。
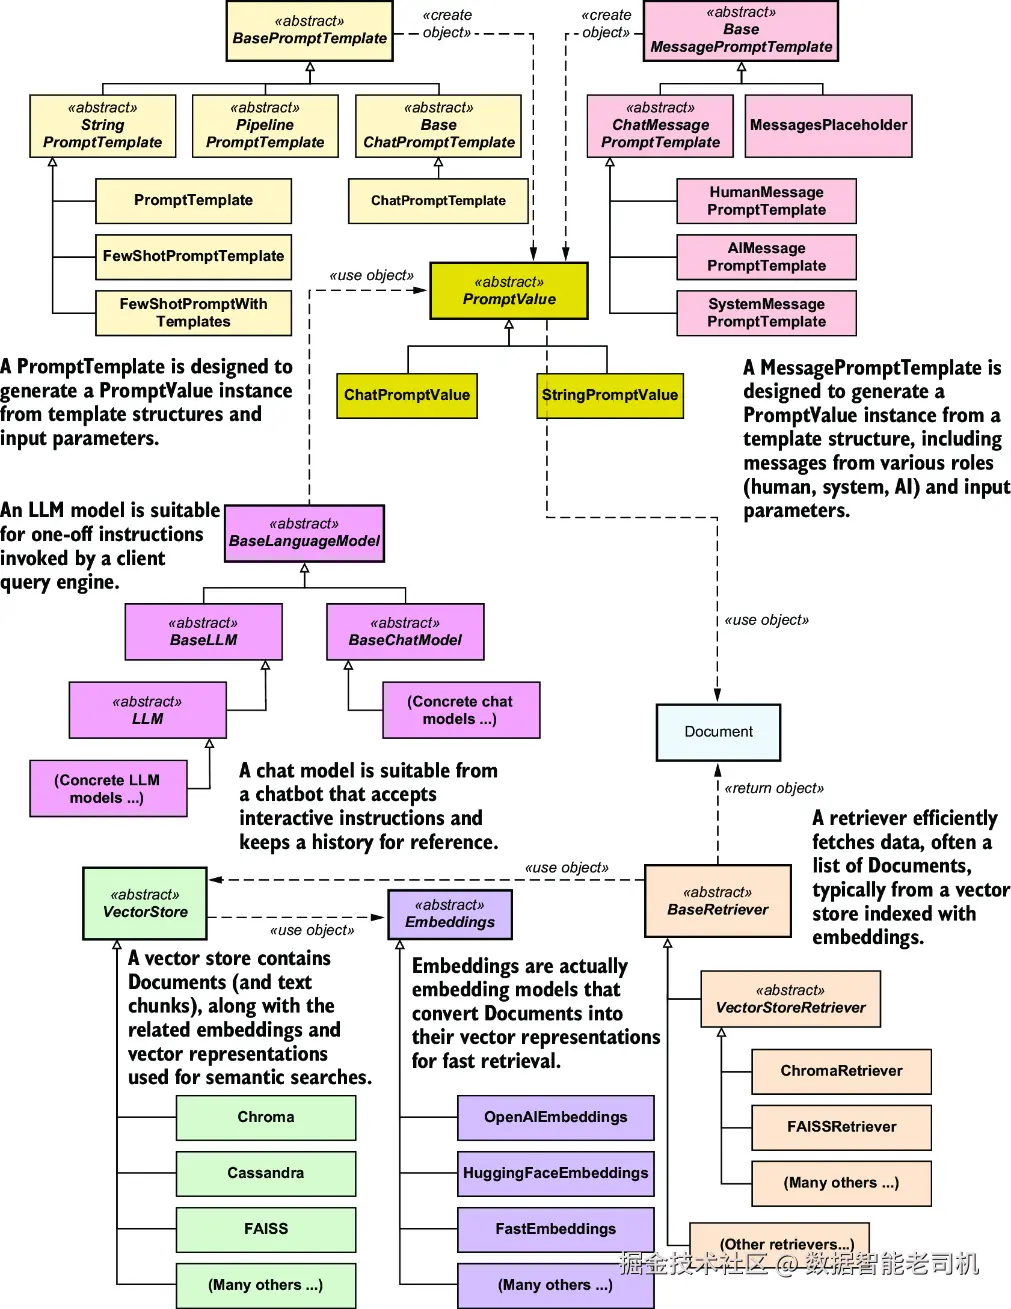
图 7.3 与检索和生成阶段相关联的对象模型
如果想从动态角度理解 Q&A 工作流,可以查看图 7.4 的时序图。LangChain 中的各个类在 Q&A 过程中是这样协作的:
- Q&A 编排器把用户问题发送给向量存储对应的
Retriever。 - Retriever 使用一个
Embeddings模型,把问题转换为 embedding。 - Retriever 在向量存储中搜索具有相似 embeddings 的文档,并将它们返回给 Q&A 编排器。
- Q&A 编排器使用
PromptTemplate,把检索得到的文档和用户问题合并成一个提示。 - 编排器把这个提示发送给
LanguageModel,后者返回答案。
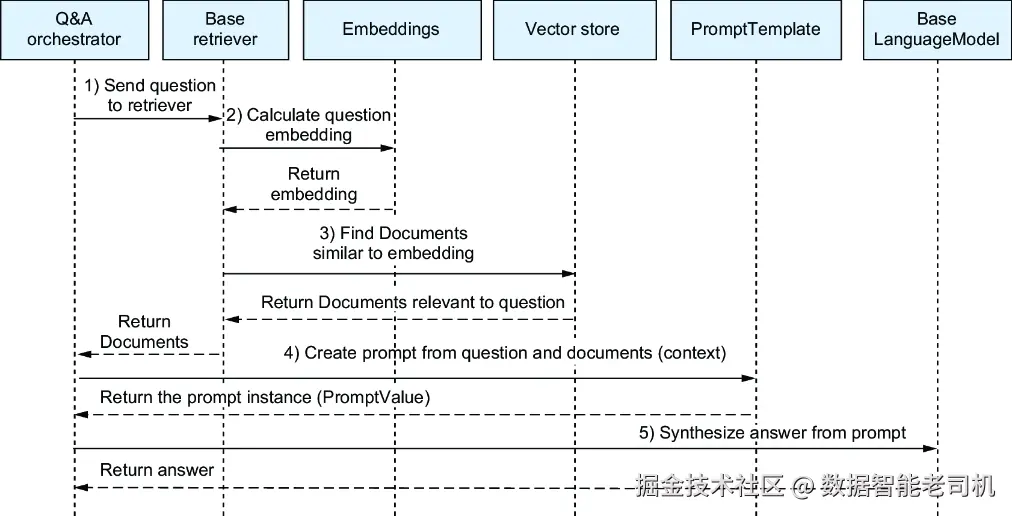
图 7.4 Q&A 时序图
既然你现在已经理解了 Q&A 的对象模型,那我们就开始真正实现它吧!第一步,是把你的文档存储起来,接下来就来做这件事。
7.2 向量存储中的内容摄取
在查询你的文档之前,你必须先把它们存储进一个向量数据库。为了让这个过程更有意思一些,我们这次不会像之前那样只用 Britannica 上那篇很短的 Paestum 文章,而是会从多个来源、不同格式中导入关于 Paestum 的内容。
首先,安装用于加载文档、切分文档以及生成 embeddings 的必要依赖。打开一个新的操作系统终端,进入本章对应文件夹,创建并激活第 7 章使用的虚拟环境,然后安装依赖包:
makefile
C:\Github\building-llm-applications\ch07>python -m venv env_ch07
C:\Github\building-llm-applications\ch07>.\env_ch07\Scripts\activate

(env_ch07) C:\Github\building-llm-applications\ch07>
↪pip install -r requirements.txt
安装完成之后,像往常一样启动 Jupyter Notebook:
scss
(env_ch07) C:\Github\building-llm-applications\ch07>jupyter notebook通过 File > New > Notebook 创建一个新的 notebook,给它命名(例如 ch07-QA_across_documents),然后保存。接着,在 notebook 中导入所需库:
javascript
from langchain_community.document_loaders
↪import WikipediaLoader, Docx2txtLoader,
↪PyPDFLoader, TextLoader

from langchain_chroma import Chroma
from langchain_text_splitters import RecursiveCharacterTextSplitter
from langchain_openai import OpenAIEmbeddings
最后,像往常一样获取 OpenAI API key:
ini
import getpass
OPENAI_API_KEY = getpass.getpass('Enter your OPENAI_API_KEY')
7.2.1 切分并存储文档
你可以让这些内容变得更"可搜索"。按照下面这些步骤来做:
- 把每个文档切分成大约 500 个字符的块。你也可以设置重叠(overlap),通常是 10% 左右,不过这里我们先把 overlap 设为 0。关于块大小和 overlap 的进一步讨论,会在第 8 章"高级索引技术"中展开。
- 计算这些文档块的 embeddings,并把它们存入 Chroma 向量数据库中。
先实例化 splitter、embedding 模型以及向量数据库客户端:
ini
text_splitter = RecursiveCharacterTextSplitter(
    chunk_size=500, chunk_overlap=0)
embeddings_model = OpenAIEmbeddings(
    openai_api_key=OPENAI_API_KEY)
vector_db = Chroma("tourist_info", embeddings_model)
现在,处理每一份文档:加载文档、把它切成块,再把这些块及其对应的 embeddings 一起存进向量数据库:
ini
wikipedia_loader = WikipediaLoader(query="Paestum")
wikipedia_chunks = text_splitter.split_documents(
    wikipedia_loader.load())
vector_db.add_documents(wikipedia_chunks)
当内容被切分并存储到向量数据库之后,你会看到类似如下的输出:
css
['d3197373-7df1-4c24-8a0a-0145c176042c', '435add06-6b85-421a-8ad8-be88b7defe08', '7fbd7575-5f56-4fed-9642-34f587325699', '6a798aca-9dcb-433c-b0d3-196acfd83b0e',... ]注意 WikipediaLoader 不仅会加载所请求的条目本身,还会加载该条目中引用到的其他 Wikipedia 超链接内容。例如,Paestum 条目中会引用 National Archaeological Museum of Paestum 、Lucania 、Lucanians ,以及 Hera 和 Athena 的神庙。因此,它加载到的相关内容会比你预期的更多。
对于其他文档格式(这里先不要运行,我稍后会对这段代码做改进),我们将使用如下写法:
ini
word_loader = Docx2txtLoader("Paestum/Paestum-Britannica.docx")
word_chunks = text_splitter.split_documents(
    word_loader.load())
vector_db.add_documents(word_chunks)

pdf_loader = PyPDFLoader("Paestum/PaestumRevisited.pdf")
pdf_chunks = text_splitter.split_documents(
    pdf_loader.load())
vector_db.add_documents(pdf_chunks)

txt_loader = TextLoader("Paestum/Paestum-Encyclopedia.txt")
txt_chunks = text_splitter.split_documents(
    txt_loader.load())
vector_db.add_documents(txt_chunks)
注意 如果你愿意,也可以处理完整版的 PaestumRevisited-StockholmsUniversitet.pdf,而不是这里的短版 PaestumRevisited.pdf。这样会花更长时间,但它能够支持回答更广范围的问题。
7.2.2 去除重复代码
你可能已经注意到了,上面的代码有很多重复。我们可以把一些公共逻辑提取成一个函数:
scss
def split_and_import(loader):
     chunks = text_splitter.split_documents(loader.load())
     vector_db.add_documents(chunks)
     print(f"Ingested chunks created by {loader}")
现在,在实例化每个 loader 之后,你就可以像下一个代码清单那样调用这个函数。
代码清单 7.1 重构后的多种文件类型摄取代码
scss
wikipedia_loader = WikipediaLoader(query="Paestum")
split_and_import(wikipedia_loader)

word_loader = Docx2txtLoader("Paestum/Paestum-Britannica.docx")
split_and_import(word_loader)

pdf_loader = PyPDFLoader("Paestum/PaestumRevisited.pdf")
split_and_import(pdf_loader)

txt_loader = TextLoader("Paestum/Paestum-Encyclopedia.txt")
split_and_import(txt_loader)
运行之后,你会看到类似这样的输出:
csharp
Ingested chunks created by <langchain_community.document_loaders .wikipedia.WikipediaLoader object at 0x000001EABD096510>
Ingested chunks created by [... SHORTENED]
7.2.3 从一个文件夹中摄取多份文档
前面我已经向你展示了:如何针对不同类型的文档(网页、DOCX、PDF、TXT),分别使用专用的 document loader 来完成摄取。这种方式对于少量文档来说完全没问题,但如果你需要加载很多文档,就需要一种更高效的方法。把所有文档放到一个文件夹中(例如 /CilentoTouristInfo)之后,你可以通过以下几种方式来处理,我们接下来会分别看看:
- 遍历文件夹中的文件,并调用相应的 loader
- 使用专门设计的
DirectoryLoader
遍历文件夹中的所有文件
你可以通过遍历一个文件夹中的所有文件、识别文件类型,再调用相应 loader 的方式,把这些文件全部摄取到向量存储中。在真正开始遍历之前,我们先创建一个 loader factory,如下所示。
代码清单 7.2 Loader 工厂:实例化正确的 loader
python
loader_classes = {
    'docx': WordLoader,
    'pdf': PdfLoader,
    'txt': TxtLoader
}

import os

def get_loader(filename):
    _, file_extension = os.path.splitext(filename)  #1
    file_extension = file_extension.lstrip('.')  #2

    loader_class = loader_classes.get(
        file_extension)  #3

    if loader_class:
        return loader_class(filename) #4
    else:
        raise ValueError(f"No loader available for file
        ↪extension '{file_extension}'")
#1 Extracts the file extension
#2 Removes the leading dot from the extension
#3 Gets the loader class from the dictionary
#4 Instantiates and returns the correct loader
练习
请遍历 /CilentoTouristInfo 文件夹中的文件,并结合 get_loader() 与 split_and_import() 把它们加载进向量存储。如果你拿不准写法,可以去看我 GitHub 上的 Python notebook ch07-QA_across_documents.ipynb,其中有一节叫 "Ingesting Multiple Documents from a Folder" 。
使用 DIRECTORYLOADER 摄取所有文件
另一种把一个文件夹中所有文件加载到向量存储的方法,是使用 DirectoryLoader。这个 loader 来自第三方包 Unstructured(这是一个提供用于 RAG 和 fine-tuning 的非结构化文档摄取与处理平台及工具的公司)。它接收一个文件夹路径和一个 glob 模式(也就是包含通配符的字符串,用来匹配一组文件名)。
首先,你需要安装 unstructured 包,或者它的 langchain-unstructured 封装以及相关依赖。请根据你的操作系统,参考 LangChain 文档(https://python.langchain.com/,进入 Integrations > Providers table > Unstructured )或者 Unstructured 官方文档(https://docs.unstructured.io/)中的安装说明。
在你的 Jupyter Notebook 中,导入 DirectoryLoader:
javascript
from langchain_community.document_loaders import DirectoryLoader现在你就可以用下面的代码把整个文件夹中的文件加载并摄取到向量存储中:
ini
folder_path = "CilentoTouristInfo"
pattern = "**/*.{docx,pdf,txt}"   #1

directory_loader = DirectoryLoader(folder_path,
↪pattern)   #2
split_and_import(directory_loader)
#1 Pattern to match .docx, .pdf, and .txt files
#2 Initializes the DirectoryLoader with the folder path and pattern
请注意,虽然上面的代码已经包含在 GitHub 仓库里,但它能否顺利执行,取决于你是否成功安装了 unstructured 或 langchain-unstructured 包。由于不同操作系统下的安装方式可能不同,这段代码并不一定能在所有环境中稳定运行。我已经在代码中加入了注释,专门说明这一点。
7.3 跨已存储文档进行 Q&A
既然你现在已经把关于 Paestum 的全部内容存好了,那我们就来看看如何使用向量存储,在多份文档之间检索信息。这一步非常重要,因为它能够验证你的摄取与分块策略是否真的按预期工作------更具体地说,就是系统是否能够在用户提出一个横跨多个来源的问题时,真正找出最相关的文本片段。
7.3.1 直接查询向量存储
我们先直接查询向量存储,看看当问题涉及多个来源的信息时,系统会检索出哪些文档:
ini
query = "Where was Poseidonia and who renamed it to Paestum?"
results = vector_db.similarity_search(query, 4)   #1
print(results)
#1 Retrieves the four closest results
下面是返回结果的一段节选。你可以从元数据中验证:向量存储返回的最相关文本块确实来自不同来源:
javascript
[Document(metadata={'source': 'Paestum/Paestum-Britannica.docx'}, page_content='Paestum, Greek\xa0Poseidonia, ancient city in southern\xa0Italy\xa0near the west coast, 22 miles (35 km) [SHORTENED..]'), Document(metadata={'source': 'Paestum/Paestum-Britannica.docx'}, page_content='Paestum, Greek\xa0Poseidonia, ancient city in southern\xa0Italy\xa0near the west coast, 22 miles (35 km) southeast of modern\xa0Salerno\xa0and 5 [SHORTENED..]), Document(metadata={'source': 'https://en.wikipedia.org/wiki/Paestum', 'summary': 'Paestum ( PEST-əm, US also  PEE-stəm ) was a major ancient Greek city on the coast of the Tyrrhenian Sea, in Magna Graecia. The ruins of Paestum are famous for
their three ancient Greek temples in the Doric order dating from about
550 to 450 BC that are in an excellent state of preservation. [SHORTENED..]'), Document(metadata={'source': 'Paestum/Paestum-Britannica.docx'}, page_content='Poseidonia was probably founded about 600\xa0BC\xa0by Greek colonists from\xa0Sybaris, along the\xa0Gulf of Taranto, and it had become a flourishing town by 540, judging from its temples. [SHORTENED..]')]虽然你现在已经知道向量存储会为你的查询返回哪些文档了,但下一步是得到一个表达完整、措辞自然的答案。这个答案将通过 LangChain 链来生成。
7.3.2 通过 LangChain 链提问
和你在第 5 章中直接使用 OpenAI GPT-5-nano 实现 RAG 时不同,使用 LangChain 时,你不再需要手动构造提示,也不需要自己把原始问题和向量存储中的上下文拼接起来。你可以直接搭建一条 RAG 链(RAG chain) ,它会自动实例化并执行一个 prompt template,如图 7.5 所示。
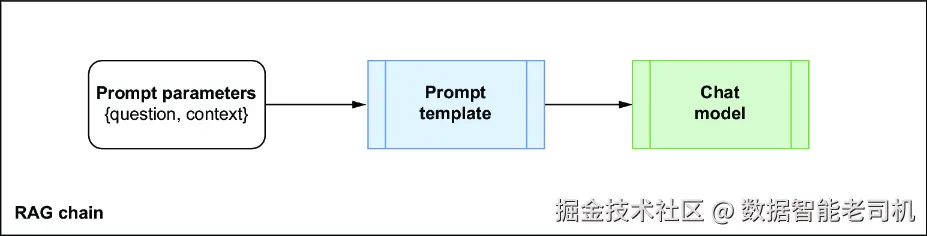
图 7.5 LangChain RAG 链会把 prompt 参数打包进一个 prompt 实例中,然后将其发送给 chat model 或 LLM model
我们先用一个来自 LangChain Hub(https://smith.langchain.com/hub)的模板来设置 prompt。为了便于讲解,我这里没有直接调用 hub,而是把这个 prompt 的内容显式地复制出来:
ini
from langchain_core.prompts import PromptTemplate

rag_prompt_template = """Use the following pieces of context
to answer the question at the end.
If you don't know the answer, just say that you don't know,
don't try to make up an answer.
Use three sentences maximum and keep the
answer as concise as possible.
{context}
Question: {question}
Helpful Answer:"""

rag_prompt = PromptTemplate.from_template(rag_prompt_template)
或者,你也可以直接从 LangChain Hub 拉取这个 prompt 实例:
ini
from langchain import hub
rag_prompt = hub.pull("rlm/rag-prompt")
7.3.3 完成 RAG 链的搭建
为了完成这条 RAG 链的搭建,我们还需要几个额外组件,如图 7.6 所示:
Retriever ------ 这个组件会从向量存储中检索相关文本内容,并把它注入到 prompt 的 context 参数中。
Question feeder ------ 这是一个简单的"直通(pass-through)"组件,通过 Runnable 接口(LangChain 中所有组件都基于这个抽象类)把用户问题直接传进去。
Chat model ------ 这个组件负责处理 prompt,并生成答案。
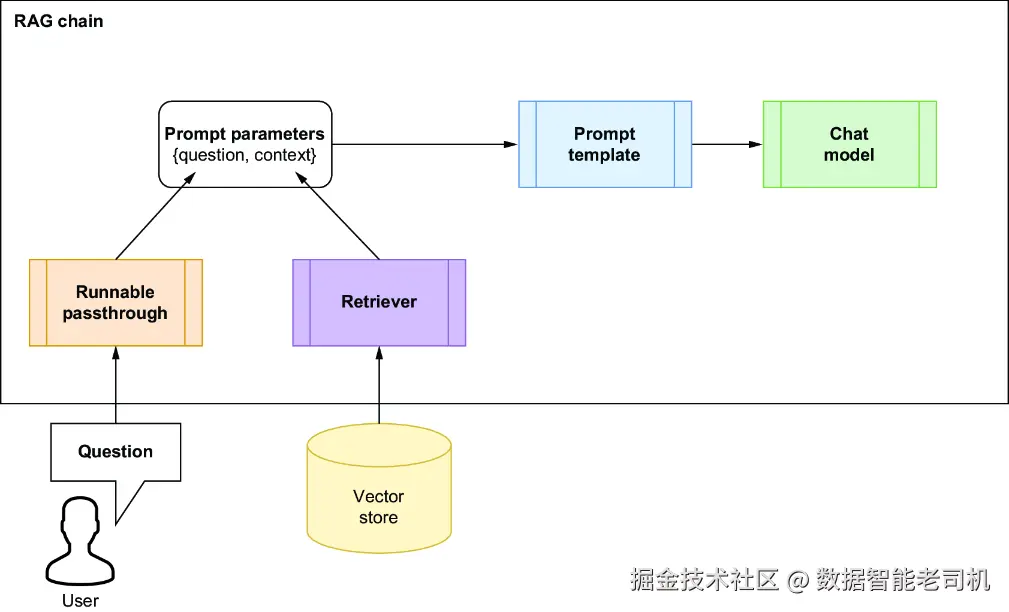
图 7.6 修正后的 RAG 链,包含 runnable pass-through 和 retriever
先实例化 retriever、question feeder 和 chat model:
ini
retriever = vector_db.as_retriever()

from langchain_core.runnables import RunnablePassthrough
question_feeder = RunnablePassthrough()

from langchain_openai import ChatOpenAI

chatbot = ChatOpenAI(openai_api_key=OPENAI_API_KEY,
                     model_name="gpt-5-nano")
现在设置这条 RAG 链。正如前面提到过的,LangChain 链中的每个模块都实现了 Runnable 接口,并且接受一个字典作为输入。这就是为什么链的第一个模块是一个字典:
ini
rag_chain = {"context": retriever,
             "question": question_feeder}|rag_prompt|chatbot
再创建一个工具函数,用来执行这条链:
arduino
def execute_chain(chain, question):
    answer = chain.invoke(question)
    return answer
现在提一个问题:
ini
question = """Where was Poseidonia and who renamed
it to Paestum. Also tell me the source."""
answer = execute_chain(rag_chain, question)
print(answer.content)
你得到的答案应该类似这样:
diff
- Poseidonia was a Greek settlement on the Tyrrhenian coast of southern
  Italy, at the Gulf of Taranto (Magna Graecia).
- It was renamed Paestum by the Romans after they took control (273 BCE).
- Source: Britannica, Paestum entry (Paestum-Britannica.docx).
如有需要,你还可以查看完整的 answer 对象:
scss
print(answer)你应该会看到类似如下内容:
python
content='- Poseidonia was a Greek settlement on the Tyrrhenian coast of southern Italy, at the Gulf of Taranto (Magna Graecia).\n- It was renamed Paestum by the Romans after they took control (273 BCE).\n- Source: Britannica, Paestum entry (Paestum-Britannica.docx).' additional_kwargs={'refusal': None} response_metadata={'token_usage': {'completion_tokens': 1999, 'prompt_tokens': 1889, 'total_tokens': 3888, 'completion_tokens_details': {'accepted_prediction_tokens': 0, 'audio_tokens': 0, 'reasoning_tokens': 1920, 'rejected_prediction_tokens': 0}, 'prompt_tokens_details': {'audio_tokens': 0, 'cached_tokens': 0}}, 'model_name': 'gpt-5-nano-2025-08-07', 'system_fingerprint': None, 'id': 'chatcmpl-CGCV6EBbH29VRQ0siMkomrR0brmPt', 'service_tier': 'default', 'finish_reason': 'stop', 'logprobs': None} id='run--78fad7ef-2b09-4b87-b206-f1b5e94216e8-0' usage_metadata={'input_tokens': 1889, 'output_tokens': 1999, 'total_tokens': 3888, 'input_token_details': {'audio': 0, 'cache_read': 0}, 'output_token_details': {'audio': 0, 'reasoning': 1920}}7.3.4 追问问题
我们来看看这个聊天机器人是否能够维持对话,通过提出一个追问来测试它。我会故意把问题说得很模糊,看看它能不能理解我想问的是什么:
ini
question = """And then, what they do?
Tell me only if you know.
Also tell me the source"""
answer = execute_chain(rag_chain, question)
print(answer.content)
聊天机器人返回了如下内容:
vbnet
Sirens are female humanlike beings with alluring voices, who appear in the Odyssey in a scene where Odysseus saves his crew's lives. Source: Siren (mythology), Wikipedia.看起来,这个聊天机器人有点"迷路"了------它没有理解这里的 "they" 指的是 Romans 。这是因为它没有记忆 前面的问答内容。当前这个机器人是无状态的(stateless) :它只是把用户问题转发给 LLM,再把答案返回给用户,并不会保留任何对话流程中的记忆。接下来我们就来看看,如何修复这个问题。
7.4 聊天机器人对消息历史的记忆
与基于 LLM 的引擎相比,基于 LLM 的聊天机器人最有用的特性之一,就是它能够记住先前的问题和回答,从而让你持续追问,直到拿到满意的答案。这种能力对于给每个新提示补充上下文至关重要。下面我们就来看看,如何把消息历史(message history) 整合到上一节刚完成的 RAG 方案中。为了便于说明,我先把那段初始 RAG 设置摘录如下。
代码清单 7.3 在加入消息历史之前的初始 RAG 设置
ini
from langchain_core.runnables import RunnablePassthrough
from langchain_core.prompts import PromptTemplate
from langchain_openai import ChatOpenAI

rag_prompt_template = """Use the following pieces of context
to answer the question at the end.
If you don't know the answer, just say that you don't know,
don't try to make up an answer.
Use three sentences maximum and keep the
answer as concise as possible.
{context}
Question: {question}
Helpful Answer:"""

rag_prompt = PromptTemplate.from_template(rag_prompt_template)

retriever = vector_db.as_retriever()

question_feeder = RunnablePassthrough()

chatbot = ChatOpenAI(openai_api_key=OPENAI_API_KEY,
                     model_name="gpt-5-nano")

rag_chain = {"context": retriever,
             "question": question_feeder}|rag_prompt|chatbot

def execute_chain(chain, question):
    answer = rag_chain.invoke(question)
    return answer
首先,我们需要修改 prompt,让它能够包含消息历史。接下来就做这件事。
7.4.1 修改 prompt
原始的 RAG prompt 没有考虑消息历史,所以我们必须对它进行修改。由于消息历史是一个"带记忆的 RAG 设计"的核心特性,因此我们不应该再继续使用 PromptTemplate.from_template 这种 prompt helper。原来的 helper 基于一个模板,它只对用户问题({question})以及由 retriever 从向量存储中拉取出来的上下文({context})进行参数化。而 LangChain 提供了一个更适合此处的 prompt helper------ChatPromptTemplate.from_messages,它可以根据一组聊天消息来创建 prompt。
聊天消息
大多数面向聊天的 LLM 都使用一种标准格式来表示消息和消息角色(role)。一个 chat message 通常是这样一个键值对:
arduino
("role", "message text")其中:
"role"可以是"system"、"human"或"ai"(表 7.1 中会有详细说明)。"message text"则表示这条消息的文本内容。
表 7.1 聊天消息角色
| Role | Description | Sample message |
|---|---|---|
"system" |
这个角色代表聊天机器人应用本身。通常你会在启动时创建一条 system message,用来定义机器人的 persona。 | You are a world-class expert in Roman and Greek history, especially in towns located in southern Italy. Provide interesting insights on local history and recommend places to visit with knowledgeable and engaging answers. |
"human" |
这条消息来自用户,通常是一条问题。 | Can you please recommend some attractions around Paestum and give me some information on them? |
"ai" |
这是 LLM 综合生成的回应。 | The best attractions in Paestum are the three Greek temples built around 500 BC. |
| 自定义 | 你也可以使用其他非标准角色,把包含有用信息的消息纳入提示。例如 "Context" 用于表示从向量存储中检索到的文本,或者 "Chat History" 用于整段聊天历史。 |
-- |
一个聊天历史(chat history)就是这类消息组成的列表:
ini
chat_history = [
    ("system", """You are a world-class expert in Roman and
    Greek history, especially in towns located in southern Italy.
    Provide interesting insights on local history and recommend
    places to visit with knowledgeable and engaging answers."""),
    ("human", """Can you please recommend some attractions
    around Paestum and give me some information on them?"""),
    ("context", """Paestum was a major ancient Greek city on the
    coast of the Tyrrhenian Sea, in Magna Graecia. The ruins of
    Paestum are famous for their three ancient Greek temples in
    the Doric order dating ... [SHORTENED]"""),
    ("ai", """The best attractions in Paestum are the three Greek
    temples built around 500 BC""")
]
基于聊天的 prompt
既然你现在已经理解了如何建模聊天消息,那么就可以创建一个基于消息的 prompt:
python
from langchain_core.prompts import ChatPromptTemplate
rag_prompt = ChatPromptTemplate.from_messages(
    [
        ("system", """You are a helpful assistant, world-class
        expert in Roman and Greek history, especially in towns
        located in southern Italy. Provide interesting insights
        on local history and recommend places to visit with
        knowledgeable and engaging answers. Answer all questions
        to the best of your ability, but only use what has been
        provided in the context. If you don't know, just say you
        don't know. Use three sentences maximum and keep
        the answer as concise as possible."""),
        ("placeholder", "{chat_history_messages}"),
        ("assistant", "{retrieved_context}"),
        ("human", "{question}"),
    ]
)
在与用户的每次交互中,你都会重新实例化这个 prompt。更具体地说,在第一次交互之后(此时 chat_history 还是空的),你会把新的 {question}、新检索到的 {retrieved_context},以及不断累积的 {chat_history_memory} 一起传进去。你已经知道如何传入一个新问题和一个新检索到的上下文------这部分和之前是一样的,只是现在 prompt 变成了基于消息的形式。下一节,我会展示如何在每次用户交互之后更新消息历史。
7.4.2 更新聊天消息历史
LangChain 提供了 ChatMessageHistory 类,用于建模聊天消息历史。我们可以把 chat_history_memory 变量实例化为一个 ChatMessageHistory 对象,用来保存整段聊天历史:
ini
from langchain_community.chat_message_histories import ChatMessageHistory
chat_history_memory = ChatMessageHistory()
你可以使用 ChatMessageHistory 提供的便利方法,向聊天历史中添加 "human"(用户问题)和 "ai"(LLM 回答)类型的消息,如表 7.2 所示。
表 7.2 ChatMessageHistory 针对标准角色提供的便利方法
| Role | Convenience method |
|---|---|
| Human | add_user_message(user_question) |
| AI | add_ai_message(llm_response) |
你不需要 把 "system" 和 "chat_history" 角色对应的消息也加进聊天历史中,因为它们已经属于 prompt 本身的一部分,再额外加入并不会给 LLM 提供更多信息。真正需要被追踪的,只有那些代表用户问题和 LLM 回应的消息。
在 execute_chain() 函数中,按照下面的方式更新聊天历史:
scss
def execute_chain_with_memory(chain, question):
    chat_history_memory.add_user_message(question)
    answer = chain.invoke(question)
    chat_history_memory.add_ai_message(answer)
    print(f'Full chat message history: {chat_history_memory.messages}\n\n')
    return answer
当 chat_history_memory 对象被最新的 Human 或 AI 消息更新之后,你就可以通过 ChatMessageHistory 类的 messages 属性,取回完整的消息历史:
ini
full_message_history = chat_history_memory.messages之后,每当用户提出一个新问题时,你都会把这整段消息历史再次注入到 prompt 中。
7.4.3 将聊天历史传入 RAG 链
当你已经修改代码,使 prompt 能够包含消息历史,并且在每次用户提问与 LLM 回答之后更新这段历史后,下一步就是要把更新后的消息历史真正传给 RAG 链。你可以通过 LangChain Expression Language(LCEL)重新定义这条链:
makefile
rag_chain = {
    "retrieved_context": retriever,
    "question": question_feeder,
    "chat_history_messages": chat_history_memory.messages
} | rag_prompt | chatbot
在这个设置中,prompt 参数 chat_history_messages 会通过对应的 chat_history_messages 属性被送进去。
7.4.4 把所有内容整合起来
为了让"把聊天机器人记忆整合进 RAG 链"这一过程中的改动更清晰,完整代码列在代码清单 7.4 中。把所有组件放在一起看,会更容易理解:聊天历史是如何被获取、注入到 prompt 中,并在每次交互后更新的。这个整体视图也能更好地展示:LCEL 是如何把 retriever、prompt、memory 和 model 串成一个完整一致的工作流的。
代码清单 7.4 带有聊天机器人记忆的 RAG 链
python
from langchain_core.runnables import RunnablePassthrough
from langchain_openai import ChatOpenAI
from langchain_core.prompts import ChatPromptTemplate
from langchain_community.chat_message_histories import ChatMessageHistory
from langchain_core.runnables import RunnableLambda

rag_prompt = ChatPromptTemplate.from_messages(
    [
        ("system", """You are a helpful assistant, world-class
            expert in Roman and Greek history, especially in towns
            located in southern Italy. Provide interesting insights
            on local history and recommend places to visit with
            knowledgeable and engaging answers. Answer all questions
            to the best of your ability, but only use what has been
            provided in the context. If you don't know, just say
            you don't know. Use three sentences maximum and keep
            the answer as concise as possible."""),
        ("placeholder", "{chat_history_messages}"),
        ("assistant", "{retrieved_context}"),
        ("human", "{question}"),
    ])

retriever = vector_db.as_retriever()
question_feeder = RunnablePassthrough()
chatbot = ChatOpenAI(openai_api_key=OPENAI_API_KEY,
                     model_name="gpt-5-nano")
chat_history_memory = ChatMessageHistory()

def get_messages(x):
    return chat_history_memory.messages

rag_chain = {
    "retrieved_context": retriever,
    "question": question_feeder,
    "chat_history_messages": RunnableLambda(get_messages)
} | rag_prompt | chatbot

def execute_chain_with_memory(chain, question):
    chat_history_memory.add_user_message(question)
    answer = chain.invoke(question)
    chat_history_memory.add_ai_message(answer)
    print(f'Full chat message history: {chat_history_memory.messages}\n\n')
    return answer
测试修改后的链
现在我们来测试更新后的链。先使用和之前相同的问题:
ini
question = """Where was Poseidonia and who renamed
it to Paestum? Also tell me the source."""
answer = execute_chain_with_memory(rag_chain, question)
print(answer.content)
下面是到目前为止累积的聊天消息历史,以及对应的回答:
csharp
Full chat message history: [HumanMessage(content='Where was Poseidonia and who renamed \nit to Paestum? Also tell me the source.', additional_kwargs={}, response_metadata={}), AIMessage(content='Poseidonia was a Greek city on the Tyrrhenian coast of southern Italy (Magna Graecia), founded around 600 BCE by settlers from Sybaris. It was renamed Paestum by the Romans after they took over (273 BCE). Source: Paestum article, Wikipedia (https://en.wikipedia.org/wiki/Paestum).', additional_kwargs={'refusal': None}, response_metadata={'token_usage': {'completion_tokens': 1811, 'prompt_tokens': 1951, 'total_tokens': 3762, 'completion_tokens_details': {'accepted_prediction_tokens': 0, 'audio_tokens': 0, 'reasoning_tokens': 1728, 'rejected_prediction_tokens': 0}, 'prompt_tokens_details': {'audio_tokens': 0, 'cached_tokens': 0}}, 'model_name': 'gpt-5-nano-2025-08-07', 'system_fingerprint': None, 'id': 'chatcmpl-CGCq8gylIKzPqi8dJGz73VXr8Mkcd', 'service_tier': 'default', 'finish_reason': 'stop', 'logprobs': None}, id='run--0c943760-b79c-4eae-aa6b-fbc2858aed7b-0', usage_metadata={'input_tokens': 1951, 'output_tokens': 1811, 'total_tokens': 3762, 'input_token_details': {'audio': 0, 'cache_read': 0}, 'output_token_details': {'audio': 0, 'reasoning': 1728}})]
"Poseidonia was an ancient Greek city located on the coast of the Tyrrhenian Sea in what is now southern Italy. It was renamed Paestum by the Romans after they took control of the city in 273 BC, following its conquest by the Lucanians. The source of this information is from Wikipedia.这个回答和我们在没有记忆的机器人那里得到的回答差不多。现在来看看,如果继续问和之前一样的追问,会发生什么:
ini
question = """And then what did they do?
Also tell me the source"""
answer = execute_chain_with_memory(rag_chain, question)
print(answer.content)
现在我们得到如下回应:
python
Full chat message history: [HumanMessage(content='Where was Poseidonia and who renamed \nit to Paestum? Also tell me the source.', additional_kwargs={}, response_metadata={}), AIMessage(content='Poseidonia was a Greek city on the Tyrrhenian coast of southern Italy (Magna Graecia), founded around 600 BCE by settlers from Sybaris. It was renamed Paestum by the Romans after they took over (273 BCE). Source: Paestum article, Wikipedia (https://en.wikipedia.org/wiki/Paestum).', additional_kwargs={'refusal': None}, response_metadata={'token_usage': {'completion_tokens': 1811, 'prompt_tokens': 1951, 'total_tokens': 3762, 'completion_tokens_details': {'accepted_prediction_tokens': 0, 'audio_tokens': 0, 'reasoning_tokens': 1728, 'rejected_prediction_tokens': 0}, 'prompt_tokens_details': {'audio_tokens': 0, 'cached_tokens': 0}}, 'model_name': 'gpt-5-nano-2025-08-07', 'system_fingerprint': None, 'id': 'chatcmpl-CGCq8gylIKzPqi8dJGz73VXr8Mkcd', 'service_tier': 'default', 'finish_reason': 'stop', 'logprobs': None}, id='run--0c943760-b79c-4eae-aa6b-fbc2858aed7b-0', usage_metadata={'input_tokens': 1951, 'output_tokens': 1811, 'total_tokens': 3762, 'input_token_details': {'audio': 0, 'cache_read': 0}, 'output_token_details': {'audio': 0, 'reasoning': 1728}}), HumanMessage(content='And then what did they do? \nAlso tell me the source', additional_kwargs={}, response_metadata={}), AIMessage(content='The available source states that the Romans took over Poseidonia around 273 BCE and renamed it Paestum; it does not detail any further actions. Source: Paestum article, Wikipedia (https://en.wikipedia.org/wiki/Paestum).', additional_kwargs={'refusal': None}, response_metadata={'token_usage': {'completion_tokens': 1084, 'prompt_tokens': 1868, 'total_tokens': 2952, 'completion_tokens_details': {'accepted_prediction_tokens': 0, 'audio_tokens': 0, 'reasoning_tokens': 1024, 'rejected_prediction_tokens': 0}, 'prompt_tokens_details': {'audio_tokens': 0, 'cached_tokens': 0}}, 'model_name': 'gpt-5-nano-2025-08-07', 'system_fingerprint': None, 'id': 'chatcmpl-CGCrgyIn28RiUGKQuPOQQOTH2ZRgP', 'service_tier': 'default', 'finish_reason': 'stop', 'logprobs': None}, id='run--c52135d6-bbba-42e5-9e79-fb9a413e38e1-0', usage_metadata={'input_tokens': 1868, 'output_tokens': 1084, 'total_tokens': 2952, 'input_token_details': {'audio': 0, 'cache_read': 0}, 'output_token_details': {'audio': 0, 'reasoning': 1024}})]
"After the Romans renamed Poseidonia to Paestum, they developed the city further, enhancing its infrastructure and economy, particularly through agriculture and trade. They also constructed significant buildings, including temples dedicated to Greek gods, which demonstrate the city's cultural continuity. The source of this information is from historical texts on Roman history and archaeology.
正如你所看到的,聊天历史现在已经包含了所有交换过的问题和回答。更重要的是,聊天机器人已经理解了这里的 "they" 指的是 Romans,因此给出了一个连贯的回答。恭喜你!你现在已经完成了一个真正可用的聊天机器人:它能够记住之前的消息,并持续进行一场像样的对话。
不过,在认为这个聊天机器人已经大功告成之前,我还想覆盖另一个非常重要的话题:如何使用 LangSmith 来跟踪它的链执行过程。
7.5 使用 LangSmith 跟踪执行过程
LangSmith 是一个面向基于 LLM 应用全生命周期的综合开发平台,无论你是否使用 LangChain,都可以使用它。它可以帮助你调试、协作、测试和监控你的 LLM 应用。由于 LLM 应用依赖自然语言输入,而自然语言往往会产生一些难以复现和调试的边界情况,因此这类应用本身就带有一定的不确定性,传统工具常常不够好用。LangSmith 在整个 LLM 应用开发生命周期中,专门应对这些挑战:
开发与调试 ------ LangSmith 的 tracing 功能能够确保你的 LLM 应用工作流按预期执行,并在行为偏离预期时帮助你排查问题。它的 Hub 还提供了一些标准化、经过实战验证的 prompt,可用于常见用例,从而加快实现速度。
评估与测试 ------ LangSmith 支持测试,并内置了一些 evaluator,可用于评估 LLM 输出在相关性、正确性和敏感性等方面的表现。它也提供工具,帮助你从多种来源(包括生产环境数据)构建数据集,以便进行持续测试和回归测试。
监控 ------ LangSmith 的 tracing 能力可以让你监控生产中 LLM 应用的实时状态。它支持通过人工标签和注释的方式提供反馈,使你能够在应用偏离预期路径时及时调查并纠正。
设置 LangSmith 的 API key
要启用 LangSmith tracing,其实只需要在应用顶部配置好 LangSmith API key 和一些 tracing 相关参数即可。你可以按如下方式申请并设置 LangSmith API key:
- 在 LangSmith(
https://smith.langchain.com/)注册。点击 Sign-Up 按钮,用 GitHub、Google、Discord 或邮箱创建一个账号。 - 登录 LangSmith 网站,点击左侧菜单中的 Settings 齿轮图标,然后点击 API Keys 菜单项,进入 API Keys 页面,如下图所示。
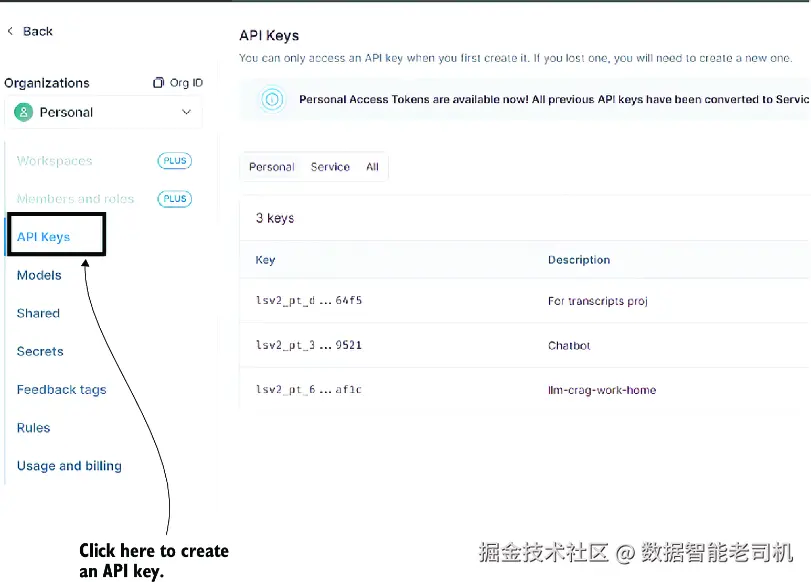
API Keys 页面
- 点击右上角的 Create API Key 按钮(图中未显示)。为这个 key 填写一个描述(例如 AI Agents and applications examples ),并把类型选择为 Personal Access Token 。然后点击 Create API Key。请务必把这个 key 复制并妥善保存在安全位置,因为在 LangSmith 网站上你之后将再也看不到完整 key,只会看到首尾几个字符。
有了 LangSmith API key 之后,你就可以在项目中使用它了。
启用 LangSmith tracing 最简单的方法,就是在启动 Jupyter Notebook 之前设置几个环境变量。如果你的 notebook 已经在运行,请先关闭它。然后按下面步骤来操作(这里假设你使用的是 Windows 的 cmd shell):
- 进入 notebook 所在文件夹,并激活你的虚拟环境:
makefile
C:\Github\building-llm-applications\ch07> env_ch07\Scripts\activate- 设置以下环境变量,它们会启用并配置 LangSmith tracing(这里默认你在
C:\Github\building-llm-applications\ch07中,所以路径做了简写):
ini
(env_ch07) C:...\ch07>set LANGSMITH_TRACING=true
(env_ch07) C:...\ch07>set
↪ LANGSMITH_ENDPOINT=https://api.smith.langchain.com
(env_ch07) C:...\ch07>set LANGSMITH_PROJECT=Q & A chatbot
(env_ch07) C:...\ch07>set LANGSMITH_API_KEY=<YOUR_LANGSMITH_API_KEY>- 重新启动 Jupyter Notebook:
scss
(env_ch07) C:...\ch07>jupyter notebook 07-QA_across_documents.ipynb- 重新运行 notebook 中的各个单元格,至少跑到 7.3 节末尾;或者如果你愿意,也可以一路跑到 7.4 节。
完成这些步骤之后,LangSmith 就已经捕获了你这次 notebook 执行过程中的 tracing 信息。你可以直接在 LangSmith 控制台中查看并分析这些 trace 数据。
如果要查看 traces,请访问 LangSmith 网站(https://smith.langchain.com),然后进入 Projects > Q&A Chatbot。点击最新的一条 trace,如图 7.7 所示。

图 7.7 LangSmith 高层 trace 视图。点击最新的一条 trace,可以查看链执行过程的高层细节。
当前这个页面会显示与你的 Q&A 聊天机器人项目相关的所有 trace(在 LangSmith 术语中,project 指的是某个应用或某个应用局部对应的全部 trace 集合),并按执行时间排序,最新的排在最上方。点击任意一条 trace------例如顶部最新的那条------你就能查看更多细节。为了讲解清晰,我把这三个面板拆开成两张图展示。图 7.8 展示了左侧面板(Q&A chatbot 项目的所有 traces)以及中间面板(所选 trace 的 runs)。
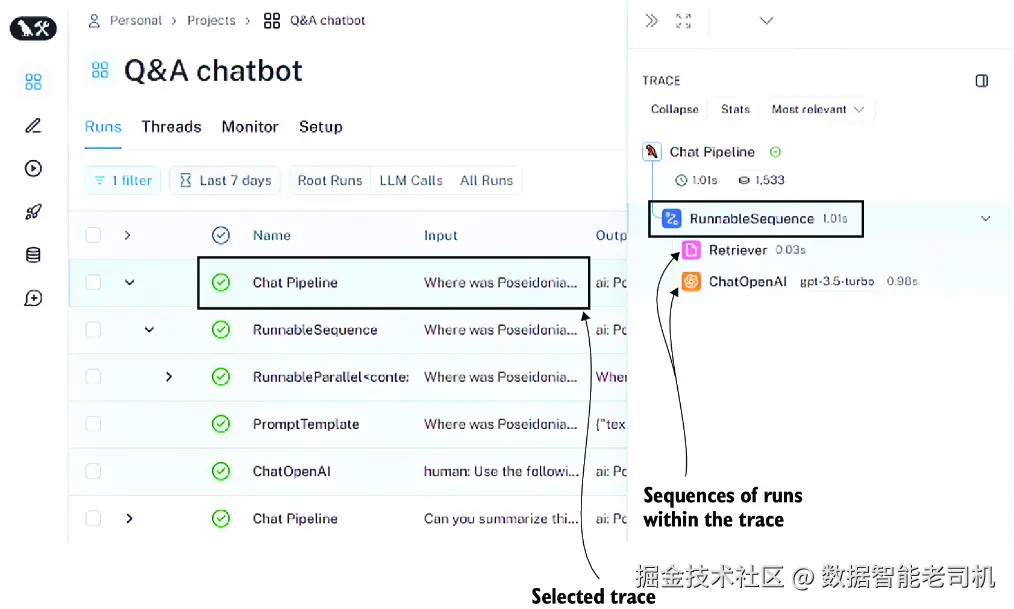
图 7.8 点击某一条 trace(例如顶部最新的一条)之后得到的 LangSmith trace 详情
图 7.9 展示了中间面板与右侧面板。中间面板仍然是所选 trace 的 runs,而右侧面板则展示了该 trace 的输入和输出。
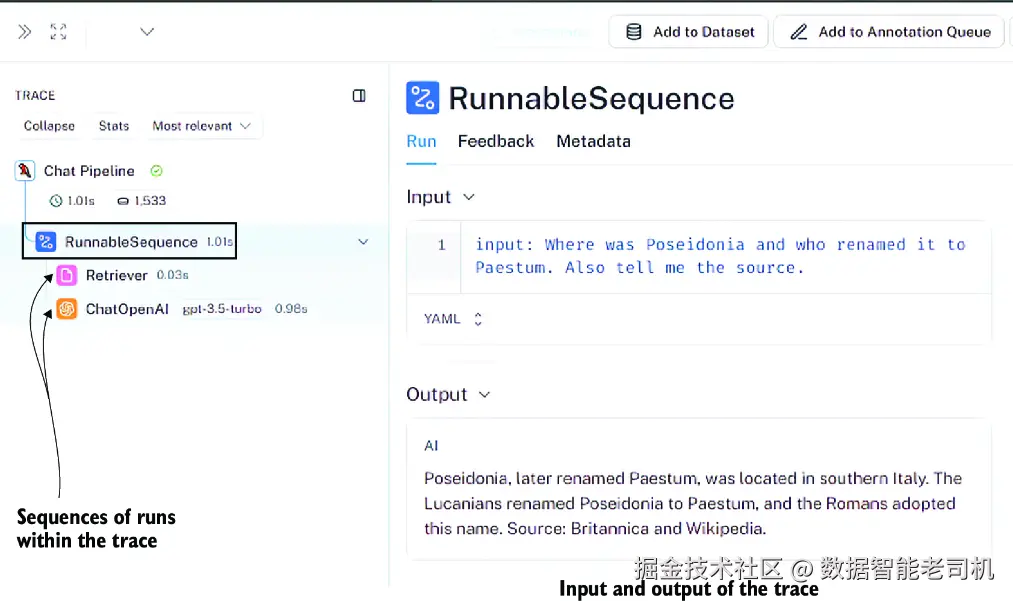
图 7.9 点击最新 trace 之后看到的中间面板与右侧面板
下面我们来逐一看看当你在 Q&A chatbot 项目页面中点击最新 trace 后,会看到的这三个面板各自代表什么:
左侧面板 ------ 显示与你的项目(Q&A chatbot)相关的所有 trace 列表,从上到下依次是由新到旧。每条 trace 都可以展开查看其内部步骤。请点击最顶部那条,也就是最新的一条。
中间面板 ------ 以图形方式显示所选 trace 的链执行 runs,包括 vector-store retriever 和 ChatOpenAI LLM client。每个 run 都代表这条 trace 中某个链组件的一次执行细节。这些 runs 按执行时间排序,并精确显示每一步的耗时(可细到百分之一秒)。
右侧面板 ------ 展示 trace 的输入(也就是用户问题)以及输出(也就是综合生成的回应)。
如果你想看更细节的内容,可以进一步点击中间面板中的某一个 run,如图 7.10 所示。例如,点击中间面板里的 Retriever run,右侧面板中就会显示它的详情。在 Input 区域,你会看到原始查询;而在 Output 区域,你会看到从向量存储中检索到的文档。
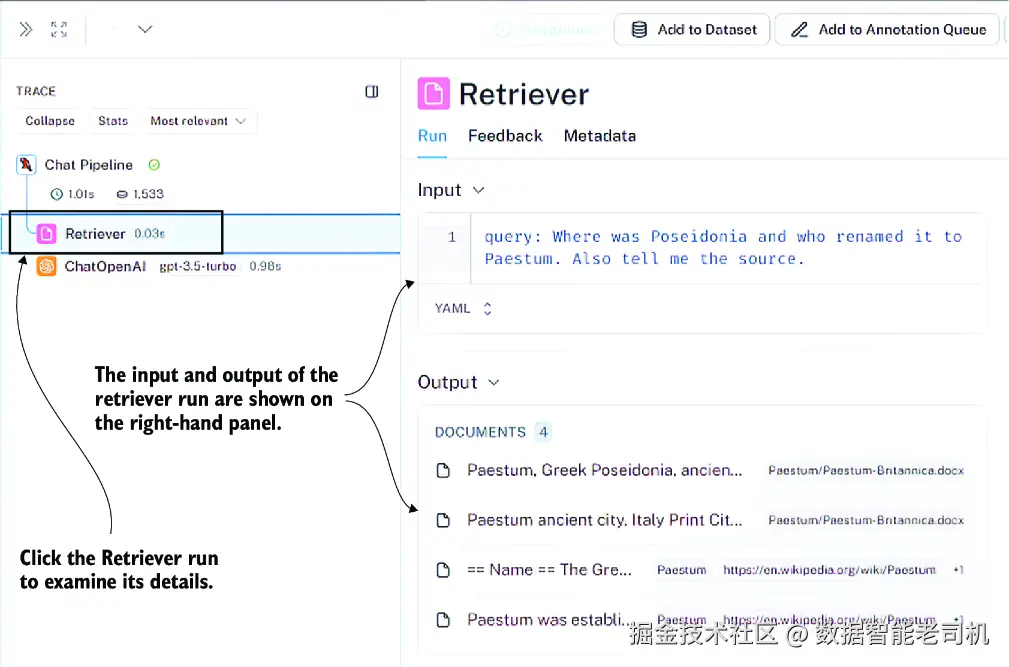
图 7.10 Run 详情
这只是利用一条简单链来体验 LangSmith tracing 能力的一个小小片段。我非常建议你把链中的每一步都点开看一遍。你可以从左侧面板点击某个 trace 的子步骤开始,然后在中间面板选择你想分析的 run,查看对应详情。如果你已经迫不及待想做更多实验,不妨新建一个 LangSmith 项目,去跟踪我们在第 4 章构建的那个研究摘要引擎的执行过程。那会让你看到一个更复杂的 trace,其中会涵盖更广泛类型的链组件,也会更能体现 tracing 的价值。
小结
-
LangChain 为 检索增强生成(RAG) 组件提供了一组抽象类。这使你能够用极少的代码改动就替换掉向量存储(例如从 ChromaDB 换到 Pinecone)、embedding 模型(例如从 OpenAI 换到 Cohere),或者 LLM(例如从 GPT 换到 Claude)。
-
LangChain 的内容摄取阶段会用到以下这些类:
- BaseLoader ------ 把文本来源(PDF、网页、数据库等)导入成带有内容和元数据的
Document对象。 - BaseDocumentTransformer ------ 对
Document对象进行变换,例如把大文本切成块,或者抽取实体。像RecursiveCharacterTextSplitter这样的 splitter 会考虑语义边界。 - VectorStore ------ 存储
Document块及其对应 embeddings,并提供相似度搜索能力。常见实现包括 ChromaDB、Pinecone、FAISS 和 Weaviate。 - Embeddings ------ embedding 模型的抽象层,把文本转换成用于相似度匹配的向量表示。支持 OpenAI、Cohere、Hugging Face 和 Google 等模型。
- BaseLoader ------ 把文本来源(PDF、网页、数据库等)导入成带有内容和元数据的
-
LangChain 的 Q&A 检索阶段会用到这些抽象:
- BasePromptTemplate ------ 定义 prompt 结构,里面的占位符会在运行时被检索文档和用户问题填充。
- BaseRetriever ------ 负责根据相似度评分与过滤规则,从向量存储中取回文档。它也支持自定义检索逻辑,例如元数据过滤或混合搜索。
- BaseLanguageModel ------ 为不同 LLM 提供统一接口(OpenAI、Anthropic、本地模型等)。你只要改一个配置参数,就能切换提供商。
-
RAG 链通过 LCEL 把这些组件连接起来。链中通常包含:用于直通用户问题的 pass-through、用于取回文档的 retriever、用于组合问题与上下文的 prompt template,以及用于生成最终答案的 LLM。
-
会话式 RAG(Conversational RAG)会在多轮对话中维护聊天历史。这样一来,像 "What about cost?" 这样的追问,就能引用前文上下文,而不必重复整个对话。
-
ChatPromptTemplate.from_messages允许你用系统指令、聊天历史数组以及当前用户消息来组织对话式 prompt。历史通常会以HumanMessage和AIMessage对象列表的形式传入。 -
LangSmith 会通过记录 RAG 链每一步的输入和输出(检索、prompt 格式化、LLM 生成等)来跟踪执行过程。这样你就能看清:到底检索到了哪些文档,以及 LLM 是如何使用这些文档的。
-
聊天历史可以存储为交替出现的
HumanMessage和AIMessage对象:
from langchain.schema import HumanMessage, AIMessage。每轮结束后把它们追加进去,就可以维持对话上下文。
-
对于很长的对话,为了不超出 token 限制,你需要实现上下文压缩策略,例如滑动窗口(只保留最近 N 轮) ,或者摘要压缩(定期把历史压缩成摘要) 。