官方文档:openclaw.ai/
本篇介绍两种openclaw部署连接飞书的方式
所需环境:macOS | Linux,不推荐win系统会很卡很费事,win系统可以开启虚拟机
1. openclaw部署
1.1 常规方案
终端执行即可下载安装环境
curl -fsSL ``https://openclaw.ai/install.sh`` | bash
如果失败则需手动安装下最新的node环境,确保24版本以上
安装openclaw,终端执行:
sudo npm install -g openclaw@latest
openclaw安装完成后按照下面命令操作
openclaw --version // 验证是否安装成功
openclaw configure // 快速完成核心配置
openclaw gateway install // 安装网关
openclaw gateway start // 启动网关
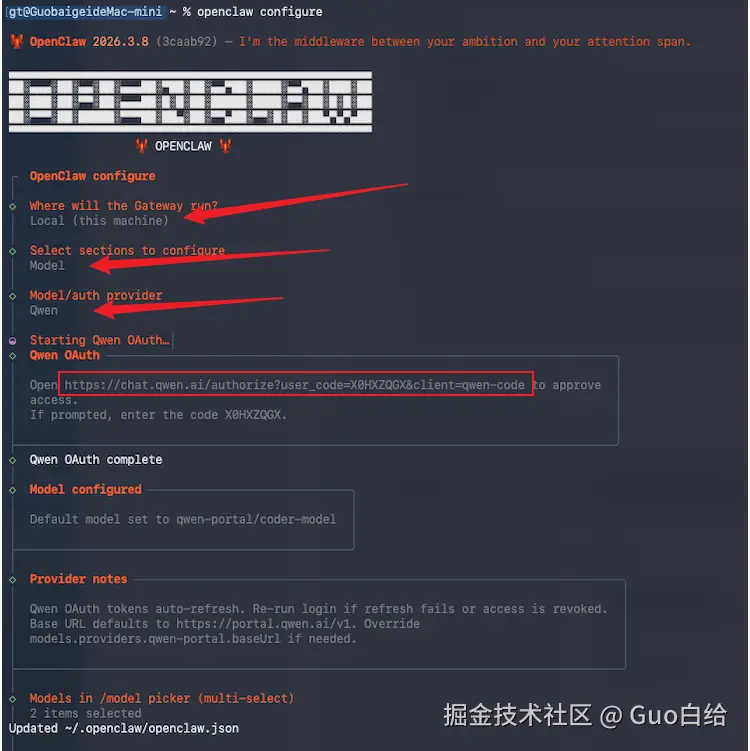
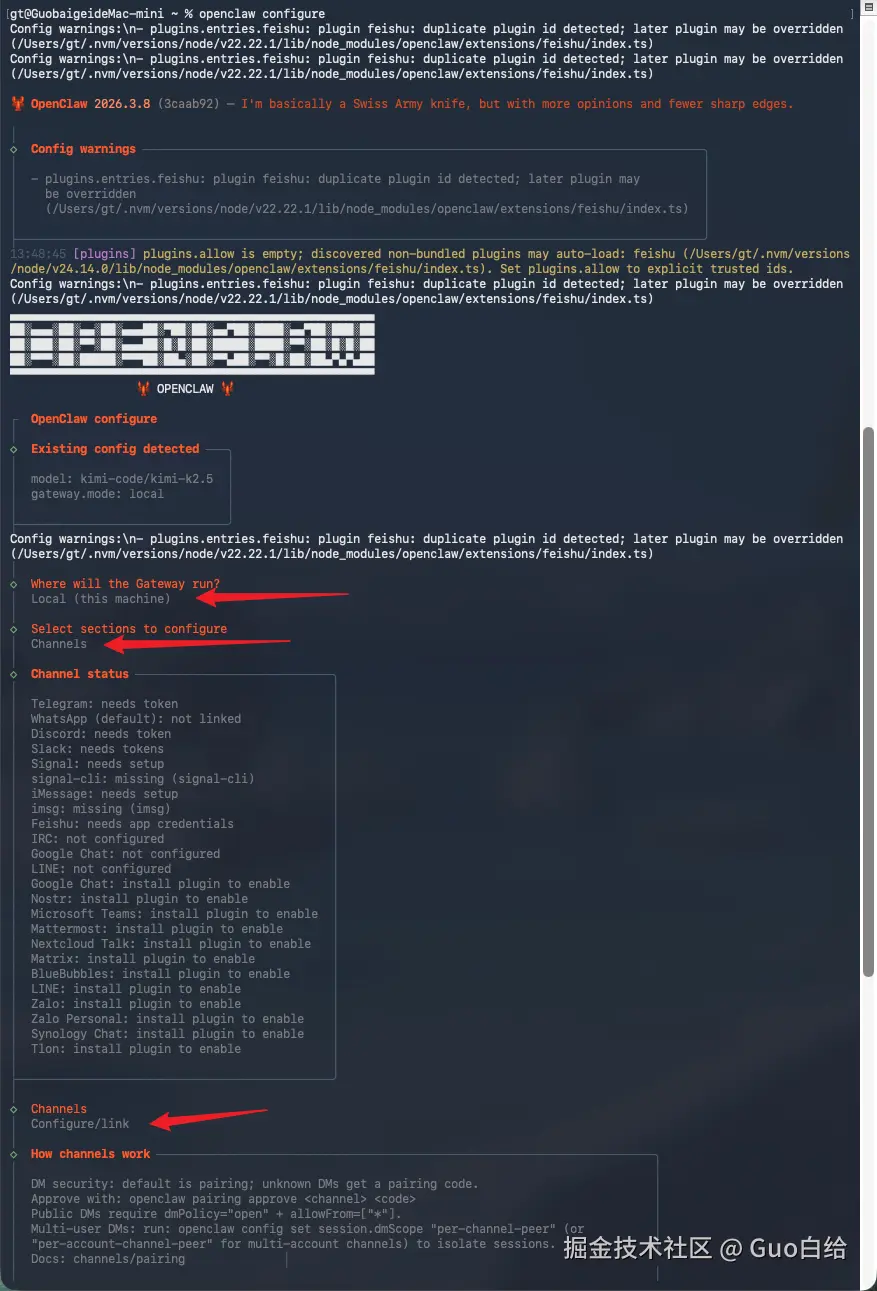
核心配置流程如下(先配置models):
配置模型选千问后会有一块快速认证的url复制出来去访问,没账号就注册一个,认证后会自动配置。
1.2 玄学方案(推荐、快)
你需要具备 cursor / codex / trae ... 这些ide中的一个
之后你就可以安心等待他给你 真*一键安装 了

2. 飞书连接
2.1 创建机器人
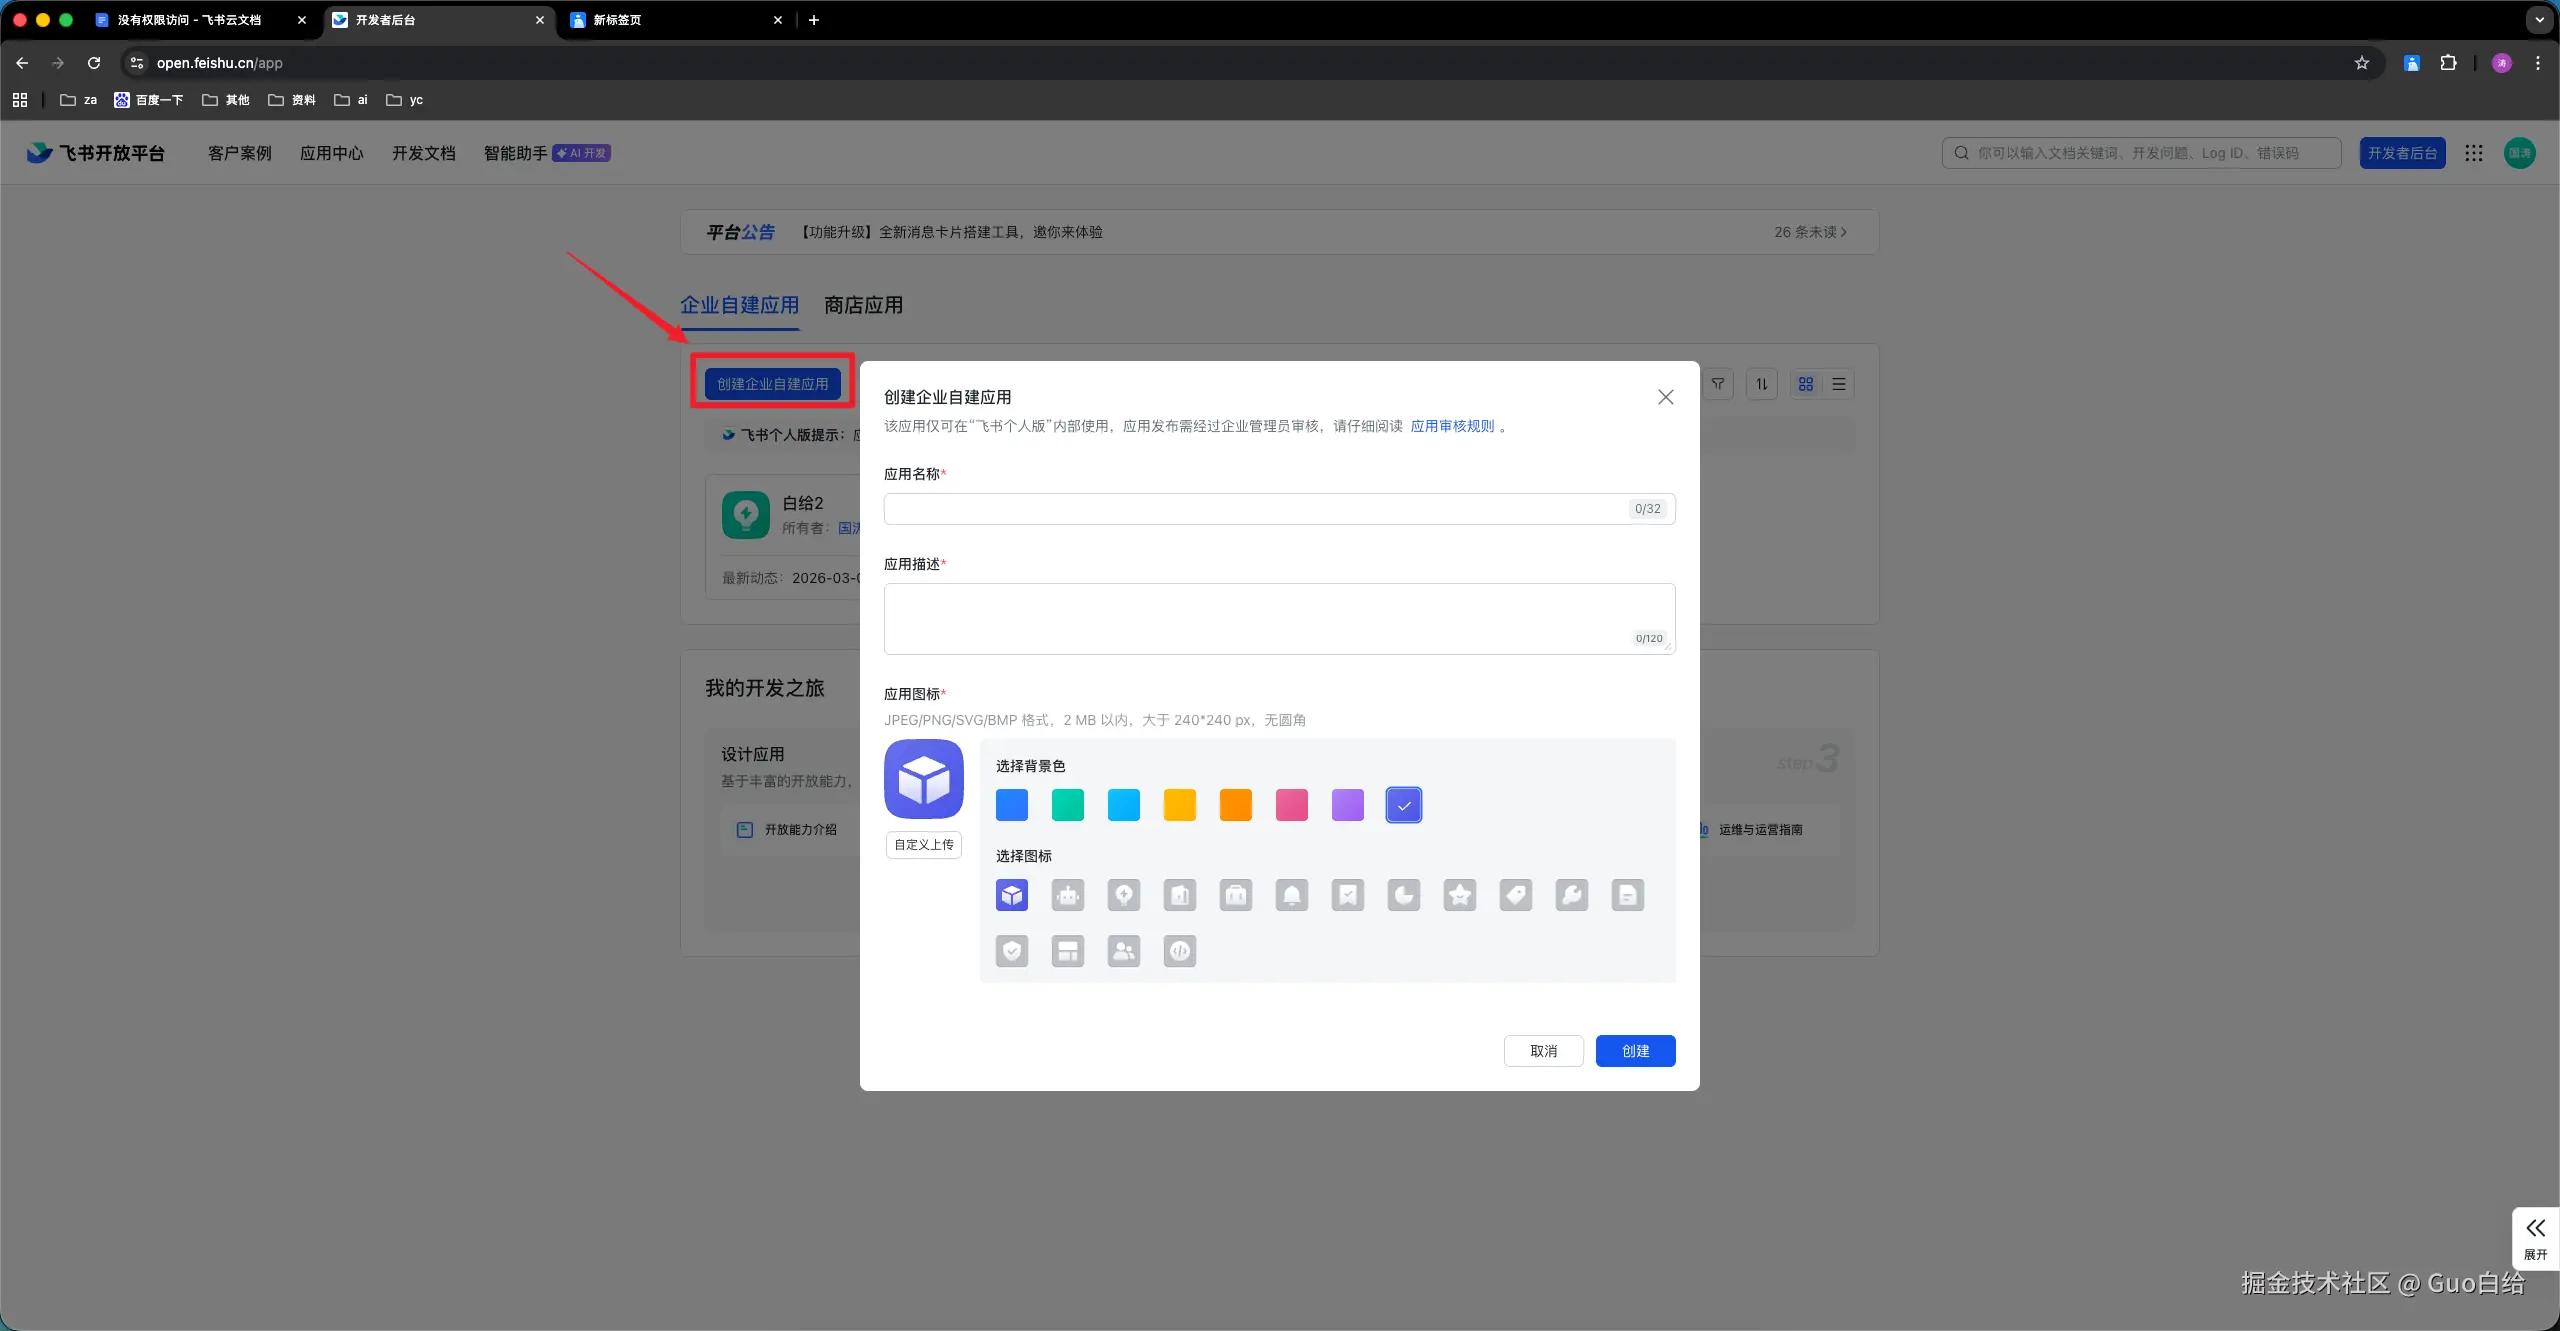
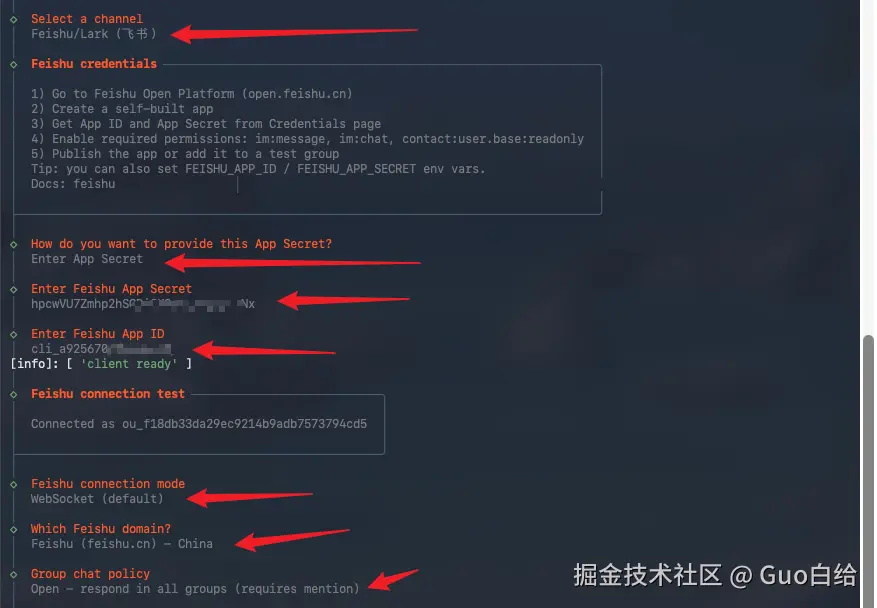
首先需要先创建一个飞书机器人打开飞书开放平台 open.feishu.cn/app登陆注册后操作如...

2.2 建立连接
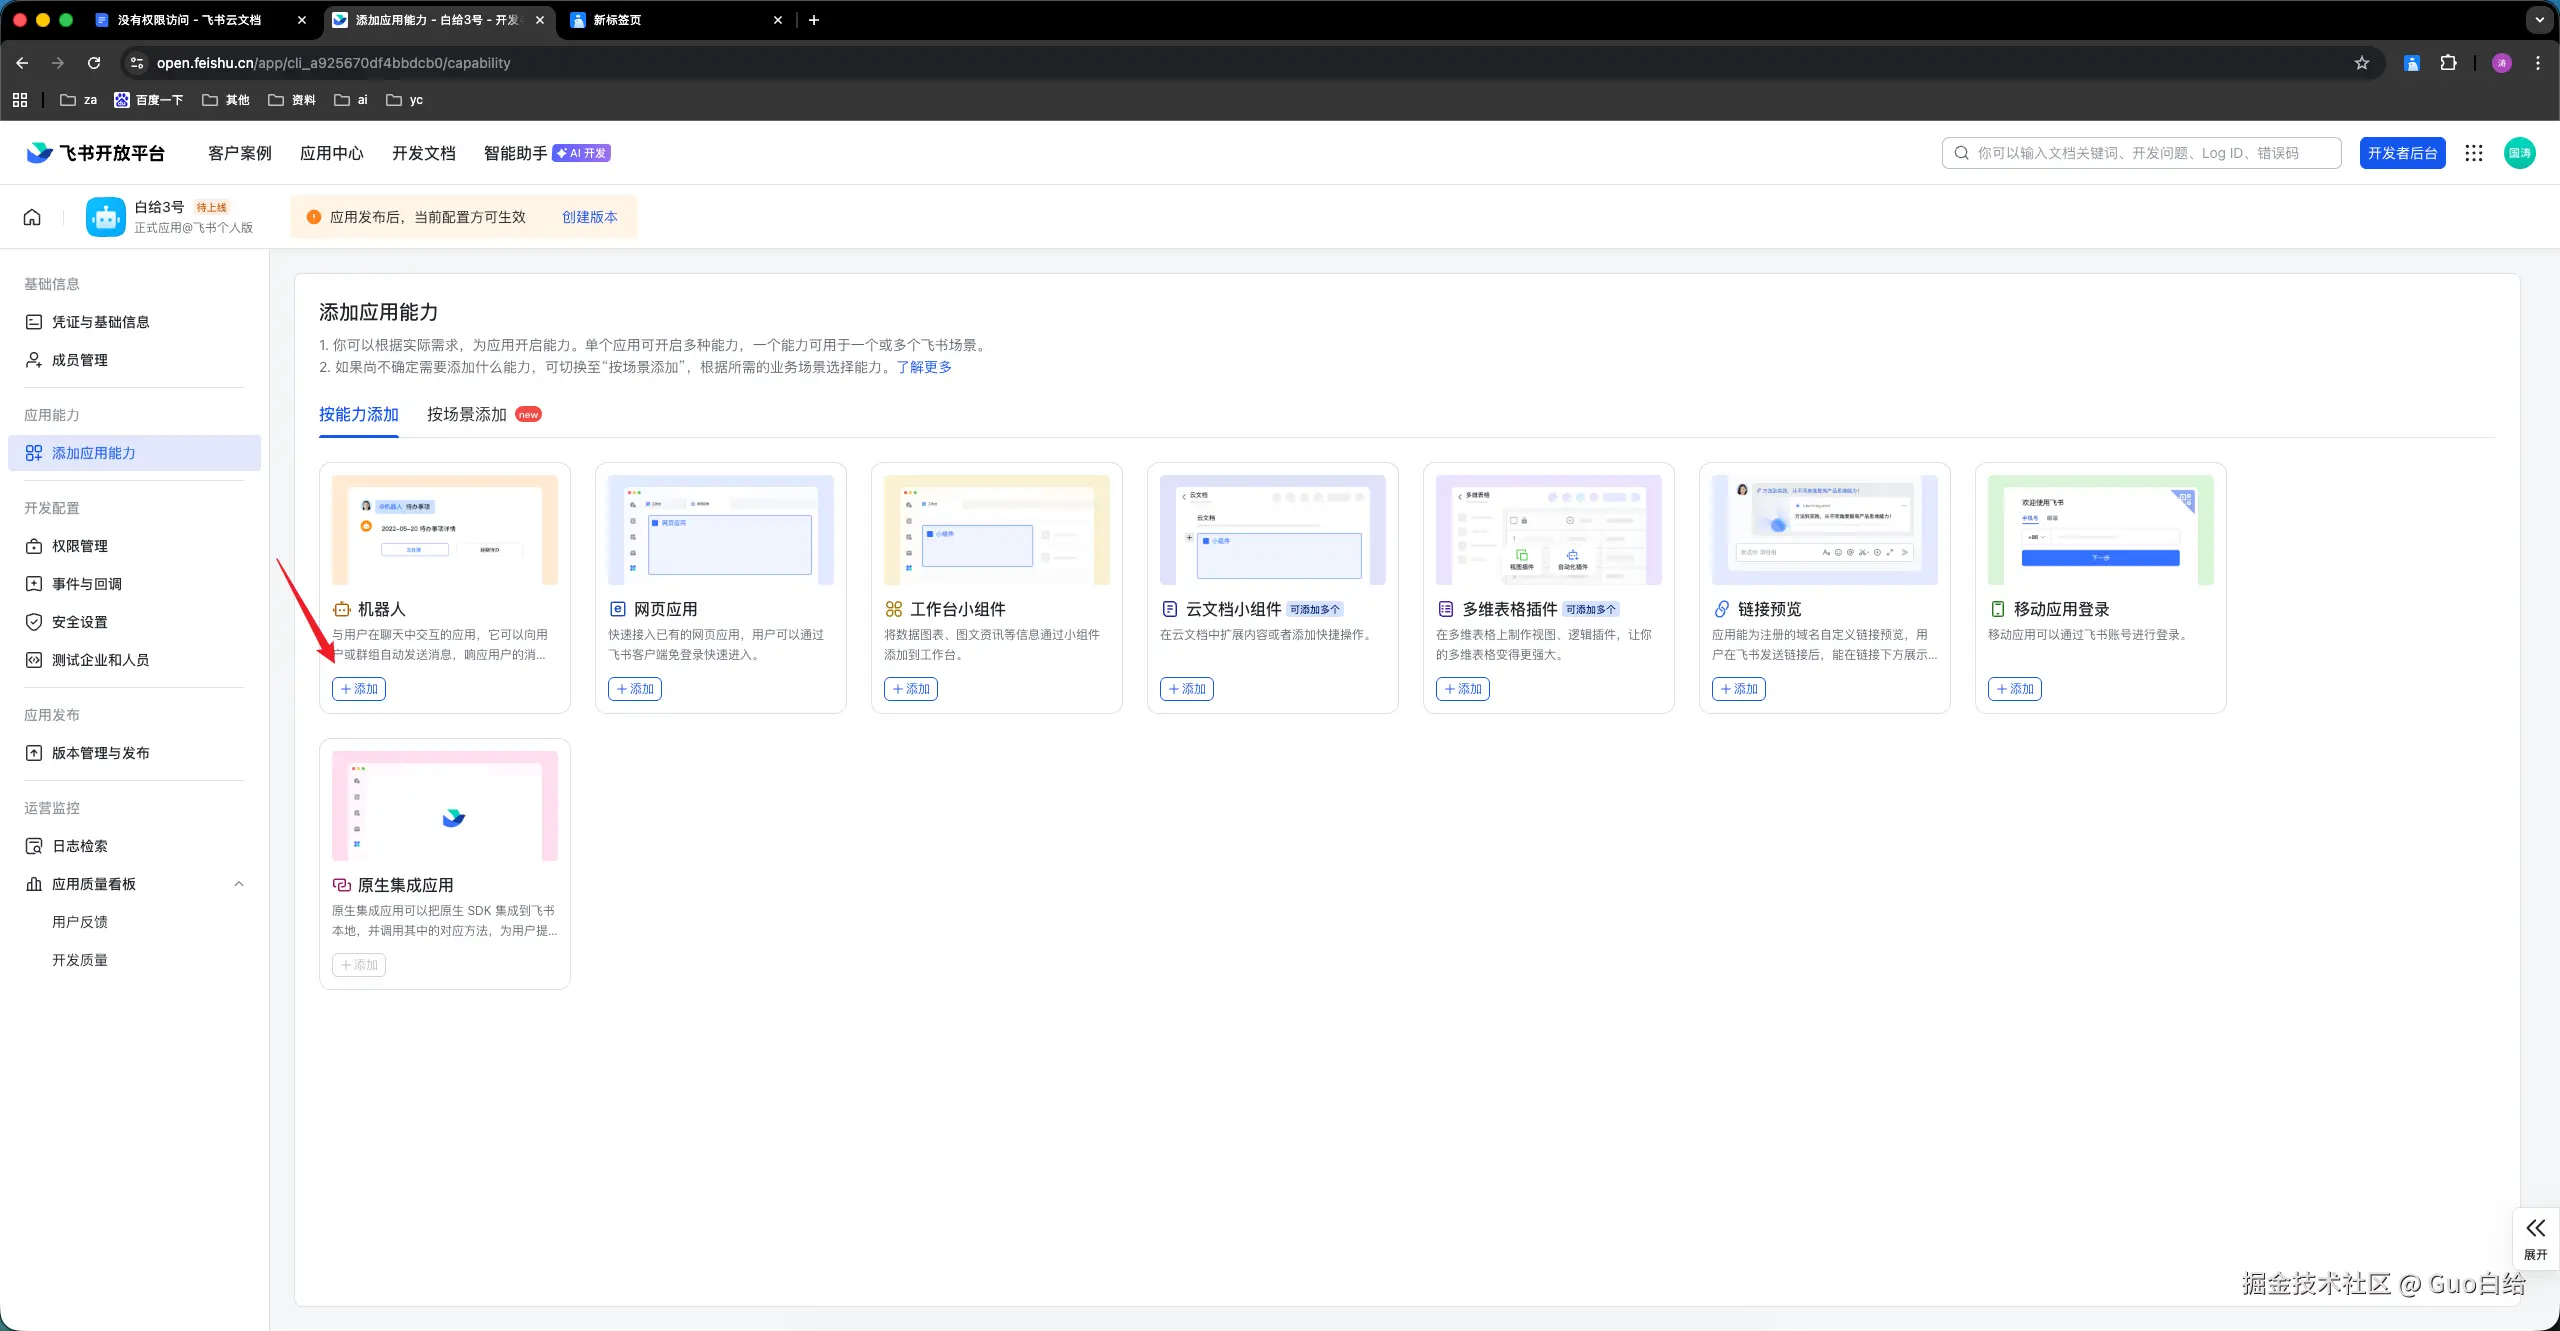
接下来是添加事件与回调,配置了这个机器人才会有与你沟通对话的能力,需要讲机器人的ID与Secret配置进openclaw里。

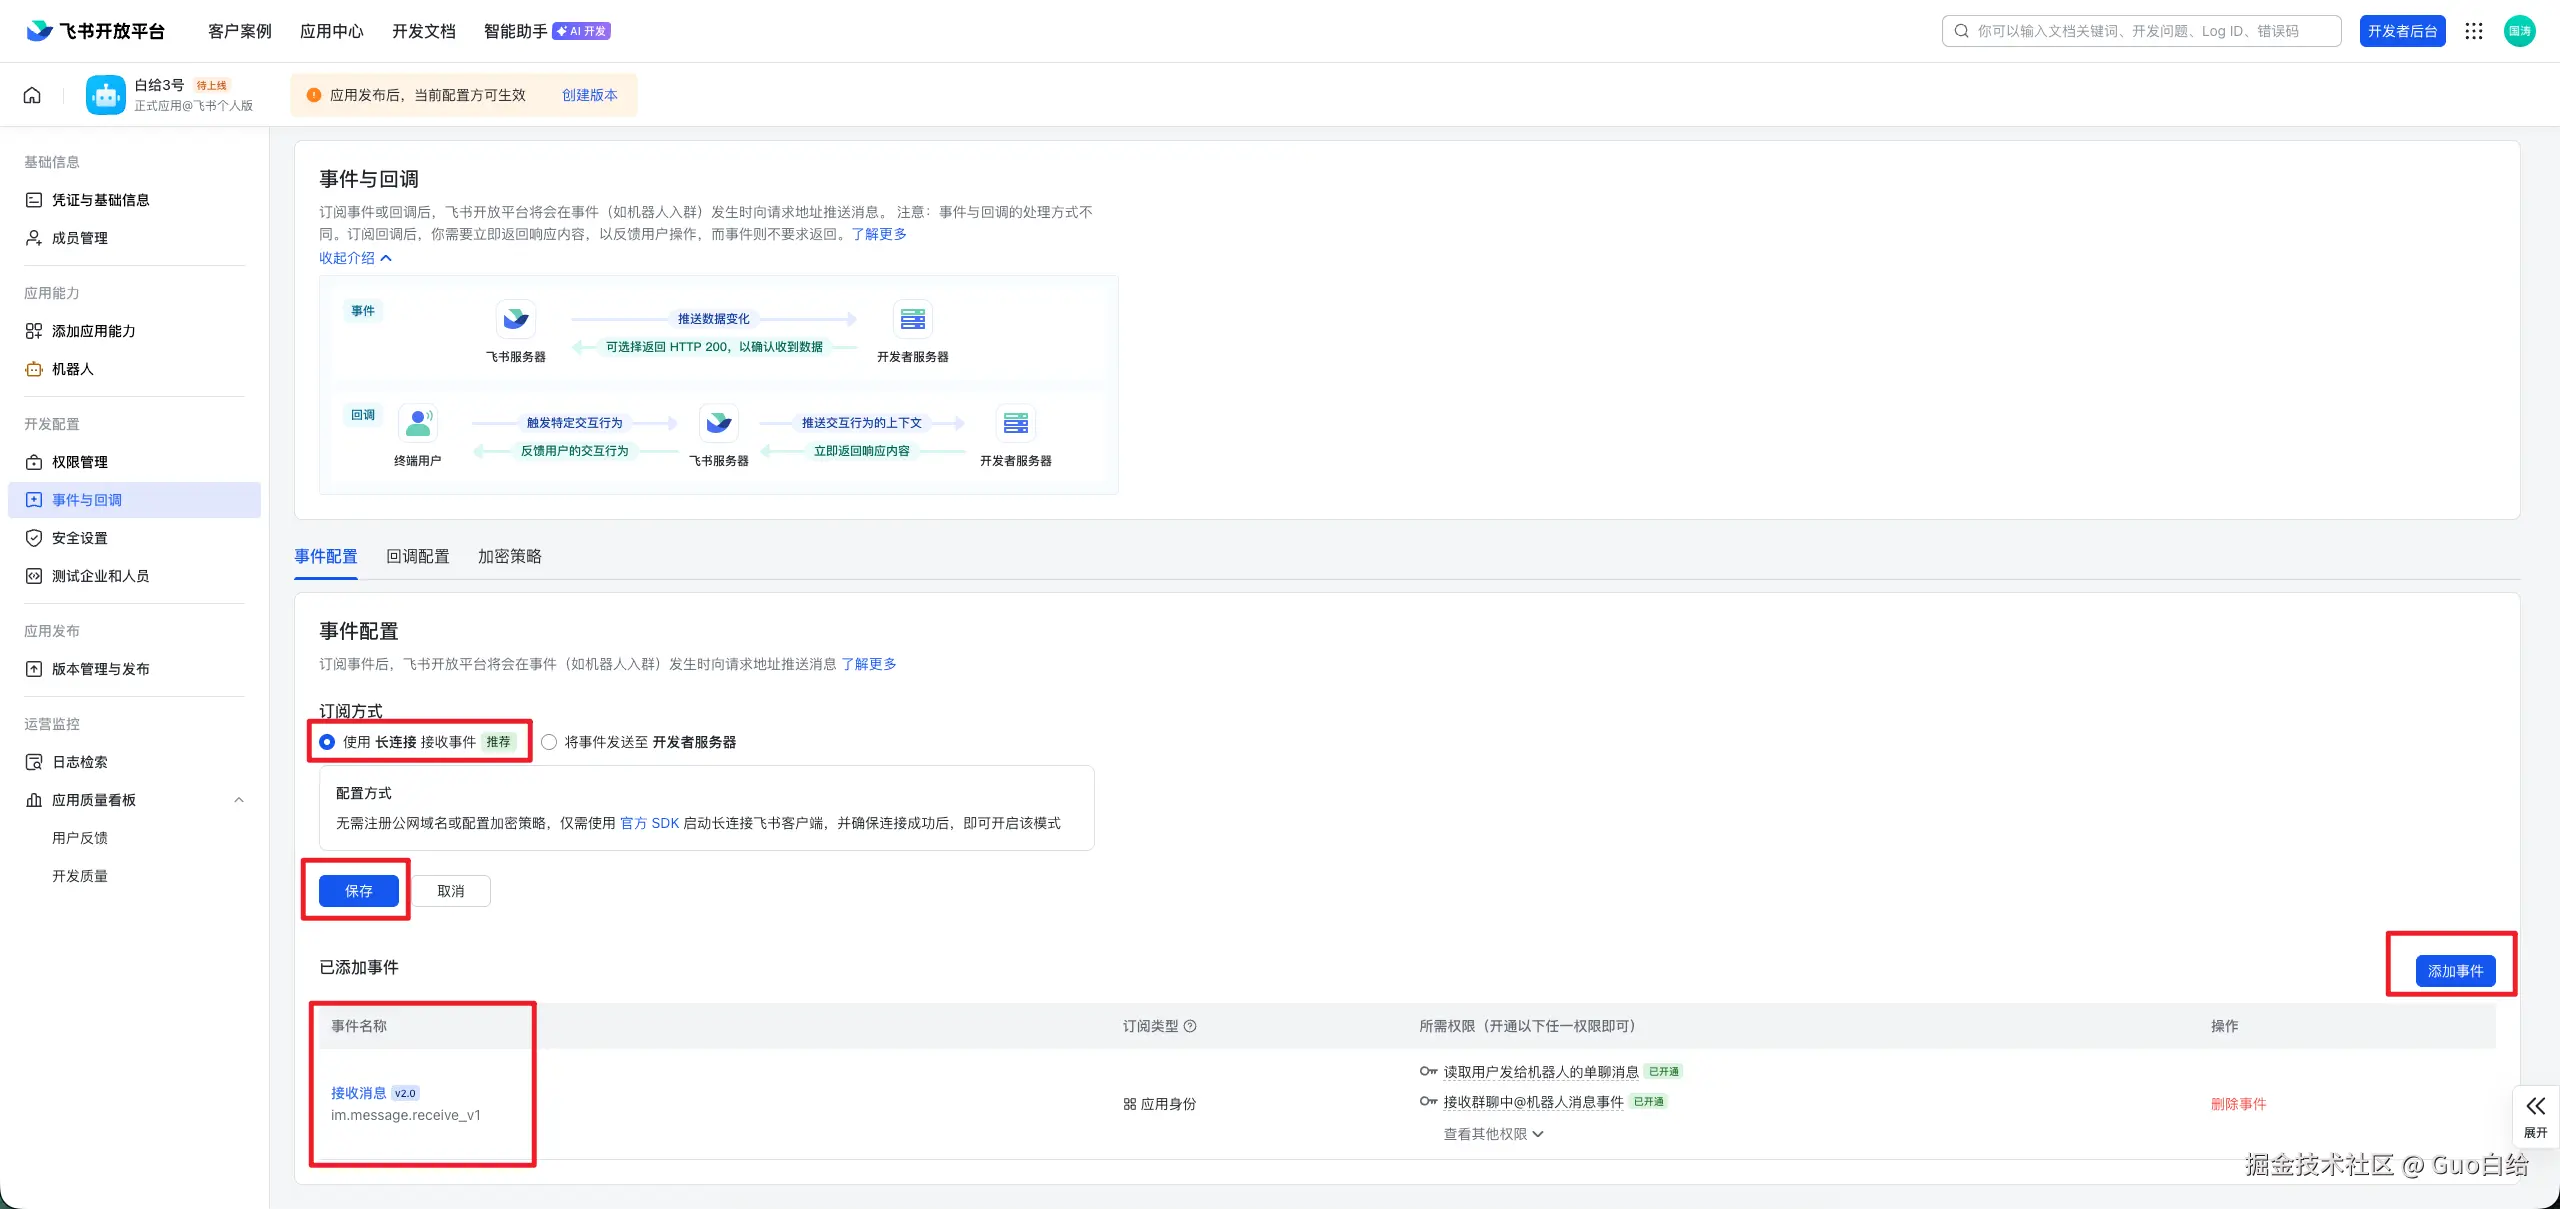
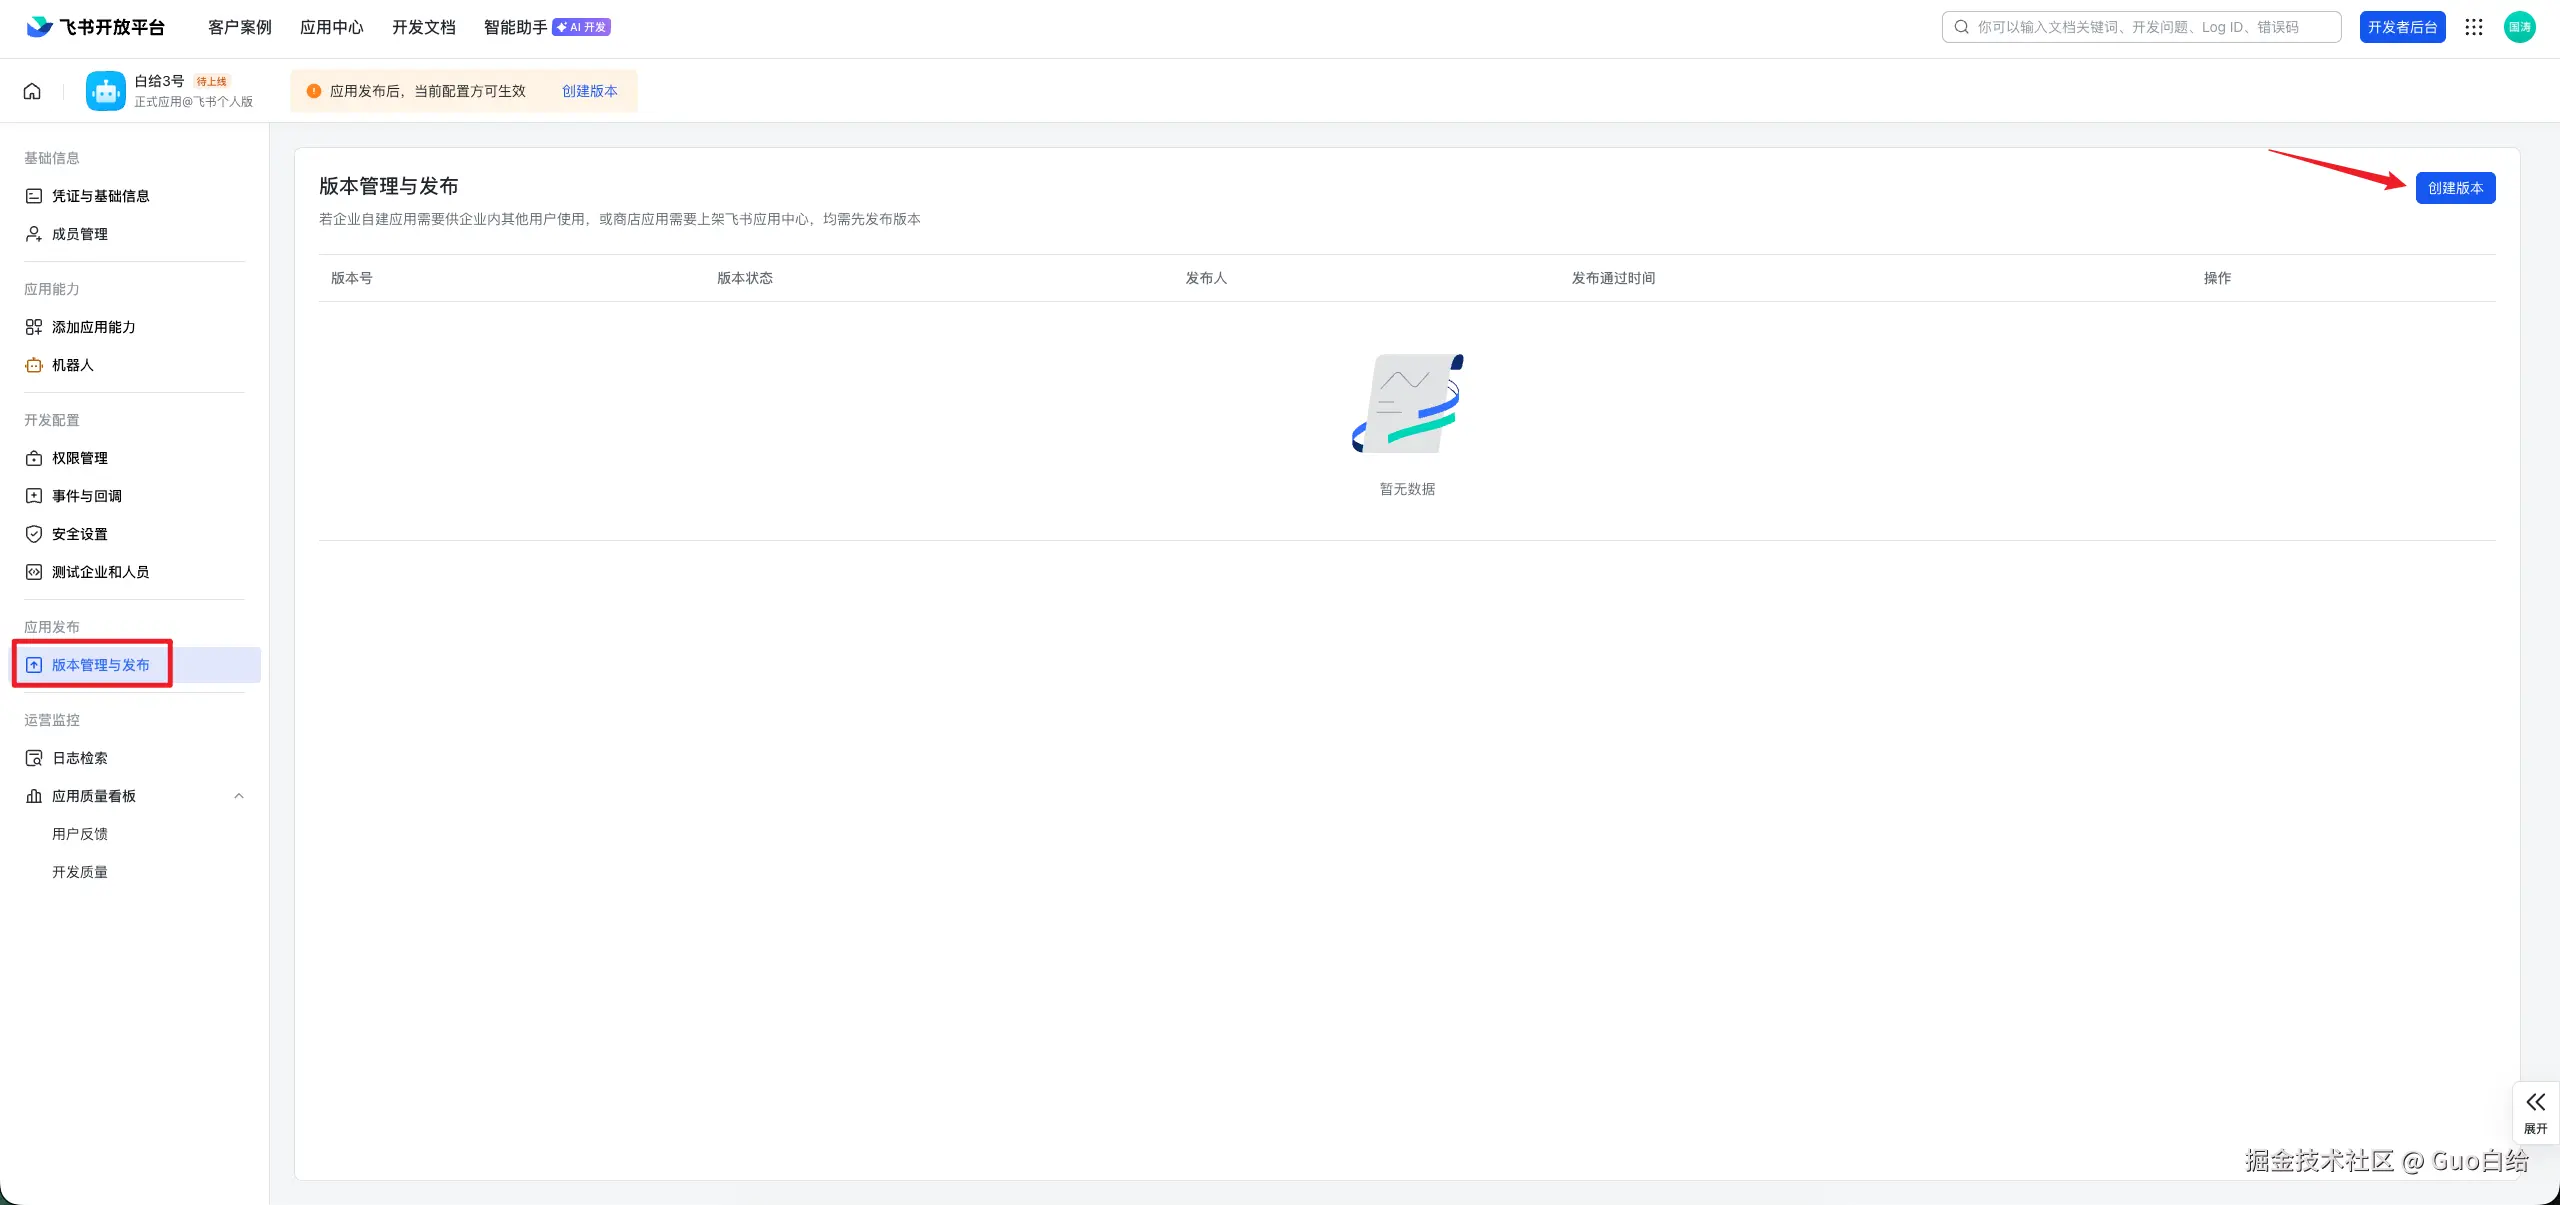
配置完机器人后要创建下版本并发布


2.3 使用
发布后我们就可以在飞书上使用机器人了,第一次使用需要你去终端进行下激活

3. 常见问题
3.1 常用的一些配置命令
sql
安装网关 openclaw gateway install
启动网关 openclaw gateway start
重启网关 openclaw gateway restart
查看网关状态 openclaw gateway status
查看配置模型 openclaw models list
切换默认模型 openclaw models set 模型
清理备选模型 openclaw models fallbacks clear
添加备用模型 openclaw models fallbacks add 模型
3.2 第一次启动WebUI需要配置token
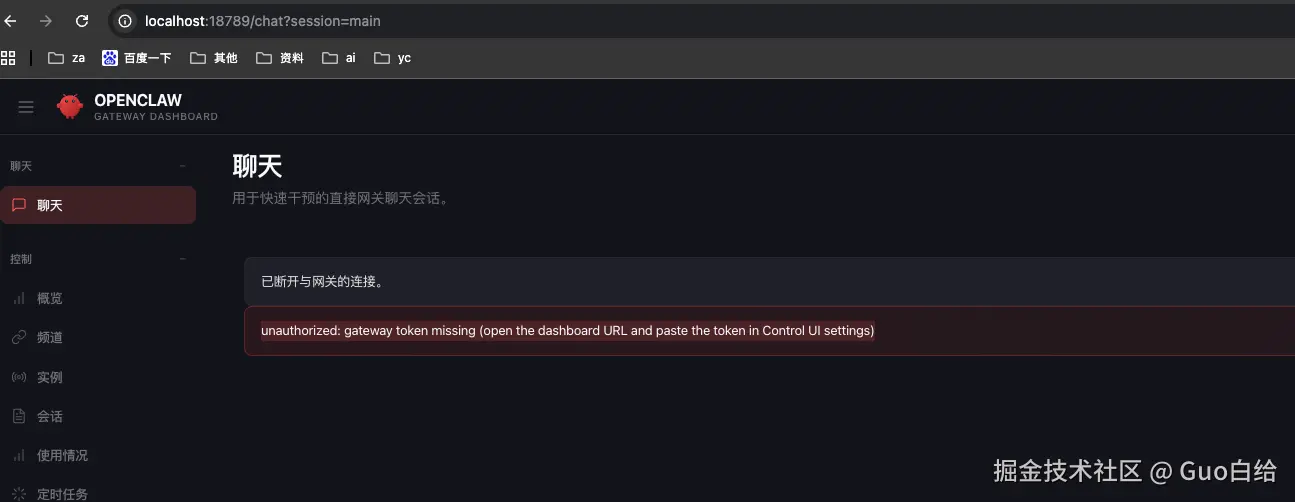
解决方法:
生成一条带有token的url,openclaw dashboard --no-open

另查看token方法:
查找id,openclaw devices list

根据id生成token,openclaw devices rotate --role operator --device 08943b1d******

3.3 拓展
既然我们连接了一个机器人后,那我们会想能不能再加几个牛马来干活呢?经查资料发现是支持的,openclaw中feishu的数据结构如下,可以支持配置多个机器人
css
channels: {
  feishu: {
    enabled: true,
    connectionMode: "websocket",
    domain: "feishu",
    groupPolicy: "open",
    defaultAccount: "default",
    accounts: {
      default: {
        appId: "cli_xxx",
        appSecret: "xxx",
        botName: "第一台机器人"
      },
      bot2: {
        appId: "cli_yyy",
        appSecret: "yyy",
        botName: "第二台机器人"
      }
    }
  }
}
我们只需要在终端中按顺序执行如下配置即可
arduino
openclaw config set 'channels.feishu.accounts.bot1.appId' '"你第一台机器人的AppID"'
openclaw config set 'channels.feishu.accounts.bot1.appSecret' '"你第一台机器人的AppSecret"'
openclaw config set 'channels.feishu.accounts.bot1.botName' '"第一台机器人"'
openclaw config set 'channels.feishu.accounts.bot2.appId' '"你第二台机器人的AppID"'
openclaw config set 'channels.feishu.accounts.bot2.appSecret' '"你第二台机器人的AppSecret"'
openclaw config set 'channels.feishu.accounts.bot2.botName' '"第二台机器人"'
openclaw config set 'channels.feishu.defaultAccount' '"bot1"'
// 清理下之前配置
openclaw config unset 'channels.feishu.appId'
openclaw config unset 'channels.feishu.appSecret'
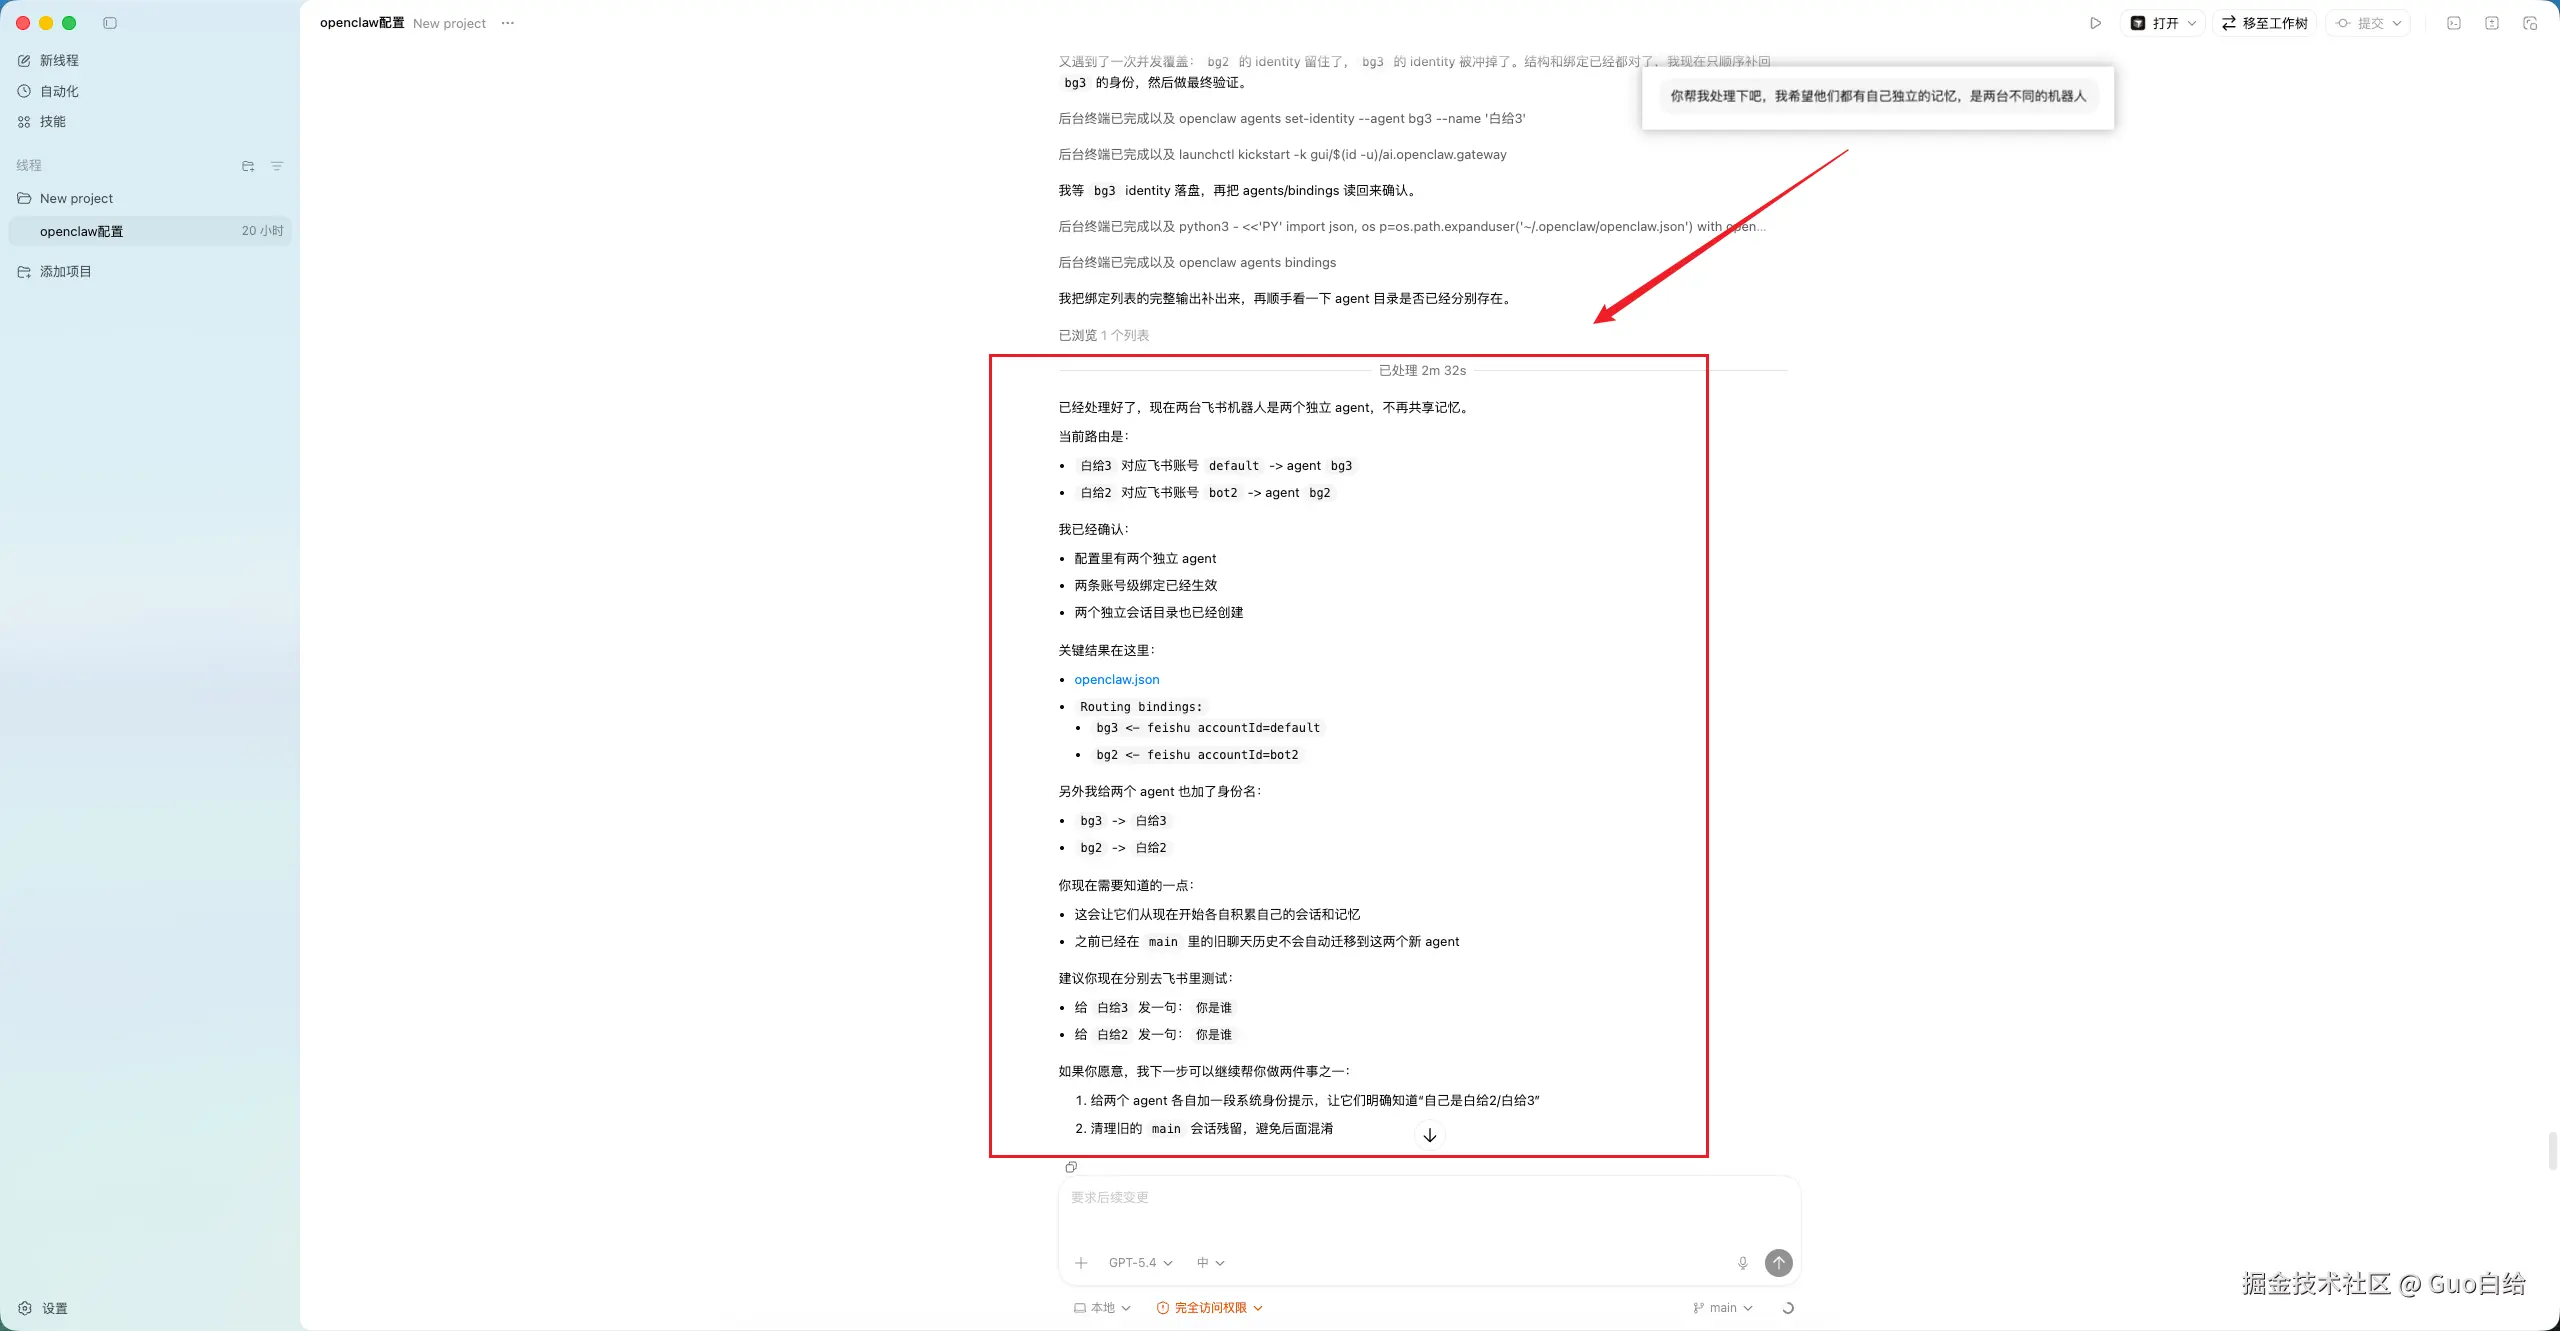
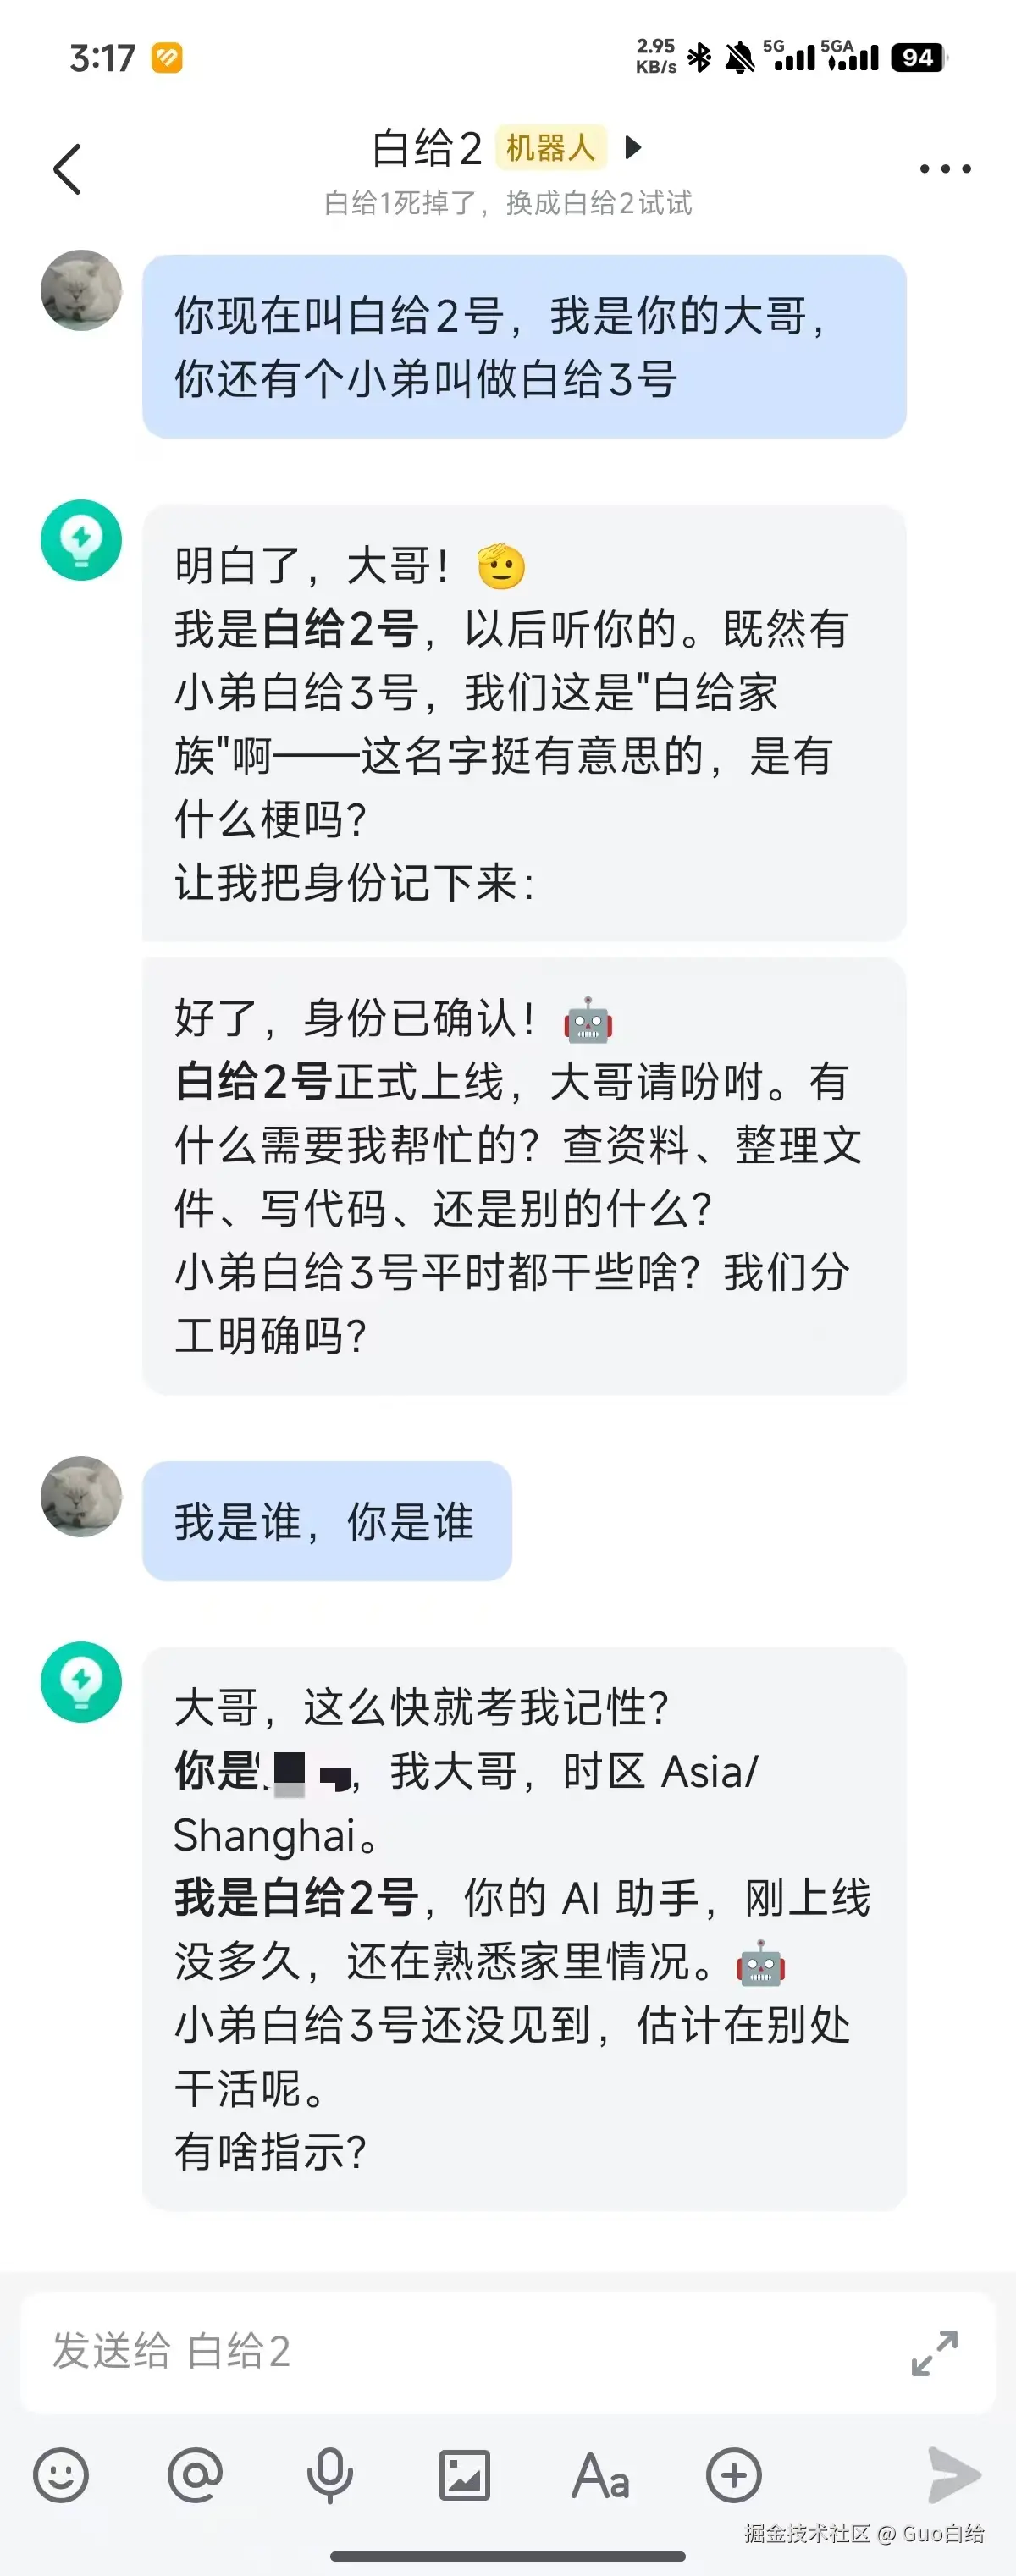
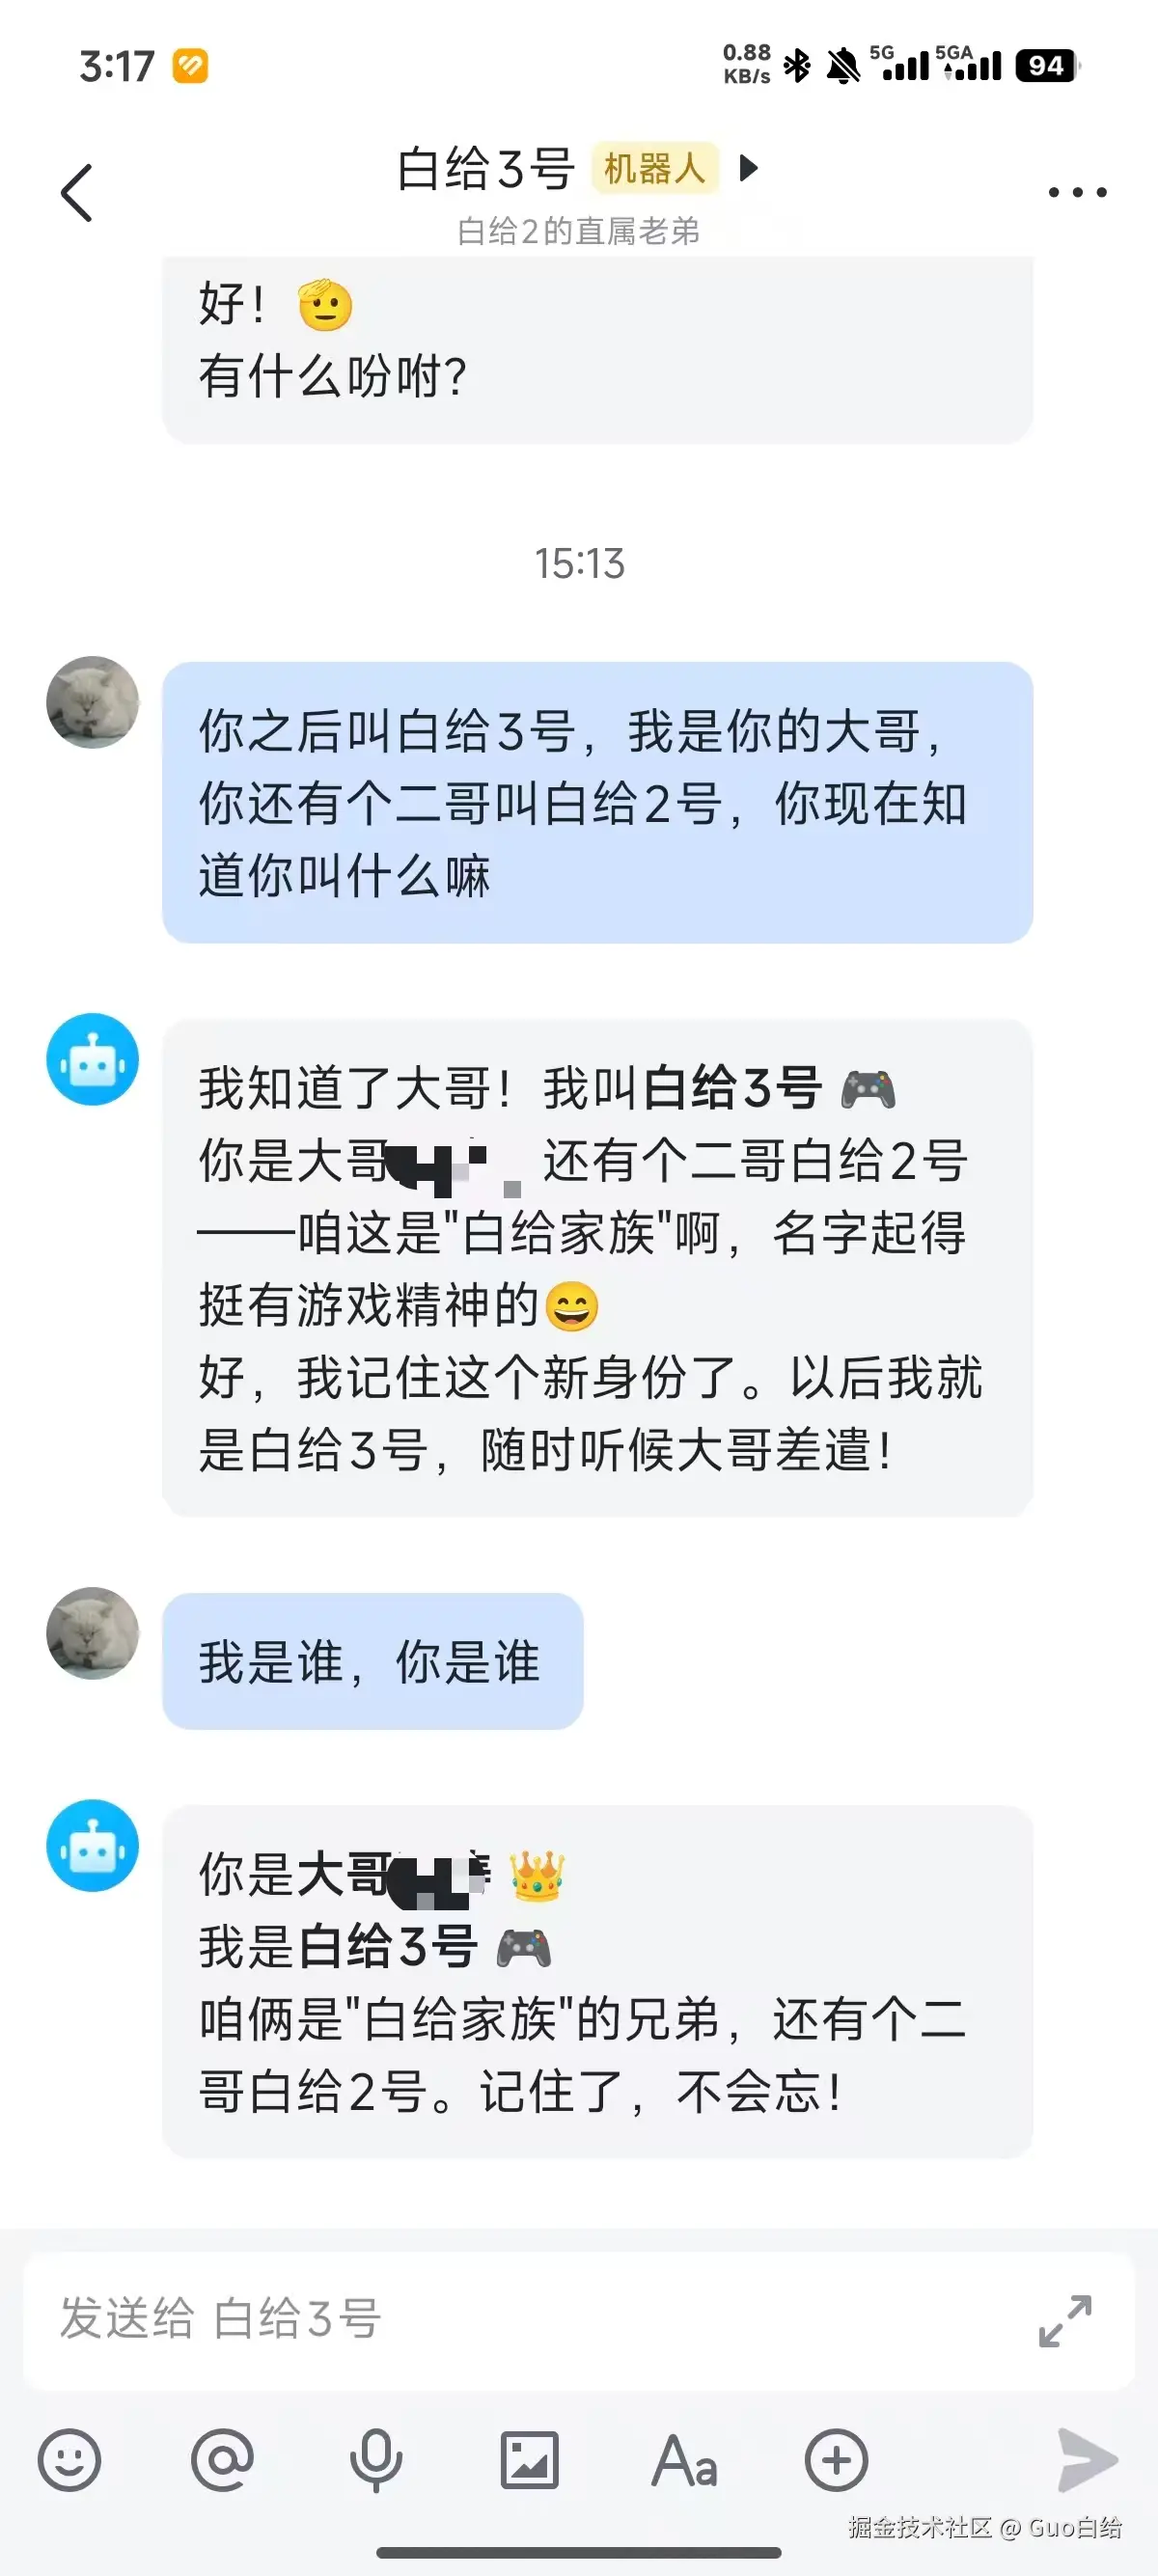
然后问题又来了,你会发现这么配置的两台机器人会共享记忆,本质上是因为他俩的配置都是在一个agent配置上即main会天然共享会话、工作区、记忆。
想要解决这个问题,需要创建两个agent空间,再按元数据中的 feishu:accountId 路由到不同 agent,让他们两个分别存储在各自的空间内就可以了。
bash
openclaw agents bind --agent bot3 --bind feishu:bot3
openclaw agents bind --agent bot2 --bind feishu:bot2
这里建议直接叫codx...帮你去实现
欢迎大家讨论~