Android 网络编程入门到实战:HttpURLConnection、JSON 处理、OkHttp 与 Retrofit2
目录
- [Android 网络编程:从 HttpURLConnection 到 Retrofit2](#Android 网络编程:从 HttpURLConnection 到 Retrofit2)
- [1. 前言](#1. 前言)
- [2. 网络编程基础](#2. 网络编程基础)
- [2.1 网络通信协议](#2.1 网络通信协议)
- [2.2 TCP、UDP、HTTP 与 HTTPS](#2.2 TCP、UDP、HTTP 与 HTTPS)
- [3. HttpURLConnection](#3. HttpURLConnection)
- [3.1 前置代码](#3.1 前置代码)
- [3.2 usesCleartextTraffic 允许明文传输](#3.2 usesCleartextTraffic 允许明文传输)
- [3.3 配置网络安全策略(Android 9.0 及以上)](#3.3 配置网络安全策略(Android 9.0 及以上))
- [3.4 使用 HttpURLConnection 发送 GET 请求](#3.4 使用 HttpURLConnection 发送 GET 请求)
- [3.5 使用 HttpURLConnection 发送 POST 请求](#3.5 使用 HttpURLConnection 发送 POST 请求)
- [4. JSONObject](#4. JSONObject)
- [4.1 使用 JSONObject 创建 JSON](#4.1 使用 JSONObject 创建 JSON)
- [4.2 使用 JSONObject 提取参数](#4.2 使用 JSONObject 提取参数)
- [5. Gson](#5. Gson)
- [5.1 使用 Gson 处理 JSON 数据](#5.1 使用 Gson 处理 JSON 数据)
- [5.2 使用 Gson 将实体类转为 JSON](#5.2 使用 Gson 将实体类转为 JSON)
- [5.3 使用 Gson 将 JSON 转为实体类](#5.3 使用 Gson 将 JSON 转为实体类)
- [6. Gson](#6. Gson)
- [6.1 前置代码](#6.1 前置代码)
- [6.2 引入依赖](#6.2 引入依赖)
- [6.3 使用 OkHttp 发起 GET 请求](#6.3 使用 OkHttp 发起 GET 请求)
- [6.4 使用 Gson 处理服务端返回的结果](#6.4 使用 Gson 处理服务端返回的结果)
- [6.5 使用 OkHttp 发起 POST 请求](#6.5 使用 OkHttp 发起 POST 请求)
- [7. Retrofit2](#7. Retrofit2)
- [7.1 前置代码](#7.1 前置代码)
- [7.2 引入依赖](#7.2 引入依赖)
- [7.3 Retrofit2 发起 GET 请求](#7.3 Retrofit2 发起 GET 请求)
- [7.4 Retrofit2 发起 POST 请求](#7.4 Retrofit2 发起 POST 请求)
- [8. 注意事项](#8. 注意事项)
- [9. 小结](#9. 小结)
- [10. 相关代码附录](#10. 相关代码附录)
- [10.1 Manifest 与依赖](#10.1 Manifest 与依赖)
- [10.2 HttpUrlConnectionActivity](#10.2 HttpUrlConnectionActivity)
- [10.3 JSONObjectActivity](#10.3 JSONObjectActivity)
- [10.4 OkHttpActivity](#10.4 OkHttpActivity)
- [10.5 Retrofit2Activity](#10.5 Retrofit2Activity)
- [10.6 布局文件](#10.6 布局文件)
- [10.7 ApiService 与数据模型](#10.7 ApiService 与数据模型)
1. 前言
Android 应用中的网络能力,通常会经历从底层 API 到高级封装的演进过程。理解 HttpURLConnection 有助于掌握请求的底层组成;掌握 JSONObject 与 Gson,可以解决数据组装与解析问题;熟悉 OkHttp 和 Retrofit2,则能够在实际开发中显著提升效率与可维护性。
本文按照知识推进顺序展开,先处理网络环境配置,再依次完成 HttpURLConnection、JSONObject/Gson、OkHttp、Retrofit2 的请求与解析流程,并在相应位置补充网络通信原理、协议背景和使用边界。
2. 网络编程基础
2.1 网络通信协议
在计算机网络中,协议用于约定两台设备之间如何通信,包括数据格式、传输方式、错误检测方法,以及如何建立和结束通信。不同系统能够互相协作,本质上依赖的就是这些统一规则。
协议的作用可以概括为下表:
| 作用 | 说明 |
|---|---|
| 数据格式化 | 规定传输数据的组织方式 |
| 传输规则 | 规定如何发送、接收、确认和重传 |
| 错误检测与处理 | 保障数据在传输过程中尽量完整、可校验 |
| 通信管理 | 规定连接建立、维持和结束的方式 |
在网络分层模型中,常见的是 OSI 模型和 TCP/IP 模型。Android 实际开发更贴近 TCP/IP 模型,但 OSI 模型更适合理解分层结构。
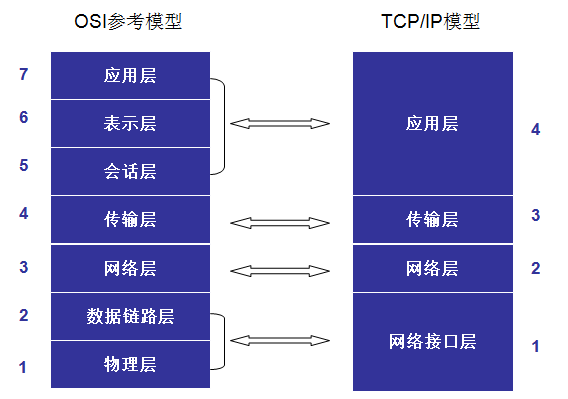
从 Android 开发视角出发,可以先抓住四层含义:
| 分层 | 作用 | 常见协议 |
|---|---|---|
| 应用层 | 向应用提供网络服务接口 | HTTP、HTTPS、FTP、DNS |
| 传输层 | 提供端到端通信能力 | TCP、UDP |
| 网络层 | 负责寻址和路由 | IP、ICMP |
| 网络接口层 | 负责和物理网络交互 | 以太网、Wi-Fi |
2.2 TCP、UDP、HTTP 与 HTTPS
TCP 是面向连接的传输层协议,强调可靠、按序和可重传,适合网页访问、接口请求、文件传输等场景。UDP 是无连接协议,开销更小,适合实时性要求高、允许少量丢包的场景,例如音视频通信和实时游戏。
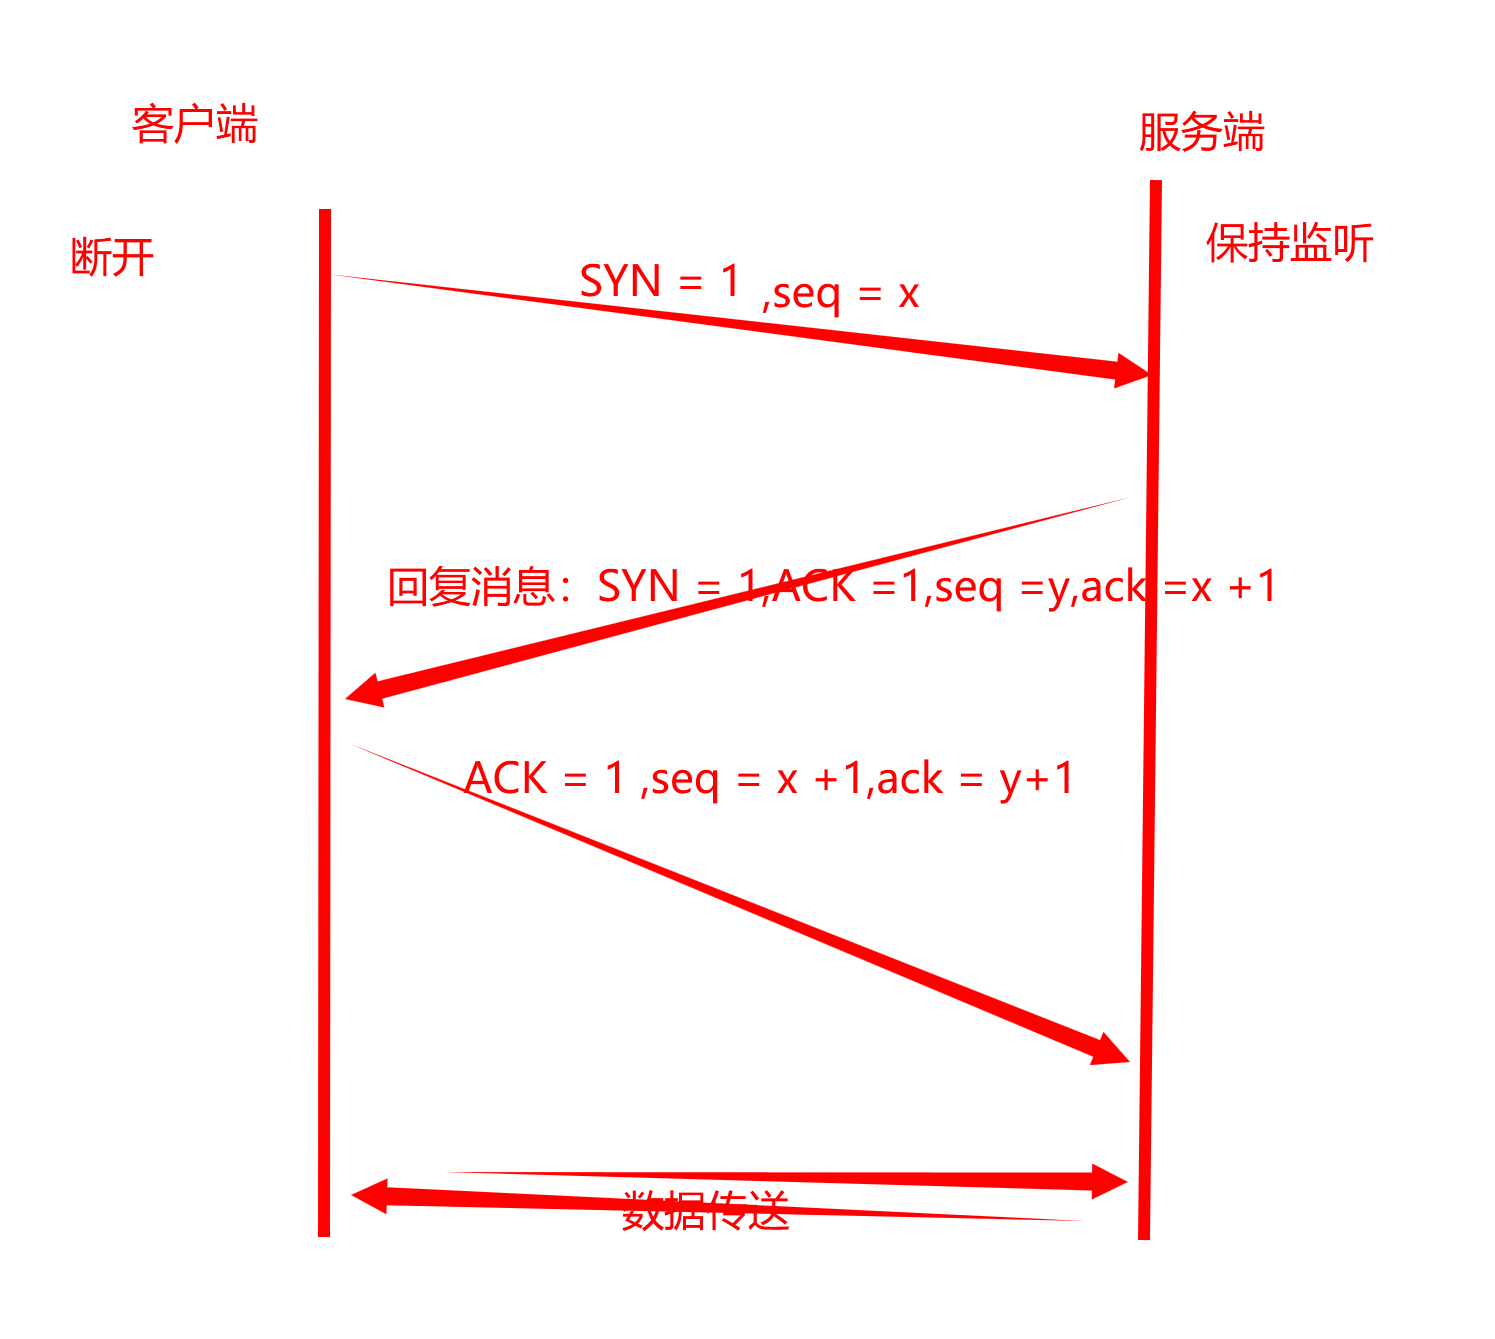
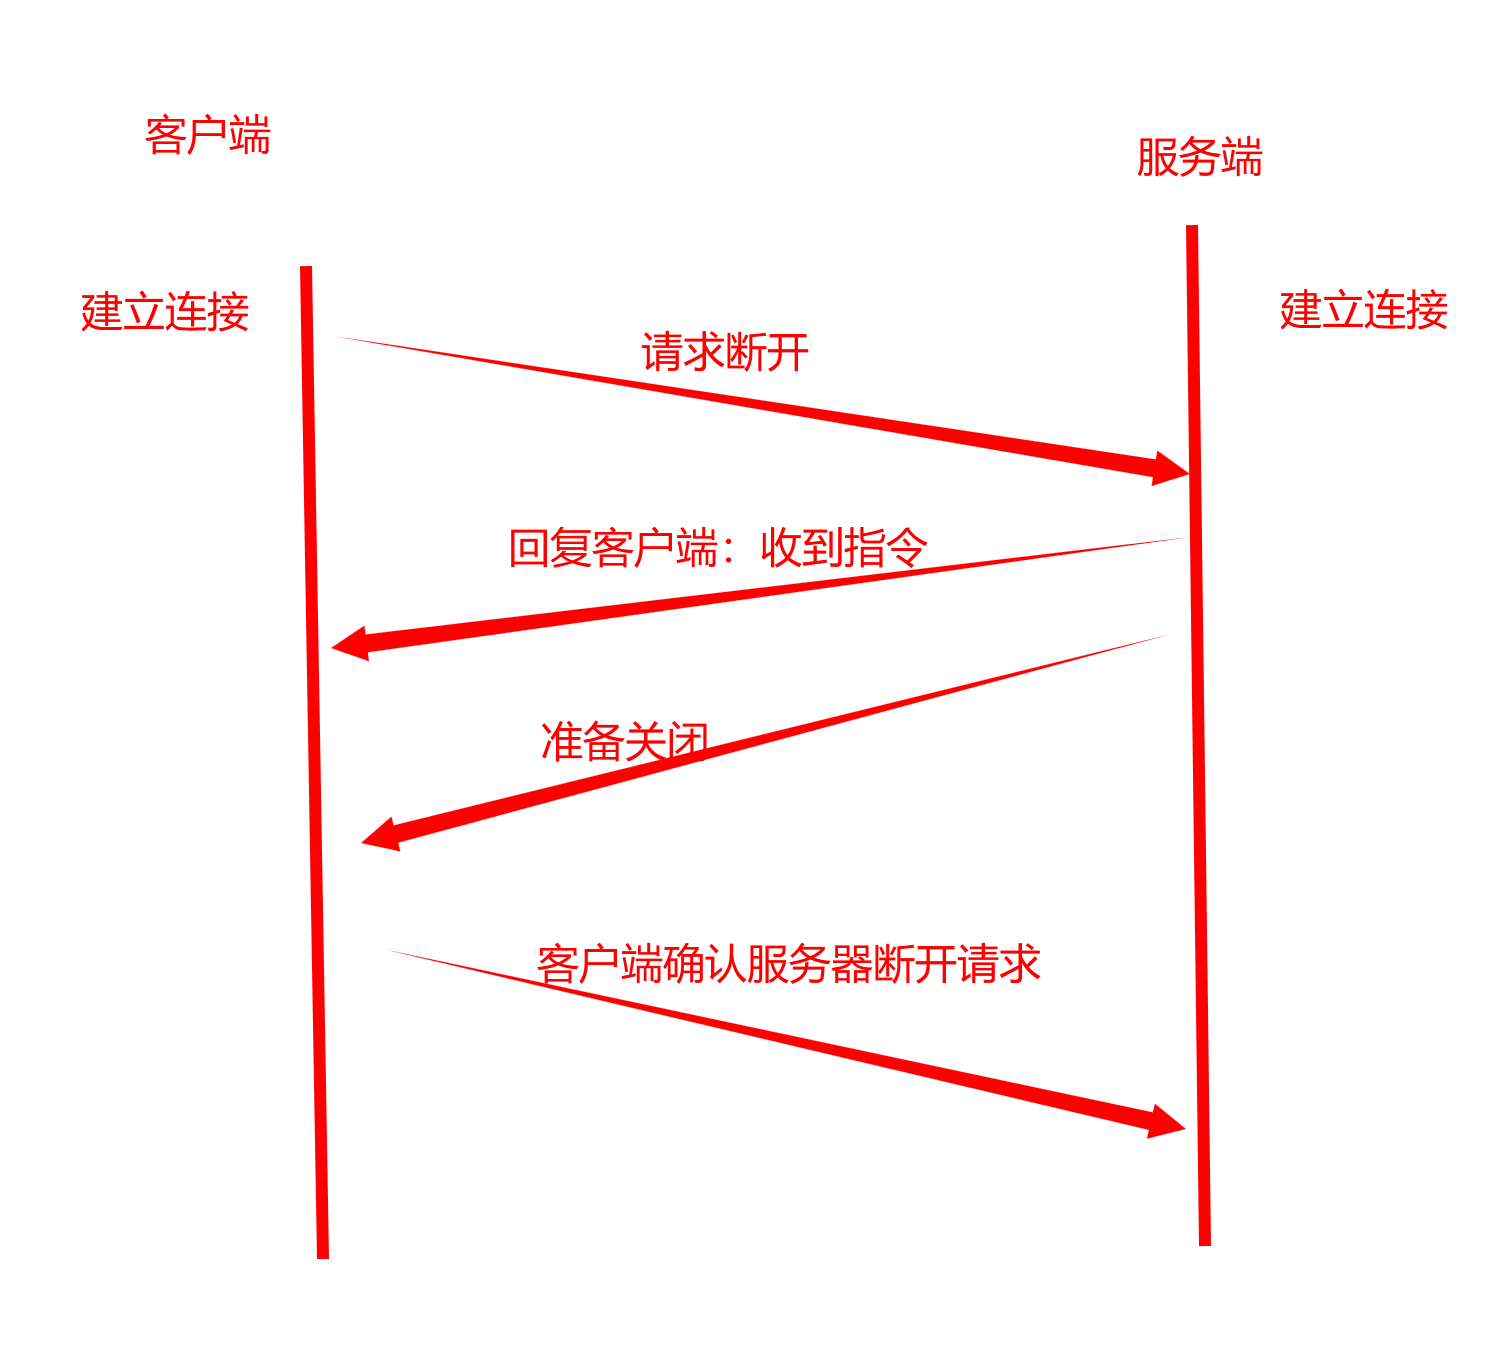
TCP 在建立连接时会经历三次握手,在断开连接时会经历四次挥手。对应示意图如下:
HTTP 是应用层的请求-响应协议,HTTPS 则是在 HTTP 基础上增加 SSL/TLS 加密后的安全版本。移动端访问服务端接口时,最常见的就是 HTTP/HTTPS。
常见请求方法如下:
| 方法 | 用途 |
|---|---|
| GET | 获取资源 |
| POST | 提交数据 |
| PUT | 更新资源 |
| DELETE | 删除资源 |
| PATCH | 局部更新资源 |
请求和响应的基本过程如下:
客户端构建请求
发送到服务器
服务器处理请求
返回响应数据
客户端接收并解析结果
3. HttpURLConnection
3.1 前置代码
先准备界面控件,并给按钮设置点击事件。后续点击不同按钮时,分别发起 GET 和 POST 请求。
xml
<?xml version="1.0" encoding="utf-8"?>
<androidx.constraintlayout.widget.ConstraintLayout xmlns:android="http://schemas.android.com/apk/res/android"
    xmlns:app="http://schemas.android.com/apk/res-auto"
    xmlns:tools="http://schemas.android.com/tools"
    android:id="@+id/main"
    android:layout_width="match_parent"
    android:layout_height="match_parent"
    android:padding="16dp"
    tools:context=".activity.HttpUrlConnectionActivity">

    <TextView
        android:id="@+id/tv_get_label"
        android:layout_width="wrap_content"
        android:layout_height="wrap_content"
        android:text="GET请求:"
        app:layout_constraintStart_toStartOf="parent"
        app:layout_constraintTop_toTopOf="parent" />

    <EditText
        android:id="@+id/et_user_id"
        android:layout_width="match_parent"
        android:layout_height="wrap_content"
        android:hint="请输入要查询的用户id"
        android:inputType="number"
        app:layout_constraintStart_toStartOf="parent"
        app:layout_constraintTop_toBottomOf="@id/tv_get_label" />

    <Button
        android:id="@+id/btn_get"
        android:layout_width="match_parent"
        android:layout_height="wrap_content"
        android:text="发起GET请求"
        app:layout_constraintStart_toStartOf="parent"
        app:layout_constraintTop_toBottomOf="@id/et_user_id" />


    <TextView
        android:id="@+id/tv_post_label"
        android:layout_width="wrap_content"
        android:layout_height="wrap_content"
        android:layout_marginTop="40dp"
        android:text="POST 请求:"
        app:layout_constraintStart_toStartOf="parent"
        app:layout_constraintTop_toBottomOf="@id/btn_get" />

    <EditText
        android:id="@+id/et_user_name"
        android:layout_width="match_parent"
        android:layout_height="wrap_content"
        android:hint="请输入用户名"
        app:layout_constraintStart_toStartOf="parent"
        app:layout_constraintTop_toBottomOf="@id/tv_post_label" />

    <EditText
        android:id="@+id/et_password"
        android:layout_width="match_parent"
        android:layout_height="wrap_content"
        android:hint="请输入密码"
        android:inputType="textPassword"
        app:layout_constraintStart_toStartOf="parent"
        app:layout_constraintTop_toBottomOf="@id/et_user_name" />

    <Button
        android:id="@+id/btn_post"
        android:layout_width="match_parent"
        android:layout_height="wrap_content"
        android:text="发起POST请求"
        app:layout_constraintStart_toStartOf="parent"
        app:layout_constraintTop_toBottomOf="@id/et_password" />


    <TextView
        android:layout_width="wrap_content"
        android:layout_height="wrap_content"
        android:text="HttpURLConnection"
        app:layout_constraintBottom_toBottomOf="parent"
        app:layout_constraintEnd_toEndOf="parent" />

</androidx.constraintlayout.widget.ConstraintLayout>
/NetworkByJavaProject/app/src/main/res/layout/activity_http_url_connection.xml
java
@Override
protected void onCreate(Bundle savedInstanceState) {
    super.onCreate(savedInstanceState);
    setContentView(R.layout.activity_http_url_connection);

    findViewById(R.id.btn_get).setOnClickListener(this);
    findViewById(R.id.btn_post).setOnClickListener(this);
    etUserId = findViewById(R.id.et_user_id);
    etUserName = findViewById(R.id.et_user_name);
    etPassword = findViewById(R.id.et_password);

}

@Override
public void onClick(View v) {
    if (v.getId() == R.id.btn_get) {
        sendGetRequest();
    } else if (v.getId() == R.id.btn_post) {
        sendPostRequest();
    }
}
/NetworkByJavaProject/app/src/main/java/com/ls/networkbyjavaproject/activity/HttpUrlConnectionActivity.java
3.2 usesCleartextTraffic 允许明文传输
在清单文件中先声明网络访问权限,同时允许访问 HTTP 明文地址。
xml
<?xml version="1.0" encoding="utf-8"?>
<manifest xmlns:android="http://schemas.android.com/apk/res/android"
    xmlns:tools="http://schemas.android.com/tools">
    <!-- 声明网络访问权限 -->
    <uses-permission android:name="android.permission.INTERNET" />

    <application
        android:allowBackup="true"
        android:dataExtractionRules="@xml/data_extraction_rules"
        android:fullBackupContent="@xml/backup_rules"
        android:icon="@mipmap/ic_launcher"
        android:label="@string/app_name"
        android:roundIcon="@mipmap/ic_launcher_round"
        android:supportsRtl="true"
        android:theme="@style/Theme.NetworkByJavaProject"
        android:usesCleartextTraffic="true"
        tools:targetApi="31">
/NetworkByJavaProject/app/src/main/AndroidManifest.xml
- 声明网络权限。
android:usesCleartextTraffic="true"允许当前应用访问 HTTP 明文地址。
3.3 配置网络安全策略(Android 9.0 及以上)
从 Android 9.0 开始,系统默认只允许 HTTPS 请求。如果需要访问 HTTP,可以额外配置网络安全策略。
先在 AndroidManifest.xml 中指定网络安全配置文件:
xml
<application
    ....
    android:networkSecurityConfig="@xml/network_security_config">
    ....
</application>
然后创建 res/xml/network_security_config.xml:
xml
<?xml version="1.0" encoding="utf-8"?>
<network-security-config>
    <!-- 允许应用使用明文流量(HTTP) -->
    <domain-config cleartextTrafficPermitted="true">
        <--表示允许某个域名-->
        <domain includeSubdomains="true">titok.fzqq.fun</domain>
    </domain-config>
</network-security-config>
如果只是快速验证,也可以直接在 application 中配置全局明文访问:
xml
<application
    ....
    android:usesCleartextTraffic="true">
    ....
</application>
按域名配置的方式约束更明确,全局放开更适合临时验证。
3.4 使用 HttpURLConnection 发送 GET 请求
- 获取输入框输入的用户 ID,拼接到 URL 的参数中。
- 创建
URL对象,该对象表示要连接的服务器地址。 - 打开连接,对
URL对象调用openConnection()方法,并且强转为HttpURLConnection,因为子类提供了 HTTP 请求特有的参数和方法。 - 对连接设置请求方法
connection.setRequestMethod("GET")。 - 设置连接超时时间和读取数据超时时间。
- 获取服务器输入流,可以从流中读取服务器返回的数据。
- 将输入流包装成
BufferedReader,方便读取数据。 - 使用
StringBuilder拼接服务端数据。 - 循环读取服务端返回数据,每次读取一行并拼接到
StringBuilder中;当读取结果为null时,说明数据已经读取完成。 - 关闭连接,释放资源。
- 在子线程的
run()方法中执行网络请求,在主线程中通过runOnUiThread()更新 UI。
java
/**
 * 发起get请求
 */
private void sendGetRequest() {
    new Thread(new Runnable() {
        @Override
        public void run() {
            String id = etUserId.getText().toString();
            String urlAdress = "http://titok.fzqq.fun/addons/cms/api.user/userInfo?user_id=" + id + "&type=archives";
            Log.i(TAG, "urlAdress:" + urlAdress);
            try {
                //创建一个URL对象,这个对象表示要连接的服务器地址
                URL url = new URL(urlAdress);
                //打开连接,HttpURLConnection里面HTPP特有的参数设定、方法
                HttpURLConnection connection = (HttpURLConnection) url.openConnection();
                //指定为GET请求方式
                connection.setRequestMethod("GET");
                //连接超时时间
                connection.setConnectTimeout(8000);
                //读取数据超时时间
                connection.setReadTimeout(8000);

                //获取服务器的输入流,从这里面可以读取服务器返回的数据
                InputStream inputStream = connection.getInputStream();
                //将输入流包装为BufferedReader,方便读取数据
                BufferedReader reader = new BufferedReader(new InputStreamReader(inputStream));

                //用于存储从服务器返回的完整数据
                StringBuilder builder = new StringBuilder();
                //循环的读取服务器返回的数据,直到readLine返回null,表示数据读取完毕
                String line;
                while ((line = reader.readLine()) != null) {
                    builder.append(line);
                }
                //返回主线程 更新UI
                runOnUiThread(() -> {
                    //把读取到的数据转成字符串
                    String string = builder.toString();
                    Log.i(TAG, "网络访问结果:" + string);
                });

                //关闭连接、释放资源
                connection.disconnect();

            } catch (MalformedURLException e) {
                throw new RuntimeException(e);
            } catch (IOException e) {
                throw new RuntimeException(e);
            }
        }
    }).start();
}
Android 不允许在主线程中直接执行网络请求,因此网络访问放在子线程中执行,界面更新再切回主线程。
3.5 使用 HttpURLConnection 发送 POST 请求
- 先定义好 POST 请求的 URL。
- 根据 URL 字符串创建
URL对象。 - 打开 URL 对象连接,并转为
HttpURLConnection。 - 对连接设置请求方法
POST。 - 配置连接允许向服务端输出数据。
- 在请求头中设置
Content-Type,用来声明请求体中的数据格式。 - 在请求头中设置
Accept,用来声明期望返回的数据类型。
java
HttpURLConnection connection = (HttpURLConnection) url.openConnection();
connection.setRequestMethod("POST");//指定为post请求方式
connection.setDoOutput(true);//允许向服务端输出数据
//在请求头中指定contentType,以此来告诉服务器请求体中的数据
connection.setRequestProperty("Content-Type", "application/json;charset=utf-8");
//在请求头中指定Accept,为了告诉服务器需要返回的数据类型
connection.setRequestProperty("Accept", "appliction/json");- 从账号名、密码输入框中获取输入的数据。
- 获取到的数据拼接为 JSON 格式的请求体。
java
String account = etUserName.getText().toString();
String password = etPassword.getText().toString();
// {"account": "lsxbug","password": "123456"}
String jsonBody = "{\"account\":\"" + account + "\",\"password\": \"" + password + "\"}";
Log.i(TAG, "jsonBody: " + jsonBody);- 将请求体字符串转为字节数组,并指定字符集为
utf-8。 - 通过连接获取输出流,在输出流中写入请求体数据。
java
//通过输出流像服务器发送数据,并指定编码格式为utf-8
OutputStream os = connection.getOutputStream();
byte[] bytes = jsonBody.getBytes("utf-8");
os.write(bytes, 0, jsonBody.length());- 从连接中获取响应状态码,根据状态码进行后续逻辑。
- 如果返回码是
HttpURLConnection.HTTP_OK,则从连接中获取输入流,并继续读取响应数据。 - 使用
BufferedReader与StringBuilder处理最终结果。 - 在主线程中拿到拼接后的字符串。
java
/**
 * 发起一个post请求
 */
private void sendPostRequest() {
    new Thread(new Runnable() {
        @Override
        public void run() {
            String loginUrl = "http://titok.fzqq.fun/addons/cms/api.login/login";
            //创建一个URL对象,这个对象表示要连接的服务器地址
            try {
                URL url = new URL(loginUrl);
                //打开连接,HttpURLConnection里面HTPP特有的参数设定、方法
                HttpURLConnection connection = (HttpURLConnection) url.openConnection();
                connection.setRequestMethod("POST");//指定为post请求方式
                connection.setDoOutput(true);//允许向服务端输出数据
                //在请求头中指定contentType,以此来告诉服务器请求体中的数据
                connection.setRequestProperty("Content-Type", "application/json;charset=utf-8");
                //在请求头中指定Accept,为了告诉服务器需要返回的数据类型
                connection.setRequestProperty("Accept", "appliction/json");

                String account = etUserName.getText().toString();
                String password = etPassword.getText().toString();
                // {"account": "lsxbug","password": "123456"}
                String jsonBody = "{\"account\":\"" + account + "\",\"password\": \"" + password + "\"}";
                Log.i(TAG, "jsonBody: " + jsonBody);
                //通过输出流像服务器发送数据,并指定编码格式为utf-8
                OutputStream os = connection.getOutputStream();
                byte[] bytes = jsonBody.getBytes("utf-8");
                os.write(bytes, 0, jsonBody.length());


                //读取响应
                int responseCode = connection.getResponseCode();
                if (responseCode == HttpURLConnection.HTTP_OK) {
                    //200表示访问成功
                    InputStream is = connection.getInputStream();

                    BufferedReader br = new BufferedReader(new InputStreamReader(is, "utf-8"));
                    //用于存储从服务器返回的完整数据
                    StringBuilder builder = new StringBuilder();
                    //循环的读取服务器返回的数据,直到readLine返回null,表示数据读取完毕
                    String line;
                    while ((line = br.readLine()) != null) {
                        builder.append(line);
                    }

                    runOnUiThread(new Runnable() {
                        @Override
                        public void run() {
                            String loginResult = builder.toString();
                            Log.i(TAG, "loginResult: " + loginResult);
                        }
                    });

                } else {
                    //请求失败
                    Log.e(TAG, "run: 网络请求失败!");
                }


            } catch (MalformedURLException e) {
                throw new RuntimeException(e);
            } catch (IOException e) {
                throw new RuntimeException(e);
            }

        }
    }).start();
}
Content-Type 与 Accept 表示的含义不同,前者描述请求体格式,后者描述期望返回的数据类型。
4. JSONObject
4.1 使用 JSONObject 创建 JSON
xml
<?xml version="1.0" encoding="utf-8"?>
<androidx.constraintlayout.widget.ConstraintLayout xmlns:android="http://schemas.android.com/apk/res/android"
    xmlns:app="http://schemas.android.com/apk/res-auto"
    xmlns:tools="http://schemas.android.com/tools"
    android:id="@+id/main"
    android:layout_width="match_parent"
    android:layout_height="match_parent"
    android:padding="16dp"
    tools:context=".activity.JSONObjectActivity">

    <Button
        android:id="@+id/btn_object"
        android:layout_width="match_parent"
        android:layout_height="wrap_content"
        android:text="提取JSON数据"
        app:layout_constraintStart_toStartOf="parent"
        app:layout_constraintTop_toTopOf="parent" />

    <Button
        android:id="@+id/btn_string"
        android:layout_width="match_parent"
        android:layout_height="wrap_content"
        android:layout_marginTop="10dp"
        android:text="创建JSON数据"
        app:layout_constraintStart_toStartOf="parent"
        app:layout_constraintTop_toBottomOf="@id/btn_object" />

    <Button
        android:id="@+id/btn_gson_object"
        android:layout_width="match_parent"
        android:layout_height="wrap_content"
        android:layout_marginTop="80dp"
        android:text="Gson提取JSON数据"
        app:layout_constraintStart_toStartOf="parent"
        app:layout_constraintTop_toBottomOf="@id/btn_string" />

    <Button
        android:id="@+id/btn_gson_string"
        android:layout_width="match_parent"
        android:layout_height="wrap_content"
        android:layout_marginTop="10dp"
        android:text="Gson创建JSON数据"
        app:layout_constraintStart_toStartOf="parent"
        app:layout_constraintTop_toBottomOf="@id/btn_gson_object" />
</androidx.constraintlayout.widget.ConstraintLayout>
/NetworkByJavaProject/app/src/main/res/layout/activity_jsonobject.xml
java
private static final String TAG = "JSONObjectActivity";

@Override
protected void onCreate(Bundle savedInstanceState) {
    super.onCreate(savedInstanceState);
    setContentView(R.layout.activity_jsonobject);

    findViewById(R.id.btn_object).setOnClickListener(this);
    findViewById(R.id.btn_string).setOnClickListener(this);
    findViewById(R.id.btn_gson_object).setOnClickListener(this);
    findViewById(R.id.btn_gson_string).setOnClickListener(this);
}

@Override
public void onClick(View v) {
    if (v.getId() == R.id.btn_object) {
        //提取JSON数据
        getJSON();
    } else if (v.getId() == R.id.btn_string) {
        //创建JSON数据
        createJSON();
    } else if (v.getId() == R.id.btn_gson_object) {
        //使用Gson提取JSON数据
        gsonCreateJSON();
    } else if (v.getId() == R.id.btn_gson_string) {
        //使用Gson创建JSON数据
        gsonGetJSON();
    }
}
/NetworkByJavaProject/app/src/main/java/com/ls/networkbyjavaproject/activity/JSONObjectActivity.java
JSONObject使用put()添加键值对。- 键值对的 key 是
String,value 可以是基本类型,也可以继续嵌套JSONObject。 JSONArray用来构造数组数据。- 最后通过
toString()转成字符串。
java
/**
 * 使用JSONObject完成json数据的创建
 * {
 * "name": "Alice",
 * "age": 30,
 * "isStudent": false,
 * "address": {
 * "city": "New York",
 * "zip": "10001"
 * },
 * "courses": ["Math", "Science", "History"],
 * "grades": [85, 90, 92],
 * "graduated": null
 * }
 */
private void createJSON() {
    //创建JSONObject对象
    JSONObject jsonObject = new JSONObject();
    try {
        jsonObject.put("name", "Alice");
        jsonObject.put("age", 30);
        jsonObject.put("isStudent", false);

        //嵌套一个JSON对象
        JSONObject addressJson = new JSONObject();
        addressJson.put("city", "New York");
        addressJson.put("zip", "10001");
        jsonObject.put("address", addressJson);

        JSONArray courses = new JSONArray();
        courses.put("Math");
        courses.put("Science");
        courses.put("History");
        jsonObject.put("courses", courses);

        JSONArray grades = new JSONArray();
        grades.put("85");
        grades.put("90");
        grades.put("92");
        jsonObject.put("grades", grades);

        jsonObject.put("graduated", null);

        //把JsonObject对象转成字符串
        String objectString = jsonObject.toString();
        Log.i(TAG, "createJSON: objectString:" + objectString);
    } catch (JSONException e) {
        throw new RuntimeException(e);
    }
}
4.2 使用 JSONObject 提取参数
JSONObject调用对应的getType()方法获取指定 key 的值。- 如果获取的是
JSONArray中的某个元素,可以先通过getJSONArray()得到数组,再通过getString(index)读取指定位置的元素。
java
private void getJSON() {
    String json = "{\"name\":\"Alice\",\"age\":30,\"isStudent\":false,\"address\":{\"city\":\"New York\",\"zip\":\"10001\"},\"courses\":[\"Math\",\"Science\",\"History\"],\"grades\":[\"85\",\"90\",\"92\"]}\n";
    try {
        //使用JSONObject对象将字符串转为json对象
        JSONObject object = new JSONObject(json);

        int age = object.getInt("age");
        String name = object.getString("name");
        Log.i(TAG, "getJSON: age = " + age);
        Log.i(TAG, "getJSON: name = " + name);
        JSONObject address = object.getJSONObject("address");
        String city = address.getString("city");
        Log.i(TAG, "getJSON: city = " + city);

        JSONArray courses = object.getJSONArray("courses");
        String h = courses.getString(2);
        Log.i(TAG, "getJSON: h = = " + h);

    } catch (JSONException e) {
        throw new RuntimeException(e);
    }
}
5. Gson
5.1 使用 Gson 处理 JSON 数据
先在模块依赖中引入 Gson:
groovy
implementation 'com.google.code.gson:gson:2.11.0'然后定义一个对象类:
java
public class Student {

    private String name;
    private int age;
    private boolean isStudent;

    private Address address;

    private String[] courses;
    private Integer[] grades;


    // get、set
    }
}
/NetworkByJavaProject/app/src/main/java/com/ls/networkbyjavaproject/bean/Student.java
Gson 默认根据字段名和 JSON key 建立映射关系,因此实体类字段命名需要和数据结构对应。
5.2 使用 Gson 将实体类转为 JSON
- 先创建一个对应的实体类对象,并设置字段值。
- 创建一个
Gson对象。 - 调用
toJson(),即可把实体类转为 JSON。
java
private void gsonGetJSON() {
    Student stu = new Student();
    stu.setName("小雷");
    stu.setAge(21);
    stu.setStudent(true);
    Student.Address address = new Student.Address();
    address.setCity("China");
    address.setZip("353333");

    stu.setCourses(new String[]{"语文", "数学", "英语"});
    stu.setGrades(new Integer[]{80, 70, 90});

    stu.setAddress(address);

    Gson gson = new Gson();
    String stuJson = gson.toJson(stu);
    Log.i(TAG, "gsonGetJSON: stuJson = " + stuJson);
}
5.3 使用 Gson 将 JSON 转为实体类
- 创建
Gson对象。 - 调用
fromJson(),传入 JSON 字符串和目标实体类。 Gson会根据字段名和 key 的对应关系完成赋值。
java
private void gsonCreateJSON() {
    String json = "{\"address\":{\"city\":\"China\",\"zip\":\"353333\"},\"age\":31,\"courses\":[\"语文\",\"数学\",\"英语\"],\"grades\":[80,70,90],\"isStudent\":true,\"name\":\"老孙\"}\n";
    Gson gson = new Gson();
    //将json数据转为对应的实体类对象
    Student student = gson.fromJson(json, Student.class);
    String name = student.getName();
    Integer[] grades = student.getGrades();
    Log.i(TAG, "gsonCreateJSON: name = " + name);
    Log.i(TAG, "gsonCreateJSON: grades[1] = " + grades[1]);
}
6. OkHttp
6.1 前置代码
java
private static final String TAG = "OkHttpActivity";
private EditText etUserId;
private EditText etUserName;
private EditText etPassword;

@Override
protected void onCreate(Bundle savedInstanceState) {
    super.onCreate(savedInstanceState);
    setContentView(R.layout.activity_ok_http);

    findViewById(R.id.btn_get).setOnClickListener(this);
    findViewById(R.id.btn_post).setOnClickListener(this);
    etUserId = findViewById(R.id.et_user_id);
    etUserName = findViewById(R.id.et_user_name);
    etPassword = findViewById(R.id.et_password);
}

@Override
public void onClick(View v) {
    if (v.getId() == R.id.btn_get) {
        sendGetRequest();
    } else if (v.getId() == R.id.btn_post) {
        sendPostRequest();
    }
}
/NetworkByJavaProject/app/src/main/java/com/ls/networkbyjavaproject/activity/OkHttpActivity.java
xml
<?xml version="1.0" encoding="utf-8"?>
<androidx.constraintlayout.widget.ConstraintLayout xmlns:android="http://schemas.android.com/apk/res/android"
    xmlns:app="http://schemas.android.com/apk/res-auto"
    xmlns:tools="http://schemas.android.com/tools"
    android:id="@+id/main"
    android:layout_width="match_parent"
    android:layout_height="match_parent"
    android:padding="16dp"
    tools:context=".activity.OkHttpActivity">


    <TextView
        android:id="@+id/tv_get_label"
        android:layout_width="wrap_content"
        android:layout_height="wrap_content"
        android:text="GET请求:"
        app:layout_constraintStart_toStartOf="parent"
        app:layout_constraintTop_toTopOf="parent" />

    <EditText
        android:id="@+id/et_user_id"
        android:layout_width="match_parent"
        android:layout_height="wrap_content"
        android:hint="请输入要查询的用户id"
        android:inputType="number"
        app:layout_constraintStart_toStartOf="parent"
        app:layout_constraintTop_toBottomOf="@id/tv_get_label" />

    <Button
        android:id="@+id/btn_get"
        android:layout_width="match_parent"
        android:layout_height="wrap_content"
        android:text="发起GET请求"
        app:layout_constraintStart_toStartOf="parent"
        app:layout_constraintTop_toBottomOf="@id/et_user_id" />


    <TextView
        android:id="@+id/tv_post_label"
        android:layout_width="wrap_content"
        android:layout_height="wrap_content"
        android:layout_marginTop="40dp"
        android:text="GET请求:"
        app:layout_constraintStart_toStartOf="parent"
        app:layout_constraintTop_toBottomOf="@id/btn_get" />

    <EditText
        android:id="@+id/et_user_name"
        android:layout_width="match_parent"
        android:layout_height="wrap_content"
        android:hint="请输入用户名"
        app:layout_constraintStart_toStartOf="parent"
        app:layout_constraintTop_toBottomOf="@id/tv_post_label" />

    <EditText
        android:id="@+id/et_password"
        android:layout_width="match_parent"
        android:layout_height="wrap_content"
        android:hint="请输入密码"
        android:inputType="textPassword"
        app:layout_constraintStart_toStartOf="parent"
        app:layout_constraintTop_toBottomOf="@id/et_user_name" />

    <Button
        android:id="@+id/btn_post"
        android:layout_width="match_parent"
        android:layout_height="wrap_content"
        android:text="发起POST请求"
        app:layout_constraintStart_toStartOf="parent"
        app:layout_constraintTop_toBottomOf="@id/et_password" />


    <TextView
        android:layout_width="wrap_content"
        android:layout_height="wrap_content"
        android:text="OkHttp"
        app:layout_constraintBottom_toBottomOf="parent"
        app:layout_constraintEnd_toEndOf="parent" />
</androidx.constraintlayout.widget.ConstraintLayout>
/NetworkByJavaProject/app/src/main/res/layout/activity_ok_http.xml
6.2 引入依赖
在模块 build.gradle 的 dependencies 中添加依赖:
groovy
implementation 'com.squareup.okhttp3:okhttp:4.12.0'6.3 使用 OkHttp 发起 GET 请求
- 从输入框中获取输入值,作为 ID 参数,并把 ID 拼接到
urlAdress中。 - 使用构建者模式创建一个
OkHttpClient对象,指定连接超时时间和读取数据超时时间。
java
OkHttpClient okHttpClient = new OkHttpClient.Builder()
                .connectTimeout(10, TimeUnit.SECONDS)
                .readTimeout(30, TimeUnit.SECONDS)
.build();- 创建一个请求对象,设置 URL、请求方式和请求头。
java
Request request = new Request.Builder()
                .url(urlAdress)
                .get()
//                .addHeader("",null);
.build();- 调用
OkHttpClient的newCall()方法,传入请求对象,生成一个Call对象,表示单个请求。 - 创建
Callback对象,重写回调方法。 - 调用
call.enqueue(callback),异步执行网络请求。
java
//生成一个call对象,表示单个请求
Call call = okHttpClient.newCall(request);

Callback callback = new Callback() {
    @Override
    public void onFailure(@NonNull Call call, @NonNull IOException e) {

    }

    @Override
    public void onResponse(@NonNull Call call, @NonNull Response response) throws IOException {


    }
};
//异步执行请求,并在callback中处理结果
call.enqueue(callback);call.execute()则是同步执行请求,可以直接获取结果,但这种形式会阻塞当前线程,不应放在主线程。
java
// 同步执行请求,可以在execute直接获取结果,但是这种形式会阻塞主线程!
//        Response execute = call.execute();
//        execute.isSuccessful();
// ResponseBody body = execute.body();- 虽然
call.enqueue(callback)会异步执行请求,但如果需要更新 UI,仍然要回到主线程。 - 在
onResponse()回调方法中,可以通过response.isSuccessful()判断请求是否成功。
java
/**
 * 使用OkHttp发起get
 */
private void sendGetRequest() {
    String id = etUserId.getText().toString();
    String urlAdress = "http://titok.fzqq.fun/addons/cms/api.user/userInfo?user_id=" + id + "&type=archives";
    //创建OkHttpClient实例对象,用于发起请求
    OkHttpClient okHttpClient = new OkHttpClient.Builder()
            .connectTimeout(10, TimeUnit.SECONDS)
            .readTimeout(30, TimeUnit.SECONDS)
            .build();

    Request request = new Request.Builder()
            .url(urlAdress)
            .get()
//                .addHeader("",null);
            .build();


    //生成一个call对象,表示单个请求
    Call call = okHttpClient.newCall(request);

    Callback callback = new Callback() {
        @Override
        public void onFailure(@NonNull Call call, @NonNull IOException e) {
            runOnUiThread(new Runnable() {
                @Override
                public void run() {
                    Toast.makeText(OkHttpActivity.this, "网络请求失败", Toast.LENGTH_SHORT).show();
                }
            });
        }

        @Override
        public void onResponse(@NonNull Call call, @NonNull Response response) throws IOException {
            runOnUiThread(new Runnable() {
                @Override
                public void run() {
                    if (response.isSuccessful()) {
                        try {
                            String result = response.body().string();
                            Log.i(TAG, "run result: " + result);
                            UserInfoQuery userInfoQuery = new Gson().fromJson(result, UserInfoQuery.class);
                            String msg = "当前用户名为:" + userInfoQuery.getData().getUser().getNickname();
                            Toast.makeText(OkHttpActivity.this, msg, Toast.LENGTH_SHORT).show();
                        } catch (IOException e) {
                            throw new RuntimeException(e);
                        }

                    } else {

                        Toast.makeText(OkHttpActivity.this, "网络请求失败:" + response.code(),
                                Toast.LENGTH_SHORT).show();
                    }
                }
            });

        }
    };
    //异步执行请求,并在callback中处理结果
    call.enqueue(callback);
    //同步执行请求,可以在execute直接获取结果,但是这种形式会阻塞主线程!
//        Response execute = call.execute();
//        execute.isSuccessful();
//        ResponseBody body = execute.body();
}
6.4 使用 Gson 处理服务端返回的结果
根据服务端返回的 JSON,可以先生成对应的实体类,再使用 Gson 把响应结果映射成对象。
json
{
  "code": 1,
  "msg": "",
  "time": "1725173338",
  "data": {
    "user": {
      "id": 2,
      "nickname": "cydic",
      "bio": "",
      "avatar": "http://titok.fzqq.fun/assets/img/qrcode.png",
      "status": "normal",
      "url": "/u/2"
    },
    "list": {
      "total": 0,
      "per_page": 10,
      "current_page": 1,
      "last_page": 0,
      "data": []
    },
    "archives": 0,
    "comments": 0
  }
}
java
/**
 * {"code":1,"msg":"","time":"1725173338",
 * "data":{"user":{"id":2,"nickname":"cydic","bio":"",
 * "avatar":"http:\/\/titok.fzqq.fun\/assets\/img\/qrcode.png","status":"normal","url":"\/u\/2"},
 * "list":{"total":0,"per_page":10,"current_page":1,"last_page":0,"data":[]},"archives":0,"comments":0}}
 */
public class UserInfoQuery {
   private int code;
   private String msg;
   private String time;
   private DataBean data;

   // get、set

      }
   }
}
把返回的 JSON 字符串转成实体类对象后,就可以直接读取对象中的字段:
java
String result = response.body().string();
Log.i(TAG, "run result: " + result);
UserInfoQuery userInfoQuery = new Gson().fromJson(result, UserInfoQuery.class);
String msg = "当前用户名为:" + userInfoQuery.getData().getUser().getNickname();
Toast.makeText(OkHttpActivity.this, msg, Toast.LENGTH_SHORT).show();
6.5 使用 OkHttp 发起 POST 请求
先定义请求体对象。输入框中的账号和密码会先封装成实体类,再转换为 JSON 作为请求体。
java
public class ReqLogin {
    private String account;
    private String password;

    public ReqLogin(String account, String password) {
        this.account = account;
        this.password = password;
    }
  // get、set
}- 定义请求 URL。
- 创建
OkHttpClient()。 - 从输入框获取账号、密码。
- 使用
Gson将账号和密码转换成请求体字符串,再指定请求体编码格式和类型。
java
//Gson拼接一个请求体
String jsonBody = new Gson().toJson(new ReqLogin(account, password));

//请求体的数据格式是json。并且编码格式utf-8
MediaType mediaType = MediaType.get("application/json;charset=utf-8");
RequestBody requestBody = RequestBody.create(jsonBody, mediaType);- 使用构造者模式创建请求,指定 URL、请求方式和请求体。
java
//构建请求
Request request = new Request.Builder()
        .url(loginUrl)
        .post(requestBody)
.build();- 异步发送网络请求,并在回调中处理结果。
- 在
onResponse()中,通过response.body().string()获取响应体。 - 使用 Gson 将返回的 JSON 转成
ResLogin对象。
java
/**
 * POST请求
 */
private void sendPostRequest() {
    String loginUrl = "http://titok.fzqq.fun/addons/cms/api.login/login";

    OkHttpClient client = new OkHttpClient();


    String account = etUserName.getText().toString();
    String password = etPassword.getText().toString();
    //Gson拼接一个请求体
    String jsonBody = new Gson().toJson(new ReqLogin(account, password));

    //请求体的数据格式是json。并且编码格式utf-8
    MediaType mediaType = MediaType.get("application/json;charset=utf-8");
    RequestBody requestBody = RequestBody.create(jsonBody, mediaType);

    //构建请求
    Request request = new Request.Builder()
            .url(loginUrl)
            .post(requestBody)
            .build();


    client.newCall(request).enqueue(new Callback() {
        @Override
        public void onFailure(@NonNull Call call, @NonNull IOException e) {
            runOnUiThread(new Runnable() {
                @Override
                public void run() {
                    Toast.makeText(OkHttpActivity.this, "网络请求失败", Toast.LENGTH_SHORT).show();
                }
            });
        }

        @Override
        public void onResponse(@NonNull Call call, @NonNull Response response) throws IOException {
            runOnUiThread(new Runnable() {
                @Override
                public void run() {
                    if (response.isSuccessful()) {
                        try {
                            String json = response.body().string();
                            Log.i(TAG, "run: " + json);
                            ResLogin resLogin = new Gson().fromJson(json, ResLogin.class);
                            Toast.makeText(OkHttpActivity.this, resLogin.getMsg() +
                                    ",欢迎用户" + resLogin.getData().getUser_id(), Toast.LENGTH_SHORT).show();
                        } catch (IOException e) {
                            throw new RuntimeException(e);
                        }

                    } else {
                        Toast.makeText(OkHttpActivity.this, "登录失败", Toast.LENGTH_SHORT).show();
                    }
                }
            });
        }
    });

}
7. Retrofit2
7.1 前置代码
java
public class Retrofit2Activity extends AppCompatActivity implements View.OnClickListener {
    private static final String TAG = "Retrofit2Activity";
    private EditText etUserId;
    private EditText etUserName;
    private EditText etPassword;

    @Override
    protected void onCreate(Bundle savedInstanceState) {
        super.onCreate(savedInstanceState);
        setContentView(R.layout.activity_retrofit2);

        findViewById(R.id.btn_get).setOnClickListener(this);
        findViewById(R.id.btn_post).setOnClickListener(this);
        etUserId = findViewById(R.id.et_user_id);
        etUserName = findViewById(R.id.et_user_name);
        etPassword = findViewById(R.id.et_password);
    }

    @Override
    public void onClick(View v) {
        if (v.getId() == R.id.btn_get) {
            sendGetRequest();
        } else if (v.getId() == R.id.btn_post) {
            sendPostRequest();
        }
    }
/NetworkByJavaProject/app/src/main/java/com/ls/networkbyjavaproject/activity/Retrofit2Activity.java
xml
<?xml version="1.0" encoding="utf-8"?>
<androidx.constraintlayout.widget.ConstraintLayout xmlns:android="http://schemas.android.com/apk/res/android"
    xmlns:app="http://schemas.android.com/apk/res-auto"
    xmlns:tools="http://schemas.android.com/tools"
    android:id="@+id/main"
    android:layout_width="match_parent"
    android:layout_height="match_parent"
    android:padding="16dp"
    tools:context=".activity.Retrofit2Activity">
    <TextView
        android:id="@+id/tv_get_label"
        android:layout_width="wrap_content"
        android:layout_height="wrap_content"
        android:text="GET请求:"
        app:layout_constraintStart_toStartOf="parent"
        app:layout_constraintTop_toTopOf="parent" />

    <EditText
        android:id="@+id/et_user_id"
        android:layout_width="match_parent"
        android:layout_height="wrap_content"
        android:hint="请输入要查询的用户id"
        android:inputType="number"
        app:layout_constraintStart_toStartOf="parent"
        app:layout_constraintTop_toBottomOf="@id/tv_get_label" />

    <Button
        android:id="@+id/btn_get"
        android:layout_width="match_parent"
        android:layout_height="wrap_content"
        android:text="发起GET请求"
        app:layout_constraintStart_toStartOf="parent"
        app:layout_constraintTop_toBottomOf="@id/et_user_id" />


    <TextView
        android:id="@+id/tv_post_label"
        android:layout_width="wrap_content"
        android:layout_height="wrap_content"
        android:layout_marginTop="40dp"
        android:text="GET请求:"
        app:layout_constraintStart_toStartOf="parent"
        app:layout_constraintTop_toBottomOf="@id/btn_get" />

    <EditText
        android:id="@+id/et_user_name"
        android:layout_width="match_parent"
        android:layout_height="wrap_content"
        android:hint="请输入用户名"
        app:layout_constraintStart_toStartOf="parent"
        app:layout_constraintTop_toBottomOf="@id/tv_post_label" />

    <EditText
        android:id="@+id/et_password"
        android:layout_width="match_parent"
        android:layout_height="wrap_content"
        android:hint="请输入密码"
        android:inputType="textPassword"
        app:layout_constraintStart_toStartOf="parent"
        app:layout_constraintTop_toBottomOf="@id/et_user_name" />

    <Button
        android:id="@+id/btn_post"
        android:layout_width="match_parent"
        android:layout_height="wrap_content"
        android:text="发起POST请求"
        app:layout_constraintStart_toStartOf="parent"
        app:layout_constraintTop_toBottomOf="@id/et_password" />


    <TextView
        android:layout_width="wrap_content"
        android:layout_height="wrap_content"
        android:text="Retrofit"
        app:layout_constraintBottom_toBottomOf="parent"
        app:layout_constraintEnd_toEndOf="parent" />
</androidx.constraintlayout.widget.ConstraintLayout>
/NetworkByJavaProject/app/src/main/res/layout/activity_retrofit2.xml
7.2 引入依赖
先引入 Retrofit:
groovy
implementation 'com.squareup.retrofit2:retrofit:2.11.0'如果要让 Retrofit 自动把响应结果转为对象,还需要加入 Gson 转换器:
groovy
implementation 'com.squareup.retrofit2:converter-gson:2.11.0'7.3 Retrofit2 发起 GET 请求
先定义网络请求接口:
- Retrofit 会在基础 URL 后拼接路径。
@GET用来标记请求方式和路径。@Query用来标记查询参数。
java
/**
 * 定义网络请求接口
 */
public interface ApiService {

    //定义了网络请求接口,指定了请求方式GET、指定URL路径、指定查询参数、指定返回的结果实体类对象
    @GET("addons/cms/api.user/userInfo")
    Call<UserInfoQuery> getUserInfo(
            @Query("user_id") String userId,
            @Query("type") String type);
}
/NetworkByJavaProject/app/src/main/java/com/ls/networkbyjavaproject/reterofit/ApiService.java
使用方式如下:
- 通过构造者创建一个
Retrofit对象,指定服务器地址baseUrl。 - 配置
addConverterFactory(),并传入GsonConverterFactory.create()作为结果转换器。 - 通过
retrofit.create(ApiService.class)获取接口实例。 - 获取输入框中的用户 id。
- 调用接口方法,传入
userId和"archives",返回Call<UserInfoQuery>。 - 通过
enqueue()异步发送请求,并在回调中处理结果。
java
private void sendGetRequest() {

    Retrofit retrofit = new Retrofit.Builder()
            .baseUrl("http://titok.fzqq.fun/")
            .addConverterFactory(GsonConverterFactory.create())//配置一个Gson转换器
            .build();

    ApiService apiService = retrofit.create(ApiService.class);

    String userId = etUserId.getText().toString();
    Call<UserInfoQuery> queryCall = apiService.getUserInfo(userId, "archives");

    queryCall.enqueue(new Callback<UserInfoQuery>() {
        @Override
        public void onResponse(Call<UserInfoQuery> call, Response<UserInfoQuery> response) {
            UserInfoQuery body = response.body();
            String nickname = body.getData().getUser().getNickname();

            Toast.makeText(Retrofit2Activity.this, "查询到:" + nickname, Toast.LENGTH_SHORT).show();
            Log.i(TAG, "onResponse: body " + nickname);
        }

        @Override
        public void onFailure(Call<UserInfoQuery> call, Throwable throwable) {

        }
    });
}
使用 Retrofit 后,回调中可以直接得到已经转换好的实体类对象,不再需要额外手动执行 fromJson()。
7.4 Retrofit2 发起 POST 请求
继续在接口中定义 POST 请求方法,并使用 @Body 标记请求体对象:
java
/**
 * 定义网络请求接口
 */
public interface ApiService {

    //定义了网络请求接口,指定了请求方式GET、指定URL路径、指定查询参数、指定返回的结果实体类对象
    @GET("addons/cms/api.user/userInfo")
    Call<UserInfoQuery> getUserInfo(
            @Query("user_id") String userId,
            @Query("type") String type);

    @POST("addons/cms/api.login/login")
    Call<ResLogin> login(@Body ReqLogin login);
}
使用时,先创建 Retrofit 和 ApiService,再把账号密码封装成 ReqLogin 对象传给接口方法:
java
private void sendPostRequest() {
    Retrofit retrofit = new Retrofit.Builder()
            .baseUrl("http://titok.fzqq.fun/")
            .addConverterFactory(GsonConverterFactory.create())//配置一个Gson转换器
            .build();

    ApiService apiService = retrofit.create(ApiService.class);

    String account = etUserName.getText().toString();
    String password = etPassword.getText().toString();
    Call<ResLogin> loginCall = apiService.login(new ReqLogin(account, password));

    loginCall.enqueue(new Callback<ResLogin>() {
        @Override
        public void onResponse(Call<ResLogin> call, Response<ResLogin> response) {
            ResLogin resLogin = response.body();
            if (response.isSuccessful() && resLogin.getCode() == 1) {
                Toast.makeText(Retrofit2Activity.this, "欢迎你," +
                        response.body().getData().getUser_id(), Toast.LENGTH_SHORT).show();
            } else {
                Toast.makeText(Retrofit2Activity.this, resLogin.getMsg(), Toast.LENGTH_SHORT).show();
//                    Toast.makeText(Retrofit2Activity.this, response.message(), Toast.LENGTH_SHORT).show();
            }
        }

        @Override
        public void onFailure(Call<ResLogin> call, Throwable throwable) {
            Toast.makeText(Retrofit2Activity.this, "网络请求失败", Toast.LENGTH_SHORT).show();
        }
    });
}
调用链路可以用下面这张图辅助理解:
定义 ApiService
Retrofit.create(ApiService.class)
调用接口方法
得到 Call
enqueue 发送请求
回调中拿到实体类结果
8. 注意事项
| 场景 | 说明 |
|---|---|
| 主线程发起网络请求 | Android 不允许在主线程执行耗时网络操作,应放到子线程或异步回调中。 |
| HTTP 明文访问失败 | Android 9.0 及以上默认限制明文流量,需要额外配置。 |
response.body().string() |
响应体通常只能读取一次,读取后不要再次重复消费。 |
execute() 的使用 |
同步请求会阻塞当前线程,不应在主线程调用。 |
Content-Type 和 Accept |
前者描述请求体格式,后者描述期望返回的数据类型。 |
| 实体类字段映射 | Gson 默认根据字段名映射,字段名不一致会影响解析结果。 |
| 原始代码中的拼写和边界问题 | 讲解中可以指出风险,但不直接改动原始实现逻辑。 |
9. 小结
这条学习路径从底层请求出发,逐步过渡到更高层的封装方式:
HttpURLConnection用来理解请求方法、请求头、请求体、输入流和线程切换。JSONObject和Gson负责 JSON 的创建、提取和对象映射。OkHttp用来简化请求构造和异步回调。Retrofit2则把接口声明、参数拼接和结果转换进一步整合为统一调用方式。
沿着这条顺序学习,不仅能看到每一步为什么这样写,也能清楚理解网络层是如何从原生实现演进到工程化封装的。
10. 相关代码附录
10.1 Manifest 与依赖
xml
<?xml version="1.0" encoding="utf-8"?>
<manifest xmlns:android="http://schemas.android.com/apk/res/android"
    xmlns:tools="http://schemas.android.com/tools">
    <!-- 声明网络访问权限 -->
    <uses-permission android:name="android.permission.INTERNET" />

    <application
        android:allowBackup="true"
        android:dataExtractionRules="@xml/data_extraction_rules"
        android:fullBackupContent="@xml/backup_rules"
        android:icon="@mipmap/ic_launcher"
        android:label="@string/app_name"
        android:roundIcon="@mipmap/ic_launcher_round"
        android:supportsRtl="true"
        android:theme="@style/Theme.NetworkByJavaProject"
        android:usesCleartextTraffic="true"
        tools:targetApi="31">
        <activity
            android:name=".activity.JSONObjectActivity"
            android:exported="false" />
        <activity
            android:name=".activity.Retrofit2Activity"
            android:exported="false" />
        <activity
            android:name=".activity.OkHttpActivity"
            android:exported="false" />
        <activity
            android:name=".activity.HttpUrlConnectionActivity"
            android:exported="false" />
        <activity
            android:name=".activity.MainActivity"
            android:exported="true">
            <intent-filter>
                <action android:name="android.intent.action.MAIN" />

                <category android:name="android.intent.category.LAUNCHER" />
            </intent-filter>
        </activity>
    </application>

</manifest>
/NetworkByJavaProject/app/src/main/AndroidManifest.xml
groovy
dependencies {

    implementation libs.appcompat
    implementation libs.material
    implementation libs.activity
    implementation libs.constraintlayout
    testImplementation libs.junit
    androidTestImplementation libs.ext.junit
    androidTestImplementation libs.espresso.core

    //Gson
    implementation 'com.google.code.gson:gson:2.11.0'
    //Okhttp
    implementation 'com.squareup.okhttp3:okhttp:4.12.0'
    //retrofit
    implementation 'com.squareup.retrofit2:retrofit:2.11.0'
    //Gson转换器
    implementation 'com.squareup.retrofit2:converter-gson:2.11.0'


}
/NetworkByJavaProject/app/build.gradle
10.2 HttpUrlConnectionActivity
java
/**
 * Android原生网络请求方式
 */
public class HttpUrlConnectionActivity extends AppCompatActivity implements View.OnClickListener {

    private static final String TAG = "HttpUrlConnectionActivi";
    private EditText etUserId;
    private EditText etUserName;
    private EditText etPassword;

    @Override
    protected void onCreate(Bundle savedInstanceState) {
        super.onCreate(savedInstanceState);
        setContentView(R.layout.activity_http_url_connection);

        findViewById(R.id.btn_get).setOnClickListener(this);
        findViewById(R.id.btn_post).setOnClickListener(this);
        etUserId = findViewById(R.id.et_user_id);
        etUserName = findViewById(R.id.et_user_name);
        etPassword = findViewById(R.id.et_password);

    }

    @Override
    public void onClick(View v) {
        if (v.getId() == R.id.btn_get) {
            sendGetRequest();
        } else if (v.getId() == R.id.btn_post) {
            sendPostRequest();
        }
    }

    /**
     * 发起一个post请求
     */
    private void sendPostRequest() {
        new Thread(new Runnable() {
            @Override
            public void run() {
                String loginUrl = "http://titok.fzqq.fun/addons/cms/api.login/login";
                //创建一个URL对象,这个对象表示要连接的服务器地址
                try {
                    URL url = new URL(loginUrl);
                    //打开连接,HttpURLConnection里面HTPP特有的参数设定、方法
                    HttpURLConnection connection = (HttpURLConnection) url.openConnection();
                    connection.setRequestMethod("POST");//指定为post请求方式
                    connection.setDoOutput(true);//允许向服务端输出数据
                    //在请求头中指定contentType,以此来告诉服务器请求体中的数据
                    connection.setRequestProperty("Content-Type", "application/json;charset=utf-8");
                    //在请求头中指定Accept,为了告诉服务器需要返回的数据类型
                    connection.setRequestProperty("Accept", "appliction/json");

                    String account = etUserName.getText().toString();
                    String password = etPassword.getText().toString();
                    // {"account": "lsxbug","password": "123456"}
                    String jsonBody = "{\"account\":\"" + account + "\",\"password\": \"" + password + "\"}";
                    Log.i(TAG, "jsonBody: " + jsonBody);
                    //通过输出流像服务器发送数据,并指定编码格式为utf-8
                    OutputStream os = connection.getOutputStream();
                    byte[] bytes = jsonBody.getBytes("utf-8");
                    os.write(bytes, 0, jsonBody.length());


                    //读取响应
                    int responseCode = connection.getResponseCode();
                    if (responseCode == HttpURLConnection.HTTP_OK) {
                        //200表示访问成功
                        InputStream is = connection.getInputStream();

                        BufferedReader br = new BufferedReader(new InputStreamReader(is, "utf-8"));
                        //用于存储从服务器返回的完整数据
                        StringBuilder builder = new StringBuilder();
                        //循环的读取服务器返回的数据,直到readLine返回null,表示数据读取完毕
                        String line;
                        while ((line = br.readLine()) != null) {
                            builder.append(line);
                        }

                        runOnUiThread(new Runnable() {
                            @Override
                            public void run() {
                                String loginResult = builder.toString();
                                Log.i(TAG, "loginResult: " + loginResult);
                            }
                        });

                    } else {
                        //请求失败
                        Log.e(TAG, "run: 网络请求失败!");
                    }


                } catch (MalformedURLException e) {
                    throw new RuntimeException(e);
                } catch (IOException e) {
                    throw new RuntimeException(e);
                }

            }
        }).start();
    }

    /**
     * 发起get请求
     */
    private void sendGetRequest() {
        new Thread(new Runnable() {
            @Override
            public void run() {
                String id = etUserId.getText().toString();
                String urlAdress = "http://titok.fzqq.fun/addons/cms/api.user/userInfo?user_id=" + id + "&type=archives";
                Log.i(TAG, "urlAdress:" + urlAdress);
                try {
                    //创建一个URL对象,这个对象表示要连接的服务器地址
                    URL url = new URL(urlAdress);
                    //打开连接,HttpURLConnection里面HTPP特有的参数设定、方法
                    HttpURLConnection connection = (HttpURLConnection) url.openConnection();
                    //指定为GET请求方式
                    connection.setRequestMethod("GET");
                    //连接超时时间
                    connection.setConnectTimeout(8000);
                    //读取数据超时时间
                    connection.setReadTimeout(8000);

                    //获取服务器的输入流,从这里面可以读取服务器返回的数据
                    InputStream inputStream = connection.getInputStream();
                    //将输入流包装为BufferedReader,方便读取数据
                    BufferedReader reader = new BufferedReader(new InputStreamReader(inputStream));

                    //用于存储从服务器返回的完整数据
                    StringBuilder builder = new StringBuilder();
                    //循环的读取服务器返回的数据,直到readLine返回null,表示数据读取完毕
                    String line;
                    while ((line = reader.readLine()) != null) {
                        builder.append(line);
                    }
                    //返回主线程 更新UI
                    runOnUiThread(() -> {
                        //把读取到的数据转成字符串
                        String string = builder.toString();
                        Log.i(TAG, "网络访问结果:" + string);
                    });

                    //关闭连接、释放资源
                    connection.disconnect();

                } catch (MalformedURLException e) {
                    throw new RuntimeException(e);
                } catch (IOException e) {
                    throw new RuntimeException(e);
                }
            }
        }).start();
    }
}
/NetworkByJavaProject/app/src/main/java/com/ls/networkbyjavaproject/activity/HttpUrlConnectionActivity.java
10.3 JSONObjectActivity
java
public class JSONObjectActivity extends AppCompatActivity implements View.OnClickListener {

    private static final String TAG = "JSONObjectActivity";

    @Override
    protected void onCreate(Bundle savedInstanceState) {
        super.onCreate(savedInstanceState);
        setContentView(R.layout.activity_jsonobject);

        findViewById(R.id.btn_object).setOnClickListener(this);
        findViewById(R.id.btn_string).setOnClickListener(this);
        findViewById(R.id.btn_gson_object).setOnClickListener(this);
        findViewById(R.id.btn_gson_string).setOnClickListener(this);
    }

    @Override
    public void onClick(View v) {
        if (v.getId() == R.id.btn_object) {
            //提取JSON数据
            getJSON();
        } else if (v.getId() == R.id.btn_string) {
            //创建JSON数据
            createJSON();
        } else if (v.getId() == R.id.btn_gson_object) {
            //使用Gson提取JSON数据
            gsonCreateJSON();
        } else if (v.getId() == R.id.btn_gson_string) {
            //使用Gson创建JSON数据
            gsonGetJSON();
        }
    }

    private void gsonGetJSON() {
        Student stu = new Student();
        stu.setName("老孙");
        stu.setAge(31);
        stu.setStudent(true);
        Student.Address address = new Student.Address();
        address.setCity("China");
        address.setZip("353333");

        stu.setCourses(new String[]{"语文", "数学", "英语"});
        stu.setGrades(new Integer[]{80, 70, 90});

        stu.setAddress(address);

        Gson gson = new Gson();
        String stuJson = gson.toJson(stu);
        Log.i(TAG, "gsonGetJSON: stuJson = " + stuJson);
    }

    private void gsonCreateJSON() {
        String json = "{\"address\":{\"city\":\"China\",\"zip\":\"353333\"},\"age\":31,\"courses\":[\"语文\",\"数学\",\"英语\"],\"grades\":[80,70,90],\"isStudent\":true,\"name\":\"老孙\"}\n";
        Gson gson = new Gson();
        //将json数据转为对应的实体类对象
        Student student = gson.fromJson(json, Student.class);
        String name = student.getName();
        Integer[] grades = student.getGrades();
        Log.i(TAG, "gsonCreateJSON: name = " + name);
        Log.i(TAG, "gsonCreateJSON: grades[1] = " + grades[1]);
    }

    private void getJSON() {
        String json = "{\"name\":\"Alice\",\"age\":30,\"isStudent\":false,\"address\":{\"city\":\"New York\",\"zip\":\"10001\"},\"courses\":[\"Math\",\"Science\",\"History\"],\"grades\":[\"85\",\"90\",\"92\"]}\n";
        try {
            //使用JSONObject对象将字符串转为json对象
            JSONObject object = new JSONObject(json);

            int age = object.getInt("age");
            String name = object.getString("name");
            Log.i(TAG, "getJSON: age = " + age);
            Log.i(TAG, "getJSON: name = " + name);
            JSONObject address = object.getJSONObject("address");
            String city = address.getString("city");
            Log.i(TAG, "getJSON: city = " + city);

            JSONArray courses = object.getJSONArray("courses");
            String h = courses.getString(2);
            Log.i(TAG, "getJSON: h = = " + h);

        } catch (JSONException e) {
            throw new RuntimeException(e);
        }
    }

    /**
     * 使用JSONObject完成json数据的创建
     * {
     * "name": "Alice",
     * "age": 30,
     * "isStudent": false,
     * "address": {
     * "city": "New York",
     * "zip": "10001"
     * },
     * "courses": ["Math", "Science", "History"],
     * "grades": [85, 90, 92],
     * "graduated": null
     * }
     */
    private void createJSON() {
        //创建JSONObject对象
        JSONObject jsonObject = new JSONObject();
        try {
            jsonObject.put("name", "Alice");
            jsonObject.put("age", 30);
            jsonObject.put("isStudent", false);

            //嵌套一个JSON对象
            JSONObject addressJson = new JSONObject();
            addressJson.put("city", "New York");
            addressJson.put("zip", "10001");
            jsonObject.put("address", addressJson);

            JSONArray courses = new JSONArray();
            courses.put("Math");
            courses.put("Science");
            courses.put("History");
            jsonObject.put("courses", courses);

            JSONArray grades = new JSONArray();
            grades.put("85");
            grades.put("90");
            grades.put("92");
            jsonObject.put("grades", grades);

            jsonObject.put("graduated", null);

            //把JsonObject对象转成字符串
            String objectString = jsonObject.toString();
            Log.i(TAG, "createJSON: objectString:" + objectString);
        } catch (JSONException e) {
            throw new RuntimeException(e);
        }


    }
}
/NetworkByJavaProject/app/src/main/java/com/ls/networkbyjavaproject/activity/JSONObjectActivity.java
10.4 OkHttpActivity
java
/**
 * 使用OKHTTP的使用案例
 */
public class OkHttpActivity extends AppCompatActivity implements View.OnClickListener {
    private static final String TAG = "OkHttpActivity";
    private EditText etUserId;
    private EditText etUserName;
    private EditText etPassword;

    @Override
    protected void onCreate(Bundle savedInstanceState) {
        super.onCreate(savedInstanceState);
        setContentView(R.layout.activity_ok_http);

        findViewById(R.id.btn_get).setOnClickListener(this);
        findViewById(R.id.btn_post).setOnClickListener(this);
        etUserId = findViewById(R.id.et_user_id);
        etUserName = findViewById(R.id.et_user_name);
        etPassword = findViewById(R.id.et_password);
    }

    @Override
    public void onClick(View v) {
        if (v.getId() == R.id.btn_get) {
            sendGetRequest();
        } else if (v.getId() == R.id.btn_post) {
            sendPostRequest();
        }
    }

    /**
     * POST请求
     */
    private void sendPostRequest() {
        String loginUrl = "http://titok.fzqq.fun/addons/cms/api.login/login";

        OkHttpClient client = new OkHttpClient();


        String account = etUserName.getText().toString();
        String password = etPassword.getText().toString();
        //Gson拼接一个请求体
        String jsonBody = new Gson().toJson(new ReqLogin(account, password));

        //请求体的数据格式是json。并且编码格式utf-8
        MediaType mediaType = MediaType.get("application/json;charset=utf-8");
        RequestBody requestBody = RequestBody.create(jsonBody, mediaType);

        //构建请求
        Request request = new Request.Builder()
                .url(loginUrl)
                .post(requestBody)
                .build();


        client.newCall(request).enqueue(new Callback() {
            @Override
            public void onFailure(@NonNull Call call, @NonNull IOException e) {
                runOnUiThread(new Runnable() {
                    @Override
                    public void run() {
                        Toast.makeText(OkHttpActivity.this, "网络请求失败", Toast.LENGTH_SHORT).show();
                    }
                });
            }

            @Override
            public void onResponse(@NonNull Call call, @NonNull Response response) throws IOException {
                runOnUiThread(new Runnable() {
                    @Override
                    public void run() {
                        if (response.isSuccessful()) {
                            try {
                                String json = response.body().string();
                                Log.i(TAG, "run: " + json);
                                ResLogin resLogin = new Gson().fromJson(json, ResLogin.class);
                                Toast.makeText(OkHttpActivity.this, resLogin.getMsg() +
                                        ",欢迎用户" + resLogin.getData().getUser_id(), Toast.LENGTH_SHORT).show();
                            } catch (IOException e) {
                                throw new RuntimeException(e);
                            }

                        } else {
                            Toast.makeText(OkHttpActivity.this, "登录失败", Toast.LENGTH_SHORT).show();
                        }
                    }
                });
            }
        });

    }

    /**
     * 使用OkHttp发起get
     */
    private void sendGetRequest() {
        String id = etUserId.getText().toString();
        String urlAdress = "http://titok.fzqq.fun/addons/cms/api.user/userInfo?user_id=" + id + "&type=archives";
        //创建OkHttpClient实例对象,用于发起请求
        OkHttpClient okHttpClient = new OkHttpClient.Builder()
                .connectTimeout(10, TimeUnit.SECONDS)
                .readTimeout(30, TimeUnit.SECONDS)
                .build();

        Request request = new Request.Builder()
                .url(urlAdress)
                .get()
//                .addHeader("",null);
                .build();


        //生成一个call对象,表示单个请求
        Call call = okHttpClient.newCall(request);

        Callback callback = new Callback() {
            @Override
            public void onFailure(@NonNull Call call, @NonNull IOException e) {
                runOnUiThread(new Runnable() {
                    @Override
                    public void run() {
                        Toast.makeText(OkHttpActivity.this, "网络请求失败", Toast.LENGTH_SHORT).show();
                    }
                });
            }

            @Override
            public void onResponse(@NonNull Call call, @NonNull Response response) throws IOException {
                runOnUiThread(new Runnable() {
                    @Override
                    public void run() {
                        if (response.isSuccessful()) {
                            try {
                                String result = response.body().string();
                                Log.i(TAG, "run result: " + result);
                                UserInfoQuery userInfoQuery = new Gson().fromJson(result, UserInfoQuery.class);
                                String msg = "当前用户名为:" + userInfoQuery.getData().getUser().getNickname();
                                Toast.makeText(OkHttpActivity.this, msg, Toast.LENGTH_SHORT).show();
                            } catch (IOException e) {
                                throw new RuntimeException(e);
                            }

                        } else {

                            Toast.makeText(OkHttpActivity.this, "网络请求失败:" + response.code(),
                                    Toast.LENGTH_SHORT).show();
                        }
                    }
                });

            }
        };
        //异步执行请求,并在callback中处理结果
        call.enqueue(callback);
        //同步执行请求,可以在execute直接获取结果,但是这种形式会阻塞主线程!
//        Response execute = call.execute();
//        execute.isSuccessful();
//        ResponseBody body = execute.body();
    }
}
/NetworkByJavaProject/app/src/main/java/com/ls/networkbyjavaproject/activity/OkHttpActivity.java
10.5 Retrofit2Activity
java
public class Retrofit2Activity extends AppCompatActivity implements View.OnClickListener {
    private static final String TAG = "Retrofit2Activity";
    private EditText etUserId;
    private EditText etUserName;
    private EditText etPassword;

    @Override
    protected void onCreate(Bundle savedInstanceState) {
        super.onCreate(savedInstanceState);
        setContentView(R.layout.activity_retrofit2);

        findViewById(R.id.btn_get).setOnClickListener(this);
        findViewById(R.id.btn_post).setOnClickListener(this);
        etUserId = findViewById(R.id.et_user_id);
        etUserName = findViewById(R.id.et_user_name);
        etPassword = findViewById(R.id.et_password);
    }

    @Override
    public void onClick(View v) {
        if (v.getId() == R.id.btn_get) {
            sendGetRequest();
        } else if (v.getId() == R.id.btn_post) {
            sendPostRequest();
        }
    }

    private void sendPostRequest() {
        Retrofit retrofit = new Retrofit.Builder()
                .baseUrl("http://titok.fzqq.fun/")
                .addConverterFactory(GsonConverterFactory.create())//配置一个Gson转换器
                .build();

        ApiService apiService = retrofit.create(ApiService.class);

        String account = etUserName.getText().toString();
        String password = etPassword.getText().toString();
        Call<ResLogin> loginCall = apiService.login(new ReqLogin(account, password));

        loginCall.enqueue(new Callback<ResLogin>() {
            @Override
            public void onResponse(Call<ResLogin> call, Response<ResLogin> response) {
                ResLogin resLogin = response.body();
                if (response.isSuccessful() && resLogin.getCode() == 1) {
                    Toast.makeText(Retrofit2Activity.this, "欢迎你," +
                            response.body().getData().getUser_id(), Toast.LENGTH_SHORT).show();
                } else {
                    Toast.makeText(Retrofit2Activity.this, resLogin.getMsg(), Toast.LENGTH_SHORT).show();
//                    Toast.makeText(Retrofit2Activity.this, response.message(), Toast.LENGTH_SHORT).show();
                }
            }

            @Override
            public void onFailure(Call<ResLogin> call, Throwable throwable) {
                Toast.makeText(Retrofit2Activity.this, "网络请求失败", Toast.LENGTH_SHORT).show();
            }
        });
    }

    private void sendGetRequest() {

        Retrofit retrofit = new Retrofit.Builder()
                .baseUrl("http://titok.fzqq.fun/")
                .addConverterFactory(GsonConverterFactory.create())//配置一个Gson转换器
                .build();

        ApiService apiService = retrofit.create(ApiService.class);

        String userId = etUserId.getText().toString();
        Call<UserInfoQuery> queryCall = apiService.getUserInfo(userId, "archives");

        queryCall.enqueue(new Callback<UserInfoQuery>() {
            @Override
            public void onResponse(Call<UserInfoQuery> call, Response<UserInfoQuery> response) {
                UserInfoQuery body = response.body();
                String nickname = body.getData().getUser().getNickname();

                Toast.makeText(Retrofit2Activity.this, "查询到:" + nickname, Toast.LENGTH_SHORT).show();
                Log.i(TAG, "onResponse: body " + nickname);
            }

            @Override
            public void onFailure(Call<UserInfoQuery> call, Throwable throwable) {

            }
        });
    }

}
/NetworkByJavaProject/app/src/main/java/com/ls/networkbyjavaproject/activity/Retrofit2Activity.java
10.6 布局文件
xml
<?xml version="1.0" encoding="utf-8"?>
<androidx.constraintlayout.widget.ConstraintLayout xmlns:android="http://schemas.android.com/apk/res/android"
    xmlns:app="http://schemas.android.com/apk/res-auto"
    xmlns:tools="http://schemas.android.com/tools"
    android:id="@+id/main"
    android:layout_width="match_parent"
    android:layout_height="match_parent"
    android:padding="16dp"
    tools:context=".activity.HttpUrlConnectionActivity">

    <TextView
        android:id="@+id/tv_get_label"
        android:layout_width="wrap_content"
        android:layout_height="wrap_content"
        android:text="GET请求:"
        app:layout_constraintStart_toStartOf="parent"
        app:layout_constraintTop_toTopOf="parent" />

    <EditText
        android:id="@+id/et_user_id"
        android:layout_width="match_parent"
        android:layout_height="wrap_content"
        android:hint="请输入要查询的用户id"
        android:inputType="number"
        app:layout_constraintStart_toStartOf="parent"
        app:layout_constraintTop_toBottomOf="@id/tv_get_label" />

    <Button
        android:id="@+id/btn_get"
        android:layout_width="match_parent"
        android:layout_height="wrap_content"
        android:text="发起GET请求"
        app:layout_constraintStart_toStartOf="parent"
        app:layout_constraintTop_toBottomOf="@id/et_user_id" />


    <TextView
        android:id="@+id/tv_post_label"
        android:layout_width="wrap_content"
        android:layout_height="wrap_content"
        android:layout_marginTop="40dp"
        android:text="POST 请求:"
        app:layout_constraintStart_toStartOf="parent"
        app:layout_constraintTop_toBottomOf="@id/btn_get" />

    <EditText
        android:id="@+id/et_user_name"
        android:layout_width="match_parent"
        android:layout_height="wrap_content"
        android:hint="请输入用户名"
        app:layout_constraintStart_toStartOf="parent"
        app:layout_constraintTop_toBottomOf="@id/tv_post_label" />

    <EditText
        android:id="@+id/et_password"
        android:layout_width="match_parent"
        android:layout_height="wrap_content"
        android:hint="请输入密码"
        android:inputType="textPassword"
        app:layout_constraintStart_toStartOf="parent"
        app:layout_constraintTop_toBottomOf="@id/et_user_name" />

    <Button
        android:id="@+id/btn_post"
        android:layout_width="match_parent"
        android:layout_height="wrap_content"
        android:text="发起POST请求"
        app:layout_constraintStart_toStartOf="parent"
        app:layout_constraintTop_toBottomOf="@id/et_password" />


    <TextView
        android:layout_width="wrap_content"
        android:layout_height="wrap_content"
        android:text="HttpURLConnection"
        app:layout_constraintBottom_toBottomOf="parent"
        app:layout_constraintEnd_toEndOf="parent" />

</androidx.constraintlayout.widget.ConstraintLayout>
/NetworkByJavaProject/app/src/main/res/layout/activity_http_url_connection.xml
xml
<?xml version="1.0" encoding="utf-8"?>
<androidx.constraintlayout.widget.ConstraintLayout xmlns:android="http://schemas.android.com/apk/res/android"
    xmlns:app="http://schemas.android.com/apk/res-auto"
    xmlns:tools="http://schemas.android.com/tools"
    android:id="@+id/main"
    android:layout_width="match_parent"
    android:layout_height="match_parent"
    android:padding="16dp"
    tools:context=".activity_ok_http">
</androidx.constraintlayout.widget.ConstraintLayout>
xml
<?xml version="1.0" encoding="utf-8"?>
<androidx.constraintlayout.widget.ConstraintLayout xmlns:android="http://schemas.android.com/apk/res/android"
    xmlns:app="http://schemas.android.com/apk/res-auto"
    xmlns:tools="http://schemas.android.com/tools"
    android:id="@+id/main"
    android:layout_width="match_parent"
    android:layout_height="match_parent"
    android:padding="16dp"
    tools:context=".activity.JSONObjectActivity">

    <Button
        android:id="@+id/btn_object"
        android:layout_width="match_parent"
        android:layout_height="wrap_content"
        android:text="提取JSON数据"
        app:layout_constraintStart_toStartOf="parent"
        app:layout_constraintTop_toTopOf="parent" />

    <Button
        android:id="@+id/btn_string"
        android:layout_width="match_parent"
        android:layout_height="wrap_content"
        android:layout_marginTop="10dp"
        android:text="创建JSON数据"
        app:layout_constraintStart_toStartOf="parent"
        app:layout_constraintTop_toBottomOf="@id/btn_object" />

    <Button
        android:id="@+id/btn_gson_object"
        android:layout_width="match_parent"
        android:layout_height="wrap_content"
        android:layout_marginTop="80dp"
        android:text="Gson提取JSON数据"
        app:layout_constraintStart_toStartOf="parent"
        app:layout_constraintTop_toBottomOf="@id/btn_string" />

    <Button
        android:id="@+id/btn_gson_string"
        android:layout_width="match_parent"
        android:layout_height="wrap_content"
        android:layout_marginTop="10dp"
        android:text="Gson创建JSON数据"
        app:layout_constraintStart_toStartOf="parent"
        app:layout_constraintTop_toBottomOf="@id/btn_gson_object" />
</androidx.constraintlayout.widget.ConstraintLayout>
/NetworkByJavaProject/app/src/main/res/layout/activity_jsonobject.xml
xml
<?xml version="1.0" encoding="utf-8"?>
<androidx.constraintlayout.widget.ConstraintLayout xmlns:android="http://schemas.android.com/apk/res/android"
    xmlns:app="http://schemas.android.com/apk/res-auto"
    xmlns:tools="http://schemas.android.com/tools"
    android:id="@+id/main"
    android:layout_width="match_parent"
    android:layout_height="match_parent"
    android:padding="16dp"
    tools:context=".activity.Retrofit2Activity">
    <TextView
        android:id="@+id/tv_get_label"
        android:layout_width="wrap_content"
        android:layout_height="wrap_content"
        android:text="GET请求:"
        app:layout_constraintStart_toStartOf="parent"
        app:layout_constraintTop_toTopOf="parent" />

    <EditText
        android:id="@+id/et_user_id"
        android:layout_width="match_parent"
        android:layout_height="wrap_content"
        android:hint="请输入要查询的用户id"
        android:inputType="number"
        app:layout_constraintStart_toStartOf="parent"
        app:layout_constraintTop_toBottomOf="@id/tv_get_label" />

    <Button
        android:id="@+id/btn_get"
        android:layout_width="match_parent"
        android:layout_height="wrap_content"
        android:text="发起GET请求"
        app:layout_constraintStart_toStartOf="parent"
        app:layout_constraintTop_toBottomOf="@id/et_user_id" />


    <TextView
        android:id="@+id/tv_post_label"
        android:layout_width="wrap_content"
        android:layout_height="wrap_content"
        android:layout_marginTop="40dp"
        android:text="GET请求:"
        app:layout_constraintStart_toStartOf="parent"
        app:layout_constraintTop_toBottomOf="@id/btn_get" />

    <EditText
        android:id="@+id/et_user_name"
        android:layout_width="match_parent"
        android:layout_height="wrap_content"
        android:hint="请输入用户名"
        app:layout_constraintStart_toStartOf="parent"
        app:layout_constraintTop_toBottomOf="@id/tv_post_label" />

    <EditText
        android:id="@+id/et_password"
        android:layout_width="match_parent"
        android:layout_height="wrap_content"
        android:hint="请输入密码"
        android:inputType="textPassword"
        app:layout_constraintStart_toStartOf="parent"
        app:layout_constraintTop_toBottomOf="@id/et_user_name" />

    <Button
        android:id="@+id/btn_post"
        android:layout_width="match_parent"
        android:layout_height="wrap_content"
        android:text="发起POST请求"
        app:layout_constraintStart_toStartOf="parent"
        app:layout_constraintTop_toBottomOf="@id/et_password" />


    <TextView
        android:layout_width="wrap_content"
        android:layout_height="wrap_content"
        android:text="Retrofit"
        app:layout_constraintBottom_toBottomOf="parent"
        app:layout_constraintEnd_toEndOf="parent" />
</androidx.constraintlayout.widget.ConstraintLayout>
/NetworkByJavaProject/app/src/main/res/layout/activity_retrofit2.xml
10.7 ApiService 与数据模型
java
/**
 * 定义网络请求接口
 */
public interface ApiService {

    //定义了网络请求接口,指定了请求方式GET、指定URL路径、指定查询参数、指定返回的结果实体类对象
    @GET("addons/cms/api.user/userInfo")
    Call<UserInfoQuery> getUserInfo(
            @Query("user_id") String userId,
            @Query("type") String type);

    @POST("addons/cms/api.login/login")
    Call<ResLogin> login(@Body ReqLogin login);
}
/NetworkByJavaProject/app/src/main/java/com/ls/networkbyjavaproject/reterofit/ApiService.java
java
public class ReqLogin {
    private String account;
    private String password;

    public ReqLogin(String account, String password) {
        this.account = account;
        this.password = password;
    }

    public String getAccount() {
        return account;
    }

    public void setAccount(String account) {
        this.account = account;
    }

    public String getPassword() {
        return password;
    }

    public void setPassword(String password) {
        this.password = password;
    }
}
/NetworkByJavaProject/app/src/main/java/com/ls/networkbyjavaproject/bean/ReqLogin.java
java
public class ResLogin {

    /**
     * code : 1
     * msg : 登录成功
     * time : 1725174857
     * data : {"token":"a464413b-6549-4dda-a5e0-b2486df5b6e6","user_id":4}
     */

    private int code;
    private String msg;
    private String time;
    private DataBean data;

    public int getCode() {
        return code;
    }

    public void setCode(int code) {
        this.code = code;
    }

    public String getMsg() {
        return msg;
    }

    public void setMsg(String msg) {
        this.msg = msg;
    }

    public String getTime() {
        return time;
    }

    public void setTime(String time) {
        this.time = time;
    }

    public DataBean getData() {
        return data;
    }

    public void setData(DataBean data) {
        this.data = data;
    }

    public static class DataBean {
        /**
         * token : a464413b-6549-4dda-a5e0-b2486df5b6e6
         * user_id : 4
         */

        private String token;
        private int user_id;

        public String getToken() {
            return token;
        }

        public void setToken(String token) {
            this.token = token;
        }

        public int getUser_id() {
            return user_id;
        }

        public void setUser_id(int user_id) {
            this.user_id = user_id;
        }
    }
}
/NetworkByJavaProject/app/src/main/java/com/ls/networkbyjavaproject/bean/ResLogin.java
java
/**
 * {"code":1,"msg":"","time":"1725173338",
 * "data":{"user":{"id":2,"nickname":"cydic","bio":"",
 * "avatar":"http:\/\/titok.fzqq.fun\/assets\/img\/qrcode.png","status":"normal","url":"\/u\/2"},
 * "list":{"total":0,"per_page":10,"current_page":1,"last_page":0,"data":[]},"archives":0,"comments":0}}
 */
public class UserInfoQuery {
   private int code;
   private String msg;
   private String time;
   private DataBean data;

   public int getCode() {
      return code;
   }

   public void setCode(int code) {
      this.code = code;
   }

   public String getMsg() {
      return msg;
   }

   public void setMsg(String msg) {
      this.msg = msg;
   }

   public String getTime() {
      return time;
   }

   public void setTime(String time) {
      this.time = time;
   }

   public DataBean getData() {
      return data;
   }

   public void setData(DataBean data) {
      this.data = data;
   }

   public static class DataBean {


      private UserBean user;
      private ListBean list;
      private int archives;
      private int comments;

      public UserBean getUser() {
         return user;
      }

      public void setUser(UserBean user) {
         this.user = user;
      }

      public ListBean getList() {
         return list;
      }

      public void setList(ListBean list) {
         this.list = list;
      }

      public int getArchives() {
         return archives;
      }

      public void setArchives(int archives) {
         this.archives = archives;
      }

      public int getComments() {
         return comments;
      }

      public void setComments(int comments) {
         this.comments = comments;
      }

      public static class UserBean {
         /**
          * id : 2
          * nickname : cydic
          * bio :
          * avatar : http://titok.fzqq.fun/assets/img/qrcode.png
          * status : normal
          * url : /u/2
          */

         private int id;
         private String nickname;
         private String bio;
         private String avatar;
         private String status;
         private String url;

         public int getId() {
            return id;
         }

         public void setId(int id) {
            this.id = id;
         }

         public String getNickname() {
            return nickname;
         }

         public void setNickname(String nickname) {
            this.nickname = nickname;
         }

         public String getBio() {
            return bio;
         }

         public void setBio(String bio) {
            this.bio = bio;
         }

         public String getAvatar() {
            return avatar;
         }

         public void setAvatar(String avatar) {
            this.avatar = avatar;
         }

         public String getStatus() {
            return status;
         }

         public void setStatus(String status) {
            this.status = status;
         }

         public String getUrl() {
            return url;
         }

         public void setUrl(String url) {
            this.url = url;
         }
      }

      public static class ListBean {
         /**
          * total : 0
          * per_page : 10
          * current_page : 1
          * last_page : 0
          * data : []
          */

         private int total;
         private int per_page;
         private int current_page;
         private int last_page;

         public int getTotal() {
            return total;
         }

         public void setTotal(int total) {
            this.total = total;
         }

         public int getPer_page() {
            return per_page;
         }

         public void setPer_page(int per_page) {
            this.per_page = per_page;
         }

         public int getCurrent_page() {
            return current_page;
         }

         public void setCurrent_page(int current_page) {
            this.current_page = current_page;
         }

         public int getLast_page() {
            return last_page;
         }

         public void setLast_page(int last_page) {
            this.last_page = last_page;
         }

      }
   }
}
/NetworkByJavaProject/app/src/main/java/com/ls/networkbyjavaproject/bean/UserInfoQuery.java
java
public class Student {

    private String name;
    private int age;
    private boolean isStudent;

    private Address address;

    private String[] courses;
    private Integer[] grades;


    public String getName() {
        return name;
    }

    public void setName(String name) {
        this.name = name;
    }

    public int getAge() {
        return age;
    }

    public void setAge(int age) {
        this.age = age;
    }

    public boolean isStudent() {
        return isStudent;
    }

    public void setStudent(boolean student) {
        isStudent = student;
    }

    public Address getAddress() {
        return address;
    }

    public void setAddress(Address address) {
        this.address = address;
    }

    public String[] getCourses() {
        return courses;
    }

    public void setCourses(String[] courses) {
        this.courses = courses;
    }

    public Integer[] getGrades() {
        return grades;
    }

    public void setGrades(Integer[] grades) {
        this.grades = grades;
    }

    public static class Address {
        private String city;
        private String zip;

        public String getCity() {
            return city;
        }

        public void setCity(String city) {
            this.city = city;
        }

        public String getZip() {
            return zip;
        }

        public void setZip(String zip) {
            this.zip = zip;
        }
    }
}
/NetworkByJavaProject/app/src/main/java/com/ls/networkbyjavaproject/bean/Student.java