文章目录
- 一、VsCode相关
-
- 一、C++环境配置
-
- 1、安装MSYS2
- 2、配置环境变量
- 3、配置VsCode环境
-
- [3.1 安装 C/C++ 扩展](#3.1 安装 C/C++ 扩展)
- [3.2 配置编译运行](#3.2 配置编译运行)
- [3.3 多个 c文件 的运行与调试](#3.3 多个 c文件 的运行与调试)
- [3.4 终端中文乱码](#3.4 终端中文乱码)
- [3.5 MSYS2指定C++ 编译/IntelliSense 标准(setting.json)](#3.5 MSYS2指定C++ 编译/IntelliSense 标准(setting.json))
- 二、Python环境配置
- [三、Ubuntu C++配置](#三、Ubuntu C++配置)
- 四、QT/Cmake配置
-
- 1、MSYS2安装QT组件
- [2、安装 CMake 和 Ninja(推荐使用)](#2、安装 CMake 和 Ninja(推荐使用))
- 3、配置系统环境变量
- 4、插件配置
- 5、创建QT项目
- [6、Qt / CMake 等程序安装在哪里](#6、Qt / CMake 等程序安装在哪里)
一、VsCode相关
一、C++环境配置
1、安装MSYS2
- MSYS2 可以去 MSYS2官网 下载,也就可以直接去 MSYS2 的 GitHub 上下载。由于在官网下载容易下错,所以我这里给一个 GitHub 的链接,也是在 VS Code 上提供的链接。
- MSYS2下载链接:Releases · msys2/msys2-installer (github.com) (官方认证,绝对没错!)
- 如下图所示,选择
msys2-x86 64-20241208.exe(记住前缀是 msys2-x86_64 就行,后面是日期),点击下载。

- 设置Shift+Ctrl+C/Shift+Ctrl+V

- 配置下载源
bash
sed -i "s#https\?://mirror.msys2.org/#https://mirrors.tuna.tsinghua.edu.cn/msys2/#g" /etc/pacman.d/mirrorlist*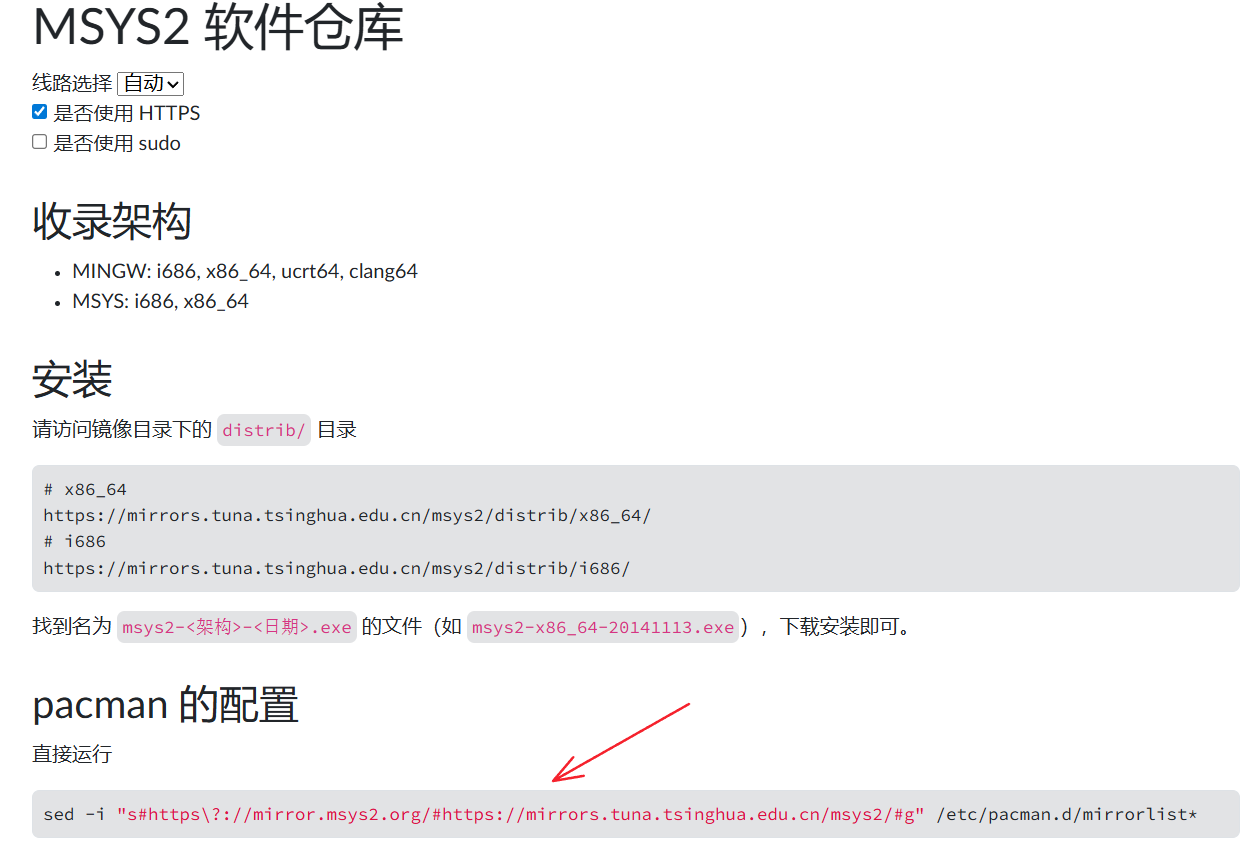
- 下载基本工具链
bash
# 也可以将base-devel去除,简洁安装
pacman -S --needed base-devel mingw-w64-ucrt-x86_64-toolchain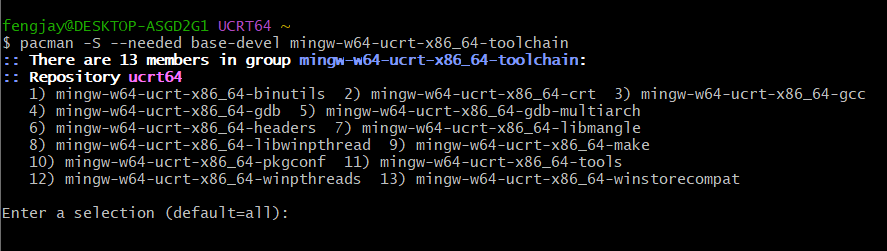
2、配置环境变量
-
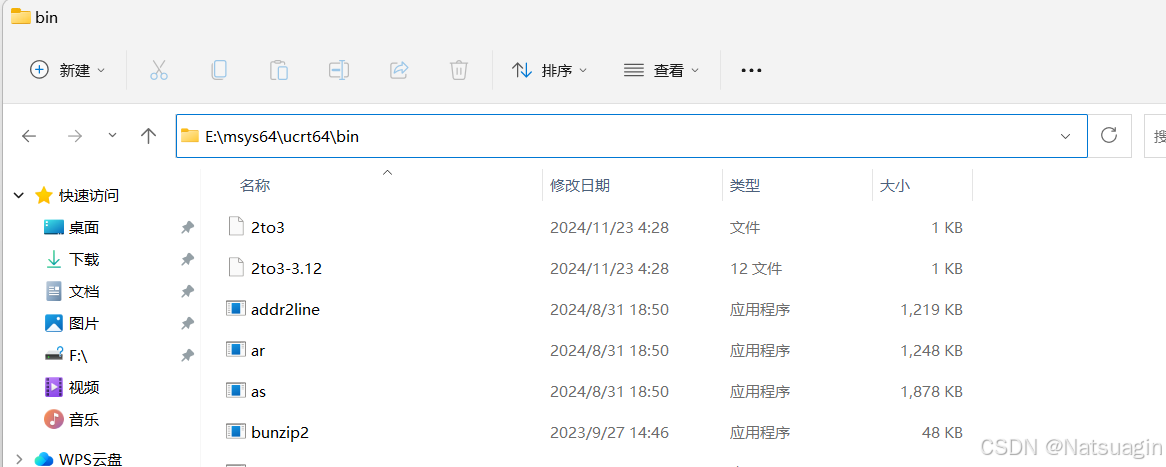
打开安装 MSYS2 的目录,找到
ucrt64文件夹并进入,再找到bin文件夹并进入,然后在地址栏中,复制路径。
-
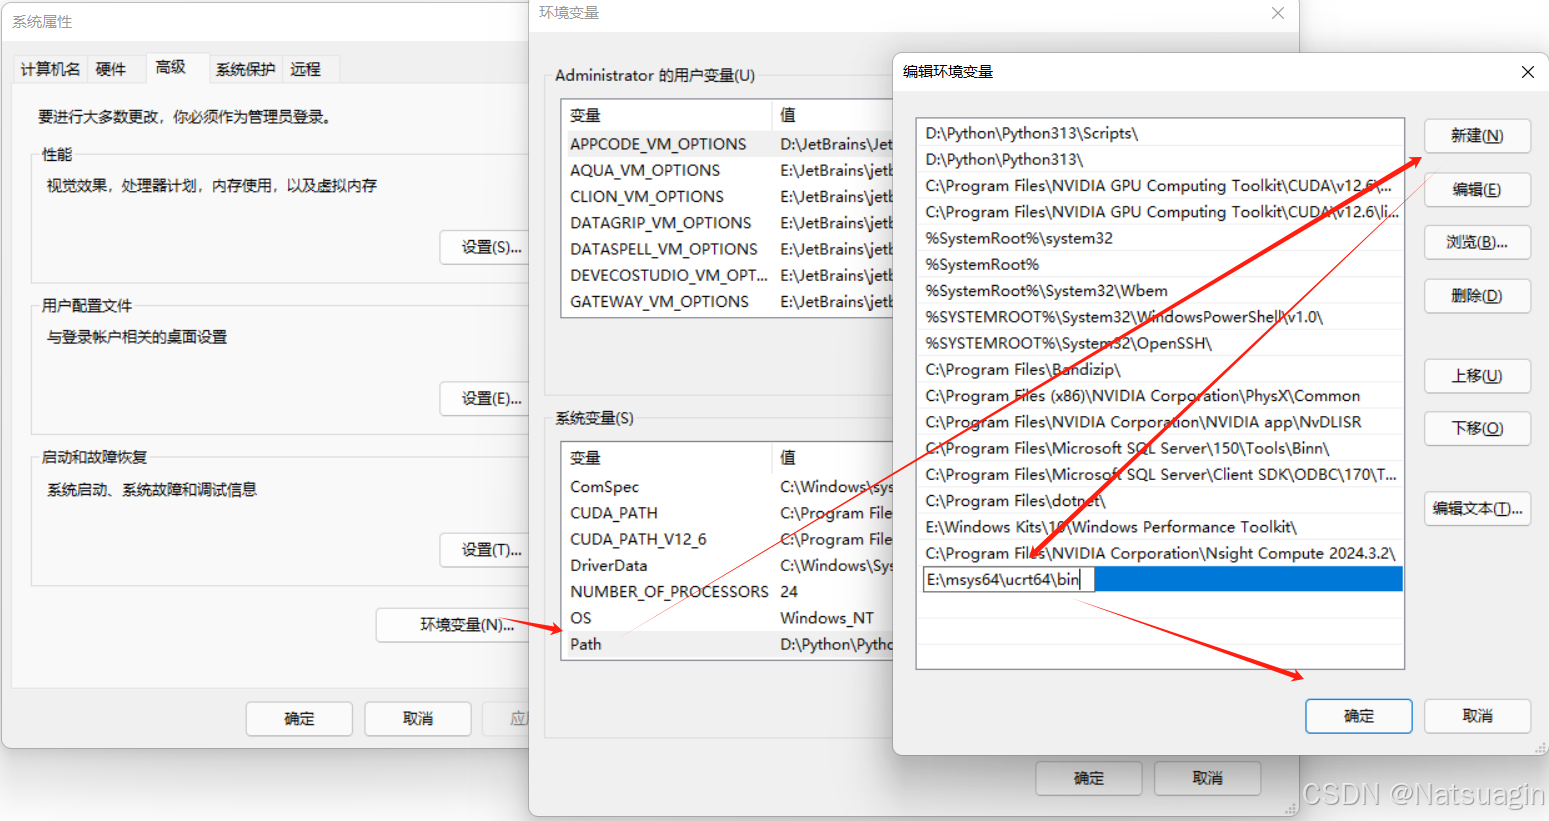
打开 系统属性 -> 高级系统设置 -> 环境变量 ,在
Path变量中添加E:\msys64\ucrt64\bin,然后依次点击三个确认退出。
-
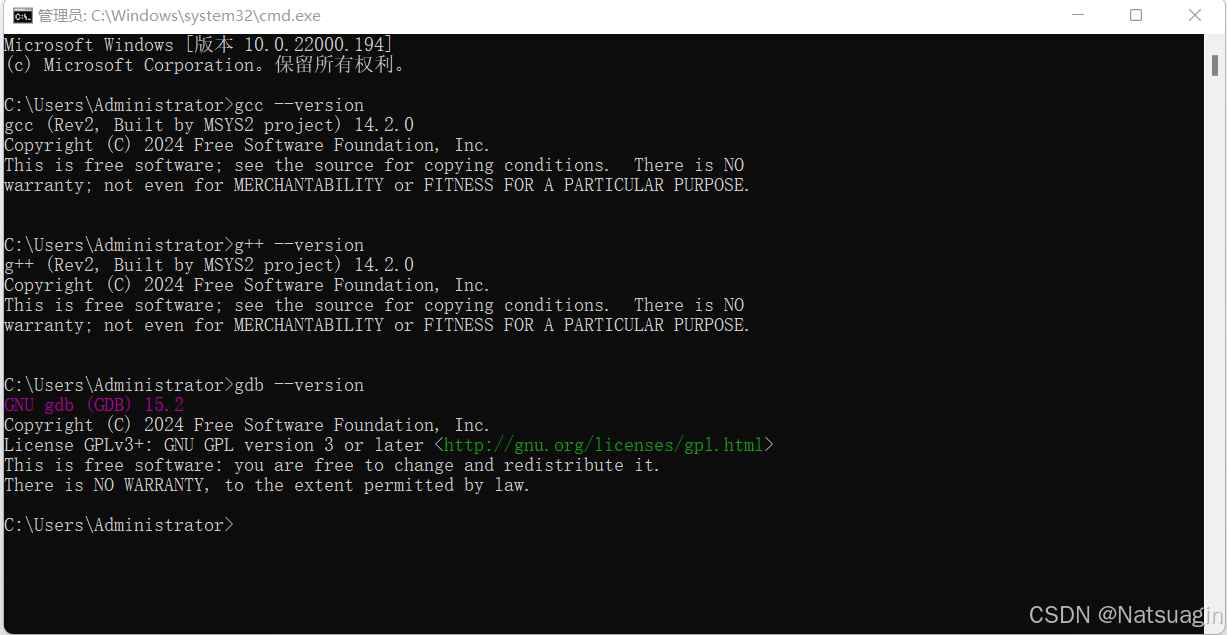
调出 cmd 的终端窗口了,然后分别输入下面的命令,每输入一次命令后回车一次:
bashgcc --version g++ --version gdb --version -
有类似下方输出说明环境配置正确。
3、配置VsCode环境
3.1 安装 C/C++ 扩展
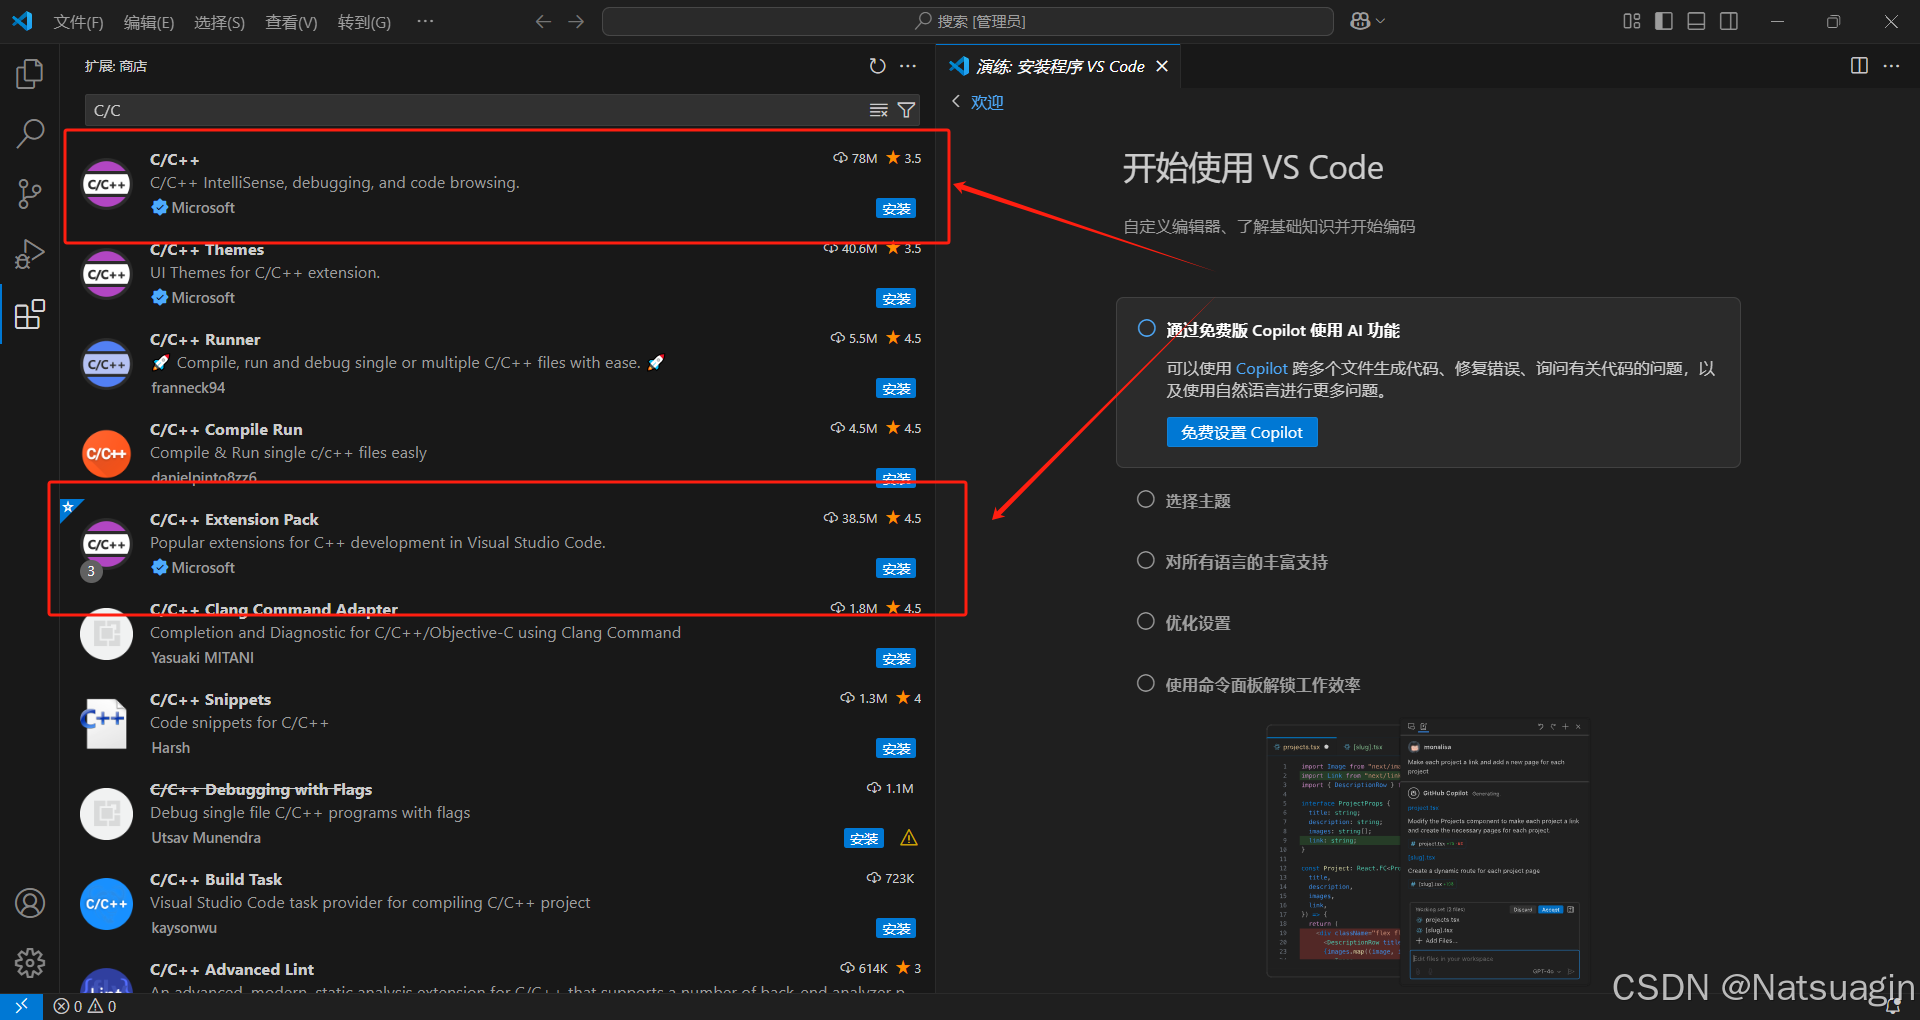
- 打开 VS Code,进入 扩展(Extensions),搜索 C/C++。
- C/C++ 扩展 必装,C/C++ Extension Pack 扩展 选装。
- C/C++ Extension Pack 是 C/C++ 的扩展功能包,里面包含了一些项目管理和代码构建的工具,不是必要的扩展包,可以选择性安装。
3.2 配置编译运行
桌面新建项目文件夹,例如 C_CPP_Project,然后打开 VS Code 并进入该目录,也可以直接将文件夹图标拖拽至 Visual Studio Code 图标处(文件夹最好不要包含中文)。
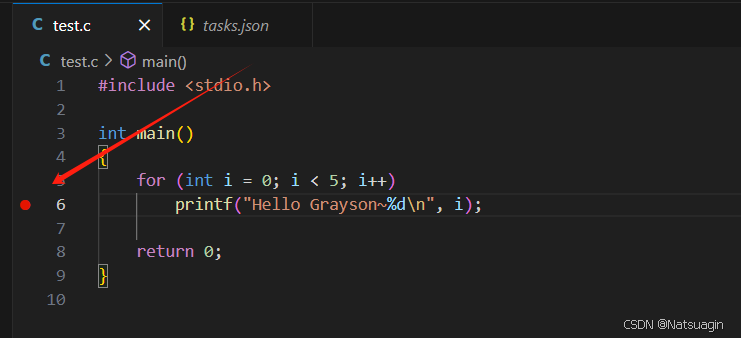
在该文件夹内创建 test.c,输入以下内容,然后点击 Ctrl + s 进行保存。
c
#include <stdio.h>
int main()
{
for (int i = 0; i < 5; i++)
printf("Hello Grayson~%d\n", i);
return 0;
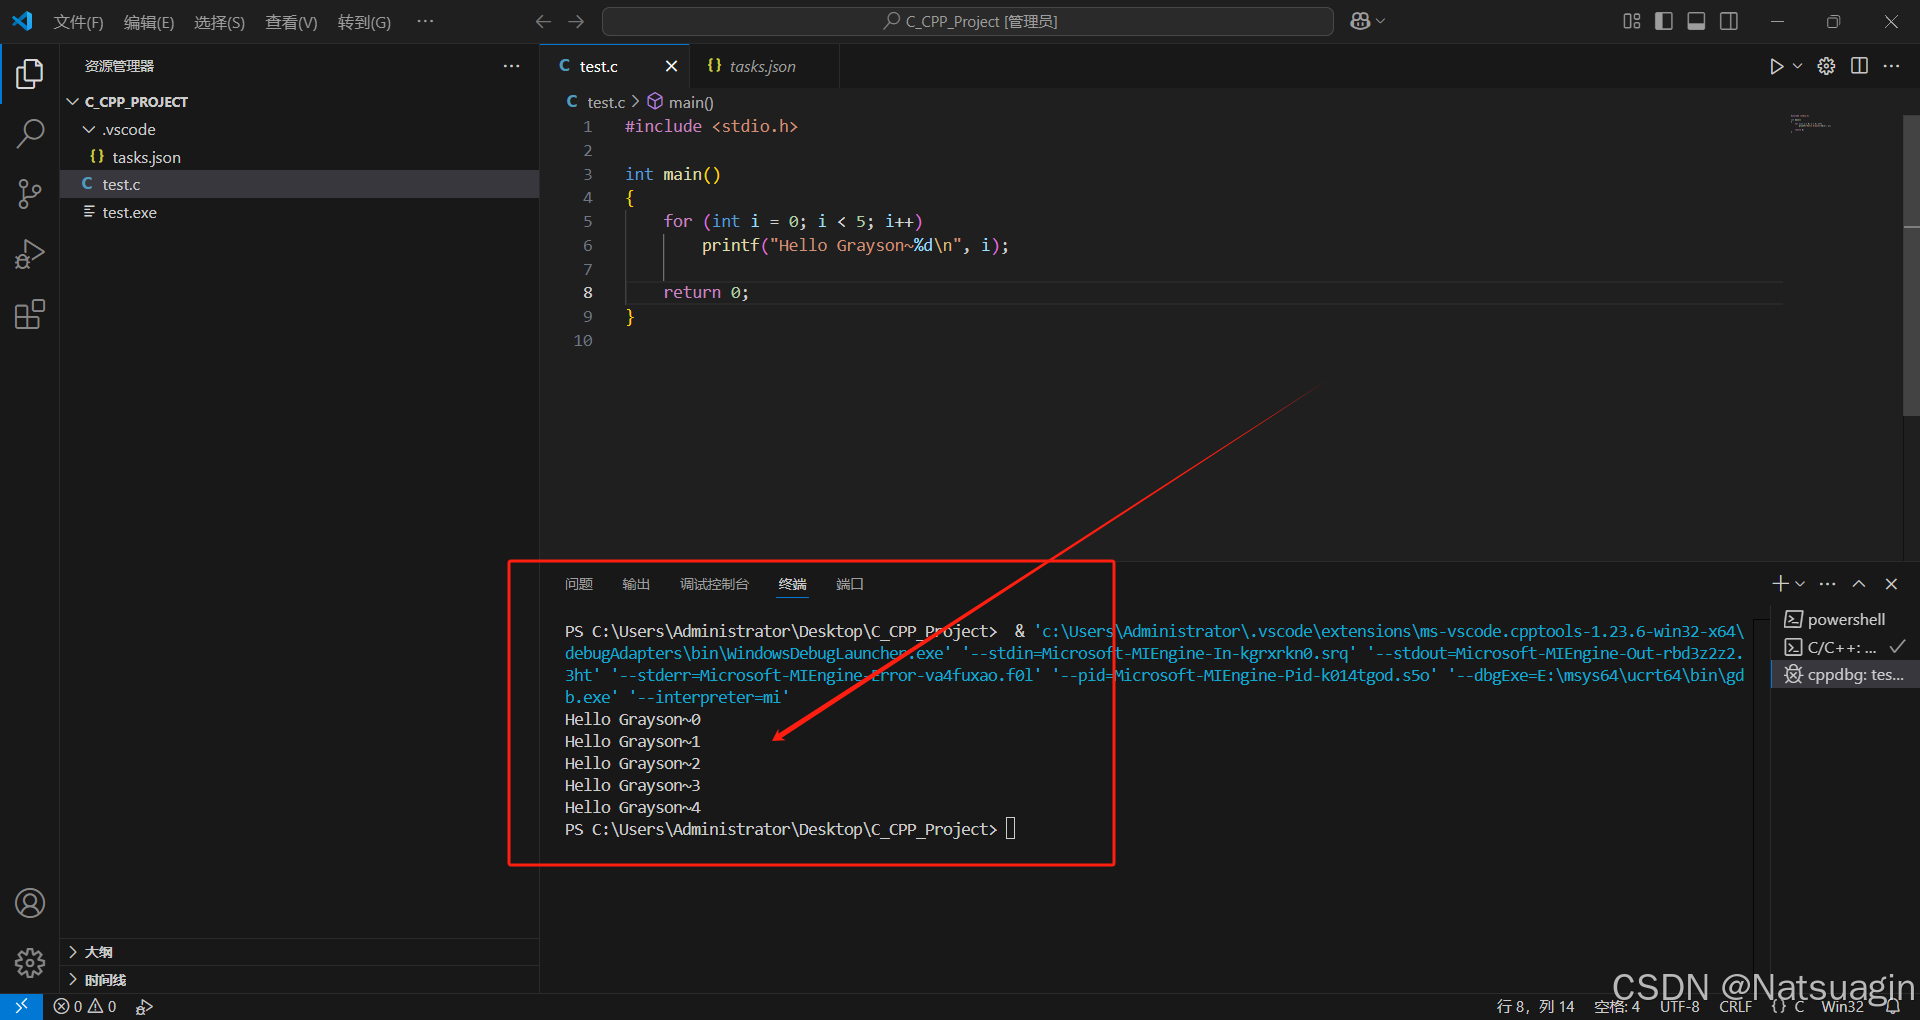
}点击右上角的调试按钮,这时会弹出调试程序的选项,选择第一个,也是本教程前面安装的 gcc 编译工具。
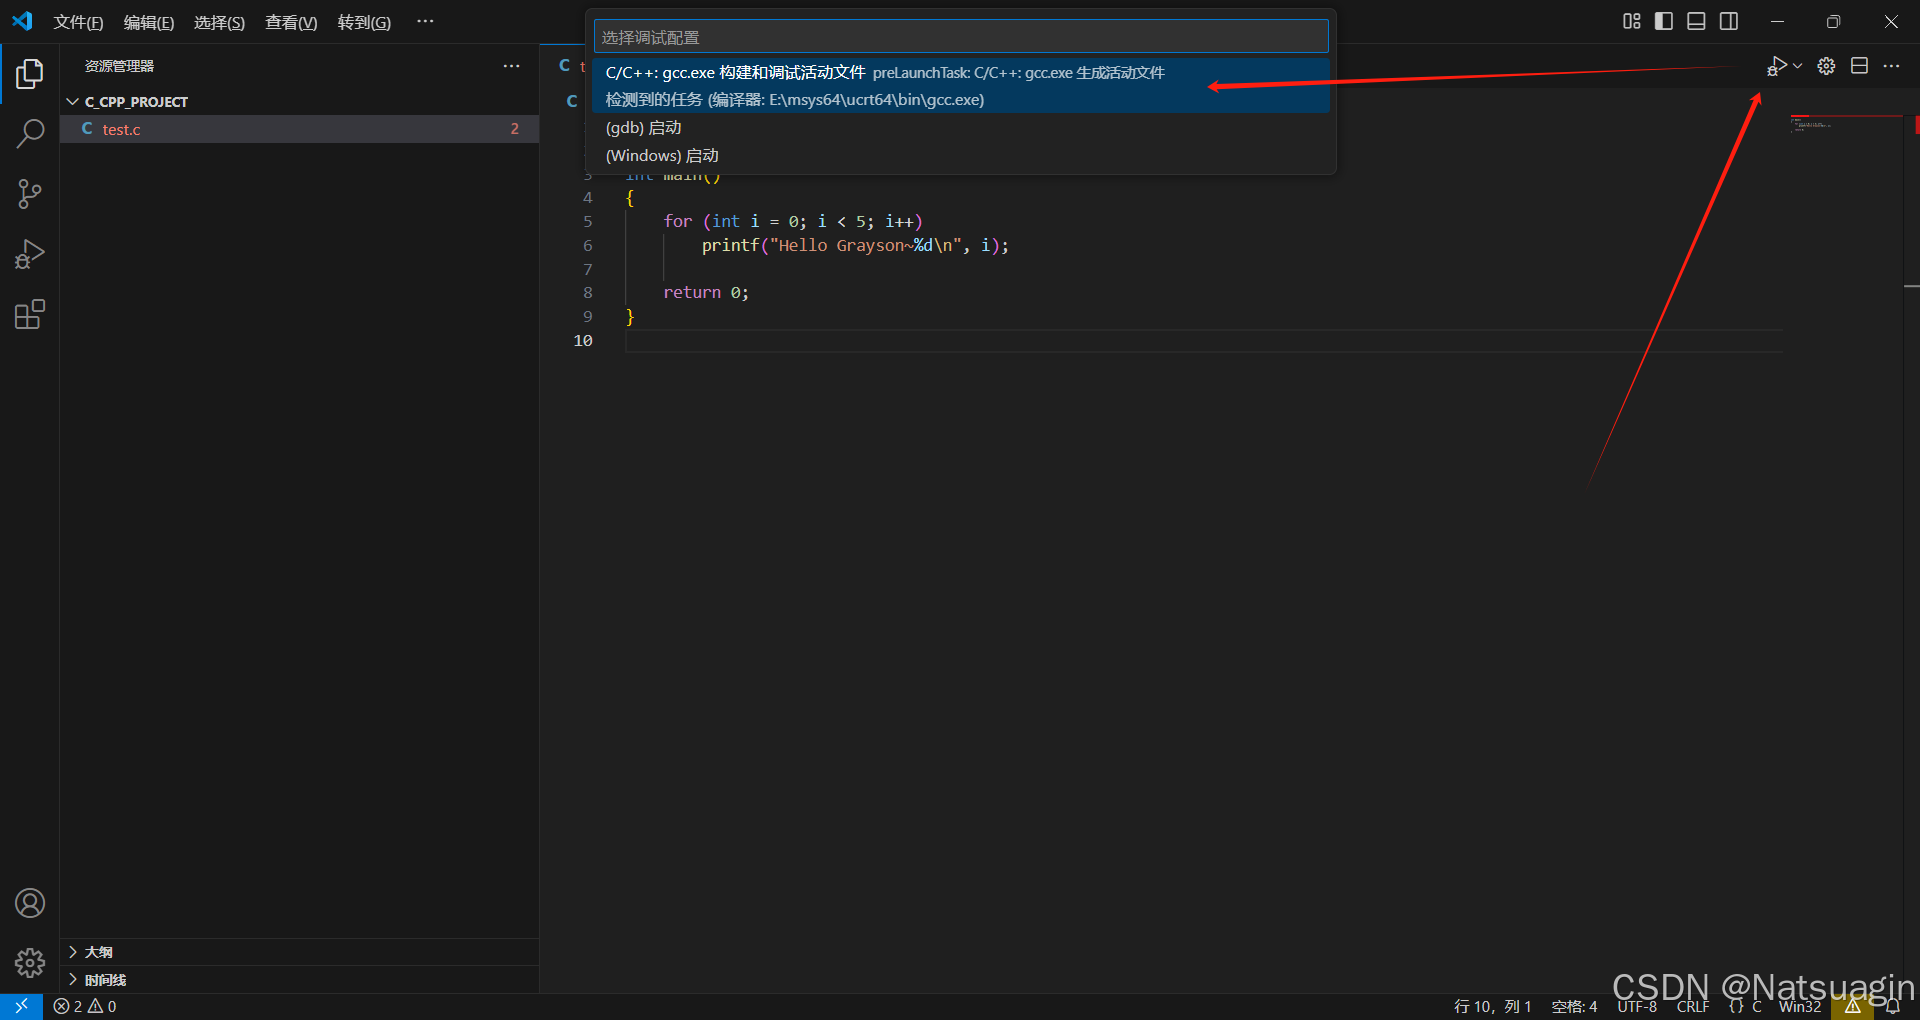
这时文件就被编译并执行,运行结果如下。
如果要进行简单的断点调试,可以在行号前加一个断点,操作也很简单,只需用鼠标左键点一下行号左边的空白处即可。如下图所示,是在第六行处加了一个断点。
这时再去运行程序,搜索框下面就会出现调试的面板,面板上有六个按钮,分别是继续、逐过程、单步调试、单步跳出、重启和停止。
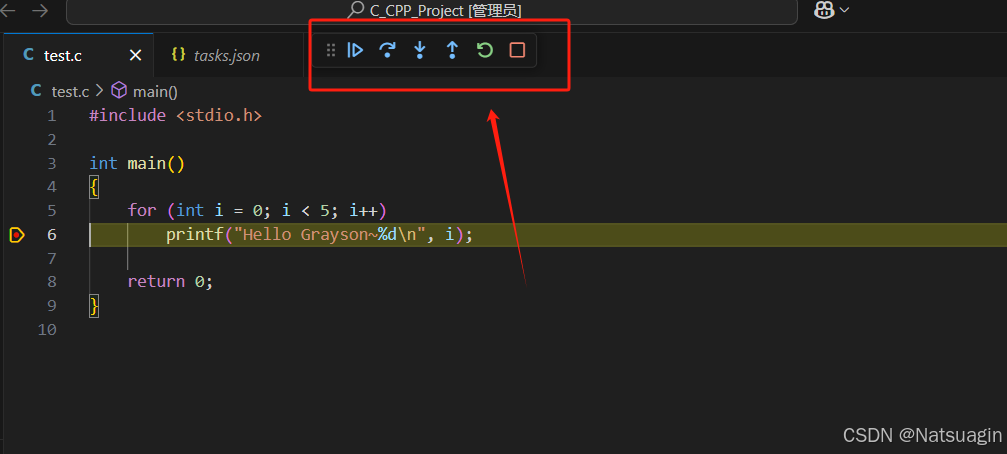
以下是 VS Code 中的 C 语言代码调试面板功能的解释:
- 继续(Continue):继续执行程序,直到遇到下一个断点或程序结束。
- 逐过程(StepOver):逐行执行当前行,如果当前行是函数调用,则进入该函数并执行完毕。
- 单步调试(StepInto):逐行执行当前行,如果当前行是函数调用,则进入该函数并停在函数内的第一行。
- 单步跳出(StepOut):执行完当前函数的剩余部分,并停在当前函数被调用的下一行。
- 重启(Restart):重新启动程序的调试会话,即从程序的起点开始执行。
- 停止(Stop):停止程序的调试会话,结束调试过程并关闭程序执行。
3.3 多个 c文件 的运行与调试
如果想要进行多个 .c 文件编译后的调试,就需要进行一些配置修改。如果进行过一次编译运行,我们会发现在资源管理器的C文件夹下,多出一个.vscode的文件夹,这个文件夹里面有个tasks.json的文件。

这个文件是用于定义任务配置,这些任务可以在 VS Code 中运行,例如编译代码、运行测试、启动调试器等。
tasks.json文件是一个JSON格式的文件,其中包含了任务的配置信息,包括任务名称、命令、参数等。通过编辑tasks.json文件,我们可以自定义项目中的各种任务,并在VS Code 中方便地执行这些任务。
当前的 VS Code 的运行效果还不是很理想,双击打开tasks.json文件修改一下编译运行功能。下图是对该 JSON 文件做了部分解释。
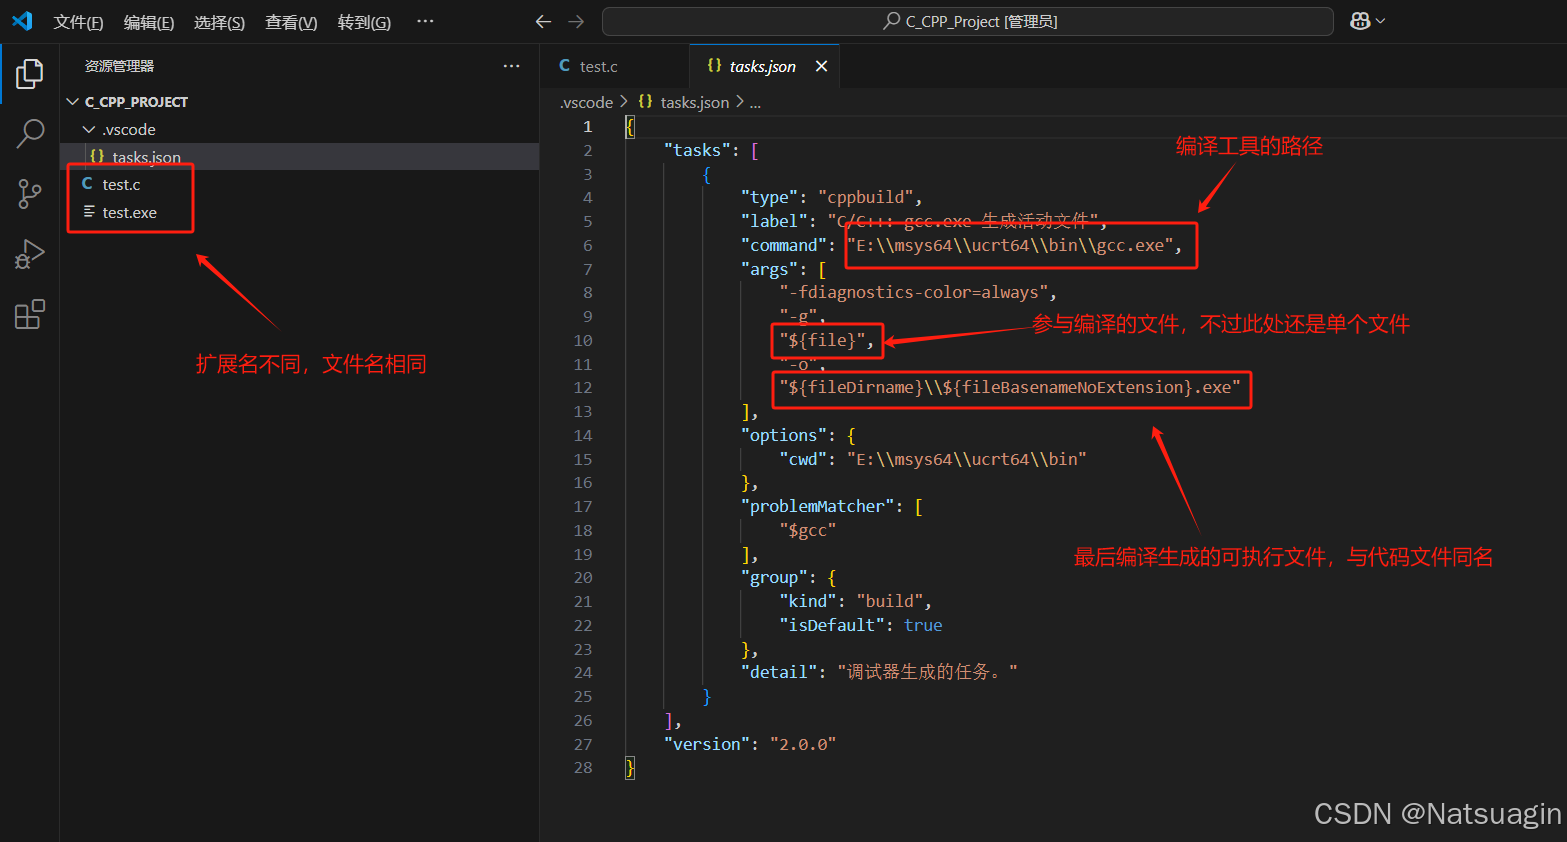
具体修改如下所示,我注释掉了原来的 "${file}",并将其改为手动列出所有 .c 文件路径(如 max.c 和 test2.c,目前找不到其他方便的解决办法,有的话希望评论区留言互相学习一下)。
这样可以避免 Windows 命令行中通配符无法解析的问题。同时也将 "${fileDirname}\\${fileBasenameNoExtension}.exe" 注释掉,改成了 "${fileDirname}\\program.exe",表示编译多个 .c 文件后生成的可执行文件为 program.exe。
代码如下,根据实际文件情况修改 ,修改好后按组合键 Ctrl + S 保存即可。
json
{
"version": "2.0.0",
"tasks": [
{
"type": "cppbuild",
"label": "C/C++: gcc.exe 生成活动文件",
"command": "E:\\msys64\\ucrt64\\bin\\gcc.exe",
"args": [
"-fdiagnostics-color=always",
"-g",
// "${file}", // 注释掉原来的 "${file}"
"${workspaceFolder}\\test2\\max.c", // 手动列出 .c 文件
"${workspaceFolder}\\test2\\test2.c",
"-o",
// "${fileDirname}\\${fileBasenameNoExtension}.exe", // 注释掉原来的输出文件名
"${workspaceFolder}\\test2\\program.exe" // 统一生成 program.exe
],
"options": {
"cwd": "${workspaceFolder}\\test2"
},
"problemMatcher": [
"$gcc"
],
"group": {
"kind": "build",
"isDefault": true
},
"detail": "调试器生成的任务。"
}
]
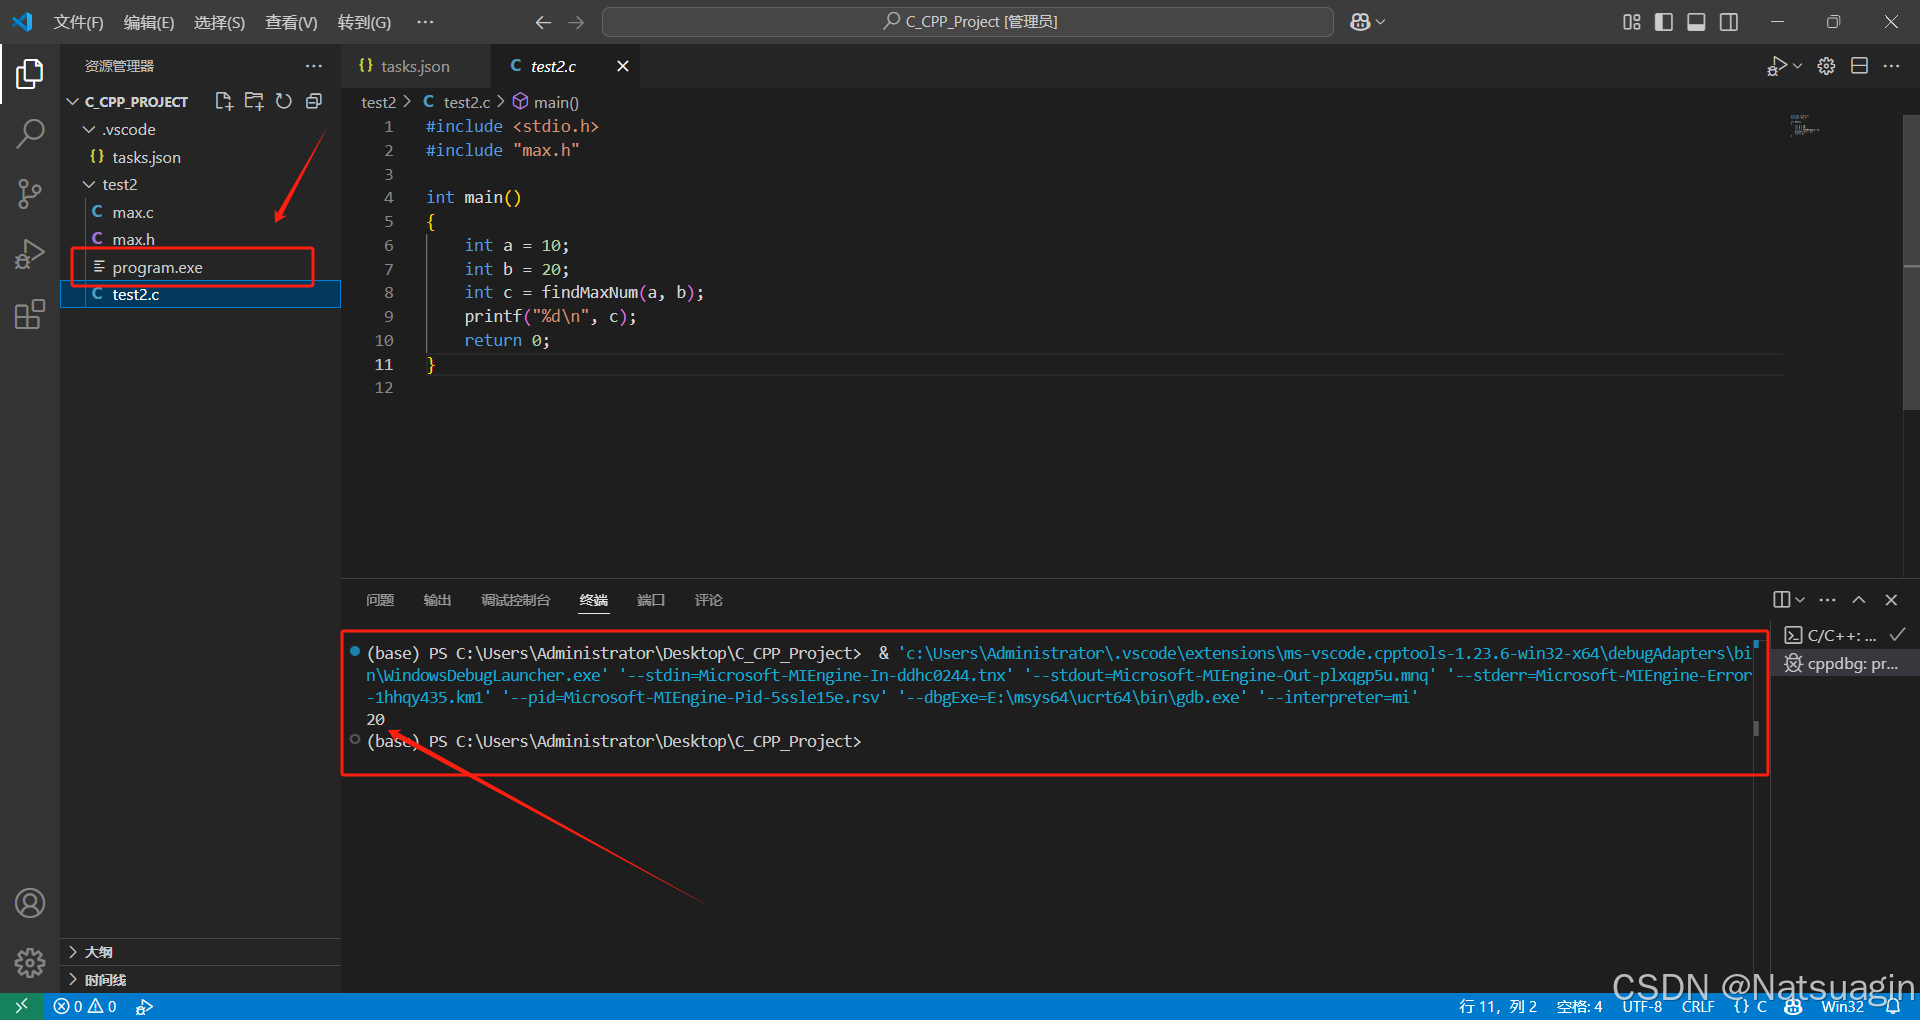
}接着点击 test2.c 文件右侧的 调试 C/C++ 文件。
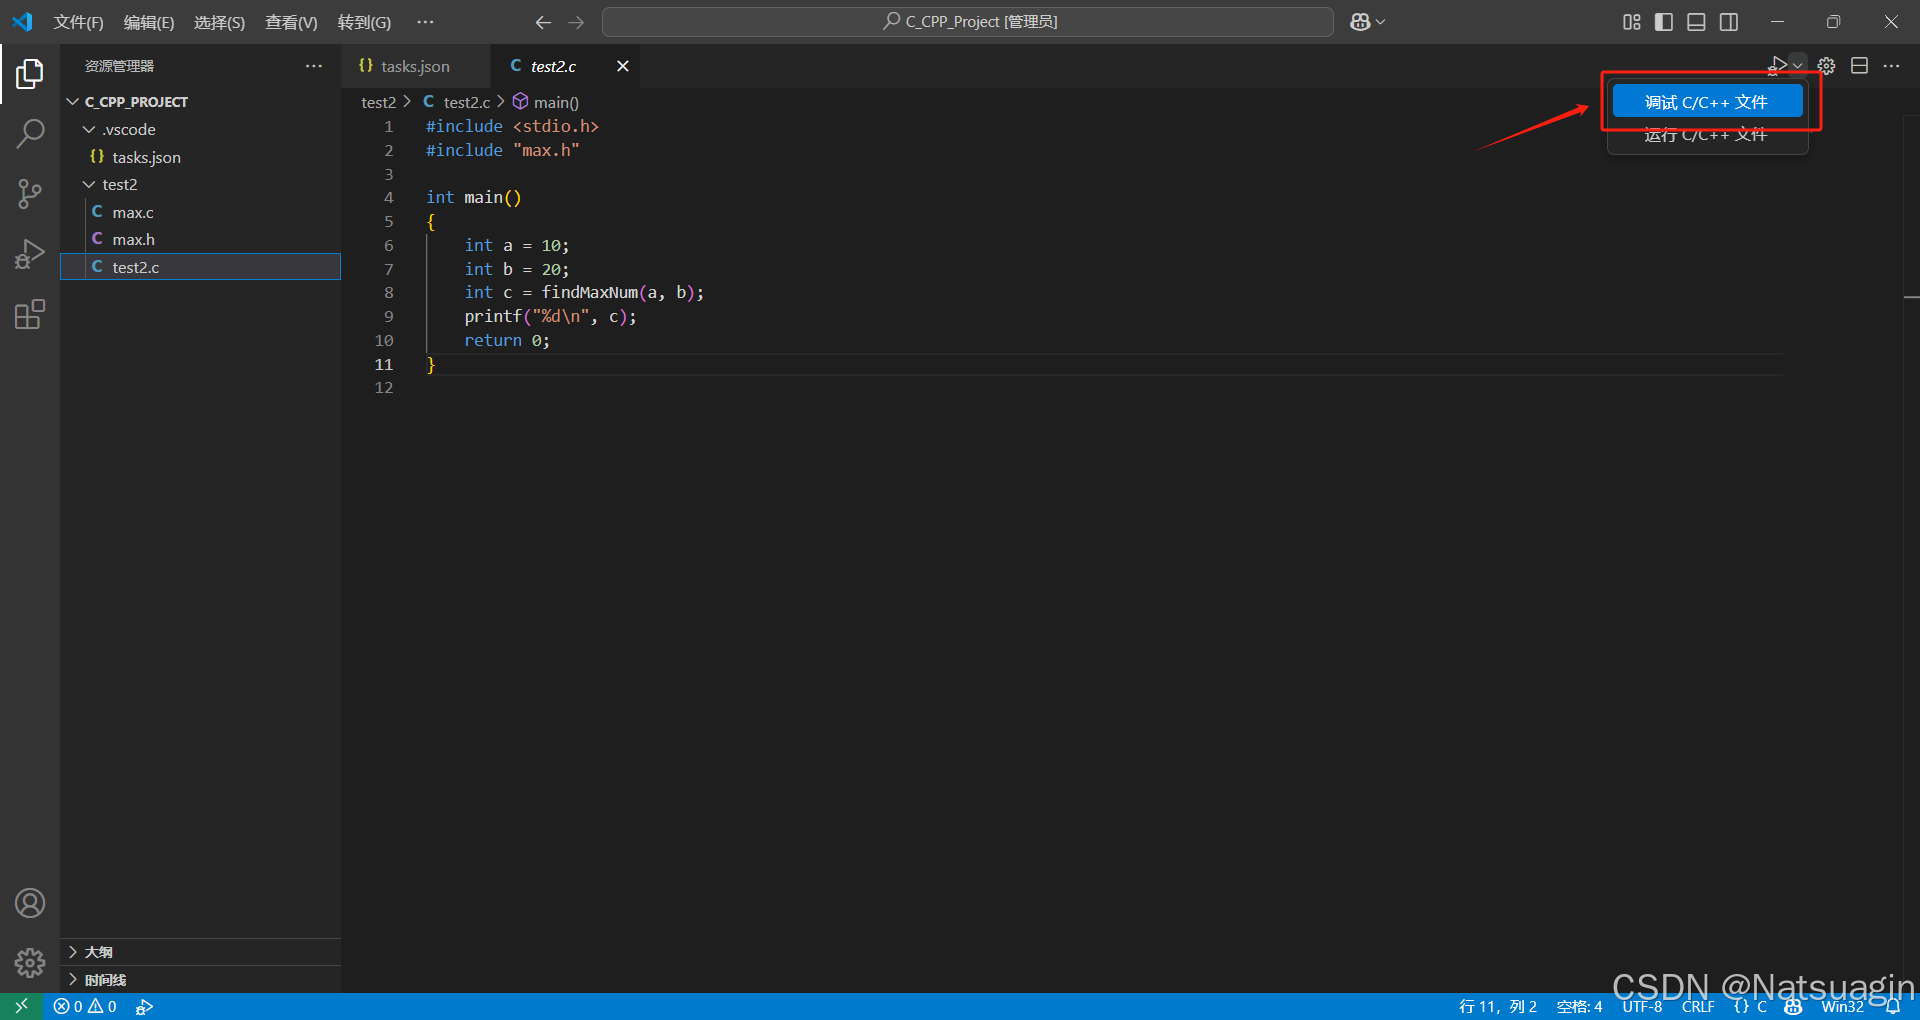
可以看到终端成功输出多个c文件编译运行以后的结果以及文件夹中生成可执行文件 program.exe。
3.4 终端中文乱码
查看终端编码方式
# 输入指令
chcp
# 如果显示
活动代码页: 936			# 表示GBK
活动代码页: 65001		# 表示UTF8
1.方法一:修改系统区域设置(可能会发生系统层面的bug)
1. 打开 控制面板 → 区域 → 管理 选项卡
2. 勾选 "Beta: 使用 Unicode UTF-8 提供全球语言支持"
3. 重启电脑
2.方法二:更改vscode默认编码UTF-8为GBK
bash
1.更改vscode默认编码UTF-8为GBK(该法需确认系统编码环境为GBK格式)
在setting.json中加入如下代码
"files.encoding": "utf8",
2.CMD修改成旧控制台(对我无用)
3.方法三:更改Power Shell/cmd默认编码方式
bash
1.临时更改编码方式
chcp 936 			# 改为gbk
chcp 65001 			# 改为utf-8
2.永久更改
①永久修改powershell编码,添加profile文件,在VSCode/IDEA等开发工具中均生效
以管理员身份打开powershell,注意,以管理员身份,不然不能生效,依次执行如下命令:
#允许运行自定义脚本
set-executionpolicy remotesigned

#创建默认profile,如果存在则不创建
if (!(Test-Path -Path $PROFILE)) {
  New-Item -ItemType File -Path $PROFILE -Force
}

#查看创建的profile文件位置
$PROFILE
根据输出的位置,找到profile文件,例如
C:\Users\xxxx\Documents\PowerShell\Microsoft.PowerShell_profile.ps1
使用编辑器打开,加入一行:
$OutputEncoding = [console]::InputEncoding = [console]::OutputEncoding = New-Object System.Text.UTF8Encoding
然后重启powershell,使用chcp查看编码,发现已经修改成了65001.

注意:上述命令可以使用#注释- 安装Terminal终端,统一管理cmd和powershell编码(仅在wt工具中生效)
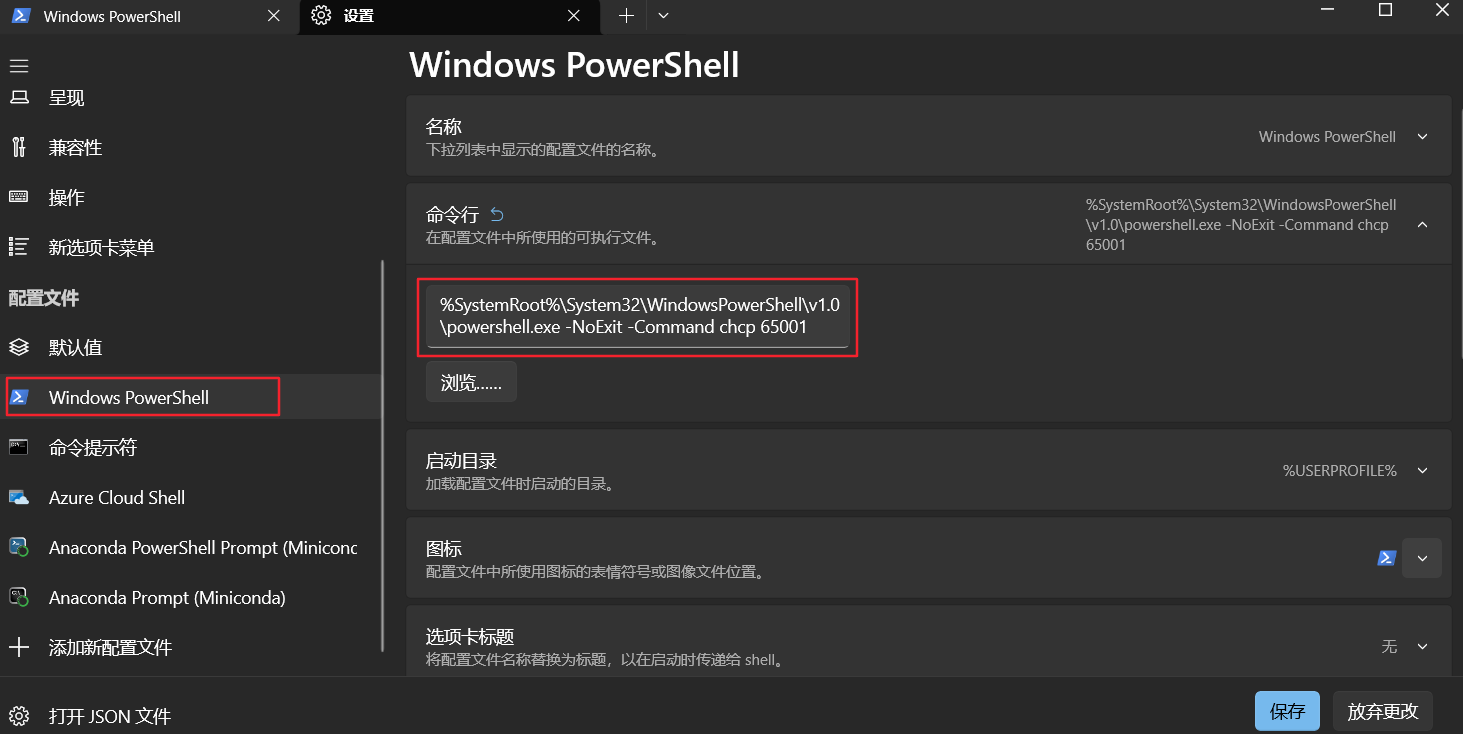
①安装Terminal终端,统一管理cmd和powershell编码
②点击powershell的配置项,编辑命令,加上 -NoExit -Command chcp 65001,每次使用终端打开powershell会自动设置为utf-8
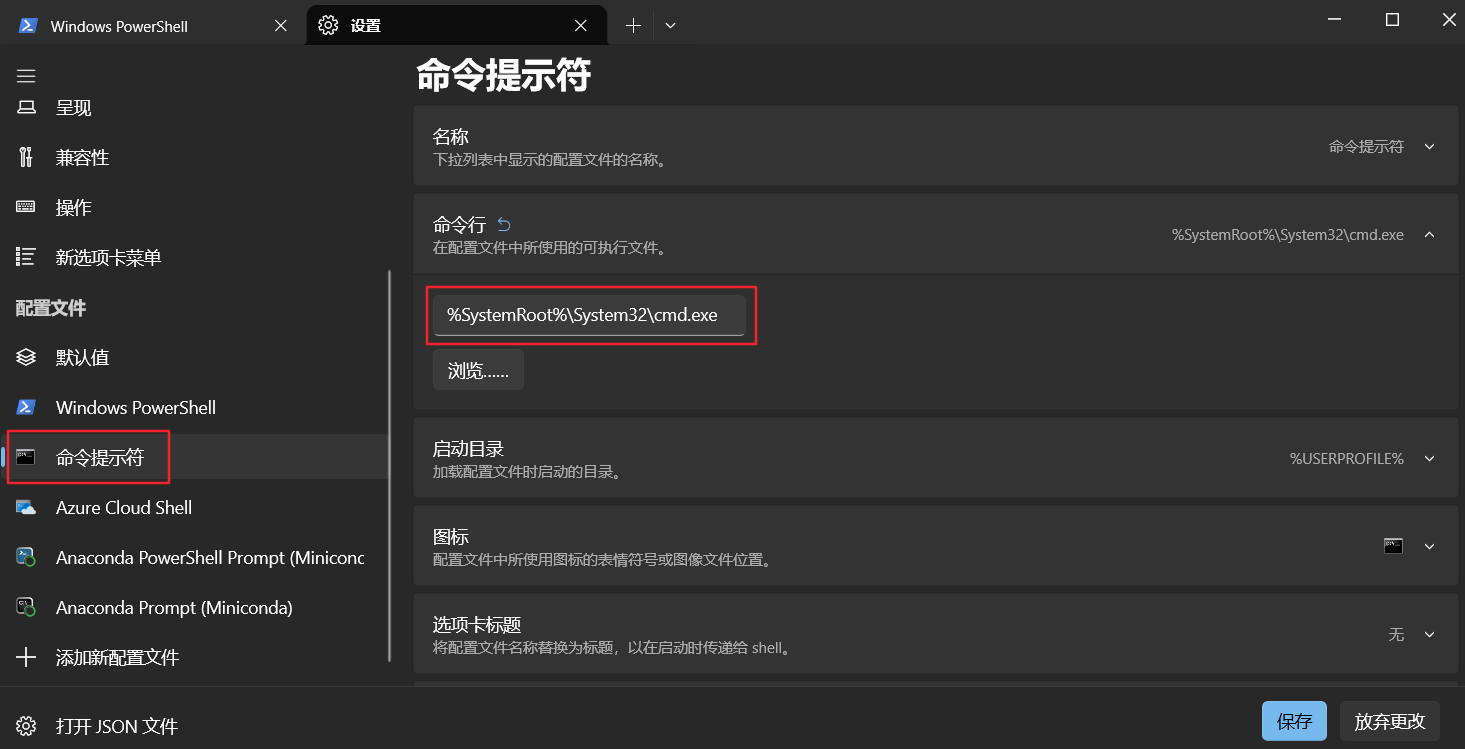
③打开cmd配置项,编辑命令,加上/k chcp 65001 > nul,保存,每次使用终端打开cmd会自动设置为utf-8
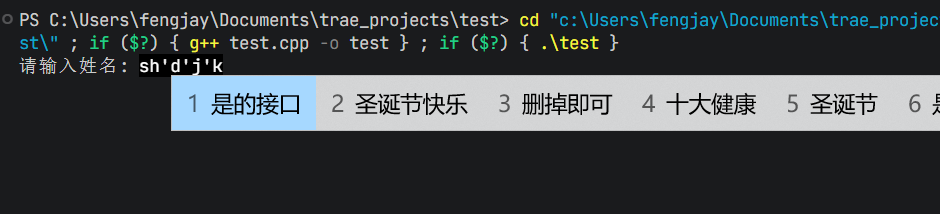
Code runner插件更改在终端输出**(这样可以直接在终端编辑!)**

- 更改前

- 更改后
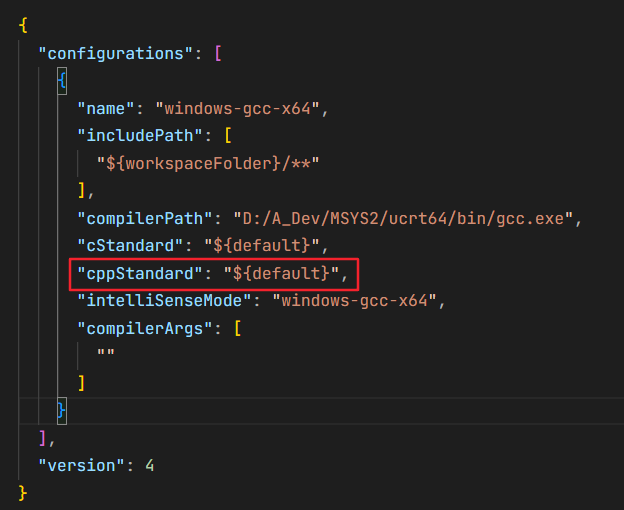
3.5 MSYS2指定C++ 编译/IntelliSense 标准(setting.json)
#include <iostream>

int main() {
 std::cout << "当前C++标准: " << __cplusplus << std::endl;

 // format在c++20之后才有的,低于此版本编译不通过
 std::cout << std::format("数字是 {}\n", 10);

 return 0;
}
脚本如上
1.c_cpp_properties.json 里的:
json
"cppStandard": "c++20"⚠️ 只影响 代码提示(IntelliSense)
❌ 不会影响真正的编译命令
2.Code Runner配置,它真正执行的是你 settings.json 里的:
json
"cpp": "cd $dir && g++ $fileName -o $fileNameWithoutExt && $dir$fileNameWithoutExt"这里没有 -std=c++20,所以必须改成:
json
"cpp": "cd $dir && g++ -std=c++20 $fileName -o $fileNameWithoutExt && $dir$fileNameWithoutExt"
二、Python环境配置
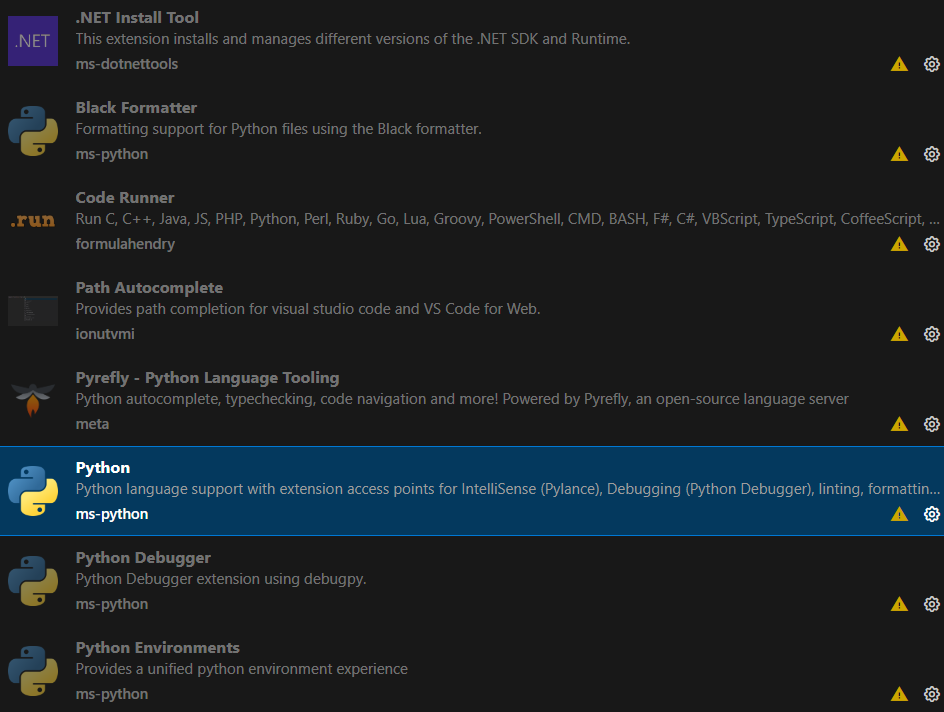
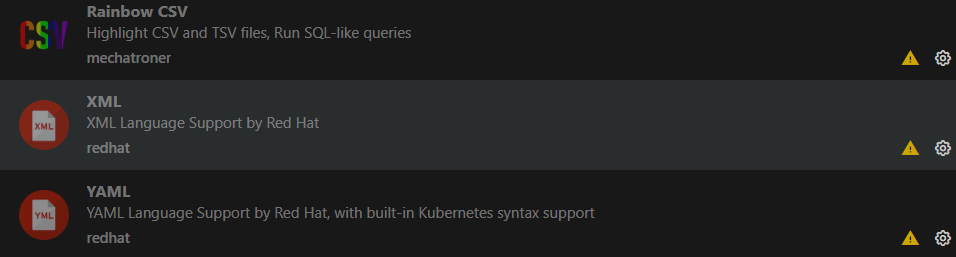
1、插件安装
常用插件如下
2、setting.json配置
比较重要的一个:自动寻找当前conda环境
json
"python": "set PYTHONIOENCODING=utf8 && $pythonPath -u $fullFileName",2、setting.json配置
比较重要的一个:自动寻找当前conda环境
json
"python": "set PYTHONIOENCODING=utf8 && $pythonPath -u $fullFileName",完整配置
json
{
  // 设置编码
  // "files.encoding": "gbk",
  "files.encoding": "utf8",
  "explorer.confirmDelete": false,
  "settingsSync.ignoredSettings": [],
  "code-runner.executorMap": {
    "javascript": "node",
    "java": "cd $dir && javac $fileName && java $fileNameWithoutExt",
    "c": "cd $dir && gcc $fileName -o $fileNameWithoutExt && $dir$fileNameWithoutExt",
    "zig": "zig run",
    // "cpp": "cd $dir && g++ $fileName -o $fileNameWithoutExt && $dir$fileNameWithoutExt",
    "cpp": "cd $dir && g++ -std=c++23 $fileName -o $fileNameWithoutExt && $dir$fileNameWithoutExt",
    "objective-c": "cd $dir && gcc -framework Cocoa $fileName -o $fileNameWithoutExt && $dir$fileNameWithoutExt",
    "php": "php",
    // "python": "python -u",
    "python": "set PYTHONIOENCODING=utf8 && $pythonPath -u $fullFileName",
    "perl": "perl",
    "perl6": "perl6",
    "ruby": "ruby",
    "go": "go run",
    "lua": "lua",
    "groovy": "groovy",
    "powershell": "powershell -ExecutionPolicy ByPass -File",
    "bat": "cmd /c",
    "shellscript": "bash",
    "fsharp": "fsi",
    "csharp": "scriptcs",
    "vbscript": "cscript //Nologo",
    "typescript": "ts-node",
    "coffeescript": "coffee",
    "scala": "scala",
    "swift": "swift",
    "julia": "julia",
    "crystal": "crystal",
    "ocaml": "ocaml",
    "r": "Rscript",
    "applescript": "osascript",
    "clojure": "lein exec",
    "haxe": "haxe --cwd $dirWithoutTrailingSlash --run $fileNameWithoutExt",
    "rust": "cd $dir && rustc $fileName && $dir$fileNameWithoutExt",
    "racket": "racket",
    "scheme": "csi -script",
    "ahk": "autohotkey",
    "autoit": "autoit3",
    "dart": "dart",
    "pascal": "cd $dir && fpc $fileName && $dir$fileNameWithoutExt",
    "d": "cd $dir && dmd $fileName && $dir$fileNameWithoutExt",
    "haskell": "runghc",
    "nim": "nim compile --verbosity:0 --hints:off --run",
    "lisp": "sbcl --script",
    "kit": "kitc --run",
    "v": "v run",
    "sass": "sass --style expanded",
    "scss": "scss --style expanded",
    "less": "cd $dir && lessc $fileName $fileNameWithoutExt.css",
    "FortranFreeForm": "cd $dir && gfortran $fileName -o $fileNameWithoutExt && $dir$fileNameWithoutExt",
    "fortran-modern": "cd $dir && gfortran $fileName -o $fileNameWithoutExt && $dir$fileNameWithoutExt",
    "fortran_fixed-form": "cd $dir && gfortran $fileName -o $fileNameWithoutExt && $dir$fileNameWithoutExt",
    "fortran": "cd $dir && gfortran $fileName -o $fileNameWithoutExt && $dir$fileNameWithoutExt",
    "sml": "cd $dir && sml $fileName",
    "mojo": "mojo run",
    "erlang": "escript",
    "spwn": "spwn build",
    "pkl": "cd $dir && pkl eval -f yaml $fileName -o $fileNameWithoutExt.yaml",
    "gleam": "gleam run -m $fileNameWithoutExt"
  },
  "editor.formatOnSave": true,
  "editor.formatOnPaste": true,
  // Black Formatter
  "[python]": {
    "editor.defaultFormatter": "ms-python.black-formatter",
    "editor.formatOnSave": true
  },
  // flake8配置
  "flake8.args": [
    "--max-line-length=120",
    "--ignore=E501,F841,F401,F405,F403,E226,E741"
  ],
  "python.createEnvironment.contentButton": "show",
  "python.analysis.autoFormatStrings": true,
  "python.analysis.completeFunctionParens": true,
  "python.analysis.autoImportCompletions": true,
  "python.terminal.activateEnvInCurrentTerminal": true,
  // 终端继承
  // "terminal.integrated.inheritEnv": false,
  "terminal.integrated.enableMultiLinePasteWarning": "never",
  "python.createEnvironment.trigger": "off",
  "[dockercompose]": {
    "editor.insertSpaces": true,
    "editor.tabSize": 2,
    "editor.autoIndent": "advanced",
    "editor.defaultFormatter": "redhat.vscode-yaml"
  },
  "[github-actions-workflow]": {
    "editor.defaultFormatter": "redhat.vscode-yaml"
  },
  "[xml]": {
    "editor.defaultFormatter": "redhat.vscode-xml"
  },
  "security.workspace.trust.untrustedFiles": "open",
  "black-formatter.importStrategy": "fromEnvironment",
  "black-formatter.showNotifications": "onError",
  "code-runner.runInTerminal": true,
  "workbench.colorTheme": "Default Dark Modern",
  "editor.codeActionsOnSave": {},
  "editor.dropIntoEditor.preferences": [],
  "extensions.ignoreRecommendations": true,
}
三、Ubuntu C++配置
1、g++版本配置
1.查看所有标准
bash
g++ --help=c++ | grep std=2.看默认标准
bash
echo | g++ -dM -E -x c++ - | grep __cplusplus
# 测试c++20
echo | g++ -std=c++20 -dM -E -x c++ - | grep __cplusplus
3.添加 GCC 官方 PPA
bash
sudo apt install software-properties-common
sudo add-apt-repository ppa:ubuntu-toolchain-r/test
回车确认
4.安装 g+±13
bash
sudo apt update
sudo apt install g++-13
5.查看版本
bash
# 查看13版本
g++-13 --version
# 查看默认版本
g++ --version
6.版本切换
bash
sudo update-alternatives --install /usr/bin/g++ g++ /usr/bin/g++-11 50
sudo update-alternatives --install /usr/bin/g++ g++ /usr/bin/g++-13 100
# 选择版本
sudo update-alternatives --config g++
会出现:
bash
There are 2 choices for the alternative g++:

  0    /usr/bin/g++-13
  1    /usr/bin/g++-11
  2    /usr/bin/g++-13
输入:2即可
2、C++标准默认配置
编辑 ~/.bashrc:
bash
sudo gedit ~/.bashrc在最后加入:
bash
alias g++='g++ -std=c++23'保存后执行:
bash
source ~/.bashrc验证默认标准
bash
echo | g++ -dM -E -x c++ - | grep __cplusplus四、QT/Cmake配置
1、MSYS2安装QT组件
bash
pacman -S mingw-w64-x86_64-qt6 mingw-w64-x86_64-qt6-tools2、安装 CMake 和 Ninja(推荐使用)
bash
pacman -S mingw-w64-x86_64-cmake mingw-w64-x86_64-ninja3、配置系统环境变量
bash
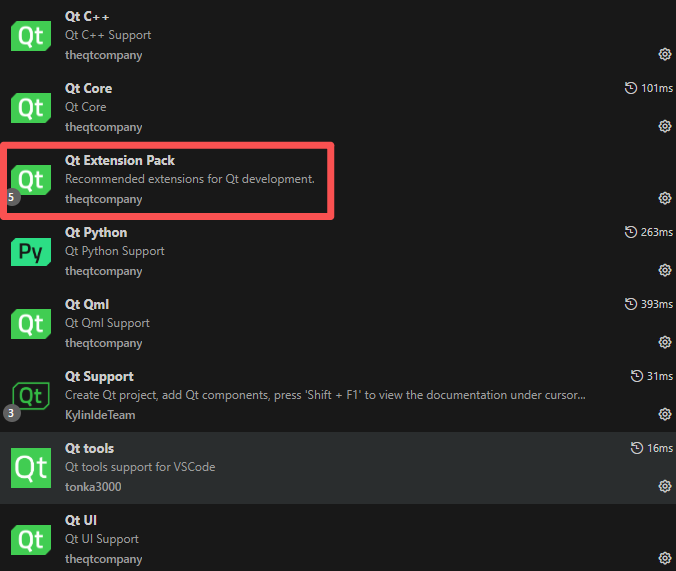
PATH = %PATH %;msys64\mingw64\bin;msys64\usr\bin 4、插件配置
必备插件如下:
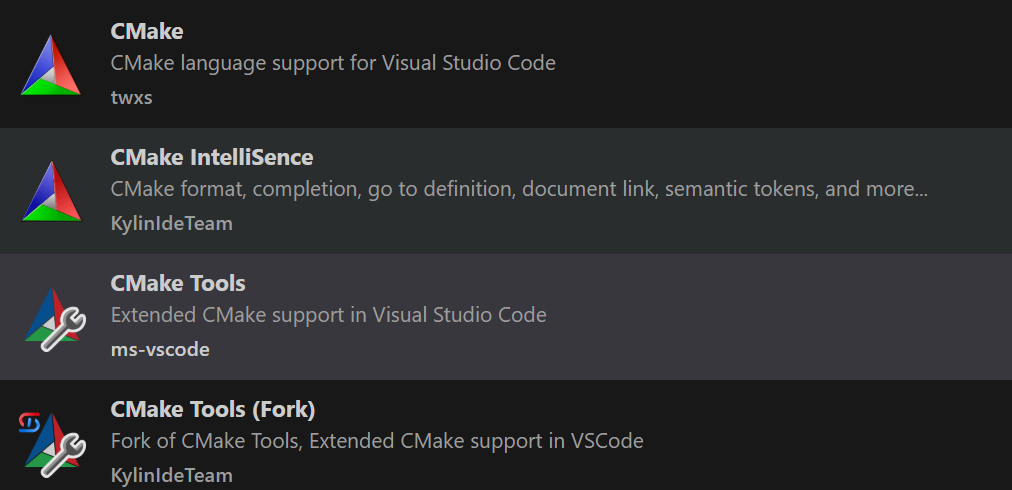
5、创建QT项目
ctrl+shift+p选择如下图所示
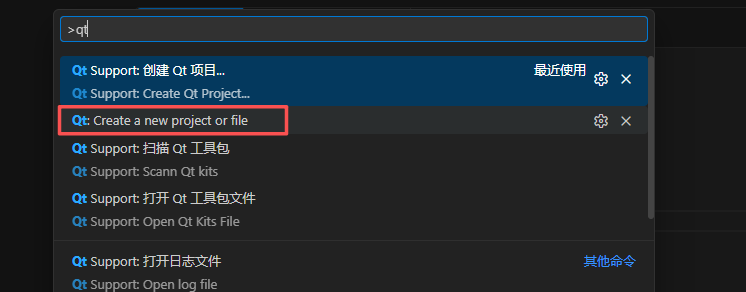
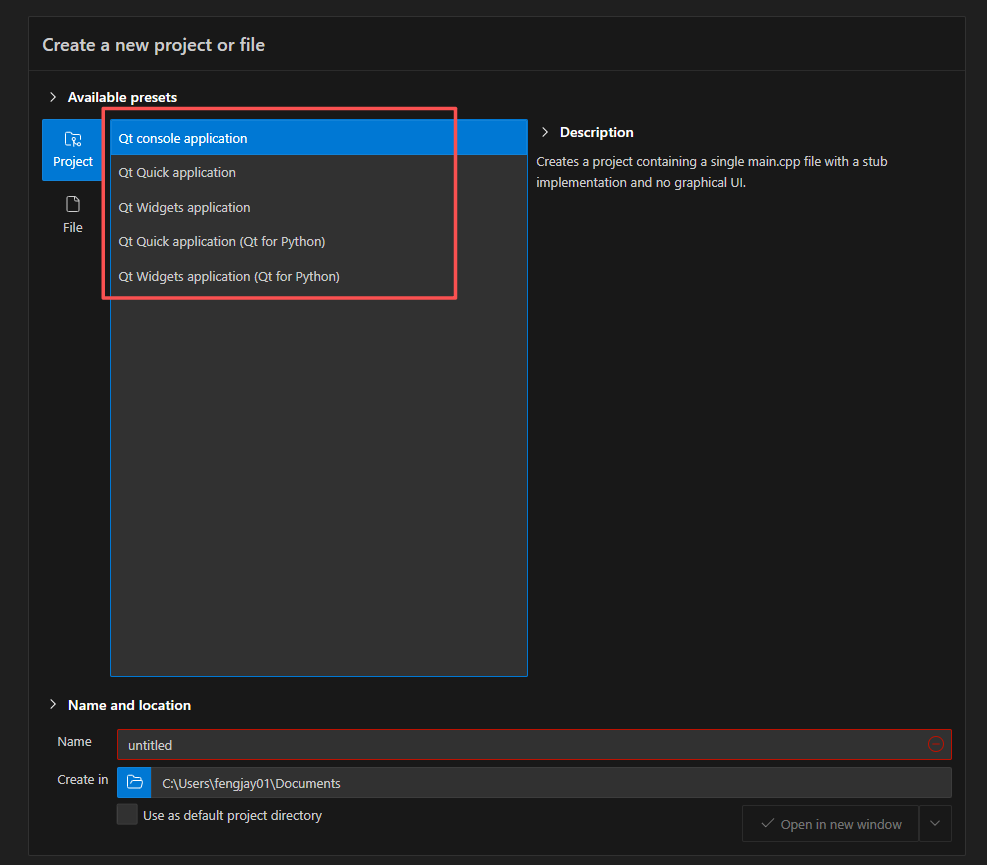
选择类型

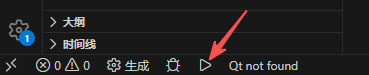
选择GCC后报错
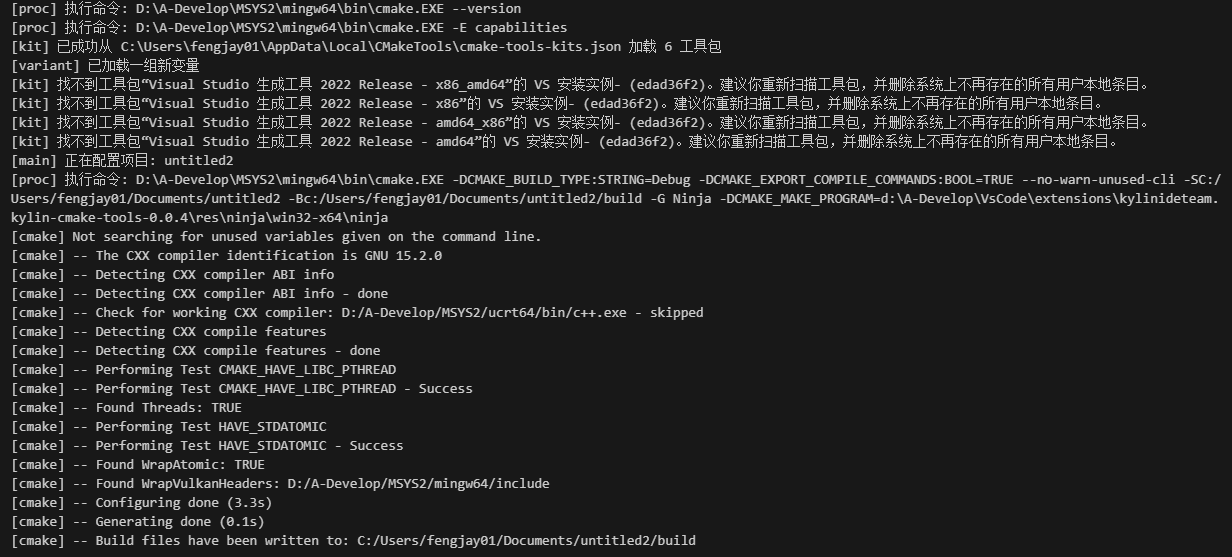
解决方法,在setting.json中配置如下
json
// C++配置
"C_Cpp.default.configurationProvider": "ms-vscode.cmake-tools",
"C_Cpp.default.compileCommands": "${workspaceFolder}/build/compile_commands.json",
"cmake.configureSettings": {
"CMAKE_EXPORT_COMPILE_COMMANDS": "ON"
},
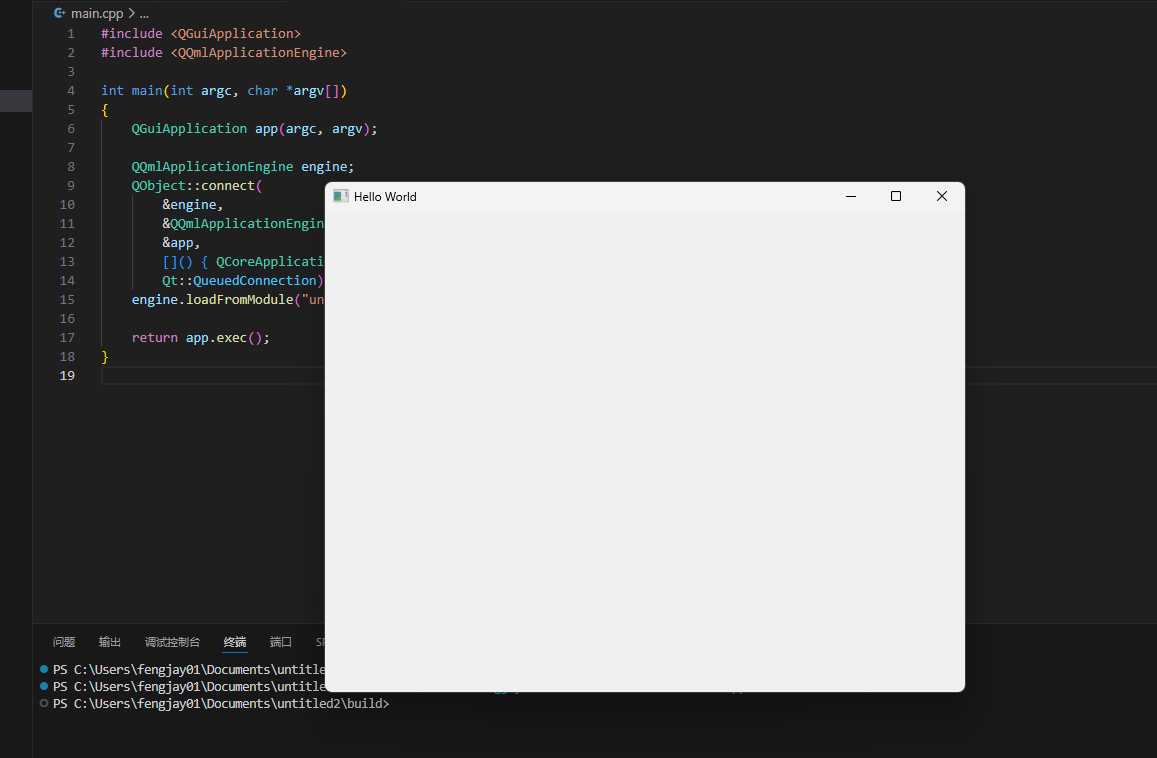
}运行
6、Qt / CMake 等程序安装在哪里
1.下载的程序存放位置
这些 mingw64 包全部安装到:
bash
C:\msys64\mingw64\主要目录:
bash
C:\msys64\mingw64
 ├── bin        可执行程序
 ├── include    头文件
 ├── lib        库文件
 ├── share
 └── etc
所以开发环境主要就是:
bash
C:\msys64\mingw64\bin一般会加入 PATH。
2.pacman下载的安装包缓存
所有下载的 .pkg.tar.zst 安装包在:
bash
C:\msys64\var\cache\pacman\pkg例如:
bash
C:\msys64\var\cache\pacman\pkg
 ├── mingw-w64-x86_64-qt6-6.9.0.pkg.tar.zst
 ├── mingw-w64-x86_64-cmake.pkg.tar.zst
 ├── mingw-w64-x86_64-ninja.pkg.tar.zst
 └── mingw-w64-x86_64-gcc.pkg.tar.zst
这是 缓存目录,作用:
- 以后更新可以复用
- 离线安装
3.缓存清理
Qt + gcc 下载后可能 几GB。
清理命令:
bash
pacman -Sc清理所有旧缓存:
bash
pacman -Scc注意:
bash
-Scc 会删除全部缓存