目录
- 一、线程的创建方式
- 二、线程中断
- 三、synchronized、volatile、wait、notify
- 四、单例模式
- 五、锁策略
-
- [1、乐观锁 vs 悲观锁](#1、乐观锁 vs 悲观锁)
- [2、轻量级锁 vs 重量级锁](#2、轻量级锁 vs 重量级锁)
- [3、自旋锁 vs 挂起等待锁](#3、自旋锁 vs 挂起等待锁)
- [4、读写锁 vs 普通互斥锁](#4、读写锁 vs 普通互斥锁)
- [5、公平锁 vs 非公平锁](#5、公平锁 vs 非公平锁)
- [6、可重入锁 vs 不可重入锁](#6、可重入锁 vs 不可重入锁)
- 六、自旋锁(CAS)
- 七、JUC的常见类
一、线程的创建方式
1、继承Thread类,重写run()方法
java
public class Demo01 {
    public static void main(String[] args) {
        // 初始化自定义的线程
        MyThread01 myThread01 = new MyThread01();
        // 运行这个线程
        myThread01.start();

    }
}

// 自定义一个线程类,继承JDK中的Thread类
class MyThread01 extends Thread {

    // 定义线程的任务
    @Override
    public void run() {
        // 可以不停的处理任务
        while (true) {
            System.out.println("hello my thread...");
        }

    }
}
2、实现Runnable接口,重写run()方法
java
public class Demo02 {
    public static void main(String[] args) {
        Thread02 thread02 = new Thread02();
        Thread thread = new Thread(thread02);

        thread.start();
    }
}

class Thread02 implements Runnable {
    @Override
    public void run() {
        while (true) {
            System.out.println("实现Runnable接口,创建多线程...");
        }
    }
}
3、通过匿名内部类的方式,创建Thread的子类
java
public class Demo03 {
    public static void main(String[] args) {
        Thread thread = new Thread() {
            @Override
            public void run() {
                while (true) {
                    System.out.println("hello my thread...");
                }
            }
        };
        thread.start();
    }
}
4、通过匿名内部类的方式,创建Runnable的子类
java
public class Demo04 {
    public static void main(String[] args) {
        Thread thread = new Thread(new Runnable () {
            @Override
            public void run() {
                while (true) {
                    System.out.println("hello my thread...");
                }
            }
        });
        thread.start();
    }
}
5、通过Lambda表达式创建多线程
java
public class Demo05 {
    public static void main(String[] args) {
        Thread thread = new Thread(()->{
            while (true) {
                System.out.println("hello my thread...");
            }
        });
        thread.start();
    }
}如果在Lambda表达式中使用局部变量会触发变量捕获
原理:
解决方法:把这个局部变量变成全局变量(可看下面的代码,有涉及到)
二、线程中断
1、自定义一个标志位,通过修改这个标志位,通知线程中断
java
public class Demo01 {
    static boolean isQuit = false;
    public static void main(String[] args) {
        Thread thread = new Thread(()-> {
            while (!isQuit) {
                System.out.println("hello my thread...");
            }
        });
        thread.start();
    }
}
2、调用interrupt()方法通知
java
public class Demo03 {
    public static void main(String[] args) throws InterruptedException {
        Thread thread = new Thread(() -> {
            // 通过线程对象内部维护的中断标识,判断当前线程是否需要中断
            while (!Thread.currentThread().isInterrupted()) {
                // 线程中具体的任务是打印一句话
                System.out.println("hello thread...");

                // 线程大部分时间在sleep
                try {
                    Thread.sleep(1000);
                } catch (InterruptedException e) {
                    e.printStackTrace();
                }
            }
            System.out.println("线程已退出");
        });

        System.out.println("线程是否存活:" + thread.isAlive());
        // 启动线程
        thread.start();
        // 休眠一会
        Thread.sleep(1000);
        System.out.println("线程是否存活:" + thread.isAlive());
        // 中断线程,发出中断信号
        thread.interrupt();
        // 等待线程销毁
        Thread.sleep(100);
        // 查看是否存活
        System.out.println("线程是否存活:" + thread.isAlive());
    }
}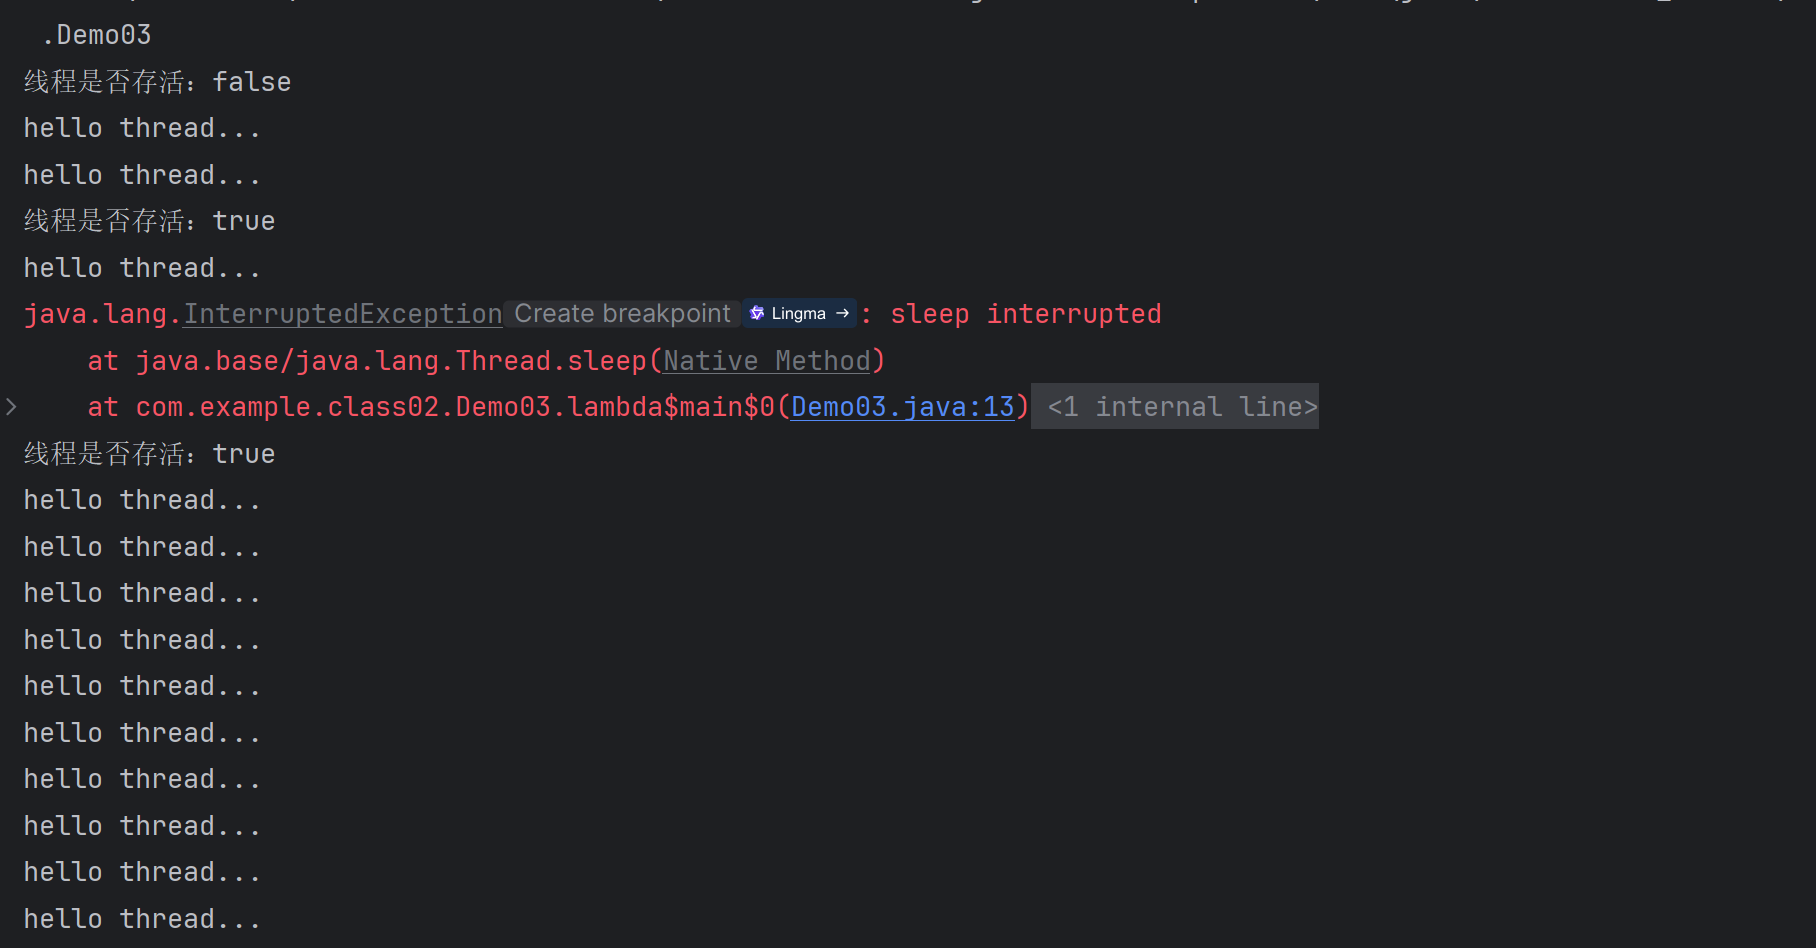
运行结果中hello thread...会一直打印下去,原因是因为子线程大部分在休眠,这就导致thread.interrupt()让子线程从sleep中醒了过来,抛出InterruptedException。而JVM在抛出异常时,会自动清除中断标志位(也就是设置为false),这样就使!Thread.currentThread().isInterrupted()变成了true,并且catch 块里只打印了异常,没有做任何退出操作;这就导致会一直循环下去。
所以,"一直打印" 的根本原因是:中断标志位被清除 + 异常处理没有退出循环。
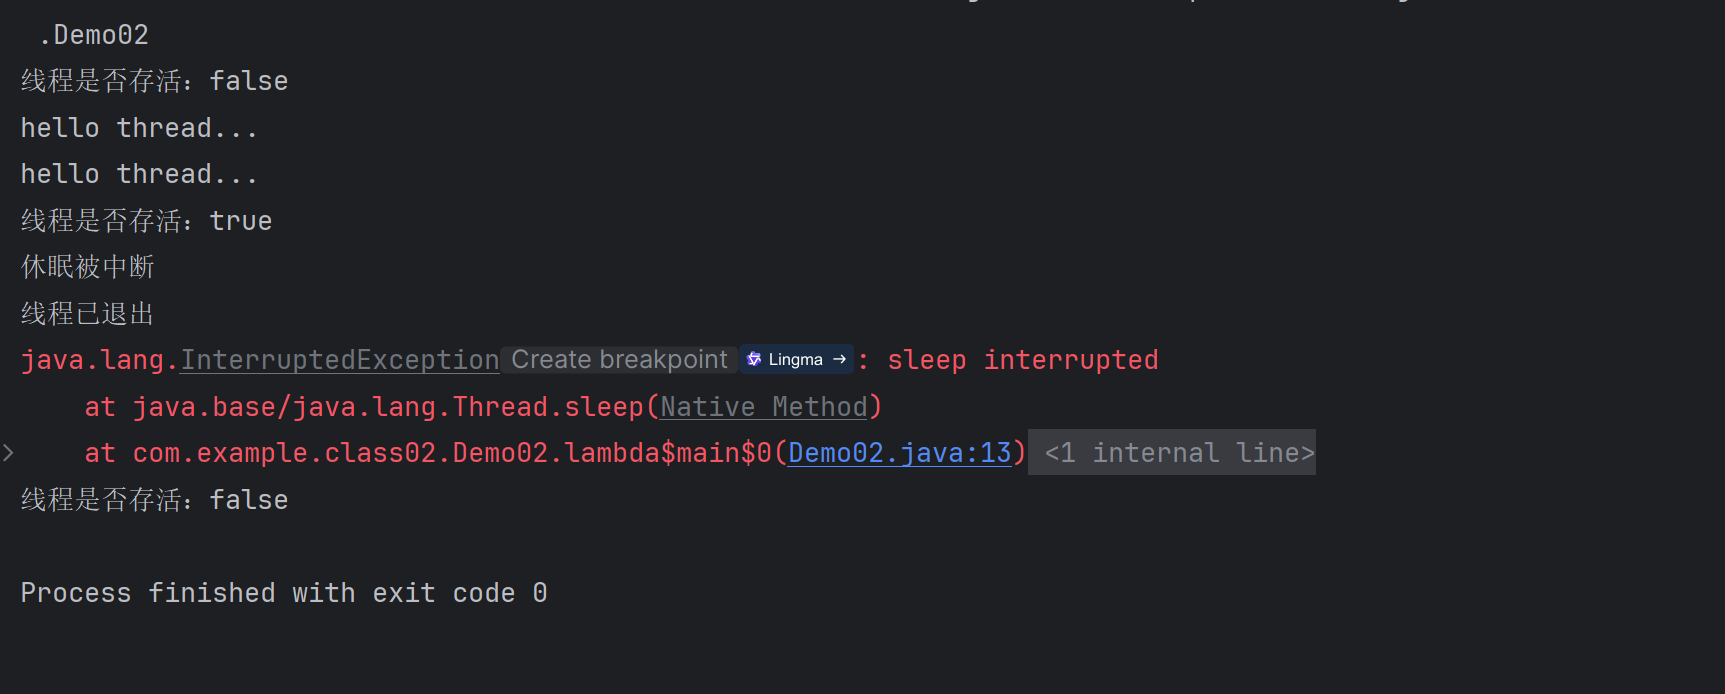
想要避抛出异常,可以像下面这样修改代码:
java
package com.example.class02;

public class Demo02 {
    public static void main(String[] args) throws InterruptedException {
        Thread thread = new Thread(() -> {
            // 通过线程对象内部维护的中断标识,判断当前线程是否需要中断
            while (!Thread.currentThread().isInterrupted()) {
                // 线程中具体的任务是打印一句话
                System.out.println("hello thread...");

                // 线程大部分时间在sleep
                try {
                    Thread.sleep(1000);
                } catch (InterruptedException e) {
                    e.printStackTrace();
                    System.out.println("休眠被中断");
                    // 处理中断逻辑
                    break;
                }
            }
            System.out.println("线程已退出");
        });

        System.out.println("线程是否存活:" + thread.isAlive());
        // 启动线程
        thread.start();
        // 休眠一会
        Thread.sleep(1000);
        System.out.println("线程是否存活:" + thread.isAlive());
        // 中断线程,发出中断信号
        thread.interrupt();
        // 等待线程销毁
        Thread.sleep(100);
        // 查看是否存活
        System.out.println("线程是否存活:" + thread.isAlive());
    }
}
三、synchronized、volatile、wait、notify
1、关于synchronized
1、被synchronized修饰的代码会变成串行执行。
2、synchronized可以修饰方法,也可以修饰代码块(有关共享变量的)。
3、被synchronized修饰的代码并不是一次性在CPU上执行完,而是中途可能会被CPU调度走。
4、只给一个线程加锁,也会出现线程安全问题。
2、volitile
多个线程之间涉及的共享变量,如果存在修改的逻辑,就要加volatile
3、wait、notify
1、当一个线程调用了wait之后,就是放掉当前持有的锁,等待被其他线程唤醒
2、当另一个线程调用了notify后,之前调用了wait的线程被唤醒,需要重新去竞争锁(有可能会没竞争到,那就继续等待),拿到锁之后,会从wait的位置继续执行逻辑。
小结:
1、wait和notify必须搭配synchronized一起使用
2、wait和notify使用的锁对象必须是同一个
3、notify执行多少次都没有关系(即使没有线程再wait)
四、单例模式
饿汉模式
java
public class Singleton {
    //定义一个类的成员变量,用static修饰,保证全局唯一
    private static Singleton singleton = new Singleton();

    //构造方法私有化
    private Singleton() {}

    //提供一个公开的方法返回instance对象
    public static Singleton getInstance() {
        return singleton;
    }
}
懒汉模式
单例类不一定在程序启动时就初始化,为了节省计算机资源,提升程序启动速度,可以在实际使用的时候再new 也就是延时加载
java
public class Singleton {
    //定义一个类的成员变量,用static修饰,保证全局唯一
    private static Singleton singleton = null;

    //构造方法私有化
    private Singleton() {}

    //提供一个公开的方法返回instance对象
    public static Singleton getInstance() {
        if(singleton == null) {
            singleton = new Singleton();
        }
        return singleton;
    }
}
双重检查锁DCL
java
public class SingletonDCL {
    private static volatile SingletonDCL singletonDCL = null;

    private SingletonDCL () {}

    public static SingletonDCL getInstance() {
        // 非同步判空:规避DCL模式下的锁竞争,提升高并发场景性能
        if (singletonDCL == null) {
            synchronized (SingletonDCL.class) {
                if (singletonDCL == null) {
                    singletonDCL = new SingletonDCL();
                }
            }
        }
        return singletonDCL;
    }
}
五、锁策略
1、乐观锁 vs 悲观锁
乐观锁:在执行任务之前预期竞争不激烈,那就先不加锁,等到竞争激烈的时候,再加锁
悲观锁:在执行任务之前预期竞争激烈,必须先加锁再执行任务
2、轻量级锁 vs 重量级锁
轻量级锁:加锁的过程比较简单,用到的资源比较少,典型就是用户态的一些操作(Java层面就可以完成加锁)
重量级锁:加锁的过程比较复杂,用到的资源比较多,典型就是内核态的一些操作
3、自旋锁 vs 挂起等待锁
自旋锁:不停的检查所是否被释放,如果锁一旦被释放就去竞争锁资源
挂起等待锁:会被操作系统挂起,进入阻塞状态,不再参与 CPU 调度,不消耗 CPU 资源,直到被唤醒,再去竞争锁资源
4、读写锁 vs 普通互斥锁
读写锁:分为读锁和写锁
读操作的时候加读锁(共享锁),多个读锁可以共存,同时加多个读锁互不影响
写操作的时候加写锁(排他锁),只允许有一个写锁执行任务,和其他的锁是冲突的
普通互斥锁:有竞争关系,只能一个线程释放了锁之后,其他线程才可以来抢,之前用到的锁基本上都是互斥锁
5、公平锁 vs 非公平锁
公平锁:先来后到,先排队的线程先拿到锁,后排队的线程后拿到锁
非公平锁:大家去抢,谁先抢到就是谁的
6、可重入锁 vs 不可重入锁
可重入锁:对一把锁可以连续加多次,不造成死锁
不可重入锁:对一把锁可以重复加多次,造成死锁
六、自旋锁(CAS)
CAS 是实现自旋锁的核心底层技术
自旋锁通过循环执行 CAS 操作来实现 "不停检查锁状态、竞争锁资源" 的核心逻辑
CAS 操作本身是一个原子指令,它会一次性完成「读取(LOAD)→ 比较 → 交换」三个步骤
锁消除
锁消除:JVM 在即时编译(JIT)时,通过逃逸分析发现某些锁对象不会被多个线程共享,因此可以直接消除这些锁,避免不必要的同步开销。
锁粗化
锁粗化:JVM 检测到连续多次对同一个对象加锁和解锁时,会把这些锁合并成一个更大范围的锁,减少频繁加锁 / 解锁的性能损耗。
七、JUC的常见类
Callable
java
public class Demo_1101_Callable {
    public static void main(String[] args) {
        // 实现Callable接口,定义任务
        Callable<Integer> callable  = new Callable<Integer>() {
            @Override
            public Integer call() throws Exception {
                System.out.println("执行运算...");
                int sum = 0;
                // 执行累加操作
                for (int i = 1; i <= 1000; i++) {
                    sum += i;
                }
                // 休眠3秒,模拟业务处理的时间
                TimeUnit.SECONDS.sleep(3);
                throw new Exception("执行过程中出现了异常...");
//                System.out.println("执运算完成...");
//                return sum;
            }
        };

        // Callable要配合FutureTask一起使用,FutureTask用来获取Callable的执行结果
        FutureTask<Integer> futureTask = new FutureTask<>(callable);
        // FutureTask当做构造参数传入到Thread构造方法中
        Thread thread = new Thread(futureTask);
        // 启动线程
        thread.start();

        try {
            // 等待结果, 的时间可能被中断,会抛出InterruptedException
            Integer result = futureTask.get();
            // 打印结果
            System.out.println("执行结果是:" + result);
        } catch (InterruptedException e) {
            e.printStackTrace();
        } catch (ExecutionException e) {
            e.printStackTrace();
            // 打印异常信息
            System.out.println("打印日志:" + e.getMessage());
        }
    }
}