GPIO子系统
1.GPIO控制器的设备树
bash
gpio1: gpio@0209c000 {
				compatible = "fsl,imx6ul-gpio", "fsl,imx35-gpio";
				reg = <0x0209c000 0x4000>;
				interrupts = <GIC_SPI 66 IRQ_TYPE_LEVEL_HIGH>,
					     <GIC_SPI 67 IRQ_TYPE_LEVEL_HIGH>;
				gpio-controller;
				#gpio-cells = <2>;
				interrupt-controller;
				#interrupt-cells = <2>;
			};
2.SOC的GPIO控制器驱动
c
//D:\mydir\imx-linux4.9.88\drivers\gpio\gpio-mxc.c
static int mxc_gpio_probe(struct platform_device *pdev)
{
struct device_node *np = pdev->dev.of_node;
struct mxc_gpio_port *port;
struct resource *iores;
int irq_base = 0;
int err;
mxc_gpio_get_hw(pdev);//获取平台硬件信息
port = devm_kzalloc(&pdev->dev, sizeof(*port), GFP_KERNEL);//分配空间
if (!port)
return -ENOMEM;
iores = platform_get_resource(pdev, IORESOURCE_MEM, 0);
port->base = devm_ioremap_resource(&pdev->dev, iores);//设置设备地址映射
if (IS_ERR(port->base))
return PTR_ERR(port->base);
port->irq_high = platform_get_irq(pdev, 1);//中断的高位
port->irq = platform_get_irq(pdev, 0);//中断的低位
if (port->irq < 0)
return port->irq;
/* the controller clock is optional */
port->clk = devm_clk_get(&pdev->dev, NULL);
if (IS_ERR(port->clk))
port->clk = NULL;
err = clk_prepare_enable(port->clk);
if (err) {
dev_err(&pdev->dev, "Unable to enable clock.\n");
return err;
}
pm_runtime_set_active(&pdev->dev);//Power Management电源运行时管理初始化
pm_runtime_enable(&pdev->dev);
err = pm_runtime_get_sync(&pdev->dev);
if (err < 0)
goto out_pm_dis;
/* disable the interrupt and clear the status */
writel(0, port->base + GPIO_IMR);
writel(~0, port->base + GPIO_ISR);
if (mxc_gpio_hwtype == IMX21_GPIO) {
/*
* Setup one handler for all GPIO interrupts. Actually setting
* the handler is needed only once, but doing it for every port
* is more robust and easier.
*/
irq_set_chained_handler(port->irq, mx2_gpio_irq_handler);
} else {
/* setup one handler for each entry */
irq_set_chained_handler_and_data(port->irq,
mx3_gpio_irq_handler, port);
if (port->irq_high > 0)
/* setup handler for GPIO 16 to 31 */
irq_set_chained_handler_and_data(port->irq_high,
mx3_gpio_irq_handler,
port);
}
//内核通用 GPIO 芯片初始化函数(bit-banged GPIO),封装了 GPIO 基本操作
//在这里设置gpio_chip的direction_output direction_input get_direction等
err = bgpio_init(&port->gc, &pdev->dev, 4,
port->base + GPIO_PSR,
port->base + GPIO_DR, NULL,
port->base + GPIO_GDIR, NULL,
BGPIOF_READ_OUTPUT_REG_SET);
if (err)
goto out_bgio;
if (of_property_read_bool(np, "gpio_ranges"))
port->gpio_ranges = true;
else
port->gpio_ranges = false;
//设置在这里设置gpio_chip的request和free等
port->gc.request = mxc_gpio_request;
port->gc.free = mxc_gpio_free;
port->gc.parent = &pdev->dev;
port->gc.to_irq = mxc_gpio_to_irq;
port->gc.base = (pdev->id < 0) ? of_alias_get_id(np, "gpio") * 32 :
pdev->id * 32;
//注册GPIO 芯片到内核
err = devm_gpiochip_add_data(&pdev->dev, &port->gc, port);
if (err)
goto out_bgio;
//中断号分配与中断域初始化
irq_base = irq_alloc_descs(-1, 0, 32, numa_node_id());//分配中断描述符
if (irq_base < 0) {
err = irq_base;
goto out_bgio;
}
port->domain = irq_domain_add_legacy(np, 32, irq_base, 0,
&irq_domain_simple_ops, NULL);//中断域
if (!port->domain) {
err = -ENODEV;
goto out_irqdesc_free;
}
/* gpio-mxc can be a generic irq chip */
err = mxc_gpio_init_gc(port, irq_base, &pdev->dev);
if (err < 0)
goto out_irqdomain_remove;
list_add_tail(&port->node, &mxc_gpio_ports);// 将端口加入全局链表管理
platform_set_drvdata(pdev, port);// 保存 port 到设备私有数据
pm_runtime_put(&pdev->dev);// 释放 PM 使用权(允许休眠)
return 0;
out_pm_dis:
pm_runtime_disable(&pdev->dev);
clk_disable_unprepare(port->clk);
out_irqdomain_remove:
irq_domain_remove(port->domain);
out_irqdesc_free:
irq_free_descs(irq_base, 32);
out_bgio:
dev_info(&pdev->dev, "%s failed with errno %d\n", __func__, err);
return err;
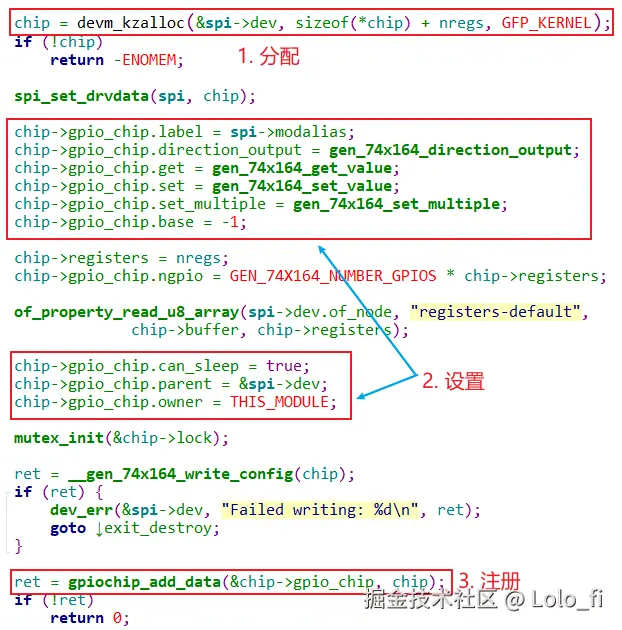
}3.SPI外设模拟GPIO 控制器
只需要分配gpio_chip空间,填充gpio_chip结构体设置值并且注册到内核gpiochip_add_data。
C
//D:\mydir\imx-linux4.9.88\drivers\gpio\gpio-74x164.c
static int gen_74x164_probe(struct spi_device *spi)
{
	struct gen_74x164_chip *chip;
	u32 nregs;
	int ret;

	/*
	 * bits_per_word cannot be configured in platform data
	 */
	spi->bits_per_word = 8;

	ret = spi_setup(spi);
	if (ret < 0)
		return ret;

	if (of_property_read_u32(spi->dev.of_node, "registers-number",
				 &nregs)) {
		dev_err(&spi->dev,
			"Missing registers-number property in the DT.\n");
		return -EINVAL;
	}

	chip = devm_kzalloc(&spi->dev, sizeof(*chip) + nregs, GFP_KERNEL);
	if (!chip)
		return -ENOMEM;

	spi_set_drvdata(spi, chip);

	chip->gpio_chip.label = spi->modalias;
	chip->gpio_chip.direction_output = gen_74x164_direction_output;
	chip->gpio_chip.get = gen_74x164_get_value;
	chip->gpio_chip.set = gen_74x164_set_value;
	chip->gpio_chip.set_multiple = gen_74x164_set_multiple;
	chip->gpio_chip.base = -1;

	chip->registers = nregs;
	chip->gpio_chip.ngpio = GEN_74X164_NUMBER_GPIOS * chip->registers;

	of_property_read_u8_array(spi->dev.of_node, "registers-default",
				 chip->buffer, chip->registers);

	chip->gpio_chip.can_sleep = true;
	chip->gpio_chip.parent = &spi->dev;
	chip->gpio_chip.owner = THIS_MODULE;

	mutex_init(&chip->lock);

	ret = __gen_74x164_write_config(chip);
	if (ret) {
		dev_err(&spi->dev, "Failed writing: %d\n", ret);
		goto exit_destroy;
	}

	ret = gpiochip_add_data(&chip->gpio_chip, chip);
	if (!ret)
		return 0;

exit_destroy:
	mutex_destroy(&chip->lock);

	return ret;
}
4.数据结构
层次
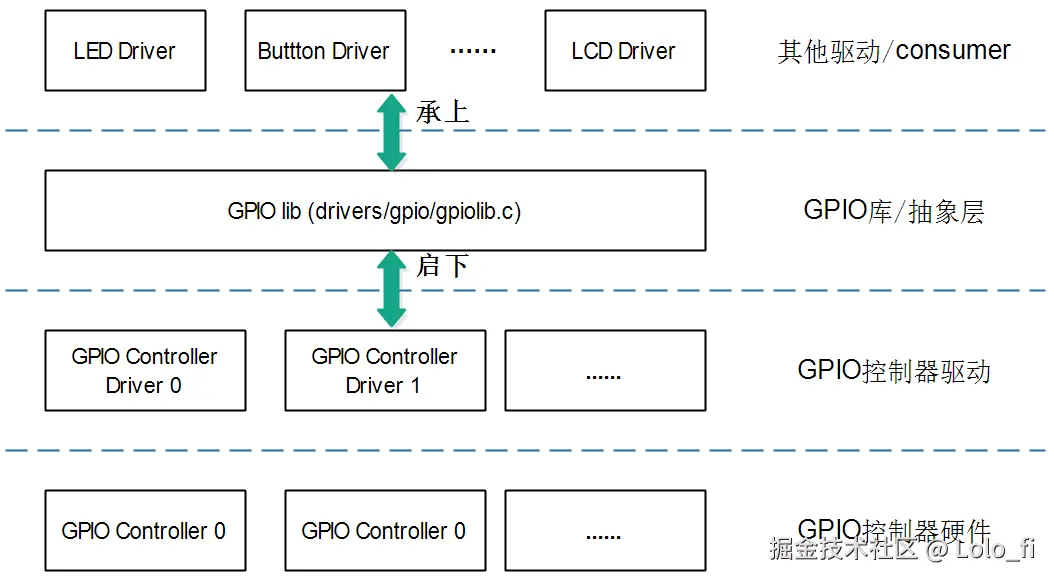
GPIOLIB向下提供的接口 在 drivers\gpio\gpiolib.c 中的 int gpiochip_add_data(struct gpio_chip *chip, void *data)
在 Linux 内核的 GPIO 子系统中,gpio_device、gpio_chip 和 gpio_desc 是三个核心数据结构,它们共同管理 GPIO 设备的硬件和软件资源。以下是它们的关系和作用:
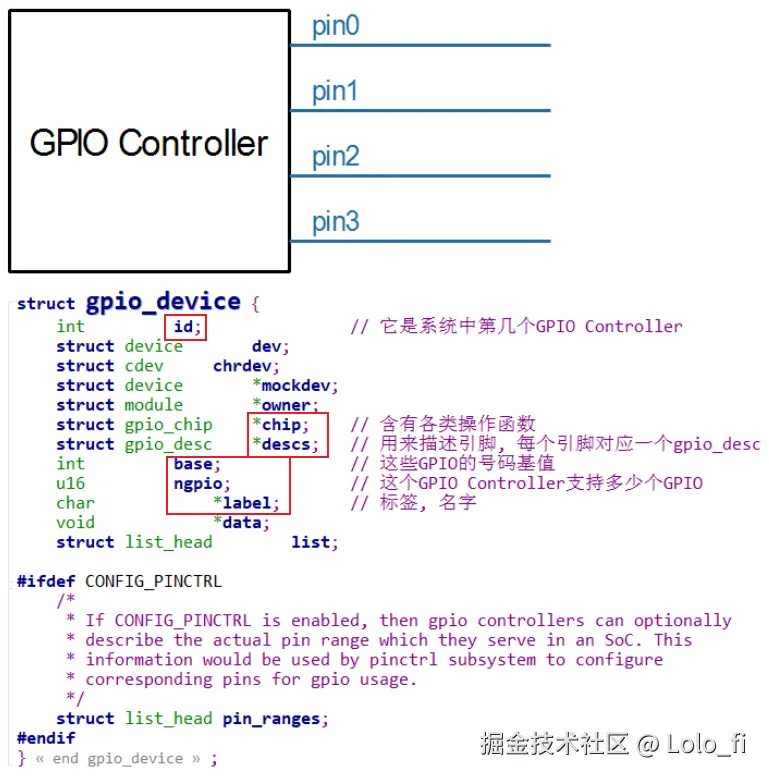
gpio_device
关键字段
| 字段 | 说明 |
|---|---|
| chip | 指向 gpio_chip 结构体的指针,表示 GPIO 控制器。 |
| base | GPIO 的起始编号(全局编号)。 |
| ngpio | GPIO 的数量。 |
| label | GPIO 设备的名称(如 "gpiochip0")。 |
每个GPIO Controller用一个gpio_device来表示:
gpio_chip
| 字段 | 说明 |
|---|---|
| label | GPIO 控制器的名称(如 "gpiochip0")。 |
| ngpio | GPIO 的数量。 |
| base | GPIO 的起始编号(全局编号)。 |
| direction_input | 函数指针,用于将 GPIO 设置为输入模式。 |
| direction_output | 函数指针,用于将 GPIO 设置为输出模式。 |
| get | 函数指针,用于读取 GPIO 的值。 |
| set | 函数指针,用于设置 GPIO 的值。 |
我们并不需要自己创建gpio_device,编写驱动时要创建的是gpio_chip,里面提供了:

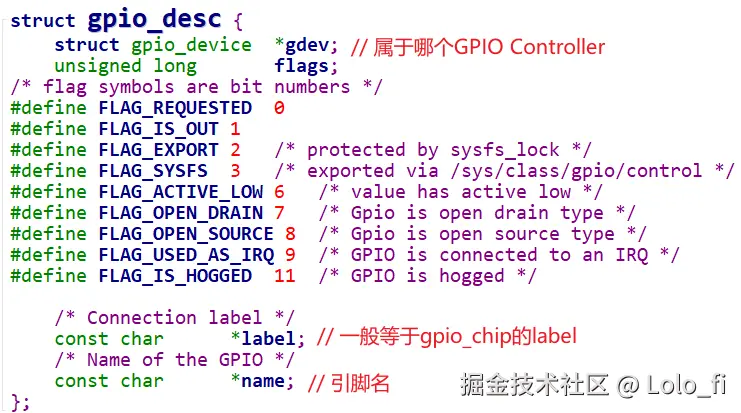
gpio_desc
关键字段
| 字段 | 说明 |
|---|---|
| chip | 指向 gpio_chip 结构体的指针,表示 GPIO 控制器。 |
| flags | GPIO 的标志(如方向、状态等)。 |
| label | GPIO 引脚的名称(如 "led")。 |
我们去使用GPIO子系统时,首先是获得某个引脚对应的gpio_desc。 gpio_device表示一个GPIO Controller,里面支持多个GPIO。 在gpio_device中有一个gpio_desc数组,每一引脚有一项gpio_desc。
以下是 gpio_device、gpio_chip 和 gpio_desc 的关系:
lua
gpio_device
    |
    |-- gpio_chip
    |       |
    |       |-- direction_input
    |       |-- direction_output
    |       |-- get
    |       |-- set
    |
    |-- gpio_desc
            |
            |-- chip
            |-- flags
            |-- label
三者共同构成了 Linux GPIO 子系统的核心,用于管理 GPIO 设备和引脚。
5.GPIO 控制器驱动程序
分配、设置、注册gpioc_chip结构体,示例:drivers\gpio\gpio-74x164.c
c
struct gen_74x164_chip {
	struct gpio_chip	gpio_chip;
	struct mutex		lock;
	u32			registers;
	/*
	 * Since the registers are chained, every byte sent will make
	 * the previous byte shift to the next register in the
	 * chain. Thus, the first byte sent will end up in the last
	 * register at the end of the transfer. So, to have a logical
	 * numbering, store the bytes in reverse order.
	 */
	u8			buffer[0];
};这里的gen_74x164_chip里面定义了gpio_chip。
在控制器驱动中只需要设置gpio_chip的值,并且通过gpiochip_add_data注册到gpio子系统核心去。
6.写外设驱动流程
1.注意资源的active low或者active high。
2.旧API gpio_request和新API devm_gpiod_get 新API会自动申请并且在dev注销时自动释放资源。
3.GPIO_ACTIVE_LOW/HIGH是逻辑值,当HIGH时,逻辑为1,此时active有效,如果是active low输出低电平/如果是active high输出高电平。
4.注意platform_set_drvdata将平台设备和私有数据绑定,这样remove或者回调函数可以从pdev->driver_data中拿到资源或者回调函数的函体地址。
举例:假设硬件资源
GPIO1_IO05 → reset(active low)
GPIO1_IO06 → power enable(active high)
c
//设备树
mydev: mydev@0 {
    compatible = "nxp,mydev-demo";
    status = "okay";

    pinctrl-names = "default";
    pinctrl-0 = <&pinctrl_mydev>;

    reset-gpios = <&gpio1 5 GPIO_ACTIVE_LOW>;
    power-gpios = <&gpio1 6 GPIO_ACTIVE_HIGH>;
};
//pinctrl
pinctrl_mydev: mydevgrp {
    fsl,pins = <
        MX6UL_PAD_GPIO1_IO05__GPIO1_IO05 0x10b0
        MX6UL_PAD_GPIO1_IO06__GPIO1_IO06 0x10b0
    >;
};
私有数据结构:
c
struct mydev {
    struct device *dev;

    struct gpio_desc *reset_gpio;  //gpio_desc表示某个gpio口
    struct gpio_desc *power_gpio;

    dev_t devt;
    struct cdev cdev;
    struct class *class;
};
probe函数
c
static int mydev_probe(struct platform_device *pdev)
{
    struct mydev *mdev;
    int ret;

    mdev = devm_kzalloc(&pdev->dev, sizeof(*mdev), GFP_KERNEL);
    if (!mdev)
        return -ENOMEM;

    mdev->dev = &pdev->dev;

    /* 获取 GPIO(逻辑语义,不关心物理电平) */
    mdev->reset_gpio =
        devm_gpiod_get(&pdev->dev, "reset", GPIOD_OUT_HIGH);
    if (IS_ERR(mdev->reset_gpio))
        return PTR_ERR(mdev->reset_gpio);

    mdev->power_gpio =
        devm_gpiod_get(&pdev->dev, "power", GPIOD_OUT_LOW);
    if (IS_ERR(mdev->power_gpio))
        return PTR_ERR(mdev->power_gpio);

    platform_set_drvdata(pdev, mdev);//私有数据和平台设备绑定

    /* === 上电 / 复位时序 === */

    gpiod_set_value(mdev->power_gpio, 1);   /* power on */
    msleep(10);

    gpiod_set_value(mdev->reset_gpio, 1);   /* assert reset */
    msleep(20);
    gpiod_set_value(mdev->reset_gpio, 0);   /* deassert reset */

    dev_info(&pdev->dev, "mydev initialized\n");
    return 0;
}
GPIOD_OUT_HIGH = 逻辑 active
GPIO_ACTIVE_LOW 决定 物理电平翻转
probe 失败 → 所有 GPIO 自动释放
remove函数
c
static int mydev_remove(struct platform_device *pdev)
{
    struct mydev *mdev = platform_get_drvdata(pdev);

    dev_info(mdev->dev, "mydev removed\n");
    return 0;
}
platform_driver定义
c
static const struct of_device_id mydev_of_match[] = {
    { .compatible = "nxp,mydev-demo" },
    { }
};
MODULE_DEVICE_TABLE(of, mydev_of_match);

static struct platform_driver mydev_driver = {
    .probe  = mydev_probe,
    .remove = mydev_remove,
    .driver = {
        .name = "mydev",
        .of_match_table = mydev_of_match,
    },
};

module_platform_driver(mydev_driver);