解密openclaw底层pi-mono架构系列一:5. pi-web-ui
>>关注,点赞,转发私信发代码<<
>>关注,点赞,转发私信发代码<<
>>关注,点赞,转发私信发代码<<
前四篇我们依次构建了
pi-ai(统一 LLM API)、pi-agent-core(智能体运行时)、pi-tui(终端 UI)、pi-coding-agent(终端编程助手)。它们都运行在 Node.js 或终端中。但如果想让普通用户也能用上 AI 能力呢?答案就是本篇主角------pi-web-ui,一套浏览器端的 AI 聊天界面组件。

目录
- [pi-web-ui 是什么](#pi-web-ui 是什么)
- 整体架构:从终端到浏览器
- ChatPanel:一步搞定聊天界面
- [自定义布局:ChatPanel + 外部框架](#自定义布局:ChatPanel + 外部框架)
- 浏览器存储系统
- [消息类型与 Artifact](#消息类型与 Artifact)
- 浏览器端工具
- [CORS 代理:跨域问题的解法](#CORS 代理:跨域问题的解法)
- 主题与样式
- [实战:AI 客服系统](#实战:AI 客服系统)
- 总结与下一步
1. pi-web-ui 是什么
一句话定义
pi-web-ui = 浏览器版的 pi-agent + Web Components UI
它把 pi-ai 和 pi-agent-core 的能力搬到了浏览器中,并提供一套开箱即用的聊天界面组件。无论你在做什么 Web 应用------电商、SaaS、内部工具------只要几行 TypeScript,就能嵌入 AI 对话能力。
类比理解
| 场景 | 类比 | 对应的包 |
|---|---|---|
| 终端里和 AI 聊天 | 在命令行里打电话 | pi-coding-agent |
| 浏览器里和 AI 聊天 | 在网页上开视频会议 | pi-web-ui |
就像把终端里的"电话"升级成了网页上的"视频会议"------功能一样,但用起来更直观、更适合普通用户。
核心 API
| 类 | 作用 | 来自 |
|---|---|---|
ChatPanel |
完整聊天界面组件(Web Component) | pi-web-ui |
Agent |
智能体运行时(管理模型、消息、工具循环) | pi-agent-core |
getModel() |
获取 LLM 模型配置 | pi-ai |
AppStorage |
统一存储管理(会话、Key、设置) | pi-web-ui |
使用方式 :创建 Agent → 创建 ChatPanel → 调用 chatPanel.setAgent(agent) 关联 → 用 Lit 渲染到页面。
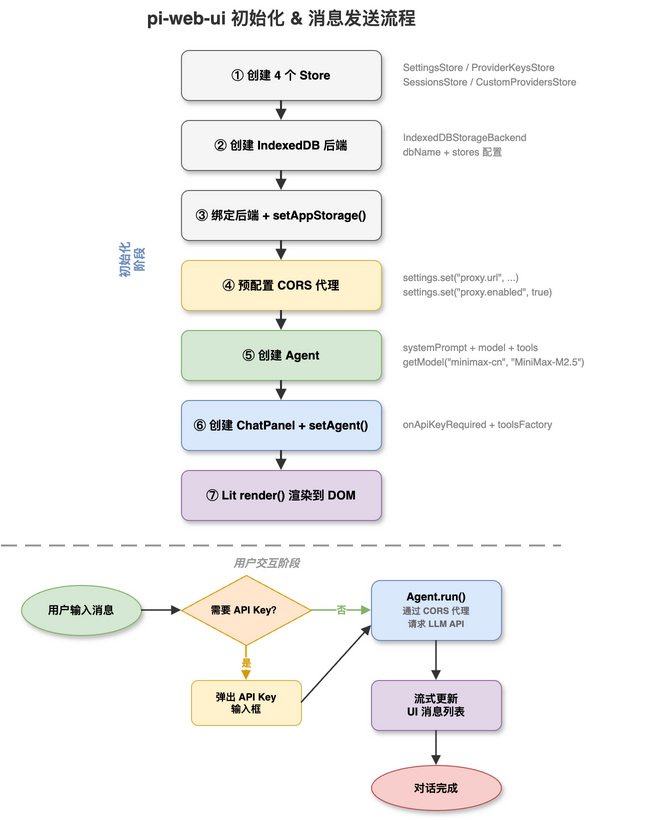
初始化流程
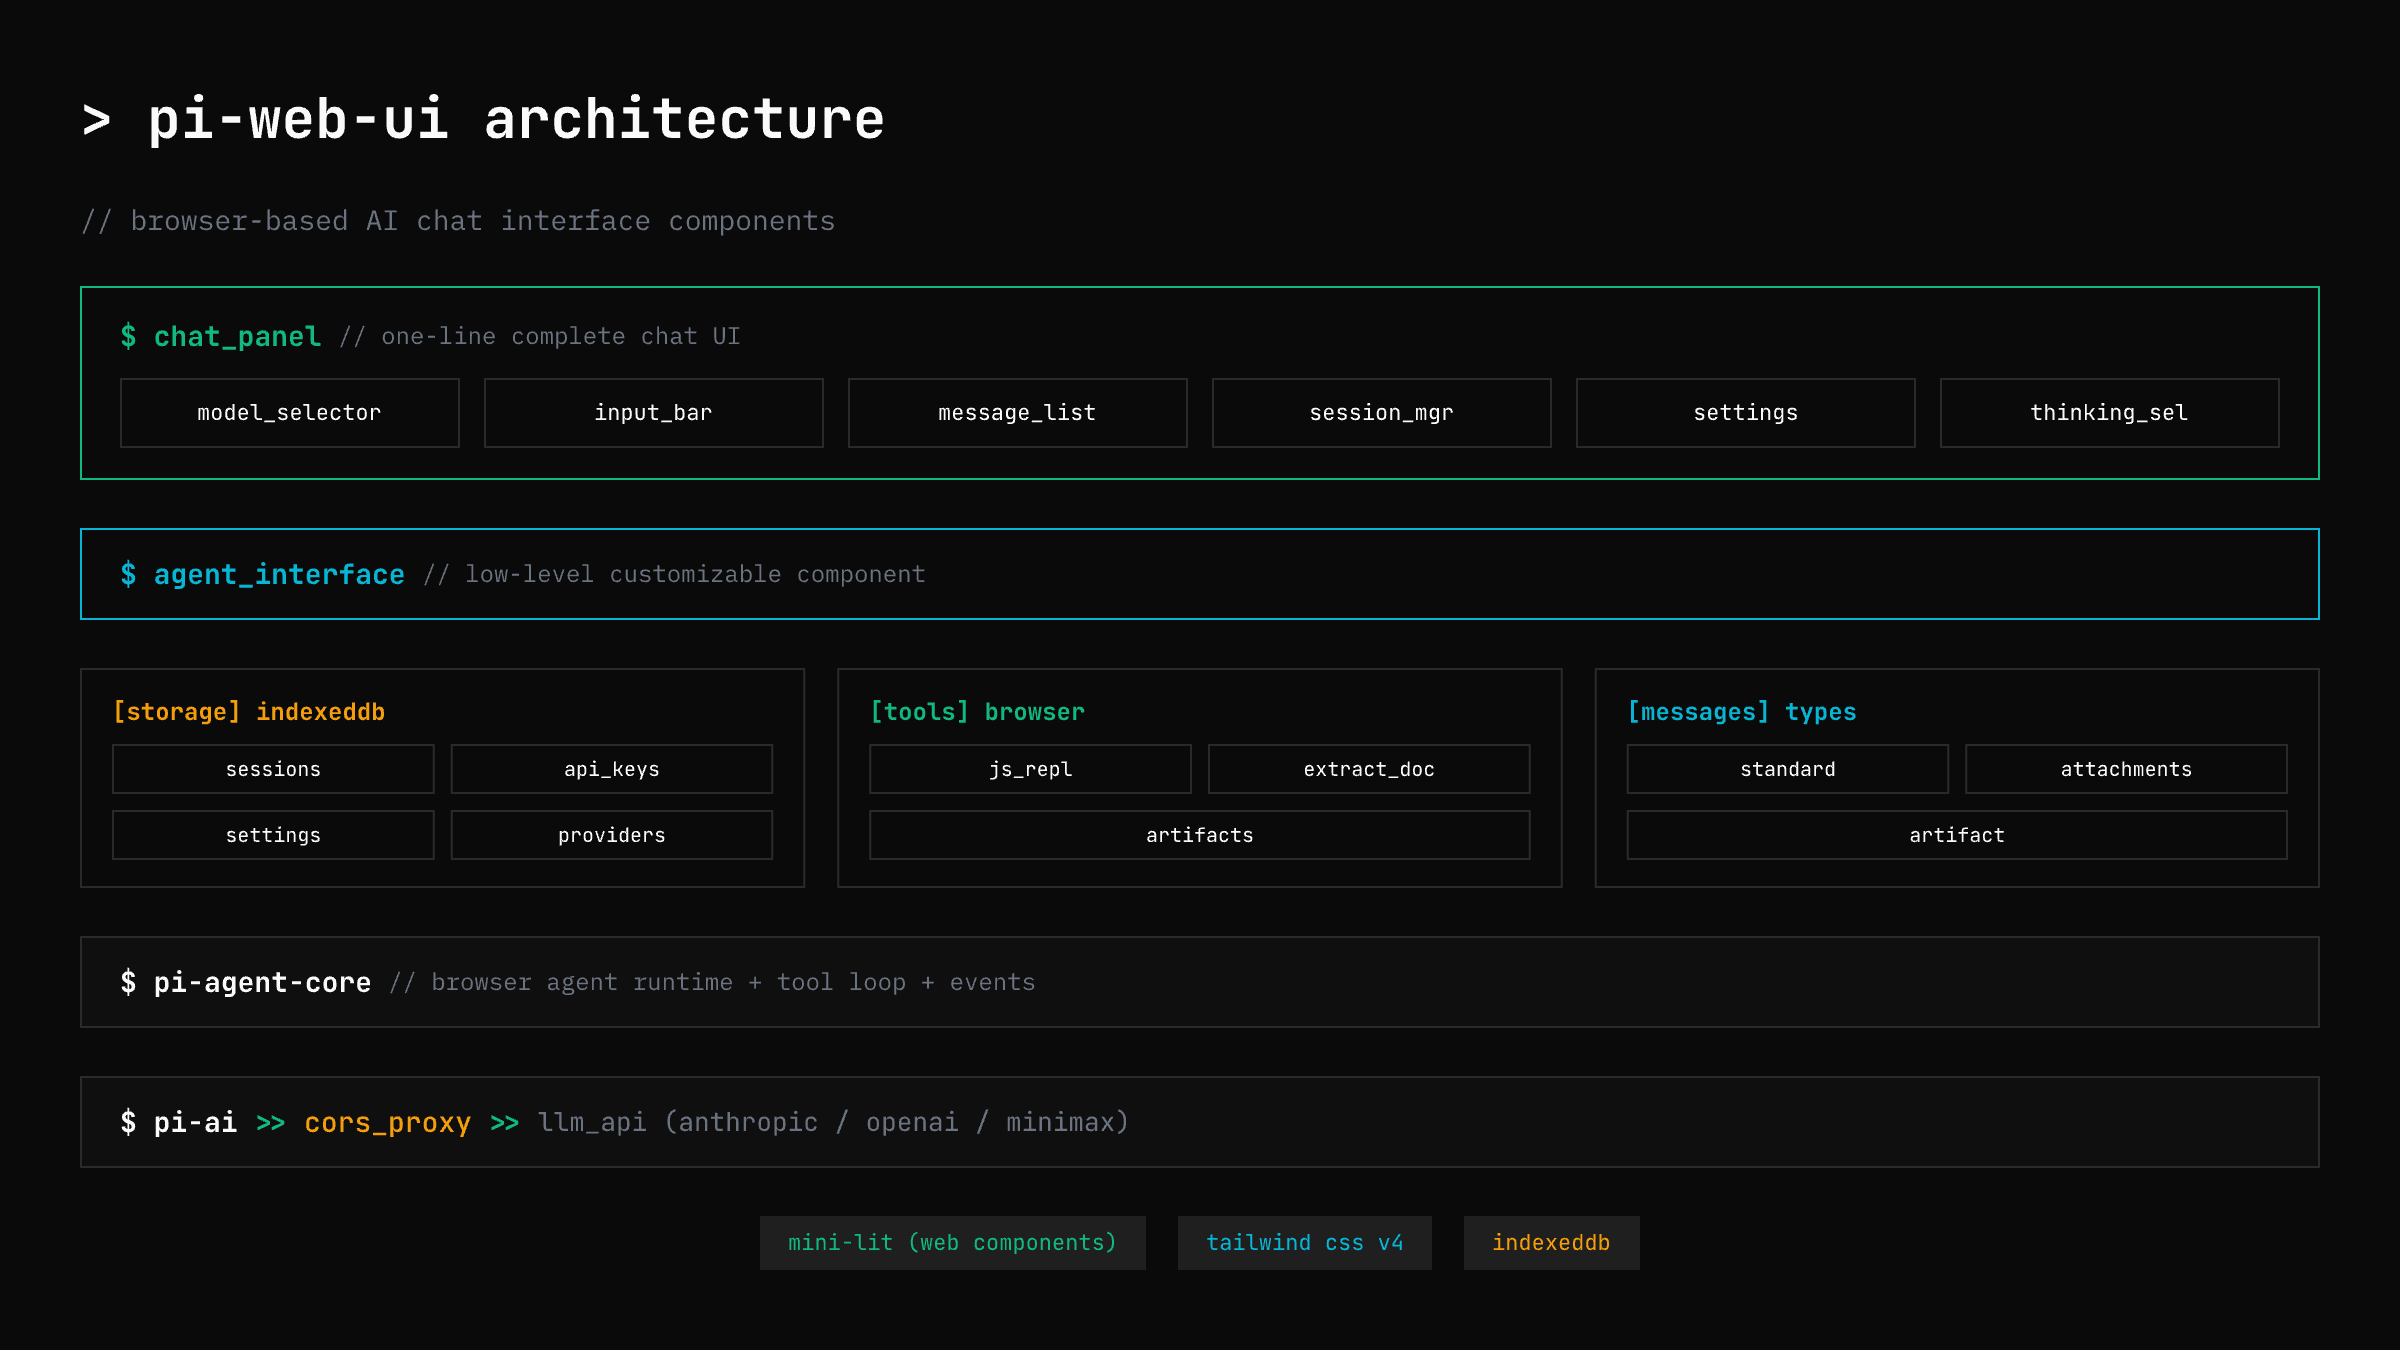
2. 整体架构:从终端到浏览器
组件架构图

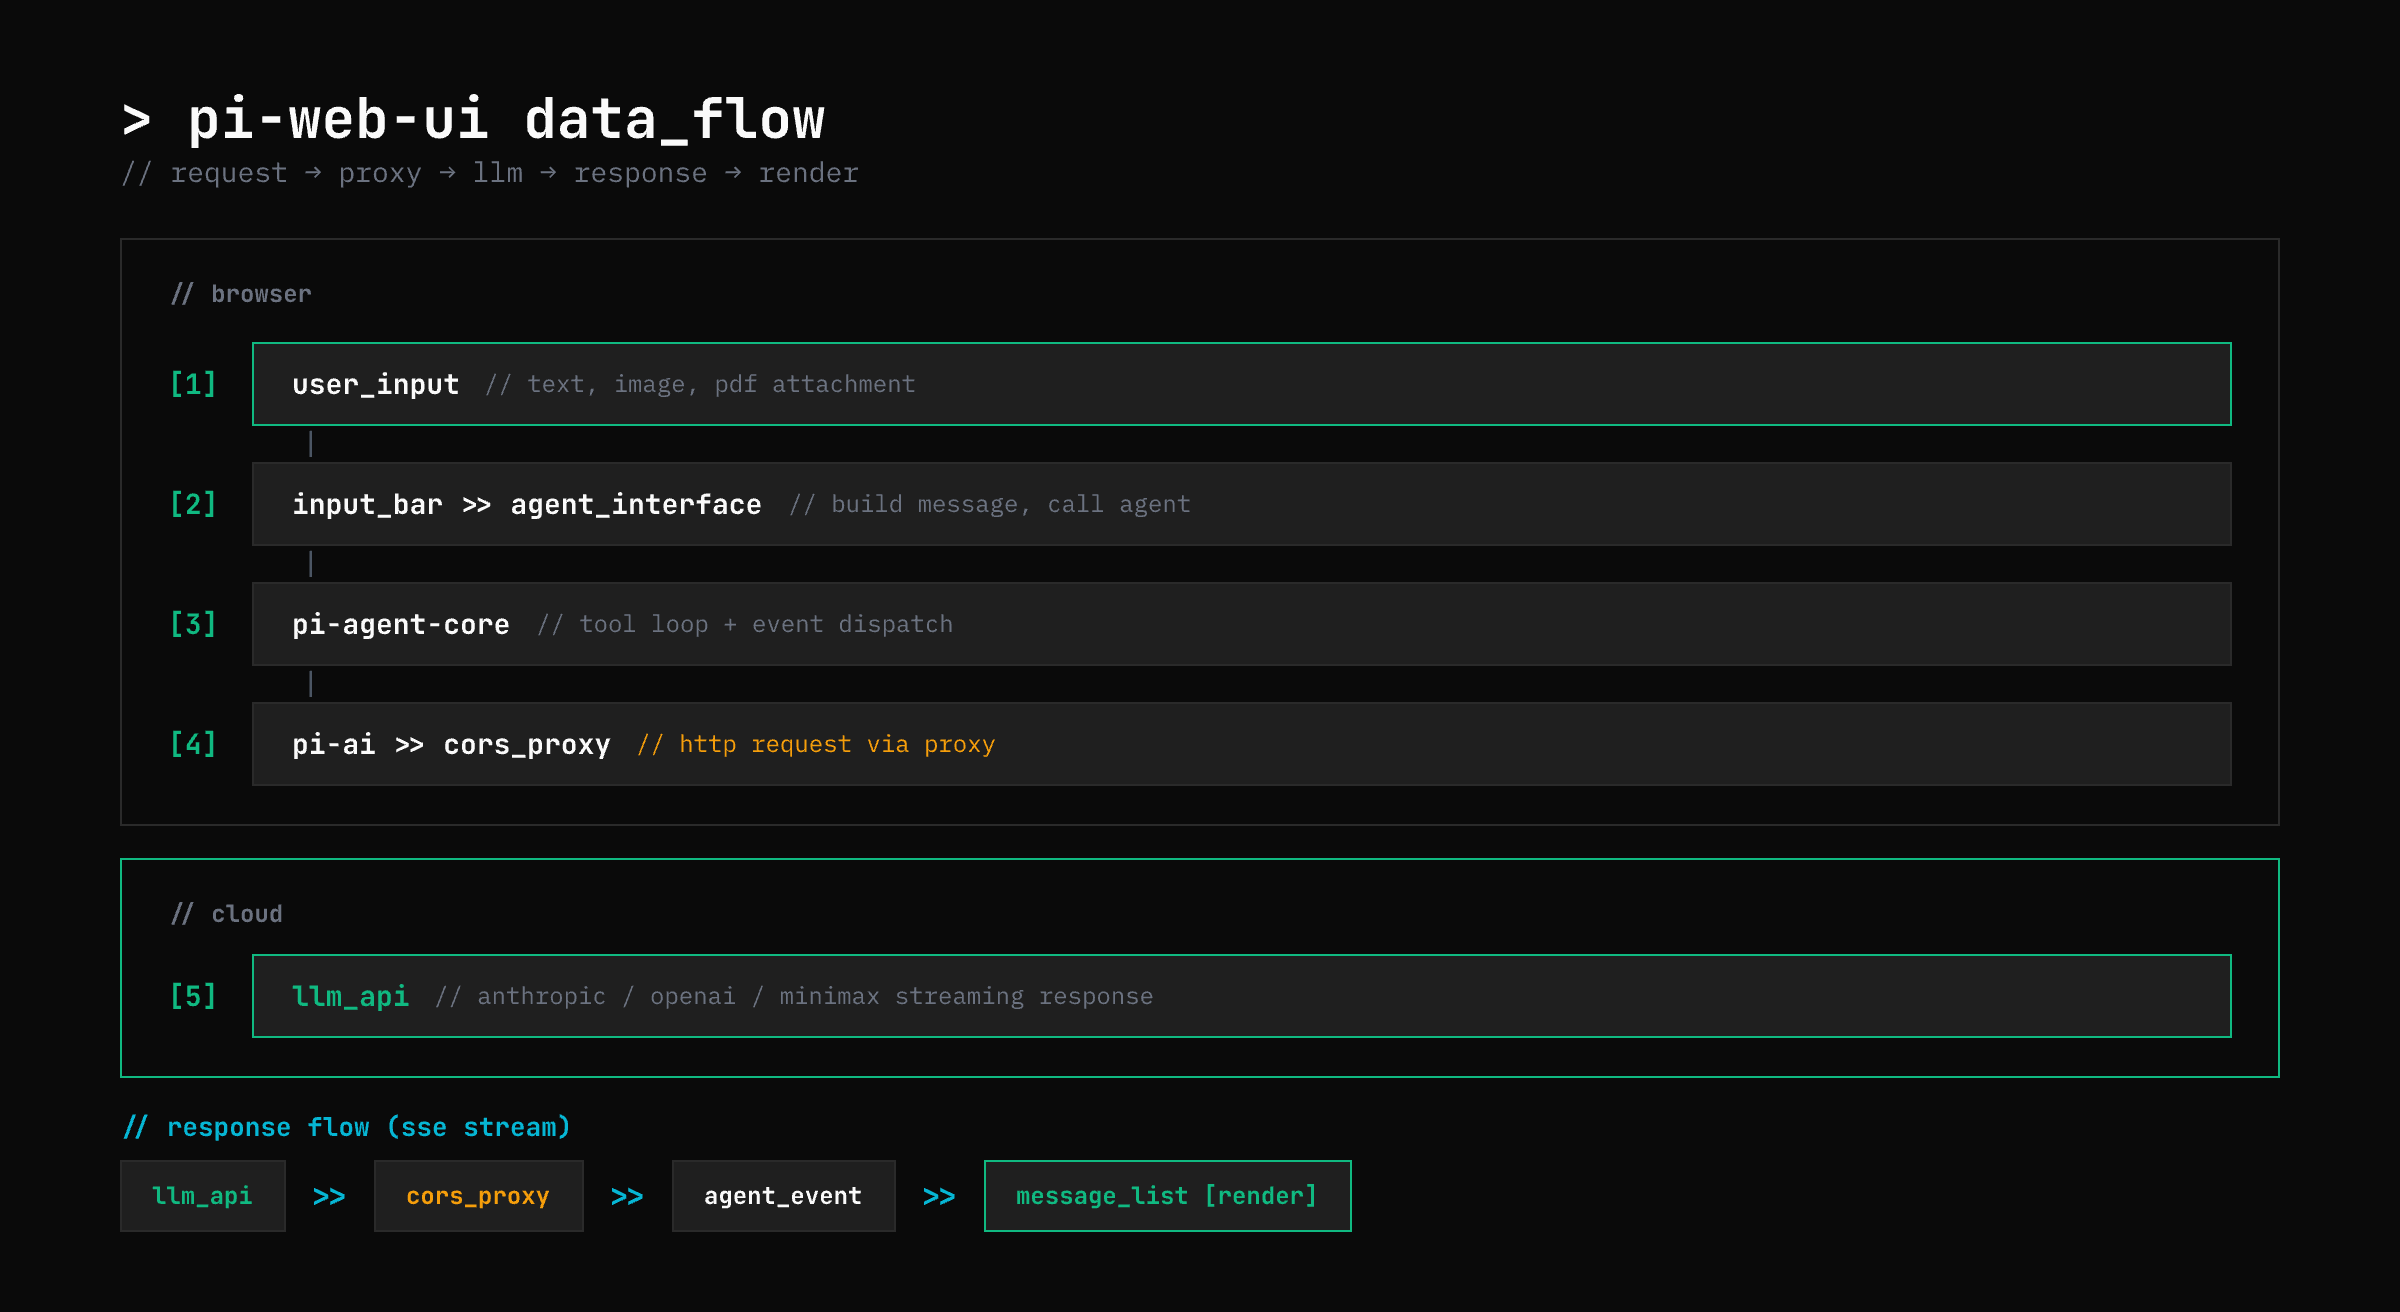
数据流架构图
技术栈
Lit               Web Components 渲染(html`...` 模板语法)
Tailwind CSS v4   原子化样式
IndexedDB         浏览器本地存储(会话、设置、API Key)
Vite              构建工具(解析 bare imports、打包)
注意 :pi-web-ui 使用 bare imports(如
import { html } from "lit"),浏览器无法直接解析,必须通过 Vite 打包 。不支持<script src="...">直接引入。
数据流
pi-web-ui 的数据流非常清晰:
用户在浏览器输入
    │
    ▼
┌──────────────────┐
│    ChatPanel     │  ← UI 组件层(Web Component)
│  (Lit 渲染)      │
└────────┬─────────┘
         │ setAgent()
         ▼
┌──────────────────┐
│  pi-agent-core   │  ← Agent 运行时(浏览器版本)
│  (浏览器 bundle) │
└────────┬─────────┘
         │ 通过
         ▼
┌──────────────────┐
│     pi-ai        │  ← 统一 LLM API(浏览器版本)
│  (浏览器 bundle) │
└────────┬─────────┘
         │ HTTP 请求
         ▼
┌──────────────────┐
│   CORS 代理      │  ← 解决浏览器跨域限制
│  /?url=<encoded> │
└────────┬─────────┘
         │
         ▼
┌──────────────────┐
│    LLM API       │  ← MiniMax / Anthropic / OpenAI ...
│  (云端服务)      │
└──────────────────┘
         │ 流式响应
         ▼
    AgentEvent 流
         │
         ▼
    更新 UI 组件
关键区别 :和终端版的 pi-coding-agent 相比,浏览器版多了一层 CORS 代理,因为浏览器不允许直接跨域请求 LLM API。
源码结构
packages/web-ui/src/
├── components/              # UI 组件
│   ├── ChatPanel.ts         # 高级:完整聊天界面
│   ├── AgentInterface.ts    # 低级:可定制的 Agent 聊天区域
│   ├── MessageList.ts       # 消息列表
│   ├── MessageItem.ts       # 单条消息
│   ├── InputBar.ts          # 输入框
│   └── ModelSelector.ts     # 模型选择器
│
├── storage/                 # IndexedDB 存储
│   ├── SessionsStore.ts     # 会话持久化
│   ├── ProviderKeysStore.ts # API Key(加密存储)
│   ├── SettingsStore.ts     # 用户设置(含代理配置)
│   └── CustomProvidersStore.ts # 自定义 LLM 提供商
│
├── tools/                   # 浏览器端工具
│   ├── js-repl.ts           # JavaScript 沙箱执行
│   └── artifacts.ts         # Artifact 渲染
│
├── dialogs/                 # 弹窗组件
│   ├── ApiKeyPromptDialog.ts # API Key 输入弹窗
│   └── SettingsDialog.ts     # 设置面板(代理/主题等)
│
└── utils/
    └── proxy-utils.ts       # CORS 代理工具函数
3. ChatPanel:一步搞定聊天界面
ChatPanel 是最高层的组件,开箱即用。它的 API 是纯 TypeScript,通过 Lit 渲染到 DOM。
最简示例
对应
examples/05-pi-web-ui/src/01-chat-panel.ts
第一步:创建 Vite 项目
bash
# package.json 核心依赖
{
  "dependencies": {
    "@mariozechner/pi-ai": "...",
    "@mariozechner/pi-agent-core": "...",
    "@mariozechner/pi-web-ui": "...",
    "@tailwindcss/vite": "^4.1.17",
    "lit": "^3.3.1"
  }
}
第二步:CSS 入口 (src/app.css)
css
@import "tailwindcss";
@import "@mariozechner/pi-web-ui/app.css";
注意路径是
@mariozechner/pi-web-ui/app.css(不是/dist/app.css),对应 package.json 的 exports 配置。
第三步:HTML 页面 (01-chat-panel.html)
html
<!DOCTYPE html>
<html lang="zh-CN">
<head>
  <meta charset="UTF-8" />
  <title>ChatPanel 示例</title>
</head>
<body>
  <div id="app"></div>
  <script type="module" src="./src/01-chat-panel.ts"></script>
</body>
</html>
第四步:TypeScript 代码 (src/01-chat-panel.ts)
typescript
import { Agent } from "@mariozechner/pi-agent-core";
import { getModel } from "@mariozechner/pi-ai";
import {
  ApiKeyPromptDialog,
  AppStorage,
  ChatPanel,
  createJavaScriptReplTool,
  IndexedDBStorageBackend,
  ProviderKeysStore,
  SessionsStore,
  SettingsStore,
  CustomProvidersStore,
  setAppStorage,
} from "@mariozechner/pi-web-ui";
import { html, render } from "lit";
import "./app.css";

// ① 初始化存储(IndexedDB)
const settings = new SettingsStore();
const providerKeys = new ProviderKeysStore();
const sessions = new SessionsStore();
const customProviders = new CustomProvidersStore();

const backend = new IndexedDBStorageBackend({
  dbName: "pi-web-ui-example-01",
  version: 2,
  stores: [
    settings.getConfig(),
    SessionsStore.getMetadataConfig(),
    providerKeys.getConfig(),
    customProviders.getConfig(),
    sessions.getConfig(),
  ],
});

settings.setBackend(backend);
providerKeys.setBackend(backend);
customProviders.setBackend(backend);
sessions.setBackend(backend);

const storage = new AppStorage(settings, providerKeys, sessions, customProviders, backend);
setAppStorage(storage);

// 预配置 CORS 代理(浏览器跨域必需)
await settings.set("proxy.url", "http://localhost:3001");
await settings.set("proxy.enabled", true);

// ② 创建 Agent ------ 使用 MiniMax-M2.5 模型
const agent = new Agent({
  initialState: {
    systemPrompt: "你是一个友善的 AI 助手,用中文回答问题。回答简洁清晰。",
    model: getModel("minimax-cn", "MiniMax-M2.5"),
    thinkingLevel: "off",
    messages: [],
    tools: [],
  },
});

// ③ 创建 ChatPanel 并关联 Agent
const chatPanel = new ChatPanel();

await chatPanel.setAgent(agent, {
  // 当需要 API Key 时弹出输入框
  onApiKeyRequired: async (provider: string) => {
    return await ApiKeyPromptDialog.prompt(provider);
  },
  // 配置工具:JavaScript REPL
  toolsFactory: (_agent, _agentInterface, _artifactsPanel, runtimeProvidersFactory) => {
    const replTool = createJavaScriptReplTool();
    replTool.runtimeProvidersFactory = runtimeProvidersFactory;
    return [replTool];
  },
});

// ④ 渲染到页面
const app = document.getElementById("app")!;
render(
  html`
    <div class="w-full h-screen flex flex-col bg-background text-foreground">
      ${chatPanel}
    </div>
  `,
  app,
);
代码解析:四步走
① 初始化存储
   创建 4 个 Store → 绑定 IndexedDB 后端 → 注册为全局 AppStorage
   这是 pi-web-ui 的固定模板代码,每个示例都需要。

② 创建 Agent
   Agent 来自 pi-agent-core,配置 systemPrompt、model、tools。
   getModel("minimax-cn", "MiniMax-M2.5") 从 pi-ai 获取模型配置。

③ 关联 ChatPanel 和 Agent
   chatPanel.setAgent(agent, config) 是核心 API。
   config 中可以配置 API Key 弹窗、工具工厂等。

④ 渲染
   ChatPanel 是 Web Component,直接用 Lit 的 html`` 模板嵌入。
   Tailwind CSS 类名控制全屏布局。
运行效果
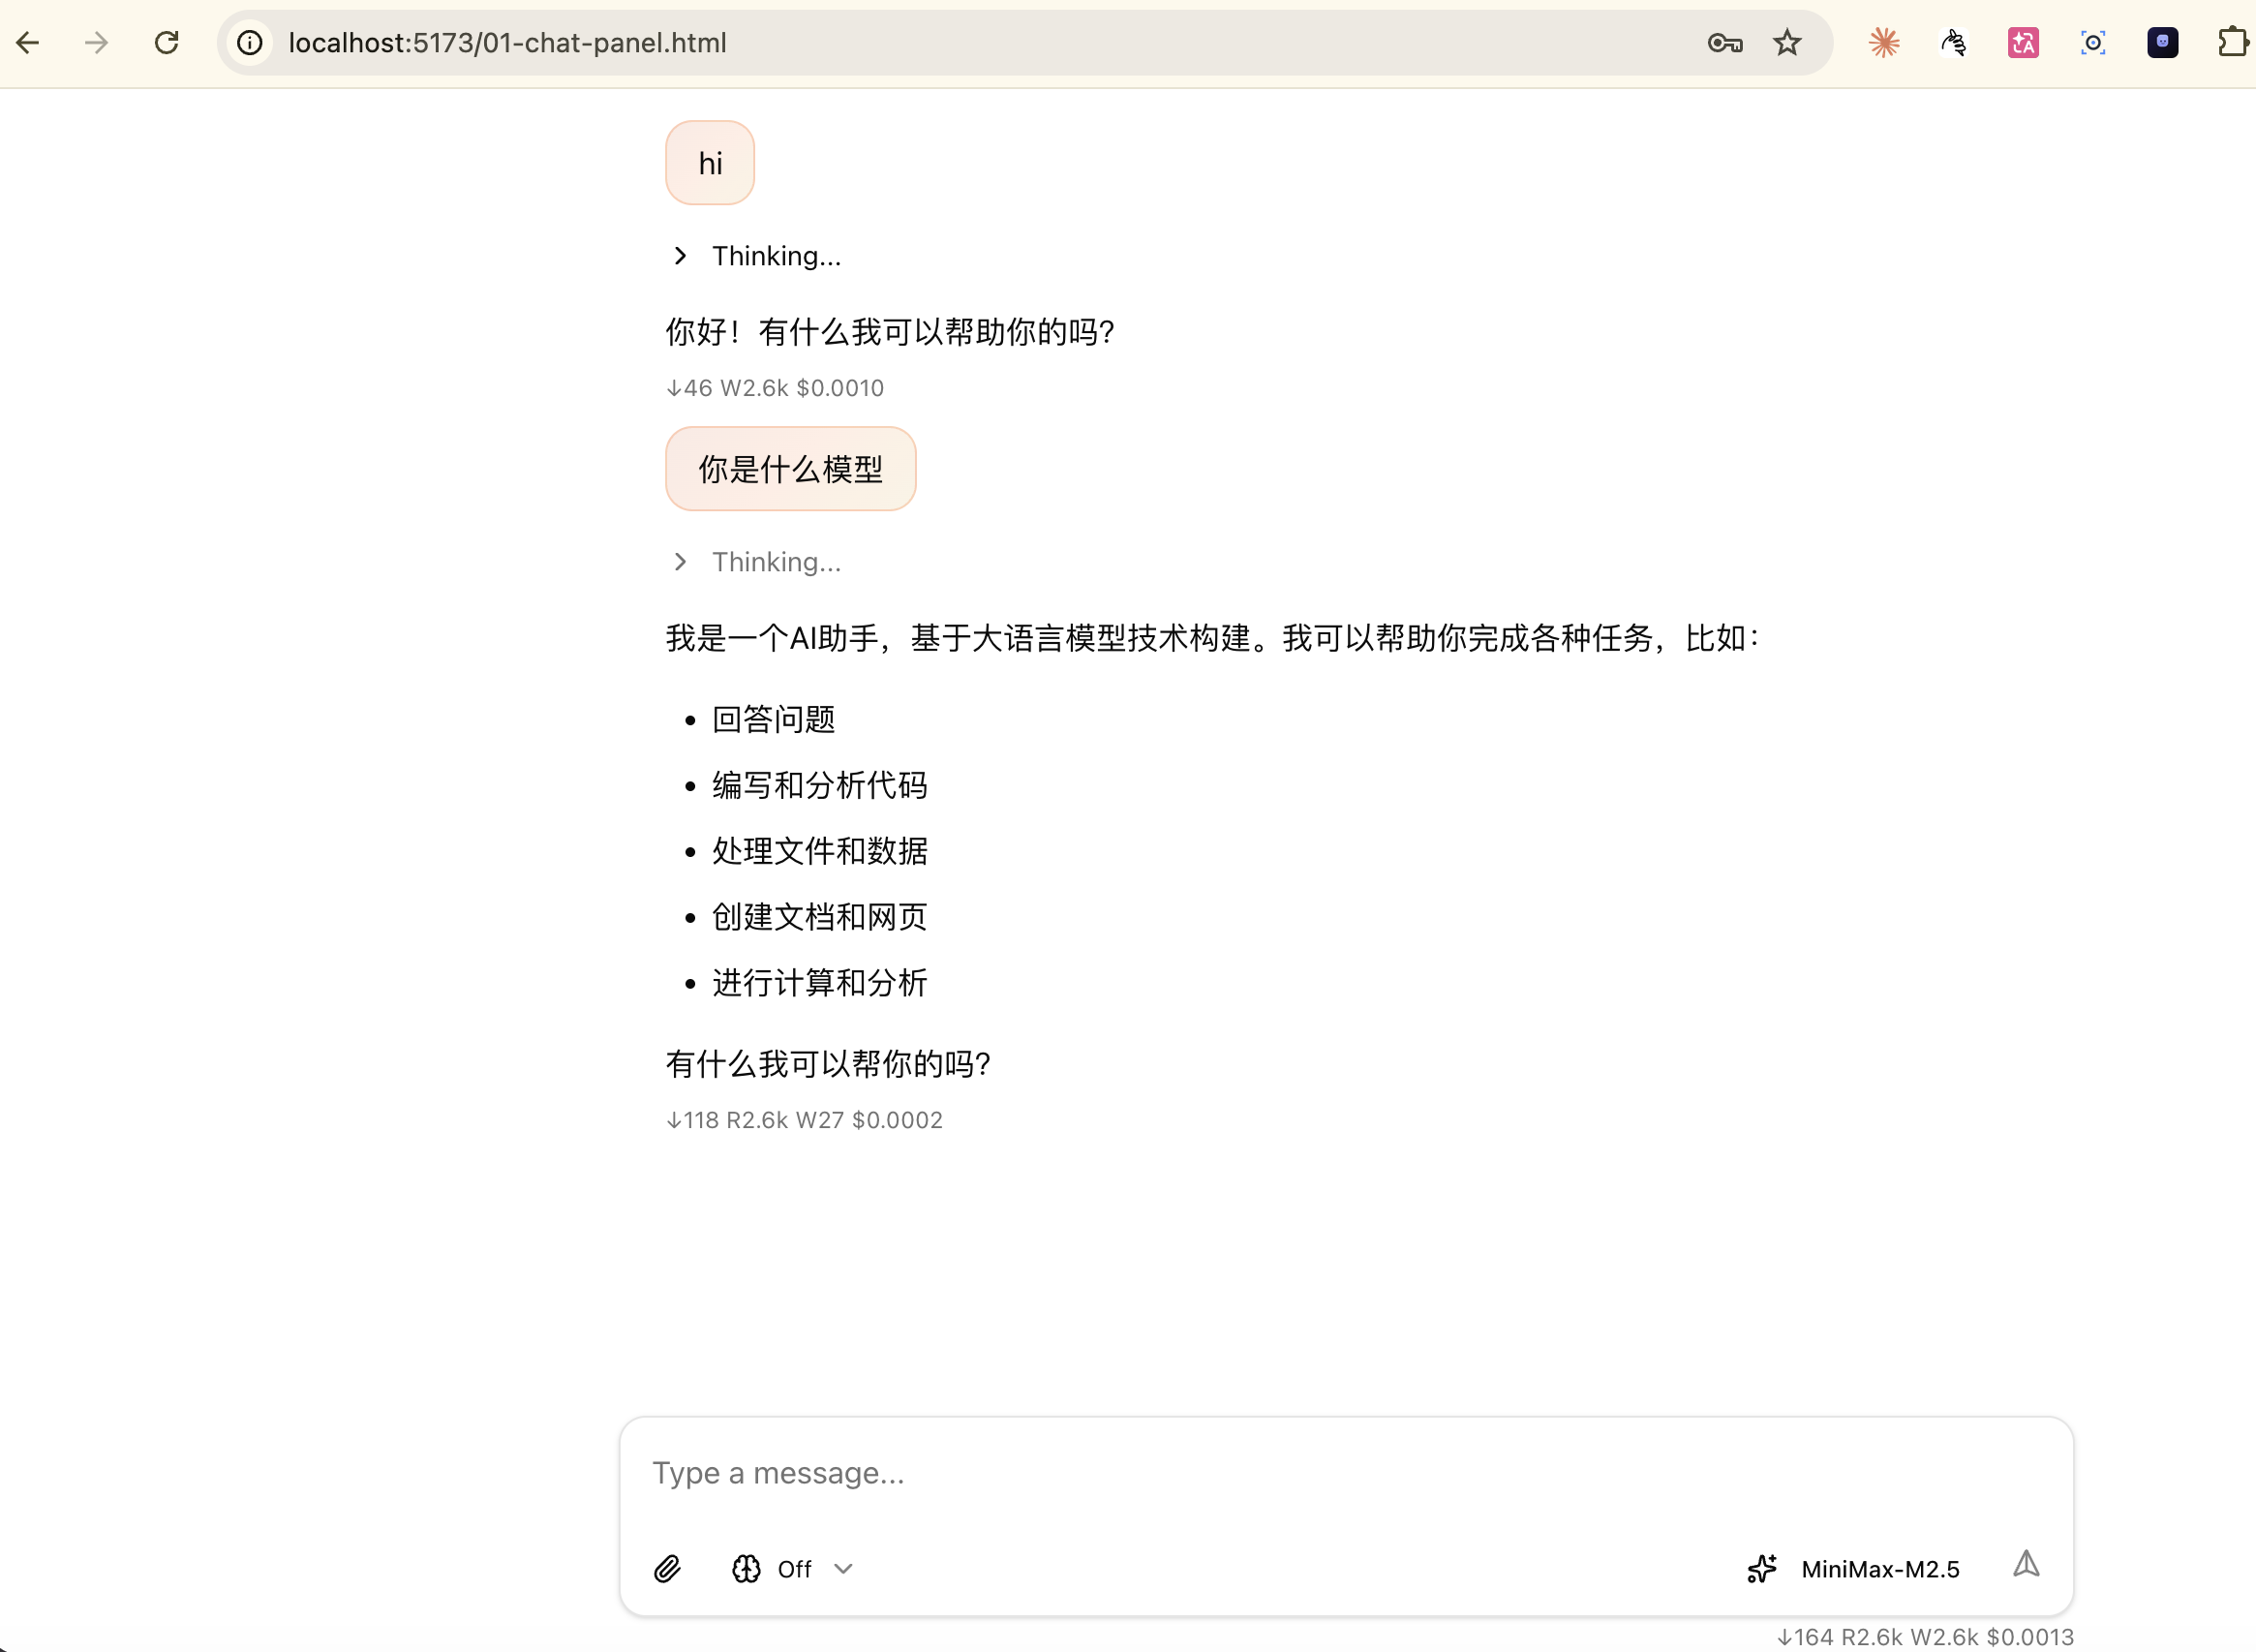
ChatPanel 自动渲染了完整的聊天界面:消息列表、输入框、模型选择器(右下角 MiniMax-M2.5)、思考深度开关。
ChatPanel 内置了什么?
不要被简单的 ${chatPanel} 骗了,ChatPanel 内部其实包含了完整的功能链:
ChatPanel
  ├── 模型选择器(切换 MiniMax/Claude/GPT...)
  ├── 思考深度选择器(off/brief/detailed)
  ├── 消息列表(自动滚动、Markdown 渲染)
  ├── 输入框(支持多行、文件拖放)
  ├── 会话管理(新建/切换/删除会话)
  ├── API Key 管理(安全存储在 IndexedDB)
  └── 设置面板(代理/主题/语言/默认模型)
4. 自定义布局:ChatPanel + 外部框架
当 ChatPanel 的默认布局不满足需求时,可以用自定义 HTML 把 ChatPanel 包裹起来,在外部添加顶栏、状态栏等。
对应
examples/05-pi-web-ui/src/02-agent-interface.ts
自定义顶栏 + 状态栏
typescript
import { Agent } from "@mariozechner/pi-agent-core";
import { getModel } from "@mariozechner/pi-ai";
import {
  ApiKeyPromptDialog, AppStorage, ChatPanel, createJavaScriptReplTool,
  IndexedDBStorageBackend, ProviderKeysStore, SessionsStore, SettingsStore,
  CustomProvidersStore, setAppStorage,
} from "@mariozechner/pi-web-ui";
import { html, render } from "lit";
import "./app.css";

// ... 存储初始化(同上,省略) ...

// 状态变量
let tokenCount = 0;
let status = "就绪";

// 创建 Agent
const agent = new Agent({
  initialState: {
    systemPrompt: "你是一个专业的代码审查助手,用中文回答。",
    model: getModel("minimax-cn", "MiniMax-M2.5"),
    thinkingLevel: "off",
    messages: [],
    tools: [],
  },
});

// 监听 Agent 事件,更新自定义状态栏
agent.subscribe((event: any) => {
  if (event.type === "message_update") {
    status = "AI 正在回复...";
    renderApp();
  }
  if (event.type === "turn_end") {
    tokenCount += event.usage?.totalTokens ?? 0;
    status = "就绪";
    renderApp();
  }
});

// 创建 ChatPanel
const chatPanel = new ChatPanel();
await chatPanel.setAgent(agent, { /* ... */ });

// 渲染:自定义顶栏 + ChatPanel + 底部状态栏
const app = document.getElementById("app")!;

function renderApp() {
  render(
    html`
      <div class="w-full h-screen flex flex-col bg-background text-foreground overflow-hidden">
        <!-- 自定义顶栏 -->
        <div class="flex items-center justify-between px-5 py-3 border-b border-border shrink-0">
          <span class="text-sm font-semibold">AI 编程助手</span>
          <span class="text-xs px-3 py-1 rounded-full bg-secondary text-muted-foreground">
            MiniMax-M2.5
          </span>
        </div>

        <!-- 聊天区域(ChatPanel 提供完整功能) -->
        <div class="flex-1 min-h-0">
          ${chatPanel}
        </div>

        <!-- 自定义底部状态栏 -->
        <div class="flex items-center justify-between px-5 py-2 border-t border-border text-xs text-muted-foreground shrink-0">
          <span>${tokenCount} tokens</span>
          <span>${status}</span>
        </div>
      </div>
    `,
    app,
  );
}

renderApp();
运行效果
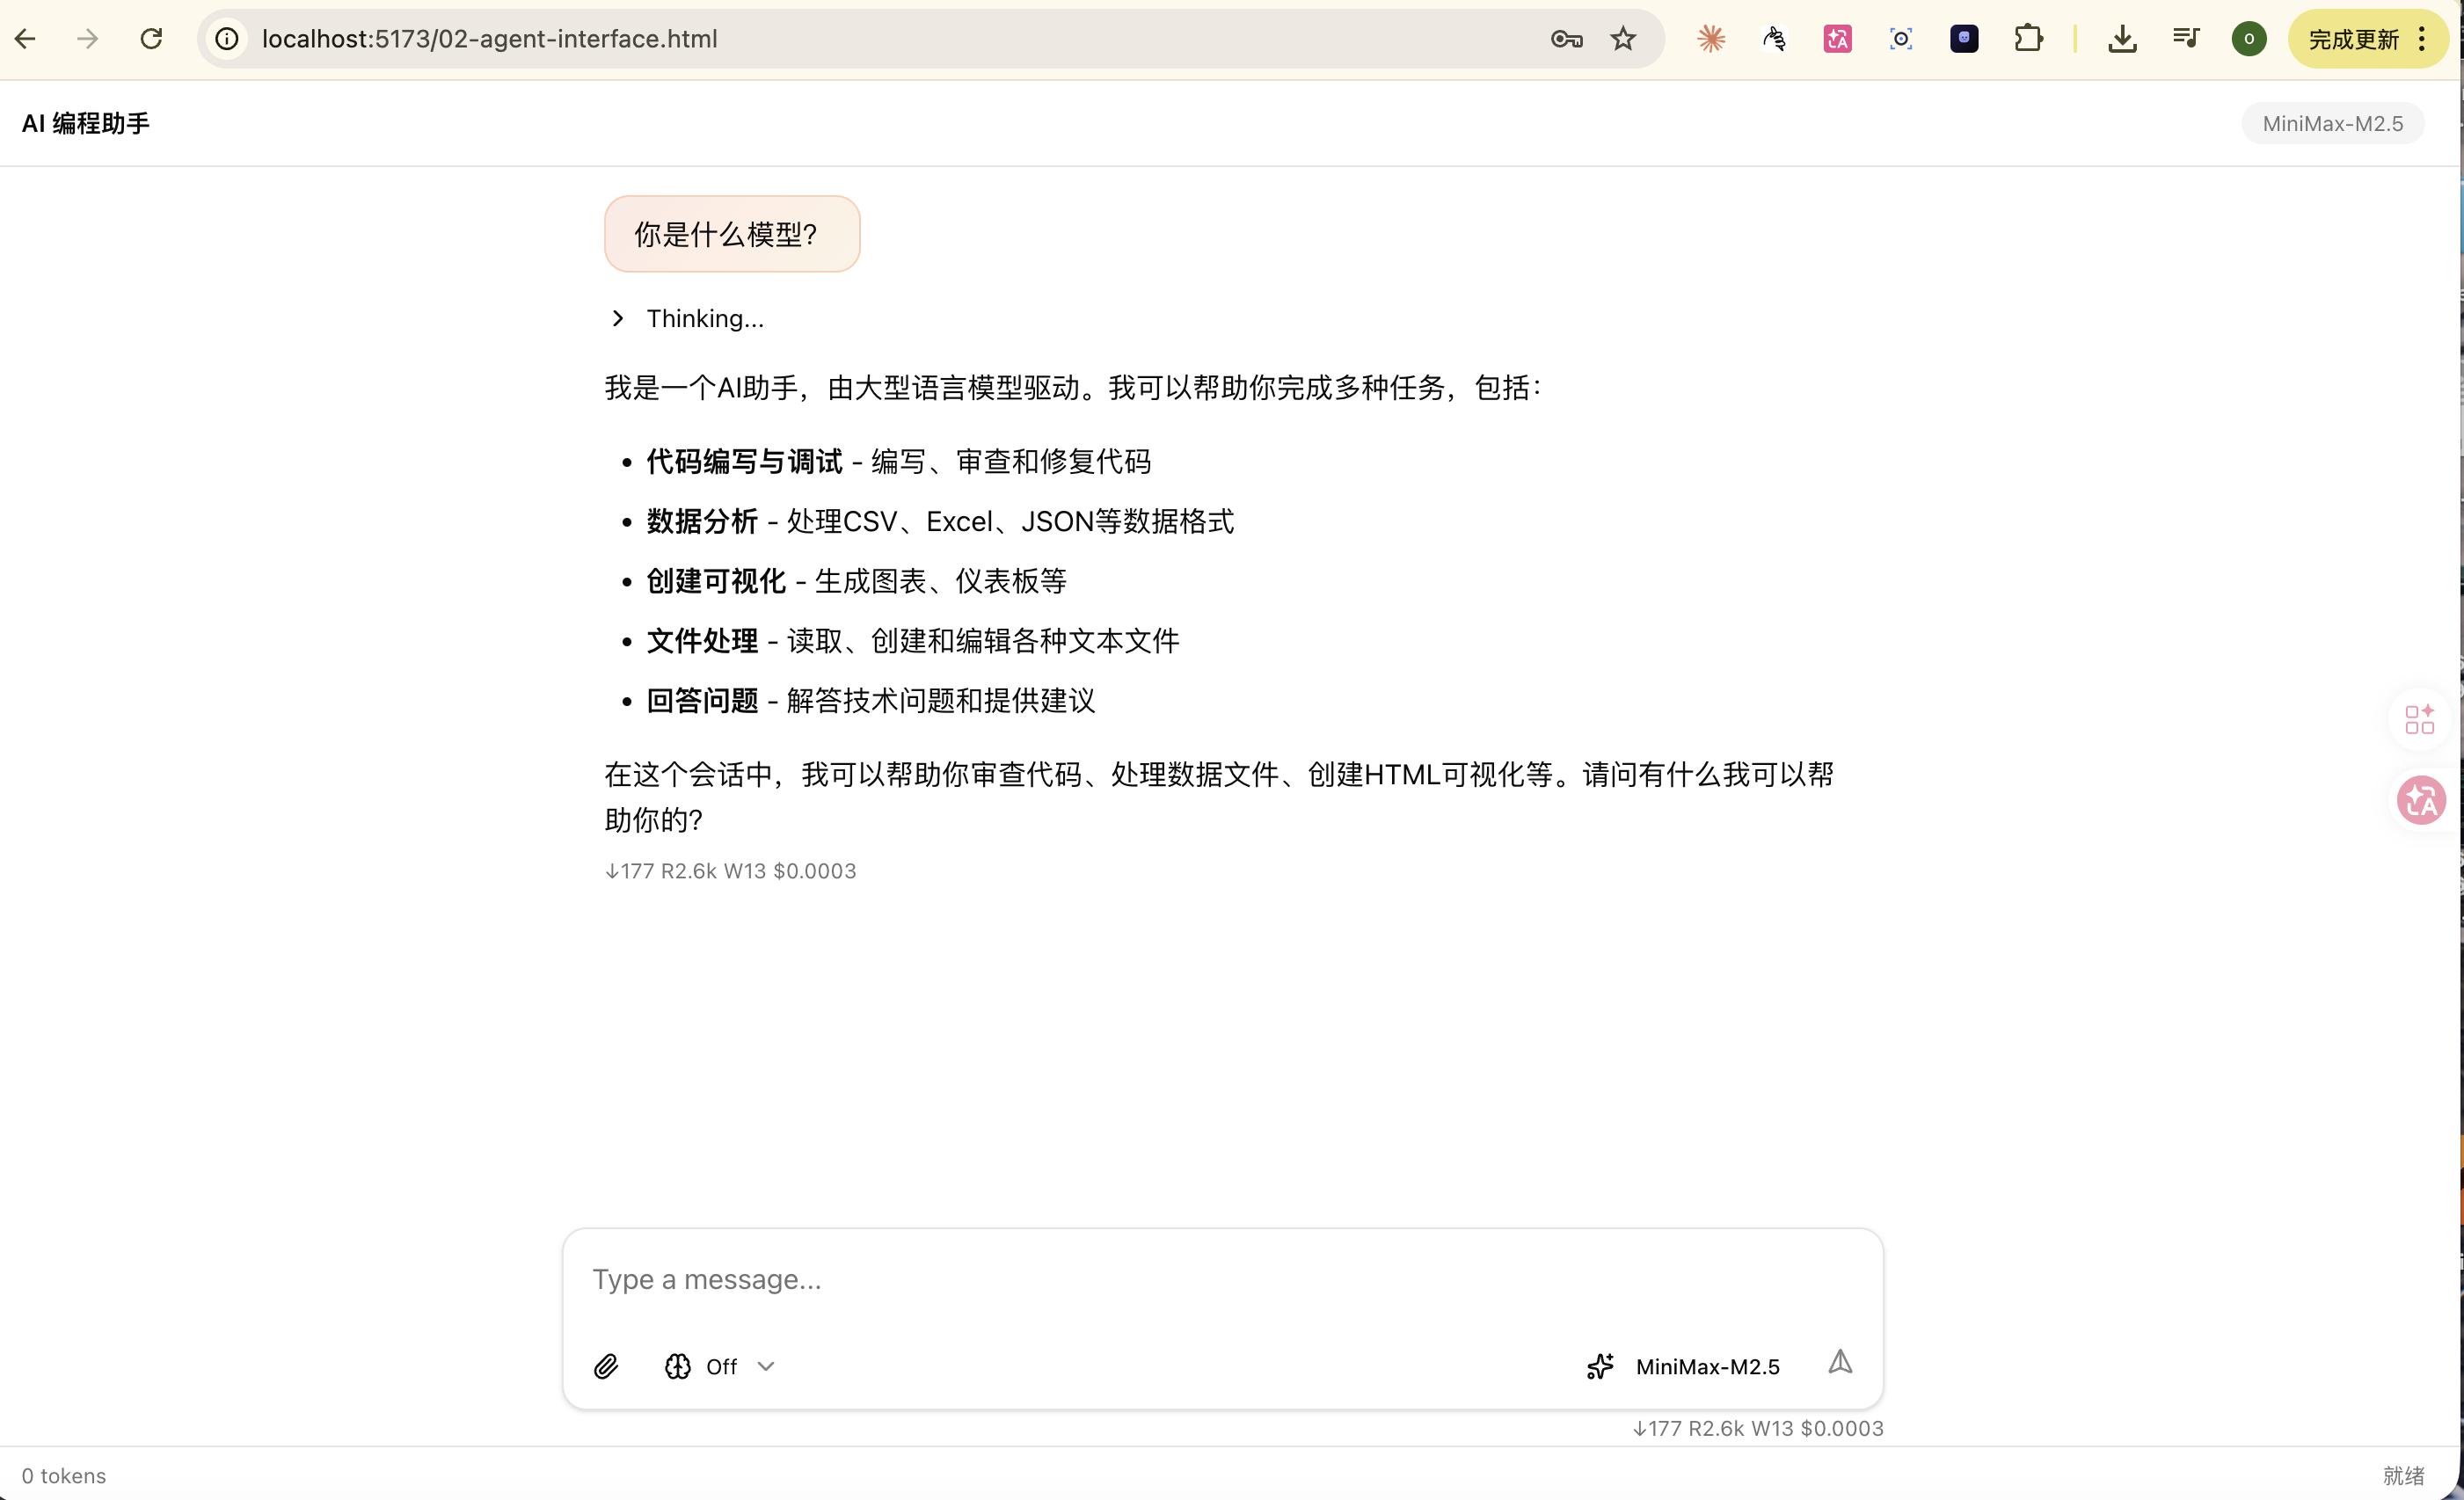
顶栏显示"AI 编程助手"和模型标签,底部状态栏实时显示 token 数和状态。
关键点
- ChatPanel 只负责聊天区域,外层布局完全由你的 HTML 控制
agent.subscribe()监听 Agent 事件,可以在自定义 UI 中实时更新 token 数、状态等renderApp()函数 在状态变化时重新渲染整个布局(Lit 会做差分更新,性能无忧)
ChatPanel 快速上手 vs 自定义布局 对比
| 对比项 | 快速上手(示例 01) | 自定义布局(示例 02) |
|---|---|---|
| 布局 | ChatPanel 占满全屏 | 自定义顶栏 + ChatPanel + 状态栏 |
| 代码量 | ~50 行 | ~80 行 |
| 状态监控 | 内置 | agent.subscribe() 自定义 |
| 适合场景 | 快速原型、独立页面 | 嵌入现有系统 |
类比:快速上手像买精装房------拎包入住;自定义布局像买毛坯房------自己装修。
5. 浏览器存储系统
pi-web-ui 使用 IndexedDB 在浏览器本地持久化数据,关闭页面后数据不会丢失。
存储层架构

IndexedDB(浏览器本地数据库)
  ├── SettingsStore          用户偏好(主题/语言/代理配置)
  ├── ProviderKeysStore      API Key(加密存储)
  ├── SessionsStore          会话记录(消息历史)
  └── CustomProvidersStore   自定义 LLM 提供商
初始化模板(每个示例都需要)
typescript
import {
  AppStorage, IndexedDBStorageBackend,
  ProviderKeysStore, SessionsStore, SettingsStore,
  CustomProvidersStore, setAppStorage,
} from "@mariozechner/pi-web-ui";

// 创建 4 个 Store
const settings = new SettingsStore();
const providerKeys = new ProviderKeysStore();
const sessions = new SessionsStore();
const customProviders = new CustomProvidersStore();

// 创建 IndexedDB 后端,注册所有 Store 的配置
const backend = new IndexedDBStorageBackend({
  dbName: "my-app",       // 数据库名,不同应用用不同名字
  version: 2,
  stores: [
    settings.getConfig(),
    SessionsStore.getMetadataConfig(),
    providerKeys.getConfig(),
    customProviders.getConfig(),
    sessions.getConfig(),
  ],
});

// 绑定后端
settings.setBackend(backend);
providerKeys.setBackend(backend);
customProviders.setBackend(backend);
sessions.setBackend(backend);

// 注册为全局存储(ChatPanel 内部会通过 getAppStorage() 读取)
const storage = new AppStorage(settings, providerKeys, sessions, customProviders, backend);
setAppStorage(storage);
常用操作
typescript
// --- 设置存储 ---
await settings.set("proxy.url", "http://localhost:3001");
await settings.set("proxy.enabled", true);
const proxyUrl = await settings.get<string>("proxy.url");

// --- API Key 存储 ---
await providerKeys.setKey("minimax-cn", "your-minimax-api-key");
const key = await providerKeys.getKey("minimax-cn");安全说明:API Key 存储在 IndexedDB 中。但浏览器端存储的安全性有限,生产环境建议从后端获取临时 Token,不要在前端硬编码 Key。
6. 消息类型与 Artifact
三类消息
pi-web-ui 支持三类消息,覆盖文本、附件、可执行内容:
消息类型系统
  ├── 标准消息        文本 / 思考内容 / 工具结果
  ├── 附件消息        图片 / PDF / 文件
  └── Artifact 消息   HTML / SVG / Markdown(可执行渲染)
标准消息
typescript
// 用户消息
const userMsg = {
  type: "user",
  content: [{ type: "text", text: "你好!" }],
};

// 助手回复(带思考过程)
const assistantMsg = {
  type: "assistant",
  content: [
    { type: "thinking", thinking: "用户在打招呼,我应该友善回复..." },
    { type: "text", text: "你好!有什么可以帮你的吗?" },
  ],
};
附件消息
typescript
// 带图片的消息(拖拽上传或粘贴)
const withImage = {
  type: "userWithAttachments",
  text: "这段代码有什么问题?",
  attachments: [{
    type: "image",
    mimeType: "image/png",
    data: base64EncodedData,
  }],
};
Artifact 消息(亮点功能)
Artifact 是 pi-web-ui 的特色功能------AI 可以生成 可执行的 HTML/SVG/Markdown 内容,直接在对话中渲染。
typescript
// HTML Artifact:在安全 iframe 中渲染
const htmlArtifact = {
  type: "artifact",
  artifactType: "html",
  content: `
    <html>
    <body>
      <h1>动态图表</h1>
      <canvas id="chart"></canvas>
      <script>
        const ctx = document.getElementById('chart').getContext('2d');
        // 绘制图表...
      </script>
    </body>
    </html>
  `,
};

// SVG Artifact:直接渲染矢量图
const svgArtifact = {
  type: "artifact",
  artifactType: "svg",
  content: `<svg width="200" height="200">
    <circle cx="100" cy="100" r="80" fill="#6366f1"/>
    <text x="55" y="110" fill="white" font-size="20">Hello!</text>
  </svg>`,
};使用场景:
- 让 AI 生成数据可视化图表
- 让 AI 输出 SVG 图标/流程图
- 让 AI 生成交互式 demo 页面
7. 浏览器端工具
和终端版的 pi-coding-agent 有 read/write/bash 工具一样,pi-web-ui 也有浏览器端的专属工具:
| 工具 | 功能 | 类比 |
|---|---|---|
js-repl |
在沙箱中执行 JavaScript | 浏览器版的 bash |
artifacts |
渲染 HTML/SVG/Markdown | 浏览器版的 write |
注册工具
工具通过 setAgent() 的 toolsFactory 配置:
typescript
await chatPanel.setAgent(agent, {
  onApiKeyRequired: async (provider) => ApiKeyPromptDialog.prompt(provider),
  toolsFactory: (_agent, _agentInterface, _artifactsPanel, runtimeProvidersFactory) => {
    const replTool = createJavaScriptReplTool();
    replTool.runtimeProvidersFactory = runtimeProvidersFactory;
    return [replTool];
  },
});
js-repl 示例
AI 可以写 JavaScript 代码并执行------比如你问"帮我计算斐波那契数列":
用户: "帮我计算斐波那契数列前 10 项"

AI 自动调用 js-repl 工具:
┌──────────────────────────────────┐
│ function fibonacci(n) {          │
│   const r = [0, 1];              │
│   for (let i = 2; i < n; i++)    │
│     r.push(r[i-1] + r[i-2]);    │
│   return r.slice(0, n);          │
│ }                                │
│ fibonacci(10);                   │
├──────────────────────────────────┤
│ 结果: [0,1,1,2,3,5,8,13,21,34]  │
└──────────────────────────────────┘

AI: 前 10 项是 0, 1, 1, 2, 3, 5, 8, 13, 21, 34代码在安全沙箱(iframe sandbox)中执行,不会影响主页面。
8. CORS 代理:跨域问题的解法
为什么需要代理?
浏览器有同源策略(Same-Origin Policy),不允许网页直接请求不同域名的 API:
你的网页 (localhost:5173)
    │
    ╳ 直接请求被浏览器拦截!
    │
    ▼
api.minimaxi.com  ← 不同域名
解决方案:加一层 CORS 代理转发请求:
你的网页 (localhost:5173)
    │
    ✓ 请求代理(已配置 CORS headers)
    │
    ▼
CORS 代理 (localhost:3001)
    │
    ✓ 服务端请求,无跨域限制
    │
    ▼
api.minimaxi.com
CORS 代理请求流程
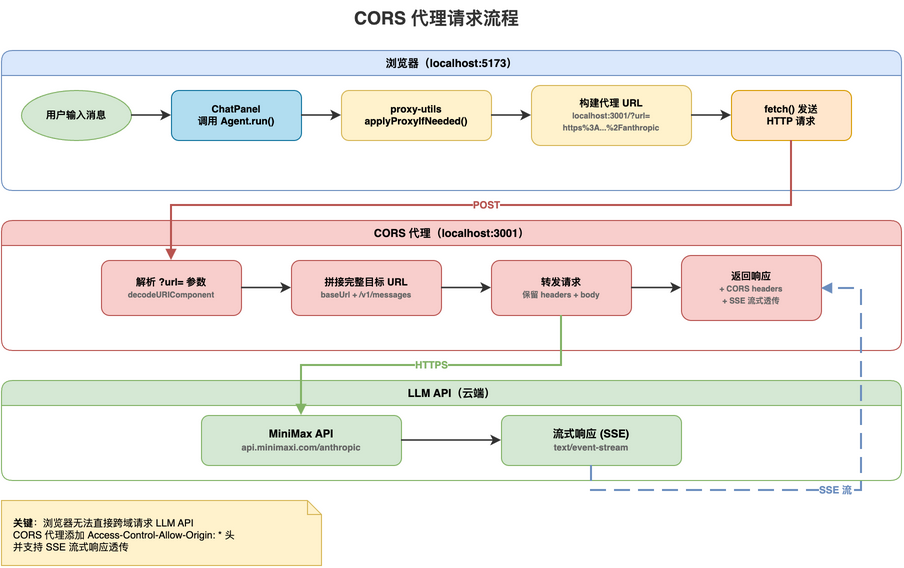
代理请求格式
pi-web-ui 内部使用查询参数格式 传递目标 URL(见 proxy-utils.ts):
原始 URL:   https://api.minimaxi.com/anthropic
代理后 URL: http://localhost:3001/?url=https%3A%2F%2Fapi.minimaxi.com%2Fanthropic
SDK 会在代理 URL 后面追加 API 路径,所以最终的请求是:
http://localhost:3001/?url=https%3A%2F%2Fapi.minimaxi.com%2Fanthropic/v1/messages代理原理
对应
examples/05-pi-web-ui/03-cors-proxy.ts
1. 收到请求:  GET /?url=https%3A%2F%2Fapi.minimaxi.com%2Fanthropic/v1/messages
2. 解析参数:  url=https://api.minimaxi.com/anthropic + /v1/messages
3. 拼接目标:  https://api.minimaxi.com/anthropic/v1/messages
4. 转发请求:  保留原始 headers 和 body
5. 返回响应:  添加 Access-Control-Allow-Origin: *
6. 流式管道:  SSE 响应实时透传(支持流式输出)
在代码中预启用代理
代理配置存储在 SettingsStore 中,可以在初始化时自动启用:
typescript
// 在存储初始化后、创建 Agent 前
await settings.set("proxy.url", "http://localhost:3001");
await settings.set("proxy.enabled", true);
这样用户打开页面后无需手动去设置面板配置代理,开箱即用。
生产环境 :不要用通配符 *,应限制允许的来源域名。
9. 主题与样式
pi-web-ui 使用 Tailwind CSS v4 + CSS 变量的样式系统。
CSS 入口文件
每个页面都需要导入两个样式:
css
/* src/app.css */
@import "tailwindcss";                        /* Tailwind 基础样式 */
@import "@mariozechner/pi-web-ui/app.css";   /* pi-web-ui 组件样式 + CSS 变量 */
内置 CSS 变量
pi-web-ui 的 app.css 定义了一套 CSS 变量(兼容 shadcn/ui 命名规范):
css
:root {
  --background: ...;        /* 页面背景 */
  --foreground: ...;        /* 文字颜色 */
  --primary: ...;           /* 主色调 */
  --secondary: ...;         /* 次要色 */
  --border: ...;            /* 边框色 */
  --muted-foreground: ...;  /* 弱文字 */
}
在代码中使用对应的 Tailwind 类名:
html
<div class="bg-background text-foreground border-border">
  <!-- 自动适配 pi-web-ui 的配色方案 -->
</div>
10. 实战:AI 客服系统
对应
examples/05-pi-web-ui/src/04-customer-service.ts
把上面学到的内容组合起来,做一个完整的 AI 客服悬浮窗:
运行效果
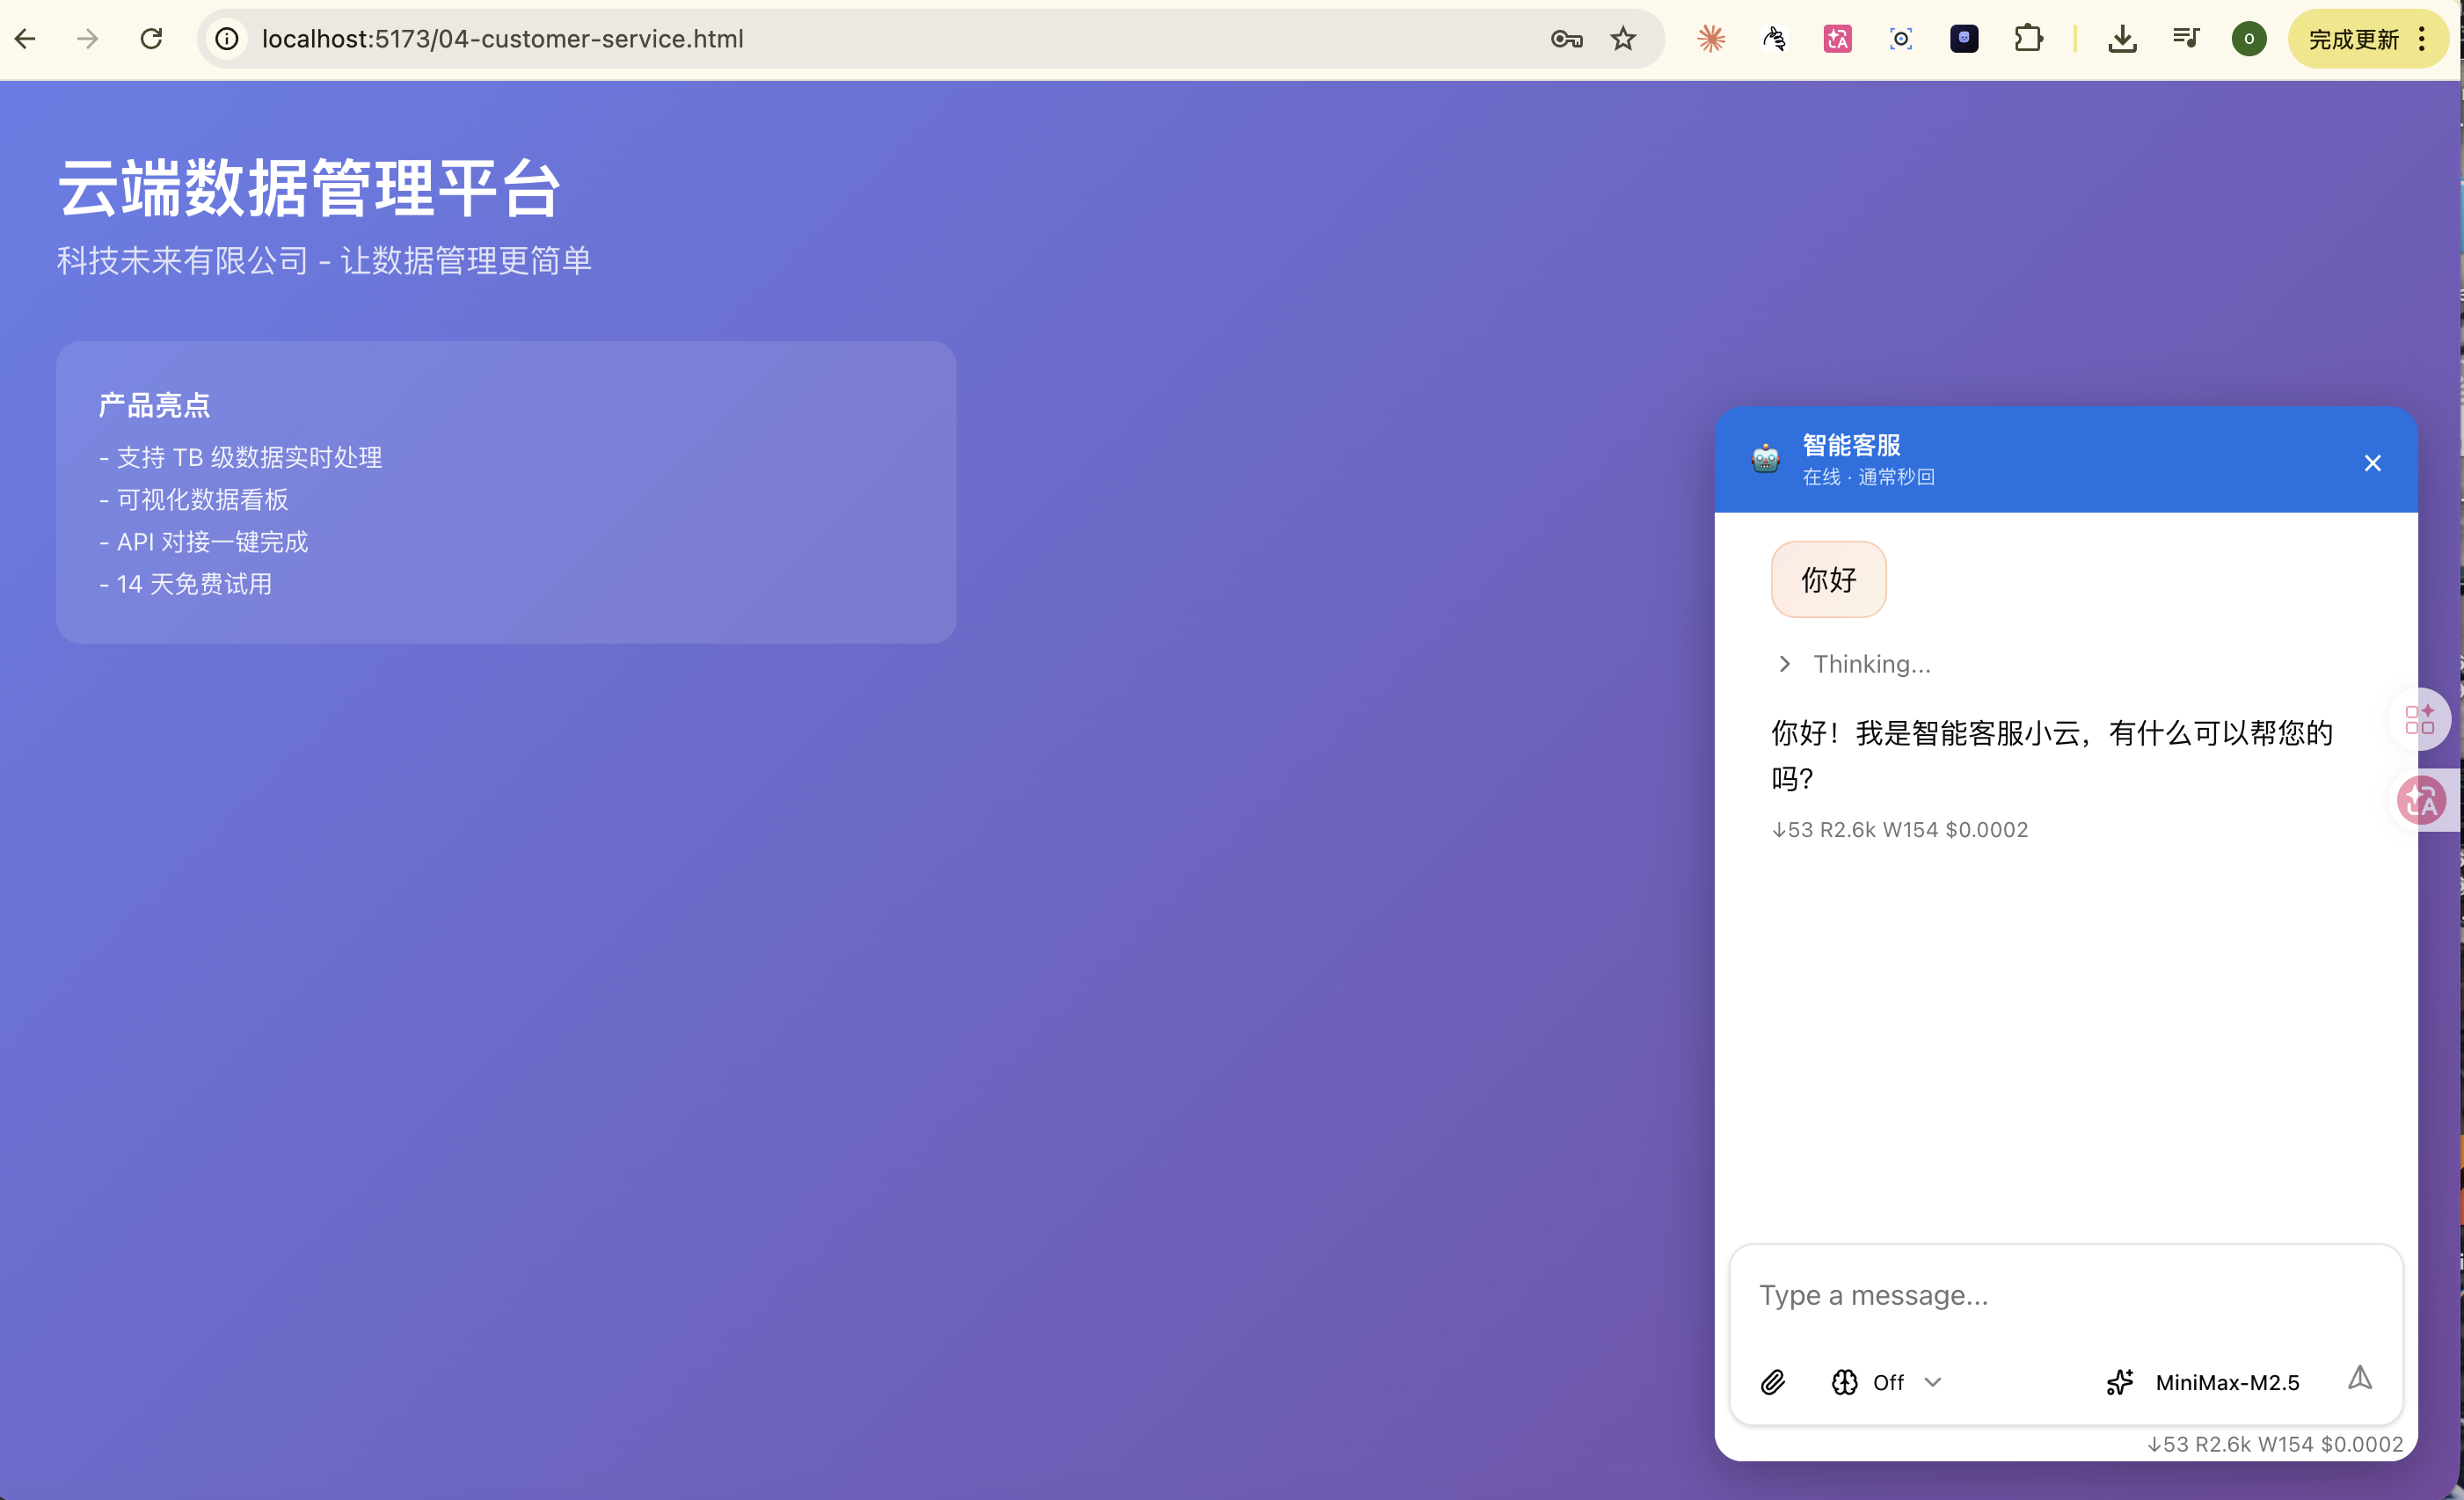
紫色渐变背景的产品页面,右下角蓝色头部的客服悬浮窗,用户发送"你好"后智能客服小云自动回复。
核心代码
typescript
// ... 存储初始化 + 代理预配置(同前) ...

// 客服 Agent ------ 使用 MiniMax-M2.5(低成本、国内直连)
const agent = new Agent({
  initialState: {
    systemPrompt: `你是科技未来有限公司的 AI 客服助手。

你的职责:
1. 回答关于"云端数据管理平台"的产品问题
2. 帮助用户解决技术问题(登录、数据导入、API 对接等)
3. 处理常见咨询(价格、功能对比、免费试用)
4. 态度友善,用中文回答,回答简洁不超过 3 句话

产品信息:
- 价格:基础版 ¥99/月,专业版 ¥299/月,企业版定制
- 免费试用:14 天
- 客服时间:工作日 9:00-18:00(AI 全天候)`,
    model: getModel("minimax-cn", "MiniMax-M2.5"),
    thinkingLevel: "off",
    messages: [],
    tools: [],
  },
});

const chatPanel = new ChatPanel();
await chatPanel.setAgent(agent, { /* ... */ });

// 悬浮窗状态
let isOpen = true;

function renderApp() {
  render(
    html`
      <!-- 模拟产品页面背景 -->
      <div class="min-h-screen" style="background: linear-gradient(135deg, #667eea, #764ba2);">
        <div class="p-10 text-white">
          <h1 class="text-4xl font-bold">云端数据管理平台</h1>
          <p class="text-lg opacity-80">科技未来有限公司</p>
        </div>

        <!-- 客服悬浮窗 -->
        ${isOpen
          ? html`
            <div class="fixed bottom-6 right-6 w-[400px] h-[600px] rounded-2xl overflow-hidden flex flex-col"
                 style="box-shadow: 0 8px 32px rgba(0,0,0,0.3); z-index: 1000;">
              <!-- 蓝色头部 -->
              <div class="flex items-center gap-3 px-5 py-3 text-white shrink-0"
                   style="background: #0071e3;">
                <span>🤖</span>
                <div>
                  <div class="text-sm font-semibold">智能客服</div>
                  <div class="text-[11px] opacity-80">在线 · 通常秒回</div>
                </div>
                <button class="ml-auto text-xl bg-transparent border-none text-white cursor-pointer"
                        @click=${() => { isOpen = false; renderApp(); }}>×</button>
              </div>
              <!-- ChatPanel 聊天区域 -->
              <div class="flex-1 min-h-0 bg-background">
                ${chatPanel}
              </div>
            </div>
          `
          : html`
            <!-- 关闭后:圆形按钮 -->
            <button class="fixed bottom-6 right-6 w-14 h-14 rounded-full border-none text-2xl text-white cursor-pointer"
                    style="background: #0071e3; box-shadow: 0 4px 16px rgba(0,113,227,0.4); z-index: 1000;"
                    @click=${() => { isOpen = true; renderApp(); }}>💬</button>
          `
        }
      </div>
    `,
    app,
  );
}
亮点分析
- Lit 模板语法 :
html\...`+@click事件绑定 +${表达式}` 条件渲染 - ChatPanel 复用:同一个 ChatPanel 实例,在悬浮窗打开/关闭间切换
- 零额外框架:不需要 React/Vue,Lit 的模板就够用
生产环境注意事项
| 事项 | 说明 |
|---|---|
| API Key | 从后端接口获取临时 Token,不要前端硬编码 |
| 模型选择 | 客服场景用 MiniMax-M2.5 等轻量模型,国内直连低成本 |
| CORS 代理 | 限制允许的域名,避免代理被滥用 |
| System Prompt | 限定角色和回答范围,防止 AI 越界 |
| 错误处理 | 配置友好的错误提示,用户体验优先 |
11. 总结与下一步
pi-web-ui 的核心价值
| 能力 | 说明 |
|---|---|
| TypeScript API | new ChatPanel() + setAgent() 关联 Agent |
| 存储系统 | IndexedDB 持久化会话、Key、设置、代理配置 |
| 消息丰富 | 文本 / 附件 / Artifact(可执行 HTML) |
| 工具系统 | js-repl / artifacts |
| CORS 代理 | 查询参数格式 /?url=<encoded> 自动处理跨域 |
| Vite 构建 | 必须通过 Vite 打包,不支持纯 HTML 引入 |
一句话记住
pi-coding-agent 是终端里的 AI 编程搭档------给程序员用的。
pi-web-ui 是浏览器里的 AI 对话组件------给所有用户用的。
回顾整个系列
第 1 章  pi-ai              统一 LLM API,一套代码调 20+ 模型
第 2 章  pi-agent-core       智能体运行时,工具循环 + 事件系统
第 3 章  pi-tui              终端 UI 框架,差分渲染 + 组件化
第 4 章  pi-coding-agent     终端 AI 编程助手 = ai + agent + tui
第 5 章  pi-web-ui           浏览器 AI 聊天组件 = ai + agent + Web Components
附录:运行示例的完整步骤
前提条件
bash
# 1. 进入示例目录并安装依赖
cd examples/05-pi-web-ui
npm install

# 2. 设置 API Key(推荐 MiniMax 国内版)
export MINIMAX_CN_API_KEY=你的key
# 也可以不设环境变量,在页面弹出的对话框中手动输入
步骤 1:启动 CORS 代理
bash
# 在终端窗口 1(从 examples 目录)
cd examples
npm run 05:proxy

# 看到输出:
# 🌐 CORS 代理已启动: http://localhost:3001
# 使用方式(查询参数格式,匹配 pi-web-ui proxy-utils):
#   原始请求:  https://api.minimaxi.com/anthropic
#   代理请求:  http://localhost:3001/?url=https%3A%2F%2Fapi.minimaxi.com%2Fanthropic
上方:CORS 代理启动后转发 API 请求的日志。下方:Vite 开发服务器就绪。
步骤 2:启动 Vite 开发服务器
bash
# 在终端窗口 2
cd examples/05-pi-web-ui
npm run dev

# 看到输出:
# VITE vX.X.X  ready in XXXms
# ➜ Local:   http://localhost:5173/
步骤 3:打开浏览器
bash
# 首页导航
open http://localhost:5173

# 示例 1:ChatPanel 快速上手
open http://localhost:5173/01-chat-panel.html

# 示例 2:自定义布局
open http://localhost:5173/02-agent-interface.html

# 示例 4:AI 客服系统
open http://localhost:5173/04-customer-service.html
步骤 4:开始对话
- 页面加载后,代理已自动配置(代码中预设了
proxy.url和proxy.enabled) - 在输入框发送消息
- 首次使用时会弹出 API Key 输入框,输入你的 MiniMax API Key
- AI 开始流式回复