Spring中Bean的生命周期
Spring 中 Bean 的生成过程是 Spring 容器核心的生命周期管理逻辑,简单来说就是 Spring 容器从配置(XML/注解/JavaConfig)中读取 Bean 定义,最终创建出可使用的 Bean 实例的全过程。
Bean 生成的核心流程
Bean 定义加载 → 实例化(创建对象) → 属性填充(依赖注入) → 初始化(执行自定义逻辑) → 就绪(可使用) → 销毁(容器关闭)Bean 生成的详细流程
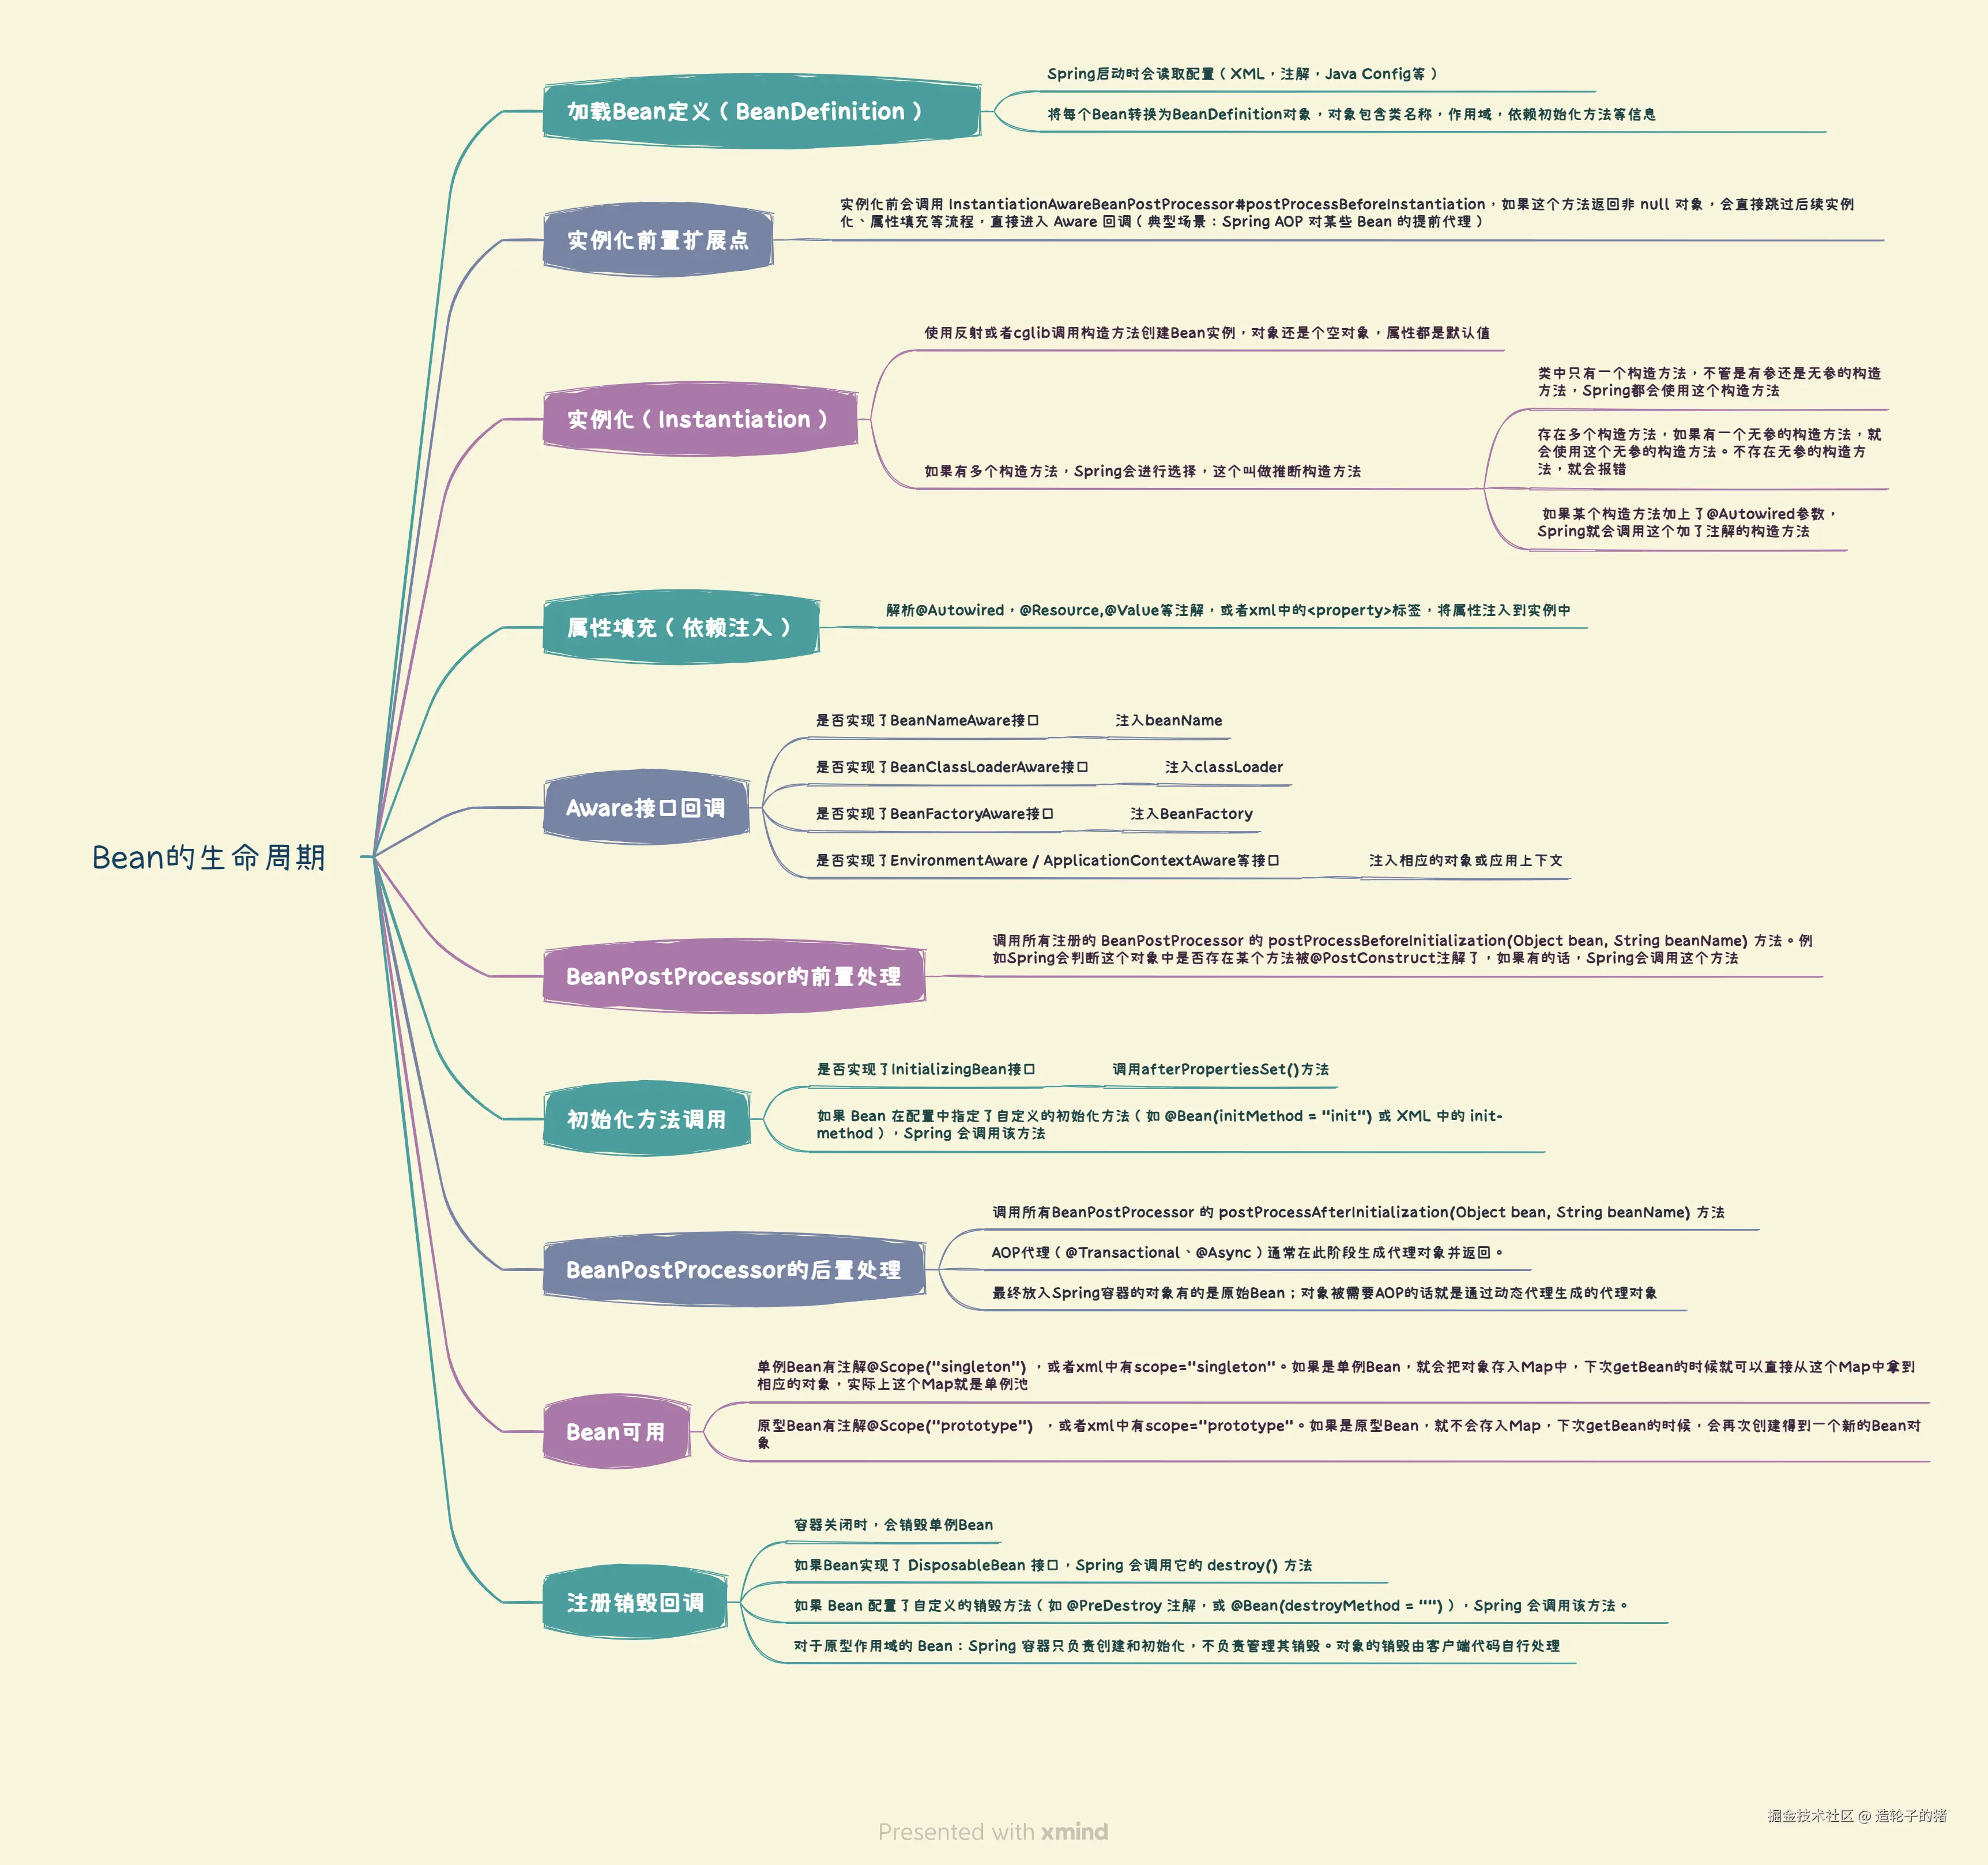
代码示例:直观感受 Bean 生命周期
java
import org.springframework.beans.BeansException;
import org.springframework.beans.factory.*;
import org.springframework.stereotype.Component;

import javax.annotation.PostConstruct;
import javax.annotation.PreDestroy;

// 标注为组件,让Spring扫描并创建Bean
@Component
public class UserBean implements BeanNameAware, BeanFactoryAware, InitializingBean, DisposableBean {

    private String name;

    // 无参构造器(实例化时调用)
    public UserBean() {
        System.out.println("1. Bean 实例化:执行构造器");
    }

    // 属性填充(依赖注入)
    public void setName(String name) {
        this.name = name;
        System.out.println("2. Bean 属性填充:设置name属性");
    }

    // ========== Aware 接口 ==========
    @Override
    public void setBeanName(String name) {
        System.out.println("3. 执行BeanNameAware:获取Bean名称=" + name);
    }

    @Override
    public void setBeanFactory(BeanFactory beanFactory) throws BeansException {
        System.out.println("4. 执行BeanFactoryAware:获取BeanFactory");
    }

    // ========== 初始化相关 ==========
    @PostConstruct
    public void postConstruct() {
        System.out.println("5. 执行@PostConstruct注解方法");
    }

    @Override
    public void afterPropertiesSet() throws Exception {
        System.out.println("6. 执行InitializingBean#afterPropertiesSet");
    }

    // 自定义初始化方法(需要在@Bean中指定initMethod,或XML配置init-method)
    public void init() {
        System.out.println("7. 执行自定义init-method");
    }

    // ========== 销毁相关 ==========
    @PreDestroy
    public void preDestroy() {
        System.out.println("8. 执行@PreDestroy注解方法");
    }

    @Override
    public void destroy() throws Exception {
        System.out.println("9. 执行DisposableBean#destroy");
    }

    // 自定义销毁方法(需要指定destroy-method)
    public void destroyMethod() {
        System.out.println("10. 执行自定义destroy-method");
    }
}配置类(启动容器):
java
import org.springframework.context.annotation.AnnotationConfigApplicationContext;
import org.springframework.context.annotation.ComponentScan;

@ComponentScan("com.example") // 扫描包下的组件
public class SpringConfig {
    public static void main(String[] args) {
        // 启动Spring容器,触发Bean创建
        AnnotationConfigApplicationContext context = new AnnotationConfigApplicationContext(SpringConfig.class);
        // 获取Bean(验证是否就绪)
        UserBean userBean = context.getBean(UserBean.class);
        System.out.println("Bean 就绪:" + userBean);
        // 关闭容器,触发Bean销毁
        context.close();
    }
}输出结果(关键顺序):
markdown
1. Bean 实例化:执行构造器
2. Bean 属性填充:设置name属性
3. 执行BeanNameAware:获取Bean名称=userBean
4. 执行BeanFactoryAware:获取BeanFactory
5. 执行@PostConstruct注解方法
6. 执行InitializingBean#afterPropertiesSet
7. 执行自定义init-method
Bean 就绪:com.example.UserBean@xxxx
8. 执行@PreDestroy注解方法
9. 执行DisposableBean#destroy
10. 执行自定义destroy-method
总结
- Spring Bean 生成的核心是:定义加载 → 实例化 → 属性填充 → 初始化 → 就绪 → 销毁,每个阶段都有明确的扩展点。
BeanPostProcessor是 Spring 最核心的扩展点,AOP、注解解析(如@PostConstruct)都依赖它实现。- 初始化阶段的执行顺序:
@PostConstruct→InitializingBean#afterPropertiesSet→ 自定义init-method;销毁阶段反之。