目录
一、了解Mysql集群技术
MySQL 集群(MySQL Cluster)本质是为了解决单节点 MySQL 的 性能瓶颈 (高并发)、可用性风险 (单点故障)和 数据可靠性(数据丢失)问题,通过多台服务器协同工作,将数据分散 / 复制存储、请求分散处理,最终实现:
- 高可用(HA):单个节点故障不影响整体服务;
- 高扩展(Scalability):可通过增加节点提升处理能力;
- 数据一致性:集群内数据保持同步(不同架构一致性级别不同)
二、MySQL源码编译
1、环境准备
bash
[root@mysql-node1 ~]# vmset.sh eth0 172.25.254.10 mysql-node12、下载安装包
bash
[root@mysql-node1 ~]# wget https://downloads.mysql.com/archives/get/p/23/file/mysql-boost-8.3.0.tar.gz3、源码编译
bash
# RHEL9中的编译环境设置
# 移入压缩包之后解压
[root@mysql-node1 ~]# ls
anaconda-ks.cfg  mysql-boost-8.3.0.tar.gz
[root@mysql-node1 ~]# tar zxf mysql-boost-8.3.0.tar.gz

# 安装依赖,在RHEL9中软件仓库中自带,直接安装即可
[root@mysql-node1 ~]# dnf install cmake3 gcc git bison openssl-devel ncurses-devel systemd-devel rpcgen.x86_64 libtirpc-devel-1.3.3-9.el9.x86_64.rpm  gcc-toolset-12-gcc gcc-toolset-12-gcc-c++ gcc-toolset-12-binutils gcc-toolset-12-annobin-annocheck gcc-toolset-12-annobin-plugin-gcc -y

[root@mysql-node1 ~]# cd mysql-8.3.0/
[root@mysql-node1 mysql-8.3.0]# mkdir  build
[root@mysql-node1 mysql-8.3.0]# cd build/
[root@mysql-node1 build]# cmake3 .. -DCMAKE_INSTALL_PREFIX=/usr/local/mysql -DMYSQL_DATADIR=/data/mysql -DMYSQL_UNIX_ADDR=/data/mysql/mysql.sock -DWITH_INNOBASE_STORAGE_ENGINE=1 -DWITH_EXTRA_CHARSETS=all -DDEFAULT_CHARSET=utf8mb4 -DDEFAULT_COLLATION=utf8mb4_unicode_ci -DWITH_BOOST=bundled  -DWITH_SSL=system -DWITH_DEBUG=OFF

[root@mysql-node1 build]# make
4、部署MySQL
bash
# 编译完成后执行安装
[root@mysql-node1 build]# make install

# 进入安装之后才生成的目录
[root@mysql-node1 build]# cd /usr/local/mysql/

# 一开始环境变量并没有mysql运行变量,所以我们就需要设置mysql运行环境的环境变量
[root@mysql-node1 mysql]# echo $PATH
/root/.local/bin:/root/bin:/usr/share/Modules/bin:/usr/local/sbin:/usr/local/bin:/usr/sbin:/usr/bin
[root@mysql-node1 mysql]# vim ~/.bash_profile
export PATH=$PATH:/usr/local/mysql/bin
[root@mysql-node1 mysql]# source ~/.bash_profile

# 一开始连接不了mysql
[root@mysql-node1 mysql]# mysql
ERROR 2002 (HY000): Can't connect to local MySQL server through socket '/data/mysql/mysql.sock' (2)

# 建立用户
[root@mysql-node1 mysql]# useradd -r -s /sbin/nologin -M mysql

# 建立目录,取决于mysql编译时的目录
[root@mysql-node1 mysql]# mkdir -p /data/mysql

# 一开始是root,编译时会有限制,所以需要更改为mysql
[root@mysql-node1 mysql]# ll -d /data/mysql/
drwxr-xr-x 2 root root 6  2月 26 09:41 /data/mysql/
[root@mysql-node1 mysql]# chown mysql.mysql /data/mysql/
[root@mysql-node1 mysql]# ll -d /data/mysql/
drwxr-xr-x 2 mysql mysql 6  2月 26 09:41 /data/mysql/

[root@mysql-nodemysql]# vim /etc/my.cnf
[mysqld]
datadir=/data/mysql
socket=/data/mysql/mysql.sock
symbolic-links=0
server-id=10
5、MySQL数据结构初始化
bash
# 进行初始化
[root@mysql-node1 mysql]# mysqld --initialize --user=mysql
2026-02-26T01:45:01.882184Z 0 [System] [MY-015017] [Server] MySQL Server Initialization - start.
2026-02-26T01:45:01.885206Z 0 [Warning] [MY-011070] [Server] 'Disabling symbolic links using --skip-symbolic-links (or equivalent) is the default. Consider not using this option as it' is deprecated and will be removed in a future release.
2026-02-26T01:45:01.885412Z 0 [System] [MY-013169] [Server] /usr/local/mysql/bin/mysqld (mysqld 8.3.0) initializing of server in progress as process 11595
2026-02-26T01:45:01.910661Z 1 [System] [MY-013576] [InnoDB] InnoDB initialization has started.
2026-02-26T01:45:02.422396Z 1 [System] [MY-013577] [InnoDB] InnoDB initialization has ended.
2026-02-26T01:45:03.168756Z 6 [Note] [MY-010454] [Server] A temporary password is generated for root@localhost: 1gQB.7,1l?r&   # 这个是默认数据库的root用户密码
2026-02-26T01:45:04.699922Z 0 [System] [MY-015018] [Server] MySQL Server Initialization - end.
6、启动MySQL
bash
# 当然还有企业7的启动方式
[root@mysql-node1 support-files]# dnf install initscripts-10.11.8-4.el9.x86_64 -y
[root@mysql-node1 support-files]# cd /usr/local/mysql/support-files/
[root@mysql-node1 support-files]# cp -p mysql.server /etc/init.d/mysqld

# 启动成功
[root@mysql-node1 support-files]# /etc/init.d/mysqld start
Starting MySQL.Logging to '/data/mysql/mysql-node1.err'.
. SUCCESS!

# 设置开启启动
[root@mysql-node1 support-files]# chkconfig --level 35 mysqld on

# 如果使用RHEL9,需要生成systemd启动文件
[root@mysql-node1 ~]# cd /usr/local/mysql/usr/lib/systemd/system/
[root@mysql-node1 system]# cp -p mysqld.service  /usr/lib/systemd/system
[root@mysql-node1 system]# systemctl daemon-reload

# 在RHEL9中启动mysql(开机自启)
[root@mysql-node1 ~]# systemctl enable --now mysqld.service
7、MySQL的安全初始化
bash
# 可设置密码为666,注意下面只要前两个是no,其余都是y即可
[root@mysql-node1 support-files]# mysql_secure_installation

Securing the MySQL server deployment.

Enter password for user root:  # 这里需要输入数据库初始化时的密码

The existing password for the user account root has expired. Please set a new password.

New password:  # 输入你自己想设定的密码,比如666

Re-enter new password:  # 再一次确认密码

VALIDATE PASSWORD COMPONENT can be used to test passwords
and improve security. It checks the strength of password
and allows the users to set only those passwords which are
secure enough. Would you like to setup VALIDATE PASSWORD component?

Press y|Y for Yes, any other key for No: no
Using existing password for root.
Change the password for root ? ((Press y|Y for Yes, any other key for No) : no

 ... skipping.
By default, a MySQL installation has an anonymous user,
allowing anyone to log into MySQL without having to have
a user account created for them. This is intended only for
testing, and to make the installation go a bit smoother.
You should remove them before moving into a production
environment.

Remove anonymous users? (Press y|Y for Yes, any other key for No) : y
Success.


Normally, root should only be allowed to connect from
'localhost'. This ensures that someone cannot guess at
the root password from the network.

Disallow root login remotely? (Press y|Y for Yes, any other key for No) : y
Success.

By default, MySQL comes with a database named 'test' that
anyone can access. This is also intended only for testing,
and should be removed before moving into a production
environment.


Remove test database and access to it? (Press y|Y for Yes, any other key for No) : y
 - Dropping test database...
Success.

 - Removing privileges on test database...
Success.

Reloading the privilege tables will ensure that all changes
made so far will take effect immediately.

Reload privilege tables now? (Press y|Y for Yes, any other key for No) : y
Success.

All done!
8、环境最后准备
bash
# mysql-node1(密码:1gQB.7,1l?r&)中将mysql转移到node2和node3中
[root@mysql-node1 ~]# scp -rp /usr/local/mysql/ root@172.25.254.20:/usr/local
[root@mysql-node1 ~]# scp -rp /usr/local/mysql/ root@172.25.254.30:/usr/local

# 在mysql-node2中(密码:Lway:Z)*t4-p)
[root@mysql-node2 ~]# vim ~/.bash_profile
export PATH=$PATH:/usr/local/mysql/bin
[root@mysql-node2 ~]# source ~/.bash_profile
[root@mysql-node2 ~]# useradd -r -s /sbin/nologin -M mysql
[root@mysql-node2 ~]# mkdir -p /data/mysql
[root@mysql-node2 ~]# chown mysql.mysql /data/mysql/
[root@mysql-node2 ~]# vim /etc/my.cnf
[mysqld]
datadir=/data/mysql
socket=/data/mysql/mysql.sock
symbolic-links=0
server-id=20

[root@mysql-node2 ~]# mysqld --initialize --user=mysql
2026-02-26T02:17:49.666772Z 0 [System] [MY-015017] [Server] MySQL Server Initialization - start.
2026-02-26T02:17:49.667533Z 0 [Warning] [MY-011070] [Server] 'Disabling symbolic links using --skip-symbolic-links (or equivalent) is the default. Consider not using this option as it' is deprecated and will be removed in a future release.
2026-02-26T02:17:49.667751Z 0 [System] [MY-013169] [Server] /usr/local/mysql/bin/mysqld (mysqld 8.3.0) initializing of server in progress as process 2986
2026-02-26T02:17:49.671959Z 1 [System] [MY-013576] [InnoDB] InnoDB initialization has started.
2026-02-26T02:17:49.808286Z 1 [System] [MY-013577] [InnoDB] InnoDB initialization has ended.
2026-02-26T02:17:50.327779Z 6 [Note] [MY-010454] [Server] A temporary password is generated for root@localhost: Lway:Z)*t4-p
2026-02-26T02:17:51.283023Z 0 [System] [MY-015018] [Server] MySQL Server Initialization - end.
[root@mysql-node2 ~]# dnf install initscripts-10.11.8-4.el9.x86_64 -y
[root@mysql-node2 ~]# cd /usr/local/mysql/support-files/
[root@mysql-node2 support-files]# cp -p mysql.server /etc/init.d/mysqld
[root@mysql-node2 support-files]# /etc/init.d/mysqld start
Starting MySQL.Logging to '/data/mysql/mysql-node2.err'.
 SUCCESS!
[root@mysql-node2 support-files]# chkconfig --level 35 mysqld on
[root@mysql-node2 support-files]# mysql_secure_installation

# 在mysql-node3中(密码为:q*>fHf-ul2d+)
[root@mysql-node3 ~]# vim ~/.bash_profile
export PATH=$PATH:/usr/local/mysql/bin
[root@mysql-node3 ~]# source ~/.bash_profile
[root@mysql-node3 ~]# useradd -r -s /sbin/nologin -M mysql
[root@mysql-node3 ~]# mkdir -p /data/mysql
[root@mysql-node3 ~]# chown mysql.mysql /data/mysql/
[root@mysql-node3 ~]# vim /etc/my.cnf
[mysqld]
datadir=/data/mysql
socket=/data/mysql/mysql.sock
symbolic-links=0
server-id=30

[root@mysql-node3 ~]# mysqld --initialize --user=mysql
2026-02-26T02:24:16.983111Z 0 [System] [MY-015017] [Server] MySQL Server Initialization - start.
2026-02-26T02:24:16.984209Z 0 [Warning] [MY-011070] [Server] 'Disabling symbolic links using --skip-symbolic-links (or equivalent) is the default. Consider not using this option as it' is deprecated and will be removed in a future release.
2026-02-26T02:24:16.984430Z 0 [System] [MY-013169] [Server] /usr/local/mysql/bin/mysqld (mysqld 8.3.0) initializing of server in progress as process 2629
2026-02-26T02:24:16.989016Z 1 [System] [MY-013576] [InnoDB] InnoDB initialization has started.
2026-02-26T02:24:17.148987Z 1 [System] [MY-013577] [InnoDB] InnoDB initialization has ended.
2026-02-26T02:24:17.690933Z 6 [Note] [MY-010454] [Server] A temporary password is generated for root@localhost: q*>fHf-ul2d+
2026-02-26T02:24:18.566065Z 0 [System] [MY-015018] [Server] MySQL Server Initialization - end.
[root@mysql-node3 ~]# cd /usr/local/mysql/support-files/
[root@mysql-node3 support-files]# cp -p mysql.server /etc/init.d/mysqld
[root@mysql-node3 support-files]# /etc/init.d/mysqld start
Starting MySQL.Logging to '/data/mysql/mysql-node3.err'.
 SUCCESS!
[root@mysql-node3 support-files]# chkconfig --level 35 mysqld on
[root@mysql-node3 support-files]# mysql_secure_installation
9、验证
bash
# mysql-node1:
[root@mysql-node1 ~]# mysql -uroot -p666
mysql: [Warning] Using a password on the command line interface can be insecure.
Welcome to the MySQL monitor.  Commands end with ; or \g.
Your MySQL connection id is 9
Server version: 8.3.0 Source distribution

Copyright (c) 2000, 2024, Oracle and/or its affiliates.

Oracle is a registered trademark of Oracle Corporation and/or its
affiliates. Other names may be trademarks of their respective
owners.

Type 'help;' or '\h' for help. Type '\c' to clear the current input statement.

mysql> select @@server_id;
+-------------+
| @@server_id |
+-------------+
|          10 |
+-------------+
1 row in set (0.00 sec)

# mysql-node2:
[root@mysql-node2 support-files]# mysql -uroot -p666
mysql: [Warning] Using a password on the command line interface can be insecure.
Welcome to the MySQL monitor.  Commands end with ; or \g.
Your MySQL connection id is 12
Server version: 8.3.0 Source distribution

Copyright (c) 2000, 2024, Oracle and/or its affiliates.

Oracle is a registered trademark of Oracle Corporation and/or its
affiliates. Other names may be trademarks of their respective
owners.

Type 'help;' or '\h' for help. Type '\c' to clear the current input statement.

mysql> select @@server_id;
+-------------+
| @@server_id |
+-------------+
|          20 |
+-------------+
1 row in set (0.00 sec)

# mysql-node3:
[root@mysql-node3 support-files]# mysql -uroot -p666
mysql: [Warning] Using a password on the command line interface can be insecure.
Welcome to the MySQL monitor.  Commands end with ; or \g.
Your MySQL connection id is 11
Server version: 8.3.0 Source distribution

Copyright (c) 2000, 2024, Oracle and/or its affiliates.

Oracle is a registered trademark of Oracle Corporation and/or its
affiliates. Other names may be trademarks of their respective
owners.

Type 'help;' or '\h' for help. Type '\c' to clear the current input statement.

mysql> select @@server_id;
+-------------+
| @@server_id |
+-------------+
|          30 |
+-------------+
1 row in set (0.00 sec)
三、MySQL集群实战-主从复制
1、编写my.cnf主配置文件
bash
# 1、在mysql-node1中
[root@mysql-node1 ~]# vim /etc/my.cnf
[mysqld]
datadir=/data/mysql
socket=/data/mysql/mysql.sock
symbolic-links=0

server-id=10
log-bin=mysql-bin

[root@mysql-node1 ~]# /etc/init.d/mysqld restart
Shutting down MySQL... SUCCESS!
Starting MySQL. SUCCESS!

# 2、在mysql-node2中
[root@mysql-node2 ~]# vim /etc/my.cnf
[mysqld]
datadir=/data/mysql
socket=/data/mysql/mysql.sock
symbolic-links=0

server-id=20
log-bin=mysql-bin

[root@mysql-node2 support-files]# /etc/init.d/mysqld restart
Shutting down MySQL... SUCCESS!
Starting MySQL.. SUCCESS!

# 3、在mysql-node3中
[root@mysql-node3 ~]# vim /etc/my.cnf
[mysqld]
datadir=/data/mysql
socket=/data/mysql/mysql.sock
symbolic-links=0

server-id=30
log-bin=mysql-bin

[root@mysql-node3 support-files]# /etc/init.d/mysqld restart
Shutting down MySQL... SUCCESS!
Starting MySQL.. SUCCESS!
2、建立同步时需要用到的数据库账号
bash
[root@mysql-node1 ~]# mysql -uroot -p666
mysql: [Warning] Using a password on the command line interface can be insecure.
Welcome to the MySQL monitor.  Commands end with ; or \g.
Your MySQL connection id is 10
Server version: 8.3.0 Source distribution

Copyright (c) 2000, 2024, Oracle and/or its affiliates.

Oracle is a registered trademark of Oracle Corporation and/or its
affiliates. Other names may be trademarks of their respective
owners.

Type 'help;' or '\h' for help. Type '\c' to clear the current input statement.

mysql> show variables like 'default_authentication_plugin';
+-------------------------------+-----------------------+
| Variable_name                 | Value                 |
+-------------------------------+-----------------------+
| default_authentication_plugin | caching_sha2_password |
+-------------------------------+-----------------------+
1 row in set (0.01 sec)

# 建立用户
mysql> create user lee@'%' identified with mysql_native_password by 'lee';
Query OK, 0 rows affected (0.01 sec)

mysql> select User from mysql.user;
+------------------+
| User             |
+------------------+
| lee              |
| mysql.infoschema |
| mysql.session    |
| mysql.sys        |
| root             |
+------------------+
5 rows in set (0.01 sec)

# 给用户授权
mysql> GRANT replication slave ON *.* to lee@'%';
Query OK, 0 rows affected (0.00 sec)

mysql> SHOW GRANTS FOR lee@'%';
+---------------------------------------------+
| Grants for lee@%                            |
+---------------------------------------------+
| GRANT REPLICATION SLAVE ON *.* TO `lee`@`%` |
+---------------------------------------------+
1 row in set (0.00 sec)

# 在其他主机中测试登录成功
[root@mysql-node2 support-files]# mysql -ulee -plee -h172.25.254.10
mysql: [Warning] Using a password on the command line interface can be insecure.
Welcome to the MySQL monitor.  Commands end with ; or \g.
Your MySQL connection id is 11
Server version: 8.3.0 Source distribution

Copyright (c) 2000, 2024, Oracle and/or its affiliates.

Oracle is a registered trademark of Oracle Corporation and/or its
affiliates. Other names may be trademarks of their respective
owners.

Type 'help;' or '\h' for help. Type '\c' to clear the current input statement.

mysql> ^DBye
3、配置数据库一主一从
bash
# 查看主数据库状态的命令
mysql> SHOW MASTER STATUS;
+------------------+----------+--------------+------------------+-------------------+
| File             | Position | Binlog_Do_DB | Binlog_Ignore_DB | Executed_Gtid_Set |
+------------------+----------+--------------+------------------+-------------------+
| mysql-bin.000001 |      659 |              |                  |                   |
+------------------+----------+--------------+------------------+-------------------+
1 row in set, 1 warning (0.00 sec)

# 在slave主机中
[root@mysql-node2 support-files]# mysql -uroot -p666
mysql: [Warning] Using a password on the command line interface can be insecure.
Welcome to the MySQL monitor.  Commands end with ; or \g.
Your MySQL connection id is 10
Server version: 8.3.0 Source distribution

Copyright (c) 2000, 2024, Oracle and/or its affiliates.

Oracle is a registered trademark of Oracle Corporation and/or its
affiliates. Other names may be trademarks of their respective
owners.

Type 'help;' or '\h' for help. Type '\c' to clear the current input statement.

mysql> CHANGE MASTER TO MASTER_HOST='172.25.254.10',MASTER_USER='lee',MASTER_PASSWORD='lee',MASTER_LOG_FILE='mysql-bin.000001',MASTER_LOG_POS=659;
Query OK, 0 rows affected, 8 warnings (0.02 sec)

mysql> start slave;
Query OK, 0 rows affected, 1 warning (0.02 sec)

mysql> show slave status \G;
*************************** 1. row ***************************
               Slave_IO_State: Waiting for source to send event
                  Master_Host: 172.25.254.10
                  Master_User: lee
                  Master_Port: 3306
                Connect_Retry: 60
              Master_Log_File: mysql-bin.000001
          Read_Master_Log_Pos: 659
               Relay_Log_File: mysql-node2-relay-bin.000002
                Relay_Log_Pos: 328
        Relay_Master_Log_File: mysql-bin.000001
             Slave_IO_Running: Yes  # 数据同步成功
            Slave_SQL_Running: Yes  # 通过同步过来的数据做日志回访成功
4、测试
bash
# 在master(mysql-node1)中建立timinglee数据库
[root@mysql-node1 ~]# mysql -uroot -p666
mysql: [Warning] Using a password on the command line interface can be insecure.
Welcome to the MySQL monitor.  Commands end with ; or \g.
Your MySQL connection id is 14
Server version: 8.3.0 Source distribution

Copyright (c) 2000, 2024, Oracle and/or its affiliates.

Oracle is a registered trademark of Oracle Corporation and/or its
affiliates. Other names may be trademarks of their respective
owners.

Type 'help;' or '\h' for help. Type '\c' to clear the current input statement.

mysql> show databases;
+--------------------+
| Database           |
+--------------------+
| information_schema |
| mysql              |
| performance_schema |
| sys                |
+--------------------+
4 rows in set (0.00 sec)

mysql> create database timinglee;
Query OK, 1 row affected (0.00 sec)

mysql> show databases;
+--------------------+
| Database           |
+--------------------+
| information_schema |
| mysql              |
| performance_schema |
| sys                |
| timinglee          |
+--------------------+
5 rows in set (0.00 sec)

# 在slave(mysql-node2)中,在slave主机中可以实现数据同步
[root@mysql-node2 support-files]# mysql -uroot -p666
mysql: [Warning] Using a password on the command line interface can be insecure.
Welcome to the MySQL monitor.  Commands end with ; or \g.
Your MySQL connection id is 17
Server version: 8.3.0 Source distribution

Copyright (c) 2000, 2024, Oracle and/or its affiliates.

Oracle is a registered trademark of Oracle Corporation and/or its
affiliates. Other names may be trademarks of their respective
owners.

Type 'help;' or '\h' for help. Type '\c' to clear the current input statement.

mysql> show databases;
+--------------------+
| Database           |
+--------------------+
| information_schema |
| mysql              |
| performance_schema |
| sys                |
| timinglee          |
+--------------------+
5 rows in set (0.00 sec)
5、向当前一主一从中加入新的数据库(无数据)
bash
# 模拟一主一从中已经存在数据情况
[root@mysql-node1 ~]# mysql -uroot -p666
mysql: [Warning] Using a password on the command line interface can be insecure.
Welcome to the MySQL monitor.  Commands end with ; or \g.
Your MySQL connection id is 15
Server version: 8.3.0 Source distribution

Copyright (c) 2000, 2024, Oracle and/or its affiliates.

Oracle is a registered trademark of Oracle Corporation and/or its
affiliates. Other names may be trademarks of their respective
owners.

Type 'help;' or '\h' for help. Type '\c' to clear the current input statement.

mysql> use timinglee;
Reading table information for completion of table and column names
You can turn off this feature to get a quicker startup with -A

Database changed

mysql> create table timinglee.userlist ( name varchar(10) not null, pass varchar(50) not null);
Query OK, 0 rows affected (0.03 sec)

mysql> desc userlist;
+-------+-------------+------+-----+---------+-------+
| Field | Type        | Null | Key | Default | Extra |
+-------+-------------+------+-----+---------+-------+
| name  | varchar(10) | NO   |     | NULL    |       |
| pass  | varchar(50) | NO   |     | NULL    |       |
+-------+-------------+------+-----+---------+-------+
2 rows in set (0.01 sec)

mysql> insert into timinglee.userlist values ('user1','123');
Query OK, 1 row affected (0.00 sec)

mysql> select * from timinglee.userlist;
+-------+------+
| name  | pass |
+-------+------+
| user1 | 123  |
+-------+------+
1 row in set (0.01 sec)


# 加入新从库时,需要手动拉平数据
# 备份数据库数据
[root@mysql-node1 ~]# mysqldump -uroot -p timinglee > timinglee.sql
Enter password:
[root@mysql-node1 ~]# scp timinglee.sql root@172.25.254.30:/root/
timinglee.sql                                   100% 1943     2.0MB/s   00:00

# 在准备一个新的从库(mysql-node3)建立库
[root@mysql-node3 ~]# mysql -uroot -p666 -e "create database timinglee;"
mysql: [Warning] Using a password on the command line interface can be insecure.
[root@mysql-node3 ~]# mysql -uroot -p666 timinglee < timinglee.sql
mysql: [Warning] Using a password on the command line interface can be insecure.

# 验证
[root@mysql-node3 ~]# mysql -uroot -p666
mysql: [Warning] Using a password on the command line interface can be insecure.
Welcome to the MySQL monitor.  Commands end with ; or \g.
Your MySQL connection id is 11
Server version: 8.3.0 Source distribution

Copyright (c) 2000, 2024, Oracle and/or its affiliates.

Oracle is a registered trademark of Oracle Corporation and/or its
affiliates. Other names may be trademarks of their respective
owners.

Type 'help;' or '\h' for help. Type '\c' to clear the current input statement.

mysql> show databases;
+--------------------+
| Database           |
+--------------------+
| information_schema |
| mysql              |
| performance_schema |
| sys                |
| timinglee          |
+--------------------+
5 rows in set (0.01 sec)

mysql> select * from timinglee.userlist;
+-------+------+
| name  | pass |
+-------+------+
| user1 | 123  |
+-------+------+
1 row in set (0.00 sec)
6、将主库加入主从结构(有数据)
bash
# 在master(mysql-node1)中查看id等才能把新库加入到主从结构中
mysql> show master status;
+------------------+----------+--------------+------------------+-------------------+
| File             | Position | Binlog_Do_DB | Binlog_Ignore_DB | Executed_Gtid_Set |
+------------------+----------+--------------+------------------+-------------------+
| mysql-bin.000001 |     1414 |              |                  |                   |
+------------------+----------+--------------+------------------+-------------------+
1 row in set, 1 warning (0.00 sec)

# 之后再把从库连接(mysql-node3)
mysql> CHANGE MASTER TO MASTER_HOST='172.25.254.10',MASTER_USER='lee',MASTER_PASSWORD='lee',MASTER_LOG_FILE='mysql-bin.000001',MASTER_LOG_POS=1414;
Query OK, 0 rows affected, 8 warnings (0.02 sec)

mysql> start slave;
Query OK, 0 rows affected, 1 warning (0.01 sec)

mysql> show slave status \G;
*************************** 1. row ***************************
               Slave_IO_State: Waiting for source to send event
                  Master_Host: 172.25.254.10
                  Master_User: lee
                  Master_Port: 3306
                Connect_Retry: 60
              Master_Log_File: mysql-bin.000001
          Read_Master_Log_Pos: 1414
               Relay_Log_File: mysql-node3-relay-bin.000002
                Relay_Log_Pos: 328
        Relay_Master_Log_File: mysql-bin.000001
             Slave_IO_Running: Yes
            Slave_SQL_Running: Yes
7、测试一主两从
bash
# 在master(mysql-node1)添加user2
mysql> insert into timinglee.userlist values ('user2','123');
Query OK, 1 row affected (0.01 sec)

# 在从(mysql-node3)中查看
mysql> select * from timinglee.userlist;
+-------+------+
| name  | pass |
+-------+------+
| user1 | 123  |
| user2 | 123  |
+-------+------+
2 rows in set (0.00 sec)

# 在从(mysql-node2)中也可以查看到
mysql> select * from userlist;
+-------+------+
| name  | pass |
+-------+------+
| user1 | 123  |
| user2 | 123  |
+-------+------+
2 rows in set (0.00 sec)
四、MySQL主从架构中的使用技巧与优化
1、延迟复制
延迟复制时用来控制 sql 线程的,和 i/o 线程无关
这个延迟复制不是 i/o 线程过段时间来复制,i/o 是正常工作的
是日志已经保存在 slave 端了,那个 sql 要等多久进行回放
bash
# 在指定slave(mysql-node2)中进行延迟复制
mysql> stop replica;
Query OK, 0 rows affected (0.03 sec)

mysql> change replication source to source_delay=60;
Query OK, 0 rows affected (0.01 sec)

mysql> start replica;
Query OK, 0 rows affected (0.00 sec)

# 在node2验证是否设置成功:
mysql> show slave status \G;
SQL_Delay: 60


# 测试:在master主机中对数据进行更改
# 在master删除user1
mysql> delete from timinglee.userlist where  name = 'user1';
Query OK, 1 row affected (0.02 sec)

mysql> select * from timinglee.userlist;
+-------+------+
| name  | pass |
+-------+------+
| user2 | 123  |
+-------+------+
1 row in set (0.00 sec)

# 此时node3(未被延迟的slave数据库)中能够直接查看,及时同步
mysql> select * from timinglee.userlist;
+-------+------+
| name  | pass |
+-------+------+
| user2 | 123  |
+-------+------+
1 row in set (0.01 sec)

# 但是延迟复制的node2还是没有显现修改后的结果,未被及时同步
mysql> select * from timinglee.userlist;
+-------+------+
| name  | pass |
+-------+------+
| user1 | 123  |
| user2 | 123  |
+-------+------+
2 rows in set (0.05 sec)

# 但是过了60秒之后,就可以同步
mysql> select * from timinglee.userlist;
+-------+------+
| name  | pass |
+-------+------+
| user2 | 123  |
+-------+------+
1 row in set (0.00 sec)
2、慢查询日志
-
慢查询,顾名思义,执行很慢的查询
-
当执行 SQL 超过 long_query_time 参数设定的时间阈值(默认 10s)时,就被认为是慢查询,这个 SQL 语句就是需要优化的
-
慢查询被记录在慢查询日志里
-
慢查询日志默认是不开启的
-
如果需要优化 SQL 语句,就可以开启这个功能,它可以让你很容易地知道哪些语句是需要优化的。
bash
# 慢查询日志是否开启(这里是OFF,未开启状态)
mysql> show variables like "slow%";
+---------------------+----------------------------------+
| Variable_name       | Value                            |
+---------------------+----------------------------------+
| slow_launch_time    | 2                                |
| slow_query_log      | OFF                              |
| slow_query_log_file | /data/mysql/mysql-node1-slow.log |
+---------------------+----------------------------------+
3 rows in set (0.02 sec)

# 开启慢查询日志
mysql> set global slow_query_log=on;
Query OK, 0 rows affected (0.01 sec)

mysql> show variables like "slow%";
+---------------------+----------------------------------+
| Variable_name       | Value                            |
+---------------------+----------------------------------+
| slow_launch_time    | 2                                |
| slow_query_log      | ON                               |
| slow_query_log_file | /data/mysql/mysql-node1-slow.log |
+---------------------+----------------------------------+
3 rows in set (0.00 sec)

# 检测慢查询日志
mysql> show variables like "long%";   # 默认是10秒
+-----------------+-----------+
| Variable_name   | Value     |
+-----------------+-----------+
| long_query_time | 10.000000 |
+-----------------+-----------+
1 row in set (0.01 sec)

# 修改慢查询时间为4s
mysql> set long_query_time=4;
Query OK, 0 rows affected (0.00 sec)

mysql> show variables like "long%";
+-----------------+----------+
| Variable_name   | Value    |
+-----------------+----------+
| long_query_time | 4.000000 |
+-----------------+----------+
1 row in set (0.00 sec)

# 测试(慢查询只记录了我们设置的超过4s的查询):
mysql> select sleep(3);
+----------+
| sleep(3) |
+----------+
|        0 |
+----------+
1 row in set (3.00 sec)

mysql> select sleep(10);
+-----------+
| sleep(10) |
+-----------+
|         0 |
+-----------+
1 row in set (10.00 sec)

[root@mysql-node1 ~]# cat /data/mysql/mysql-node1-slow.log
/usr/local/mysql/bin/mysqld, Version: 8.3.0 (Source distribution). started with:
Tcp port: 3306  Unix socket: /data/mysql/mysql.sock
Time                 Id Command    Argument
# Time: 2026-02-27T02:04:41.703338Z
# User@Host: root[root] @ localhost []  Id:    12
# Query_time: 10.003855  Lock_time: 0.000000 Rows_sent: 1  Rows_examined: 1
SET timestamp=1772157871;
select sleep(10);
3、gtid模式
当为启用 gtid 时我们要考虑的问题
在 master 端的写入时多用户读写,在 slave 端的复制时单线程日志回放,所以 slave 端一定会延迟与 master 端
这种延迟在 slave 端的延迟可能会不一致,当 master 挂掉后 slave 接管,一般会挑选一个和 master 延迟日志最接近的充当新的 master
那么为接管 master 的主机继续充当 slave 角色并会指向到新的 master 上,作为其 slave
这时候按照之前的配置我们需要知道新的 master 上的 pos 的 id,但是我们无法确定新的 master 和 slave 之间差多少
当激活 GITD 之后
当 master 出现问题后,slave2 和 master 的数据最接近,会被作为新的 master
slave1 指向新的 master,但是他不会去检测新的 master 的 pos id,只需要继续读取自己 gtid_next 即可
GTID 的简单工作流程
-
主库执行一个事务,提交后自动生成一个唯一的 GTID,记录到 binlog 里;
-
从库读取主库的 binlog,先记录这个 GTID(标记为 "已收到");
-
从库执行这个事务,执行完后把 GTID 标记为 "已执行";
-
主从同步时,从库只会向主库请求自己 "未执行" 的 GTID 对应的事务。
bash
# 在master和slave默认是未开启的,所以需要手动开启
mysql> show variables like '%gtid%';
+----------------------------------+-----------+
| Variable_name                    | Value     |
+----------------------------------+-----------+
| binlog_gtid_simple_recovery      | ON        |
| enforce_gtid_consistency         | OFF       |
| gtid_executed                    |           |
| gtid_executed_compression_period | 0         |
| gtid_mode                        | OFF       |
| gtid_next                        | AUTOMATIC |
| gtid_owned                       |           |
| gtid_purged                      |           |
| session_track_gtids              | OFF       |
+----------------------------------+-----------+
9 rows in set (0.00 sec)

# 再所有主机中加入参数
[root@mysql-node1 ~]# vim /etc/my.cnf
[mysqld]
datadir=/data/mysql
socket=/data/mysql/mysql.sock
symbolic-links=0

server-id=10
log-bin=mysql-bin

gtid_mode=ON
enforce-gtid-consistency=ON

[root@mysql-node2 ~]# vim /etc/my.cnf
[mysqld]
datadir=/data/mysql
socket=/data/mysql/mysql.sock
symbolic-links=0

server-id=20
log-bin=mysql-bin

gtid_mode=ON
enforce-gtid-consistency=ON

[root@myql-node3 ~]# vim /etc/my.cnf
[mysqld]
datadir=/data/mysql
socket=/data/mysql/mysql.sock
symbolic-links=0

server-id=30
log-bin=mysql-bin

gtid_mode=ON
enforce-gtid-consistency=ON

# 重启
[root@mysql-node1 ~]# /etc/init.d/mysqld restart
Shutting down MySQL........... SUCCESS!
Starting MySQL. SUCCESS!
[root@mysql-node2 ~]# /etc/init.d/mysqld restart
Shutting down MySQL........... SUCCESS!
Starting MySQL. SUCCESS!
[root@mysql-node3 ~]# /etc/init.d/mysqld restart
Shutting down MySQL........... SUCCESS!
Starting MySQL. SUCCESS!

# 查看gtid状态
mysql> show variables like '%gtid%';
+----------------------------------+-----------+
| Variable_name                    | Value     |
+----------------------------------+-----------+
| binlog_gtid_simple_recovery      | ON        |
| enforce_gtid_consistency         | ON        |
| gtid_executed                    |           |
| gtid_executed_compression_period | 0         |
| gtid_mode                        | ON        |
| gtid_next                        | AUTOMATIC |
| gtid_owned                       |           |
| gtid_purged                      |           |
| session_track_gtids              | OFF       |
+----------------------------------+-----------+
9 rows in set (0.01 sec)

# 在从库(node2和node3)中都需要停止slave功能,之后执行以下命令
mysql> stop slave;
Query OK, 0 rows affected, 1 warning (0.00 sec)

mysql> CHANGE MASTER TO MASTER_HOST='172.25.254.10', MASTER_USER='lee', MASTER_PASSWORD='lee', MASTER_AUTO_POSITION=1;
Query OK, 0 rows affected, 7 warnings (0.01 sec)

mysql> start slave;
Query OK, 0 rows affected, 1 warning (0.01 sec)

mysql> show slave status \G;
*************************** 1. row ***************************
               Slave_IO_State: Waiting for source to send event
                  Master_Host: 172.25.254.10
                  Master_User: lee
                  Master_Port: 3306
                Connect_Retry: 60
              Master_Log_File: mysql-bin.000003
          Read_Master_Log_Pos: 158
               Relay_Log_File: mysql-node2-relay-bin.000002
                Relay_Log_Pos: 375
        Relay_Master_Log_File: mysql-bin.000003
             Slave_IO_Running: Yes
            Slave_SQL_Running: Yes
              Replicate_Do_DB:
          Replicate_Ignore_DB:
           Replicate_Do_Table:
       Replicate_Ignore_Table:
      Replicate_Wild_Do_Table:
  Replicate_Wild_Ignore_Table:
                   Last_Errno: 0
                   Last_Error:
                 Skip_Counter: 0
          Exec_Master_Log_Pos: 154
              Relay_Log_Space: 580
              Until_Condition: None
               Until_Log_File:
                Until_Log_Pos: 0
           Master_SSL_Allowed: No
           Master_SSL_CA_File:
           Master_SSL_CA_Path:
              Master_SSL_Cert:
            Master_SSL_Cipher:
               Master_SSL_Key:
        Seconds_Behind_Master: 0
Master_SSL_Verify_Server_Cert: No
                Last_IO_Errno: 0
                Last_IO_Error:
               Last_SQL_Errno: 0
               Last_SQL_Error:
  Replicate_Ignore_Server_Ids:
             Master_Server_Id: 1
                  Master_UUID: 768c6b91-4c01-11ef-a514-000c299355ea
             Master_Info_File: /data/mysql/master.info
                    SQL_Delay: 0
          SQL_Remaining_Delay: NULL
      Slave_SQL_Running_State: Slave has read all relay log; waiting for more updates
           Master_Retry_Count: 86400
                  Master_Bind:
      Last_IO_Error_Timestamp:
     Last_SQL_Error_Timestamp:
               Master_SSL_Crl:
           Master_SSL_Crlpath:
           Retrieved_Gtid_Set:
            Executed_Gtid_Set:
                Auto_Position: 1		# 功能开启
         Replicate_Rewrite_DB:
                 Channel_Name:
           Master_TLS_Version:
1 row in set (0.00 sec)
4、多线程回放
默认情况下 slave 中使用的是 sql 单线程回放
在 master 中时多用户读写,如果使用 sql 单线程回放那么会造成组从延迟严重
开启 MySQL 的多线程回放可以解决上述问题
bash
# 在slave主机中默认回放日志时使用单线程回放
mysql> show processlist;
bash
# 在node2(slaves中进行修改)
[root@mysql-node2 ~]# vim /etc/my.cnf
slave-parallel-type=LOGICAL_CLOCK
slave-parallel-workers=16
relay_log_recovery=ON

[root@mysql-node2 ~]# /etc/init.d/mysqld restart
Shutting down MySQL... SUCCESS!
Starting MySQL. SUCCESS!

# 查看更改生效信息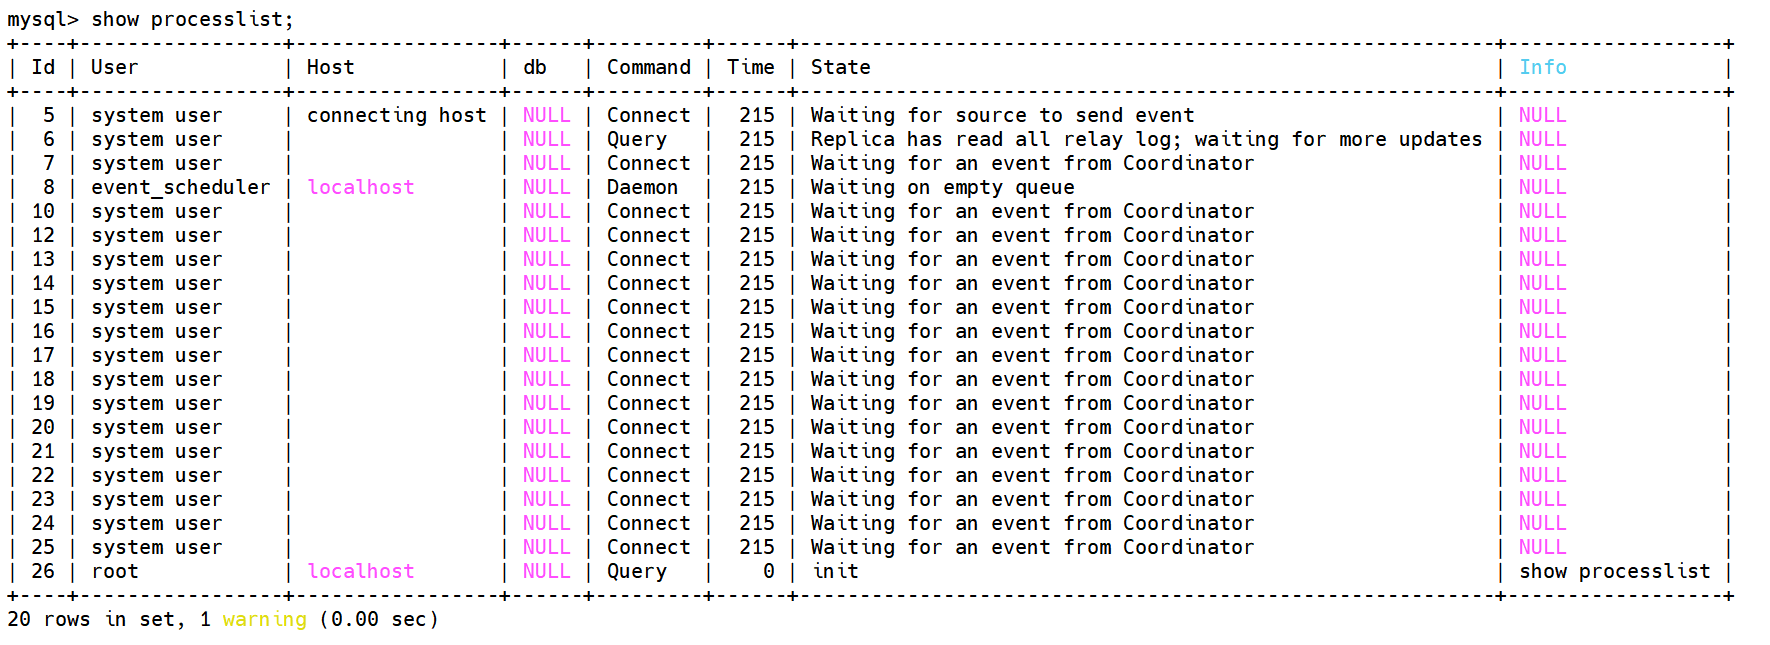
单线程回放(配置前)
系统线程数量少,Waiting for an event from Coordinator 的线程只有 4~5 个。
没有大量 system user 的 Connect 线程,说明只有 1 个 SQL 线程在顺序执行 relay log。
多线程回放(配置后)
system user 线程数量显著增加,从原来的几个变成了 十几个(和 slave-parallel-workers=16 对应)。
大量线程状态为 Waiting for an event from Coordinator,这正是多线程工作线程在等待协调器分配任务的典型表现。
总线程数从 8 行变成了 20 行,直观体现了多线程的启动。
5、半同步模式
1、用户线程写入完成后 master 中的 dump 会把日志推送到 slave 端
2、slave 中的 io 线程接收后保存到 relaylog 中继日志
3、保存完成后 slave 向 master 端返回 ack
4、在未接受到 slave 的 ack 时 master 端时不做提交的,一直处于等待当收到 ack 后提交到存储引擎
5、在 5.6 版本中用到的时 after_commit 模式,after_commit 模式时先提交在等待 ack 返回后输出 ok
bash
# 开启半同步模式
[root@mysql-node1 ~]# vim /etc/my.cnf
rpl_semi_sync_master_enabled=1

[root@mysql-node2 ~]# vim /etc/my.cnf
rpl_semi_sync_slave_enabled=1

[root@mysql-node3 ~]# vim /etc/my.cnf
rpl_semi_sync_slave_enabled=1

# node1安装对应的master半同步插件
mysql> install plugin rpl_semi_sync_master soname 'semisync_master.so';
Query OK, 0 rows affected, 1 warning (0.01 sec)

# node2,3安装对应的slave半同步插件
mysql> install plugin rpl_semi_sync_slave soname 'semisync_slave.so';
Query OK, 0 rows affected, 1 warning (0.01 sec)
mysql> install plugin rpl_semi_sync_slave soname 'semisync_slave.so';
Query OK, 0 rows affected, 1 warning (0.01 sec)

# node1查看插件情况
mysql> select plugin_name,plugin_status from information_schema.plugins where plugin_name like '%semi%';
+----------------------+---------------+
| plugin_name          | plugin_status |
+----------------------+---------------+
| rpl_semi_sync_master | ACTIVE        |
+----------------------+---------------+
1 row in set (0.00 sec)

# node2,3查看插件情况
mysql> select plugin_name,plugin_status from information_schema.plugins where plugin_name like '%semi%';
+---------------------+---------------+
| plugin_name         | plugin_status |
+---------------------+---------------+
| rpl_semi_sync_slave | ACTIVE        |
+---------------------+---------------+
1 row in set (0.00 sec)

# node1打开半同步功能
mysql> SET GLOBAL rpl_semi_sync_master_enabled = 1;
Query OK, 0 rows affected (0.00 sec)

# node2,3打开半同步功能(注意命令,是有master和slave的区分)
mysql> SET GLOBAL rpl_semi_sync_slave_enabled =1;
Query OK, 0 rows affected (0.00 sec)
mysql> SET GLOBAL rpl_semi_sync_slave_enabled =1;
Query OK, 0 rows affected (0.00 sec)

# (slave主机中)node2,3中进行
mysql> stop slave io_thread;
Query OK, 0 rows affected, 1 warning (0.01 sec)

mysql> start slave io_thread;
Query OK, 0 rows affected, 1 warning (0.01 sec)

# node1查看半同步功能状态
mysql> show variables like 'rpl_semi_sync%';
+-------------------------------------------+------------+
| Variable_name                             | Value      |
+-------------------------------------------+------------+
| rpl_semi_sync_master_enabled              | ON         |
| rpl_semi_sync_master_timeout              | 10000      |
| rpl_semi_sync_master_trace_level          | 32         |
| rpl_semi_sync_master_wait_for_slave_count | 1          |
| rpl_semi_sync_master_wait_no_slave        | ON         |
| rpl_semi_sync_master_wait_point           | AFTER_SYNC |
+-------------------------------------------+------------+
6 rows in set (0.00 sec)

# node2,3查看半同步功能状态
mysql> SHOW VARIABLES LIKE 'rpl_semi_sync%';
+---------------------------------+-------+
| Variable_name                   | Value |
+---------------------------------+-------+
| rpl_semi_sync_slave_enabled     | ON    |
| rpl_semi_sync_slave_trace_level | 32    |
+---------------------------------+-------+
2 rows in set (0.03 sec)

mysql> SHOW VARIABLES LIKE 'rpl_semi_sync%';
+---------------------------------+-------+
| Variable_name                   | Value |
+---------------------------------+-------+
| rpl_semi_sync_slave_enabled     | ON    |
| rpl_semi_sync_slave_trace_level | 32    |
+---------------------------------+-------+
2 rows in set (0.00 sec)
(1)进行测试
bash
# 测试
# 在主库中写入数据user4
mysql> insert into timinglee.userlist values ('user4','123');
Query OK, 1 row affected (10.07 sec)  # 10秒超时

mysql> SHOW VARIABLES LIKE 'rpl_semi_sync%';
+-------------------------------------------+------------+
| Variable_name                             | Value      |
+-------------------------------------------+------------+
| rpl_semi_sync_master_enabled              | ON         |
| rpl_semi_sync_master_timeout              | 10000      |
| rpl_semi_sync_master_trace_level          | 32         |
| rpl_semi_sync_master_wait_for_slave_count | 1          |
| rpl_semi_sync_master_wait_no_slave        | ON         |
| rpl_semi_sync_master_wait_point           | AFTER_SYNC |
+-------------------------------------------+------------+
6 rows in set (0.00 sec)

mysql> select * from timinglee.userlist;
+-------+------+
| name  | pass |
+-------+------+
| user1 | 123  |
| user2 | 123  |
| user3 | 123  |
| user4 | 123  |
+-------+------+
4 rows in set (0.00 sec)

# 模拟ack故障,在所有slave主机(node2,3)中
mysql> stop slave io_thread;
Query OK, 0 rows affected, 1 warning (0.01 sec)

# 故障后,在主库master(node1)中写入数据user5
mysql> insert into timinglee.userlist values ('user5','123');
Query OK, 1 row affected (0.00 sec)

mysql> SHOW STATUS LIKE 'Rpl_semi_sync%';
+--------------------------------------------+-------+
| Variable_name                              | Value |
+--------------------------------------------+-------+
| Rpl_semi_sync_master_clients               | 0     |
| Rpl_semi_sync_master_net_avg_wait_time     | 0     |
| Rpl_semi_sync_master_net_wait_time         | 0     |
| Rpl_semi_sync_master_net_waits             | 0     |
| Rpl_semi_sync_master_no_times              | 1     |
| Rpl_semi_sync_master_no_tx                 | 2     |
| Rpl_semi_sync_master_status                | OFF   |
| Rpl_semi_sync_master_timefunc_failures     | 0     |
| Rpl_semi_sync_master_tx_avg_wait_time      | 0     |
| Rpl_semi_sync_master_tx_wait_time          | 0     |
| Rpl_semi_sync_master_tx_waits              | 0     |
| Rpl_semi_sync_master_wait_pos_backtraverse | 0     |
| Rpl_semi_sync_master_wait_sessions         | 0     |
| Rpl_semi_sync_master_yes_tx                | 0     |
+--------------------------------------------+-------+
14 rows in set (0.00 sec)

# 恢复故障,在所有slave(node2,3)主机中
mysql> start SLAVE IO_THREAD;
Query OK, 0 rows affected, 1 warning (0.01 sec)

# 会自动恢复,自动转为异步模式,当slave恢复,master就会显示为ON
mysql> SHOW STATUS LIKE 'Rpl_semi_sync%';
+--------------------------------------------+-------+
| Variable_name                              | Value |
+--------------------------------------------+-------+
| Rpl_semi_sync_master_clients               | 2     |
| Rpl_semi_sync_master_net_avg_wait_time     | 0     |
| Rpl_semi_sync_master_net_wait_time         | 0     |
| Rpl_semi_sync_master_net_waits             | 1     |
| Rpl_semi_sync_master_no_times              | 1     |
| Rpl_semi_sync_master_no_tx                 | 2     |  # 2笔数据为同步
| Rpl_semi_sync_master_status                | ON    |	# 自动转为异步模式,当slave恢复
| Rpl_semi_sync_master_timefunc_failures     | 0     |	# 会自动恢复
| Rpl_semi_sync_master_tx_avg_wait_time      | 0     |
| Rpl_semi_sync_master_tx_wait_time          | 0     |
| Rpl_semi_sync_master_tx_waits              | 0     |
| Rpl_semi_sync_master_wait_pos_backtraverse | 0     |
| Rpl_semi_sync_master_wait_sessions         | 0     |
| Rpl_semi_sync_master_yes_tx                | 0     |
+--------------------------------------------+-------+
14 rows in set (0.00 sec)

# 即可在node2,3(slave)中查看新增信息
mysql> select * from timinglee.userlist;
+-------+------+
| name  | pass |
+-------+------+
| user1 | 123  |
| user2 | 123  |
| user3 | 123  |
| user4 | 123  |
| user5 | 123  |
+-------+------+
5 rows in set (0.00 sec)
五、MySQL-MHA高可用集群环境配置
1、准备工作-保证数据一致性(在所有的mysql节点)
bash
# 重新初始化数据(node1,2,3都需要进行此操作,只是以下示例以node1为例)
[root@mysql-node1 ~]# /etc/init.d/mysqld stop
Shutting down MySQL........... SUCCESS!
[root@mysql-node1 ~]# rm -rf /data/mysql/
[root@mysql-node1 ~]# mkdir /data/mysql
[root@mysql-node1 ~]# chown mysql.mysql /data/mysql/

# 此事还需要查看一下半同步模块是否开启,需要关闭掉(注释)
[root@mysql-node1 ~]# vim /etc/my.cnf
#rpl_semi_sync_master_enabled=1

[root@mysql-node1 ~]# mysqld --initialize  --user mysql
2026-03-09T01:06:54.599816Z 0 [System] [MY-015017] [Server] MySQL Server Initialization - start.
2026-03-09T01:06:54.600599Z 0 [Warning] [MY-011070] [Server] 'Disabling symbolic links using --skip-symbolic-links (or equivalent) is the default. Consider not using this option as it' is deprecated and will be removed in a future release.
2026-03-09T01:06:54.600646Z 0 [System] [MY-013169] [Server] /usr/local/mysql/bin/mysqld (mysqld 8.3.0) initializing of server in progress as process 6419
2026-03-09T01:06:54.605395Z 1 [System] [MY-013576] [InnoDB] InnoDB initialization has started.
2026-03-09T01:06:54.777185Z 1 [System] [MY-013577] [InnoDB] InnoDB initialization has ended.
2026-03-09T01:06:55.379855Z 6 [Note] [MY-010454] [Server] A temporary password is generated for root@localhost: ujEBNukJs4;a
2026-03-09T01:06:56.373991Z 0 [System] [MY-015018] [Server] MySQL Server Initialization - end.

# 如果显示PID查找不到时,就再重新查找
[root@mysql-node2 ~]# /etc/init.d/mysqld restart
 ERROR! MySQL server PID file could not be found!
Starting MySQL.Logging to '/data/mysql/mysql-node2.err'.
 SUCCESS!
[root@mysql-node1 ~]# /etc/init.d/mysqld restart
Shutting down MySQL. SUCCESS!
Starting MySQL. SUCCESS!

[root@mysql-node1 ~]# mysql_secure_installation

# 创建用户(用于slave端做认证使用)并且指定他的加密方式
[root@mysql-node1 ~]# mysql -uroot -plee -e "create user lee@'%' identified with mysql_native_password by 'lee';"
mysql: [Warning] Using a password on the command line interface can be insecure.
[root@mysql-node1 ~]# mysql -uroot -plee -e "grant replication slave on *.* to lee@'%';"                      mysql: [Warning] Using a password on the command line interface can be insecure.
[root@mysql-node1 ~]# mysql -uroot -plee -e "show master status;"
mysql: [Warning] Using a password on the command line interface can be insecure.
+------------------+----------+--------------+------------------+------------------------------------------+
| File             | Position | Binlog_Do_DB | Binlog_Ignore_DB | Executed_Gtid_Set                        |
+------------------+----------+--------------+------------------+------------------------------------------+
| mysql-bin.000003 |      980 |              |                  | 4354e525-1b54-11f1-b4ee-000c29e36ced:1-3 |
+------------------+----------+--------------+------------------+------------------------------------------+

# 重新配置主从,在slave主机中(node2,3)
[root@mysql-node2 ~]# mysql -uroot -plee -e "CHANGE MASTER TO MASTER_HOST='172.25.254.10', MASTER_USER='lee', MASTER_PASSWORD='lee', MASTER_AUTO_POSITION=1;"
mysql: [Warning] Using a password on the command line interface can be insecure.
[root@mysql-node2 ~]# mysql -uroot -plee -e "start slave;"
mysql: [Warning] Using a password on the command line interface can be insecure.
[root@mysql-node2 ~]# mysql -uroot -plee -e "show slave status\G"
mysql: [Warning] Using a password on the command line interface can be insecure.
*************************** 1. row ***************************
               Slave_IO_State: Waiting for source to send event
                  Master_Host: 172.25.254.10
                  Master_User: lee
                  Master_Port: 3306
                Connect_Retry: 60
              Master_Log_File: mysql-bin.000003
          Read_Master_Log_Pos: 980
               Relay_Log_File: mysql-node2-relay-bin.000002
                Relay_Log_Pos: 1197
        Relay_Master_Log_File: mysql-bin.000003
             Slave_IO_Running: Yes
            Slave_SQL_Running: Yes
2、在所有主机安装相应软件(配置MHA-manager)
Manager 工具包主要包括以下几个工具:
- masterha_check_ssh # 检查MHA的SSH配置状况
- masterha_check_repl # 检查MySQL复制状况
- masterha_manger # 启动MHA
- masterha_check_status # 检测当前MHA运行状态
- masterha_master_monitor # 检测master是否宕机
- masterha_master_switch # 控制故障转移(自动或者手动)
- masterha_conf_host # 添加或删除配置的server信息
bash
[root@mha ~]# unzip MHA-7.zip
[root@mha ~]# ls
anaconda-ks.cfg  MHA-7  MHA-7.zip
[root@mha ~]# cd MHA-7/

# 安装perl环境
[root@mha MHA-7]# dnf install perl perl-DBD-MySQL perl-CPAN  -y

# 利用cpan在安装MHA的依赖
[root@mha MHA-7]# cpan
Would you like to configure as much as possible automatically? [yes] yes
cpan[1]> install Config::Tiny
cpan[2]> install Log::Dispatch
cpan[3]> install Mail::Sender
Specify defaults for Mail::Sender? (y/N) y
Default encoding of message bodies (N)one, (Q)uoted-printable, (B)ase64: n

cpan[4]> install Parallel::ForkManager
cpan[5]> exit

# 验证组建是否安装成功
[root@mha ~]# perl -MConfig::Tiny -e 'print "OK\n"'
OK
[root@mha ~]# perl -MLog::Dispatch -e 'print "OK\n"'
OK
[root@mha ~]# perl -MMail::Sender -e 'print "OK\n"'
Mail::Sender is deprecated and you should look to Email::Sender instead at -e line 0.
OK
[root@mha ~]# perl -MParallel::ForkManager -e 'print "OK\n"'
OK

# 在MHA主机中安装MHA管理工具
[root@mha MHA-7]# rpm -ivh mha4mysql-manager-0.58-0.el7.centos.noarch.rpm --nodeps
[root@mha MHA-7]# rpm -ivh mha4mysql-node-0.58-0.el7.centos.noarch.rpm --nodeps

# 在所有mysql节点
[root@mha node1]# rpm -ivh mha4mysql-node-0.58-0.el7.centos.noarch.rpm --nodeps
[root@mha node2]# rpm -ivh mha4mysql-node-0.58-0.el7.centos.noarch.rpm --nodeps
[root@mha node3]# rpm -ivh mha4mysql-node-0.58-0.el7.centos.noarch.rpm --nodeps
3、在slave中安装相对应的软件
bash
[root@mha MHA-7]# for i in 10 20 30
> do
> scp mha4mysql-node-0.58-0.el7.centos.noarch.rpm root@172.25.254.$i:/mnt
> ssh -l root 172.25.254.$i "rpm -ivh /mnt/mha4mysql-node-0.58-0.el7.centos.noarch.rpm --nodeps"
> done
Warning: Permanently added '172.25.254.10' (ED25519) to the list of known hosts.
mha4mysql-node-0.58-0.el7.centos.noarch.rpm     100%   35KB  14.5MB/s   00:00
Verifying...                          ########################################
准备中...                          ########################################
正在升级/安装...
mha4mysql-node-0.58-0.el7.centos      ########################################
Warning: Permanently added '172.25.254.20' (ED25519) to the list of known hosts.
mha4mysql-node-0.58-0.el7.centos.noarch.rpm     100%   35KB  13.9MB/s   00:00
Verifying...                          ########################################
准备中...                          ########################################
正在升级/安装...
mha4mysql-node-0.58-0.el7.centos      ########################################
Warning: Permanently added '172.25.254.30' (ED25519) to the list of known hosts.
mha4mysql-node-0.58-0.el7.centos.noarch.rpm     100%   35KB  16.8MB/s   00:00
Verifying...                          ########################################
准备中...                          ########################################
正在升级/安装...
mha4mysql-node-0.58-0.el7.centos      ########################################
4、修改MHA-Manager中的检查代码
bash
# 前面是序号
[root@mha MHA-7]# vim /usr/share/perl5/vendor_perl/MHA/NodeUtil.pm
199 #sub parse_mysql_major_version($) {
200 #  my $str = shift;
201 #  my $result = sprintf( '%03d%03d', $str =~ m/(\d+)/g );
202 #  return $result;
203 #}

sub parse_mysql_major_version($) {
  my $str = shift;
  my @nums = $str =~ m/(\d+)/g;
  my $result = sprintf( '%03d%03d', $nums[0]//0, $nums[1]//0);
  return $result;
}
5、为MHA建立远程登陆用户
bash
# 在master主机中,确认所有主机中都有lee用户并且有对应权限
mysql> create user root@'%' identified with mysql_native_password by 'lee';
Query OK, 0 rows affected (0.02 sec)

mysql> GRANT ALL ON *.* TO root@'%' ;
Query OK, 0 rows affected (0.01 sec)

# 没有lee用户的主机中
mysql> CREATE USER IF NOT EXISTS 'lee'@'%' IDENTIFIED WITH mysql_native_password BY 'lee';
Query OK, 0 rows affected (0.01 sec)

mysql> GRANT REPLICATION SLAVE, REPLICATION CLIENT, SUPER ON *.* TO 'lee'@'%';
Query OK, 0 rows affected, 1 warning (0.00 sec)

mysql> FLUSH PRIVILEGES;
Query OK, 0 rows affected (0.00 sec)

mysql> SHOW SLAVE STATUS\G
*************************** 1. row ***************************
               Slave_IO_State: Waiting for source to send event
                  Master_Host: 172.25.254.10
                  Master_User: lee
                  Master_Port: 3306
                Connect_Retry: 60
              Master_Log_File: mysql-bin.000004
          Read_Master_Log_Pos: 2828
               Relay_Log_File: mysql-node2-relay-bin.000009
                Relay_Log_Pos: 2376
        Relay_Master_Log_File: mysql-bin.000004
             Slave_IO_Running: Yes
            Slave_SQL_Running: No

# 如果显示主从关系没有,则需要重新手动操作
mysql> stop slave;
Query OK, 0 rows affected, 1 warning (0.00 sec)

mysql> SET GLOBAL sql_slave_skip_counter = 1;
Query OK, 0 rows affected, 2 warnings (0.00 sec)

mysql> start slave;
Query OK, 0 rows affected, 1 warning (0.03 sec)

mysql> SHOW SLAVE STATUS\G
*************************** 1. row ***************************
               Slave_IO_State: Waiting for source to send event
                  Master_Host: 172.25.254.10
                  Master_User: lee
                  Master_Port: 3306
                Connect_Retry: 60
              Master_Log_File: mysql-bin.000004
          Read_Master_Log_Pos: 2828
               Relay_Log_File: mysql-node2-relay-bin.000010
                Relay_Log_Pos: 462
        Relay_Master_Log_File: mysql-bin.000004
             Slave_IO_Running: Yes
            Slave_SQL_Running: Yes
6、生成MHA-manager的配置文件模板
bash
[root@mha MHA-7]# tar zxf mha4mysql-manager-0.58.tar.gz
[root@mha MHA-7]# cd mha4mysql-manager-0.58/
[root@mha mha4mysql-manager-0.58]# mkdir /etc/masterha/ -p
[root@mha mha4mysql-manager-0.58]# cat samples/conf/masterha_default.cnf samples/conf/app1.cnf  > /etc/masterha/app1.cnf
7、修改配置文件
bash
[root@mha mha4mysql-manager-0.58]# vim /etc/masterha/app1.cnf
[server default]
user=root
password=666
ssh_user=root
repl_user=lee
repl_password=lee
master_binlog_dir= /data/mysql
remote_workdir=/tmp
secondary_check_script= masterha_secondary_check -s 172.25.254.10 -s 172.25.254.2
ping_interval=3
# master_ip_failover_script= /script/masterha/master_ip_failover
# shutdown_script= /script/masterha/power_manager
# report_script= /script/masterha/send_report
# master_ip_online_change_script= /script/masterha/master_ip_online_change
[server default]
manager_workdir=/etc/masterha
manager_log=/etc/masterha/mha.log

[server1]
hostname=172.25.254.10
candidate_master=1
check_repl_delay=0

[server2]
hostname=172.25.254.20
candidate_master=1
check_repl_delay=0

[server3]
hostname=172.25.254.30
no_master=1
8、检测环境
bash
# 检测环境成功
[root@mha mha4mysql-manager-0.58]# masterha_check_ssh  --conf=/etc/masterha/app1.cnf
Fri Feb 27 16:36:17 2026 - [warning] Global configuration file /etc/masterha_default.cnf not found. Skipping.
Fri Feb 27 16:36:17 2026 - [info] Reading application default configuration from /etc/masterha/app1.cnf..
Fri Feb 27 16:36:17 2026 - [info] Reading server configuration from /etc/masterha/app1.cnf..
Fri Feb 27 16:36:17 2026 - [info] Starting SSH connection tests..
Fri Feb 27 16:36:18 2026 - [debug]
Fri Feb 27 16:36:17 2026 - [debug]  Connecting via SSH from root@172.25.254.10(172.25.254.10:22) to root@172.25.254.20(172.25.254.20:22)..
Fri Feb 27 16:36:18 2026 - [debug]   ok.
Fri Feb 27 16:36:18 2026 - [debug]  Connecting via SSH from root@172.25.254.10(172.25.254.10:22) to root@172.25.254.30(172.25.254.30:22)..
Fri Feb 27 16:36:18 2026 - [debug]   ok.
Fri Feb 27 16:36:19 2026 - [debug]
Fri Feb 27 16:36:18 2026 - [debug]  Connecting via SSH from root@172.25.254.20(172.25.254.20:22) to root@172.25.254.10(172.25.254.10:22)..
Warning: Permanently added '172.25.254.10' (ED25519) to the list of known hosts.
Fri Feb 27 16:36:18 2026 - [debug]   ok.
Fri Feb 27 16:36:18 2026 - [debug]  Connecting via SSH from root@172.25.254.20(172.25.254.20:22) to root@172.25.254.30(172.25.254.30:22)..
Warning: Permanently added '172.25.254.30' (ED25519) to the list of known hosts.
Fri Feb 27 16:36:19 2026 - [debug]   ok.
Fri Feb 27 16:36:20 2026 - [debug]
Fri Feb 27 16:36:18 2026 - [debug]  Connecting via SSH from root@172.25.254.30(172.25.254.30:22) to root@172.25.254.10(172.25.254.10:22)..
Warning: Permanently added '172.25.254.10' (ED25519) to the list of known hosts.
Fri Feb 27 16:36:19 2026 - [debug]   ok.
Fri Feb 27 16:36:19 2026 - [debug]  Connecting via SSH from root@172.25.254.30(172.25.254.30:22) to root@172.25.254.20(172.25.254.20:22)..
Warning: Permanently added '172.25.254.20' (ED25519) to the list of known hosts.
Fri Feb 27 16:36:19 2026 - [debug]   ok.
Fri Feb 27 16:36:20 2026 - [info] All SSH connection tests passed successfully.
Use of uninitialized value in exit at /usr/bin/masterha_check_ssh line 44.
六、集群切换操作
MHA 的故障切换过程
共包括以下的步骤:
1、配置文件检查阶段,这个阶段会检查整个集群配置文件配置
2、宕机的 master 处理,这个阶段包括虚拟 ip 摘除操作,主机关机操作
3、复制 dead master 和最新 slave 相差的 relay log,并保存到 MHA Manger 具体的目录下
4、识别含有最新更新的 slave
5、应用从 master 保存的二进制日志事件(binlog events)
6、提升一个 slave 为新的 master 进行复制
7、使其他的 slave 连接新的 master 进行复制
1、手动切换
(1)master无故障切换
bash
# 查看slave(node2,3)默认状态
[root@mysql-node2 ~]# mysql -uroot -plee -e "show slave status\G;" | head -n 15
mysql: [Warning] Using a password on the command line interface can be insecure.
*************************** 1. row ***************************
               Slave_IO_State: Waiting for source to send event
                  Master_Host: 172.25.254.10
                  Master_User: lee
                  Master_Port: 3306
                Connect_Retry: 60
              Master_Log_File: mysql-bin.000003
          Read_Master_Log_Pos: 1480
               Relay_Log_File: mysql-node2-relay-bin.000002
                Relay_Log_Pos: 1697
        Relay_Master_Log_File: mysql-bin.000003
             Slave_IO_Running: Yes
            Slave_SQL_Running: Yes
              Replicate_Do_DB:
          Replicate_Ignore_DB:

[root@mysql-node3 ~]# mysql -uroot -plee -e "show slave status\G;" | head -n 15
mysql: [Warning] Using a password on the command line interface can be insecure.
*************************** 1. row ***************************
               Slave_IO_State: Waiting for source to send event
                  Master_Host: 172.25.254.10
                  Master_User: lee
                  Master_Port: 3306
                Connect_Retry: 60
              Master_Log_File: mysql-bin.000003
          Read_Master_Log_Pos: 1480
               Relay_Log_File: mysql-node3-relay-bin.000002
                Relay_Log_Pos: 1697
        Relay_Master_Log_File: mysql-bin.000003
             Slave_IO_Running: Yes
            Slave_SQL_Running: Yes
              Replicate_Do_DB:
          Replicate_Ignore_DB:

# 执行切换,把master切换到20,在MHA主机中
[root@mha ~]# masterha_master_switch \
> --conf=/etc/masterha/app1.cnf \
> --master_state=alive \
> --new_master_host=172.25.254.20 \
> --new_master_port=3306 \
> --orig_master_is_new_slave \
> --running_updates_limit=10000

# 查看集群状态,进行验证(在node1,3验证):
[root@mysql-node1 ~]# mysql -uroot -plee -e "show slave status\G;" | head -n 15
mysql: [Warning] Using a password on the command line interface can be insecure.
*************************** 1. row ***************************
               Slave_IO_State: Waiting for source to send event
                  Master_Host: 172.25.254.20
                  Master_User: lee
                  Master_Port: 3306
                Connect_Retry: 60
              Master_Log_File: mysql-bin.000003
          Read_Master_Log_Pos: 1834
               Relay_Log_File: mysql-node1-relay-bin.000002
                Relay_Log_Pos: 741
        Relay_Master_Log_File: mysql-bin.000003
             Slave_IO_Running: Yes
            Slave_SQL_Running: Yes
              Replicate_Do_DB:
          Replicate_Ignore_DB:

[root@mysql-node3 ~]# mysql -uroot -plee -e "show slave status\G;" | head -n 15
mysql: [Warning] Using a password on the command line interface can be insecure.
*************************** 1. row ***************************
               Slave_IO_State: Waiting for source to send event
                  Master_Host: 172.25.254.20
                  Master_User: lee
                  Master_Port: 3306
                Connect_Retry: 60
              Master_Log_File: mysql-bin.000003
          Read_Master_Log_Pos: 1834
               Relay_Log_File: mysql-node3-relay-bin.000002
                Relay_Log_Pos: 741
        Relay_Master_Log_File: mysql-bin.000003
             Slave_IO_Running: Yes
            Slave_SQL_Running: Yes
              Replicate_Do_DB:
          Replicate_Ignore_DB:
(2)master故障切换
bash
# 首先模拟node1故障
[root@mysql-node1 ~]# /etc/init.d/mysqld stop
Shutting down MySQL......... SUCCESS!

# 在MHA主机做故障切换,--ignore_last_failover 表示忽略在/etc/masterha/目录中在切换过程中生成的锁文件
[root@mha ~]# masterha_master_switch --master_state=dead --conf=/etc/masterha/app1.cnf --dead_master_host=172.25.254.10 --dead_master_port=3306 --new_master_host=172.25.254.20 --new_master_port=3306 --ignore_last_failover

# 查看切换集群状态(在node3)
[root@mysql-node3 ~]# mysql -uroot -plee -e "show slave status\G;" | head -n 15
mysql: [Warning] Using a password on the command line interface can be insecure.
*************************** 1. row ***************************
               Slave_IO_State: Waiting for source to send event
                  Master_Host: 172.25.254.20
                  Master_User: lee
                  Master_Port: 3306
                Connect_Retry: 60
              Master_Log_File: mysql-bin.000003
          Read_Master_Log_Pos: 1834
               Relay_Log_File: mysql-node3-relay-bin.000002
                Relay_Log_Pos: 422
        Relay_Master_Log_File: mysql-bin.000003
             Slave_IO_Running: Yes
            Slave_SQL_Running: Yes
              Replicate_Do_DB:
          Replicate_Ignore_DB:

# 将故障恢复,恢复一主两从(此时因为前面的故障,master为172.25.254.20)
# 当出现故障切换后,mha主机中会出现切换锁文件,当文件存在后不能再次执行切换
[root@mha ~]# ls /etc/masterha
app1.cnf  app1.failover.complete # 这个是锁文件

# 清除锁文件并重置slave
[root@mha ~]# rm -rf /etc/masterha/app1.failover.complete
[root@mysql-node2 ~]# mysql -uroot -plee -e "reset slave;"
mysql: [Warning] Using a password on the command line interface can be insecure.

[root@mysql-node1 ~]# /etc/init.d/mysqld start
Starting MySQL. SUCCESS!
[root@mysql-node1 ~]# mysql -uroot -plee -e "change master to master_host='172.25.254.20',master_user='lee',master_password='lee',master_auto_position=1"
mysql: [Warning] Using a password on the command line interface can be insecure.
[root@mysql-node1 ~]# mysql -uroot -plee -e "start slave"
mysql: [Warning] Using a password on the command line interface can be insecure.
[root@mysql-node1 ~]# mysql -uroot -plee -e "show slave status\G"
mysql: [Warning] Using a password on the command line interface can be insecure.
*************************** 1. row ***************************
               Slave_IO_State: Waiting for source to send event
                  Master_Host: 172.25.254.20
                  Master_User: lee
                  Master_Port: 3306
                Connect_Retry: 60
              Master_Log_File: mysql-bin.000003
          Read_Master_Log_Pos: 1834
               Relay_Log_File: mysql-node1-relay-bin.000002
                Relay_Log_Pos: 422
        Relay_Master_Log_File: mysql-bin.000003
             Slave_IO_Running: Yes
            Slave_SQL_Running: Yes

# 修复故障后手动进行将,node1变为master
[root@mha ~]# masterha_master_switch --conf=/etc/masterha/app1.cnf --master_state=alive --new_master_host=172.25.254.10 --new_master_port=3306 --orig_master_is_new_slave --running_updates_limit=10000

# 查看集群状态是否把master切换为10
[root@mysql-node2 ~]# mysql -uroot -plee -e "show slave status\G;" | head -n 15
mysql: [Warning] Using a password on the command line interface can be insecure.
*************************** 1. row ***************************
               Slave_IO_State: Waiting for source to send event
                  Master_Host: 172.25.254.10
                  Master_User: lee
                  Master_Port: 3306
                Connect_Retry: 60
              Master_Log_File: mysql-bin.000005
          Read_Master_Log_Pos: 238
               Relay_Log_File: mysql-node2-relay-bin.000002
                Relay_Log_Pos: 375
        Relay_Master_Log_File: mysql-bin.000005
             Slave_IO_Running: Yes
            Slave_SQL_Running: Yes
              Replicate_Do_DB:
          Replicate_Ignore_DB:

[root@mysql-node3 ~]# mysql -uroot -plee -e "show slave status\G;" | head -n 15
mysql: [Warning] Using a password on the command line interface can be insecure.
*************************** 1. row ***************************
               Slave_IO_State: Waiting for source to send event
                  Master_Host: 172.25.254.10
                  Master_User: lee
                  Master_Port: 3306
                Connect_Retry: 60
              Master_Log_File: mysql-bin.000005
          Read_Master_Log_Pos: 238
               Relay_Log_File: mysql-node3-relay-bin.000002
                Relay_Log_Pos: 375
        Relay_Master_Log_File: mysql-bin.000005
             Slave_IO_Running: Yes
            Slave_SQL_Running: Yes
              Replicate_Do_DB:
          Replicate_Ignore_DB:
2、自动切换
bash
# 首先进行检测一主两从是否ok的
[root@mha ~]# masterha_check_repl --conf=/etc/masterha/app1.cnf
MySQL Replication Health is OK.

# 为了方便观察建议开启两个shell
[root@mha ~]#  > /etc/masterha/mha.log
[root@mha ~]# watch -n 1 cat /etc/masterha/mha.log

# 开启自动切换功能
[root@mha ~]# masterha_manager --conf=/etc/masterha/app1.cnf  &

# 确保是在运行中
[root@mha ~]# jobs
[1]+  运行中               masterha_manager --conf=/etc/masterha/app1.cnf &

# 模拟故障
[root@mysql-node1 ~]# /etc/init.d/mysqld stop
Shutting down MySQL......... SUCCESS!

# 之后查看日志是否成功切换,这里显示成功切换
[root@mha masterha]# cat /etc/masterha/mha.log
app1: MySQL Master failover 172.25.254.10(172.25.254.10:3306) to 172.25.254.20(172.25.254.20:3306)

Master 172.25.254.10(172.25.254.10:3306) is down!

# 检测node3,集群的状态master是否切换到20
[root@mysql-node3 ~]# mysql -uroot -plee -e "show slave status\G;" | head -n 15
mysql: [Warning] Using a password on the command line interface can be insecure.
*************************** 1. row ***************************
               Slave_IO_State: Waiting for source to send event
                  Master_Host: 172.25.254.20
                  Master_User: lee
                  Master_Port: 3306
                Connect_Retry: 60
              Master_Log_File: mysql-bin.000003
          Read_Master_Log_Pos: 1834
               Relay_Log_File: mysql-node3-relay-bin.000002
                Relay_Log_Pos: 422
        Relay_Master_Log_File: mysql-bin.000003
             Slave_IO_Running: Yes
            Slave_SQL_Running: Yes
              Replicate_Do_DB:
          Replicate_Ignore_DB:

# 之后出现故障了,我们就需要去还原
[root@mysql-node1 ~]# /etc/init.d/mysqld start
Starting MySQL. SUCCESS!
[root@mysql-node1 ~]# mysql -uroot -plee -e "CHANGE MASTER TO MASTER_HOST='172.25.254.20', MASTER_USER='lee', MASTER_PASSWORD='lee', MASTER_AUTO_POSITION=1;"
[root@mysql-node1 ~]# mysql -uroot -plee -e "start slave;"
mysql: [Warning] Using a password on the command line interface can be insecure.
[root@mysql-node1 ~]# mysql -uroot -plee -e "show slave status\G;"
mysql: [Warning] Using a password on the command line interface can be insecure.
*************************** 1. row ***************************
               Slave_IO_State: Waiting for source to send event
                  Master_Host: 172.25.254.20
                  Master_User: lee
                  Master_Port: 3306
                Connect_Retry: 60
              Master_Log_File: mysql-bin.000003
          Read_Master_Log_Pos: 1834
               Relay_Log_File: mysql-node1-relay-bin.000002
                Relay_Log_Pos: 422
        Relay_Master_Log_File: mysql-bin.000003
             Slave_IO_Running: Yes
            Slave_SQL_Running: Yes

# 之后我们就又会在MHA里面发现一个锁,我们就需要去删除它
[root@mha masterha]# cd /etc/masterha/
[root@mha masterha]# ls
app1.cnf  app1.failover.complete  mha.log
[root@mha masterha]# rm -rf app1.failover.complete

# 因为node2目前是master,所以我们需要进行reset slave
[root@mysql-node2 ~]# mysql -uroot -plee -e "reset slave;"
mysql: [Warning] Using a password on the command line interface can be insecure.

# 之后再在MHA主机中把master手动切换为10(node1)
[root@mha masterha]# masterha_master_switch --conf=/etc/masterha/app1.cnf --master_state=alive --new_master_host=172.25.254.10 --new_master_port=3306 --orig_master_is_new_slave --running_updates_limit=10000

# 检测集群状态,看看是否切换成功
[root@mysql-node2 ~]# mysql -uroot -plee -e "show slave status\G;" | head -n 15
mysql: [Warning] Using a password on the command line interface can be insecure.
*************************** 1. row ***************************
               Slave_IO_State: Waiting for source to send event
                  Master_Host: 172.25.254.10
                  Master_User: lee
                  Master_Port: 3306
                Connect_Retry: 60
              Master_Log_File: mysql-bin.000013
          Read_Master_Log_Pos: 238
               Relay_Log_File: mysql-node2-relay-bin.000002
                Relay_Log_Pos: 375
        Relay_Master_Log_File: mysql-bin.000013
             Slave_IO_Running: Yes
            Slave_SQL_Running: Yes
              Replicate_Do_DB:
          Replicate_Ignore_DB:

[root@mysql-node3 ~]# mysql -uroot -plee -e "show slave status\G;" | head -n 15
mysql: [Warning] Using a password on the command line interface can be insecure.
*************************** 1. row ***************************
               Slave_IO_State: Waiting for source to send event
                  Master_Host: 172.25.254.10
                  Master_User: lee
                  Master_Port: 3306
                Connect_Retry: 60
              Master_Log_File: mysql-bin.000013
          Read_Master_Log_Pos: 238
               Relay_Log_File: mysql-node3-relay-bin.000002
                Relay_Log_Pos: 375
        Relay_Master_Log_File: mysql-bin.000013
             Slave_IO_Running: Yes
            Slave_SQL_Running: Yes
              Replicate_Do_DB:
          Replicate_Ignore_DB:
七、VIP功能及VIP的启动切换
bash
[root@mha ~]# unzip MHA-7.zip
[root@mha ~]# ll MHA-7/master_ip_*
-rw-r--r-- 1 root root 2156  1月 14  2021 MHA-7/master_ip_failover
-rw-r--r-- 1 root root 3813  1月 14  2021 MHA-7/master_ip_online_change
[root@mha ~]# mkdir /etc/masterha/scripts
[root@mha ~]# cp MHA-7/master_ip_* /etc/masterha/scripts/
[root@mha ~]# vim /etc/masterha/app1.cnf
master_ip_failover_script= /etc/masterha/scripts/master_ip_failover
# shutdown_script= /script/masterha/power_manager
# report_script= /script/masterha/send_report
master_ip_online_change_script= /etc/masterha/scripts/master_ip_online_change

[root@mha ~]# vim /etc/masterha/scripts/master_ip_failover
my $vip = '172.25.254..100/24';

[root@mha ~]# vim /etc/masterha/scripts/master_ip_online_change
my $vip = '172.25.254.100/24';

[root@mha ~]# chmod +x /etc/masterha/scripts/master_ip_failover

# 先检测一主两从是否ok
[root@mha ~]# masterha_check_repl --conf=/etc/masterha/app1.cnf
MySQL Replication Health is OK.
[root@mysql-node1 ~]# ip a a 172.25.254.100/24 dev eth0

# 之后进行测试
[root@mha ~]# masterha_manager  --conf=/etc/masterha/app1.cnf &

# 关闭mysql的master
[root@mysql-node1 ~]# /etc/init.d/mysqld stop
Shutting down MySQL.......... SUCCESS!

# 验证
[root@mysql-node2 ~]# ip a
1: lo: <LOOPBACK,UP,LOWER_UP> mtu 65536 qdisc noqueue state UNKNOWN group default qlen 1000
    link/loopback 00:00:00:00:00:00 brd 00:00:00:00:00:00
    inet 127.0.0.1/8 scope host lo
       valid_lft forever preferred_lft forever
    inet6 ::1/128 scope host
       valid_lft forever preferred_lft forever
2: eth0: <BROADCAST,MULTICAST,UP,LOWER_UP> mtu 1500 qdisc mq state UP group default qlen 1000
    link/ether 00:0c:29:e3:6c:ed brd ff:ff:ff:ff:ff:ff
    altname enp3s0
    altname ens160
    inet 172.25.254.20/24 brd 172.25.254.255 scope global noprefixroute eth0
       valid_lft forever preferred_lft forever
    inet 172.25.254.100/24 scope global secondary eth0
       valid_lft forever preferred_lft forever
    inet6 fe80::466e:fe26:7640:7ea3/64 scope link noprefixroute
       valid_lft forever preferred_lft forever

[root@mysql-node3 ~]# mysql -uroot -plee -e "show slave status\G;" | head -n 15
mysql: [Warning] Using a password on the command line interface can be insecure.
*************************** 1. row ***************************
               Slave_IO_State: Waiting for source to send event
                  Master_Host: 172.25.254.20
                  Master_User: lee
                  Master_Port: 3306
                Connect_Retry: 60
              Master_Log_File: mysql-bin.000003
          Read_Master_Log_Pos: 1834
               Relay_Log_File: mysql-node3-relay-bin.000002
                Relay_Log_Pos: 422
        Relay_Master_Log_File: mysql-bin.000003
             Slave_IO_Running: Yes
            Slave_SQL_Running: Yes
              Replicate_Do_DB:
          Replicate_Ignore_DB:
八、MySQL组复制(MGA)
1、还原MySQL所有节点
bash
# 利用ansible还原所有节点
[root@mha ~]# cd /etc/yum.repos.d/
[root@mha yum.repos.d]# ls
redhat.repo  rhel.repo  software.repo
[root@mha yum.repos.d]# cat > /etc/yum.repos.d/epel.repo <<EOF
> [epel]
> name=epel
> baseurl = https://mirrors.aliyun.com/epel-archive/9.6/Everything/x86_64/
> gpgcheck = 0
> EOF
[root@mha yum.repos.d]# dnf search ansible
正在更新 Subscription Management 软件仓库。
无法读取客户身份

本系统尚未在权利服务器中注册。可使用 "rhc" 或 "subscription-manager" 进行注册。

epel                                   67% [=========================-            ] 1.1 MB/s |  13 MB     00:05 ETA
[root@mha yum.repos.d]# dnf install ansible

# 查看是否安装成功
[root@mha yum.repos.d]# ansible --version
ansible [core 2.14.18]
  config file = /etc/ansible/ansible.cfg
  configured module search path = ['/root/.ansible/plugins/modules', '/usr/share/ansible/plugins/modules']
  ansible python module location = /usr/lib/python3.9/site-packages/ansible
  ansible collection location = /root/.ansible/collections:/usr/share/ansible/collections
  executable location = /usr/bin/ansible
  python version = 3.9.21 (main, Feb 10 2025, 00:00:00) [GCC 11.5.0 20240719 (Red Hat 11.5.0-5)] (/usr/bin/python3)
  jinja version = 3.1.2
  libyaml = True

# 建立用户,设定密码
[root@mha ~]# useradd devops
[root@mha ~]# echo lee | passwd --stdin devops
更改用户 devops 的密码 。
passwd:所有的身份验证令牌已经成功更新。

[root@mha ~]# su - devops
[devops@mha ~]$ mkdir ansible

[devops@mha ansible]$ cat >ansible.cfg <<EOF
[defaults]
inventory=./inventory
remote_user=root
host_key_checking=false
[privilege_escalation]
become=False
EOF

[devops@mha ansible]$ vim inventory
[mysql]
172.25.254.10
172.25.254.20
172.25.254.30

# 在远程主机建立我们要连接的devops用户,并且查看是否建立成功(都是一次性操作三台主机10,20,30)
[devops@mha ansible]$ ansible mysql -m user -a 'name=devops'
[devops@mha ansible]$ ansible mysql -m shell -a 'id devops'
172.25.254.20 | CHANGED | rc=0 >>
用户id=1000(devops) 组id=1000(devops) 组=1000(devops)
172.25.254.30 | CHANGED | rc=0 >>
用户id=1000(devops) 组id=1000(devops) 组=1000(devops)
172.25.254.10 | CHANGED | rc=0 >>
用户id=1000(devops) 组id=1000(devops) 组=1000(devops)

# 设定devops的密码(也是同时进行三台主机同时更改)
[devops@mha ansible]$ ansible mysql -m shell -a 'echo devops | passwd --stdin devops'
172.25.254.30 | CHANGED | rc=0 >>
更改用户 devops 的密码 。
passwd:所有的身份验证令牌已经成功更新。
172.25.254.20 | CHANGED | rc=0 >>
更改用户 devops 的密码 。
passwd:所有的身份验证令牌已经成功更新。
172.25.254.10 | CHANGED | rc=0 >>
更改用户 devops 的密码 。
passwd:所有的身份验证令牌已经成功更新。

# 统一授权(下放权力)
[devops@mha ansible]$ ansible mysql -m shell -a 'echo "devops ALL=(ALL) NOPASSWD:ALL" >> /etc/sudoers'
172.25.254.30 | CHANGED | rc=0 >>

172.25.254.20 | CHANGED | rc=0 >>

172.25.254.10 | CHANGED | rc=0 >>

# 在远程主机建立目录,实现免密登录
[devops@mha ansible]$ ansible all -m file -a 'path=/home/devops/.ssh owner=devops group=devops mode="0700" state=directory'

# 把文件拷贝过去
[devops@mha ansible]$ ansible all -m copy -a 'src=/home/devops/.ssh/authorized_keys dest=/home/devops/.ssh/authorized_keys owner=devops group=devops mode='0600''

[devops@mha ansible]$ vim ansible.cfg
[defaults]
inventory=./inventory
remote_user=devops
host_key_checking=false

[privilege_escalation]
become=True
become_ask_pass=False
become_method=sudo
become_user=root

# 测试:
[devops@mha ansible]$ ansible all -m shell -a 'whoami'
172.25.254.30 | CHANGED | rc=0 >>
root
172.25.254.20 | CHANGED | rc=0 >>
root
172.25.254.10 | CHANGED | rc=0 >>
root

[devops@mha ansible]$ vim clear_mysql.yml
- name: reset mysql
  hosts: mysql
  tasks:
  - name: stop mysql
    shell: '/etc/init.d/mysqld stop'
    ignore_errors: yes

  - name: delete mysql data
    file:
      path: /data/mysql
      state: absent

  - name: crate data directroy
    file:
      path: /data/mysql
      state: directory
      owner: mysql
      group: mysql

  - name: initialize mysql
    shell: '/usr/local/mysql/bin/mysqld --initialize --user=mysql'

# 在前面步骤的基础下,我们可以执行下面命令进行还原所有MySQL节点
[devops@mha ansible]$ ansible-playbook  clear_mysql.yml  -vv | grep password
2、手动还原方式
bash
# 所以节点初始化数据
[root@mysql-node1 ~]# /etc/init.d/mysqld stop
[root@mysql-node1 ~]# rm -rf /data/mysql/*
[root@mysql-node1 ~]# vim /etc/my.cnf
[mysqld]
datadir=/data/mysql
socket=/data/mysql/mysql.sock
symbolic-links=0
server-id=10/20/30 # 按照在不同主机中(node1,2,3)设置不同,注意区分
log-bin=mysql-bin
gtid_mode=ON
enforce-gtid-consistency=ON

default_authentication_plugin=mysql_native_password
log_slave_updates=ON
binlog_format=ROW
binlog_checksum=NONE
disabled_storage_engines="MyISAM,BLACKHOLE,FEDERATED,ARCHIVE,MEMORY"

# 开始初始化(所有节点,node1,2,3)
[root@mysql-node1 ~]# mysqld --user=mysql --initialize
3、部署组复制
bash
# 设置所有mysql节点的解析,每个操作都需要在每个主机中实现
[root@mysql-node1 ~]# vim /etc/hosts
127.0.0.1   localhost localhost.localdomain localhost4 localhost4.localdomain4
::1         localhost localhost.localdomain localhost6 localhost6.localdomain6
172.25.254.10     mysql-node1
172.25.254.20     mysql-node2
172.25.254.30     mysql-node3

[root@mysql-node1 ~]# vim /etc/my.cnf
plugin_load_add='group_replication.so'
group_replication_group_name="aaaaaaaa-aaaa-aaaa-aaaa-aaaaaaaaaaaa"
group_replication_start_on_boot=off
group_replication_local_address="172.25.254.10:33061"  # 根据设置的主机进行更改ip(10,20,30)
group_replication_group_seeds="172.25.254.10:33061,172.25.254.20:33061,172.25.254.30:33061"
group_replication_bootstrap_group=off
group_replication_single_primary_mode=OFF

# 之后启动MySQL
[root@mysql-node1 ~]# /etc/init.d/mysqld start
Starting MySQL.Logging to '/data/mysql/mysql-node1.err'.
.. SUCCESS!
[root@mysql-node2 ~]# /etc/init.d/mysqld start
Starting MySQL.Logging to '/data/mysql/mysql-node2.err'.
. SUCCESS!
[root@mysql-node3 ~]# /etc/init.d/mysqld start
Starting MySQL.Logging to '/data/mysql/mysql-node3.err'.
. SUCCESS!

# 配置组复制-在首台主机中
[root@mysql-node1 ~]# mysql -uroot -pItrUtkxh%1fx

mysql> alter user root@localhost identified   by 'lee';
Query OK, 0 rows affected (0.00 sec)

mysql> SET SQL_LOG_BIN=0;
Query OK, 0 rows affected (0.00 sec)

mysql> CREATE USER rpl_user@'%' IDENTIFIED BY 'lee';
Query OK, 0 rows affected (0.01 sec)

mysql> GRANT REPLICATION SLAVE ON *.* TO rpl_user@'%';
Query OK, 0 rows affected (0.00 sec)

mysql> GRANT CONNECTION_ADMIN ON *.* TO rpl_user@'%';
Query OK, 0 rows affected (0.00 sec)

mysql> GRANT BACKUP_ADMIN ON *.* TO rpl_user@'%';
Query OK, 0 rows affected (0.00 sec)

mysql> GRANT GROUP_REPLICATION_STREAM ON *.* TO rpl_user@'%';
Query OK, 0 rows affected (0.00 sec)

mysql> FLUSH PRIVILEGES;
Query OK, 0 rows affected (0.00 sec)

mysql> SET SQL_LOG_BIN=1;
Query OK, 0 rows affected (0.00 sec)

mysql> CHANGE REPLICATION SOURCE TO SOURCE_USER='rpl_user', SOURCE_PASSWORD='lee' FOR CHANNEL 'group_replication_recovery';
Query OK, 0 rows affected, 2 warnings (0.01 sec)

# 查看组复制插件是否激活
mysql> SHOW PLUGINS;
+---------------------------------+----------+--------------------+----------------------+---------+
| Name                            | Status   | Type               | Library              | License |
+---------------------------------+----------+--------------------+----------------------+---------+
| group_replication               | ACTIVE   | GROUP REPLICATION  | group_replication.so | GPL     |
+---------------------------------+----------+--------------------+----------------------+---------+

mysql> SET GLOBAL group_replication_bootstrap_group=ON;
Query OK, 0 rows affected (0.00 sec)

mysql> START GROUP_REPLICATION USER='rpl_user', PASSWORD='lee'; # 出现此处报错可以初始化下master
Query OK, 0 rows affected (1.82 sec)

# 如果上面一条命令出现了报错则可以执行下面这一条命令
mysql> reset master

# 这里继续
mysql> SET GLOBAL group_replication_bootstrap_group=OFF;
Query OK, 0 rows affected (0.00 sec)

mysql> SELECT * FROM performance_schema.replication_group_members;
+---------------------------+--------------------------------------+-------------+-------------+--------------+-------------+----------------+----------------------------+
| CHANNEL_NAME              | MEMBER_ID                            | MEMBER_HOST | MEMBER_PORT | MEMBER_STATE | MEMBER_ROLE | MEMBER_VERSION | MEMBER_COMMUNICATION_STACK |
+---------------------------+--------------------------------------+-------------+-------------+--------------+-------------+----------------+----------------------------+
| group_replication_applier | 2df45e1f-1c49-11f1-ab97-000c29e36ced | mysql-node1 |        3306 | ONLINE       | PRIMARY     | 8.3.0          | XCom                       |
+---------------------------+--------------------------------------+-------------+-------------+--------------+-------------+----------------+----------------------------+
1 row in set (0.00 sec)

# 配置组复制在其余主机中(node2,3在下面)
[root@mysql-node2 ~]# /etc/init.d/mysqld start
[root@mysql-node2 ~]# mysql -uroot -ptqoULr44ui*l  # node3密码肯定就不是这个了
mysql> alter user root@localhost identified   by 'lee';
Query OK, 0 rows affected (0.00 sec)

mysql> SET SQL_LOG_BIN=0;
Query OK, 0 rows affected (0.00 sec)

mysql> CREATE USER rpl_user@'%' IDENTIFIED BY 'lee';
Query OK, 0 rows affected (0.00 sec)

mysql> GRANT REPLICATION SLAVE ON *.* TO rpl_user@'%';
Query OK, 0 rows affected (0.00 sec)

mysql> GRANT CONNECTION_ADMIN ON *.* TO rpl_user@'%';
Query OK, 0 rows affected (0.00 sec)

mysql> GRANT BACKUP_ADMIN ON *.* TO rpl_user@'%';
Query OK, 0 rows affected (0.01 sec)

mysql> GRANT GROUP_REPLICATION_STREAM ON *.* TO rpl_user@'%';
Query OK, 0 rows affected (0.00 sec)

mysql> SET SQL_LOG_BIN=1;
Query OK, 0 rows affected (0.00 sec)

mysql> CHANGE REPLICATION SOURCE TO SOURCE_USER='rpl_user',SOURCE_PASSWORD='lee' FOR CHANNEL 'group_replication_recovery';
Query OK, 0 rows affected, 2 warnings (0.01 sec)

mysql> START GROUP_REPLICATION USER='rpl_user', PASSWORD='lee';
ERROR 3092 (HY000): The server is not configured properly to be an active member of the group. Please see m                                         ore details on error log.
mysql> reset master;
Query OK, 0 rows affected, 1 warning (0.01 sec)

mysql> START GROUP_REPLICATION USER='rpl_user', PASSWORD='lee';
Query OK, 0 rows affected (5.44 sec)

mysql> SELECT * FROM performance_schema.replication_group_members;
+---------------------------+--------------------------------------+-------------+-------------+--------------+-------------+----------------+----------------------------+
| CHANNEL_NAME              | MEMBER_ID                            | MEMBER_HOST | MEMBER_PORT | MEMBER_STATE | MEMBER_ROLE | MEMBER_VERSION | MEMBER_COMMUNICATION_STACK |
+---------------------------+--------------------------------------+-------------+-------------+--------------+-------------+----------------+----------------------------+
| group_replication_applier | 07dc5f48-1c6f-11f1-94f6-000c29e36ced | mysql-node1 |        3306 | ONLINE       | PRIMARY     | 8.3.0          | XCom                       |
| group_replication_applier | 12736bc5-1c6f-11f1-82ac-000c29cd783c | mysql-node2 |        3306 | ONLINE   | PRIMARY     | 8.3.0          | XCom                       |
+---------------------------+--------------------------------------+-------------+-------------+--------------+-------------+----------------+----------------------------+
2 rows in set (0.00 sec)

# node3
mysql> alter user root@localhost identified   by 'lee';
Query OK, 0 rows affected (0.00 sec)

mysql> SET SQL_LOG_BIN=0;
Query OK, 0 rows affected (0.00 sec)

mysql> CREATE USER rpl_user@'%' IDENTIFIED BY 'lee';
Query OK, 0 rows affected (0.00 sec)

mysql> GRANT REPLICATION SLAVE ON *.* TO rpl_user@'%';
Query OK, 0 rows affected (0.00 sec)

mysql> GRANT CONNECTION_ADMIN ON *.* TO rpl_user@'%';
Query OK, 0 rows affected (0.01 sec)

mysql> GRANT BACKUP_ADMIN ON *.* TO rpl_user@'%';
Query OK, 0 rows affected (0.00 sec)

mysql> GRANT GROUP_REPLICATION_STREAM ON *.* TO rpl_user@'%';
Query OK, 0 rows affected (0.00 sec)

mysql> SET SQL_LOG_BIN=1;
Query OK, 0 rows affected (0.00 sec)

mysql> CHANGE REPLICATION SOURCE TO SOURCE_USER='rpl_user',SOURCE_PASSWORD='lee' FOR CHANNEL 'group_replication_reco                                             very';
Query OK, 0 rows affected, 2 warnings (0.01 sec)

mysql> START GROUP_REPLICATION USER='rpl_user', PASSWORD='lee';
ERROR 3092 (HY000): The server is not configured properly to be an active member of the group. Please see more detai                                             ls on error log.
mysql> reset master;
Query OK, 0 rows affected, 1 warning (0.01 sec)

mysql> START GROUP_REPLICATION USER='rpl_user', PASSWORD='lee';
Query OK, 0 rows affected (5.37 sec)

# 三台主机部署成功的效果
mysql> SELECT * FROM performance_schema.replication_group_members;
+---------------------------+--------------------------------------+-------------+-------------+--------------+-------------+----------------+----------------------------+
| CHANNEL_NAME              | MEMBER_ID                            | MEMBER_HOST | MEMBER_PORT | MEMBER_STATE | MEMBER_ROLE | MEMBER_VERSION | MEMBER_COMMUNICATION_STACK |
+---------------------------+--------------------------------------+-------------+-------------+--------------+-------------+----------------+----------------------------+
| group_replication_applier | 4f8fee1e-1c7a-11f1-a435-000c29e36ced | mysql-node1 |        3306 | ONLINE       | PRIMARY     | 8.3.0          | XCom                       |
| group_replication_applier | 522ef1a0-1c7a-11f1-be3b-000c293b6212 | mysql-node3 |        3306 | ONLINE       | PRIMARY     | 8.3.0          | XCom                       |
| group_replication_applier | 53914815-1c7a-11f1-971a-000c29cd783c | mysql-node2 |        3306 | ONLINE       | PRIMARY     | 8.3.0          | XCom                       |
+---------------------------+--------------------------------------+-------------+-------------+--------------+-------------+----------------+----------------------------+
3 rows in set (0.00 sec)

# 看到主机online表示成功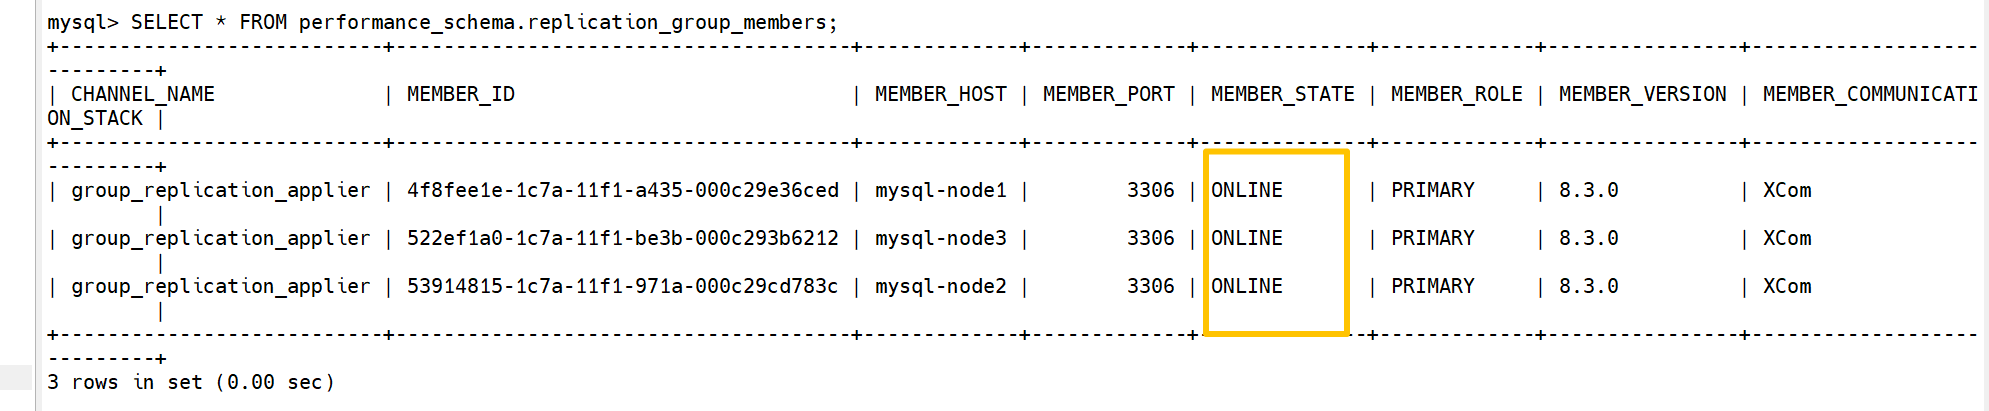
4、测试
bash
# 测试所有节点是否可以执行读写并数据是否同步
# 在node1中
mysql> create database timinglee;
Query OK, 1 row affected (0.01 sec)

mysql> create table timinglee.userlist (
    -> username VARCHAR(10) PRIMARY KEY NOT NULL,
    -> password VARCHAR(50) NOT NULL
    -> );
Query OK, 0 rows affected (0.01 sec)

mysql> INSERT INTO timinglee.userlist VALUES ('user1','111');
Query OK, 1 row affected (0.01 sec)

# 在node2中查看数据并插入新的数据
mysql> select * from timinglee.userlist;
+----------+----------+
| username | password |
+----------+----------+
| user1    | 111      |
+----------+----------+
1 row in set (0.00 sec)

mysql> insert into timinglee.userlist values ('user2','222');
Query OK, 1 row affected (0.01 sec)

mysql> select * from timinglee.userlist;
+----------+----------+
| username | password |
+----------+----------+
| user1    | 111      |
| user2    | 222      |
+----------+----------+
2 rows in set (0.01 sec)

# 在node3中查看并插入数据
mysql> select * from timinglee.userlist;
+----------+----------+
| username | password |
+----------+----------+
| user1    | 111      |
| user2    | 222      |
+----------+----------+
2 rows in set (0.00 sec)

mysql> insert into timinglee.userlist values ('user3','333');
Query OK, 1 row affected (0.01 sec)

mysql> select * from timinglee.userlist;
+----------+----------+
| username | password |
+----------+----------+
| user1    | 111      |
| user2    | 222      |
| user3    | 333      |
+----------+----------+
3 rows in set (0.00 sec)

# 在node1和2中也可以看到以上数据
九、MySQLrouter
MySQL Router
是一个对应用程序透明的 InnoDB Cluster 连接路由服务,提供负载均衡、应用连接故障转移和客户端路由。
利用路由器的连接路由特性,用户可以编写应用程序来连接到路由器,并令路由器使用相应的路由策略来处理连接,使其连接到正确的 MySQL 数据库服务
1、MySQLrouter软件下载
bash
# 可以将MHA更改为mysqlrouter
[root@mysqlrouter ~]# hostnamectl hostname mysqlrouter
[root@mysqlrouter ~]# wget https://downloads.mysql.com/archives/get/p/41/file/mysql-router-community-8.4.7-1.el9.x86_64.rpm
2、安装MySQLrouter
bash
[root@mysqlrouter ~]# dnf install mysql-router-community-8.4.7-1.el9.x86_64.rpm -y3、MySQLrouter配置文件
bash
[root@mysqlrouter ~]# rpm -qc mysql-router-community
/etc/logrotate.d/mysqlrouter       # 做日志轮询及日志截断策略
/etc/mysqlrouter/mysqlrouter.conf  # 主配置文件

# 启动脚本
[root@mysqlrouter ~]# systemctl status mysqlrouter.service
4、配置mysqlrouter
bash
# 配置文件
[root@mysqlrouter ~]# vim /etc/mysqlrouter/mysqlrouter.conf
[routing:ro]
bind_address = 0.0.0.0
bind_port = 7001
destinations = 172.25.254.10:3306,172.25.254.20:3306,172.25.254.30:3306
routing_strategy = round-robin

[routing:rw]
bind_address = 0.0.0.0
bind_port = 7002
destinations = 172.25.254.30:3306,172.25.254.20:3306,172.25.254.10:3306
routing_strategy = first-available

[root@mysqlrouter ~]# systemctl enable --now mysqlrouter.service
Created symlink /etc/systemd/system/multi-user.target.wants/mysqlrouter.service → /usr/lib/systemd/system/mysqlrouter.service.

[root@mysqlrouter ~]# netstat -antlupe | grep mysql
tcp        0      0 0.0.0.0:7002            0.0.0.0:*               LISTEN      991        311836     111343/mysqlrouter
tcp        0      0 0.0.0.0:7001            0.0.0.0:*               LISTEN      991        315485     111343/mysqlrouter
5、测试
bash
# 在mysql节点的任意主机中添加root远程登录,因为前面操作,所以会同步
[root@mysql-node1 ~]# mysql -uroot -plee
mysql: [Warning] Using a password on the command line interface can be insecure.
Welcome to the MySQL monitor.  Commands end with ; or \g.
Your MySQL connection id is 25
Server version: 8.3.0 Source distribution

Copyright (c) 2000, 2024, Oracle and/or its affiliates.

Oracle is a registered trademark of Oracle Corporation and/or its
affiliates. Other names may be trademarks of their respective
owners.

Type 'help;' or '\h' for help. Type '\c' to clear the current input statement.

mysql> create user root@'%' identified by 'lee';
Query OK, 0 rows affected (0.00 sec)

mysql> grant all on *.* to root@'%';
Query OK, 0 rows affected (0.00 sec)

# 可远程登录所有主机(10,20,30)
[root@mysql-node1 ~]# mysql -uroot -plee -h172.25.254.20
mysql: [Warning] Using a password on the command line interface can be insecure.
Welcome to the MySQL monitor.  Commands end with ; or \g.
Your MySQL connection id is 133
Server version: 8.3.0 Source distribution

Copyright (c) 2000, 2024, Oracle and/or its affiliates.

Oracle is a registered trademark of Oracle Corporation and/or its
affiliates. Other names may be trademarks of their respective
owners.

Type 'help;' or '\h' for help. Type '\c' to clear the current input statement.

mysql> exit
Bye
[root@mysql-node1 ~]# mysql -uroot -plee -h172.25.254.30
mysql: [Warning] Using a password on the command line interface can be insecure.
Welcome to the MySQL monitor.  Commands end with ; or \g.
Your MySQL connection id is 40
Server version: 8.3.0 Source distribution

Copyright (c) 2000, 2024, Oracle and/or its affiliates.

Oracle is a registered trademark of Oracle Corporation and/or its
affiliates. Other names may be trademarks of their respective
owners.

Type 'help;' or '\h' for help. Type '\c' to clear the current input statement.


# 查看调度效果(node1,2,3)
[root@mysql-node1 ~]# watch -n1 lsof -i :3306
COMMAND   PID  USER   FD   TYPE DEVICE SIZE/OFF NODE NAME
mysqld  90061 mysql   22u  IPv6 220818      0t0  TCP *:mysql (LISTEN)

[root@mysql-node2 ~]# watch -n1 lsof -i :3306
COMMAND    PID  USER   FD   TYPE DEVICE SIZE/OFF NODE NAME
mysqld  133949 mysql   23u  IPv6 331698      0t0  TCP *:mysql (LISTEN)

[root@mysql-node3 ~]# watch -n1 lsof -i :3306
COMMAND    PID  USER   FD   TYPE DEVICE SIZE/OFF NODE NAME
mysqld  113634 mysql   23u  IPv6 272481      0t0  TCP *:mysql (LISTEN)

# 测试效果
[root@mysql-node1 ~]# mysql -uroot -plee -h172.25.254.40 -P7002
mysql: [Warning] Using a password on the command line interface can be insecure.
Welcome to the MySQL monitor.  Commands end with ; or \g.
Your MySQL connection id is 41
Server version: 8.3.0 Source distribution

Copyright (c) 2000, 2024, Oracle and/or its affiliates.

Oracle is a registered trademark of Oracle Corporation and/or its
affiliates. Other names may be trademarks of their respective
owners.

Type 'help;' or '\h' for help. Type '\c' to clear the current input statement.

mysql>