文章目录
实现线程池
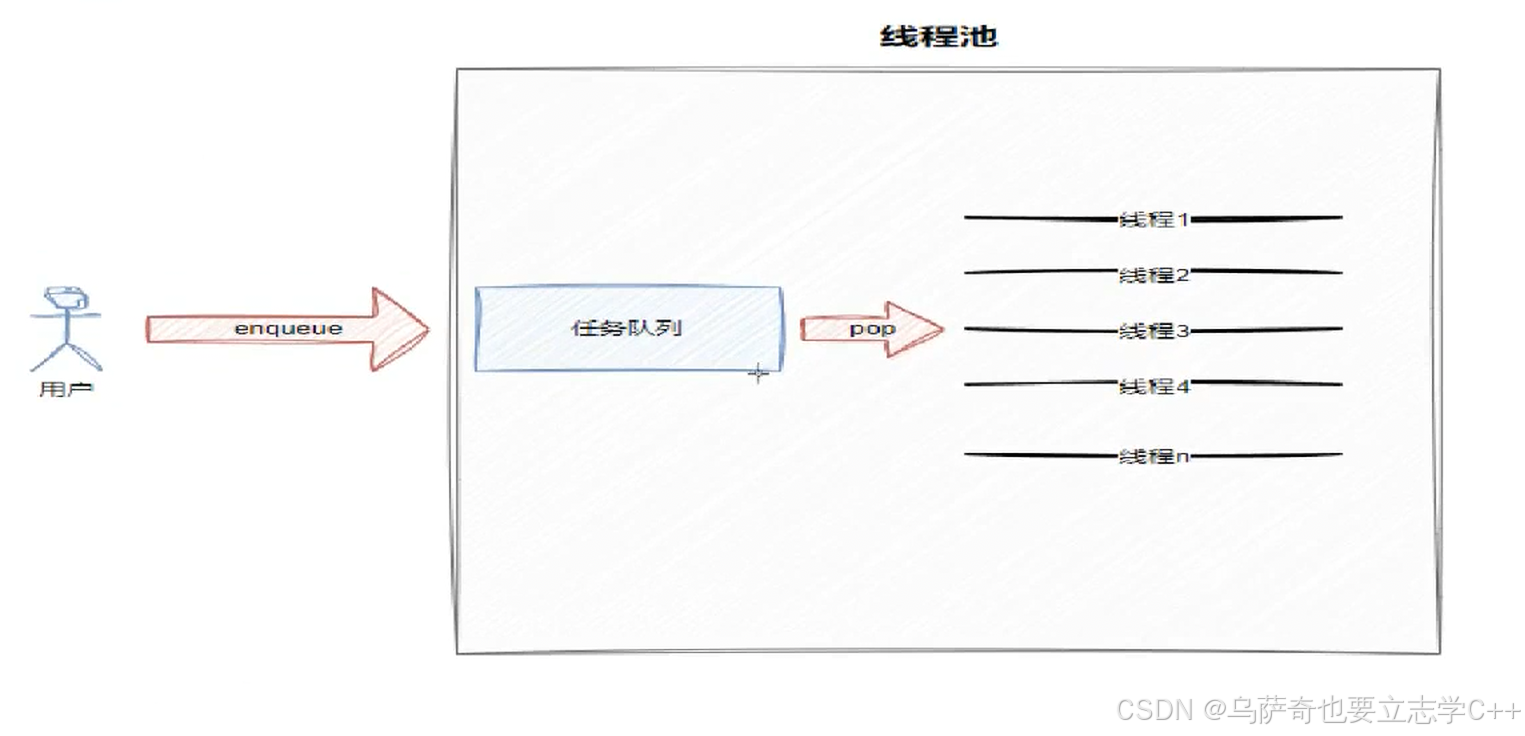
我们之前已经接触了进程池,其实线程池和进程池核心思路差不多,对于线程池来说,会有一个任务队列和若干线程,用户往任务队列里添加任务,若干线程在任务队列里拿任务并完成。
ThreadPool类设计
构造函数
对于线程来说,启动线程池分为两步:
1.先创建线程本身(Thread类对象)2.再启动线程(调用Thread的start接口)
所以在构造函数我们要先创建线程本身(thread t(回调函数,线程名)),创建线程需要传递回调函数(假设是hello)和线程名,但这里有一个问题,一般来说传递的回调函数是ThreadPool的类内成员函数,类内成员函数的参数默认是包含this指针的,而我们封装线程类Thread时故意将回调函数设计为无参无返回值void()(为了方便解耦),此时代码就会因为参数不匹配而报错,这里有两个解决办法一个是lambda表达式(匿名函数):
cpp
Thread t([this]() {
    this->hello();
    }, )
另一个办法是用包装器:
cpp
auto f = bind(hello, this);
Thread t(f, )
构造函数源码:
cpp
//ThreadPool
    ThreadPool(int threadnum = default_threadnum)
        : _is_running(false), _threadnum(threadnum)
    {
        for (int i = 0; i < _threadnum; i++)
        {
            // 方法一:
            //std::string name = "thread-" + std::to_string(i + 1);
            //  auto f = bind(hello, this);
            //  Thread t(f, name);

            // 方法二:
            // std::string name = "thread-" + std::to_string(i + 1);
            // Thread t([this]()
            //          { this->hello(); }, name);
            // _threads.push_back(std::move(t)); // move避免拷贝

            // 方法二的优化版本:
            std::string name = "thread-" + std::to_string(i + 1);
            _threads.emplace_back([this]()
                                  { this->hello(); }, name);
        }
    }
Start接口
构造函数创建线程完成后接下来就要启动线程:
cpp
//ThreadPool
    void Start()
    {
        // 防止线程池重复启动
        if (_is_running)
            return;
        _is_running = true;
        for(auto &t : _threads)
        {
            t.start();
        }
    }
Stop和Wait接口设计思路类似,小编就不赘述了。
线程池接入日志
线程池接入日志很简单,就是在Thread类中各种创建线程、启动线程、等待线程、回收线程的代码后输出日志即可。ThreadPool类同理。
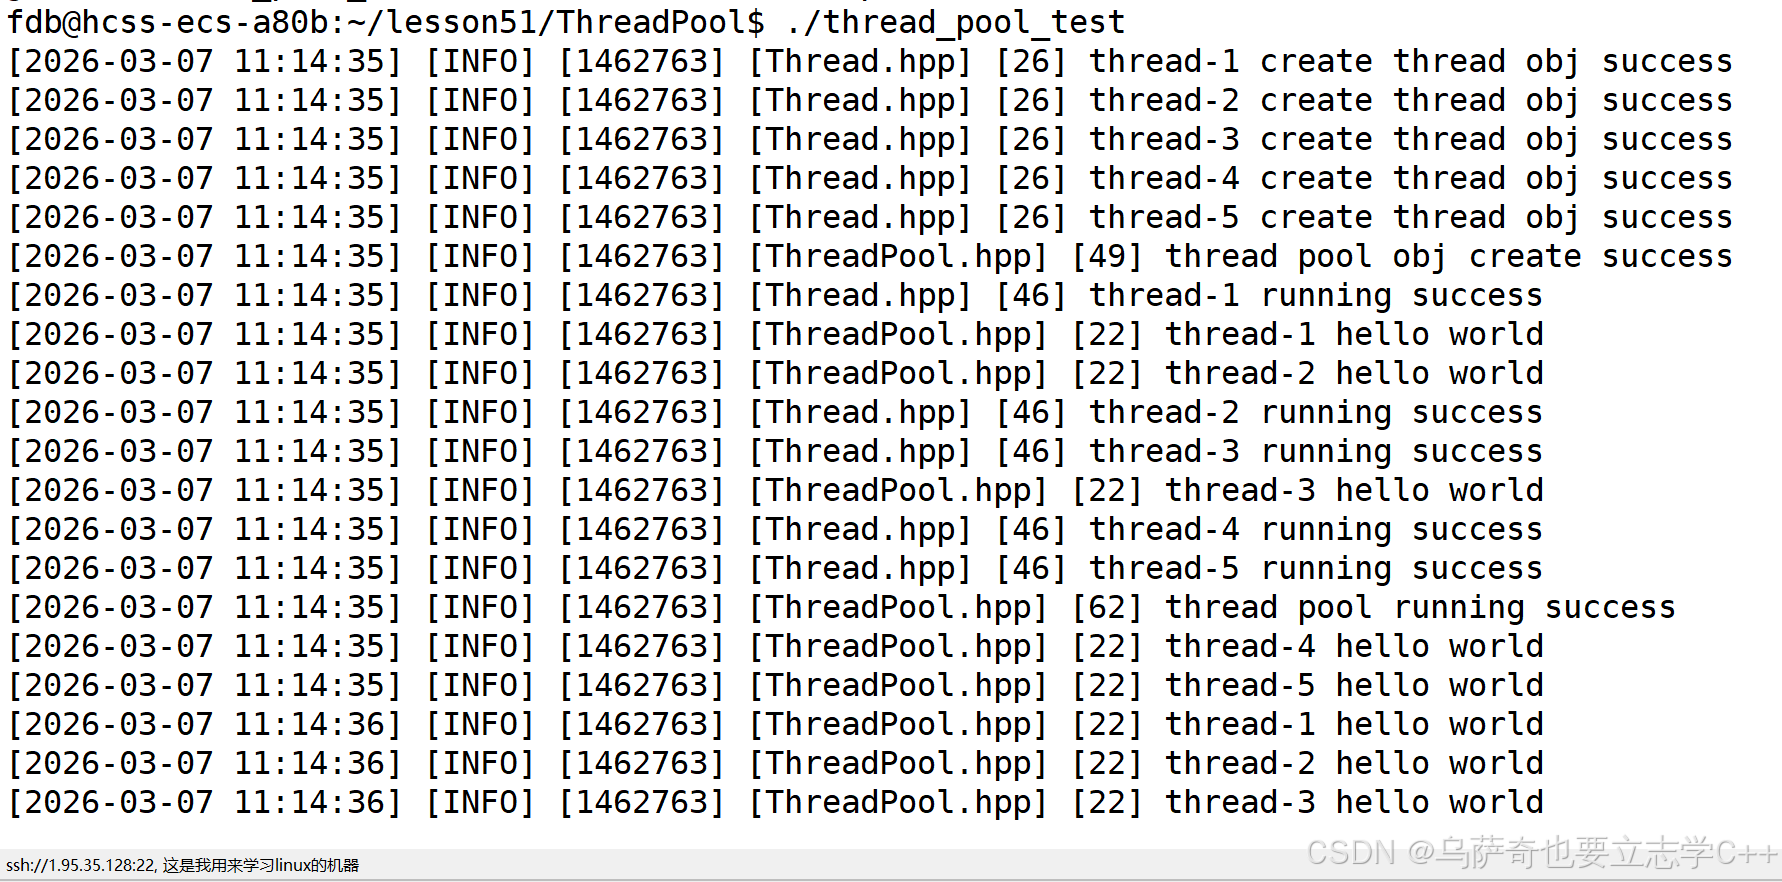
初步实现源码及效果图
cpp
//ThreadPool.hpp
#pragma once

#include <iostream>
#include <queue>
#include <vector>
#include <unistd.h>
#include "Thread.hpp"
#include "Mutex.hpp"
#include "Cond.hpp"

const static int default_threadnum = 3; // for debug

template <typename T>
class ThreadPool
{
private:
    // 创建线程时传递的回调函数
    void hello(const std::string &name) // for test
    {
        while (1)
        {
            LOG(LogLevel::INFO) << name << " hello world";
            sleep(1);
        }
    }

public:
    ThreadPool(int threadnum = default_threadnum)
        : _is_running(false), _threadnum(threadnum)
    {
        for (int i = 0; i < _threadnum; i++)
        {
            // 方法一:
            //std::string name = "thread-" + std::to_string(i + 1);
            //  auto f = bind(hello, this);
            //  Thread t(f, name);

            // 方法二:
            // std::string name = "thread-" + std::to_string(i + 1);
            // Thread t([this]()
            //          { this->hello(); }, name);
            // _threads.push_back(std::move(t)); // move避免拷贝

            // 方法二的优化版本:
            std::string name = "thread-" + std::to_string(i + 1);
            _threads.emplace_back([this](const std::string &name)
                                  { this->hello(name); }, name);
        }
        LOG(LogLevel::INFO) << "thread pool obj create success";
    }

    void Start()
    {
        // 防止线程池重复启动
        if (_is_running)
            return;
        _is_running = true;
        for(auto &t : _threads)
        {
            t.Start();
        }
        LOG(LogLevel::INFO) << "thread pool running success";
    }

    void Stop()
    {
        if (!_is_running)
            return;
        _is_running = false;
        for(auto &t : _threads)
        {
            t.Stop();
        }
        LOG(LogLevel::INFO) << "thread pool stop success";
    }

    void Wait()
    {
        for(auto &t : _threads)
        {
            t.Join();
        }
        LOG(LogLevel::INFO) << "thread pool wait success";
    }

    // 往任务队列里插入任务
    void Enqueue(const T &t)
    {
    }

    ~ThreadPool()
    {
    }

private:
    // 任务队列
    std::queue<T> _q; // 整体使用的临界资源

    // 多个线程
    std::vector<Thread> _threads; // 1.先创建线程本身(Thread类对象)2.再启动线程(调用Thread的start)
    int _threadnum;

    // 保护机制
    Mutex _mutex; // 锁
    Cond _cond;   // 条件变量

    // 其他属性
    bool _is_running;
};
cpp
main.cc
#include "ThreadPool.hpp"
#include <memory>

int main()
{
    //接入日志
    EnableConsoleLogStrategy();

    std::unique_ptr<ThreadPool<int>> tp = std::make_unique<ThreadPool<int>>(5);

    tp->Start();

    sleep(5);

    tp->Stop();

    tp->Wait();

    return 0;
}
总结代码执行逻辑
- ThreadPool 构造函数:仅创建 Thread 对象,无线程启动、无回调执行;
- 线程启动的核心:ThreadPool::Start() → Thread::Start() → pthread_create;
- 回调执行流程:pthread_create → pthread_routine → _func(lambda) → Routine;
步骤pthread_routine → _func(lambda)详细解释:
步骤 1:pthread_routine 拿到 Thread 对象指针(桥接的基础)
当你调用 Thread::Start() 时,pthread_create 的第四个参数传的是 this(当前 Thread 对象的指针):
cpp
// Thread::Start() 里的核心代码
pthread_create(&_tid, nullptr, pthread_routine, this);
// 第四个参数 this → 指向当前 Thread 对象 → 会被传给 pthread_routine 的 void* args
所以 pthread_routine 执行时,第一步是把 void* args 转回 Thread*:
cpp
static void *pthread_routine(void *args)
{
    // 关键:将无类型的 args 强转为 Thread 对象指针
    Thread *self = static_cast<Thread *>(args);
    // self 现在指向当前这个 Thread 对象,能访问它的所有成员(包括 _func、_name)
    ...
}
步骤 2:_func 的本质(lambda 是如何被存储的)
你在 ThreadPool 构造函数里传给 Thread 的 lambda:
cpp
_threads.emplace_back([this](const std::string &name)
                      { this->Routine(name); }, name);
底层发生的事:
lambda 被封装为 func_t:
func_t 是你定义的 std::function<void(const std::string &name)>,lambda 会被隐式转换成这个类型,存入 Thread 对象的 _func 成员;
这个 lambda 捕获了 ThreadPool 的 this 指针,所以能调用ThreadPool::Routine;
lambda 的参数是 const std::string &name,和 func_t 的签名完全匹配。
Thread 对象保存关键数据:
Thread 对象的 _func 成员现在指向这个 lambda,_name 成员保存了线程名(如 "thread-1")。
步骤 3:pthread_routine 调用 _func(执行 lambda)
这是最核心的一步,代码里的 self->_func(self->_name) 拆解如下:
cpp
static void *pthread_routine(void *args)
{
    Thread *self = static_cast<Thread *>(args);
    self->_isrunning = true;
    self->_lwpid = get_lwp_id();

    // 核心调用:self->_func 是存储的 lambda,self->_name 是线程名参数
    self->_func(self->_name);
    // ↑ 等价于执行:[this](const std::string &name) { this->Routine(name); }("thread-1")

    pthread_exit((void *)0);
}
调用链的完整展开:
pthread_routine →
self->_func(self->_name) → // 调用存储的 lambda,传入线程名
lambda 执行 →
this->Routine(name) → // lambda 里的 this 是 ThreadPool 的指针
ThreadPool::Routine("thread-1") // 最终执行你的业务逻辑
实现回调函数Routine
我们上面的回调函数hello只是为了测试,真正的回调函数是需要从任务队列中拿任务并消费。
因为要访问临界资源,所以这段代码需要加锁,但是注意,拿到任务后消费(执行)任务是不需要加锁的。
cpp
    void Routine(const std::string &name)
    {
        while (1)
        {
            T t; // "拿碗"
            {
                //这个临界区本质:把临界资源获取到线程私有(临界区->线程栈)
                // "打饭"
                LockGuard lockguard(&_lock);
                //队列为空,让线程在指定条件变量下等待
                while(QueueIsEmpty())
                {
                    _cond.Wait(_lock);
                }
                //走到这里队列一定不为空了!
                T t = _q.front();
                _q.pop();
            }
            t(); // "吃饭"
        }
    }
enqueue接口实现
当用户往队列中放任务后就需要唤醒一个线程去消费任务,所以我们还需要添加一个成员变量_wait_thread_num表示正在休眠的线程数量。
cpp
    void Enqueue(const T &t)
    {
        {
            LockGuard lockguard(&_lock);
            _q.push(t);
            if(_wait_thread_num > 0)
            {
                //唤醒一个线程去消费任务
                _cond.NotifyOne();
            }
        }
    }
线程池退出stop接口优化
上面我们实现的线程池退出逻辑非常简单粗暴,直接将所有线程都退出,但是实际生产中当我们调用stop让线程池退出时,线程可能正在休眠或者还在消费任务,直接打断所有线程让它们退出显然不合理,所以我们要做一下优化,我们先分析,线程退出时有下面三种可能的情况:
1、如果被唤醒 && 任务队列没有任务 = 让线程退出
2、如果被唤醒 && 任务队列有任务 = 线程不能立即退出,而应该让线程把任务处理完,再退出
3、线程本身没有被休眠,我们应该让他把他能处理的任务全部处理完成, 再退出
情况2、3最终都会转化为情况1,所以我们在stop接口只用修改_is_running状态标志位并且把所有线程唤醒就好:
有的读者可能会稳为什么线程池退出要唤醒所有线程?
因为当调用Stop()时,_is_running被设为false,但此时可能有多个线程正卡在_cond.Wait(_lock)处休眠 ------ 这些休眠的线程根本不知道_is_running已经变了,会一直卡在Wait里,永远无法执行后续的退出判断,所以必须唤醒所有休眠线程,让休眠线程从Wait中醒来,执行退出逻辑。
cpp
    void Stop()
    {
        //优化版本
        if (!_is_running)
            return;
        _is_running = false;
        if(_wait_thread_num)
        {
            //有休眠的线程,将其唤醒
                 _cond.NotifyAll();
        }
    }
其他操作在routine里实现:
cpp
void Routine(const std::string &name)
    {
        while (1)
        {
            T t; // "拿碗"
            {
                //这个临界区本质:把临界资源获取到线程私有(临界区->线程栈)
                // "打饭"
                LockGuard lockguard(&_lock);
                //队列为空,让线程在指定条件变量下等待
                while(QueueIsEmpty() && _is_running)
                {
                    //队列为空&&线程池是运行状态线程才会休眠
                    _wait_thread_num++;
                    _cond.Wait(_lock);
                    _wait_thread_num--;
                }
                if(QueueIsEmpty() && !_is_running)
                {
                    //情况1,线程退出
                    LOG(LogLevel::INFO) << "线程池要退出 && 任务队列为空 " << name << " 退出";
                    break;
                }
                //走到这里队列一定不为空了!并且情况分以下两种:
                //1、线程池要退出------此时不再生成新任务,线程只消耗历史任务 情况2
                //2、线程池不推迟------此时线程正常工作
                t = _q.front();
                _q.pop();
            }
            t(); // "吃饭"
            LOG(LogLevel::DEBUG) << name << " handler task:" << t.Result2string();
        }
    }
线程池源码
cpp
//ThreadPool.hpp
#pragma once

#include <iostream>
#include <queue>
#include <vector>
#include <unistd.h>
#include "Thread.hpp"
#include "Mutex.hpp"
#include "Cond.hpp"
#include "Task.cpp"

const static int default_threadnum = 3; // for debug

template <typename T>
class ThreadPool
{
private:
    bool QueueIsEmpty()
    {
        return _q.empty();
    }

    // 创建线程时传递的回调函数
    void Routine(const std::string &name)
    {
        while (1)
        {
            T t; // "拿碗"
            {
                //这个临界区本质:把临界资源获取到线程私有(临界区->线程栈)
                // "打饭"
                LockGuard lockguard(&_lock);
                //队列为空,让线程在指定条件变量下等待
                while(QueueIsEmpty() && _is_running)
                {
                    //队列为空&&线程池是运行状态线程才会休眠
                    _wait_thread_num++;
                    _cond.Wait(_lock);
                    _wait_thread_num--;
                }
                if(QueueIsEmpty() && !_is_running)
                {
                    //情况1,线程退出
                    LOG(LogLevel::INFO) << "线程池要退出 && 任务队列为空 " << name << " 退出";
                    break;
                }
                //走到这里队列一定不为空了!并且情况分以下两种:
                //1、线程池要退出------此时不再生成新任务,线程只消耗历史任务 情况2
                //2、线程池不推迟------此时线程正常工作
                t = _q.front();
                _q.pop();
            }
            t(); // "吃饭"
            LOG(LogLevel::DEBUG) << name << " handler task:" << t.Result2string();
        }
    }

public:
    ThreadPool(int threadnum = default_threadnum)
        : _is_running(false)
        , _threadnum(threadnum)
        ,_wait_thread_num(0)
    {
        for (int i = 0; i < _threadnum; i++)
        {
            // 方法一:
            //std::string name = "thread-" + std::to_string(i + 1);
            //  auto f = bind(hello, this);
            //  Thread t(f, name);

            // 方法二:
            // std::string name = "thread-" + std::to_string(i + 1);
            // Thread t([this]()
            //          { this->hello(); }, name);
            // _threads.push_back(std::move(t)); // move避免拷贝

            // 方法二的优化版本:
            std::string name = "thread-" + std::to_string(i + 1);
            _threads.emplace_back([this](const std::string &name)
                                  { this->Routine(name); }, name);
        }
        LOG(LogLevel::INFO) << "thread pool obj create success";
    }

    void Start()
    {
        // 防止线程池重复启动
        if (_is_running)
            return;
        _is_running = true;
        for(auto &t : _threads)
        {
            t.Start();
        }
        LOG(LogLevel::INFO) << "thread pool running success";
    }

    void Stop()
    {
        // if (!_is_running)
        //     return;
        // _is_running = false;
        // for(auto &t : _threads)
        // {
        //     t.Stop();
        // }
        // LOG(LogLevel::INFO) << "thread pool stop success";

        //优化版本
        if (!_is_running)
            return;
        _is_running = false;
        if(_wait_thread_num)
        {
            //有休眠的线程,将其唤醒
                 _cond.NotifyAll();
        }
    }

    void Wait()
    {
        for(auto &t : _threads)
        {
            t.Join();
        }
        LOG(LogLevel::INFO) << "thread pool wait success";
    }

    // 往任务队列里插入任务
    void Enqueue(const T &t)
    {
        //如果线程要退出,不再允许用户生产任务
        if(!_is_running)
            return;
        {
            LockGuard lockguard(&_lock);
            _q.push(t);
            if(_wait_thread_num > 0)
            {
                //唤醒一个线程去消费任务
                _cond.NotifyOne();
            }
        }
    }

    ~ThreadPool()
    {
    }

private:
    // 任务队列
    std::queue<T> _q; // 整体使用的临界资源

    // 多个线程
    std::vector<Thread> _threads; // 1.先创建线程本身(Thread类对象)2.再启动线程(调用Thread的start)
    int _threadnum;
    int _wait_thread_num;

    // 保护机制
    Mutex _lock; // 锁
    Cond _cond;   // 条件变量

    // 其他属性
    bool _is_running;
};
线程安全和重入问题
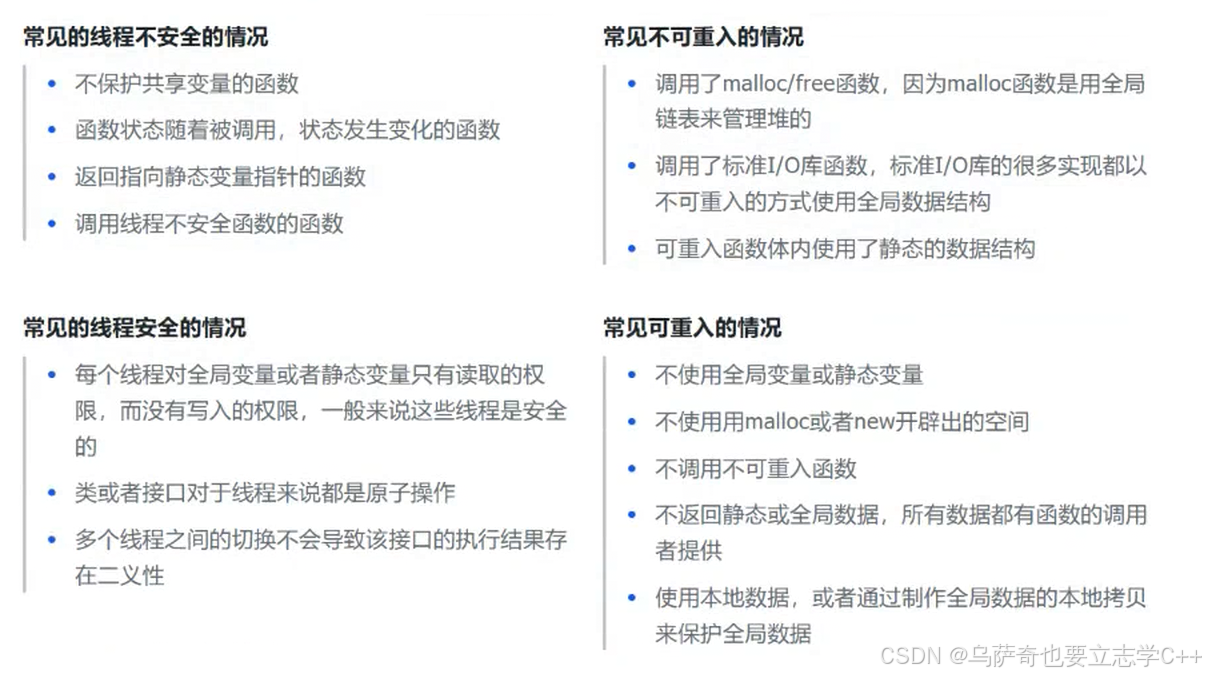
线程安全:就是多个线程在访问共享资源时,能够正确地执⾏,不会相互⼲扰或破坏彼此的执⾏结果。⼀般⽽⾔,多个线程并发访问同⼀段只有局部变量的代码时,不会出现不同的结果。但是对全局变量或者静态变量进⾏操作(如修改),并且没有锁保护的情况下,容易出现该问题。
重⼊:同⼀个函数被不同的执⾏流调⽤,当前⼀个流程还没有执⾏完,就有其他的执⾏流再次进⼊,
我们称之为重⼊。⼀个函数在重⼊的情况下,运⾏结果不会出现任何不同或者任何问题,则该函数被
称为可重⼊函数,否则,是不可重⼊函数。
学到现在,其实我们已经能理解重⼊其实可以分为两种情况
1、多线程重⼊函数
2、信号导致⼀个执⾏流重复进⼊函数
结论
不要被上面绕口令式的话语唬住,你只要仔细观察,其实对应概念说的都是一回事。
可重入与线程安全联系
1、函数是可重入的,那就是线程安全的 (其实知道这一句话就够了)
2、函数是不可重入的,那就不能由多个线程使用,有可能引发线程安全问题
3、如果一个函数中有全局变量,那么这个函数既不是线程安全也不是可重入的。
可重入与线程安全区别
1、可重入函数是线程安全函数的一种
2、线程安全不一定是可重入的(补充解释:首先明确main函数和捕捉信号是同一个执行流,这时有一个场景:当一个进程加锁进入函数,此时来了一个信号,该信号让进程再次加锁进入这个函数,此时单个执行流就会"自己把自己绊倒",就会产生死锁,所以即使有锁保护该函数,该函数也不一定是可重入的,上述现象仅局限于单进程响应信号视角,如果是多线程视角,线程安全和函数可重入几乎是等价的),而可重入函数则一定是线程安全的。
3、如果将对临界资源的访问加上锁,则这个函数是线程安全的,但如果这个重入函数若锁还未释放则会产生死锁,因此是不可重入的。
注意:
1、如果不考虑 信号导致一个执行流重复进入函数 这种重入情况,线程安全和重入在安全角度不做区分。
2、但是线程安全侧重说明线程访问公共资源的安全情况,表现的是并发线程的特点。
3、可重入描述的是一个函数是否能被重复进入,表示的是函数的特点。
死锁
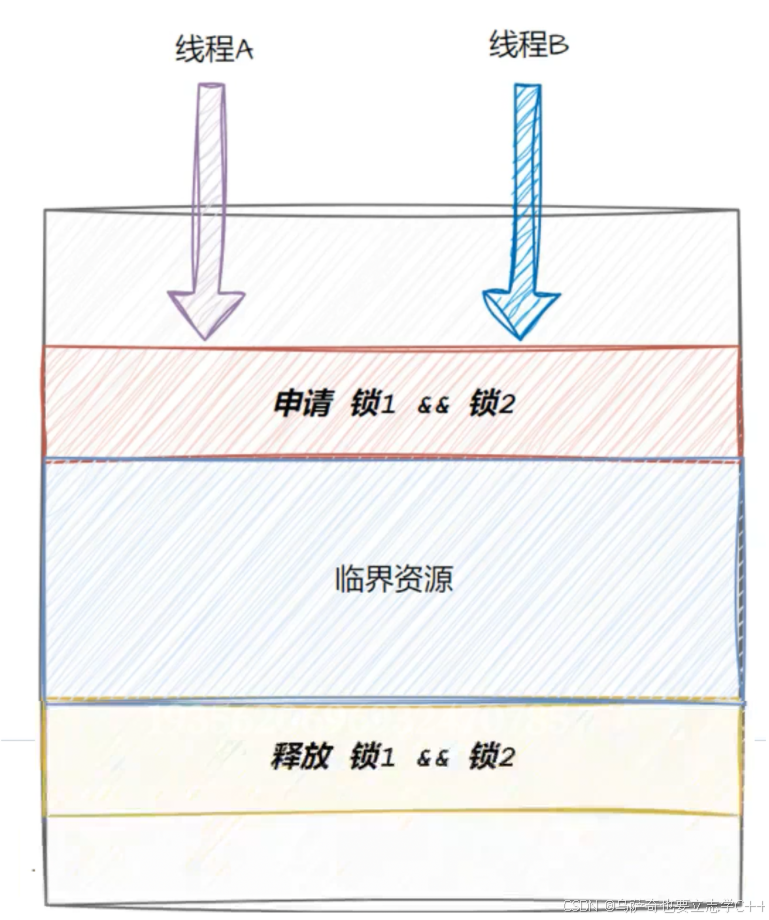
1、死锁是指在⼀组进程中的各个进程均占有不会释放的资源,但因互相申请被其他进程所站⽤不会释放的资源⽽处于的⼀种永久等待状态。
2、为了⽅便表述,假设现在线程A,线程B必须同时持有锁1和锁2,才能进⾏后续资源的访问
3、小编介绍一个场景,方便大家理解死锁:A和B两个小朋友各自有5毛钱,都想去超市买1块钱的棒棒糖,这时两个小朋友既不肯把自己的钱拿给对方,各自还想要对方的5毛钱,此时就会僵持住,类似于死锁。
死锁四个必要条件
1、互斥条件:⼀个资源每次只能被⼀个执⾏流使用。
◦ 好理解,不做解释
2、请求与保持条件:⼀个执⾏流因请求资源⽽阻塞时,对已获得的资源保持不放。
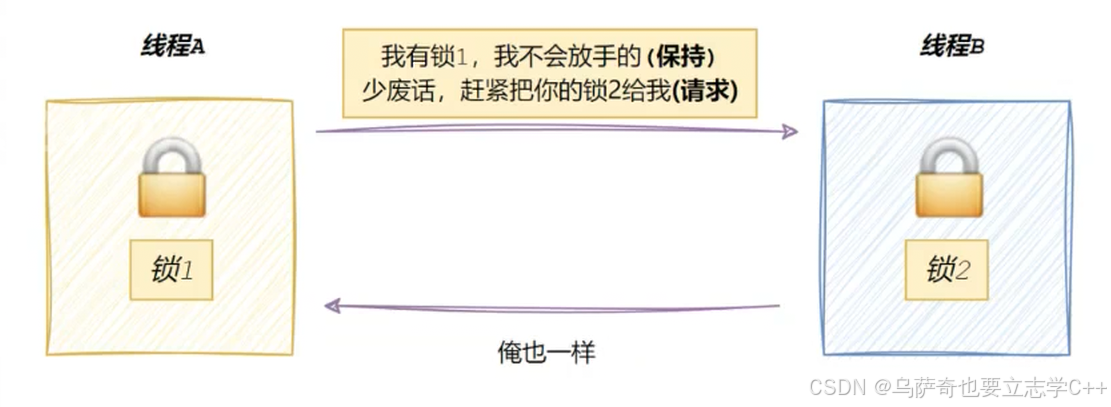
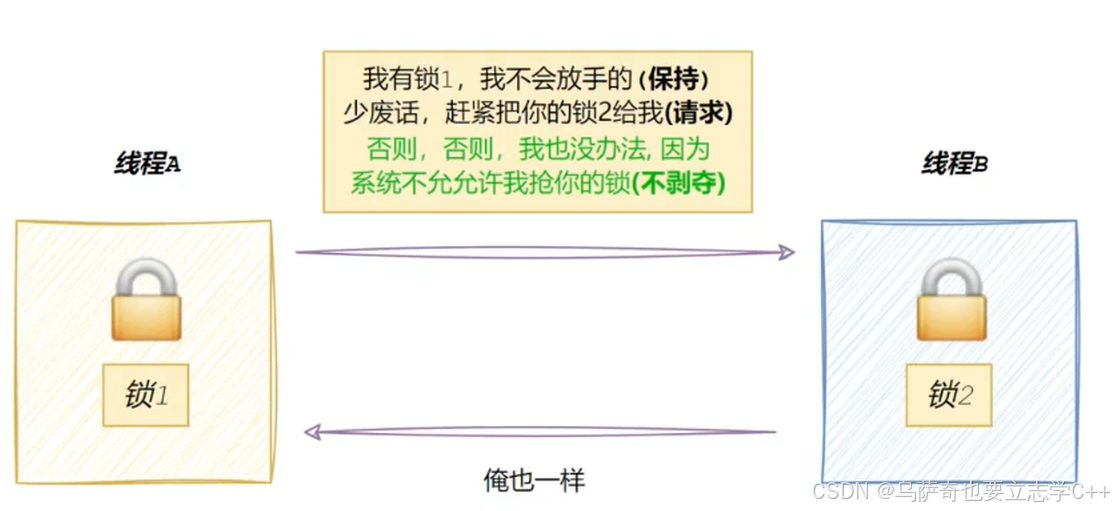
3、不剥夺条件:⼀个执⾏流已获得的资源,在末使⽤完之前,不能强⾏剥夺(小朋友不能强行抢对方的5毛钱)
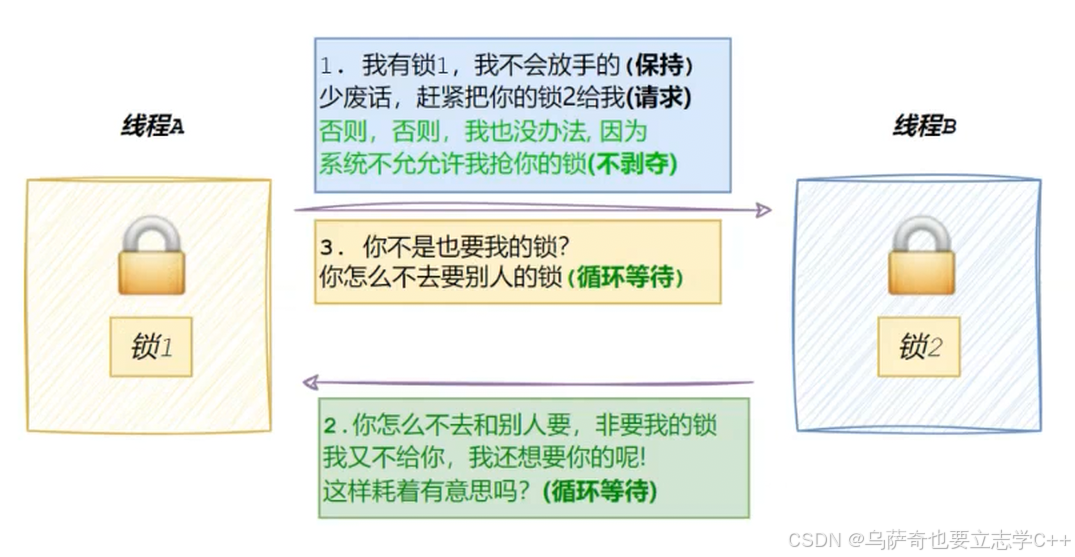
4、循环等待条件:若⼲执⾏流之间形成⼀种头尾相接的循环等待资源的关系
避免死锁
避免死锁的核心思想:破坏死锁的四个必要条件,其中的一个或多个。
破坏请求与保持条件:
请求是执行流的刚需,不能破坏,但是可以破坏保持,在编码层面,保持是申请锁失败后,线程会阻塞住,如果我们让线程申请锁失败后,不是阻塞等待,而是释放所有锁重新从0开始申请锁即可。
在linux中可以用pthread_mutex_trylock接口,当线程用pthread_mutex_trylock申请锁失败后不会阻塞等待,而是返回错误码。
破坏不剥夺条件:
在线程中设计一个仲裁函数,当发生死锁问题时,相关线程都去调用仲裁函数,让优先级较低的线程主动unlock释放锁,然后让优先级较高的线程申请锁。
预防循环等待:
由于循环等待是在复杂场景中出现的,所以对于循环等待我们不会事先知道什么时候会出现,所以只能预防循环等待的出现。
预防方法:保证资源⼀次性分配, 使⽤超时机制、加锁顺序⼀致。(简单说就是如果线程执行任务需要两把锁,让线程一次性申请两把锁,而不是先申请一把锁再申请另一把锁)
STL、智能指针和线程安全
STL 中的容器是否是线程安全的?
不是。
原因是,STL 的设计初衷是将性能挖掘到极致,而一旦涉及到加锁保证线程安全,会对性能造成巨大的影响。
而且对于不同的容器,加锁方式的不同,性能可能也不同 (例如 hash 表的锁表和锁桶)。
因此 STL 默认不是线程安全。如果需要在多线程环境下使用,往往需要调用者自行保证线程安全。
智能指针是否是线程安全的?
注意我们这里讨论的是智能指针本身,而不是智能指针所指向的对象。
对于 unique_ptr, 由于只是在当前代码块范围内生效,因此不涉及线程安全问题。
对于 shared_ptr, 多个对象需要共用一个引用计数变量,所以会存在线程安全问题。但是标准库实现的时候考虑到了这个问题,基于原子操作 (CAS) 的方式保证 shared_ptr 能够高效,原子的操作引用计数。