《逆向工程核心原理》使用调试函数hook api的实验在64位Windows11上的复现
原理概述
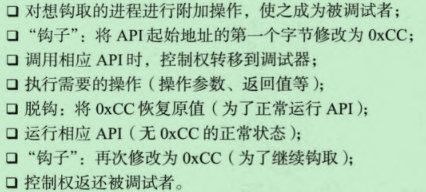
简单来说,我们自己的Hook程序是目标进程的调试器,需要将目标进程地址空间中我们需要Hook的api的首地址改为0xCC,也就是int3中断指令,当目标进程调用到我们下断点的api时,它就会触发一个0xCC异常,此时控制权转移到我们的程序上,此时我们就可以操作目标进程的地址空间了。这属于inline hook(见《加密与解密》)。
总之就是使用了Windows系统提供的异常处理功能:
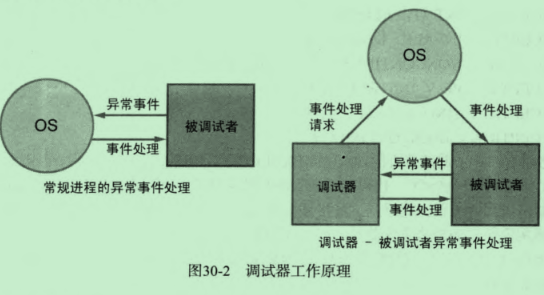
我们主要关注的是EXCEPTION_DEBUG_EVENT调试事件中的EXCEPTION_BREAKPOINT异常。这个异常对应汇编指令int3,机器码0xCC。
下图给出了具体的步骤:
原作者代码分析
下面是原作者的代码,他的系统是32位Windows XP:
cpp
#include "windows.h"
#include "stdio.h"

LPVOID g_pfWriteFile = NULL;
CREATE_PROCESS_DEBUG_INFO g_cpdi;
BYTE g_chINT3 = 0xCC, g_chOrgByte = 0;

BOOL OnCreateProcessDebugEvent(LPDEBUG_EVENT pde)
{
    // WriteFile() API 주소 구하기
    g_pfWriteFile = GetProcAddress(GetModuleHandleA("kernel32.dll"), "WriteFile");

    // API Hook - WriteFile()
    //   첫 번째 byte 를 0xCC (INT 3) 으로 변경
    //   (orginal byte 는 백업)
    memcpy(&g_cpdi, &pde->u.CreateProcessInfo, sizeof(CREATE_PROCESS_DEBUG_INFO));
    ReadProcessMemory(g_cpdi.hProcess, g_pfWriteFile,
                      &g_chOrgByte, sizeof(BYTE), NULL);
    WriteProcessMemory(g_cpdi.hProcess, g_pfWriteFile,
                       &g_chINT3, sizeof(BYTE), NULL);

    return TRUE;
}

BOOL OnExceptionDebugEvent(LPDEBUG_EVENT pde)
{
    CONTEXT ctx;
    PBYTE lpBuffer = NULL;
    DWORD dwNumOfBytesToWrite, dwAddrOfBuffer, i;
    PEXCEPTION_RECORD per = &pde->u.Exception.ExceptionRecord;

    // BreakPoint exception (INT 3) 인 경우
    if( EXCEPTION_BREAKPOINT == per->ExceptionCode )
    {
        // BP 주소가 WriteFile() 인 경우
        if( g_pfWriteFile == per->ExceptionAddress )
        {
            // #1. Unhook
            //   0xCC 로 덮어쓴 부분을 original byte 로 되돌림
            WriteProcessMemory(g_cpdi.hProcess, g_pfWriteFile,
                               &g_chOrgByte, sizeof(BYTE), NULL);

            // #2. Thread Context 구하기
            ctx.ContextFlags = CONTEXT_CONTROL;
            GetThreadContext(g_cpdi.hThread, &ctx);

            // #3. WriteFile() 의 param 2, 3 값 구하기
            //   함수의 파라미터는 해당 프로세스의 스택에 존재함
            //   param 2 : ESP + 0x8
            //   param 3 : ESP + 0xC
            ReadProcessMemory(g_cpdi.hProcess, (LPVOID)(ctx.Esp + 0x8),
                              &dwAddrOfBuffer, sizeof(DWORD), NULL);
            ReadProcessMemory(g_cpdi.hProcess, (LPVOID)(ctx.Esp + 0xC),
                              &dwNumOfBytesToWrite, sizeof(DWORD), NULL);

            // #4. 임시 버퍼 할당
            lpBuffer = (PBYTE)malloc(dwNumOfBytesToWrite+1);
            memset(lpBuffer, 0, dwNumOfBytesToWrite+1);

            // #5. WriteFile() 의 버퍼를 임시 버퍼에 복사
            ReadProcessMemory(g_cpdi.hProcess, (LPVOID)dwAddrOfBuffer,
                              lpBuffer, dwNumOfBytesToWrite, NULL);
            printf("\n### original string ###\n%s\n", lpBuffer);

            // #6. 소문자 -> 대문자 변환
            for( i = 0; i < dwNumOfBytesToWrite; i++ )
            {
                if( 0x61 <= lpBuffer[i] && lpBuffer[i] <= 0x7A )
                    lpBuffer[i] -= 0x20;
            }

            printf("\n### converted string ###\n%s\n", lpBuffer);

            // #7. 변환된 버퍼를 WriteFile() 버퍼로 복사
            WriteProcessMemory(g_cpdi.hProcess, (LPVOID)dwAddrOfBuffer,
                               lpBuffer, dwNumOfBytesToWrite, NULL);

            // #8. 임시 버퍼 해제
            free(lpBuffer);

            // #9. Thread Context 의 EIP 를 WriteFile() 시작으로 변경
            //   (현재는 WriteFile() + 1 만큼 지나왔음)
            ctx.Eip = (DWORD)g_pfWriteFile;
            SetThreadContext(g_cpdi.hThread, &ctx);

            // #10. Debuggee 프로세스를 진행시킴
            ContinueDebugEvent(pde->dwProcessId, pde->dwThreadId, DBG_CONTINUE);
            Sleep(0);

            // #11. API Hook
            WriteProcessMemory(g_cpdi.hProcess, g_pfWriteFile,
                               &g_chINT3, sizeof(BYTE), NULL);

            return TRUE;
        }
    }

    return FALSE;
}

void DebugLoop()
{
    DEBUG_EVENT de;
    DWORD dwContinueStatus;

    // Debuggee 로부터 event 가 발생할 때까지 기다림
    while( WaitForDebugEvent(&de, INFINITE) )
    {
        dwContinueStatus = DBG_CONTINUE;

        // Debuggee 프로세스 생성 혹은 attach 이벤트
        if( CREATE_PROCESS_DEBUG_EVENT == de.dwDebugEventCode )
        {
            OnCreateProcessDebugEvent(&de);
        }
        // 예외 이벤트
        else if( EXCEPTION_DEBUG_EVENT == de.dwDebugEventCode )
        {
            if( OnExceptionDebugEvent(&de) )
                continue;
        }
        // Debuggee 프로세스 종료 이벤트
        else if( EXIT_PROCESS_DEBUG_EVENT == de.dwDebugEventCode )
        {
            // debuggee 종료 -> debugger 종료
            break;
        }

        // Debuggee 의 실행을 재개시킴
        ContinueDebugEvent(de.dwProcessId, de.dwThreadId, dwContinueStatus);
    }
}

int main(int argc, char* argv[])
{
    DWORD dwPID;

    if( argc != 2 )
    {
        printf("\nUSAGE : hookdbg.exe <pid>\n");
        return 1;
    }

    // Attach Process
    dwPID = atoi(argv[1]);
    if( !DebugActiveProcess(dwPID) )
    {
        printf("DebugActiveProcess(%d) failed!!!\n"
               "Error Code = %d\n", dwPID, GetLastError());
        return 1;
    }

    // 디버거 루프
    DebugLoop();

    return 0;
}
代码十分简单。在Windows XP系统上,notepad是单线程的:
所以原作者的代码可以实现正确的功能。
笔者代码分析
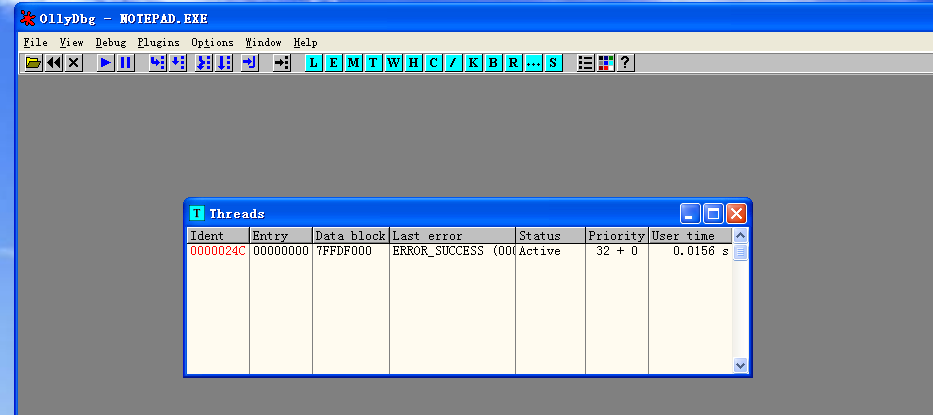
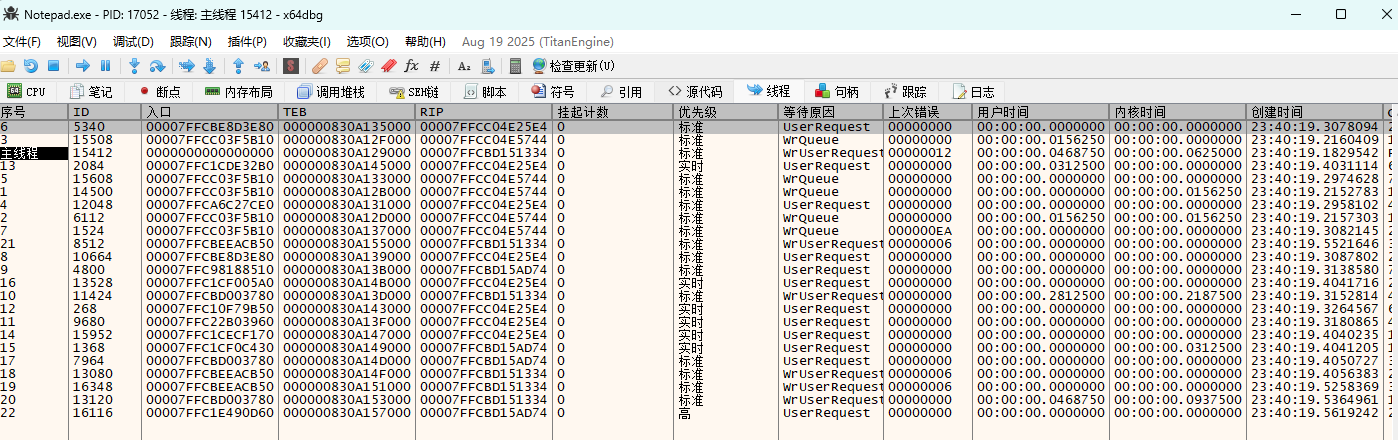
在64位Windows11上, notepad不再是一个单线程的程序,而是多线程的,调用WriteFile不是主线程,所以在获取CONTEXT结构体的时候,不能使用被调试进程附加事件处理函数中初始化的g_cpdi结构体中的hThread,应该根据pde中的TID重新获取句柄。
在读取缓冲区的时候,不知道是不是代码页不同的原因,我始终无法获得正确的缓冲区内容,但是缓冲区的地址是没问题的,指示在翻译二进制数据的时候,notepad使用的代码页和我程序使用的代码页不一样。所以说这个实验只能算复现成功了一半。
cpp
#include <Windows.h>
#include <iostream>

LPVOID g_pfWriteFile = NULL; // WriteFile的绝对虚拟地址
CREATE_PROCESS_DEBUG_INFO g_cpdi;
BYTE g_chINT3 = 0xCC, g_chOrgByte = 0;

// 被调试进程生成或者附加事件处理函数
BOOL OnCreateProcessDebugEvent(LPDEBUG_EVENT pde)
{
	// WriteFile的绝对虚拟地址
	g_pfWriteFile = GetProcAddress(GetModuleHandleW(L"kernel32.dll"), "WriteFile");

	// 初始化调试信息结构体,供后续的使用
	memcpy_s(&g_cpdi, sizeof(CREATE_PROCESS_DEBUG_INFO),
		&pde->u.CreateProcessInfo, sizeof(CREATE_PROCESS_DEBUG_INFO));
	// 读取WriteFile函数首地址
	ReadProcessMemory(g_cpdi.hProcess, g_pfWriteFile,
		&g_chOrgByte, sizeof(BYTE), NULL);
	// 修改WriteFile函数首地址
	WriteProcessMemory(g_cpdi.hProcess, g_pfWriteFile,
		&g_chINT3, sizeof(BYTE), NULL);

	return TRUE;
}

BOOL OnExceptionDebugEvent(LPDEBUG_EVENT pde)
{
	CONTEXT ctx = {0};
	PWCHAR lpBuffer = NULL;
	DWORD64 dwNumOfBytesToWrite, dwAddrOfBuffer, i;
	PEXCEPTION_RECORD per = &pde->u.Exception.ExceptionRecord;

	/*
	这里使用pde结构体来初始化hThread,之前使用g_cpdi的hThread获取的CONTEXT总是不正确
	希望这样修改可以成功吧,确实成功了,但是notapd的代码页貌似和我的程序不一样啊
	*/
	HANDLE hThread = OpenThread(THREAD_GET_CONTEXT | THREAD_SET_CONTEXT | THREAD_SUSPEND_RESUME,
		FALSE, pde->dwThreadId);

	// 为断点异常时
	if (EXCEPTION_BREAKPOINT == per->ExceptionCode)
	{
		// 异常地址为WriteFile函数的首地址
		if (g_pfWriteFile == per->ExceptionAddress)
		{
			// Unhook
			WriteProcessMemory(g_cpdi.hProcess, g_pfWriteFile,
				&g_chOrgByte, sizeof(BYTE), NULL);

			// Thread Context
			ctx.ContextFlags = CONTEXT_FULL;
			// BOOL bRes = GetThreadContext(g_cpdi.hThread, &ctx);
			BOOL bRes = GetThreadContext(hThread, &ctx);
			if (!bRes)
			{
				std::cout << "GetThreadContext Failed" << std::endl;
				return FALSE;
			}

			// 获取WriteFile的参数
			// 在x64调用约定中,前四个参数使用寄存器传递
			// lpBuffer : rdx
			// nNumberOfBytesToWrite : r8
			dwAddrOfBuffer = ctx.Rdx;
			dwNumOfBytesToWrite = ctx.R8;

			// 分配临时缓冲区,用于变换字符串,+2是为了保存字符串结束符
			lpBuffer = (PWCHAR)malloc(sizeof(WCHAR) * dwNumOfBytesToWrite + 2);
			memset(lpBuffer, 0, sizeof(WCHAR) * dwNumOfBytesToWrite + 2);

			// 读取WriteFile的缓冲区
			ReadProcessMemory(g_cpdi.hProcess, (LPVOID)dwAddrOfBuffer, lpBuffer,
				sizeof(WCHAR) * dwNumOfBytesToWrite, NULL);
			wprintf_s(L"\n### original string ###\n%ls\n", lpBuffer);

			// 进行大小写转换
			for (i = 0; i < dwNumOfBytesToWrite; i++)
			{
				if (0x61 <= lpBuffer[i] && lpBuffer[i] <= 0x7A)
					lpBuffer[i] -= 0x20;
			}

			// 将转换的字符串写入WriteFile的缓冲区
			WriteProcessMemory(g_cpdi.hProcess, (LPVOID)dwAddrOfBuffer,
				(LPVOID)lpBuffer,
				sizeof(dwNumOfBytesToWrite) * dwNumOfBytesToWrite, NULL);

			free(lpBuffer);

			// 恢复被调试进程的运行
			ctx.Rip = (DWORD64)g_pfWriteFile;
			SetThreadContext(g_cpdi.hThread, &ctx);

			ContinueDebugEvent(pde->dwProcessId, pde->dwThreadId, DBG_CONTINUE);
			Sleep(0);

			// 恢复钩子
			WriteProcessMemory(g_cpdi.hProcess, g_pfWriteFile, &g_chINT3,
				sizeof(BYTE), NULL);

			return TRUE;
		}
	}

	return FALSE;
}

void DbgLoop()
{
	DEBUG_EVENT de;
	DWORD dwContinueStatus;

	dwContinueStatus = DBG_CONTINUE;
	while (WaitForDebugEvent(&de, INFINITE))
	{
		// 被调试进程生成或者附加事件
		if (CREATE_PROCESS_DEBUG_EVENT == de.dwDebugEventCode)
			OnCreateProcessDebugEvent(&de);
		// 异常事件
		else if (EXCEPTION_DEBUG_EVENT == de.dwDebugEventCode)
		{
			if (OnExceptionDebugEvent(&de))
				continue;
		}
		// 被调试进程退出事件
		else if (EXIT_PROCESS_DEBUG_EVENT == de.dwDebugEventCode)
			// 被调试进程退出,则调试器退出
			break;
		// 再次运行被调试进程
		ContinueDebugEvent(de.dwProcessId, de.dwThreadId, dwContinueStatus);
	}
}

int main(int argc, char const *argv[])
{
	DWORD dwPID = 0;
	if (argc != 2)
	{
		std::cout << "Usage : " << argv[0] << " <pid>" << std::endl;
		return 1;
	}

	dwPID = atoi(argv[1]);
	if (!DebugActiveProcess(dwPID))
	{
		printf("DebugActiveProcess(%d) failed!!!\n Error Code = %d\n", dwPID, GetLastError());
		return 1;
	}

	DbgLoop();

	return 0;
}
如图所示,在Windows11上,notepad是一个多线程程序:
另外,想要复现该实验,最好在虚拟机上进行,或者检查dwNumOfBytesToWrite的大小。负责如果一旦获取到了错误的大小,就会获得几百G大小的txt文件。