第一章:网络请求
1.1 虚拟环境
1.1.1 为什么需要虚拟环境
直接通过pip install xx安装的第三方包会存入系统级Python环境,若不同项目依赖不同版本的包(如Django 1.10和Django 0.9),会因版本不兼容导致项目无法正常运行。虚拟环境可解决多版本包共存的问题。
1.1.2 虚拟环境原理
虚拟环境如同独立的"抽屉",每个抽屉内安装的包相互隔离,可给不同项目指定对应的虚拟环境,保证项目依赖的包版本独立且不冲突。
1.1.3 安装virtualenv
通过pip/pip3安装:
bash
pip install virtualenv
# 或针对Python3
pip3 install virtualenv
1.1.4 创建虚拟环境
bash
virtualenv [虚拟环境名称]-
解释器版本由系统环境变量中Python2/Scripts和Python3/Scripts的顺序决定。
-
手动指定解释器版本:
bashvirtualenv -p C:\Python36\python.exe [虚拟环境名称]
1.1.5 进入/退出虚拟环境
| 系统 | 进入虚拟环境 | 退出虚拟环境 |
|---|---|---|
| Windows | 进入虚拟环境Scripts文件夹,执行activate |
deactivate |
| *nix | source /path/to/virtualenv/bin/activate |
deactivate |
1.1.6 virtualenvwrapper(简化虚拟环境管理)
安装
- *nix:
pip install virtualenvwrapper - Windows:
pip install virtualenvwrapper-win
基本使用
| 功能 | 命令 |
|---|---|
| 创建虚拟环境 | mkvirtualenv my_env |
| 切换虚拟环境 | workon my_env |
| 退出虚拟环境 | deactivate |
| 删除虚拟环境 | rmvirtualenv my_env |
| 列出所有虚拟环境 | lsvirtualenv |
| 进入虚拟环境目录 | cdvirtualenv |
| 指定Python版本创建 | mkvirtualenv --python==C:\Python36\python.exe hy_env |
修改默认路径
在系统环境变量中添加WORKON_HOME,设置自定义存储路径。
1.2 爬虫前奏
1.2.1 爬虫实际例子
搜索引擎(百度、谷歌)、伯乐在线、惠惠购物助手、数据分析工具、抢票软件等。
1.2.2 网络爬虫定义
- 通俗理解:模拟人类请求网站的程序,自动请求网页、抓取数据并提取有价值信息。
- 专业定义:通过程序自动化获取互联网网页内容的技术。
1.2.3 通用爬虫和聚焦爬虫
- 通用爬虫:搜索引擎核心组件,下载网页形成互联网内容镜像备份,无针对性。
- 聚焦爬虫:面向特定需求,抓取时筛选内容,仅获取与需求相关的网页信息。
1.2.4 为什么用Python写爬虫
| 语言 | 劣势 |
|---|---|
| PHP | 多线程/异步支持差,并发处理能力弱 |
| Java | 代码量大、笨重,重构成本高 |
| C/C++ | 学习和开发成本高,开发效率低 |
| Python | 语法简洁、开发效率高,爬虫模块/框架丰富(Scrapy、Scrapy-redis) |
1.2.5 爬虫准备工具
- Python3.6开发环境
- Pycharm 2017 professional版
- 虚拟环境(virtualenv/virtualenvwrapper)
- HTTP协议知识和Chrome抓包工具
1.3 HTTP协议和Chrome浏览器
1.3.1 HTTP和HTTPS协议
- HTTP:超文本传输协议,端口80,明文传输。
- HTTPS:HTTP的加密版本(SSL层),端口443,安全传输。
1.3.2 浏览器发送HTTP请求的过程
- 输入URL并回车,浏览器发送Request请求获取目标HTML文件;
- 服务器返回Response文件,浏览器解析HTML,发现依赖的图片/CSS/JS等文件;
- 浏览器自动发送Request请求获取这些依赖文件;
- 所有文件下载完成后,网页完整渲染。
1.3.3 URL详解
URL格式:scheme://host:port/path/?query-string=xxx#anchor
| 组成部分 | 说明 |
|---|---|
| scheme | 访问协议(http/https/ftp等) |
| host | 主机名/域名(如www.baidu.com) |
| port | 端口号(默认80) |
| path | 查找路径(如/Trending/now) |
| query-string | 查询字符串(如wd=python) |
| anchor | 锚点(前端页面定位用,后台不处理) |
- 特殊字符(中文等)会被浏览器编码为
%+十六进制码值。
1.3.4 常用请求方法
- GET:仅从服务器获取数据,不修改服务器资源(如查询数据)。
- POST:向服务器发送数据,修改服务器资源(如登录、上传文件)。
- 注:部分网站会反爬虫,可能混用GET/POST。
1.3.5 请求头常见参数
| 参数 | 作用 |
|---|---|
| User-Agent | 标识请求来源(伪装浏览器避免被识别为爬虫) |
| Referer | 标识请求来源URL(反爬虫常用) |
| Cookie | 维持会话状态(登录验证必备) |
1.3.6 常见响应状态码
| 状态码 | 含义 |
|---|---|
| 200 | 请求成功 |
| 301 | 永久重定向 |
| 302 | 临时重定向 |
| 400 | 请求URL错误 |
| 403 | 服务器拒绝访问 |
| 500 | 服务器内部错误 |
1.3.7 Chrome抓包工具
右键网页 → 检查 → 开发者工具,可查看网络请求、请求参数、响应数据等。
1.4 urllib库
urllib是Python内置网络请求库,可模拟浏览器发送请求、获取响应。
1.4.1 urlopen函数
基础用法:
python
from urllib import request
# 发送GET请求
resp = request.urlopen('http://www.baidu.com')
# 读取响应内容(字节流)
print(resp.read())- 参数:
url(请求地址)、data(POST请求数据,传入则为POST请求)。 - 返回值:
HTTPResponse对象,支持read()/readline()/getcode()等方法。
1.4.2 urlretrieve函数
下载文件到本地:
python
from urllib import request
# 下载百度首页到本地baidu.html
request.urlretrieve('http://www.baidu.com/', 'baidu.html')
1.4.3 urlencode/parse_qs函数
-
urlencode:将字典转为URL编码字符串:
pythonfrom urllib import parse data = {'name':'爬虫基础','greet':'hello world','age':100} qs = parse.urlencode(data) print(qs) # 输出:name=%E7%88%AC%E8%99%AB%E5%9F%BA%E7%A1%80&greet=hello+world&age=100 -
parse_qs:解码URL编码字符串:
pythonfrom urllib import parse qs = "name=%E7%88%AC%E8%99%AB%E5%9F%BA%E7%A1%80&greet=hello+world&age=100" print(parse.parse_qs(qs)) # 输出:{'name': ['爬虫基础'], 'greet': ['hello world'], 'age': ['100']}
1.4.4 urlparse/urlsplit函数
分割URL组成部分:
python
from urllib import parse
url = 'http://www.baidu.com/s?username=zhiliao'
result = parse.urlsplit(url)
# 或 urlparse(多一个params属性,用于解析URL中;后的参数)
print('scheme:', result.scheme)  # http
print('netloc:', result.netloc)  # www.baidu.com
print('path:', result.path)      # /s
print('query:', result.query)    # username=zhiliao
1.4.5 Request类(添加请求头)
python
from urllib import request
headers = {
    'User-Agent': 'Mozilla/5.0 (Windows NT 10.0; Win64; x64) AppleWebKit/537.36 (KHTML, like Gecko) Chrome/62.0.3202.94 Safari/537.36'
}
# 构造带请求头的请求
req = request.Request("http://www.baidu.com/", headers=headers)
resp = request.urlopen(req)
print(resp.read())
1.4.6 ProxyHandler(代理设置)
避免IP被封禁:
python
from urllib import request
# 构造代理处理器
handler = request.ProxyHandler({"http":"218.66.161.88:31769"})
opener = request.build_opener(handler)
req = request.Request("http://httpbin.org/ip")
resp = opener.open(req)
print(resp.read())
常用免费代理平台:西刺免费代理IP、快代理、代理云。
1.4.7 Cookie处理
Cookie原理
HTTP无状态,Cookie用于标识用户身份,第一次登录后服务器返回Cookie,后续请求自动携带。
手动携带Cookie请求
python
from urllib import request
headers = {
    'User-Agent': 'Mozilla/5.0 (Windows NT 10.0; Win64; x64) AppleWebKit/537.36 (KHTML, like Gecko) Chrome/62.0.3202.94 Safari/537.36',
    'Cookie': 'xxx'  # 从浏览器复制的Cookie
}
url = 'http://www.renren.com/880151247/profile'
req = request.Request(url, headers=headers)
resp = request.urlopen(req)
with open('renren.html','w') as fp:
    fp.write(resp.read().decode('utf-8'))
自动管理Cookie(CookieJar)
python
from urllib import request, parse
from http.cookiejar import CookieJar

headers = {
    'User-Agent': 'Mozilla/5.0 (Windows NT 10.0; Win64; x64) AppleWebKit/537.36 (KHTML, like Gecko) Chrome/62.0.3202.94 Safari/537.36'
}

def get_opener():
    cookiejar = CookieJar()
    handler = request.HTTPCookieProcessor(cookiejar)
    opener = request.build_opener(handler)
    return opener

def login_renren(opener):
    data = {"email": "970138074@qq.com", "password": "pythonspider"}
    data = parse.urlencode(data).encode('utf-8')
    login_url = "http://www.renren.com/PLogin.do"
    req = request.Request(login_url, headers=headers, data=data)
    opener.open(req)

def visit_profile(opener):
    url = 'http://www.renren.com/880151247/profile'
    req = request.Request(url,headers=headers)
    resp = opener.open(req)
    with open('renren.html','w') as fp:
        fp.write(resp.read().decode('utf-8'))

if __name__ == '__main__':
    opener = get_opener()
    login_renren(opener)
    visit_profile(opener)
Cookie保存/加载
-
保存Cookie到本地:
pythonfrom urllib import request from http.cookiejar import MozillaCookieJar cookiejar = MozillaCookieJar("cookie.txt") handler = request.HTTPCookieProcessor(cookiejar) opener = request.build_opener(handler) req = request.Request('http://httpbin.org/cookies', headers=headers) resp = opener.open(req) cookiejar.save(ignore_discard=True, ignore_expires=True) -
从本地加载Cookie:
pythonfrom urllib import request from http.cookiejar import MozillaCookieJar cookiejar = MozillaCookieJar("cookie.txt") cookiejar.load(ignore_expires=True, ignore_discard=True) handler = request.HTTPCookieProcessor(cookiejar) opener = request.build_opener(handler) req = request.Request('http://httpbin.org/cookies', headers=headers) resp = opener.open(req) print(resp.read())
1.5 requests库
requests是第三方库,比urllib更简洁易用,主打"HTTP for Humans"。
1.5.1 安装
bash
pip install requests文档:http://docs.python-requests.org/zh_CN/latest/
1.5.2 发送GET请求
python
import requests
# 基础GET请求
response = requests.get("http://www.baidu.com/")

# 带查询参数和请求头
kw = {'wd':'中国'}
headers = {"User-Agent": "Mozilla/5.0 (Windows NT 10.0; Win64; x64) AppleWebKit/537.36 (KHTML, like Gecko) Chrome/54.0.2840.99 Safari/537.36"}
response = requests.get("http://www.baidu.com/s", params=kw, headers=headers)

# 响应属性
print(response.text)       # Unicode格式响应内容
print(response.content)    # 字节流响应内容
print(response.url)        # 完整URL
print(response.encoding)   # 响应编码
print(response.status_code)# 响应状态码
1.5.3 发送POST请求
python
import requests
url = "https://www.lagou.com/jobs/positionAjax.json?city=%E6%B7%B1%E5%9C%B3&needAddtionalResult=false&isSchoolJob=0"
headers = {
    'User-Agent': 'Mozilla/5.0 (Windows NT 10.0; Win64; x64) AppleWebKit/537.36 (KHTML, like Gecko) Chrome/62.0.3202.94 Safari/537.36',
    'Referer': 'https://www.lagou.com/jobs/list_python?labelWords=&fromSearch=true&suginput='
}
data = {
    'first': 'true',
    'pn': 1,
    'kd': 'python'
}
# POST请求(data直接传字典,无需urlencode)
resp = requests.post(url, headers=headers, data=data)
print(resp.json())  # 直接解析JSON响应
1.5.4 使用代理
python
import requests
url = "http://httpbin.org/get"
headers = {
    'User-Agent': 'Mozilla/5.0 (Windows NT 10.0; Win64; x64) AppleWebKit/537.36 (KHTML, like Gecko) Chrome/62.0.3202.94 Safari/537.36',
}
proxy = {
    'http': '171.14.209.180:27829'
}
resp = requests.get(url, headers=headers, proxies=proxy)
1.5.5 Cookie和Session
-
获取响应Cookie:
pythonimport requests resp = requests.get('http://www.baidu.com/') print(resp.cookies) # Cookie对象 print(resp.cookies.get_dict()) # 转为字典 -
Session共享Cookie(模拟登录):
pythonimport requests url = "http://www.renren.com/PLogin.do" data = {"email":"970138074@qq.com",'password':"pythonspider"} headers = { 'User-Agent': "Mozilla/5.0 (Windows NT 10.0; Win64; x64) AppleWebKit/537.36 (KHTML, like Gecko) Chrome/62.0.3202.94 Safari/537.36" } # 创建Session对象,自动维护Cookie session = requests.session() session.post(url, data=data, headers=headers) # 访问需要登录的页面 resp = session.get('http://www.renren.com/880151247/profile') print(resp.text)
1.5.6 处理不信任的SSL证书
python
import requests
# verify=False 跳过SSL证书验证
resp = requests.get('http://www.12306.cn/mormhweb/', verify=False)
print(resp.content.decode('utf-8'))
第二章:数据提取
2.1 XPath语法与lxml库
2.1.1 什么是XPath
XPath(XML Path Language)是一门在XML和HTML文档中查找信息的语言,可遍历文档中的元素和属性,是爬虫提取页面数据的核心工具之一。
2.1.2 XPath开发工具
- Chrome插件:XPath Helper
- Firefox插件:Try XPath
2.1.3 XPath核心语法
1. 选取节点
| 表达式 | 描述 | 示例 | 结果 |
|---|---|---|---|
| nodename | 选取此节点的所有子节点 | bookstore | 选取bookstore下所有子节点 |
| / | 根节点选取(最前面)或子节点选取 | /bookstore | 选取根元素下所有bookstore节点 |
| // | 全局选取(任意位置) | //book | 选取所有book节点 |
| @ | 选取节点属性 | //book@price | 选取所有含price属性的book节点 |
| . | 当前节点 | ./a | 选取当前节点下的a标签 |
2. 谓语(筛选特定节点)
谓语嵌在方括号中,用于精准匹配节点:
| 路径表达式 | 描述 |
|---|---|
| /bookstore/book1 | 选取bookstore下第一个book子元素 |
| /bookstore/booklast() | 选取bookstore下最后一个book元素 |
| /bookstore/bookposition()❤️ | 选取bookstore下前两个book元素 |
| //book@price=10 | 选取price属性等于10的所有book元素 |
3. 通配符
| 通配符 | 描述 | 示例 | 结果 |
|---|---|---|---|
| * | 匹配任意节点 | /bookstore/* | 选取bookstore下所有子元素 |
| @* | 匹配任意属性 | //book@\* | 选取所有带属性的book元素 |
4. 选取多个路径
使用|运算符同时选取多个路径:
xpath
//bookstore/book | //book/title
# 选取所有book元素及book下的所有title元素
2.1.4 lxml库(高性能解析器)
lxml是基于C实现的HTML/XML解析库,支持XPath语法,能自动修复不规范的HTML代码。
1. 安装
bash
pip install lxml官方文档:http://lxml.de/index.html
2. 基本使用
(1)解析字符串(自动补全标签)
python
from lxml import etree

text = '''
<div>
    <ul>
         <li class="item-0"><a href="link1.html">first item</a></li>
         <li class="item-1"><a href="link2.html">second item</a></li>
         <li class="item-inactive"><a href="link3.html">third item</a></li>
         <li class="item-1"><a href="link4.html">fourth item</a></li>
         <li class="item-0"><a href="link5.html">fifth item</a> # 缺少闭合标签
     </ul>
 </div>
'''

# 解析为HTML文档
html = etree.HTML(text)
# 序列化HTML(自动补全li、html、body标签)
result = etree.tostring(html)
print(result.decode('utf-8'))
(2)从文件读取HTML
python
from lxml import etree

# 读取外部文件(hello.html)
html = etree.parse('hello.html')
# 格式化输出
result = etree.tostring(html, pretty_print=True)
print(result.decode('utf-8'))
3. 结合XPath提取数据
基于hello.html(包含5个li标签)的示例:
python
from lxml import etree

html = etree.parse('hello.html')

# 1. 获取所有li标签
li_list = html.xpath('//li')
print(li_list)  # 返回元素对象列表

# 2. 获取所有li的class属性值
li_classes = html.xpath('//li/@class')
print(li_classes)  # ['item-0', 'item-1', 'item-inactive', 'item-1', 'item-0']

# 3. 获取li下href为指定值的a标签
target_a = html.xpath('//li/a[@href="link2.html"]')
print(target_a)

# 4. 获取li下所有span标签(//匹配子孙节点,/仅匹配子节点)
span_list = html.xpath('//li//span')
print(span_list)

# 5. 获取最后一个li的a标签href属性
last_href = html.xpath('//li[last()]/a/@href')
print(last_href)  # ['link5.html']

# 6. 获取倒数第二个li的a标签文本(两种方式)
# 方式1:通过元素对象的text属性
second_last_text1 = html.xpath('//li[last()-1]/a')[0].text
# 方式2:直接通过XPath提取文本
second_last_text2 = html.xpath('//li[last()-1]/a/text()')[0]
print(second_last_text1, second_last_text2)  # fourth item fourth item
4. 实战:爬取电影天堂数据
python
import requests
from lxml import etree

BASE_DOMAIN = 'http://www.dytt8.net'
HEADERS = {
    'User-Agent': 'Mozilla/5.0 (Windows NT 10.0; Win64; x64) AppleWebKit/537.36 (KHTML, like Gecko) Chrome/61.0.3163.100 Safari/537.36',
    'Referer': 'http://www.dytt8.net/html/gndy/dyzz/list_23_2.html'
}

def spider():
    """爬取列表页,获取详情页链接"""
    url = 'http://www.dytt8.net/html/gndy/dyzz/list_23_1.html'
    resp = requests.get(url, headers=HEADERS)
    text = resp.content.decode('gbk')  # 电影天堂编码为gbk
    tree = etree.HTML(text)
    all_a = tree.xpath("//div[@class='co_content8']//a")
    for a in all_a:
        title = a.xpath("text()")[0]
        href = a.xpath("@href")[0]
        if href.startswith('/'):
            detail_url = BASE_DOMAIN + href
            crawl_detail(detail_url)
            break  # 仅爬取第一条示例

def crawl_detail(url):
    """解析详情页,提取电影信息"""
    resp = requests.get(url, headers=HEADERS)
    text = resp.content.decode('gbk')
    tree = etree.HTML(text)
    # 提取发布时间
    create_time = tree.xpath("//div[@class='co_content8']/ul/text()")[0].strip()
    # 提取海报和截图
    imgs = tree.xpath("//div[@id='Zoom']//img/@src")
    cover = imgs[0] if imgs else ''  # 海报
    screenshoot = imgs[1] if len(imgs)>=2 else ''  # 截图
    # 提取详情信息(年代、评分、主演等)
    infos = tree.xpath("//div[@id='Zoom']//text()")
    for index, info in enumerate(infos):
        if info.startswith("◎年  代"):
            year = info.replace("◎年  代", "").strip()
            print(f"年代:{year}")
        if info.startswith("◎豆瓣评分"):
            douban_rating = info.replace("◎豆瓣评分", "").strip()
            print(f"豆瓣评分:{douban_rating}")
        if info.startswith("◎主  演"):
            actors = [info.replace("◎主  演", "").strip()]
            # 遍历后续文本,直到遇到下一个◎开头的标签
            for x in range(index+1, len(infos)):
                actor = infos[x].strip()
                if actor.startswith("◎"):
                    break
                if actor:
                    actors.append(actor)
            print(f"主演:{','.join(actors)}")

if __name__ == '__main__':
    spider()
2.1.5 注意事项
Chrome 62版本存在302重定向时无法记录FormData的bug,可升级至金丝雀版本(https://www.google.com/chrome/browser/canary.html)解决。
2.2 BeautifulSoup4库
2.2.1 简介
BeautifulSoup4(简称bs4)是HTML/XML解析库,基于DOM树解析,API人性化,支持CSS选择器,缺点是性能低于lxml。
2.2.2 安装与文档
- 安装:
pip install bs4 - 中文文档:https://www.crummy.com/software/BeautifulSoup/bs4/doc/index.zh.html
2.2.3 解析工具对比
| 解析工具 | 解析速度 | 使用难度 |
|---|---|---|
| BeautifulSoup4 | 最慢 | 最简单 |
| lxml | 快 | 简单 |
| 正则表达式 | 最快 | 最难 |
2.2.4 基本使用
python
from bs4 import BeautifulSoup

html = """
<html><head><title>The Dormouse's story</title></head>
<body>
<p class="title" name="dromouse"><b>The Dormouse's story</b></p>
<p class="story">Once upon a time there were three little sisters; and their names were
<a href="http://example.com/elsie" class="sister" id="link1"><!-- Elsie --></a>,
<a href="http://example.com/lacie" class="sister" id="link2">Lacie</a> and
<a href="http://example.com/tillie" class="sister" id="link3">Tillie</a>;
and they lived at the bottom of a well.</p>
<p class="story">...</p>
"""

# 创建BeautifulSoup对象(指定lxml解析器)
soup = BeautifulSoup(html, "lxml")
# 格式化输出HTML
print(soup.prettify())
2.2.5 四大核心对象
1. Tag(标签对象)
对应HTML中的标签,可通过soup.标签名获取第一个匹配的标签:
python
# 获取标签
title_tag = soup.title  # <title>The Dormouse's story</title>
a_tag = soup.a  # 第一个a标签

# 标签属性
print(title_tag.name)  # title(标签名)
print(soup.p.attrs)  # {'class': ['title'], 'name': 'dromouse'}(所有属性)
print(soup.p['class'])  # ['title'](获取指定属性)
soup.p['class'] = 'new-title'  # 修改属性
2. NavigableString(标签文本)
获取标签内的文本内容:
python
p_text = soup.p.string  # The Dormouse's story
print(type(p_text))  # <class 'bs4.element.NavigableString'>
3. BeautifulSoup(文档对象)
代表整个HTML文档,可视为特殊的Tag,name为[document]:
python
print(soup.name) # [document]4. Comment(注释对象)
特殊的NavigableString,对应HTML注释内容:
python
markup = "<b><!--Hey, buddy. Want to buy a used parser?--></b>"
soup = BeautifulSoup(markup, 'lxml')
comment = soup.b.string
print(type(comment))  # <class 'bs4.element.Comment'>
print(comment)  # Hey, buddy. Want to buy a used parser?
2.2.6 遍历文档树
1. contents/children(子节点)
python
html_doc = """
<html><head><title>The Dormouse's story</title></head>
<p class="title"><b>The Dormouse's story</b></p>
"""
soup = BeautifulSoup(html_doc, 'lxml')
head_tag = soup.head

# contents:返回子节点列表
print(head_tag.contents)  # [<title>The Dormouse's story</title>]

# children:返回子节点迭代器
for child in head_tag.children:
    print(child)  # <title>The Dormouse's story</title>
2. strings/stripped_strings(文本遍历)
python
# strings:获取所有文本(含空白)
for string in soup.strings:
    print(repr(string))

# stripped_strings:去除空白文本
for string in soup.stripped_strings:
    print(repr(string))
2.2.7 搜索文档树
1. find/find_all(核心方法)
find:返回第一个匹配的标签find_all:返回所有匹配的标签列表
python
# 按标签+属性查找
a_list = soup.find_all("a", attrs={"id": "link2"})
# 简写(直接传属性名)
a_list = soup.find_all("a", id="link2")
2. select(CSS选择器)
支持CSS语法查找标签,返回列表:
python
# 1. 按标签名
print(soup.select('a'))

# 2. 按类名(.类名)
print(soup.select('.sister'))

# 3. 按ID(#ID名)
print(soup.select('#link1'))

# 4. 组合查找
print(soup.select("p #link1"))  # p标签下的#link1
print(soup.select("head > title"))  # head的直接子标签title

# 5. 按属性
print(soup.select('a[href="http://example.com/elsie"]'))

# 6. 提取文本(get_text())
for title in soup.select('title'):
    print(title.get_text())
2.3 正则表达式和re模块
2.3.1 什么是正则表达式
正则表达式是一套字符匹配规则,用于从字符串中精准匹配/提取符合规则的数据。
2.3.2 常用匹配规则
1. 基础匹配符
| 符号 | 描述 | 示例 | 匹配结果 |
|---|---|---|---|
| 普通字符 | 匹配自身 | re.match('he', 'hello') |
'he' |
| . | 匹配任意字符(不含换行) | re.match('.', 'ab') |
'a' |
| \d | 匹配数字(0-9) | re.match('\d', '123') |
'1' |
| \D | 匹配非数字 | re.match('\D', 'a') |
'a' |
| \s | 匹配空白符(\n/\t/\r/空格) | re.match('\s', '\t') |
'\t' |
| \w | 匹配字母/数字/下划线 | re.match('\w', '_') |
'_' |
| \W | 匹配非\w字符 | re.match('\W', '+') |
'+' |
| \[\] | 匹配括号内任意字符 | re.match('[\d\-]+', '0731-88888888') |
'0731-88888888' |
2. 数量匹配符
| 符号 | 描述 | 示例 | 匹配结果 |
|---|---|---|---|
| * | 匹配0或多个 | re.match('\d*', '0731') |
'0731' |
| + | 匹配1或多个 | re.match('\w+', 'abc') |
'abc' |
| ? | 匹配0或1个 | re.match('\d?', '123') |
'1' |
| {m} | 匹配m个 | re.match('\d{2}', '123') |
'12' |
| {m,n} | 匹配m-n个 | re.match('\d{1,2}', '123') |
'12' |
3. 边界匹配符
| 符号 | 描述 | 示例 | 匹配结果 |
|---|---|---|---|
| ^ | 以指定字符开头 | re.match('^h', 'hello') |
'h' |
| $ | 以指定字符结尾 | re.search('\w+@163\.com$', 'xxx@163.com') |
'xxx@163.com' |
| 匹配多个表达式 | `re.search('hello |
4. 贪婪/非贪婪模式
-
贪婪模式(默认):匹配尽可能多的字符
pythonre.match('\d+', '0123456').group() # '0123456' -
非贪婪模式(加
?):匹配尽可能少的字符pythonre.match('\d+?', '0123456').group() # '0'
2.3.3 经典匹配案例
python
import re

# 1. 验证手机号(1开头,第二位3/4/5/8/7,后9位数字)
text = "18570631587"
ret = re.match('1[34587]\d{9}', text)
print(ret.group())  # 18570631587

# 2. 验证邮箱
text = "hynever@163.com"
ret = re.match('\w+@\w+\.[a-zA-Z\.]+', text)
print(ret.group())  # hynever@163.com

# 3. 验证URL
text = "http://www.baidu.com/"
ret = re.match('(http|https|ftp)://[^\s]+', text)
print(ret.group())  # http://www.baidu.com/

# 4. 验证身份证(18位,最后一位可为数字/x/X)
text = "3113111890812323X"
ret = re.match('\d{17}[\dxX]', text)
print(ret.group())  # 3113111890812323X

# 5. 匹配0-100数字
text = '99'
ret = re.match('[1-9]?\d$|100$', text)
print(ret.group())  # 99
2.3.4 转义字符与原生字符串
- 转义字符:特殊符号(如
$/\)需用\转义 - 原生字符串:加
r前缀,避免多次转义(推荐)
python
# 匹配$符号
text = "apple price is $99"
ret = re.search('\$(\d+)', text)
print(ret.group())  # $99

# 匹配\c(原生字符串)
text = "apple \c"
ret = re.search(r'\\c', text)
print(ret.group())  # \c
2.3.5 re模块核心函数
1. match(从开头匹配)
python
text = 'hello'
ret = re.match('h', text)
print(ret.group())  # h

# 匹配换行(flag=re.DOTALL)
text = "abc\nabc"
ret = re.match('abc.*abc', text, re.DOTALL)
print(ret.group())  # abc\nabc
2. search(全局匹配第一个)
python
text = 'apple price $99 orange price $88'
ret = re.search('\d+', text)
print(ret.group())  # 99

# 分组提取(()分组)
text = "apple price $99,orange price $10"
ret = re.search(r".*(\$\d+).*(\$\d+)", text)
print(ret.group())    # 整体:apple price $99,orange price $10
print(ret.group(1))   # 第一个分组:$99
print(ret.group(2))   # 第二个分组:$10
print(ret.groups())   # 所有分组:('$99', '$10')
3. findall(匹配所有结果)
python
text = 'apple price $99 orange price $88'
ret = re.findall('\d+', text)
print(ret)  # ['99', '88']
4. sub(替换匹配内容)
python
text = 'apple price $99 orange price $88'
ret = re.sub('\d+', '0', text)
print(ret)  # apple price $0 orange price $0

# 实战:清理HTML标签
html = "<p>1、精通HTML5、CSS3、JavaScript</p>"
ret = re.sub('</?[a-zA-Z0-9]+>', "", html)
print(ret)  # 1、精通HTML5、CSS3、JavaScript
5. split(按规则分割字符串)
python
text = "hello world ni hao"
ret = re.split('\W', text)
print(ret)  # ['hello', 'world', 'ni', 'hao']
6. compile(预编译正则)
提升重复匹配效率,支持注释(re.VERBOSE):
python
text = "the number is 20.50"
# 预编译(带注释)
pattern = re.compile(r"""
    \d+  # 整数部分
    \.?  # 小数点(可选)
    \d*  # 小数部分(可选)
""", re.VERBOSE)
ret = re.search(pattern, text)
print(ret.group())  # 20.50
第三章:数据存储
3.1 JSON文件处理
3.1.1 什么是JSON
JSON(JavaScript Object Notation)是轻量级数据交换格式,基于ECMAScript子集,独立于编程语言,以简洁的文本格式存储/表示数据,兼具人类可读性和机器解析效率,是爬虫数据存储的常用格式。
核心特点:本质是字符串,支持字典(对象)、列表(数组)、数值、布尔、null、字符串(必须双引号)等类型,多数据用逗号分隔。
3.1.2 字典/列表转JSON字符串
使用json.dumps()方法,ensure_ascii=False可避免中文转义:
python
import json

# 待转换数据
books = [
    {
        'title': '钢铁是怎样练成的',
        'price': 9.8
    },
    {
        'title': '红楼梦',
        'price': 9.9
    }
]

# 转换为JSON字符串(保留中文)
json_str = json.dumps(books, ensure_ascii=False)
print(json_str)  # 输出:[{"title": "钢铁是怎样练成的", "price": 9.8}, {"title": "红楼梦", "price": 9.9}]
print(type(json_str))  # <class 'str'>
3.1.3 直接将JSON写入文件
使用json.dump()方法,传入文件指针直接写入:
python
import json

books = [
    {'title': '钢铁是怎样练成的', 'price': 9.8},
    {'title': '红楼梦', 'price': 9.9}
]

# 写入文件(默认utf-8编码)
with open('books.json', 'w', encoding='utf-8') as fp:
    json.dump(books, fp, ensure_ascii=False)
3.1.4 JSON字符串转Python对象
使用json.loads()方法解析JSON字符串:
python
import json

# JSON字符串(注意双引号)
json_str = '[{"title": "钢铁是怎样练成的", "price": 9.8}, {"title": "红楼梦", "price": 9.9}]'

# 转换为Python列表
books = json.loads(json_str, encoding='utf-8')
print(type(books))  # <class 'list'>
print(books[0]['title'])  # 钢铁是怎样练成的
3.1.5 从文件读取JSON
使用json.load()方法直接读取文件中的JSON数据:
python
import json

with open('books.json', 'r', encoding='utf-8') as fp:
    # 直接加载为Python对象
    books = json.load(fp)
    print(books)  # [{'title': '钢铁是怎样练成的', 'price': 9.8}, {'title': '红楼梦', 'price': 9.9}]
3.2 CSV文件处理
CSV(逗号分隔值)是纯文本表格格式,适用于简单结构化数据存储,Python内置csv模块支持读写。
3.2.1 读取CSV文件
方式1:基础读取(按索引取值)
python
import csv

# 读取stock.csv文件
with open('stock.csv', 'r', encoding='utf-8') as fp:
    reader = csv.reader(fp)
    # 获取表头(第一行)
    titles = next(reader)
    print("表头:", titles)
    # 遍历数据行
    for row in reader:
        print(row)  # 每行是列表,按索引取值如row[0]
方式2:DictReader(按标题取值)
更易用,直接通过列名获取数据:
python
import csv

with open('stock.csv', 'r', encoding='utf-8') as fp:
    # 创建字典读取器
    reader = csv.DictReader(fp)
    # 按列名取值
    for row in reader:
        print(row['turnoverVol'])  # 直接通过标题获取对应值
3.2.2 写入CSV文件
方式1:基础写入(列表格式)
python
import csv

# 表头和数据
headers = ['name', 'age', 'classroom']
values = [
    ('zhiliao', 18, '111'),
    ('wena', 20, '222'),
    ('bbc', 21, '111')
]

# 写入文件(newline=''避免空行)
with open('test.csv', 'w', newline='', encoding='utf-8') as fp:
    writer = csv.writer(fp)
    writer.writerow(headers)  # 写入表头(单行)
    writer.writerows(values)  # 写入多行数据
方式2:DictWriter(字典格式)
按列名匹配写入,更贴合业务数据结构:
python
import csv

headers = ['name', 'age', 'classroom']
values = [
    {"name": 'wenn', "age": 20, "classroom": '222'},
    {"name": 'abc', "age": 30, "classroom": '333'}
]

with open('test.csv', 'w', newline='', encoding='utf-8') as fp:
    writer = csv.DictWriter(fp, headers)
    writer.writeheader()  # 写入表头(注意:原代码笔误为csv.writeheader())
    writer.writerow({'name': 'zhiliao', "age": 18, "classroom": '111'})  # 写入单行
    writer.writerows(values)  # 写入多行
3.3 Excel文件处理
Python处理Excel依赖xlrd(读)和xlwt(写)库,适用于需要兼容Excel格式的场景。
3.3.1 安装依赖
bash
pip install xlrd==1.2.0  # 高版本不支持xlsx,指定1.2.0兼容
pip install xlwt
3.3.2 读取Excel文件
1. 打开工作簿 & 获取Sheet
python
import xlrd

# 打开Excel文件
workbook = xlrd.open_workbook("成绩表.xlsx")

# 获取所有Sheet名称
sheet_names = workbook.sheet_names()
print("所有Sheet:", sheet_names)

# 获取Sheet的3种方式
sheet1 = workbook.sheet_by_index(0)  # 按索引(从0开始)
sheet2 = workbook.sheet_by_name("1班成绩")  # 按名称
sheets = workbook.sheets()  # 获取所有Sheet对象

# 获取Sheet的行数/列数
nrows = sheet1.nrows  # 行数
ncols = sheet1.ncols  # 列数
print(f"行数:{nrows},列数:{ncols}")
2. 获取Cell(单元格)数据
python
import xlrd

workbook = xlrd.open_workbook("成绩表.xlsx")
sheet = workbook.sheet_by_index(0)

# 方式1:获取指定单元格对象
cell = sheet.cell(0, 0)  # 第0行第0列
print("单元格值:", cell.value)
print("数据类型:", cell.ctype)  # 1=文本,2=数值,3=日期等

# 方式2:直接获取单元格值
value = sheet.cell_value(1, 2)  # 第1行第2列的值
print("单元格值(直接获取):", value)

# 方式3:获取整行/整列数据
row_values = sheet.row_values(0)  # 第0行所有值
col_values = sheet.col_values(1)  # 第1列所有值
print("第0行数据:", row_values)
print("第1列数据:", col_values)

# 方式4:切片获取行/列
row_slice = sheet.row_slice(0, 1, 3)  # 第0行,第1-2列(左闭右开)
col_slice = sheet.col_slice(0, 1, 3)  # 第0列,第1-2行
3.3.3 写入Excel文件
1. 新建Excel并写入
python
import xlwt
import random

# 创建工作簿(指定编码)
workbook = xlwt.Workbook(encoding='utf-8')
# 添加Sheet(指定名称)
sheet = workbook.add_sheet("成绩表")

# 写入表头
fields = ['数学', '英语', '语文']
for index, field in enumerate(fields):
    sheet.write(0, index, field)  # 行、列、值

# 写入随机成绩(1-9行)
for row in range(1, 10):
    for col in range(3):
        grade = random.randint(0, 100)
        sheet.write(row, col, grade)

# 保存文件(仅支持xls格式)
workbook.save("成绩表_新.xls")
2. 追加数据到现有Excel
python
import xlrd
import xlwt

# 读取原有Excel
workbook = xlrd.open_workbook("成绩表.xlsx")
rsheet = workbook.sheet_by_index(0)

# 1. 追加"总分"列
rsheet.put_cell(0, 4, xlrd.XL_CELL_TEXT, "总分", None)  # 表头
for row in range(1, rsheet.nrows):
    # 计算1-3列(数学/英语/语文)的总分
    total = sum(rsheet.row_values(row, 1, 4))
    rsheet.put_cell(row, 4, xlrd.XL_CELL_NUMBER, total, None)

# 2. 追加"平均分"行
total_rows = rsheet.nrows
for col in range(1, rsheet.ncols):
    # 计算每列平均分
    grades = rsheet.col_values(col, 1, total_rows)
    avg = sum(grades) / len(grades)
    rsheet.put_cell(total_rows, col, xlrd.XL_CELL_NUMBER, avg, None)

# 3. 写入新Excel文件
wwb = xlwt.Workbook(encoding="utf-8")
wsheet = wwb.add_sheet("1班学生成绩")
# 复制所有数据
for row in range(rsheet.nrows + 1):  # 包含平均分行
    for col in range(rsheet.ncols):
        wsheet.write(row, col, rsheet.cell_value(row, col) if row < rsheet.nrows else rsheet.cell_value(total_rows, col))

wwb.save("成绩表_追加.xls")
3.4 MySQL数据库
MySQL是关系型数据库,适用于结构化数据的持久化存储,Python通过pymysql驱动操作。
3.4.1 环境准备
-
安装MySQL:官网下载安装包(https://dev.mysql.com/downloads/windows/installer/5.7.html),需安装.NET Framework和Microsoft Visual C++依赖;
-
安装客户端(可选):Navicat(图形化操作工具);
-
安装Python驱动:
bashpip install pymysql
3.4.2 数据库连接
python
import pymysql

# 建立连接
db = pymysql.connect(
    host="127.0.0.1",  # 主机地址(本地为127.0.0.1)
    user='root',        # 用户名
    password='root',    # 密码
    database='pymysql_test',  # 数据库名
    port=3306,          # 端口(默认3306)
    charset='utf8'      # 编码
)

# 创建游标(执行SQL的工具)
cursor = db.cursor()
# 测试连接
cursor.execute("select 1")
data = cursor.fetchone()
print("连接成功:", data)  # 输出(1,)

# 关闭连接
db.close()
3.4.3 插入数据
1. 直接插入
python
import pymysql

db = pymysql.connect(host="127.0.0.1", user='root', password='root', database='pymysql_test', port=3306)
cursor = db.cursor()

# 插入SQL
sql = """
insert into user(
    id,username,gender,age,password
)
values(null,'abc',1,18,'111111');
"""

try:
    cursor.execute(sql)
    db.commit()  # 提交事务(必须)
    print("插入成功")
except Exception as e:
    db.rollback()  # 失败回滚
    print("插入失败:", e)
finally:
    db.close()
2. 参数化插入(防SQL注入)
python
import pymysql

db = pymysql.connect(host="127.0.0.1", user='root', password='root', database='pymysql_test', port=3306)
cursor = db.cursor()

# 带占位符的SQL
sql = """
insert into user(
    id,username,gender,age,password
)
values(null,%s,%s,%s,%s);
"""

try:
    # 传入参数(元组格式)
    cursor.execute(sql, ('spider', 1, 20, '222222'))
    db.commit()
    print("参数化插入成功")
except Exception as e:
    db.rollback()
    print("插入失败:", e)
finally:
    db.close()
3.4.4 查询数据
python
import pymysql

db = pymysql.connect(host="127.0.0.1", user='root', password='root', database='pymysql_test', port=3306)
cursor = db.cursor()

# 查询SQL
sql = "select * from user"
cursor.execute(sql)

# 方式1:逐行读取(fetchone)
print("=== fetchone ===")
while True:
    result = cursor.fetchone()
    if not result:
        break
    print(result)

# 方式2:读取所有(fetchall)
cursor.execute(sql)  # 重新执行SQL(游标已移动)
results = cursor.fetchall()
print("\n=== fetchall ===")
for result in results:
    print(result)

# 方式3:读取指定条数(fetchmany)
cursor.execute(sql)
results = cursor.fetchmany(2)  # 读取2条
print("\n=== fetchmany(2) ===")
for result in results:
    print(result)

db.close()
3.4.5 更新/删除数据
1. 更新数据
python
import pymysql

db = pymysql.connect(host="127.0.0.1", user='root', password='root', database='pymysql_test', port=3306)
cursor = db.cursor()

sql = "update user set username='aaa' where id=1"
try:
    cursor.execute(sql)
    db.commit()
    print("更新成功")
except Exception as e:
    db.rollback()
    print("更新失败:", e)
finally:
    db.close()
2. 删除数据
python
import pymysql

db = pymysql.connect(host="127.0.0.1", user='root', password='root', database='pymysql_test', port=3306)
cursor = db.cursor()

sql = "delete from user where id=1"
try:
    cursor.execute(sql)
    db.commit()
    print("删除成功")
except Exception as e:
    db.rollback()
    print("删除失败:", e)
finally:
    db.close()
3.5 MongoDB数据库
MongoDB是NoSQL数据库(文档型),适用于非结构化/海量数据存储,爬虫场景下灵活性更高。
3.5.1 环境准备
-
安装MongoDB:官网下载社区版(https://www.mongodb.com/download-center/community),安装时可勾选Compass(图形化工具);
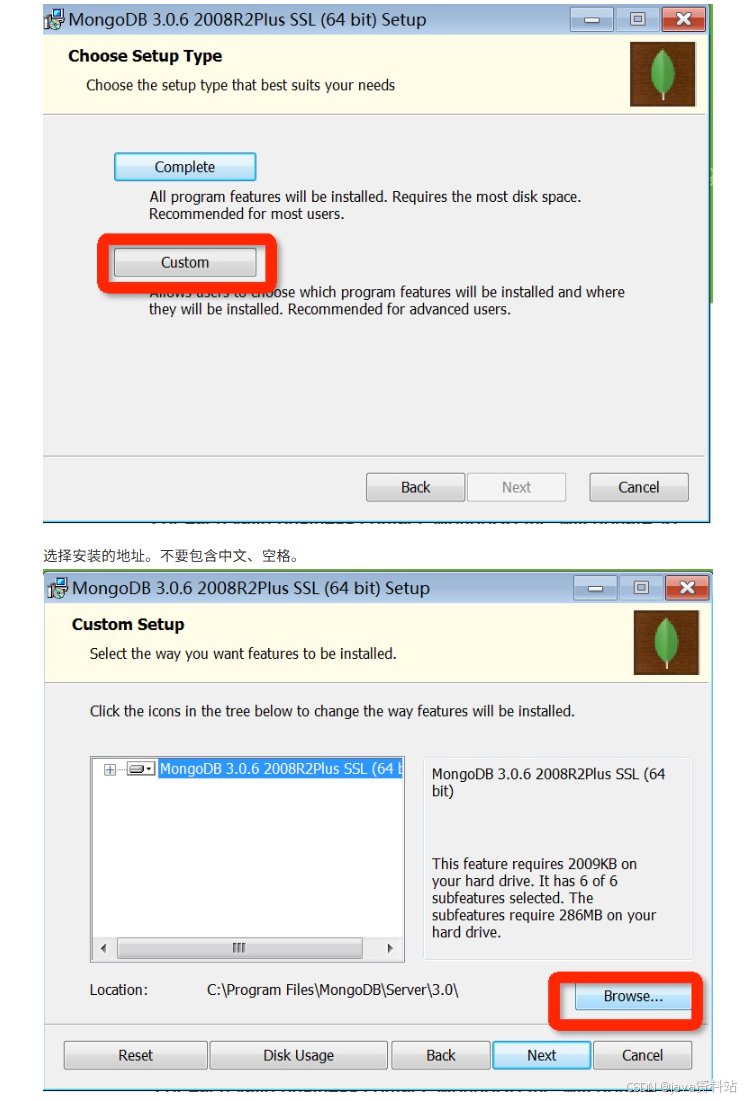
-
配置运行环境:
- 创建数据目录(如
D:\mongodb\data\db)和日志目录(D:\mongodb\data\log); - 将MongoDB的bin目录加入系统环境变量;
- 启动命令:
mongod --dbpath D:\mongodb\data\db;
- 创建数据目录(如
-
制作Windows服务(可选,避免每次手动启动):
bash# 1. 创建配置文件mongod.cfg # logpath=D:\mongodb\data\log\mongod.log # dbpath=D:\mongodb\data\db # 2. 安装服务 mongod --config "D:\mongodb\mongod.cfg" --install # 3. 启动/停止服务 net start mongodb net stop mongodb # 4. 移除服务 "D:\mongodb\bin\mongod.exe" --remove -
安装Python驱动:
bashpip install pymongo
3.5.2 核心概念
| SQL术语 | MongoDB术语 | 说明 |
|---|---|---|
| database | database | 数据库 |
| table | collection | 集合(表) |
| row | document | 文档(行) |
| column | field | 字段(列) |
| primary key | _id | 主键(MongoDB自动生成) |
3.5.3 Python连接MongoDB
python
import pymongo

# 建立连接(本地默认端口27017)
client = pymongo.MongoClient('127.0.0.1', port=27017)

# 获取数据库(不存在则自动创建)
db = client.zhihu  # 等价于 client['zhihu']

# 获取集合(表,不存在则自动创建)
collection = db.qa  # 等价于 db['qa']

print("连接成功")
3.5.4 基本操作
1. 插入数据
python
import pymongo

client = pymongo.MongoClient('127.0.0.1', 27017)
db = client.zhihu
collection = db.qa

# 插入单条
collection.insert_one({
    "username": "abc",
    "password": "hello"
})

# 插入多条
collection.insert_many([
    {"username": "abc", "password": "111111"},
    {"username": "bbb", "password": "222222"}
])

print("插入完成")
2. 查询数据
python
import pymongo

client = pymongo.MongoClient('127.0.0.1', 27017)
db = client.zhihu
collection = db.qa

# 查询单条(默认第一条)
result = collection.find_one()
print("默认第一条:", result)

# 条件查询单条
result = collection.find_one({"username": "abc"})
print("条件查询:", result)

# 查询所有(返回游标,可遍历)
results = collection.find({"username": "abc"})
print("\n所有符合条件的数据:")
for res in results:
    print(res)
3. 更新数据
python
import pymongo

client = pymongo.MongoClient('127.0.0.1', 27017)
db = client.zhihu
collection = db.qa

# 更新单条
collection.update_one(
    {"username": "abc"},  # 查询条件
    {"$set": {"username": "aaa"}}  # 更新操作
)

# 更新多条
collection.update_many(
    {"username": "abc"},
    {"$set": {"username": "aaa"}}
)

print("更新完成")
4. 删除数据
python
import pymongo

client = pymongo.MongoClient('127.0.0.1', 27017)
db = client.zhihu
collection = db.qa

# 删除单条
collection.delete_one({"username": "abc"})

# 删除多条
collection.delete_many({"username": "abc"})

print("删除完成")
第四章:爬虫进阶
4.1 多线程爬虫
多线程爬虫核心是利用线程并行执行耗时操作(如IO密集型的图片/数据下载),提升爬虫效率,Python主要通过threading模块和queue线程安全队列实现。
核心知识点
-
多线程基础
threading.Thread类:创建线程,通过target指定执行函数或继承Thread重写run方法。- 线程安全问题:多线程共享全局变量会导致数据错乱,需用
threading.Lock加锁解决。 - 进阶同步:
threading.Condition替代Lock,通过wait()/notify()减少无效锁竞争,提升性能。
-
线程安全队列(queue.Queue)
内置锁机制,无需手动加锁,适合生产者-消费者模式:
- 生产者线程:解析网页、提取待下载资源(如图片URL),存入队列。
- 消费者线程:从队列取出资源,执行下载/保存操作。
-
多线程爬虫实战(以表情包下载为例)
pythonimport threading import requests from lxml import etree from urllib import request import os import re from queue import Queue class Producer(threading.Thread): headers = {'User-Agent': 'Mozilla/5.0 (Windows NT 10.0; Win64; x64) Chrome/62.0.3202.94 Safari/537.36'} def __init__(self, page_queue, img_queue, *args, **kwargs): super().__init__(*args, **kwargs) self.page_queue = page_queue self.img_queue = img_queue def run(self): while True: if self.page_queue.empty(): break url = self.page_queue.get() self.parse_page(url) def parse_page(self, url): response = requests.get(url, headers=self.headers) html = etree.HTML(response.text) imgs = html.xpath("//div[@class='page-content text-center']//a//img") for img in imgs: if img.get('class') == 'gif': continue img_url = img.xpath(".//@data-original")[0] suffix = os.path.splitext(img_url)[1] alt = re.sub(r'[,。??,/\\·]','', img.xpath(".//@alt")[0]) self.img_queue.put((img_url, alt + suffix)) class Consumer(threading.Thread): def __init__(self, page_queue, img_queue, *args, **kwargs): super().__init__(*args, **kwargs) self.page_queue = page_queue self.img_queue = img_queue def run(self): while True: if self.img_queue.empty() and self.page_queue.empty(): return img_url, filename = self.img_queue.get(block=True) request.urlretrieve(img_url, f'images/{filename}') print(f'{filename} 下载完成!') if __name__ == '__main__': page_queue = Queue(100) img_queue = Queue(500) # 填充页码队列 for i in range(1, 101): page_queue.put(f"http://www.doutula.com/photo/list/?page={i}") # 启动5个生产者、5个消费者 for _ in range(5): Producer(page_queue, img_queue).start() for _ in range(5): Consumer(page_queue, img_queue).start() -
GIL全局解释器锁
CPython的GIL导致多线程无法利用多核CPU,仅适合IO密集型任务(如网络请求);CPU密集型任务建议用多进程。
4.2 动态网页爬虫
动态网页通过AJAX异步加载数据,无法直接从静态HTML中提取,核心解决方案有两种:
2.1 分析AJAX接口
- 优点:代码量少、性能高,直接请求接口获取JSON/XML数据。
- 缺点:需分析接口参数(如加密、签名),易被反爬识别。
2.2 Selenium+ChromeDriver模拟浏览器
Selenium模拟人类操作浏览器,能获取JS渲染后的完整页面,适合复杂动态页面。
-
环境准备
-
安装:
pip install selenium,下载对应Chrome版本的ChromeDriver并配置环境变量。 -
基础使用:
pythonfrom selenium import webdriver # 指定ChromeDriver路径 driver = webdriver.Chrome(executable_path=r'D:\chromedriver.exe') driver.get("https://www.baidu.com") print(driver.page_source) # 获取渲染后的页面源码 driver.quit() # 关闭浏览器
-
-
核心操作
- 定位元素:
find_element_by_id/name/xpath/css_selector等,find_elements获取所有匹配元素。 - 操作表单:输入框
send_keys()、复选框click()、下拉框Select类。 - 行为链:
ActionChains模拟鼠标连续操作(移动、点击、输入)。 - 页面等待:
- 隐式等待:
driver.implicitly_wait(10)(全局等待元素加载)。 - 显式等待:
WebDriverWait配合expected_conditions,等待指定条件满足。
- 隐式等待:
- 切换页面/代理:
switch_to.window()切换标签页;ChromeOptions配置代理IP。
- 定位元素:
4.3 图形验证码识别
图形验证码是爬虫常见阻碍,核心通过OCR(光学字符识别)技术识别,主流工具为Tesseract。
3.1 环境准备
- 安装Tesseract-OCR(配置环境变量
TESSDATA_PREFIX指向训练数据目录)。 - 安装依赖:
pip install pytesseract pillow。
3.2 基础使用
python
import pytesseract
from PIL import Image

# 指定Tesseract路径(Windows需配置)
pytesseract.pytesseract.tesseract_cmd = r'D:\TesseractOCR\tesseract.exe'

# 打开图片并识别
image = Image.open("captcha.png")
text = pytesseract.image_to_string(image, lang='eng')  # lang指定语言(eng/chi_sim)
print("识别结果:", text)
3.3 优化
- 预处理图片(灰度、二值化、降噪)提升识别率。
- 复杂验证码(如滑块、点选)需结合OpenCV或第三方打码平台。
4.4 字体反爬
字体反爬通过自定义字体文件(如TTF)映射字符,网页显示的是字体编码而非真实文字,核心解决思路是形状匹配。
4.1 反爬原理
- 网页通过
@font-face加载自定义字体,文字内容以&#xXXXX;(字体编码)形式存在。 - 字体文件中
cmap表存储"编码→字体名称"映射,glyf表存储字体形状绘制规则。
4.2 解决方案
- 提取网页中的自定义字体(base64解码或下载TTF文件)。
- 用FontCreator工具打开TTF,分析"字体形状→真实文字"的映射关系。
- 爬取时,将网页中的字体编码转换为字体形状,再匹配真实文字。
第五章:Scrapy框架
Scrapy是一款专为爬虫设计的高效、可扩展的Python框架,封装了网络请求、数据解析、异步处理、反反爬等核心能力,是企业级爬虫开发的首选工具。
5.1 框架架构
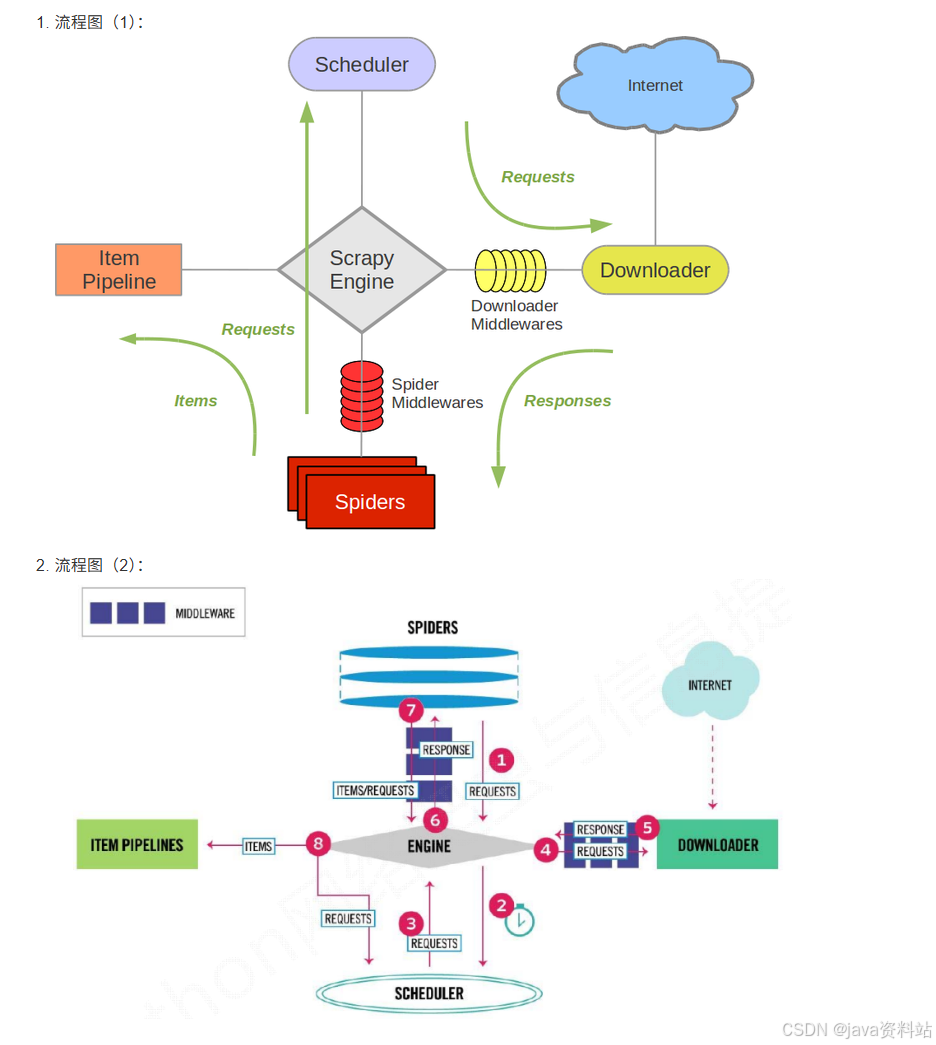
5.1.1 核心模块及功能
Scrapy的核心是引擎(Engine),负责各模块间的通信和数据流转,整体架构包含7个核心组件:
| 模块 | 核心功能 |
|---|---|
| Scrapy Engine(引擎) | 框架核心,负责调度、传递数据和协调所有模块 |
| Spider(爬虫) | 开发者自定义,指定爬取链接、解析页面数据(核心逻辑层) |
| Scheduler(调度器) | 接收引擎的请求,排序/去重后调度请求顺序 |
| Downloader(下载器) | 下载网页数据,返回给引擎 |
| Item Pipeline(管道) | 处理爬虫解析后的数据(存储到文件/数据库) |
| Downloader Middlewares(下载中间件) | 扩展引擎↔下载器的通信(设置代理、请求头) |
| Spider Middlewares(爬虫中间件) | 扩展引擎↔爬虫的通信(过滤请求/响应) |
5.1.2 核心流程
- 引擎向爬虫获取初始爬取URL(start_urls),交给调度器;
- 调度器将URL排序后,通过引擎交给下载器;
- 下载器下载页面数据,经下载中间件处理后返回引擎;
- 引擎将下载的响应(Response)交给爬虫解析;
- 爬虫解析出数据(Item)或新的URL:
- 数据(Item)→ 引擎 → 管道(Pipeline)存储;
- 新URL → 引擎 → 调度器,重复上述流程;
- 所有请求完成后,引擎关闭管道,爬虫结束。
5.2 快速入门
5.2.1 环境安装
通用安装
bash
pip install scrapy系统特殊配置
-
Ubuntu :先安装依赖再装Scrapy
bashsudo apt-get install python3-dev build-essential python3-pip libxml2-dev libxslt1-dev zlib1g-dev libffi-dev libssl-dev pip install scrapy -
Windows :解决
win32api缺失问题bashpip install pypiwin32
5.2.2 项目创建与目录结构
1. 创建项目
bash
# 进入目标目录后执行
scrapy startproject 项目名称  # 例:scrapy startproject qsbk_project
2. 核心目录结构
qsbk_project/
├── qsbk_project/          # 项目核心目录
│   ├── __init__.py
│   ├── items.py           # 数据模型(定义爬取的字段)
│   ├── middlewares.py     # 中间件(下载/爬虫中间件)
│   ├── pipelines.py       # 数据管道(存储数据)
│   ├── settings.py        # 全局配置(请求头、并发、代理等)
│   └── spiders/           # 爬虫脚本目录(核心)
└── scrapy.cfg             # 项目部署配置
5.2.3 第一个爬虫:爬取糗事百科
1. 创建爬虫
bash
# 进入项目目录后执行
scrapy genspider qsbk "qiushibaike.com"  # 爬虫名:qsbk,限定域名:qiushibaike.com
2. 核心配置(settings.py)
python
# 关闭爬虫协议(必改)
ROBOTSTXT_OBEY = False

# 添加请求头(模拟浏览器)
DEFAULT_REQUEST_HEADERS = {
  'User-Agent': 'Mozilla/5.0 (Windows NT 10.0; Win64; x64) Chrome/120.0.0.0 Safari/537.36',
  'Accept': 'text/html,application/xhtml+xml,application/xml;q=0.9,*/*;q=0.8',
}
3. 定义数据模型(items.py)
python
import scrapy

class QsbkItem(scrapy.Item):
    # 定义要爬取的字段
    author = scrapy.Field()  # 作者
    content = scrapy.Field()  # 段子内容
4. 编写爬虫逻辑(spiders/qsbk.py)
python
import scrapy
from qsbk_project.items import QsbkItem

class QsbkSpider(scrapy.Spider):
    name = 'qsbk'  # 爬虫名(唯一)
    allowed_domains = ['qiushibaike.com']  # 允许爬取的域名
    start_urls = ['https://www.qiushibaike.com/text/']  # 初始URL

    def parse(self, response):
        """解析页面数据(核心方法)"""
        # 提取所有段子容器
        outer_box = response.xpath("//div[@id='content-left']/div")
        for box in outer_box:
            # 提取作者(去除空白字符)
            author = box.xpath(".//div[contains(@class,'author')]//h2/text()").extract_first().strip()
            # 提取段子内容
            content = box.xpath(".//div[@class='content']/span/text()").extract_first().strip()

            # 封装到Item对象
            item = QsbkItem()
            item['author'] = author
            item['content'] = content
            yield item  # 提交给管道
5. 编写数据管道(pipelines.py)
python
import json

class QsbkProjectPipeline:
    def __init__(self):
        # 初始化:打开文件
        self.fp = open('qsbk.json', 'w', encoding='utf-8')
        self.items = []

    def process_item(self, item, spider):
        """处理每个Item(必实现)"""
        self.items.append(dict(item))  # 转换为字典存入列表
        return item  # 必须返回Item(供后续管道处理)

    def close_spider(self, spider):
        """爬虫结束时执行"""
        json.dump(self.items, self.fp, ensure_ascii=False)  # 写入JSON文件
        self.fp.close()
6. 启用管道(settings.py)
python
ITEM_PIPELINES = {
   'qsbk_project.pipelines.QsbkProjectPipeline': 300,  # 数字越小,优先级越高
}
7. 运行爬虫
-
命令行运行:
bashscrapy crawl qsbk # qsbk为爬虫名 -
脚本运行(创建start.py):
pythonfrom scrapy import cmdline cmdline.execute("scrapy crawl qsbk".split())
5.3 CrawlSpider
5.3.1 核心作用
继承自Scrapy.Spider,新增自动提取满足规则的URL能力,无需手动生成Request,适合批量爬取分页/列表类页面。
5.3.2 创建CrawlSpider
bash
scrapy genspider -c crawl 爬虫名 域名 # 例:scrapy genspider -c crawl applet "wxapp-union.com"5.3.3 核心组件
1. LinkExtractors(链接提取器)
自动提取满足规则的URL,核心参数:
python
from scrapy.linkextractors import LinkExtractor

# 示例:提取所有分页链接(匹配/page/数字/的URL)
link_extractor = LinkExtractor(
    allow=r'/page/\d+/',  # 允许的URL正则
    deny_domains=['xxx.com'],  # 禁止的域名
    restrict_xpaths=['//div[@class="pager"]']  # 限定提取区域(XPath)
)
2. Rule(规则类)
定义URL的爬取规则,核心参数:
python
from scrapy.spiders import Rule

# 示例规则
rules = [
    # 提取分页链接,跟进(继续爬取),不指定回调
    Rule(link_extractor, follow=True),
    # 提取详情页链接,指定回调函数解析,不跟进
    Rule(LinkExtractor(allow=r'/article/\d+/'), callback='parse_detail', follow=False)
]
5.3.4 示例:小程序社区爬虫
python
import scrapy
from scrapy.linkextractors import LinkExtractor
from scrapy.spiders import CrawlSpider, Rule
from wxapp_project.items import WxappItem

class WxappSpider(CrawlSpider):
    name = 'wxapp'
    allowed_domains = ['wxapp-union.com']
    start_urls = ['https://www.wxapp-union.com/']

    # 定义链接提取规则
    link_extractor = LinkExtractor(allow=r'/article/\d+/.html')
    rules = [
        Rule(link_extractor, callback='parse_detail', follow=False)
    ]

    def parse_detail(self, response):
        """解析详情页"""
        title = response.xpath("//h1[@class='ph']/text()").extract_first()
        author = response.xpath("//p[@class='authors']/a/text()").extract_first()
        content = response.xpath("//div[@class='content']//text()").extract()
        content = ''.join(content).strip()

        item = WxappItem()
        item['title'] = title
        item['author'] = author
        item['content'] = content
        yield item
5.4 Scrapy Shell
5.4.1 核心作用
轻量级交互式环境,无需运行完整爬虫,快速验证XPath/CSS选择器、调试解析规则。
5.4.2 使用方法
bash
# 进入项目目录,执行以下命令(指定要调试的URL)
scrapy shell https://www.qiushibaike.com/text/
5.4.3 常用命令/属性
| 命令/属性 | 作用 |
|---|---|
response.xpath('//div[@class="content"]') |
执行XPath解析 |
response.css('.content') |
执行CSS选择器解析 |
extract() |
提取所有结果(列表) |
extract_first() |
提取第一个结果(避免索引越界) |
view(response) |
在浏览器中打开响应页面(调试用) |
5.5 Request和Response对象
5.5.1 Request对象
手动发送请求时使用,核心参数:
python
from scrapy import Request

# 示例:发送GET请求
yield Request(
    url='https://www.xxx.com/page/2',  # 请求URL
    callback=self.parse_page,  # 回调函数
    meta={'page': 2},  # 传递数据(跨请求共享)
    dont_filter=True  # 禁止调度器过滤重复URL
)

# 示例:发送POST请求(模拟登录)
from scrapy import FormRequest

yield FormRequest(
    url='https://www.xxx.com/login',
    formdata={'username': 'xxx', 'password': 'xxx'},  # POST参数
    callback=self.after_login
)
5.5.2 Response对象
下载器返回的响应对象,核心属性:
| 属性 | 作用 |
|---|---|
response.text |
响应文本(Unicode格式) |
response.body |
响应字节流(二进制) |
response.xpath() |
XPath解析方法 |
response.css() |
CSS选择器解析方法 |
response.meta |
获取Request传递的meta数据 |
response.status |
响应状态码(200/404等) |
5.5.3 模拟登录示例(豆瓣)
python
class DoubanSpider(scrapy.Spider):
    name = 'douban'
    allowed_domains = ['douban.com']
    start_urls = ['https://www.douban.com/']

    def start_requests(self):
        """重写初始请求,发送登录POST"""
        login_url = 'https://accounts.douban.com/login'
        yield FormRequest(
            url=login_url,
            formdata={
                'form_email': '你的账号',
                'form_password': '你的密码',
                'source': 'index_nav'
            },
            callback=self.parse_login
        )

    def parse_login(self, response):
        """登录后解析"""
        # 验证是否登录成功
        if '我的豆瓣' in response.text:
            self.logger.info('登录成功!')
            # 继续爬取需要登录的页面
            yield Request(url='https://www.douban.com/mine', callback=self.parse_mine)
        else:
            self.logger.error('登录失败!')
5.6 下载文件和图片
Scrapy内置FilesPipeline/ImagesPipeline,支持异步下载、去重、格式转换,效率远高于手动下载。
5.6.1 下载图片(ImagesPipeline)
1. 定义Item(items.py)
python
import scrapy

class CarImageItem(scrapy.Item):
    image_urls = scrapy.Field()  # 图片URL列表(必须)
    images = scrapy.Field()  # 下载后的信息(自动填充)
2. 配置settings.py
python
# 图片存储路径(绝对/相对路径)
IMAGES_STORE = './car_images'

# 启用图片管道
ITEM_PIPELINES = {
    'scrapy.pipelines.images.ImagesPipeline': 1,
}

# 可选:图片最小尺寸(过滤过小图片)
IMAGES_MIN_HEIGHT = 100
IMAGES_MIN_WIDTH = 100
3. 爬虫逻辑(爬取汽车之家图片)
python
import scrapy
from car_project.items import CarImageItem

class CarSpider(scrapy.Spider):
    name = 'car'
    allowed_domains = ['autohome.com.cn']
    start_urls = ['https://car.autohome.com.cn/pic/series/65.html']

    def parse(self, response):
        # 提取图片URL
        image_urls = response.xpath("//div[@class='uibox-con']//img/@src").extract()
        # 补全URL(部分图片URL为相对路径)
        image_urls = [url if url.startswith('http') else 'https:' + url for url in image_urls]

        item = CarImageItem()
        item['image_urls'] = image_urls  # 必须是列表
        yield item
5.7 下载中间件
5.7.1 核心作用
拦截引擎与下载器之间的请求/响应,实现随机请求头、IP代理、反反爬等功能,核心方法:
process_request(request, spider):请求发送前执行;process_response(request, response, spider):响应返回前执行。
5.7.2 实战1:随机请求头中间件
python
# middlewares.py
import random

class RandomUserAgentMiddleware:
    # 自定义请求头列表
    USER_AGENTS = [
        'Mozilla/5.0 (Windows NT 10.0; Win64; x64) Chrome/120.0.0.0 Safari/537.36',
        'Mozilla/5.0 (Macintosh; Intel Mac OS X 10_15_7) Firefox/121.0',
        'Mozilla/5.0 (iPhone; CPU iPhone OS 17_0 like Mac OS X) Safari/605.1.15'
    ]

    def process_request(self, request, spider):
        """请求发送前,随机设置User-Agent"""
        user_agent = random.choice(self.USER_AGENTS)
        request.headers['User-Agent'] = user_agent
        return None  # 返回None:继续处理请求
5.7.3 实战2:IP代理池中间件
python
# middlewares.py
import random
import base64

class IPProxyMiddleware:
    # 开放代理池
    PROXIES = [
        '110.243.32.154:9999',
        '123.56.78.90:8080',
        '180.101.59.19:8080'
    ]

    def process_request(self, request, spider):
        """设置IP代理"""
        # 方式1:开放代理
        proxy = random.choice(self.PROXIES)
        request.meta['proxy'] = f'http://{proxy}'

        # 方式2:独享代理(带账号密码)
        # proxy = '121.199.6.124:16816'
        # user_pwd = '账号:密码'
        # b64_pwd = base64.b64encode(user_pwd.encode('utf-8')).decode('utf-8')
        # request.meta['proxy'] = f'http://{proxy}'
        # request.headers['Proxy-Authorization'] = f'Basic {b64_pwd}'
        return None
5.7.4 启用中间件(settings.py)
python
DOWNLOADER_MIDDLEWARES = {
   'car_project.middlewares.RandomUserAgentMiddleware': 543,
   'car_project.middlewares.IPProxyMiddleware': 544,  # 数字越小,优先级越高
}
5.8 Settings配置信息
5.8.1 核心配置项(常用)
| 配置项 | 作用 | 默认值 |
|---|---|---|
ROBOTSTXT_OBEY |
是否遵守robots协议 | True |
CONCURRENT_REQUESTS |
下载器并发请求数 | 16 |
DOWNLOAD_DELAY |
下载延迟(秒),防反爬 | 0 |
DEFAULT_REQUEST_HEADERS |
默认请求头 | - |
ITEM_PIPELINES |
启用的管道及优先级 | {} |
DOWNLOADER_MIDDLEWARES |
启用的下载中间件 | {} |
LOG_LEVEL |
日志级别(DEBUG/INFO/WARNING) | DEBUG |
COOKIES_ENABLED |
是否启用Cookie(关闭防追踪) | True |
DEPTH_LIMIT |
最大爬取深度(0=无限制) | 0 |
DOWNLOAD_TIMEOUT |
下载超时时间(秒) | 180 |
5.8.2 优化配置示例(防反爬)
python
# 关闭robots协议
ROBOTSTXT_OBEY = False

# 降低并发,增加延迟
CONCURRENT_REQUESTS = 8
DOWNLOAD_DELAY = 2  # 每次请求间隔2秒

# 关闭Cookie
COOKIES_ENABLED = False

# 日志级别(上线后改为INFO,减少输出)
LOG_LEVEL = 'INFO'

# 请求头
DEFAULT_REQUEST_HEADERS = {
    'Accept': 'text/html,application/xhtml+xml,application/xml;q=0.9,*/*;q=0.8',
    'Accept-Language': 'zh-CN,zh;q=0.9,en;q=0.8',
}
5.9 Scrapy爬虫实战
5.9.1 实战场景汇总
| 实战案例 | 核心技术 | 应用场景 |
|---|---|---|
| 糗事百科爬虫 | Spider、XPath解析、JSON存储 | 入门级文本爬取 |
| 小程序社区爬虫 | CrawlSpider、LinkExtractors | 批量分页爬取 |
| 豆瓣模拟登录 | FormRequest、POST请求 | 需登录的站点爬取 |
| 汽车之家图片爬取 | ImagesPipeline、异步下载 | 文件/图片下载 |
| BOSS直聘爬虫 | IP代理中间件、随机请求头 | 高反爬站点爬取 |
| 简书整站爬虫 | MySQL管道、Selenium集成 | 数据入库、动态页面爬取 |
5.9.2 实战核心要点
- 反反爬:随机请求头 + IP代理 + 下载延迟 + 关闭Cookie;
- 数据存储:JSON/CSV(简单)、MySQL/MongoDB(海量数据);
- 动态页面:集成Selenium/Playwright处理JS渲染;
- 效率优化:合理设置并发数、使用异步下载、增量爬取。
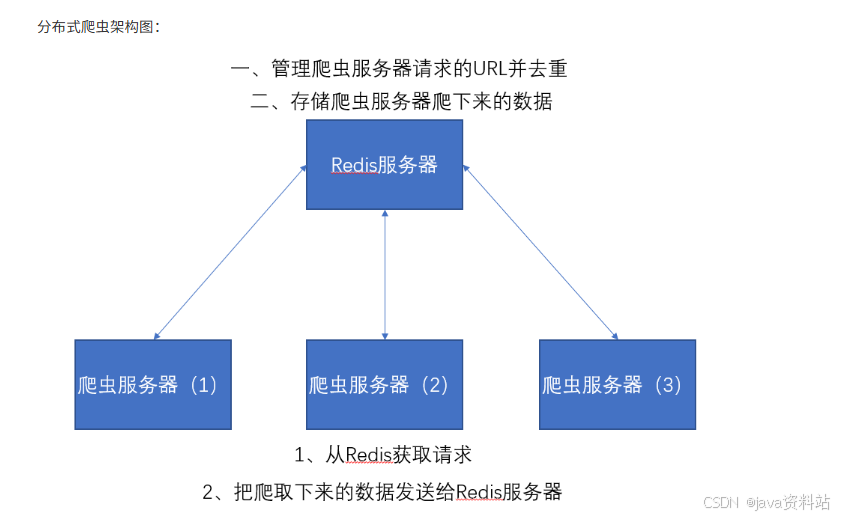
第六章:Scrapy-Redis分布式组件
Scrapy-Redis是Scrapy框架的分布式扩展组件,核心基于Redis数据库实现爬虫的分布式部署,解决多机协同爬取时的任务调度、数据去重、数据统一存储问题,大幅提升爬虫的爬取效率。
6.1 Redis数据库介绍
6.1.1 核心特性
Redis是一款内存型NoSQL数据库(支持磁盘持久化),相比传统数据库/Memcached,具备以下优势:
- 数据存储在内存中,读写速度极快(单机QPS可达10万+);
- 支持丰富的数据结构:字符串(String)、列表(List)、集合(Set)、哈希(Hash)、有序集合(Sorted Set);
- 支持分布式、事务、发布/订阅、过期策略等特性;
- 可持久化数据(定时同步到磁盘),避免数据丢失。
6.1.2 典型使用场景
| 场景 | 说明 |
|---|---|
| 登录会话存储 | 替代Memcached,数据可持久化 |
| 排行榜/计数器 | 点赞数、阅读量、主播排名等实时统计 |
| 消息队列 | Celery、Scrapy-Redis等框架的中间人 |
| 在线人数统计 | 实时获取系统在线用户数 |
| 热点数据缓存 | 论坛板块、热门文章等低频变更数据缓存 |
| 分布式锁/去重 | 分布式爬虫的任务去重、资源竞争控制 |
6.1.3 环境安装与启动
1. Ubuntu系统
bash
# 安装
sudo apt-get install redis-server

# 启动/停止/重启
sudo service redis-server start
sudo service redis-server stop
sudo service redis-server restart

# 查看运行状态
ps aux | grep redis
2. Windows系统
- 下载地址:https://github.com/MicrosoftArchive/redis/releases(微软移植版);
- 安装:双击MSI文件,按向导完成安装;
- 启动:进入安装目录,执行
redis-server.exe redis.windows.conf; - 连接:执行
redis-cli.exe(需将Redis路径加入系统环境变量)。
3. 允许远程访问
修改Redis配置文件(Ubuntu:/etc/redis/redis.conf;Windows:redis.windows.conf):
ini
# 将bind 127.0.0.1改为0.0.0.0(允许所有IP访问)
bind 0.0.0.0

# 关闭保护模式(可选,生产环境需配置密码)
protected-mode no
修改后重启Redis服务。
6.1.4 核心数据结构操作(redis-cli)
1. 字符串(String):最基础类型
bash
# 设置值(永久有效)
set username xiaotuo

# 设置值并指定过期时间(10秒后过期)
setex username 10 xiaotuo
# 或 set username xiaotuo EX 10

# 获取值
get username

# 删除值
del username

# 查看过期时间(-1=永久,-2=已过期)
ttl username

# 查看所有key
keys *
2. 列表(List):有序可重复,适合做队列
bash
# 左插入(表头)
lpush languages python java php

# 右插入(表尾)
rpush languages c++

# 查看列表(0=-1表示所有元素)
lrange languages 0 -1

# 左弹出(移除并返回表头元素)
lpop languages

# 右弹出(移除并返回表尾元素)
rpop languages

# 获取列表长度
llen languages

# 删除指定元素(count=0删除所有匹配项)
lrem languages 0 php
3. 集合(Set):无序不可重复,适合去重/交集
bash
# 添加元素
sadd team xiaotuo datuo mingming

# 查看所有元素
smembers team

# 删除元素
srem team mingming

# 获取集合大小
scard team

# 交集(共同元素)
sinter team1 team2

# 并集(所有元素)
sunion team1 team2

# 差集(team1有但team2没有)
sdiff team1 team2
4. 哈希(Hash):键值对集合,适合存储对象
bash
# 设置字段值
hset website baidu baidu.com
hset website taobao taobao.com

# 获取字段值
hget website baidu

# 获取所有字段和值
hgetall website

# 获取所有字段
hkeys website

# 获取所有值
hvals website

# 删除字段
hdel website taobao

# 判断字段是否存在
hexists website baidu
5. 事务:批量执行命令(原子性)
bash
# 开启事务
multi

# 执行多个命令(暂存,未提交)
set a 1
set b 2

# 提交事务(执行所有命令)
exec

# 取消事务(放弃所有命令)
discard
6. 发布/订阅:消息通信
bash
# 终端1:订阅频道
subscribe news

# 终端2:发布消息到频道
publish news "Scrapy-Redis分布式爬虫教程"
6.2 Scrapy-Redis组件介绍
6.2.1 核心解决的问题
Scrapy本身不支持分布式,多机运行时会出现重复爬取、任务冲突、数据分散等问题,Scrapy-Redis通过Redis解决:
- 统一任务调度:所有爬虫节点从Redis获取待爬取的URL,避免重复任务;
- 分布式去重:所有爬虫节点共享Redis的去重指纹库,防止重复爬取;
- 统一数据存储:爬取的Item统一存入Redis,便于后续集中处理。
6.2.2 架构对比(Scrapy vs Scrapy-Redis)
| 模块 | Scrapy(单机) | Scrapy-Redis(分布式) |
|---|---|---|
| 任务调度(Scheduler) | 本地内存队列 | Redis队列(所有节点共享) |
| 去重(DupeFilter) | 本地内存去重 | Redis集合去重(共享指纹) |
| 数据存储(Pipeline) | 本地文件/数据库 | Redis统一存储(可选) |
| 启动方式 | 本地start_urls | Redis推送初始URL(lpush) |
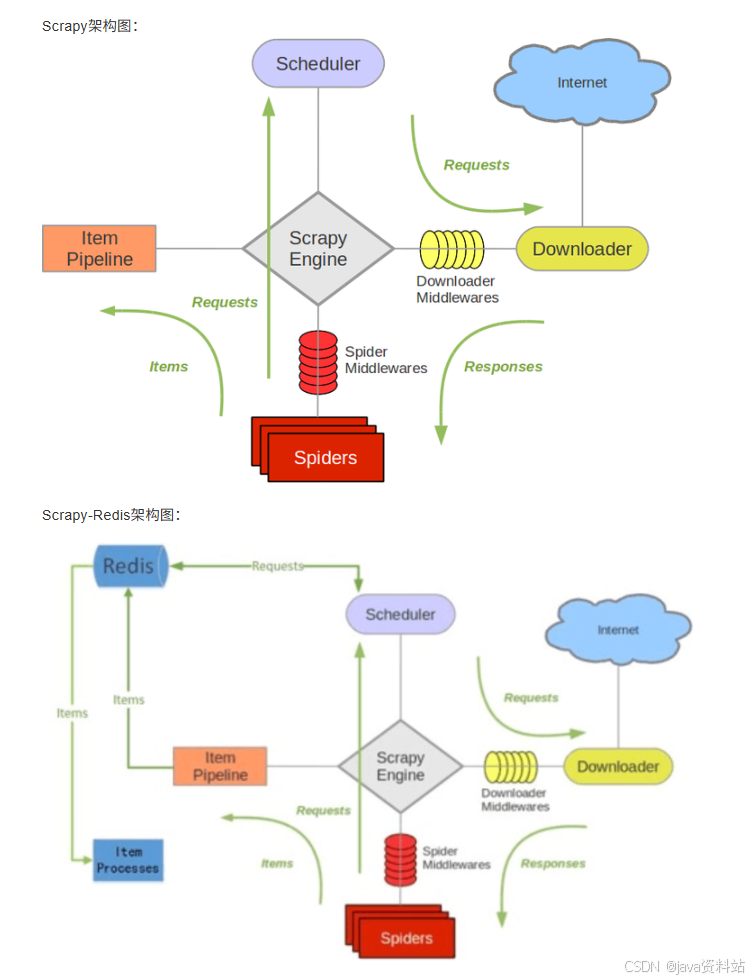
以上两个图片对比我们可以发现。Item Pipeline在接收到数据后发送给了Redis、Scheduler调度器调度数据也是从Redis中来的、并且其实数据去重也是在Redis中做的。
6.2.3 安装
bash
pip install scrapy-redis6.2.4 核心配置(settings.py)
python
# ========== Scrapy-Redis 核心配置 ==========
# 1. 替换调度器:使用Redis存储待爬取的请求
SCHEDULER = "scrapy_redis.scheduler.Scheduler"

# 2. 替换去重器:使用Redis的集合存储去重指纹
DUPEFILTER_CLASS = "scrapy_redis.dupefilter.RFPDupeFilter"

# 3. 启用Redis管道:将Item存入Redis(可选,也可自定义管道存入MySQL/MongoDB)
ITEM_PIPELINES = {
    'scrapy_redis.pipelines.RedisPipeline': 300,
    # 自定义管道(如存入MySQL)可叠加
    # 'sfw_project.pipelines.SfwPipeline': 400,
}

# 4. 持久化调度器队列:Redis中的队列不会清空,支持暂停/恢复爬虫
SCHEDULER_PERSIST = True

# 5. Redis连接配置(分布式爬虫所有节点需指向同一Redis服务器)
REDIS_HOST = '192.168.1.100'  # Redis服务器IP(非本地需填真实IP)
REDIS_PORT = 6379  # Redis端口(默认6379)
# REDIS_PASSWORD = '123456'  # 如有密码需配置

# ========== 基础防反爬配置 ==========
ROBOTSTXT_OBEY = False
CONCURRENT_REQUESTS = 16
DOWNLOAD_DELAY = 1
DEFAULT_REQUEST_HEADERS = {
    'User-Agent': 'Mozilla/5.0 (Windows NT 10.0; Win64; x64) Chrome/120.0.0.0 Safari/537.36',
}
6.3 搜房网分布式爬虫实战
6.3.1 需求说明
爬取搜房网(https://www1.fang.com)指定城市的小区信息(名称、价格、地址),通过多台机器分布式爬取,提升效率。
6.3.2 项目创建与改造
1. 创建Scrapy项目
bash
scrapy startproject sfw_project
cd sfw_project
scrapy genspider -c crawl sfw "fang.com"  # 创建CrawlSpider爬虫
2. 改造爬虫(spiders/sfw.py)
将普通CrawlSpider改为RedisCrawlSpider,适配分布式:
python
import scrapy
from scrapy.linkextractors import LinkExtractor
from scrapy.spiders import RedisCrawlSpider, Rule  # 替换为RedisCrawlSpider
from sfw_project.items import SfwItem

class SfwSpider(RedisCrawlSpider):  # 继承RedisCrawlSpider
    name = 'sfw'
    allowed_domains = ['fang.com']
    # 移除start_urls,改为redis_key(从Redis获取初始URL)
    redis_key = 'sfw:start_urls'  # 格式:项目名:标识

    # 定义链接提取规则
    # 规则1:城市列表→小区列表(跟进,不回调)
    list_link = LinkExtractor(allow=r'/newhouse/[\w]+/fangjia/\d+.htm')
    # 规则2:小区列表→小区详情(回调解析,不跟进)
    detail_link = LinkExtractor(allow=r'/newhouse/[\w]+/house/\d+.htm')

    rules = [
        Rule(list_link, follow=True),
        Rule(detail_link, callback='parse_detail', follow=False)
    ]

    def parse_detail(self, response):
        """解析小区详情页"""
        # 提取小区名称
        name = response.xpath("//h1[@class='detail-title']/text()").extract_first().strip()
        # 提取小区价格
        price = response.xpath("//span[@class='price']/text()").extract_first() or '暂无价格'
        # 提取小区地址
        address = response.xpath("//div[@class='detail-address']/span/text()").extract_first().strip()

        # 封装Item
        item = SfwItem()
        item['name'] = name
        item['price'] = price
        item['address'] = address

        yield item
3. 定义Item(items.py)
python
import scrapy

class SfwItem(scrapy.Item):
    # 小区名称
    name = scrapy.Field()
    # 小区价格
    price = scrapy.Field()
    # 小区地址
    address = scrapy.Field()
4. 自定义管道(可选,存入MySQL)
如果需要将数据存入MySQL(而非仅Redis),修改pipelines.py:
python
import pymysql

class SfwPipeline:
    def __init__(self):
        # 连接MySQL(分布式所有节点需指向同一数据库)
        self.conn = pymysql.connect(
            host='192.168.1.100',
            user='root',
            password='123456',
            database='sfw_db',
            port=3306,
            charset='utf8'
        )
        self.cursor = self.conn.cursor()

    def process_item(self, item, spider):
        """插入数据"""
        sql = """
        INSERT INTO community (name, price, address)
        VALUES (%s, %s, %s)
        ON DUPLICATE KEY UPDATE price=%s  # 去重更新
        """
        try:
            self.cursor.execute(sql, (item['name'], item['price'], item['address'], item['price']))
            self.conn.commit()
        except Exception as e:
            self.conn.rollback()
            spider.logger.error(f"插入失败:{e}")
        return item

    def close_spider(self, spider):
        """关闭连接"""
        self.cursor.close()
self.conn.close()启用自定义管道(settings.py):
python
ITEM_PIPELINES = {
    'scrapy_redis.pipelines.RedisPipeline': 300,  # 先存入Redis
    'sfw_project.pipelines.SfwPipeline': 400,     # 再存入MySQL
}
6.3.3 分布式部署与运行
前提条件
- 所有爬虫节点(多台机器)需安装:
scrapy、scrapy-redis、pymysql(如需MySQL); - 所有节点能访问同一Redis服务器和MySQL服务器(如有);
- 所有节点的爬虫代码保持一致。
运行步骤
步骤1:启动Redis服务器
bash
# 在Redis服务器(如192.168.1.100)上启动
redis-server
步骤2:在所有爬虫节点启动爬虫
bash
# 节点1(如192.168.1.101)
cd /path/to/sfw_project
scrapy runspider sfw.py

# 节点2(如192.168.1.102)
cd /path/to/sfw_project
scrapy runspider sfw.py

# 节点3(如192.168.1.103)
cd /path/to/sfw_project
scrapy runspider sfw.py
此时爬虫会等待Redis推送初始URL,不会立即爬取。
步骤3:推送初始URL到Redis
bash
# 连接Redis服务器(任意节点均可)
redis-cli -h 192.168.1.100 -p 6379

# 推送初始URL(对应爬虫的redis_key=sfw:start_urls)
lpush sfw:start_urls https://www1.fang.com/newhouse/
推送后,所有爬虫节点会立即从Redis获取任务,开始分布式爬取。
6.3.4 监控与调试
-
查看Redis中的待爬取队列 :
bashredis-cli -h 192.168.1.100 llen scrapy:queue:sfw # 查看待爬取请求数 smembers scrapy:dupefilter:sfw # 查看去重指纹(数量大时慎用) lrange sfw:items 0 -1 # 查看存入Redis的Item -
暂停/恢复爬虫 :
- 暂停:直接关闭爬虫节点,Redis中的队列不会清空;
- 恢复:重新启动爬虫节点,会从Redis继续获取未完成的任务。
-
扩展节点:新增机器只需同步代码,启动爬虫即可自动加入分布式集群。