用CPU训练很辛苦,图像尺寸用的320 .
训练
xml文件
xml
# Ultralytics 🚀 AGPL-3.0 License - https://ultralytics.com/license

# Parameters
nc: 80 # number of classes
depth_multiple: 0.33 # model depth multiple
width_multiple: 0.50 # layer channel multiple
anchors:
  - [10, 13, 16, 30, 33, 23] # P3/8
  - [30, 61, 62, 45, 59, 119] # P4/16
  - [116, 90, 156, 198, 373, 326] # P5/32

# YOLOv5 v6.0 backbone
backbone:
  # [from, number, module, args]
  [
    [-1, 1, Conv, [64, 6, 2, 2]], # 0-P1/2
    [-1, 1, Conv, [128, 3, 2]], # 1-P2/4
    [-1, 3, C3, [128]],
    [-1, 1, Conv, [256, 3, 2]], # 3-P3/8
    [-1, 6, C3, [256]],
    [-1, 1, Conv, [512, 3, 2]], # 5-P4/16
    [-1, 9, C3, [512]],
    [-1, 1, Conv, [1024, 3, 2]], # 7-P5/32
    [-1, 3, C3, [1024]],
    [-1, 1, SPPF, [1024, 5]], # 9
  ]

# YOLOv5 v6.0 head
head: [
    [-1, 1, Conv, [512, 1, 1]],
    [-1, 1, nn.Upsample, [None, 2, "nearest"]],
    [[-1, 6], 1, Concat, [1]], # cat backbone P4
    [-1, 3, C3, [512, False]], # 13

    [-1, 1, Conv, [256, 1, 1]],
    [-1, 1, nn.Upsample, [None, 2, "nearest"]],
    [[-1, 4], 1, Concat, [1]], # cat backbone P3
    [-1, 3, C3, [256, False]], # 17 (P3/8-small)

    [-1, 1, Conv, [256, 3, 2]],
    [[-1, 14], 1, Concat, [1]], # cat head P4
    [-1, 3, C3, [512, False]], # 20 (P4/16-medium)

    [-1, 1, Conv, [512, 3, 2]],
    [[-1, 10], 1, Concat, [1]], # cat head P5
    [-1, 3, C3, [1024, False]], # 23 (P5/32-large)

    [[17, 20, 23], 1, Detect, [nc]], # Detect(P3, P4, P5)
  ]
Python训练程序
python
# https://blog.csdn.net/qq_28262763/article/details/127984206
# 模型配置文件
model_yaml_path = r"e:/9/yolov5s.yaml"
#数据集配置文件
data_yaml_path = r'e:/9/mycoco.yaml'

#预训练模型
pre_model_name = r'e:/9/yolov5su.pt'


import warnings
warnings.filterwarnings('ignore')
from ultralytics import YOLO

if __name__ == '__main__':
    model = YOLO(model_yaml_path)
    model.load(pre_model_name) # 是否加载预训练权重
    model.train(
       data=data_yaml_path,
       task='detect',  # 明确指定任务类型
       cache=False,    # 禁用缓存减少磁盘IO
       imgsz=320,      # 降低分辨率至320x320(原640x640)
       epochs=50,      # 减少训练轮次(原100)
       single_cls=True,# 保持单类别检测
       batch=16,       # 大幅减小批次(原64)
       close_mosaic=0, # 关闭马赛克增强
       workers=8,      # 根据CPU核心数调整(建议物理核心数)
       device='cpu',   # 强制使用CPU
       optimizer='Adam',# 更稳定的优化器(原SGD)
       amp=False,      # 关闭自动混合精度
       project='e:/9/result',
       name='exp_cpu',
                )
转换
python代码进行定位是真的方便。
c++下使用opencv的dnn来做,得转换为onnx格式。
python
from ultralytics import YOLO
import onnx
print(onnx.version)
# Load the YOLOv11n model
model = YOLO("best.pt")

# Export the model to ONNX format
model.export(format="onnx", imgsz=320, simplify=True, opset=12)
得到的onnx文件差不多大了1倍。
C++代码
cpp
#include <opencv2/opencv.hpp>
#include <opencv2/dnn.hpp>
#include <iostream>
#include <vector>
const float CONFIDENCE_THRESHOLD = 0.5f;
const float NMS_THRESHOLD = 0.4f;
const int INPUT_WIDTH = 320;
const int INPUT_HEIGHT = 320;
// 针对 YOLOv5su / YOLOv8 的后处理函数
void postprocess_yolov5su(cv::Mat& frame, const std::vector<cv::Mat>& outs)
{
// 1. 获取输出维度
// yolov5su 输出形状: [1, channels, num_anchors]
// 例如: [1, 5, 8400] (4坐标 + 1类别)
int dimensions = outs[0].size[1]; // 5
int rows = outs[0].size[2]; // 8400/2100 (预测框数量)
// 2. 计算缩放比例
float x_factor = frame.cols / (float)INPUT_WIDTH;
float y_factor = frame.rows / (float)INPUT_HEIGHT;
float* data = (float*)outs[0].data;
std::vector<int> classIds;
std::vector<float> confidences;
std::vector<cv::Rect> boxes;
// 3. 640x640 输入遍历 8400个预测框,320x320 输入遍历 2100
// 注意数据内存布局:先存所有框的 cx,再存所有框的 cy...
for (int i = 0; i < rows; ++i)
{
// 获取类别置信度 (假设只有1个类,索引为4)
// 如果 dimensions=5,那么第4个通道就是类别分数
float score = data[4 * rows + i];
if (score >= CONFIDENCE_THRESHOLD)
{
// 获取坐标 (前4个通道)
float cx = data[i]; // 通道0
float cy = data[rows + i]; // 通道1
float w = data[2 * rows + i]; // 通道2
float h = data[3 * rows + i]; // 通道3
// 转换为左上角坐标并缩放回原图尺寸
int left = int((cx - 0.5 * w) * x_factor);
int top = int((cy - 0.5 * h) * y_factor);
int width = int(w * x_factor);
int height = int(h * y_factor);
boxes.push_back(cv::Rect(left, top, width, height));
confidences.push_back(score);
classIds.push_back(0); // 二维码类别 ID
}
}
// 4. NMS 非极大值抑制
std::vector<int> indices;
cv::dnn::NMSBoxes(boxes, confidences, CONFIDENCE_THRESHOLD, NMS_THRESHOLD, indices);
// 5. 绘制结果
for (size_t i = 0; i < indices.size(); ++i)
{
int idx = indices[i];
cv::Rect box = boxes[idx];
cv::rectangle(frame, box, cv::Scalar(0, 255, 0), 2);
std::string label = cv::format("QRCode: %.2f", confidences[idx]);
cv::putText(frame, label, cv::Point(box.x, box.y - 5),
cv::FONT_HERSHEY_SIMPLEX, 0.5, cv::Scalar(0, 0, 255), 1);
}
}
int main(int argc, char* argv[])
{
cv::String image_file = "D:/Users/a/source/repos/yolotest/yolotest/x64/Debug/test_qr.jpg";
if (argc > 1)
image_file = argv[1];
cv::Mat frame = cv::imread(image_file);
if (frame.empty()) return -1;
// 加载 ONNX
cv::dnn::Net net = cv::dnn::readNetFromONNX("D:/Users/a/source/repos/yolotest/yolotest/x64/Debug/best.onnx");
net.setPreferableBackend(cv::dnn::DNN_BACKEND_OPENCV);
net.setPreferableTarget(cv::dnn::DNN_TARGET_CPU);
// 预处理
cv::Mat blob = cv::dnn::blobFromImage(frame, 1 / 255.0, cv::Size(INPUT_WIDTH, INPUT_HEIGHT), cv::Scalar(0, 0, 0), true, false);
net.setInput(blob);
// 推理
std::vector<cv::Mat> outs;
net.forward(outs, net.getUnconnectedOutLayersNames());
// 处理结果
postprocess_yolov5su(frame, outs);
cv::imshow("Result", frame);
cv::waitKey(0);
return 0;
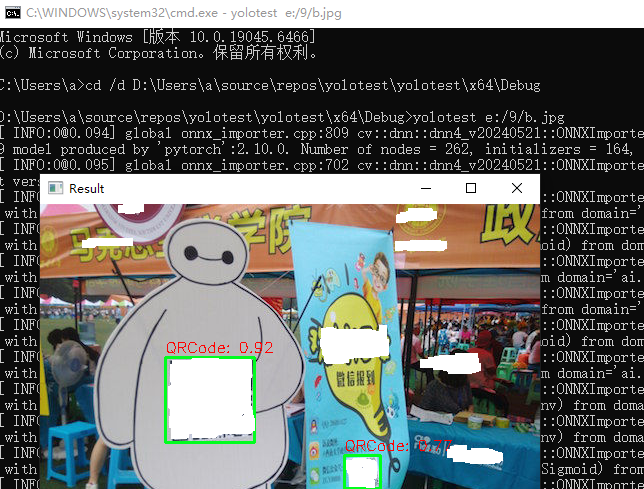
}结果

总结检查清单
为了确保万无一失,请确认以下保持一致:
- 训练时:imgsz=320
- 导出 ONNX 时:model.export(..., imgsz=320) (导出时也要指定 320,否则模型结构可能不匹配)
- C++ 推理时:const int INPUT_WIDTH = 320; (你正在修改的部分)
要注意yolo的版本,yolo5和yolov5su不一样,yolov5su.pt 是 YOLOv5 的 "Ultralytics" 更新版,它的内核架构其实已经和 YOLOv8 完全一致了。
否则会报错。
bash
OpenCV(4.10.0) Error: Assertion failed (total(srcShape, srcRange.start, srcRange.end) == maskTotal) in cv::dnn::computeShapeByReshapeMask, file C:\GHA-OCV-1\_work\ci-gha-workflow\ci-gha-workflow\opencv\modules\dnn\src\layers\reshape_layer.cpp, line 109