一、LED点亮
应用层控制硬件的两种方式
- /dev/目录下的设备文件(设备节点) (复杂设备)
- sysfs文件系统:/sys/目录下设备的属性文件 (简单设备)
sysfs文件系统
- 基于内存的文件系统,同 devfs、proc 文件系统一样,称为虚拟文件系统。
- 将内核信息以文件的方式提供给应用处使用。对系统设备进行管理。
- 挂载在开发板/sys目录下。
文件目录
cpp
/home/alientek/C_Program/LedControl/
├── CMakeLists.txt  # 核心配置文件(源码根目录)
├── build/          # 空目录(用于编译输出)
└── led_app.c       # 源文件
CMakeLists.txt
cpp
# 1. 指定CMake最低版本(兼容Ubuntu常见版本,如20.04用3.16+)
cmake_minimum_required(VERSION 3.5)

# 2. 定义项目名称(自定义,如my_project)
project(my_project)

# ===================== 新增:交叉编译核心配置 =====================
# 关键1:指定目标系统(开发板是Linux)
set(CMAKE_SYSTEM_NAME Linux)
# 关键2:指定目标架构(根据你的开发板改,常见ARM32填arm,ARM64填aarch64)
set(CMAKE_SYSTEM_PROCESSOR arm)

# 关键3:指定交叉编译器路径/名称(核心!替换成你实际的交叉编译器)
# 示例1:ARM32 常见编译器(如正点原子/韦东山开发板常用)
set(CMAKE_C_COMPILER "arm-linux-gnueabihf-gcc")
# 示例2:如果是ARM64开发板,替换成:
# set(CMAKE_C_COMPILER "aarch64-linux-gnu-gcc")

# 可选:禁用编译器检查(嵌入式交叉编译环境常需要)
set(CMAKE_C_COMPILER_FORCED TRUE)
# ==================================================================

# 3. 设置C语言标准(如C99,根据你的代码需求改)
set(CMAKE_C_STANDARD 99)
# 可选:强制使用指定标准,避免兼容问题
set(CMAKE_C_STANDARD_REQUIRED ON)

# 4. 列出所有需要编译的.c源文件(N个文件都列在这里)
# 方式1:手动列(文件少的时候)
# 注意:你的源码文件名是 led_app.c(不是main.c),这里要改!
set(SOURCE_FILES
    led_app.c  # 核心修改:对应你的LED控制源码文件名
    # 更多.c文件继续往下加...
)

# 方式2:自动查找当前目录下所有.c文件(文件多的时候推荐)
# file(GLOB SOURCE_FILES "${CMAKE_CURRENT_SOURCE_DIR}/*.c")

# 5. 指定生成可执行文件:可执行文件名 依赖的源文件
add_executable(led_app ${SOURCE_FILES})

# 可选:如果头文件不在当前目录(比如有include子目录),添加头文件路径
# include_directories(${CMAKE_CURRENT_SOURCE_DIR}/include)

# 可选:添加编译选项(警告提示、优化)
target_compile_options(led_app PRIVATE -Wall -O2)
led_app.c
cpp
#include <stdio.h>
#include <stdlib.h>
#include <sys/types.h>
#include <sys/stat.h>
#include <fcntl.h>
#include <unistd.h>
#include <string.h>

#define LED_TRIGGER     "/sys/class/leds/sys-led/trigger"
#define LED_BRIGHTNESS  "/sys/class/leds/sys-led/brightness"
#define USAGE()         fprintf(stderr, "usage:\n" \
                        " %s <on|off>\n" \
                        " %s <trigger> <type>\n", argv[0], argv[0])

int main(int argc,char *argv[])
{
    int fd1,fd2;

    if (2>argc)
    {
        USAGE();
        exit(-1);
    }

    fd1 = open(LED_TRIGGER,O_RDWR);
    if (0>fd1)
    {
        perror("fd1 open error");
        exit(-1);
    }

    fd2 = open(LED_BRIGHTNESS,O_RDWR);
    if (0>fd2)
    {
        perror("fd2 open error");
    }

    if (!strcmp(argv[1],"on"))
    {
        write(fd1,"none",4);
        write(fd2,"1",1);
    }

    if (!strcmp(argv[1],"off"))
    {
        write(fd1,"none",4);
        write(fd2,"0",1);
    }

    if (!strcmp(argv[1],"trigger"))
    {
        if (3!=argc)
        {
            USAGE();
            exit(-1);
        }
        if (0>write(fd1,argv[2],strlen(argv[2])))
        {
            perror("write error");
        }
    }
    else
    {
        USAGE();
    }
    exit(0);
}
ubuntu:
cpp
编译、生成可执行文件、传输到IMX6ULL开发板
alientek@ubuntu16:~/C_Program/LedControl/build$ cmake ..
-- The C compiler identification is GNU 5.4.0
-- The CXX compiler identification is GNU 5.4.0
-- Check for working C compiler: /usr/bin/cc
-- Check for working C compiler: /usr/bin/cc -- works
-- Detecting C compiler ABI info
-- Detecting C compiler ABI info - done
-- Detecting C compile features
-- Detecting C compile features - done
-- Check for working CXX compiler: /usr/bin/c++
-- Check for working CXX compiler: /usr/bin/c++ -- works
-- Detecting CXX compiler ABI info
-- Detecting CXX compiler ABI info - done
-- Detecting CXX compile features
-- Detecting CXX compile features - done
-- Configuring done
-- Generating done
-- Build files have been written to: /home/alientek/C_Program/LedControl/build
alientek@ubuntu16:~/C_Program/LedControl/build$ make
Scanning dependencies of target led_app
[ 50%] Building C object CMakeFiles/led_app.dir/led_app.c.o
[100%] Linking C executable led_app
[100%] Built target led_app
alientek@ubuntu16:~/C_Program/LedControl/build$ file led_app
led_app: ELF 32-bit LSB executable, ARM, EABI5 version 1 (SYSV), dynamically linked, interpreter /lib/ld-linux-armhf.so.3, for GNU/Linux 2.6.31, BuildID[sha1]=db55a37a233e068c916d068a1ef4a1922c439e5d, not stripped
alientek@ubuntu16:~/C_Program/LedControl/build$ scp led_app root@192.168.101.42:/home/root/app/
led_app                                       100%   11KB  10.7KB/s   00:00
alientek@ubuntu16:~/C_Program/LedControl/build$
开发板:
cpp
root@ATK-IMX6U:~/app# ./led_app off
usage:
 ./led_app <on|off>
 ./led_app <trigger> <type>
root@ATK-IMX6U:~/app# ./led_app on
usage:
 ./led_app <on|off>
 ./led_app <trigger> <type>
root@ATK-IMX6U:~/app# ./led_app trigger heartbeat
root@ATK-IMX6U:~/app# ./led_app off
usage:
 ./led_app <on|off>
 ./led_app <trigger> <type>
二、GPIO应用编程
应用层控制GPIO
在开发板进入/sys/class/gpio目录

- gpiochipX:当前 SoC 所包含的 GPIO 控制器,IMX6ULL包含五个控制器:GPIO1,GPIO2,GPIO3,GPIO4,GPIO5。分别对应gpiochip0,gpiochip32,gpiochip64,gpiochip96,gpiochip128。
- base:该控制器的GPIO引脚最小编号。
- label:该组GPIO对应标签(名字)。
- ngpio:该控制器管理的GPIO引脚数量。(base~base+ngpio-1)。
举个例子:
给定一个 GPIO 引脚为 GPIO4_IO16,那它对应的编号是多少呢?首先我们要确定 GPIO4 对应于 gpiochip96,该组 GPIO 引脚的最小编号是 96(对应于 GPIO4_IO0),所以 GPIO4_IO16 对应的编号自然是 96 + 16 = 112;同理GPIO3_IO20 对应的编号是 64 + 20 = 84。
- export:将指定编号的GPIO引脚导出。(使用之前,需要导出)。echo 0 > export。导出之后生成一个gpio0文件夹。
- unexport:将导出的GPIO引脚删除。echo 0 > unexport
进入gpio0文件夹,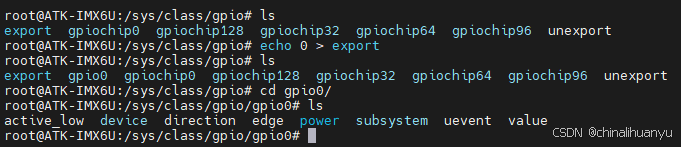
- direction:输入/输出模式。(in/out)
- value:输出模式(0低1高),输入模式(读)
- active_low:控制极性,默认0低1高,可修改为0高1低
- edge:控制中断触发方式(none非中断引脚,rising上升沿触发,falling下降沿触发,both边沿触发)
GPIO输出源码
cpp
#include <fcntl.h>
#include <stdio.h>
#include <stdlib.h>
#include <string.h>
#include <sys/stat.h>
#include <sys/types.h>
#include <unistd.h>

static char gpio_path[100];
static int gpio_config(const char* attr, const char* val)
{
    char file_path[100];
    int len;
    int fd;
    sprintf(file_path, "%s/%s", gpio_path, attr);
    if (0 > (fd = open(file_path, O_WRONLY)))
    {
        perror("open error");
        return fd;
    }
    len = strlen(val);
    if (len != write(fd, val, len))
    {
        perror("write error");
        close(fd);
        return -1;
    }
    close(fd); //关闭文件
    return 0;
}
int main(int argc, char* argv[])
{
    /* 校验传参 */
    if (3 != argc)
    {
        fprintf(stderr, "usage: %s <gpio> <value>\n", argv[0]);
        exit(-1);
    }

    /* 判断指定编号的 GPIO 是否导出 */
    sprintf(gpio_path, "/sys/class/gpio/gpio%s", argv[1]);
    if (access(gpio_path, F_OK))
    { //如果目录不存在 则需要导出
        int fd;
        int len;
        if (0 > (fd = open("/sys/class/gpio/export", O_WRONLY)))
        {
            perror("open error");
            exit(-1);
        }
        len = strlen(argv[1]);
        if (len != write(fd, argv[1], len))
        { //导出 gpio
            perror("write error");
            close(fd);
            exit(-1);
        }
        close(fd); //关闭文件
    }
    /* 配置为输出模式 */
    if (gpio_config("direction", "out"))
        exit(-1);
    /* 极性设置 */
    if (gpio_config("active_low", "0"))
        exit(-1);
    /* 控制 GPIO 输出高低电平 */
    if (gpio_config("value", argv[2]))
        exit(-1);
    /* 退出程序 */
    exit(0);
}
GPIO输入源码
cpp
#include <fcntl.h>
#include <stdio.h>
#include <stdlib.h>
#include <string.h>
#include <sys/stat.h>
#include <sys/types.h>
#include <unistd.h>

static char gpio_path[100];
static int gpio_config(const char* attr, const char* val)
{
    char file_path[100];
    int len;
    int fd;
    sprintf(file_path, "%s/%s", gpio_path, attr);
    if (0 > (fd = open(file_path, O_WRONLY)))
    {
        perror("open error");
        return fd;
    }
    len = strlen(val);
    if (len != write(fd, val, len))
    {
        perror("write error");
        close(fd);
        return -1;
    }
    close(fd); //关闭文件
    return 0;
}
int main(int argc, char* argv[])
{
    char file_path[100];
    char val;
    int fd;
    /* 校验传参 */
    if (2 != argc)
    {
        fprintf(stderr, "usage: %s <gpio>\n", argv[0]);
        exit(-1);
    }
    /* 判断指定编号的 GPIO 是否导出 */
    sprintf(gpio_path, "/sys/class/gpio/gpio%s", argv[1]);
    if (access(gpio_path, F_OK))
    { //如果目录不存在 则需要导出
        int len;
        if (0 > (fd = open("/sys/class/gpio/export", O_WRONLY)))
        {
            perror("open error");
            exit(-1);
        }
        len = strlen(argv[1]);
        if (len != write(fd, argv[1], len))
        { //导出 gpio
            perror("write error");
            close(fd);
            exit(-1);
        }
        close(fd); //关闭文件
    }
    /* 配置为输入模式 */
    if (gpio_config("direction", "in"))
        exit(-1);
    /* 极性设置 */
    if (gpio_config("active_low", "0"))
        exit(-1);
    /* 配置为非中断方式 */
    if (gpio_config("edge", "none"))
        exit(-1);
    /* 读取 GPIO 电平状态 */
    sprintf(file_path, "%s/%s", gpio_path, "value");
    if (0 > (fd = open(file_path, O_RDONLY)))
    {
        perror("open error");
        exit(-1);
    }
    if (0 > read(fd, &val, 1))
    {
        perror("read error");
        close(fd);
        exit(-1);
    }
    printf("value: %c\n", val);
    /* 退出程序 */
    close(fd);
    exit(0);
}
GPIO中断
cpp
#include <fcntl.h>
#include <poll.h>
#include <stdio.h>
#include <stdlib.h>
#include <string.h>
#include <sys/stat.h>
#include <sys/types.h>
#include <unistd.h>
static char gpio_path[100];
static int gpio_config(const char* attr, const char* val)
{
    char file_path[100];
    int len;
    int fd;
    sprintf(file_path, "%s/%s", gpio_path, attr);
    if (0 > (fd = open(file_path, O_WRONLY)))
    {
        perror("open error");
        return fd;
    }
    len = strlen(val);
    if (len != write(fd, val, len))
    {
        perror("write error");
        return -1;
    }
    close(fd); //关闭文件
    return 0;
}
int main(int argc, char* argv[])
{
    struct pollfd pfd;
    char file_path[100];
    int ret;
    char val;
    /* 校验传参 */
    if (2 != argc)
    {
        fprintf(stderr, "usage: %s <gpio>\n", argv[0]);
        exit(-1);
    }
    /* 判断指定编号的 GPIO 是否导出 */
    sprintf(gpio_path, "/sys/class/gpio/gpio%s", argv[1]);
    if (access(gpio_path, F_OK))
    { //如果目录不存在 则需要导出
        int len;
        int fd;
        if (0 > (fd = open("/sys/class/gpio/export", O_WRONLY)))
        {
            perror("open error");
            exit(-1);
        }
        len = strlen(argv[1]);
        if (len != write(fd, argv[1], len))
        { //导出 gpio
            perror("write error");
            exit(-1);
        }
        close(fd); //关闭文件
    }
    /* 配置为输入模式 */
    if (gpio_config("direction", "in"))
        exit(-1);
    /* 极性设置 */
    if (gpio_config("active_low", "0"))
        exit(-1);
    /* 配置中断触发方式: 上升沿和下降沿 */
    if (gpio_config("edge", "both"))
        exit(-1);
    /* 打开 value 属性文件 */
    sprintf(file_path, "%s/%s", gpio_path, "value");
    if (0 > (pfd.fd = open(file_path, O_RDONLY)))
    {
        perror("open error");
        exit(-1);
    }
    /* 调用 poll */
    pfd.events = POLLPRI;  //只关心高优先级数据可读(中断)
    read(pfd.fd, &val, 1); //先读取一次清除状态
    for (;;)
    {
        ret = poll(&pfd, 1, -1); //调用 poll
        if (0 > ret)
        {
            perror("poll error");
            exit(-1);
        }
        else if (0 == ret)
        {
            fprintf(stderr, "poll timeout.\n");
            continue;
        }
        /* 校验高优先级数据是否可读 */
        if (pfd.revents & POLLPRI)
        {
            if (0 > lseek(pfd.fd, 0, SEEK_SET))
            { //将读位置移动到头部
                perror("lseek error");
                exit(-1);
            }
            if (0 > read(pfd.fd, &val, 1))
            {
                perror("read error");
                exit(-1);
            }
            printf("GPIO 中断触发<value=%c>\n", val);
        }
    }
    /* 退出程序 */
    exit(0);
}
在开发板上测试
cpp
root@ATK-IMX6U:~/app# ./gpio_out 1 1    #控制GPIO1_IO1输出高电平
root@ATK-IMX6U:~/app# ./gpio_out 1 0    #控制GPIO1_IO1输出低电平
root@ATK-IMX6U:~/app# ./gpio_in 1       #读取GPIO1_IO1状态
value: 1
root@ATK-IMX6U:~/app# ./gpio_in 1       #读取GPIO1_IO1状态
value: 0
root@ATK-IMX6U:~/app# ./gpio_intr 1     #监测GPIO1_IO1引脚中断触发
GPIO 中断触发<value=0>
GPIO 中断触发<value=1>
GPIO 中断触发<value=0>
GPIO 中断触发<value=0>
GPIO 中断触发<value=1>
GPIO 中断触发<value=0>- gpio_out:用万用表测试的。
- gpio_in:使用杜邦线分别连接GPIO1_IO1和3V3、GPIO1_IO1和GND。
- gpio_intr:使用杜邦线将 GPIO1_IO01 引脚连接到 GND 或 3.3V 电源引脚上,来回切换。
三、输入设备应用编程
3.1 输入设备介绍
输入设备(input设备),/dev/input/eventX
3.2 读取数据的流程
- 应用程度打开/dev/input/event0设备文件。
- 应用程序发起读操作,没有数据可读进入休眠。
- 有数据可读,唤醒,读操作获取到数据返回。
- 应用程序对读取到的数据进行解析。
3.3 如何解析数据
cpp
struct input_event {
 struct timeval time;
 __u16 type;                //描述发生哪一类事件
 __u16 code;                //
 __s32 value;               //
};

/*
* Event types
*/
#define EV_SYN 0x00 //同步类事件,用于同步事件
#define EV_KEY 0x01 //按键类事件
#define EV_REL 0x02 //相对位移类事件(譬如鼠标)
#define EV_ABS 0x03 //绝对位移类事件(譬如触摸屏)
#define EV_MSC 0x04 //其它杂类事件
#define EV_SW 0x05
#define EV_LED 0x11
#define EV_SND 0x12
#define EV_REP 0x14
#define EV_FF 0x15
#define EV_PWR 0x16
#define EV_FF_STATUS 0x17
#define EV_MAX 0x1f
#define EV_CNT (EV_MAX+1)


/*
* Event code
*/
//按键类
#define KEY_ESC 1 //ESC 键
#define KEY_1 2 //数字 1 键
#define KEY_2 3 //数字 2 键
#define KEY_TAB 15 //TAB 键
#define KEY_Q 16 //字母 Q 键
#define KEY_W 17 //字母 W 键
#define KEY_E 18 //字母 E 键
#define KEY_R 19 //字母 R 键
......

//相对唯一事件
#define REL_X 0x00 //X 轴
#define REL_Y 0x01 //Y 轴
#define REL_Z 0x02 //Z 轴
#define REL_RX 0x03
#define REL_RY 0x04
#define REL_RZ 0x05
#define REL_HWHEEL 0x06
#define REL_DIAL 0x07
#define REL_WHEEL 0x08
#define REL_MISC 0x09
#define REL_MAX 0x0f
#define REL_CNT (REL_MAX+1)

//绝对位移事件
#define ABS_X 0x00 //X 轴
#define ABS_Y 0x01 //Y 轴
#define ABS_Z 0x02 //Z 轴
#define ABS_RX 0x03
#define ABS_RY 0x04
#define ABS_RZ 0x05
#define ABS_THROTTLE 0x06
#define ABS_RUDDER 0x07
#define ABS_WHEEL 0x08
#define ABS_GAS 0x09
#define ABS_BRAKE 0x0a
#define ABS_HAT0X 0x10
#define ABS_HAT0Y 0x11
#define ABS_HAT1X 0x12
#define ABS_HAT1Y 0x13
#define ABS_HAT2X 0x14
#define ABS_HAT2Y 0x15
#define ABS_HAT3X 0x16
#define ABS_HAT3Y 0x17
#define ABS_PRESSURE 0x18
#define ABS_DISTANCE 0x19
#define ABS_TILT_X 0x1a
#define ABS_TILT_Y 0x1b
#define ABS_TOOL_WIDTH 0x1c
......


/*
* Event value
*/
内核每次上报事件都会向应用层发送一个数据 value,对 value 值的解释随着 code 的变化而
变化。


当信息需要多次read操作才能读完的时候,当上报完所有信息之后,会上报一个同步事件。
/*
* Synchronization events.
*/
#define SYN_REPORT 0
#define SYN_CONFIG 1
#define SYN_MT_REPORT 2
#define SYN_DROPPED 3
#define SYN_MAX 0xf
#define SYN_CNT (SYN_MAX+1)
3.4 读取 struct input_event 数据
cpp
#include <fcntl.h>
#include <linux/input.h>
#include <stdio.h>
#include <stdlib.h>
#include <sys/stat.h>
#include <sys/types.h>
#include <unistd.h>
int main(int argc, char* argv[])
{
    struct input_event in_ev = {0};
    int fd = -1;
    /* 校验传参 */
    if (2 != argc)
    {
        fprintf(stderr, "usage: %s <input-dev>\n", argv[0]);
        exit(-1);
    }
    /* 打开文件 */
    if (0 > (fd = open(argv[1], O_RDONLY)))
    {
        perror("open error");
        exit(-1);
    }
    for (;;)
    {
        /* 循环读取数据 */
        if (sizeof(struct input_event) != read(fd, &in_ev, sizeof(struct input_event)))
        {
            perror("read error");
            exit(-1);
        }
        printf("type:%d code:%d value:%d\n", in_ev.type, in_ev.code, in_ev.value);
    }
}
测试:
cpp
root@ATK-IMX6U:/proc# cat /proc/bus/input/devices
I: Bus=0019 Vendor=0000 Product=0000 Version=0000
N: Name="20cc000.snvs:snvs-powerkey"
P: Phys=snvs-pwrkey/input0
S: Sysfs=/devices/platform/soc/2000000.aips-bus/20cc000.snvs/20cc000.snvs:snvs-powerkey/input/input0
U: Uniq=
H: Handlers=kbd event0
B: PROP=0
B: EV=3
B: KEY=100000 0 0 0

I: Bus=0018 Vendor=dead Product=beef Version=28bb
N: Name="goodix-ts"
P: Phys=input/ts
S: Sysfs=/devices/virtual/input/input2
U: Uniq=
H: Handlers=event1
B: PROP=3
B: EV=b
B: KEY=e520 0 0 0 0 0 0 0 0 0 0
B: ABS=2658000 0

I: Bus=0019 Vendor=0001 Product=0001 Version=0100
N: Name="gpio_keys@0"
P: Phys=gpio-keys/input0
S: Sysfs=/devices/platform/gpio_keys@0/input/input3
U: Uniq=
H: Handlers=kbd event2
B: PROP=0
B: EV=100003
B: KEY=40000 0 0 0

root@ATK-IMX6U:~/app# ./read_input /dev/input/event2
type:20 code:0 value:400
type:20 code:1 value:80
type:1 code:114 value:1
type:0 code:0 value:0
type:1 code:114 value:0
type:0 code:0 value:0
type:1 code:114 value:1
type:0 code:0 value:0
type:1 code:114 value:0
type:0 code:0 value:0
type:1 code:114 value:1
type:0 code:0 value:0
3.5 按键应用编程
cpp
#include <fcntl.h>
#include <linux/input.h>
#include <stdio.h>
#include <stdlib.h>
#include <sys/stat.h>
#include <sys/types.h>
#include <unistd.h>
int main(int argc, char* argv[])
{
    struct input_event in_ev = {0};
    int fd = -1;
    int value = -1;
    /* 校验传参 */
    if (2 != argc)
    {
        fprintf(stderr, "usage: %s <input-dev>\n", argv[0]);
        exit(-1);
    }
    /* 打开文件 */
    if (0 > (fd = open(argv[1], O_RDONLY)))
    {
        perror("open error");
        exit(-1);
    }
    for (;;)
    {
        /* 循环读取数据 */
        if (sizeof(struct input_event) != read(fd, &in_ev, sizeof(struct input_event)))
        {
            perror("read error");
            exit(-1);
        }
        if (EV_KEY == in_ev.type)
        { //按键事件
            switch (in_ev.value)
            {
                case 0:
                    printf("code<%d>: 松开\n", in_ev.code);
                    break;
                case 1:
                    printf("code<%d>: 按下\n", in_ev.code);
                    break;
                case 2:
                    printf("code<%d>: 长按\n", in_ev.code);
                    break;
            }
        }
    }
}
测试:
cpp
root@ATK-IMX6U:~/app# ./read_key /dev/input/event2
code<114>: 按下
code<114>: 松开
code<114>: 按下
code<114>: 松开
code<114>: 按下
code<114>: 松开
code<114>: 按下
code<114>: 长按
code<114>: 长按
code<114>: 长按
code<114>: 长按
code<114>: 长按
code<114>: 长按
code<114>: 长按
code<114>: 长按
code<114>: 长按
code<114>: 长按
code<114>: 长按
code<114>: 长按
code<114>: 长按
code<114>: 长按
code<114>: 长按
code<114>: 长按
code<114>: 松开
code<114>: 按下
code<114>: 松开
3.6 触摸屏应用编程
触摸屏设备:上报绝对位移事件。
单点触摸应用程序(测试无打印)
cpp
#include <fcntl.h>
#include <linux/input.h>
#include <stdio.h>
#include <stdlib.h>
#include <sys/stat.h>
#include <sys/types.h>
#include <unistd.h>
int main(int argc, char* argv[])
{
    struct input_event in_ev;
    int x, y; //触摸点 x 和 y 坐标
    int down; //用于记录 BTN_TOUCH 事件的 value,1 表示按下,0 表示松开,-1 表示移动
    int valid; //用于记录数据是否有效(我们关注的信息发生更新表示有效,1 表示有效,0 表示无效)
    int fd = -1;
    /* 校验传参 */
    if (2 != argc)
    {
        fprintf(stderr, "usage: %s <input-dev>\n", argv[0]);
        exit(EXIT_FAILURE);
    }
    /* 打开文件 */
    if (0 > (fd = open(argv[1], O_RDONLY)))
    {
        perror("open error");
        exit(EXIT_FAILURE);
    }
    x = y = 0; //初始化 x 和 y 坐标值
    down = -1; //初始化<移动>
    valid = 0; //初始化<无效>
    for (;;)
    {
        /* 循环读取数据 */
        if (sizeof(struct input_event) != read(fd, &in_ev, sizeof(struct input_event)))
        {
            perror("read error");
            exit(EXIT_FAILURE);
        }

        switch (in_ev.type)
        {
            case EV_KEY: //按键事件
                if (BTN_TOUCH == in_ev.code)
                {
                    down = in_ev.value;
                    valid = 1;
                }
                break;
            case EV_ABS: //绝对位移事件
                switch (in_ev.code)
                {
                    case ABS_X: // X 坐标
                        x = in_ev.value;
                        valid = 1;
                        break;
                    case ABS_Y: // Y 坐标
                        y = in_ev.value;
                        valid = 1;
                        break;
                }
                break;
            case EV_SYN: //同步事件
                if (SYN_REPORT == in_ev.code)
                {
                    if (valid)
                    { //判断是否有效
                        switch (down)
                        { //判断状态
                            case 1:
                                printf("按下(%d, %d)\n", x, y);
                                break;
                            case 0:
                                printf("松开\n");
                                break;
                            case -1:
                                printf("移动(%d, %d)\n", x, y);
                                break;
                        }
                        valid = 0; //重置 valid
                        down = -1; //重置 down
                    }
                }
                break;
        }
    }
}
多点触摸应用程序(测试无打印)
cpp
/***************************************************************
Copyright © ALIENTEK Co., Ltd. 1998-2021. All rights reserved.
文件名 : read_mt.c
作者 : 邓涛
版本 : V1.0
描述 : 触摸屏多点触摸应用程序示例代码
其他 : 无
论坛 : www.openedv.com
日志 : 初版 V1.0 2021/6/15 邓涛创建
***************************************************************/
#include <fcntl.h>
#include <linux/input.h>
#include <stdio.h>
#include <stdlib.h>
#include <string.h>
#include <sys/ioctl.h>
#include <sys/stat.h>
#include <sys/types.h>
#include <unistd.h>
/* 用于描述 MT 多点触摸每一个触摸点的信息 */
struct ts_mt
{
    int x;     // X 坐标
    int y;     // Y 坐标
    int id;    //对应 ABS_MT_TRACKING_ID
    int valid; //数据有效标志位(=1 表示触摸点信息发生更新)
};
/* 一个触摸点的 x 坐标和 y 坐标 */
struct tp_xy
{
    int x;
    int y;
};
static int ts_read(const int fd, const int max_slots, struct ts_mt* mt)
{
    struct input_event in_ev;
    static int slot = 0; //用于保存上一个 slot
    static struct tp_xy xy[12] = {
        0}; //用于保存上一次的 x 和 y 坐标值,假设触摸屏支持的最大触摸点数不会超过 12
    int i;
    /* 对缓冲区初始化操作 */
    memset(mt, 0x0, max_slots * sizeof(struct ts_mt)); //清零
    for (i = 0; i < max_slots; i++)
        mt[i].id = -2; //将 id 初始化为-2, id=-1 表示触摸点删除, id>=0 表示创建
    for (;;)
    {
        if (sizeof(struct input_event) != read(fd, &in_ev, sizeof(struct input_event)))
        {
            perror("read error");
            return -1;
        }
        switch (in_ev.type)
        {
            case EV_ABS:
                switch (in_ev.code)
                {
                    case ABS_MT_SLOT:
                        slot = in_ev.value;
                        break;
                    case ABS_MT_POSITION_X:
                        xy[slot].x = in_ev.value;
                        mt[slot].valid = 1;
                        break;
                    case ABS_MT_POSITION_Y:
                        xy[slot].y = in_ev.value;
                        mt[slot].valid = 1;
                        break;
                    case ABS_MT_TRACKING_ID:
                        mt[slot].id = in_ev.value;
                        mt[slot].valid = 1;
                        break;
                }
                break;
            // case EV_KEY://按键事件对单点触摸应用比较有用
            // break;
            case EV_SYN:
                if (SYN_REPORT == in_ev.code)
                {
                    for (i = 0; i < max_slots; i++)
                    {
                        mt[i].x = xy[i].x;
                        mt[i].y = xy[i].y;
                    }
                }
                return 0;
        }
    }
}
int main(int argc, char* argv[])
{
    struct input_absinfo slot;
    struct ts_mt* mt = NULL;
    int max_slots;
    int fd;
    int i;
    /* 参数校验 */
    if (2 != argc)
    {
        fprintf(stderr, "usage: %s <input_dev>\n", argv[0]);
        exit(EXIT_FAILURE);
    }
    /* 打开文件 */
    fd = open(argv[1], O_RDONLY);
    if (0 > fd)
    {
        perror("open error");
        exit(EXIT_FAILURE);
    }
    /* 获取触摸屏支持的最大触摸点数 */
    if (0 > ioctl(fd, EVIOCGABS(ABS_MT_SLOT), &slot))
    {
        perror("ioctl error");
        close(fd);
        exit(EXIT_FAILURE);
    }
    max_slots = slot.maximum + 1 - slot.minimum;
    printf("max_slots: %d\n", max_slots);
    /*申请内存空间并清零* /
    mt = calloc(max_slots, sizeof(struct ts_mt));
    /* 读数据 */
    for (;;)
    {
        if (0 > ts_read(fd, max_slots, mt))
            break;
        for (i = 0; i < max_slots; i++)
        {
            if (mt[i].valid)
            { //判断每一个触摸点信息是否发生更新(关注的信息发生更新)
                if (0 <= mt[i].id)
                    printf("slot<%d>, 按下(%d, %d)\n", i, mt[i].x, mt[i].y);
                else if (-1 == mt[i].id)
                    printf("slot<%d>, 松开\n", i);
                else
                    printf("slot<%d>, 移动(%d, %d)\n", i, mt[i].x, mt[i].y);
            }
        }
    }
    /* 关闭设备、退出 */
    close(fd);
    free(mt);
    exit(EXIT_FAILURE);
}
3.7 鼠标应用编程
cpp
root@ATK-IMX6U:~/app# [ 5814.243626] usb 1-1.1: new low-speed USB device number 3 using ci_hdrc
[ 5814.374209] input: HP USB MOUSE as /devices/platform/soc/2100000.aips-bus/2184200.usb/ci_hdrc.1/usb1/1-1/1-1.1/1-1.1:1.0/0003:1C4F:004B.0001/input/input4
[ 5814.454169] hid-generic 0003:1C4F:004B.0001: input: USB HID v1.10 Keyboard [HP USB MOUSE] on usb-ci_hdrc.1-1.1/input0
[ 5814.472283] input: HP USB MOUSE as /devices/platform/soc/2100000.aips-bus/2184200.usb/ci_hdrc.1/usb1/1-1/1-1.1/1-1.1:1.1/0003:1C4F:004B.0002/input/input5
[ 5814.490105] hid-generic 0003:1C4F:004B.0002: input: USB HID v1.10 Mouse [HP USB MOUSE] on usb-ci_hdrc.1-1.1/input1
[ 5825.104903] usb 1-1.1: USB disconnect, device number 3