Python 并发编程详解 - Java 开发者视角
📌 目标读者 :有 Java 背景的开发者
🎯 核心目标 :通过 Java 对比,理解 Python 并发编程模型
⏱️ 预计时间:30-45 分钟
📖 目录
1️⃣ 核心概念对照
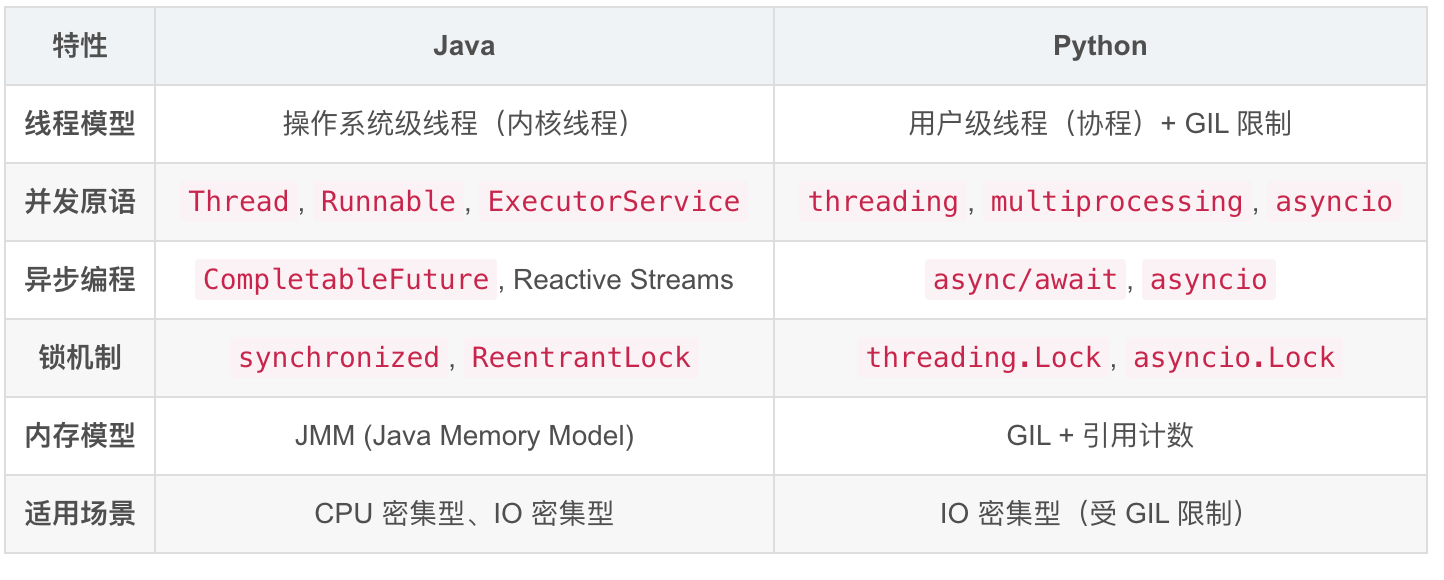
Java vs Python 并发模型
| 特性 | Java | Python |
|---|---|---|
| 线程模型 | 操作系统级线程(内核线程) | 用户级线程(协程)+ GIL 限制 |
| 并发原语 | Thread, Runnable, ExecutorService |
threading, multiprocessing, asyncio |
| 异步编程 | CompletableFuture, Reactive Streams |
async/await, asyncio |
| 锁机制 | synchronized, ReentrantLock |
threading.Lock, asyncio.Lock |
| 内存模型 | JMM (Java Memory Model) | GIL + 引用计数 |
| 适用场景 | CPU 密集型、IO 密集型 | IO 密集型(受 GIL 限制) |
2️⃣ Python 并发模型演进
阶段 1:多线程时代(类似 Java)
python
# ❌ Python 多线程(受 GIL 限制,不适合 CPU 密集型)
import threading
import time

def task(name, seconds):
    print(f"{name} 开始执行")
    time.sleep(seconds)  # 模拟 IO 操作
    print(f"{name} 完成")

# 创建线程(类似 Java Thread)
t1 = threading.Thread(target=task, args=("任务 1", 2))
t2 = threading.Thread(target=task, args=("任务 2", 3))

t1.start()
t2.start()
t1.join()
t2.join()

print("所有任务完成")
对应 Java 代码:
java
// Java 多线程
Thread t1 = new Thread(() -> {
    System.out.println("任务 1 开始执行");
    try {
        Thread.sleep(2000);
    } catch (InterruptedException e) {
        e.printStackTrace();
    }
    System.out.println("任务 1 完成");
});

Thread t2 = new Thread(() -> {
    System.out.println("任务 2 开始执行");
    try {
        Thread.sleep(3000);
    } catch (InterruptedException e) {
        e.printStackTrace();
    }
    System.out.println("任务 2 完成");
});

t1.start();
t2.start();
try {
    t1.join();
    t2.join();
} catch (InterruptedException e) {
    e.printStackTrace();
}

System.out.println("所有任务完成");关键区别:
- ✅ Java 线程:真正的并行(多核利用)
- ⚠️ Python 线程:受 GIL 限制,同一时刻只有一个线程在执行 Python 字节码
- 💡 Python 多线程适合 IO 密集型(文件、网络),不适合 CPU 密集型
阶段 2:多进程(突破 GIL 限制)
python
# ✅ CPU 密集型任务:使用多进程
from multiprocessing import Process, Pool
import os

def cpu_intensive_task(n):
    print(f"进程 {os.getpid()} 正在计算...")
    result = sum(i * i for i in range(n))
    print(f"进程 {os.getpid()} 完成")
    return result

if __name__ == "__main__":
    # 方式 1: Process 类(类似 Java ProcessBuilder)
    p1 = Process(target=cpu_intensive_task, args=(10000000,))
    p2 = Process(target=cpu_intensive_task, args=(10000000,))

    p1.start()
    p2.start()
    p1.join()
    p2.join()

    # 方式 2: 进程池(类似 Java ThreadPoolExecutor)
    with Pool(processes=4) as pool:
        results = pool.map(cpu_intensive_task, [10000000] * 4)
        print(f"结果:{results}")
对应 Java 代码:
java
// Java 进程池(ExecutorService)
ExecutorService executor = Executors.newFixedThreadPool(4);

List<Future<Integer>> futures = new ArrayList<>();
for (int i = 0; i < 4; i++) {
    Future<Integer> future = executor.submit(() -> {
        System.out.println("进程 " + Thread.currentThread().getName() + " 正在计算...");
        int result = IntStream.range(0, 10_000_000)
                              .map(i -> i * i)
                              .sum();
        System.out.println("进程 " + Thread.currentThread().getName() + " 完成");
        return result;
    });
    futures.add(future);
}

// 收集结果
List<Integer> results = new ArrayList<>();
for (Future<Integer> future : futures) {
    try {
        results.add(future.get());  // 阻塞等待结果
    } catch (Exception e) {
        e.printStackTrace();
    }
}

executor.shutdown();
阶段 3:异步 IO(asyncio)⭐ 重点
这是 Python 3.5+ 的核心并发模型,也是本文的重点!
python
# ✅ IO 密集型任务的最佳选择
import asyncio

async def fetch_data(url, delay):
    """异步函数(协程)"""
    print(f"开始请求:{url}")
    await asyncio.sleep(delay)  # 非阻塞等待
    print(f"完成请求:{url}")
    return f"数据:{url}"

async def main():
    # 创建任务(类似 Java CompletableFuture)
    task1 = asyncio.create_task(fetch_data("https://api.example.com/users", 2))
    task2 = asyncio.create_task(fetch_data("https://api.example.com/posts", 3))

    # 等待所有任务完成(类似 Java CompletableFuture.allOf)
    results = await asyncio.gather(task1, task2)

    print(f"所有结果:{results}")

# 运行事件循环
asyncio.run(main())
对应 Java 代码(CompletableFuture):
java
// Java 异步编程
CompletableFuture<String> task1 = CompletableFuture.supplyAsync(() -> {
    System.out.println("开始请求:https://api.example.com/users");
    try {
        Thread.sleep(2000);  // 模拟网络延迟
    } catch (InterruptedException e) {
        e.printStackTrace();
    }
    System.out.println("完成请求:https://api.example.com/users");
    return "数据:https://api.example.com/users";
});

CompletableFuture<String> task2 = CompletableFuture.supplyAsync(() -> {
    System.out.println("开始请求:https://api.example.com/posts");
    try {
        Thread.sleep(3000);
    } catch (InterruptedException e) {
        e.printStackTrace();
    }
    System.out.println("完成请求:https://api.example.com/posts");
    return "数据:https://api.example.com/posts";
});

// 等待所有任务完成
CompletableFuture<Void> allTasks = CompletableFuture.allOf(task1, task2);

// 获取结果
allTasks.thenRun(() -> {
    try {
        List<String> results = List.of(task1.get(), task2.get());
        System.out.println("所有结果:" + results);
    } catch (Exception e) {
        e.printStackTrace();
    }
}).join();  // 阻塞等待完成
3️⃣ async/await 深度解析
3.1 什么是 async/await?
Python 版本
python
# async 关键字:声明一个函数是异步函数(协程)
async def get_user(user_id):
    """异步函数定义"""
    # await 关键字:等待异步操作完成
    user = await database.query("SELECT * FROM users WHERE id = ?", user_id)
    return user

# 调用异步函数
async def main():
    user = await get_user(123)
    print(user)

asyncio.run(main())
Java 对比
java
// Java 没有直接的 async/await 语法糖(但有 Project Loom 在开发中)
// 最接近的是 CompletableFuture

public CompletableFuture<User> getUser(int userId) {
    return CompletableFuture.supplyAsync(() -> {
        // 模拟数据库查询
        return database.query("SELECT * FROM users WHERE id = ?", userId);
    });
}

// 调用
getUser(123)
    .thenAccept(user -> System.out.println(user))
.join(); // 阻塞等待关键区别:
- ✅ Python
async/await:语法糖,代码看起来像同步代码 - ⚠️ Java
CompletableFuture:链式调用,嵌套多层时较复杂 - 💡 Python 更易读,Java 更显式
3.2 Event Loop(事件循环)vs ExecutorService
Python Event Loop
python
import asyncio

# Event Loop 是 Python 异步的核心
# 它负责调度和运行所有协程

async def task1():
    print("任务 1 开始")
    await asyncio.sleep(1)
    print("任务 1 完成")

async def task2():
    print("任务 2 开始")
    await asyncio.sleep(2)
    print("任务 2 完成")

async def main():
    # 创建两个任务
    t1 = asyncio.create_task(task1())
    t2 = asyncio.create_task(task2())

    # 等待所有任务
    await asyncio.gather(t1, t2)

# asyncio.run() 会创建并运行一个 Event Loop
asyncio.run(main())
Event Loop 工作原理:
┌─────────────────────────────────────┐
│       Event Loop (事件循环)          │
│                                     │
│  while True:                        │
│      # 1. 检查就绪的任务             │
│      ready_tasks = check_ready()    │
│                                     │
│      # 2. 执行就绪任务               │
│      for task in ready_tasks:       │
│          task.step()  # 执行一步     │
│                                     │
│      # 3. 处理 IO 事件                │
│      handle_io_events()             │
│                                     │
│      # 4. 调度延迟任务               │
│      schedule_delayed_tasks()       │
└─────────────────────────────────────┘
Java ExecutorService
java
// Java 使用 ExecutorService 管理线程池
ExecutorService executor = Executors.newFixedThreadPool(4);

// 提交任务
Future<?> future1 = executor.submit(() -> {
    System.out.println("任务 1 执行");
});

Future<?> future2 = executor.submit(() -> {
    System.out.println("任务 2 执行");
});

// 关闭线程池
executor.shutdown();对比表:
| 特性 | Python Event Loop | Java ExecutorService |
|---|---|---|
| 线程模型 | 单线程 + 协程 | 多线程池 |
| 调度方式 | 协作式(任务主动让出 CPU) | 抢占式(操作系统调度) |
| 适用场景 | 高并发 IO 密集型 | CPU 密集型 + IO 密集型 |
| 性能特点 | 轻量级,百万级并发 | 较重,千级并发 |
3.3 Await 的本质:不是阻塞,是暂停!
这是 Java 开发者最容易误解的地方!
python
# ❌ 错误理解:await = 阻塞
async def wrong_understanding():
    print("开始")
    result = await some_async_call()  # ← 以为这里会阻塞整个线程
    print("这行代码不会执行")  # ✅ 实际上会执行!

# ✅ 正确理解:await = 暂停当前任务,但释放线程
async def correct_understanding():
    print("任务 A 开始")

    # 遇到 await:
    # 1. 暂停这个任务的执行
    # 2. 把线程让给其他任务使用
    # 3. 当异步操作完成后,自动唤醒继续执行
    result = await some_async_call()

    # ✅ 这行代码会在异步操作完成后执行!
    print(f"结果是:{result}")
Java 对比:
java
// Java 的 Future.get() 是真正的阻塞
public void blockingExample() {
    Future<String> future = executor.submit(() -> {
        return "结果";
    });

    System.out.println("开始等待");
    String result = future.get();  // ❌ 阻塞!线程被占用
    System.out.println("获得结果:" + result);
}

// CompletableFuture.thenApply() 是非阻塞的
public void nonBlockingExample() {
    CompletableFuture<String> future = CompletableFuture.supplyAsync(() -> {
        return "结果";
    });

    future.thenApply(result -> {
        // ✅ 这个回调会在未来某个时刻执行
        System.out.println("获得结果:" + result);
    });

    System.out.println("主线程继续执行其他工作...");
}关键要点:
- ✅ Python
await= JavaCompletableFuture.thenApply()(非阻塞) - ❌ Python
await≠ JavaFuture.get()(阻塞)
4️⃣ 实战示例
示例 1:并发调用多个 API
Python 版本
python
import asyncio
import aiohttp  # 异步 HTTP 客户端

async def fetch_user(session, user_id):
    """异步获取用户信息"""
    url = f"https://api.example.com/users/{user_id}"
    async with session.get(url) as response:
        return await response.json()

async def fetch_post(session, post_id):
    """异步获取帖子信息"""
    url = f"https://api.example.com/posts/{post_id}"
    async with session.get(url) as response:
        return await response.json()

async def main():
    async with aiohttp.ClientSession() as session:
        # 方式 1: 顺序执行(慢!)
        print("=== 顺序执行 ===")
        user1 = await fetch_user(session, 1)  # 等待 1 秒
        post1 = await fetch_post(session, 1)  # 等待 1 秒
        # 总耗时:2 秒

        # 方式 2: 并发执行(快!)
        print("=== 并发执行 ===")
        tasks = [
            fetch_user(session, 1),
            fetch_post(session, 1),
            fetch_user(session, 2),
            fetch_post(session, 2),
        ]

        # 所有请求同时发出
        results = await asyncio.gather(*tasks)
        # 总耗时:~1 秒(取决于最慢的请求)

        print(f"获取到 {len(results)} 条数据")

asyncio.run(main())
Java 版本
java
import java.net.http.*;
import java.time.Duration;

public class ConcurrentApiCalls {

    private final HttpClient client = HttpClient.newBuilder()
        .connectTimeout(Duration.ofSeconds(5))
        .build();

    public CompletableFuture<String> fetchUser(int userId) {
        HttpRequest request = HttpRequest.newBuilder()
            .uri(URI.create("https://api.example.com/users/" + userId))
            .GET()
            .build();

        return client.sendAsync(request, HttpResponse.BodyHandlers.ofString())
            .thenApply(HttpResponse::body);
    }

    public CompletableFuture<String> fetchPost(int postId) {
        HttpRequest request = HttpRequest.newBuilder()
            .uri(URI.create("https://api.example.com/posts/" + postId))
            .GET()
            .build();

        return client.sendAsync(request, HttpResponse.BodyHandlers.ofString())
            .thenApply(HttpResponse::body);
    }

    public void sequential() throws Exception {
        // 方式 1: 顺序执行
        System.out.println("=== 顺序执行 ===");
        String user1 = fetchUser(1).get();  // 等待 1 秒
        String post1 = fetchPost(1).get();  // 等待 1 秒
        // 总耗时:2 秒
    }

    public void concurrent() throws Exception {
        // 方式 2: 并发执行
        System.out.println("=== 并发执行 ===");

        CompletableFuture<String> user1Future = fetchUser(1);
        CompletableFuture<String> post1Future = fetchPost(1);
        CompletableFuture<String> user2Future = fetchUser(2);
        CompletableFuture<String> post2Future = fetchPost(2);

        // 等待所有完成
        CompletableFuture<Void> allFutures = CompletableFuture.allOf(
            user1Future, post1Future, user2Future, post2Future
        );

        allFutures.join();  // 阻塞等待所有完成

        // 获取结果
        List<String> results = List.of(
            user1Future.get(),
            post1Future.get(),
            user2Future.get(),
            post2Future.get()
        );

        System.out.println("获取到 " + results.size() + " 条数据");
        // 总耗时:~1 秒
    }
}
示例 2:生产者 - 消费者模式
Python 版本(使用 Queue)
python
import asyncio

async def producer(queue, name, count):
    """生产者:生产数据放入队列"""
    for i in range(count):
        item = f"{name}-产品-{i}"
        await queue.put(item)  # 异步放入
        print(f"{name} 生产了:{item}")
        await asyncio.sleep(0.5)  # 模拟生产时间

async def consumer(queue, name):
    """消费者:从队列取出数据处理"""
    while True:
        item = await queue.get()  # 异步取出

        if item is None:  # 毒丸信号,结束消费
            queue.task_done()
            break

        print(f"{name} 正在处理:{item}")
        await asyncio.sleep(1)  # 模拟处理时间
        queue.task_done()  # 标记任务完成

async def main():
    # 创建队列(类似 Java BlockingQueue)
    queue = asyncio.Queue(maxsize=10)

    # 创建生产者
    producer1 = asyncio.create_task(producer(queue, "工厂 A", 5))
    producer2 = asyncio.create_task(producer(queue, "工厂 B", 5))

    # 创建消费者
    consumer1 = asyncio.create_task(consumer(queue, "工人 1"))
    consumer2 = asyncio.create_task(consumer(queue, "工人 2"))

    # 等待生产者完成
    await producer1
    await producer2

    # 发送毒丸信号
    await queue.put(None)
    await queue.put(None)

    # 等待队列清空
    await queue.join()

    # 等待消费者完成
    await consumer1
    await consumer2

asyncio.run(main())
Java 版本(使用 BlockingQueue)
java
import java.util.concurrent.*;

public class ProducerConsumer {

    private final BlockingQueue<String> queue = new ArrayBlockingQueue<>(10);

    class Producer implements Runnable {
        private final String name;
        private final int count;

        public Producer(String name, int count) {
            this.name = name;
            this.count = count;
        }

        @Override
        public void run() {
            try {
                for (int i = 0; i < count; i++) {
                    String item = name + "-产品-" + i;
                    queue.put(item);  // 阻塞放入
                    System.out.println(name + " 生产了:" + item);
                    Thread.sleep(500);
                }
            } catch (InterruptedException e) {
                Thread.currentThread().interrupt();
            }
        }
    }

    class Consumer implements Runnable {
        private final String name;

        public Consumer(String name) {
            this.name = name;
        }

        @Override
        public void run() {
            try {
                while (true) {
                    String item = queue.take();  // 阻塞取出

                    if (item == null) {  // 毒丸信号
                        queue.taskDone();
                        break;
                    }

                    System.out.println(name + " 正在处理:" + item);
                    Thread.sleep(1000);
                    queue.taskDone();
                }
            } catch (InterruptedException e) {
                Thread.currentThread().interrupt();
            }
        }
    }

    public void run() throws InterruptedException {
        ExecutorService executor = Executors.newCachedThreadPool();

        // 启动生产者
        executor.submit(new Producer("工厂 A", 5));
        executor.submit(new Producer("工厂 B", 5));

        // 启动消费者
        executor.submit(new Consumer("工人 1"));
        executor.submit(new Consumer("工人 2"));

        // 等待完成...
        executor.shutdown();
        executor.awaitTermination(1, TimeUnit.MINUTES);
    }
}
示例 3:带超时和重试的异步操作
Python 版本
python
import asyncio
import aiohttp
from typing import Optional

async def fetch_with_retry(
    session: aiohttp.ClientSession,
    url: str,
    max_retries: int = 3,
    timeout: float = 5.0
) -> Optional[dict]:
    """带重试和超时的异步请求"""

    for attempt in range(max_retries):
        try:
            # 设置超时
            async with asyncio.timeout(timeout):
                async with session.get(url) as response:
                    if response.status == 200:
                        return await response.json()
                    else:
                        raise Exception(f"HTTP {response.status}")

        except asyncio.TimeoutError:
            print(f"尝试 {attempt + 1}/{max_retries}: 请求超时")

        except Exception as e:
            print(f"尝试 {attempt + 1}/{max_retries}: 失败 - {e}")

        # 指数退避
        if attempt < max_retries - 1:
            wait_time = 2 ** attempt
            print(f"等待 {wait_time} 秒后重试...")
            await asyncio.sleep(wait_time)

    print("所有重试失败")
    return None

async def main():
    async with aiohttp.ClientSession() as session:
        result = await fetch_with_retry(
            session,
            "https://api.example.com/data",
            max_retries=3,
            timeout=5.0
        )

        if result:
            print(f"成功获取数据:{result}")
        else:
            print("最终失败")

asyncio.run(main())
Java 版本
java
import java.net.http.*;
import java.time.Duration;
import java.util.concurrent.*;

public class RetryWithTimeout {

    private final HttpClient client = HttpClient.newBuilder()
        .connectTimeout(Duration.ofSeconds(5))
        .build();

    private final ExecutorService executor = Executors.newCachedThreadPool();

    public CompletableFuture<String> fetchWithRetry(
        String url,
        int maxRetries,
        long timeoutMs
    ) {
        return fetchWithRetryInternal(url, maxRetries, timeoutMs, 0);
    }

    private CompletableFuture<String> fetchWithRetryInternal(
        String url,
        int maxRetries,
        long timeoutMs,
        int attempt
    ) {
        HttpRequest request = HttpRequest.newBuilder()
            .uri(URI.create(url))
            .timeout(Duration.ofMillis(timeoutMs))
            .GET()
            .build();

        return client.sendAsync(request, HttpResponse.BodyHandlers.ofString())
            .thenApply(HttpResponse::body)
            .exceptionallyCompose(ex -> {
                // 如果失败,判断是否需要重试
                if (attempt < maxRetries - 1) {
                    System.out.printf("尝试 %d/%d: 失败 - %s%n",
                        attempt + 1, maxRetries, ex.getMessage());

                    // 指数退避
                    long waitTime = (long) Math.pow(2, attempt) * 1000;
                    System.out.println("等待 " + waitTime + "ms 后重试...");

                    return CompletableFuture.completedFuture(null)
                        .thenComposeAsync(v -> {
                            try {
                                Thread.sleep(waitTime);
                            } catch (InterruptedException e) {
                                Thread.currentThread().interrupt();
                            }
                            return null;
                        }, executor)
                        .thenCompose(v -> fetchWithRetryInternal(
                            url, maxRetries, timeoutMs, attempt + 1
                        ));
                } else {
                    System.out.println("所有重试失败");
                    return CompletableFuture.failedFuture(ex);
                }
            });
    }

    public void run() {
        fetchWithRetry("https://api.example.com/data", 3, 5000)
            .thenAccept(result -> {
                if (result != null) {
                    System.out.println("成功获取数据:" + result);
                } else {
                    System.out.println("最终失败");
                }
            })
            .join();
    }
}
5️⃣ 常见陷阱与最佳实践
陷阱 1:在异步函数中使用阻塞调用
python
# ❌ 错误示例
async def bad_example():
    result = await some_async_call()

    # 阻塞调用!会卡住整个事件循环
    time.sleep(5)  # ❌ 不要用这个!

    return result

# ✅ 正确示例
async def good_example():
    result = await some_async_call()

    # 非阻塞等待
    await asyncio.sleep(5)  # ✅ 用这个!

    return result
Java 对比:
java
// ❌ Java 中的类似问题
public CompletableFuture<String> badExample() {
    return CompletableFuture.supplyAsync(() -> {
        try {
            Thread.sleep(5000);  // 阻塞线程
        } catch (InterruptedException e) {
            e.printStackTrace();
        }
        return "结果";
    });
}

// ✅ Java 改进版
public CompletableFuture<String> goodExample() {
    return CompletableFuture.supplyAsync(() -> {
        return "结果";
    }).thenApplyAsync(result -> {
        // 延迟处理,但不阻塞
        return delayedResult();
    });
}
陷阱 2:忘记使用 await
python
# ❌ 错误示例
async def forget_await():
    task = asyncio.create_task(some_async_call())
    # 忘记 await,直接返回 task 对象
    return task  # ❌ 返回的是 Coroutine 对象,不是结果!

# ✅ 正确示例
async def remember_await():
    task = asyncio.create_task(some_async_call())
    result = await task  # ✅ 等待结果
    return result

# 或者更简洁
async def concise_version():
    return await some_async_call()
陷阱 3:异常处理不当
python
# ❌ 错误示例
async def bad_error_handling():
    try:
        result = await risky_operation()
    except Exception as e:
        print(f"出错了:{e}")
        # 没有重新抛出或返回错误
        return None  # ❌ 吞掉异常,上层无法感知

    return result

# ✅ 正确示例
async def good_error_handling():
    try:
        result = await risky_operation()
        return result
    except Exception as e:
        print(f"出错了:{e}")
        raise  # ✅ 重新抛出,让上层决定如何处理

# 或者返回明确的错误类型
from typing import Optional, Tuple

async def explicit_error_handling() -> Tuple[bool, Optional[str]]:
    """返回 (成功标志,结果/错误信息)"""
    try:
        result = await risky_operation()
        return True, result
    except Exception as e:
        return False, str(e)
最佳实践 1:使用 asyncio.gather() 并发执行独立任务
python
# ✅ 推荐做法
async def fetch_all_data():
    # 三个独立的 IO 操作
    user_task = fetch_users()
    post_task = fetch_posts()
    comment_task = fetch_comments()

    # 并发执行
    users, posts, comments = await asyncio.gather(
        user_task, post_task, comment_task,
        return_exceptions=True  # ✅ 即使一个失败,其他也能继续
    )

    return users, posts, comments
最佳实践 2:使用 Semaphore 限制并发数
python
# ✅ 防止过多并发连接压垮服务器
async def fetch_with_limit(urls, max_concurrent=5):
    semaphore = asyncio.Semaphore(max_concurrent)

    async def fetch_one(url):
        async with semaphore:  # 限制并发数
            return await fetch_url(url)

    tasks = [fetch_one(url) for url in urls]
    return await asyncio.gather(*tasks)
Java 对比:
java
// Java 使用 Semaphore
Semaphore semaphore = new Semaphore(5);

public CompletableFuture<String> fetchWithLimit(String url) {
    try {
        semaphore.acquire();  // 获取许可
    } catch (InterruptedException e) {
        Thread.currentThread().interrupt();
    }

    try {
        return fetchUrl(url)
            .whenComplete((result, ex) -> semaphore.release());  // 释放许可
    } catch (Exception e) {
        semaphore.release();
        throw e;
    }
}
最佳实践 3:使用上下文管理器处理资源
python
# ✅ 确保资源正确释放
async def process_file(filename):
    async with aiofiles.open(filename, 'r') as f:  # 自动关闭
        content = await f.read()
        return content

# 自定义异步上下文管理器
class AsyncResource:
    async def __aenter__(self):
        await self.connect()
        return self

    async def __aexit__(self, exc_type, exc_val, exc_tb):
        await self.close()

async def use_resource():
    async with AsyncResource() as resource:
        await resource.do_something()
    # 自动调用 __aexit__,即使发生异常
Java 对比:
java
// Java try-with-resources(类似 Python 上下文管理器)
try (BufferedReader reader = Files.newBufferedReader(path)) {
    return reader.readLine();
} catch (IOException e) {
    e.printStackTrace();
}
// 自动关闭资源
6️⃣ 总结对比表
核心概念对照
| Python 概念 | Java 对应物 | 说明 |
|---|---|---|
async def |
CompletableFuture<T> |
异步方法定义 |
await |
.thenApply() / .join() |
等待异步结果 |
asyncio.create_task() |
CompletableFuture.supplyAsync() |
创建异步任务 |
asyncio.gather() |
CompletableFuture.allOf() |
等待所有任务完成 |
asyncio.Queue |
BlockingQueue |
异步队列 |
asyncio.Lock |
ReentrantLock |
异步锁 |
asyncio.Semaphore |
Semaphore |
信号量 |
asyncio.run(main()) |
ExecutorService |
启动异步程序 |
aiohttp |
HttpClient (Java 11+) |
异步 HTTP 客户端 |
async with |
try-with-resources | 异步上下文管理器 |
并发模型对比
| 特性 | Python asyncio | Java 线程池 |
|---|---|---|
| 线程数量 | 单线程(主线程) | 多线程 |
| 调度方式 | 协作式(任务主动让出) | 抢占式(OS 调度) |
| 内存占用 | 低(KB 级 per coroutine) | 高(MB 级 per thread) |
| 最大并发 | 百万级 | 千级 |
| 适用场景 | IO 密集型 | CPU + IO 密集型 |
| 学习曲线 | 中等(需理解 async/await) | 较陡(需理解线程安全) |
性能对比
场景:1000 个 HTTP 请求

Python asyncio:
├─ 启动时间:~0.1s
├─ 内存占用:~50MB
├─ 并发数:1000(单线程)
└─ 总耗时:~10s

Java 线程池:
├─ 启动时间:~0.5s
├─ 内存占用:~500MB
├─ 并发数:~100(受线程池大小限制)
└─ 总耗时:~100s(分批执行)

结论:IO 密集型场景,Python asyncio 优势明显
🎯 给 Java 开发者的建议
1. 心态转变
- ❌ 不要想"这会阻塞吗?"
- ✅ 要想"这是在等待 IO 吗?如果是,就用 await"
2. 代码风格
python
# ❌ Java 风格的 Python 代码
def fetch_data():
    future = asyncio.create_task(api_call())
    # ... 做其他事
    result = future.result()  # 阻塞等待
    return result

# ✅ Pythonic 风格
async def fetch_data():
    result = await api_call()
    return result
3. 调试技巧
python
# 添加日志查看执行顺序
async def debug_example():
    print(f"[{asyncio.get_event_loop().time():.2f}] 开始")

    result = await some_call()

    print(f"[{asyncio.get_event_loop().time():.2f}] 完成:{result}")
    return result
4. 测试异步代码
python
import pytest

# ✅ 测试异步函数
@pytest.mark.asyncio
async def test_async_function():
    result = await my_async_function()
    assert result == expected_value

# 或在测试中运行事件循环
def test_with_loop():
    loop = asyncio.get_event_loop()
    result = loop.run_until_complete(my_async_function())
    assert result == expected_value
📚 推荐学习资源
Python 异步编程
- 📖 官方文档:asyncio
- 📖 书籍:《Python Asyncio 并发编程》
- 🎥 视频:David Beazley - Asyncio Demystified
Java 对比学习
- 📖 《Java 并发编程实战》
- 📖 《Java 8 函数式编程》
- 📖 Project Loom(虚拟线程,类似 Python 协程)
✅ 关键要点回顾
- async/await 不是阻塞:是暂停当前任务,释放线程给其他任务
- Event Loop 是核心:单线程调度百万级并发
- await 必须在 async 函数内:不能在同步函数中直接 await
- 并发用 gather() :独立任务用
asyncio.gather()并发执行 - 避免阻塞调用 :用
await asyncio.sleep()替代time.sleep() - 异常处理要谨慎:要么重新抛出,要么明确返回错误
- 资源管理用 async with:确保异步资源正确释放
作者:Alioo Agent Team
最后更新:2026-03-23
基于 Python 3.13 + Java 17/21