QGroundControl 二次开发实战:Android 单机离线授权怎么落地
摘要
这篇文章记录一次 QGroundControl 二次开发中的实际需求落地:Android 遥控器上的 APK 可以安装,但拷贝到其它设备后不能继续正常使用。实现上没有走联网激活,而是采用 设备指纹 + 应用签名 + 私钥签发 license.dat + APK 内置公钥验签 的离线方案。整体仍然沿用 QGC 原有框架,把 Android 相关能力放在 QGCActivity.java,授权状态管理放在 C++ 工具层 LicenseManager,界面拦截放在 MainRootWindow.qml,同时补了一套便携式厂内发码工具,方便测试人员现场抓取设备信息并生成授权文件。本文重点记录这套方案在 QGC 二次开发中的代码落点、目录设计和实操流程。
一、需求背景
这次项目里的需求其实很典型:
- App 运行在 Android 遥控器上
- 同一个 APK 安装到其它设备后不能正常使用
- 尽量不依赖联网
- 厂家或测试人员要能现场快速完成授权测试
如果单看 Android 应用开发,很容易想到注册码、设备码这类做法;但项目本身是 QGroundControl(QGC) 二次开发,所以实现时更重要的是顺着 QGC 原有框架去接,而不是把逻辑堆在单一层里。
最后落地的方案是:
设备指纹 + 应用签名 + 私钥签发 license.dat + APK 内置公钥验签
二、整体架构
整个实现仍然沿用 QGC 二次开发常见的三层结构:
- Android Java 层:采集设备指纹、应用签名、完成公钥验签
- QGC C++ 工具层:统一处理授权文件加载、设备绑定和授权状态
- QML 主界面层:负责授权页显示和主界面拦截
1. 整体架构图
Android 遥控器
usv-pilot App
QGCActivity.java
采集 Device Fingerprint
采集 App Signature
LicenseManager
读取 license.dat
绑定校验
验签
MainRootWindow.qml
授权页 / 主界面拦截
厂家发码工具
Capture-AndroidLicense.ps1
生成 license.dat
私钥
license_private_key.json
APK 内置公钥
QGCActivity.java
savePath/license.dat
导入源文件
savePath/License/license.dat
正式授权文件
授权成功
进入主界面
授权失败
显示授权页
2. 架构说明
这套方案里的角色划分比较明确:
(1)QGCActivity.java
位于:
text
android/src/org/mavlink/qgroundcontrol/QGCActivity.java这里负责:
- 获取
Device Fingerprint - 获取
App Signature - 使用 APK 内置公钥做验签
- 在 Debug 版本中打印设备指纹和签名日志
(2)LicenseManager
位于:
text
src/LicenseManager.h
src/LicenseManager.cc
这是本次在 QGC 工具层新增的授权管理器,主要负责:
- 查找
license.dat - 读取授权文件
- 校验
deviceFingerprint - 校验
appSigningCertDigest - 调用 Java 层完成签名验证
- 向 QML 暴露授权状态
(3)MainRootWindow.qml
位于:
text
src/ui/MainRootWindow.qml这里负责:
- 未授权时拦截主界面
- 显示授权页
- 显示设备指纹、应用签名、错误信息
- 提供导入授权文件和重新校验按钮
这里继续沿用项目自己的 X 控件体系,而不是回退到默认 QGC 控件,这样整体风格不会乱。
三、授权文件与目录设计
授权文件统一使用:
text
license.dat最终保存位置为:
text
savePath/License/license.dat其中 License/ 与这些目录同级:
WaterQualityData/Logs/Photo/Video/Telemetry/Missions/
为了方便测试导入,先约定把源文件放在:
text
savePath/license.dat然后在 App 中点击导入按钮,由程序自动复制到:
text
savePath/License/license.dat这样目录结构清晰,也符合项目本身的保存路径体系。
四、授权校验流程
1. 授权校验流程图
否
是
是
否
启动 App
QGCActivity 获取
Device Fingerprint / App Signature
LicenseManager 查找授权文件
是否存在
savePath/License/license.dat ?
进入授权页
读取 license.dat
校验 productId
校验 deviceFingerprint
校验 appSigningCertDigest
使用 APK 内置公钥验签
是否全部通过?
授权成功
进入主界面
授权失败
显示错误原因
2. 流程说明
App 启动后,先由 Java 层拿到当前设备的 Device Fingerprint 和 App Signature,再由 LicenseManager 去查找授权文件。如果 license.dat 不存在,直接进入授权页;如果存在,就读取文件内容,依次校验:
productIddeviceFingerprintappSigningCertDigest- 签名是否由匹配的私钥生成
只有全部通过,才会解锁主界面。这样即使把同一个 APK 拷贝到其它遥控器,或者把同一份 license.dat 拿到另一台设备上,也无法继续正常使用。
五、QGC 二次开发中的关键代码落点
这部分是整套方案真正落在代码里的地方,也是后面维护时最常回看的部分。
1. Java 层:设备指纹、应用签名与验签
在 QGCActivity.java 中,一共做了三件事:
- 采集设备指纹
- 采集 APK 签名摘要
- 使用内置公钥验签
关键代码片段:公钥验签
java
private static PublicKey getLicensePublicKey() throws Exception
{
    byte[] modulusBytes = Base64.decode(LICENSE_PUBLIC_MODULUS_B64, Base64.DEFAULT);
    byte[] exponentBytes = Base64.decode(LICENSE_PUBLIC_EXPONENT_B64, Base64.DEFAULT);
    RSAPublicKeySpec keySpec = new RSAPublicKeySpec(new BigInteger(1, modulusBytes), new BigInteger(1, exponentBytes));
    return KeyFactory.getInstance("RSA").generatePublic(keySpec);
}

public static boolean verifyLicenseSignature(String canonicalPayload, String signatureBase64)
{
    try {
        java.security.Signature verifier = java.security.Signature.getInstance("SHA256withRSA");
        verifier.initVerify(getLicensePublicKey());
        verifier.update(canonicalPayload.getBytes(StandardCharsets.UTF_8));
        byte[] signatureBytes = Base64.decode(signatureBase64, Base64.DEFAULT);
        return verifier.verify(signatureBytes);
    } catch (Exception e) {
        Log.e(TAG, "verifyLicenseSignature failed", e);
        return false;
    }
}
这一段的作用很直接:
- APK 内只保存公钥
license.dat由厂家私钥签发- App 启动时用公钥校验这份授权文件是否可信
关键代码片段:生成设备指纹
java
public static String getDeviceFingerprint()
{
    try {
        Context context = _instance != null ? _instance : m_context;
        if (context == null) {
            return "";
        }

        String androidId = "";
        try {
            androidId = Settings.Secure.getString(context.getContentResolver(), Settings.Secure.ANDROID_ID);
        } catch (Exception e) {
            Log.e(TAG, "ANDROID_ID lookup failed", e);
        }

        String rawFingerprint = "ANDROID_ID=" + normalizeLicenseField(androidId)
                + "|BRAND=" + normalizeLicenseField(safeBuildField(Build.BRAND))
                + "|MODEL=" + normalizeLicenseField(safeBuildField(Build.MODEL))
                + "|DEVICE=" + normalizeLicenseField(safeBuildField(Build.DEVICE))
                + "|SERIAL=" + normalizeLicenseField(getBestEffortSerial());

        String fingerprint = sha256Hex(rawFingerprint.getBytes(StandardCharsets.UTF_8));
        if (isDebugBuild()) {
            Log.d(TAG, "License device fingerprint: " + fingerprint);
        }
        return fingerprint;
    } catch (Exception e) {
        Log.e(TAG, "getDeviceFingerprint failed", e);
        return "";
    }
}
这里不是直接使用某一个原始设备号,而是把多个设备字段规范化后再做哈希,这样稳定性会更好一些。
关键代码片段:获取应用签名摘要
java
public static String getAppSigningCertDigest()
{
    try {
        Context context = _instance != null ? _instance : m_context;
        if (context == null) {
            return "";
        }

        PackageManager packageManager = context.getPackageManager();
        PackageInfo packageInfo;

        if (Build.VERSION.SDK_INT >= Build.VERSION_CODES.P) {
            packageInfo = packageManager.getPackageInfo(context.getPackageName(), PackageManager.GET_SIGNING_CERTIFICATES);
            SigningInfo signingInfo = packageInfo.signingInfo;
            if (signingInfo != null) {
                android.content.pm.Signature[] signatures = signingInfo.hasMultipleSigners()
                        ? signingInfo.getApkContentsSigners()
                        : signingInfo.getSigningCertificateHistory();
                if (signatures != null && signatures.length > 0) {
                    String digest = sha256Hex(signatures[0].toByteArray());
                    if (isDebugBuild()) {
                        Log.d(TAG, "License app signing digest: " + digest);
                    }
                    return digest;
                }
            }
        }
    } catch (Exception e) {
        Log.e(TAG, "getAppSigningCertDigest failed", e);
    }

    return "";
}
这里把当前 APK 的签名摘要也纳入授权校验范围,这样即使有人重新签名打包,也过不了授权验证。
2. C++ 层:LicenseManager 统一管理授权状态
在 QGC 二次开发里,如果想让授权状态对整个应用可见,最自然的做法就是接进 QGCToolbox。因此这里新增了 LicenseManager,并把它挂到了 QGC 全局工具链里。
关键代码片段:加载并校验授权文件
cpp
void LicenseManager::reloadLicense()
{
    _refreshDeviceInfo();
    _licenseFilePath = _resolvePreferredLicensePath();

#if !defined(__android__)
    _setLicensed(true, QString());
    emit licenseStateChanged();
    return;
#endif

    QFile licenseFile(_licenseFilePath);
    if (!licenseFile.exists()) {
        _setLicensed(false, tr("License file not found at %1").arg(_licenseFilePath));
        return;
    }

    if (!licenseFile.open(QIODevice::ReadOnly | QIODevice::Text)) {
        _setLicensed(false, tr("Unable to open license file at %1").arg(_licenseFilePath));
        return;
    }

    const QByteArray licenseBytes = licenseFile.readAll();
    licenseFile.close();

    QJsonParseError parseError;
    const QJsonDocument licenseDocument = QJsonDocument::fromJson(licenseBytes, &parseError);
    if (parseError.error != QJsonParseError::NoError || !licenseDocument.isObject()) {
        _setLicensed(false, tr("Invalid license file format."));
        return;
    }

    QString validationError;
    if (!_validateLicenseObject(licenseDocument.object(), validationError)) {
        _setLicensed(false, validationError);
        return;
    }

    _setLicensed(true, QString());
}
这段代码的作用就是把整个授权流程收口到一个入口里,App 启动或用户点击 Recheck License 时都走这里。
关键代码片段:从保存根目录导入授权文件
cpp
bool LicenseManager::importLicenseFromSaveRoot()
{
#if !defined(__android__)
    _setLicensed(true, QString());
    return true;
#else
    QString saveRootPath;
    if (_appSettings) {
        saveRootPath = _appSettings->savePath()->rawValue().toString();
    }

    const QString sourcePath = QDir(saveRootPath).filePath(licenseFileName());
    const QString destinationPath = _resolvePrimaryLicensePath();

    if (saveRootPath.isEmpty() || !QFileInfo::exists(sourcePath)) {
        _setLicensed(false, tr("license.dat was not found in %1").arg(sourcePath));
        return false;
    }

    QDir destinationDir = QFileInfo(destinationPath).dir();
    if (!destinationDir.exists() && !destinationDir.mkpath(QStringLiteral("."))) {
        _setLicensed(false, tr("Unable to create license directory at %1").arg(destinationDir.absolutePath()));
        return false;
    }

    if (QFileInfo::exists(destinationPath) && !QFile::remove(destinationPath)) {
        _setLicensed(false, tr("Unable to replace the existing license file."));
        return false;
    }

    if (!QFile::copy(sourcePath, destinationPath)) {
        _setLicensed(false, tr("Failed to import license.dat from %1").arg(sourcePath));
        return false;
    }

    reloadLicense();
    return _isLicensed;
#endif
}
这段代码对应的就是授权页上的导入按钮。测试人员只要把 license.dat 先放到保存根目录,再点导入即可。
3. QML 层:在 MainRootWindow 中做授权拦截
界面如图所示:
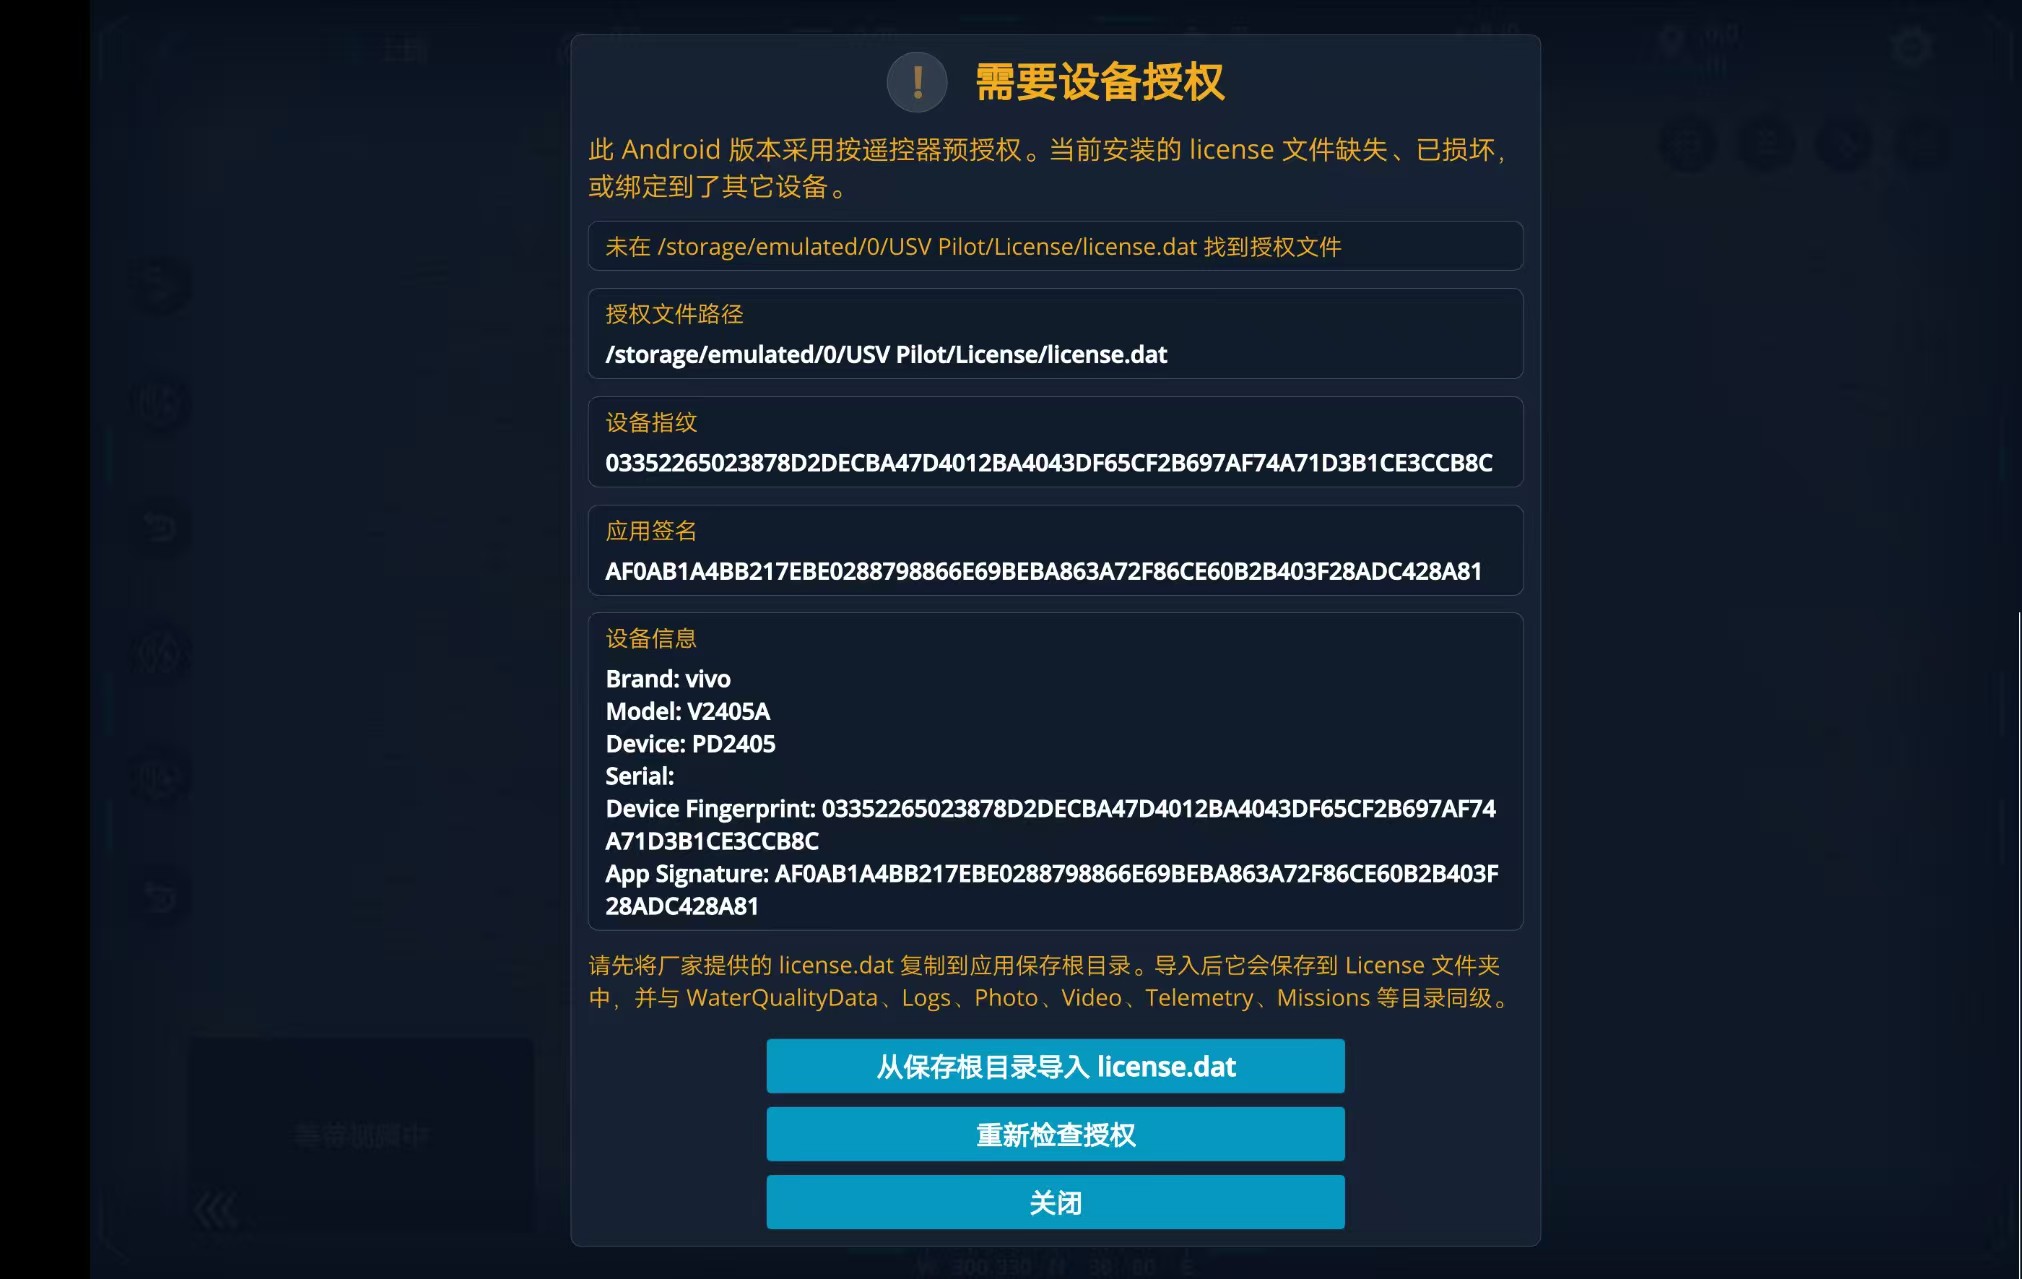
QML 层的处理比较直接,就是在 MainRootWindow.qml 中增加一层授权页,用来拦截未授权设备。
关键代码片段:授权页显示条件
qml
visible: XScreenTool.isAndroid
         && QGroundControl.licenseManager
         && QGroundControl.licenseManager.licenseEnforced
         && !QGroundControl.licenseManager.isLicensed
这段逻辑保证了:
- 只在 Android 下拦截
- 桌面版本不受影响
- 只有未授权时才显示授权页
关键代码片段:导入与重检按钮
qml
Buttonl {
    width: parent.width
    text: qsTr("Import license.dat from Save Root")
    onClicked: {
        if (QGroundControl.licenseManager) {
            QGroundControl.licenseManager.importLicenseFromSaveRoot()
        }
    }
}

Button {
    width: parent.width
    text: qsTr("Recheck License")
    onClicked: {
        if (QGroundControl.licenseManager) {
            QGroundControl.licenseManager.reloadLicense()
        }
    }
}
这部分在实际测试时非常关键,因为它直接决定了工厂导入流程是否顺手。
六、厂内实操流程
为了方便厂家和测试人员现场使用,这里又配套做了一套便携式脚本工具。
1. 工厂/测试流程图
测试人员连接遥控器
运行
Capture-AndroidLicense.bat
自动抓取
Device Fingerprint
App Signature
使用私钥生成
license.dat
推送到
savePath/license.dat
App 点击
Import license.dat from Save Root
导入到
savePath/License/license.dat
点击 Recheck License
授权成功
2. 便携工具包结构
text
发码工具包/
  Capture-AndroidLicense.bat
  Capture-AndroidLicense.ps1
  license_private_key.json
  platform-tools/
    adb.exe
    AdbWinApi.dll
    AdbWinUsbApi.dll
    ...
3. 实操步骤
如果是一台全新的未授权 Android 遥控器,厂家或测试人员只需要按下面步骤操作:
- 安装最新 APK,首次启动后进入授权页
- 运行
Capture-AndroidLicense.bat - 脚本自动抓取:
Device FingerprintApp Signature
- 脚本自动生成
license.dat - 脚本可选自动 push 到
savePath/license.dat - 在 App 授权页点击:
Import license.dat from Save RootRecheck License
- 授权成功后进入主界面
关键代码片段:抓取日志中的设备指纹与签名
powershell
$logOutput = & $script:AdbExePath logcat "-d" "QGC_QGCActivity:D" "*:S" 2>&1 | Out-String
$fingerprintMatch = [regex]::Match($logOutput, "License device fingerprint:\s*([A-F0-9]+)")
$signingMatch = [regex]::Match($logOutput, "License app signing digest:\s*([A-F0-9]+)")
这段代码的作用很简单,就是直接从调试日志里抓出两个关键值,不需要手工去抄。
关键代码片段:便携模式优先使用本地 adb
powershell
$localAdbPath = Resolve-PreferredPath -RelativeOrAbsolutePath "platform-tools\adb.exe" -BaseDirectories @($scriptDirectory, $workingDirectory)
if (Test-Path $localAdbPath) {
    $script:AdbExePath = $localAdbPath
} elseif ($adbCommand) {
    $script:AdbExePath = $adbCommand
} else {
    throw "adb.exe was not found. Place platform-tools next to this script, or install adb and add it to PATH."
}
这一步主要是为了让厂家测试人员拿到工具包后可以直接双击使用,不依赖系统环境变量。
七、license.dat 是怎么生成的
license.dat 里保存的是一组授权数据,例如:
productIddeviceFingerprintappSigningCertDigestfingerprintVersionlicenseVersionissuedAtfeaturessignature
其中前面的字段构成授权内容,最后再由私钥生成 signature。
所以从原理上说:
license.dat = 授权内容 + 私钥签名
对应关系如下:
- 私钥:厂家保管,用于发码
- 公钥:内置在 APK 中,用于验签
license.dat:保存在设备上,承载设备绑定授权信息
这样就算别人拿到了 APK,也只能看到公钥,无法反推出私钥;没有私钥,也就不能伪造合法授权文件。
八、方案优点与边界
1. 优点
这套方案的优点主要有:
- 基于 QGC 原有框架扩展,代码落点清晰
- 不依赖联网,适合工厂测试和现场交付
- 同时绑定设备和 APK 签名
- 授权页可直接显示关键调试信息
- 配套便携发码工具,现场使用成本低
2. 边界
这套方案也有边界,需要提前说清楚:
- 它不能阻止 APK 被安装
- 只能保证"安装后未授权不可用"
- 如果私钥泄露,别人也能自行发码
所以真正需要保护好的,是:
text
license_private_key.json这个文件不能随便外发。
九、总结
这次基于 QGroundControl 二次开发实现 Android 单机离线授权,最大的体会是:这类需求真正难的不是"验签"本身,而是如何把 Java、C++、QML 和厂内测试流程串成一条完整闭环。单独写一个注册码输入框并不难,难的是让它真正适合项目结构、适合交付、适合后面的人继续维护。
从结果上看,这套方案已经能满足当前项目的主要目标:未授权设备无法进入主界面,APK 拷贝到其它遥控器后不能继续正常使用,厂家或测试人员也可以通过便携工具快速完成现场发码和验证。对 QGC 二次开发项目来说,这种"尽量顺着原框架接"的实现方式,后期维护成本也会更低一些。