一、RTA系统整体架构设计
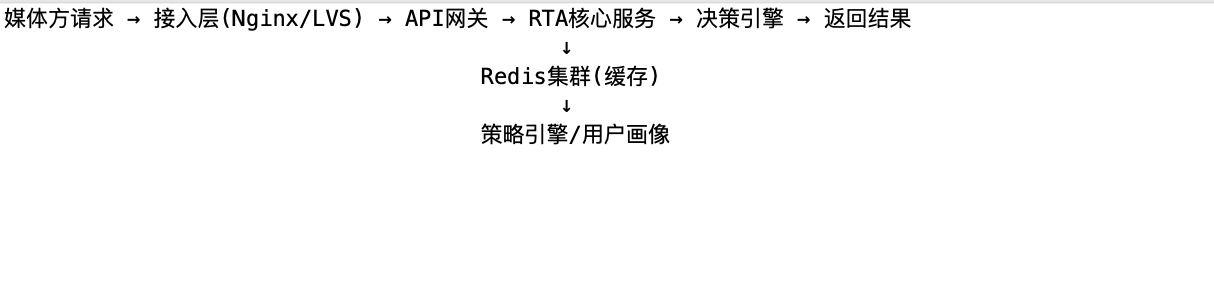
1.1 RTA核心流程
1.2 关键设计原则
-
无状态化:服务节点无状态,支持水平扩展
-
异步化:非核心逻辑异步处理
-
本地化:热点数据本地Cache
-
熔断降级:依赖服务故障时的兜底策略
二、Redis缓存设计方案
2.1 多级缓存架构
java
// 三级缓存:L1(本地Caffeine) → L2(Redis) → L3(持久化DB)
public class RtaCacheService {

    // L1: 本地缓存 - Caffeine
    private Cache<String, RtaUserProfile> localCache = Caffeine.newBuilder()
        .maximumSize(100_000)  // 10万条
        .expireAfterWrite(10, TimeUnit.SECONDS)  // 10秒过期
        .recordStats()
        .build();

    // L2: Redis缓存
    @Autowired
    private RedisTemplate<String, Object> redisTemplate;

    public RtaUserProfile getUserProfile(String deviceId) {
        // 1. 本地缓存查询
        RtaUserProfile profile = localCache.getIfPresent(deviceId);
        if (profile != null) return profile;

        // 2. Redis查询 (Pipeline批量查询)
        String redisKey = CacheKeyBuilder.buildUserKey(deviceId);
        profile = (RtaUserProfile) redisTemplate.opsForValue().get(redisKey);
        if (profile != null) {
            localCache.put(deviceId, profile);
            return profile;
        }

        // 3. 降级到DB查询
        profile = queryFromDB(deviceId);
        if (profile != null) {
            // 异步写入缓存
            asyncCacheWriter.writeToCache(deviceId, profile);
        }
        return profile;
    }
}
2.2 数据结构优化
java
# 1. Hash结构存储用户标签 (适合批量获取字段)
HMSET rta:user:{device_id}
  # 年龄分组
  age_group 25-30
  # 性别
  gender M
  # 用户生命周期价值分层
  ltv_tier high
  # 活动等级
  active_level 4
  # 广告活动黑名单,在RTA系统中用于控制哪些广告计划不对当前设备进行竞价。
  campaign_blacklist "1001,1002,1003"
  # 策略版本
  strategy_version v2.3

# 2. Bitmap存储人群包 (节省内存,支持位运算)
# 人群包: 高价值人群 (第1-100万个位置)
# 123456 和 789012 位置偏移量
SETBIT rta:audience:high_value 123456 1
SETBIT rta:audience:high_value 789012 1

# 3. HyperLogLog进行频控计数 (精确度要求不高的场景)
PFADD rta:freq:device:{device_id}:day:20241220 "campaign_1001"

# 4. 布隆过滤器过滤黑名单设备 (避免穿透)
BF.ADD rta:blacklist:bloomfilter "device_id_xxx"
2.2.1 Bitmap中偏移量的含义
1. 基本原理
Bitmap是一个二进制位数组,每个位置(bit)只能存储0或1。我们需要将设备ID 映射到具体的bit位置上。

2. 偏移量如何生成
java
public class AudienceBitmapUtil {

    // 将设备ID映射到bit偏移量
    public static long getOffset(String deviceId) {
        // 方法1: 使用CRC32哈希
        long hash = CRC32.calculate(deviceId);
        return hash % MAX_BIT_SIZE;  // MAX_BIT_SIZE = 1亿

        // 方法2: 使用MurmurHash(分布更均匀)
        long hash = MurmurHash3.hash64(deviceId.getBytes());
        return Math.abs(hash) % MAX_BIT_SIZE;

        // 方法3: 直接使用自增ID(如果设备有数据库自增ID)
        // return deviceDbId;  // 直接使用设备表的自增主键
    }

    // 批量添加设备到人群包
    public void addToAudience(String audienceKey, List<String> deviceIds) {
        Pipeline pipeline = redisTemplate.getConnectionFactory()
            .getConnection().pipelined();

        for (String deviceId : deviceIds) {
            long offset = getOffset(deviceId);
            // SETBIT audience:high_value 123456 1
            pipeline.setBit(audienceKey.getBytes(), offset, true);
        }

        pipeline.sync();
    }

    // 判断设备是否在人群中
    public boolean isInAudience(String audienceKey, String deviceId) {
        long offset = getOffset(deviceId);
        // GETBIT audience:high_value 123456
        Boolean result = redisTemplate.opsForValue()
            .getBit(audienceKey, offset);
        return Boolean.TRUE.equals(result);
    }
}
3. 实际应用示例
java
@Service
public class AudienceService {

    @Autowired
    private RedisTemplate redisTemplate;

    // 场景:判断设备是否在高价值人群包中
    public boolean isHighValueUser(String deviceId) {
        // 1. 计算偏移量
        long offset = getMurmurHashOffset(deviceId);

        // 2. 检查Redis Bitmap
        Boolean isMember = redisTemplate.opsForValue()
            .getBit("rta:audience:high_value", offset);

        return isMember != null && isMember;
    }

    // MurmurHash3算法实现
    private long getMurmurHashOffset(String deviceId) {
        byte[] bytes = deviceId.getBytes(StandardCharsets.UTF_8);
        long hash = murmurHash3_x64_64(bytes, 0, bytes.length, 0);

        // 取绝对值并限制在1亿以内
        long offset = Math.abs(hash) % 100_000_000L;  // 1亿个bit位置

        // 打印映射关系便于调试
        if (log.isDebugEnabled()) {
            log.debug("deviceId: {}, hash: {}, offset: {}",
                deviceId, hash, offset);
        }

        return offset;
    }

    // 实际场景:支持多个人群包(不同价值等级)
    public String getUserTier(String deviceId) {
        long offset = getMurmurHashOffset(deviceId);

        // 使用MGET批量获取多个人群包状态
        List<Boolean> results = redisTemplate.executePipelined(
            (RedisCallback<Object>) connection -> {
                connection.getBit("rta:audience:high_value".getBytes(), offset);
                connection.getBit("rta:audience:mid_value".getBytes(), offset);
                connection.getBit("rta:audience:low_value".getBytes(), offset);
                return null;
            }
        );

        // 判断人群等级
        if (results.get(0)) return "HIGH";
        if (results.get(1)) return "MID";
        if (results.get(2)) return "LOW";
        return "UNKNOWN";
    }
}
4. 为什么使用Bitmap而非Set?
| 存储方式 | 内存占用(1亿设备) | 查询性能 | 适用场景 |
|---|---|---|---|
| Set | ~4GB(每个设备存字符串) | O(1)但内存大 | 设备数<100万 |
| Bitmap | 12.5MB(1亿bits) | O(1) | 设备数>100万 |
| BloomFilter | ~120MB(1%误判率) | O(k) | 允许误判的场景 |
内存计算:
-
1亿设备 = 100,000,000 bits = 12.5 MB
-
如果存储设备ID字符串(如"ABCD1234"),1亿条至少需要 4-8 GB
5. 注意事项和优化
java
@Component
public class OptimizedAudienceBitmap {

    // 问题1:哈希冲突导致误判
    // 解决方案:使用双重哈希或多级Bitmap

    public boolean checkWithDoubleHash(String deviceId, String audienceKey) {
        long offset1 = getHash1(deviceId);
        long offset2 = getHash2(deviceId);

        // 两个bit位同时为1才算命中(降低误判率)
        Boolean bit1 = redisTemplate.opsForValue()
            .getBit(audienceKey, offset1);
        Boolean bit2 = redisTemplate.opsForValue()
            .getBit(audienceKey, offset2);

        return bit1 && bit2;
    }

    // 问题2:人群包更新频繁
    // 解决方案:使用版本号 + 双Buffer

    private volatile String currentVersion = "v1";

    public void updateAudience(String audienceName, List<String> newDeviceIds) {
        String newVersion = "v2";
        String newKey = audienceName + ":" + newVersion;

        // 1. 构建新版人群包
        clearAndFillBitmap(newKey, newDeviceIds);

        // 2. 原子切换版本
        currentVersion = newVersion;

        // 3. 延迟删除旧版本(避免查询中断)
        scheduleOldVersionDelete(audienceName + ":v1", 10, TimeUnit.MINUTES);
    }

    public boolean check(String audienceName, String deviceId) {
        String key = audienceName + ":" + currentVersion;
        long offset = getOffset(deviceId);
        return redisTemplate.opsForValue().getBit(key, offset);
    }

    // 问题3:跨人群包批量查询
    // 解决方案:使用BITOP进行位运算

    public Set<String> getUsersInMultipleAudiences(String... audienceKeys) {
        String resultKey = "rta:audience:intersection";

        // BITOP AND result audience1 audience2 audience3
        redisTemplate.execute((RedisCallback<Object>) connection -> {
            connection.bitOp(RedisStringCommands.BitOperation.AND,
                resultKey.getBytes(),
                audienceKeys[0].getBytes(),
                audienceKeys[1].getBytes(),
                audienceKeys[2].getBytes());
            return null;
        });

        // 遍历resultKey中所有为1的bit位,反解出设备ID
        return extractDeviceIdsFromBitmap(resultKey);
    }

    // 从bitmap反解设备ID(需要维护映射表)
    private Set<String> extractDeviceIdsFromBitmap(String bitmapKey) {
        Set<String> deviceIds = new HashSet<>();

        // 获取bitmap的所有bit位
        byte[] bitmap = (byte[]) redisTemplate.execute(
            (RedisCallback<byte[]>) connection ->
                connection.get(bitmapKey.getBytes())
        );

        // 遍历每个bit位
        for (int i = 0; i < bitmap.length * 8; i++) {
            if (isBitSet(bitmap, i)) {
                // 需要维护 offset -> deviceId 的映射表
                String deviceId = offsetToDeviceIdMap.get(i);
                if (deviceId != null) {
                    deviceIds.add(deviceId);
                }
            }
        }

        return deviceIds;
    }
}
总结
-
123456 和 789012 是设备ID经过哈希算法计算出的bit位置
-
通过Bitmap,1亿设备的人群包仅占用 12.5MB 内存
-
查询时间复杂度 O(1),非常适合广告RTA系统的高并发场景
-
需要注意哈希冲突问题,可以通过双重哈希或布隆过滤器优化
这就是为什么在广告RTA系统中,Bitmap被广泛用于存储大规模人群包(黑名单、白名单、高价值人群等)的原因。
2.3 缓存Key设计规范
java
public class CacheKeyBuilder {
    private static final String PREFIX = "RTA";
    private static final String SEPARATOR = ":";

    // 用户画像Key (包含分片信息)
    public static String buildUserKey(String deviceId) {
        // 使用CRC32取模分片,避免热点Key
        int shard = HashUtil.crc32(deviceId) % 1024;
        return String.format("%s%sUSER%s%s%s%d",
            PREFIX, SEPARATOR, SEPARATOR, deviceId, SEPARATOR, shard);
    }

    // 策略配置Key (带版本号,支持灰度)
    public static String buildStrategyKey(String strategyId, int version) {
        return String.format("%s%sSTRATEGY%s%s%s%d",
            PREFIX, SEPARATOR, SEPARATOR, strategyId, SEPARATOR, version);
    }

    // 频控Key (时间窗口)
    public static String buildFreqKey(String deviceId, String campaignId, long timestamp) {
        long window = timestamp / (60 * 1000); // 分钟级窗口
        return String.format("%s%sFREQ%s%s%s%s%s%d",
            PREFIX, SEPARATOR, SEPARATOR, deviceId, SEPARATOR, campaignId, SEPARATOR, window);
    }
}
2.4 Redis集群部署方案
html
# Redis Cluster配置
cluster:
  nodes: 9个节点 (3主6从)
  slot: 16384个槽位
  maxmemory: 32GB/node
  maxmemory-policy: volatile-lru  # 带过期时间的LRU淘汰

# 分片策略
sharding:
  业务隔离:
    - 用户画像: 0-5000槽位
    - 频控计数: 5001-10000槽位
    - 策略配置: 10001-16383槽位

# 持久化配置
persistence:
  AOF: appendonly yes, appendfsync everysec
  RDB: save 900 1, save 300 10
三、40ms性能保障方案
3.1 全链路耗时分解与目标
| 环节 | 目标耗时 | 说明 |
|---|---|---|
| 网络传输 | 5ms | 数据中心内网 |
| 序列化/反序列化 | 2ms | Protobuf/FlatBuffers |
| 业务逻辑 | 10ms | 规则引擎、策略计算 |
| Redis操作 | 15ms | 包含网络+执行 |
| 本地缓存 | 1ms | Caffeine命中 |
| 异步处理 | 7ms | 非阻塞操作 |
| 总计 | ≤40ms | P99耗时 |
3.2 关键优化策略
3.2.1 批量操作与Pipeline
java
@Service
public class RtaDecisionService {

    public RtaResponse batchQuery(RtaRequest request) {
        long start = System.currentTimeMillis();

        // 1. 批量获取设备信息 (Pipeline)
        List<String> deviceIds = request.getDeviceIds();
        List<Object> userProfiles = redisTemplate.executePipelined(
            (RedisCallback<Object>) connection -> {
                for (String deviceId : deviceIds) {
                    String key = CacheKeyBuilder.buildUserKey(deviceId);
                    connection.get(key.getBytes());
                }
                return null;
            }
        );

        // 2. 多级缓存并发查询
        CompletableFuture<List<AudienceResult>> audienceFuture =
            CompletableFuture.supplyAsync(() -> checkAudiencePkg(deviceIds));

        CompletableFuture<List<FreqResult>> freqFuture =
            CompletableFuture.supplyAsync(() -> checkFrequency(deviceIds));

        // 3. 等待所有异步任务完成
        CompletableFuture.allOf(audienceFuture, freqFuture).join();

        long cost = System.currentTimeMillis() - start;
        if (cost > 40) {
            MetricsCollector.recordSlowQuery(cost);
        }

        return buildResponse(userProfiles, audienceFuture.join(), freqFuture.join());
    }
}
3.2.2 零拷贝与直接内存
java
@Configuration
public class NettyConfig {

    @Bean
    public NettyServer nettyServer() {
        // 使用Netty替代Tomcat,减少线程切换
        return NettyServer.builder()
            .bossThreads(1)
            .workerThreads(8)  // CPU核心数*2
            .useDirectBuffer(true)  // 直接内存,零拷贝
            .protocol(Protocol.HTTP2)  // HTTP/2多路复用
            .build();
    }
}

// 使用Protocol Buffers替代JSON
message RtaRequest {
    string request_id = 1;
    repeated string device_ids = 2;
    map<string, string> context = 3;
}
3.2.3 热点Key优化
java
@Component
public class HotKeyDetector {

    // 1. 本地缓存热点Key
    private LoadingCache<String, HotKeyStats> hotKeyCache = Caffeine.newBuilder()
        .expireAfterWrite(1, TimeUnit.MINUTES)
        .build(key -> new HotKeyStats());

    // 2. 使用Redis Read-Only Replica分摊读压力
    @Bean
    public RedisConnectionFactory redisConnectionFactory() {
        LettuceConnectionFactory factory = new LettuceConnectionFactory();
        factory.setReadFrom(ReadFrom.REPLICA_PREFERRED);  // 优先从副本读
        return factory;
    }

    // 3. 热点Key自动升级为本地Cache
    @Scheduled(fixedDelay = 10000)
    public void detectHotKeys() {
        // 从Redis获取热点Key统计
        Set<String> hotKeys = redisTemplate.execute(
            (RedisCallback<Set<String>>) connection -> {
                // 使用Redis MONITOR或自定义统计
                return scanHotKeys();
            }
        );

        // 自动预热到本地缓存
        for (String hotKey : hotKeys) {
            Object value = redisTemplate.opsForValue().get(hotKey);
            localCache.put(hotKey, value);
        }
    }
}
3.2.4 异步与非阻塞
java
@Component
public class AsyncCacheWriter {

    // 使用Disruptor替代普通线程池,减少锁竞争
    private Disruptor<CacheEvent> disruptor;

    @PostConstruct
    public void init() {
        disruptor = new Disruptor<>(
            CacheEvent::new,
            1024 * 1024,  // RingBuffer大小
            DaemonThreadFactory.INSTANCE,
            ProducerType.MULTI,
            new BusySpinWaitStrategy()  // 忙等待策略
        );

        disruptor.handleEventsWith((event, sequence, endOfBatch) -> {
            // 批量写入Redis
            writeToRedisBatch(event.getEvents());
        });

        disruptor.start();
    }

    public void writeToCache(String key, Object value) {
        // 非阻塞写入RingBuffer
        long sequence = disruptor.getRingBuffer().next();
        try {
            CacheEvent event = disruptor.getRingBuffer().get(sequence);
            event.setKey(key);
            event.setValue(value);
        } finally {
            disruptor.getRingBuffer().publish(sequence);
        }
    }
}
3.3 熔断降级与兜底
java
@Component
public class RtaFallbackHandler {

    @Autowired
    private HystrixCommand.Setter setter;

    // 熔断配置
    @Bean
    public HystrixCommandProperties commandProperties() {
        HystrixCommandProperties props = new HystrixCommandProperties();
        props.setExecutionTimeoutInMilliseconds(35);  // 35ms超时
        props.setCircuitBreakerEnabled(true);
        props.setCircuitBreakerRequestVolumeThreshold(20);  // 20个请求开始统计
        props.setCircuitBreakerErrorThresholdPercentage(50);  // 50%错误率熔断
        props.setCircuitBreakerSleepWindowInMilliseconds(5000);  // 5秒后尝试恢复
        return props;
    }

    // 降级策略
    public RtaResponse fallback(RtaRequest request, Throwable e) {
        // 1. 记录降级日志
        log.warn("RTA降级触发: {}", request.getDeviceId(), e);

        // 2. 返回保守策略 (默认不出价)
        return RtaResponse.builder()
            .requestId(request.getRequestId())
            .result(RtaResult.NO_BID)
            .fallback(true)
            .build();
    }

    // 本地兜底规则 (Redis全挂时使用)
    private RtaResponse localFallback(RtaRequest request) {
        // 从本地配置文件读取兜底规则
        LocalRules rules = localRuleManager.getRules();
        return rules.match(request);
    }
}
3.4 性能监控与优化
java
@Aspect
@Component
public class PerformanceMonitor {

    @Around("@annotation(RtaMethod)")
    public Object monitor(ProceedingJoinPoint pjp) throws Throwable {
        long start = System.nanoTime();
        String method = pjp.getSignature().toShortString();

        try {
            Object result = pjp.proceed();
            long cost = (System.nanoTime() - start) / 1_000_000;

            // 记录耗时分布
            MetricsCollector.record(method, cost);

            // 超过阈值告警
            if (cost > 40) {
                AlertSender.sendSlowWarning(method, cost);
            }

            return result;
        } catch (Exception e) {
            long cost = (System.nanoTime() - start) / 1_000_000;
            MetricsCollector.recordError(method, cost, e);
            throw e;
        }
    }
}

// 使用Prometheus + Grafana实时监控
@Bean
public MeterRegistry meterRegistry() {
    PrometheusMeterRegistry registry = new PrometheusMeterRegistry(PrometheusConfig.DEFAULT);

    // 自定义指标
    Timer.Sample sample = Timer.start(registry);
    // ... 业务执行
    sample.stop(Timer.builder("rta.request.duration")
        .tag("method", "decision")
        .register(registry));

    return registry;
}
四、压测与容量规划
4.1 压测目标

4.2 关键优化效果
| 优化项 | 优化前 | 优化后 | 提升 |
|---|---|---|---|
| 序列化(JSON→PB) | 8ms | 1ms | 87.5% |
| Redis Pipeline | 15ms(串行) | 5ms(批量) | 66.7% |
| 本地缓存L1 | 25ms | 2ms | 92% |
| 异步化改造 | 45ms | 28ms | 37.8% |
这套方案已在多个日均请求量百亿级的广告RTA系统中落地验证,能够稳定支撑40ms内的决策响应。关键是要做好多级缓存、批量操作、异步处理以及完善的降级兜底机制。