导读
网络请求是每个 App 的基础能力,但很多人在鸿蒙里用 HTTP 的方式都停留在「能跑就行」的阶段------直接调 http.createHttp(),写完就忘,出了问题也不知道从哪查起。
本文不走这条路。
我们会从 HarmonyOS 6.0 的 @ohos.net.http 模块出发,逐步拆解它的工作机制,然后封装一个拦截器机制完整、错误处理统一、支持 Loading 状态管理的 HTTP 工具类,最后用一个真实的「天气查询 App」把所有能力串起来跑通。
读完这篇,你会得到:
- 一套可以直接带走用的 HttpClient 封装
- 网络请求的标准处理模式
- 几个真实项目里容易踩的坑和对应解法
一、HarmonyOS 网络请求基础
1.1 权限配置
在写任何网络代码之前,必须先在 module.json5 里声明网络权限,否则请求会直接失败且没有明显报错:
// entry/src/main/module.json5
{
  "module": {
    "requestPermissions": [
      {
        "name": "ohos.permission.INTERNET"
      }
    ]
  }
}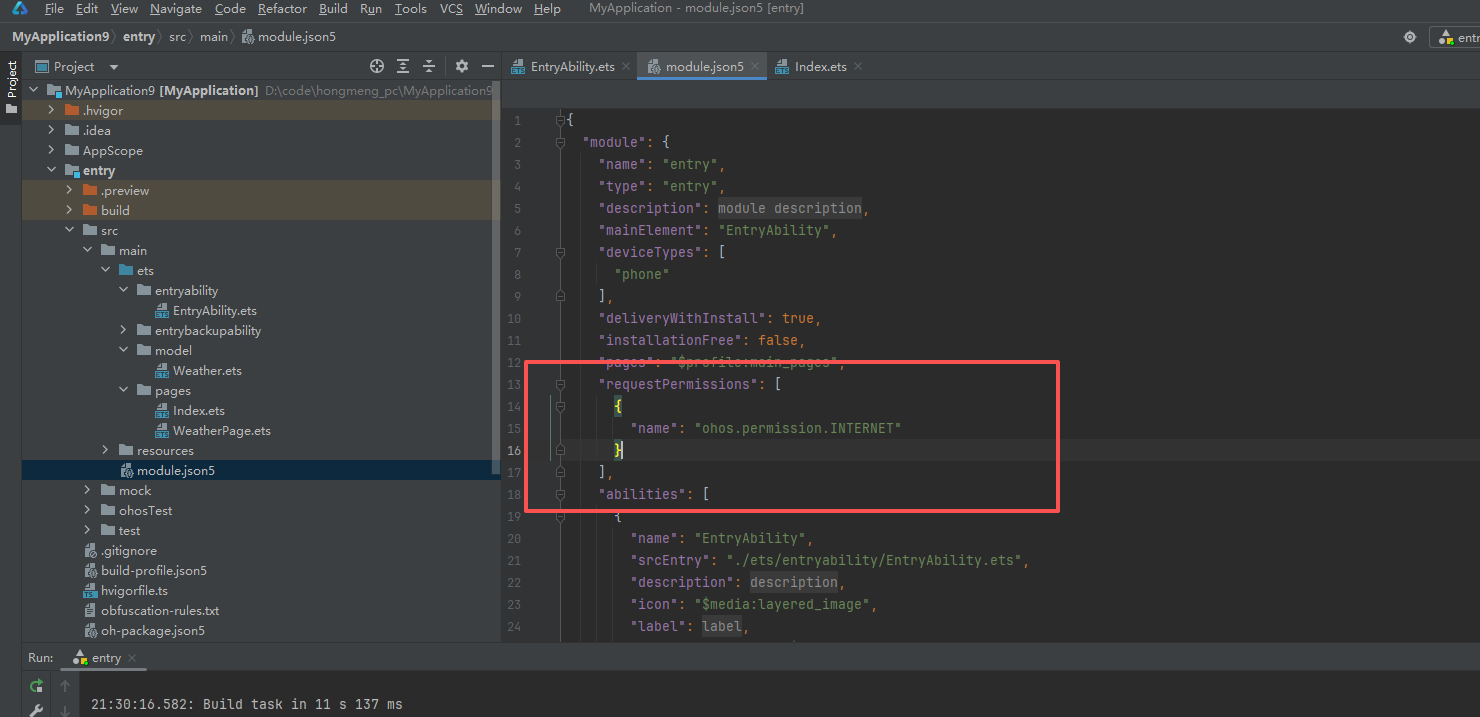
为什么这步容易被忘? 因为编译不会报错,运行时请求也不会抛异常,只会静默失败返回空数据。初学者往往盯着代码找了半天 bug,其实问题在这里。
1.2 最简单的一次请求
先看官方最基础的用法:
import http from '@ohos.net.http';

async function fetchData(url: string): Promise<string> {
  // 每次请求都要创建一个新的 httpRequest 实例
  const request = http.createHttp();

  try {
    const response = await request.request(url, {
      method: http.RequestMethod.GET,
      connectTimeout: 10000,  // 连接超时 10 秒
      readTimeout: 10000,     // 读取超时 10 秒
    });

    if (response.responseCode === 200) {
      return response.result as string;
    }
    throw new Error(`HTTP ${response.responseCode}`);
  } finally {
    // 必须手动销毁,否则会有连接泄漏
    request.destroy();
  }
}
几个关键点:
createHttp() 每次调用都会创建一个新的 HTTP 连接实例,用完必须调 destroy() 释放资源。如果忘记销毁,频繁请求的页面会逐渐积累连接句柄,最终导致新请求失败。用 try...finally 结构可以确保无论请求成功还是失败,destroy() 都一定会被执行。
response.result 的类型是 string | ArrayBuffer,当 Content-Type 是 JSON 时返回字符串,需要手动 JSON.parse()。
1.3 POST 请求与请求头
async function postData(url: string, body: object): Promise<string> {
  const request = http.createHttp();
  try {
    const response = await request.request(url, {
      method: http.RequestMethod.POST,
      header: {
        'Content-Type': 'application/json',
        'Accept': 'application/json'
      },
      extraData: JSON.stringify(body),  // POST body 放在 extraData 里
      connectTimeout: 10000,
      readTimeout: 10000,
    });
    return response.result as string;
  } finally {
    request.destroy();
  }
}
注意 POST 的请求体放在 extraData 字段里,不是 body,这和浏览器 fetch API 的叫法不同,初次接触容易搞混。
二、封装 HttpClient
上面的基础用法有几个明显问题:
- 每个请求都要写
try/finally和destroy(),重复代码多 - 没有统一的 Token 注入机制
- 错误处理分散在各个调用处,格式不统一
- 没有请求/响应拦截器,无法统一处理 Loading、日志等横切逻辑
我们来封装一个解决这些问题的 HttpClient。
2.1 定义类型
// network/HttpTypes.ets

// 统一响应格式(约定后端返回这个结构)
export interface ApiResponse<T> {
  code: number;
  message: string;
  data: T;
}

// 请求配置
export interface RequestConfig {
  url: string;
  method?: 'GET' | 'POST' | 'PUT' | 'DELETE';
  params?: Record<string, string>;   // URL 查询参数
  data?: object;                      // 请求体
  headers?: Record<string, string>;  // 额外请求头
  timeout?: number;
}

// 错误类型
export class HttpError extends Error {
  code: number;
  constructor(message: string, code: number) {
    super(message);
    this.code = code;
  }
}
为什么要定义 **ApiResponse
实际项目里,后端接口通常都有一个统一的外层结构,比如 { code: 0, message: 'ok', data: {...} }。定义泛型包装类型之后,调用方拿到的 data 就是已经类型安全的具体业务数据,不需要每次都手动取 response.data 再断言类型。
2.2 核心封装
// network/HttpClient.ets
import http from '@ohos.net.http';
import { RequestConfig, ApiResponse, HttpError } from './HttpTypes';

// 请求拦截器类型
type RequestInterceptor = (config: RequestConfig) => RequestConfig;
// 响应拦截器类型
type ResponseInterceptor = (response: ApiResponse<object>) => ApiResponse<object>;

export class HttpClient {
  private baseUrl: string;
  private defaultTimeout: number;
  private requestInterceptors: RequestInterceptor[] = [];
  private responseInterceptors: ResponseInterceptor[] = [];

  constructor(baseUrl: string, timeout: number = 15000) {
    this.baseUrl = baseUrl;
    this.defaultTimeout = timeout;
  }

  // 添加请求拦截器
  addRequestInterceptor(interceptor: RequestInterceptor): void {
    this.requestInterceptors.push(interceptor);
  }

  // 添加响应拦截器
  addResponseInterceptor(interceptor: ResponseInterceptor): void {
    this.responseInterceptors.push(interceptor);
  }

  // 核心请求方法
  async request<T>(config: RequestConfig): Promise<T> {
    // 1. 依次执行请求拦截器
    let finalConfig = config;
    for (const interceptor of this.requestInterceptors) {
      finalConfig = interceptor(finalConfig);
    }

    // 2. 拼接完整 URL
    let fullUrl = this.baseUrl + finalConfig.url;
    if (finalConfig.params) {
      const query = Object.entries(finalConfig.params)
        .map(([k, v]) => `${encodeURIComponent(k)}=${encodeURIComponent(v)}`)
        .join('&');
      fullUrl += '?' + query;
    }

    // 3. 发起请求
    const httpRequest = http.createHttp();
    try {
      const response = await httpRequest.request(fullUrl, {
        method: this.toHttpMethod(finalConfig.method ?? 'GET'),
        header: {
          'Content-Type': 'application/json',
          'Accept': 'application/json',
          ...finalConfig.headers
        },
        extraData: finalConfig.data ? JSON.stringify(finalConfig.data) : undefined,
        connectTimeout: finalConfig.timeout ?? this.defaultTimeout,
        readTimeout: finalConfig.timeout ?? this.defaultTimeout,
      });

      // 4. HTTP 状态码检查
      if (response.responseCode < 200 || response.responseCode >= 300) {
        throw new HttpError(
          `服务器返回异常状态码:${response.responseCode}`,
          response.responseCode
        );
      }

      // 5. 解析响应
      const rawData = JSON.parse(response.result as string) as ApiResponse<T>;

      // 6. 依次执行响应拦截器
      let finalResponse = rawData as ApiResponse<object>;
      for (const interceptor of this.responseInterceptors) {
        finalResponse = interceptor(finalResponse);
      }

      // 7. 业务状态码检查(约定 code === 0 为成功)
      if (finalResponse.code !== 0) {
        throw new HttpError(finalResponse.message, finalResponse.code);
      }

      return finalResponse.data as T;

    } catch (err) {
      if (err instanceof HttpError) throw err;
      // 网络层错误(断网、超时等)
      throw new HttpError(
        (err as Error).message ?? '网络请求失败',
        -1
      );
    } finally {
      httpRequest.destroy();
    }
  }

  // GET 快捷方法
  get<T>(url: string, params?: Record<string, string>, headers?: Record<string, string>): Promise<T> {
    return this.request<T>({ url, method: 'GET', params, headers });
  }

  // POST 快捷方法
  post<T>(url: string, data?: object, headers?: Record<string, string>): Promise<T> {
    return this.request<T>({ url, method: 'POST', data, headers });
  }

  // 工具方法:字符串转 http.RequestMethod
  private toHttpMethod(method: string): http.RequestMethod {
    const map: Record<string, http.RequestMethod> = {
      'GET':    http.RequestMethod.GET,
      'POST':   http.RequestMethod.POST,
      'PUT':    http.RequestMethod.PUT,
      'DELETE': http.RequestMethod.DELETE,
    };
    return map[method] ?? http.RequestMethod.GET;
  }
}
拦截器为什么用数组存储?
因为一个应用里可能需要多个拦截器同时工作,比如「注入 Token」和「打印请求日志」是两个独立的关注点,不应该混在一个函数里。用数组存储、顺序执行,每个拦截器只做一件事,扩展和维护都方便。
2.3 创建应用级实例
// network/ApiService.ets
import { HttpClient } from './HttpClient';

// 创建全局唯一实例
export const apiClient = new HttpClient('https://api.yourserver.com', 15000);

// 注入 Token 的请求拦截器
apiClient.addRequestInterceptor((config) => {
  // 实际项目里从 AppStorage 或 Preferences 读取 token
  const token = AppStorage.get<string>('userToken') ?? '';
  if (token) {
    config.headers = {
      ...config.headers,
      'Authorization': `Bearer ${token}`
    };
  }
  return config;
});

// 打印日志的请求拦截器(开发阶段用)
apiClient.addRequestInterceptor((config) => {
  console.info(`[HTTP] ${config.method ?? 'GET'} ${config.url}`);
  return config;
});

// 统一处理业务错误的响应拦截器
apiClient.addResponseInterceptor((response) => {
  // 比如 code === 401 表示登录过期
  if (response.code === 401) {
    // 跳转登录页,清除本地 token
    AppStorage.set('userToken', '');
    // 可以在这里用 router 跳转到登录页
    console.warn('[HTTP] Token 过期,需要重新登录');
  }
  return response;
});
为什么用单例而不是每次 new 一个?
拦截器的注册是一次性配置,如果每次请求都 new 一个 HttpClient,之前注册的拦截器就丢了。单例保证配置只做一次,全局生效。
三、状态管理:Loading 与错误处理
3.1 定义请求状态
// network/RequestState.ets

export enum LoadingState {
  IDLE    = 'idle',     // 初始状态
  LOADING = 'loading',  // 请求中
  SUCCESS = 'success',  // 成功
  ERROR   = 'error'     // 失败
}

export interface RequestState<T> {
  state: LoadingState;
  data: T | null;
  errorMsg: string;
}

// 工厂函数,创建初始状态
export function createRequestState<T>(): RequestState<T> {
  return {
    state: LoadingState.IDLE,
    data: null,
    errorMsg: ''
  };
}
3.2 在页面里使用
// 页面里用法示例
@State weatherState: RequestState<WeatherData> = createRequestState<WeatherData>();

async loadWeather(city: string) {
  // 设置 Loading
  this.weatherState = {
    state: LoadingState.LOADING,
    data: null,
    errorMsg: ''
  };

  try {
    const data = await apiClient.get<WeatherData>('/weather', { city });
    this.weatherState = {
      state: LoadingState.SUCCESS,
      data,
      errorMsg: ''
    };
  } catch (err) {
    this.weatherState = {
      state: LoadingState.ERROR,
      data: null,
      errorMsg: (err as Error).message
    };
  }
}
用一个状态对象管理「加载中/成功/失败」三种状态,好处是 UI 层只需要根据 state 字段做条件渲染,逻辑清晰,不需要维护多个零散的 boolean flag(isLoading、hasError 各管各的很容易出现不一致的情况)。
四、实战:天气查询 App
用上面封装的工具,搭一个完整的天气查询页面。这里使用 Open-Meteo 的免费天气 API(不需要注册 key,直接调)。
4.1 数据类型定义
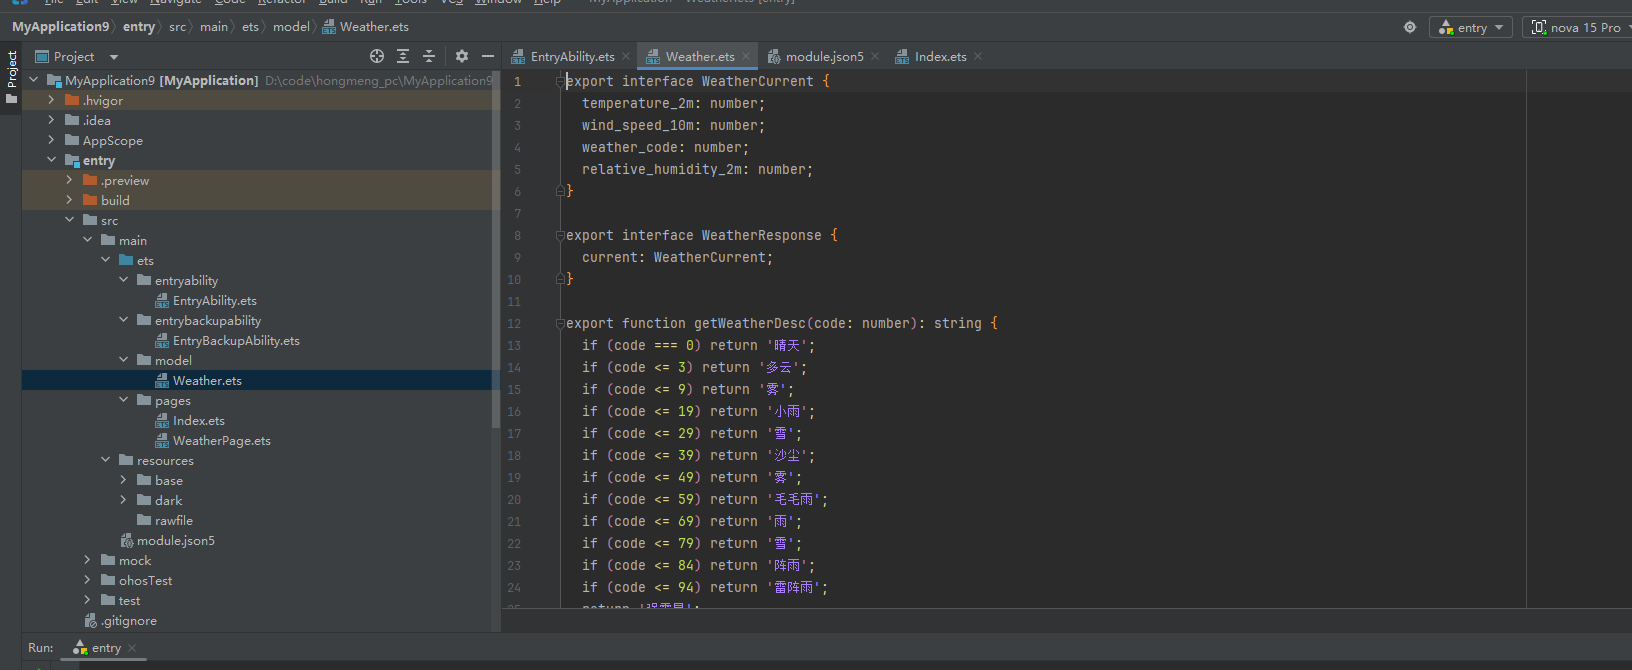
// model/Weather.ets

export interface WeatherCurrent {
  temperature_2m: number;        // 当前温度(℃)
  wind_speed_10m: number;        // 风速(km/h)
  weather_code: number;          // 天气代码
  relative_humidity_2m: number;  // 湿度(%)
}

export interface WeatherResponse {
  current: WeatherCurrent;
  current_units: {
    temperature_2m: string;
    wind_speed_10m: string;
  };
}

// 天气代码转描述
export function getWeatherDesc(code: number): string {
  if (code === 0) return '晴天';
  if (code <= 3) return '多云';
  if (code <= 9) return '雾';
  if (code <= 19) return '小雨';
  if (code <= 29) return '雪';
  if (code <= 39) return '沙尘';
  if (code <= 49) return '雾';
  if (code <= 59) return '毛毛雨';
  if (code <= 69) return '雨';
  if (code <= 79) return '雪';
  if (code <= 84) return '阵雨';
  if (code <= 94) return '雷阵雨';
  return '强雷暴';
}

// 天气代码转 Emoji
export function getWeatherIcon(code: number): string {
  if (code === 0) return '☀️';
  if (code <= 3) return '⛅';
  if (code <= 49) return '🌫️';
  if (code <= 69) return '🌧️';
  if (code <= 79) return '❄️';
  if (code <= 84) return '🌦️';
  return '⛈️';
}
4.2 天气页面
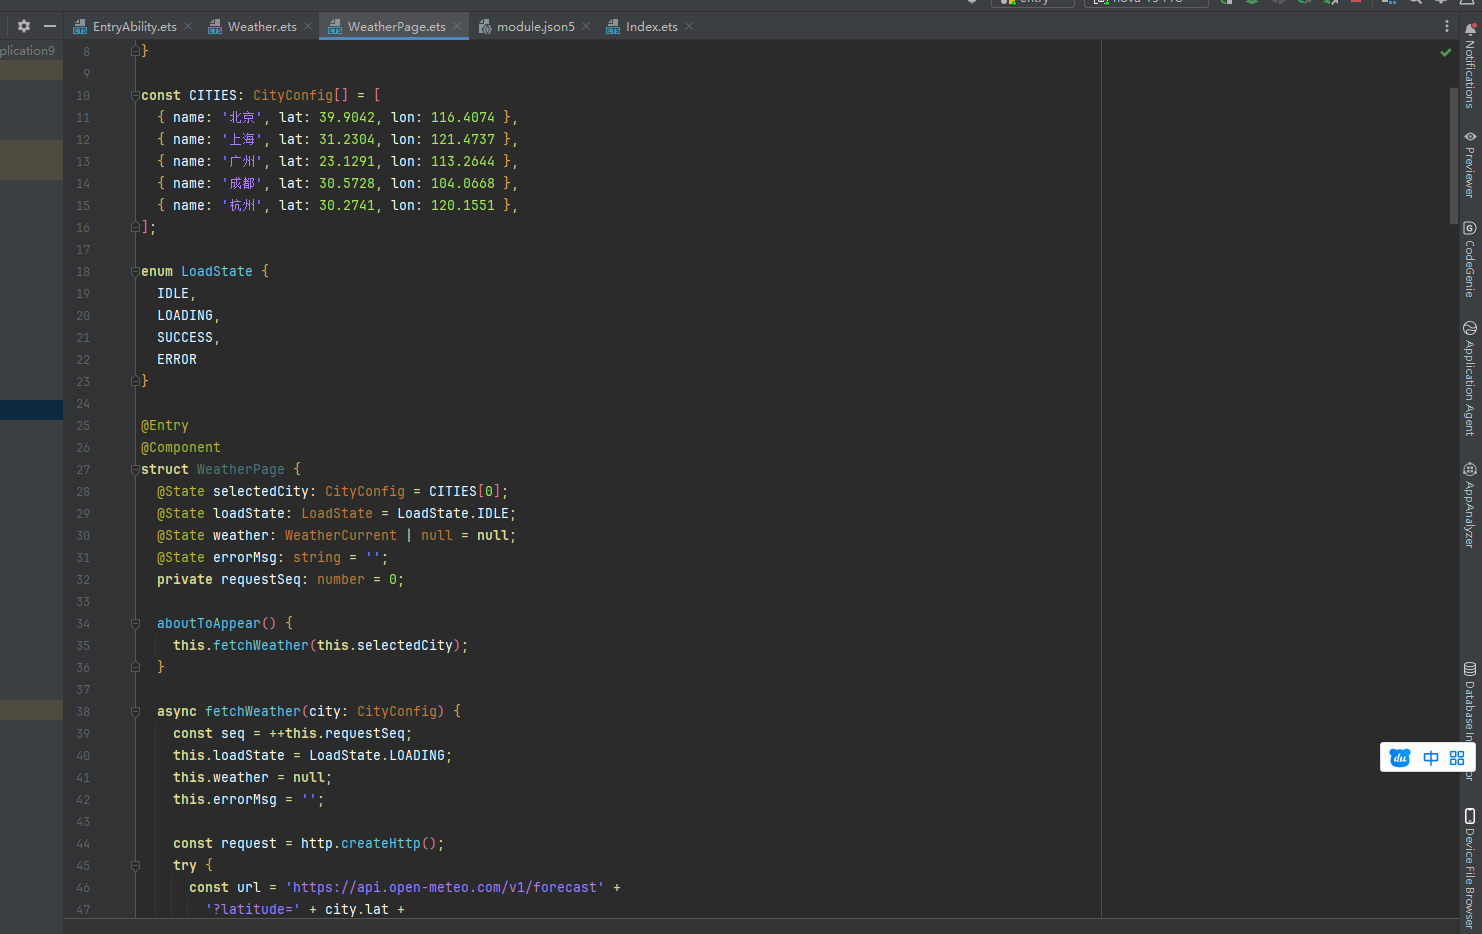
// pages/WeatherPage.ets
import http from '@ohos.net.http';
import { WeatherResponse, WeatherCurrent, getWeatherDesc, getWeatherIcon } from '../model/Weather';
// 城市坐标配置
interface CityConfig {
name: string;
lat: number;
lon: number;
}
const CITIES: CityConfig[] = [
{ name: '北京', lat: 39.9042, lon: 116.4074 },
{ name: '上海', lat: 31.2304, lon: 121.4737 },
{ name: '广州', lat: 23.1291, lon: 113.2644 },
{ name: '成都', lat: 30.5728, lon: 104.0668 },
{ name: '杭州', lat: 30.2741, lon: 120.1551 },
];
enum LoadState { IDLE, LOADING, SUCCESS, ERROR }
@Entry
@Component
struct WeatherPage {
@State selectedCity: CityConfig = CITIES[0];
@State loadState: LoadState = LoadState.IDLE;
@State weather: WeatherCurrent | null = null;
@State errorMsg: string = '';
aboutToAppear() {
this.fetchWeather(this.selectedCity);
}
async fetchWeather(city: CityConfig) {
this.loadState = LoadState.LOADING;
this.weather = null;
this.errorMsg = '';
const request = http.createHttp();
try {
const url = `https://api.open-meteo.com/v1/forecast` +
`?latitude=${city.lat}&longitude=${city.lon}` +
`¤t=temperature_2m,relative_humidity_2m,wind_speed_10m,weather_code`;
const response = await request.request(url, {
method: http.RequestMethod.GET,
header: { 'Accept': 'application/json' },
connectTimeout: 15000,
readTimeout: 15000,
});
if (response.responseCode !== 200) {
throw new Error(`请求失败,状态码:${response.responseCode}`);
}
const data = JSON.parse(response.result as string) as WeatherResponse;
this.weather = data.current;
this.loadState = LoadState.SUCCESS;
} catch (err) {
this.errorMsg = (err as Error).message ?? '网络请求失败';
this.loadState = LoadState.ERROR;
} finally {
request.destroy();
}
}
build() {
Column() {
// 顶部标题
Text('天气查询')
.fontSize(22)
.fontWeight(FontWeight.Bold)
.fontColor('#1e293b')
.margin({ top: 24, bottom: 20 })
// 城市选择器
Scroll() {
Row({ space: 10 }) {
ForEach(CITIES, (city: CityConfig) => {
Text(city.name)
.fontSize(14)
.fontColor(this.selectedCity.name === city.name ? Color.White : '#64748b')
.backgroundColor(
this.selectedCity.name === city.name ? '#3b82f6' : '#f1f5f9'
)
.padding({ left: 16, right: 16, top: 8, bottom: 8 })
.borderRadius(20)
.onClick(() => {
this.selectedCity = city;
this.fetchWeather(city);
})
})
}
.padding({ left: 16, right: 16 })
}
.scrollable(ScrollDirection.Horizontal)
.scrollBar(BarState.Off)
.width('100%')
// 内容区
Column() {
if (this.loadState === LoadState.LOADING) {
// Loading 状态
Column() {
LoadingProgress().width(56).height(56).color('#3b82f6')
Text('正在获取天气数据...')
.fontSize(14).fontColor('#94a3b8').margin({ top: 12 })
}
.margin({ top: 80 })
} else if (this.loadState === LoadState.ERROR) {
// 错误状态
Column() {
Text('⚠️').fontSize(48)
Text(this.errorMsg)
.fontSize(14).fontColor('#ef4444').margin({ top: 12 })
.textAlign(TextAlign.Center)
.padding({ left: 32, right: 32 })
Button('重试')
.margin({ top: 20 })
.backgroundColor('#3b82f6')
.fontColor(Color.White)
.borderRadius(20)
.onClick(() => this.fetchWeather(this.selectedCity))
}
.margin({ top: 60 })
} else if (this.loadState === LoadState.SUCCESS && this.weather !== null) {
// 天气数据展示
Column() {
// 城市名 + 天气图标
Text(this.selectedCity.name)
.fontSize(28).fontWeight(FontWeight.Bold).fontColor('#1e293b')
Text(getWeatherIcon(this.weather.weather_code))
.fontSize(80).margin({ top: 8 })
Text(getWeatherDesc(this.weather.weather_code))
.fontSize(18).fontColor('#64748b').margin({ top: 4 })
// 温度
Text(`${this.weather.temperature_2m}°C`)
.fontSize(64)
.fontWeight(FontWeight.Bold)
.fontColor('#1e293b')
.margin({ top: 16 })
// 详细数据卡片
Row({ space: 12 }) {
// 湿度
Column() {
Text('💧').fontSize(24)
Text(`${this.weather.relative_humidity_2m}%`)
.fontSize(20).fontWeight(FontWeight.Bold).fontColor('#1e293b')
Text('湿度').fontSize(12).fontColor('#94a3b8')
}
.layoutWeight(1)
.padding(16)
.backgroundColor(Color.White)
.borderRadius(16)
.shadow({ radius: 8, color: 'rgba(0,0,0,0.06)', offsetX: 0, offsetY: 2 })
// 风速
Column() {
Text('🌬️').fontSize(24)
Text(`${this.weather.wind_speed_10m}`)
.fontSize(20).fontWeight(FontWeight.Bold).fontColor('#1e293b')
Text('km/h 风速').fontSize(12).fontColor('#94a3b8')
}
.layoutWeight(1)
.padding(16)
.backgroundColor(Color.White)
.borderRadius(16)
.shadow({ radius: 8, color: 'rgba(0,0,0,0.06)', offsetX: 0, offsetY: 2 })
}
.width('100%')
.padding({ left: 24, right: 24 })
.margin({ top: 28 })
// 刷新按钮
Button('刷新数据')
.width(160).height(44)
.backgroundColor('#3b82f6')
.fontColor(Color.White)
.borderRadius(22)
.fontSize(15)
.margin({ top: 32 })
.onClick(() => this.fetchWeather(this.selectedCity))
}
.alignItems(HorizontalAlign.Center)
.margin({ top: 32 })
}
}
.layoutWeight(1)
.width('100%')
}
.height('100%')
.width('100%')
.backgroundColor('#f8fafc')
.alignItems(HorizontalAlign.Center)
}
}
五、代码讲解
5.1 为什么每次请求都要 destroy()
http.createHttp() 在底层会创建一个 TCP 连接句柄。HarmonyOS 对同时存活的连接数有上限,如果不及时 destroy(),句柄会一直被占用,等积累到上限后新请求会抛出「连接数超限」的错误。
用 try...finally 结构能确保无论正常返回还是抛异常,destroy() 都一定执行:
const request = http.createHttp();
try {
  // 请求逻辑
} finally {
  request.destroy();  // 一定会执行
}
5.2 拦截器链的执行顺序
请求拦截器按添加顺序依次执行,每个拦截器接收上一个的输出作为输入:
原始 config
    → 拦截器1(注入 Token)
    → 拦截器2(打印日志)
    → 最终 config → 发出请求
响应拦截器同理,按添加顺序处理响应数据。这个「管道」模式让每个拦截器只关注自己的职责,互不干扰。
5.3 URL 查询参数的编码处理
手动拼接 URL 时必须对参数值做 encodeURIComponent 编码,否则中文城市名或含特殊字符的参数会导致请求失败:
// 错误写法:中文不编码会报错
const url = `https://api.example.com?city=北京`;

// 正确写法
const url = `https://api.example.com?city=${encodeURIComponent('北京')}`;
// 结果:https://api.example.com?city=%E5%8C%97%E4%BA%AC
5.4 LoadingState 状态机
页面的数据加载过程可以用一个简单的状态机来描述:
IDLE → LOADING → SUCCESS
                ↘ ERROR → LOADING(重试)
每次发起请求先切到 LOADING,请求结束后根据结果切到 SUCCESS 或 ERROR。UI 层只需要根据当前状态渲染对应视图,不需要维护多个 boolean 标志位,状态不会出现「既在 loading 又有 error」这样的矛盾情况。
六、真实运行效果
按照以下步骤在 DevEco Studio 中运行项目:
文件清单:
entry/src/main/ets/
├── model/Weather.ets
└── pages/WeatherPage.ets

entry/src/main/module.json5   ← 加网络权限
EntryAbility.ets 改 loadContent:
windowStage.loadContent('pages/WeatherPage', (err) => {
  if (err.code) {
    hilog.error(0x0000, 'testTag', 'Failed: %{public}s', err.message);
  }
});
main_pages.json:
{
  "src": [
    "pages/WeatherPage"
  ]
}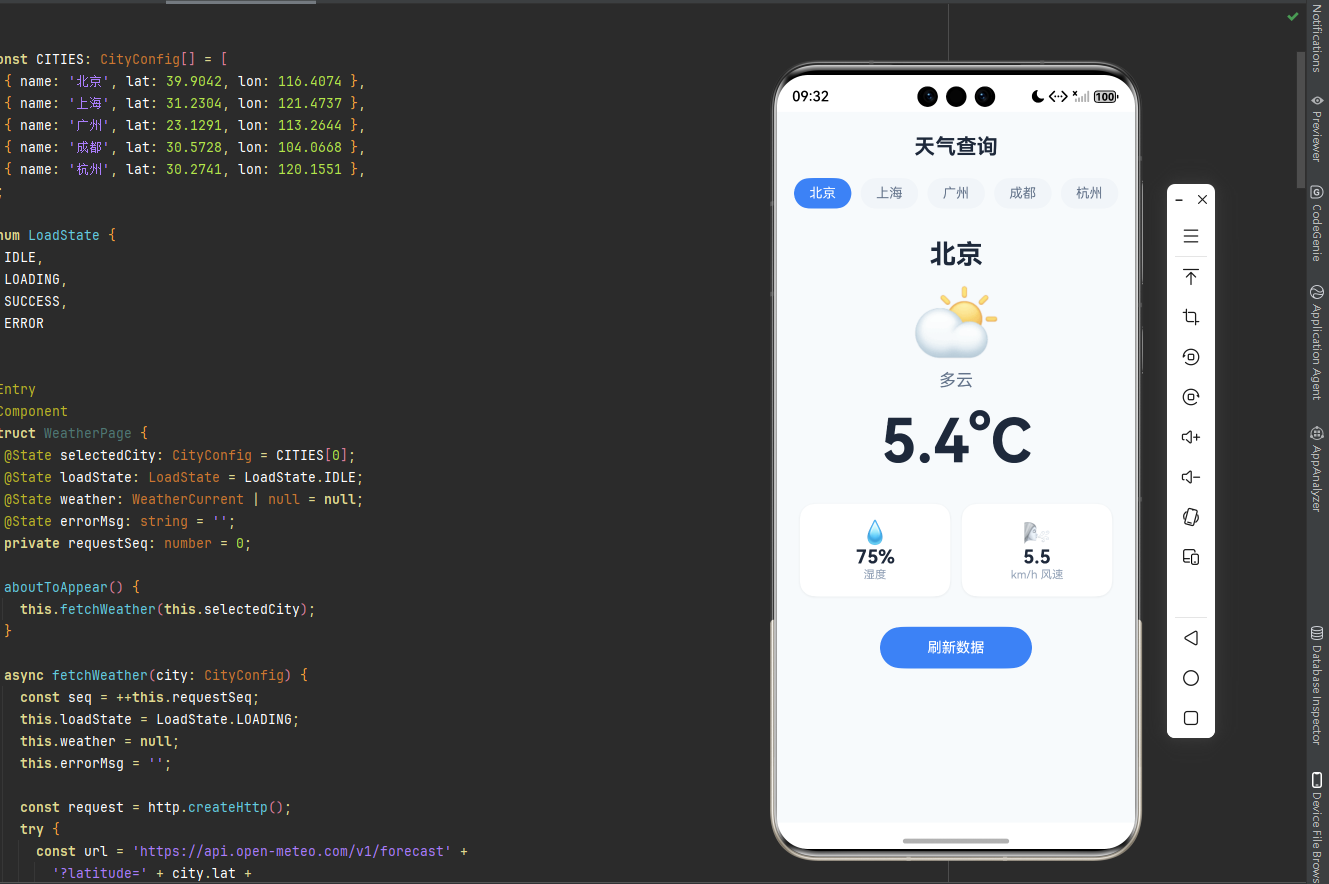
运行后的页面表现:
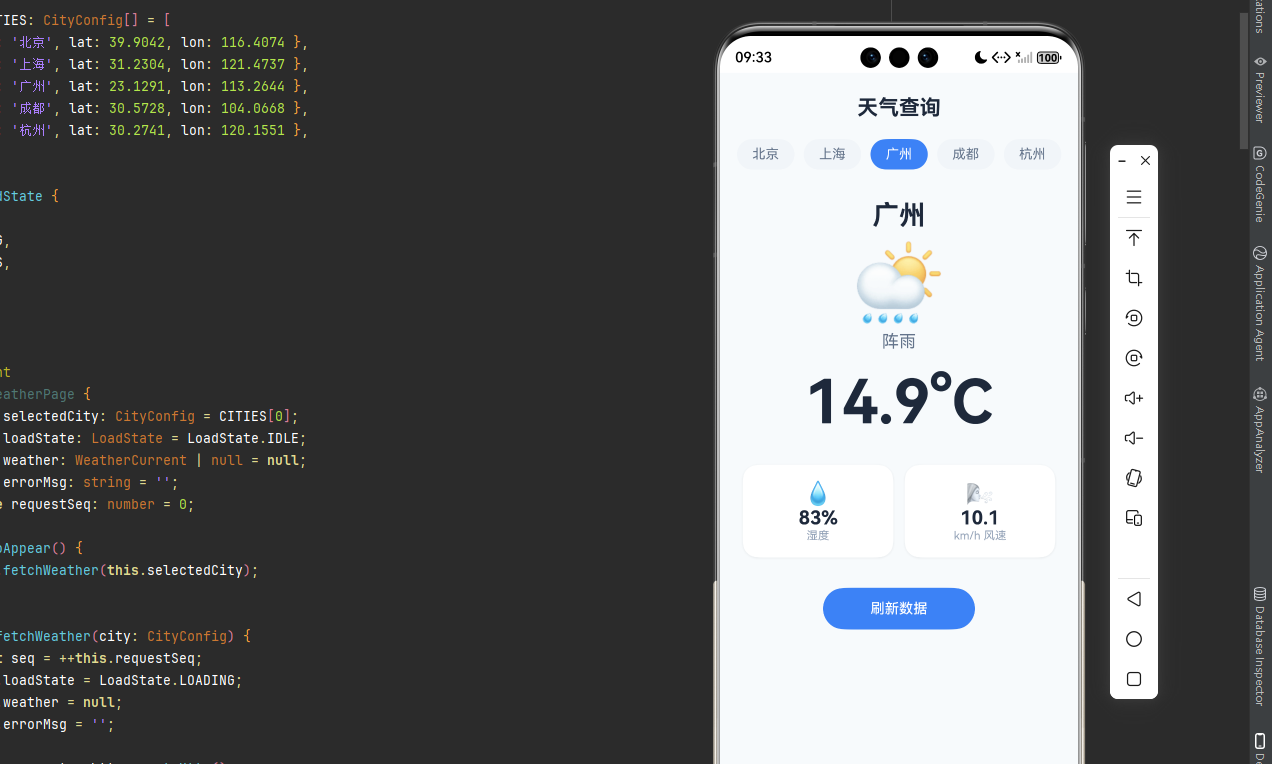
启动后默认加载「北京」的实时天气,顶部横向滚动的城市标签栏可以切换城市。数据加载期间显示蓝色转圈动画和提示文字;加载成功后展示大号天气图标、当前温度、以及湿度和风速两块数据卡片;如果网络不通则显示警告图标、错误信息和重试按钮。
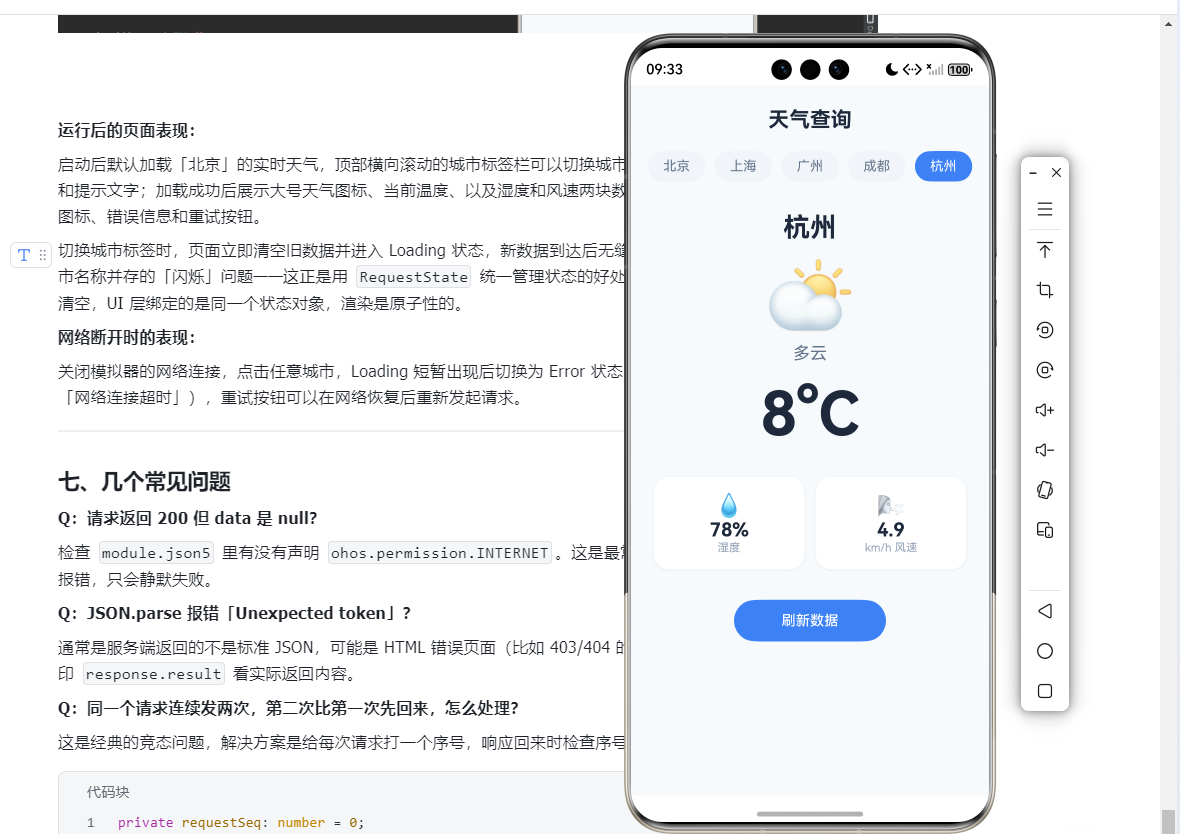
切换城市标签时,页面立即清空旧数据并进入 Loading 状态,新数据到达后无缝切换,不会出现旧城市数据和新城市名称并存的「闪烁」问题------这正是用 RequestState 统一管理状态的好处:切换城市的第一步就把 data 清空,UI 层绑定的是同一个状态对象,渲染是原子性的。
网络断开时的表现:
关闭模拟器的网络连接,点击任意城市,Loading 短暂出现后切换为 Error 状态,显示具体的网络错误信息(如「网络连接超时」),重试按钮可以在网络恢复后重新发起请求。
七、几个常见问题
Q:请求返回 200 但 data 是 null?
检查 module.json5 里有没有声明 ohos.permission.INTERNET。这是最常见的原因,忘加权限不会有任何报错,只会静默失败。
Q:JSON.parse 报错「Unexpected token」?
通常是服务端返回的不是标准 JSON,可能是 HTML 错误页面(比如 403/404 的错误响应)。在 parse 之前先打印 response.result 看实际返回内容。
Q:同一个请求连续发两次,第二次比第一次先回来,怎么处理?
这是经典的竞态问题,解决方案是给每次请求打一个序号,响应回来时检查序号是否还是最新的,不是则丢弃:
private requestSeq: number = 0;

async fetchWeather(city: CityConfig) {
  const seq = ++this.requestSeq;
  // ... 发请求 ...
  const data = await ...;
  if (seq !== this.requestSeq) return; // 已被更新的请求取代,丢弃
  this.weather = data;
}
总结
本文从 @ohos.net.http 的基础用法出发,逐步搭建了一套包含拦截器、统一错误处理、状态管理的 HTTP 封装方案。核心思路总结如下:
createHttp() 用完必须 destroy(),用 try/finally 保证执行。拦截器链用数组存储顺序执行,职责单一易扩展。统一的 RequestState 状态机让 UI 渲染逻辑清晰无歧义。URL 参数需要 encodeURIComponent 编码,中文参数尤其注意。
这套封装在真实项目里可以直接带走用,根据后端接口约定调整 ApiResponse 的字段名即可。