下面是完成这道题目的代码:
python
import os
import cv2
import numpy as np
import pandas as pd
import torch
import torch.nn as nn
from torch.utils.data import Dataset,DataLoader
from torchvision import transforms
import matplotlib.pyplot as plt1. 数据集定义(匹配你的目录结构)
python
class FaceKeypointDataset(Dataset):
    def __init__(self,txt_path,img_dir,transform=None):
        self.df = pd.read_csv(txt_path,sep=r'\s+',header=None,on_bad_lines='skip')
        self.img_dir = img_dir
        self.transform = transform

    def __len__(self):
        return len(self.df)


    def __getitem__(self,idx):
        #读取图片名和路径
        img_name=self.df.iloc[idx,0]
        img_path=os.path.join(self.img_dir,img_name)

        img = cv2.imread(img_path)
        img = cv2.cvtColor(img,cv2,COLOR_BGR2RGB)
        img = cv2.resize(img,(64,64))


        #读取10个关键点坐标

        kpts=self.df.iloc[idx,1:11].values.astype(np.float32)

        #坐标归一化
        kpts[0::2]/=64.0#x坐标
        kpts[1::2]/=64.0#y坐标

        if self.transform:
            img = self.transform(img)

return img,torch.tensor(kpts,dtype=torch.float32)2. 卷积神经网络模型
python
class KeypointNet(nn.Module):
    def __init__(self):
        super().__init__()
        #卷积层提取特征
        self.conv_layers =nn.Sequential(
            nn.Conv2d(3,16,kernel_size=3,padding=1),
            nn.RELU(),
            nn.MaxPool2d(2,2),

            nn.Conv2d(16,32,kernel_size = 3,padding=1),
            nn.ReLU(),
            nn.MaxPool2d(2,2),

            nn.Conv2d(32,64,kernel_size=3,padding=1),
            nn.ReLU(),
            nn.MaxPool2d(2,2),
        )
    #全连接层:输出10个关键点坐标
     self.fc_layers=nn.Sequential(
        nn.Linear(64*8*8,256),
        nn.ReLU(),
        nn.Linear(256,10)#输出层:10个神经元
       )
    def forward(self,x):
        x=self.conv_layers(x)
        x=x.view(x.size(0),-1)
        x=self.fc_layers(x)
retrun x3. 训练主程序
python
def main():
#配置设备
device=torch.device("cuda" if torch.cuda.is_available() else "cpu")
print(f"使用设备:{device}")
#数据预处理
transform = transforms.Compose([
transfroms.ToTensor(),
transforms.Normalize(mean=[0.5,0.5,0.5],std=[0.5,0.5,0.5])
])
train_dataset = FaceKeypointDataset(txt_path="train.txt", img_dir="imgdata", transform=transform)
test_dataset = FaceKeypointDataset(txt_path="test.txt", img_dir="imgdata", transform=transform)
train_loader = DataLoader(train_dataset,batch_size=8,shuffle=True)
test_loader = DataLoader(test_dataset,batch_size=8,shuffle=False)
#初始化模型,损失函数,优化器
model = KeypointNet().to(device)
criterion = nn.L1loss()
optimizer = torch.optim.Adam(model.parameters(),lr=1e-3)
#训练参数
num_ephchs=30
train_loss_history =[]
test_loss_history=[]
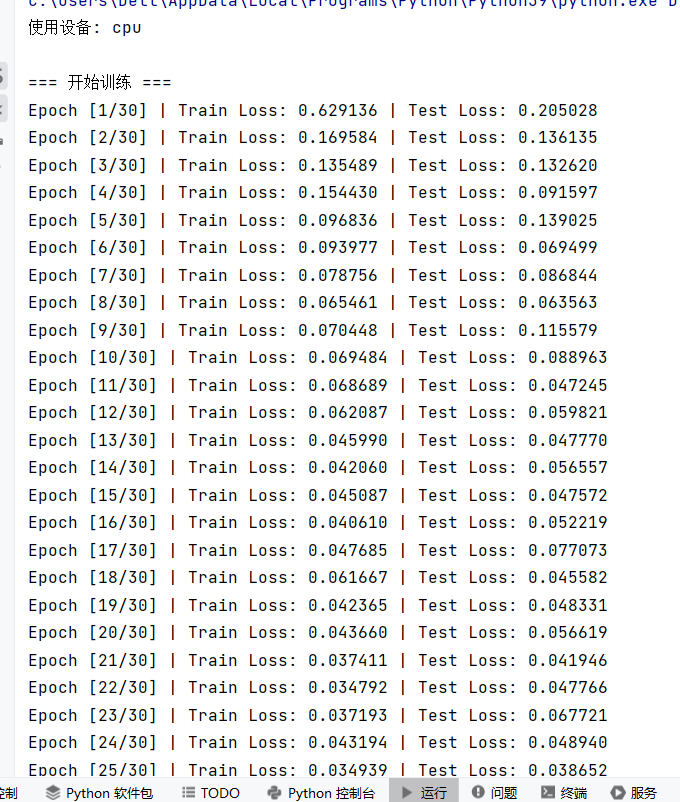
print("\n=====开始训练=====")
for epoch in range(num_epochs):
model.train()
train_loss=0.0
for imgs,kpts in train_loader:
imgs,kpts=imgs.to(device),kpts.to(device)
#前向传播
outputs = model(imgs)
loss = criterion(outputs,kpts)
#反向传播
optimizer.zero_grad()
loss.backward()
optimizer.step()
train_loss+=loss.item() * imgs.size(0)
#计算平均训练损失
train_loss/ = len(train_dataset)
train_loss_history.append(train_loss)
#测试阶段
model.eval()
test_loss=0.0
with torch.no_grad():
for imgs,kpts in test_loader:
imgs,kpts = imgs.to(device),kpts.to(device)
outputs = model(imgs)
test_loss +=criterion(outputs,kpts).item()*imgs.size(0)
test_loss / =len(test_dataset)
test_loss_history.append(test_loss)
print(f"Epoch [{epoch+1}/{num_epochs}} | Train Loss:{train_loss:.6f} | Test Loss:{test_loss:.6f}")
print("======训练完成======")
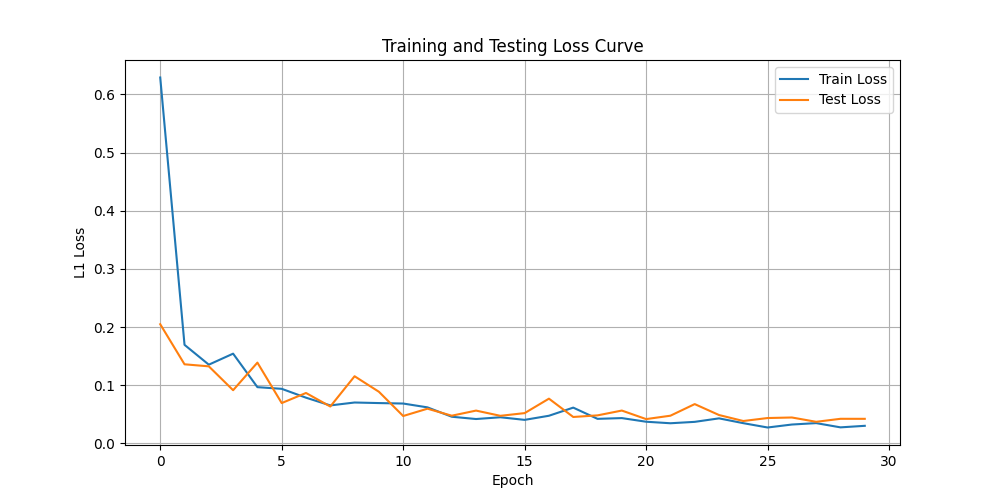
plt.figure(figsize=(10,5))
plt.plot(train_loss_history,label = "Train Loss")
plt.plot(test_loss_history,label="Test Loss")
plt.xlabel("Epoch")
plt.ylabel("L1 Loss")
plt.title("Training and Testing Loss Curve")
plt.lengend()
plt.grid(True)
plt.savefig("loss_curve.png")
plt.show()
torch.save(model.state_dict(), "face_keypoint_model.pth")
print("模型已保存为 face_keypoint_model.pth")
if __name__ == "__main__":
main()
运行结果: