这里写目录标题
背景
此文章用于对比两段文本的相似性对比,从编辑距离,词频余弦相似度,BERT 相似度(语义分析),本人因为业务需要,需要整个通用方法python代码离线部署,在ai很发达的今天,还有人坚持手搓代码写文章(主要是给自己打一个结点,方便自己回顾。)
源码
# ============================
# Python 版 SpringBoot 服务
# 功能:3种文本相似度 API
# 支持:Postman调用 / Java调用 / 内网运行
# ============================
from fastapi import FastAPI
import uvicorn
import jieba
import os
import sys
from sklearn.feature_extraction.text import CountVectorizer
from sklearn.metrics.pairwise import cosine_similarity
from sentence_transformers import SentenceTransformer, util

# ===================== 🔥 这里是修复的核心 =====================
# 获取 exe 所在的真实路径
if getattr(sys, 'frozen', False):
    base_path = os.path.dirname(sys.executable)
else:
    base_path = os.path.dirname(__file__)

# 加载本地模型(绝对路径,不会报错)
model_path = os.path.join(base_path, "paraphrase-multilingual-MiniLM-L12-v2")
model = SentenceTransformer(model_path)
# ==============================================================

# ============== 1. 编辑距离 ==============
try:
    import Levenshtein
    def cal_edit_similarity(sent1, sent2):
        distance = Levenshtein.distance(sent1, sent2)
        max_len = max(len(sent1), len(sent2))
        return 1.0 if max_len == 0 else 1 - (distance / max_len)
except ImportError:
    def cal_edit_similarity(sent1, sent2):
        return "依赖未安装"

# ============== 2. 词频余弦相似度 ==============
def cal_tf_cosine_similarity(sent1, sent2):
    seg1 = " ".join(jieba.lcut(sent1))
    seg2 = " ".join(jieba.lcut(sent2))
    vec = CountVectorizer()
    tf_mat = vec.fit_transform([seg1, seg2])
    return cosine_similarity(tf_mat)[0][1]

# ============== 3. BERT 相似度 ==============
def cal_bert_similarity(sent1, sent2):
    emb1 = model.encode(sent1, convert_to_tensor=True)
    emb2 = model.encode(sent2, convert_to_tensor=True)
    return util.cos_sim(emb1, emb2).item()

# ============================
# 【核心】FastAPI 启动(SpringBoot 模式)
# ============================
app = FastAPI(title="文本相似度算法服务", version="1.0")

# 接口1:编辑距离
@app.post("/api/edit_distance")
def api_edit(sent1: str, sent2: str):
    return {
        "sent1": sent1,
        "sent2": sent2,
        "similarity": cal_edit_similarity(sent1, sent2)
    }

# 接口2:词频余弦
@app.post("/api/tf_cosine")
def api_cosine(sent1: str, sent2: str):
    return {
        "sent1": sent1,
        "sent2": sent2,
        "similarity": cal_tf_cosine_similarity(sent1, sent2)
    }

# 接口3:BERT 句向量
@app.post("/api/bert")
def api_bert(sent1: str, sent2: str):
    return {
        "sent1": sent1,
        "sent2": sent2,
        "similarity": cal_bert_similarity(sent1, sent2)
    }

# 接口4:一次性返回所有结果(最实用)
@app.post("/api/all_similarity")
def api_all(sent1: str, sent2: str):
    return {
        "sent1": sent1,
        "sent2": sent2,
        "edit_distance": cal_edit_similarity(sent1, sent2),
        "tf_cosine": cal_tf_cosine_similarity(sent1, sent2),
        "bert": cal_bert_similarity(sent1, sent2)
    }

# ============================
# 启动服务(和 SpringBoot 一样)
# ============================
if __name__ == "__main__":
    # 🔥 写法修正:直接传入 app 对象,而不是字符串
    uvicorn.run(
        app,  # 👈 这里改成直接传 app 实例
        host="0.0.0.0",
        port=8080,
        # 👈 绝对不要加 reload=True,生产模式必须关闭
    )
离线配置方法
将
C:\Users\Administrator.cache\huggingface\hub\models--sentence-transformers--paraphrase-multilingual-MiniLM-L12-v2\snapshots\e8f8c211226b894fcb81acc59f3b34ba3efd5f42
下的文件放到dist文件夹下
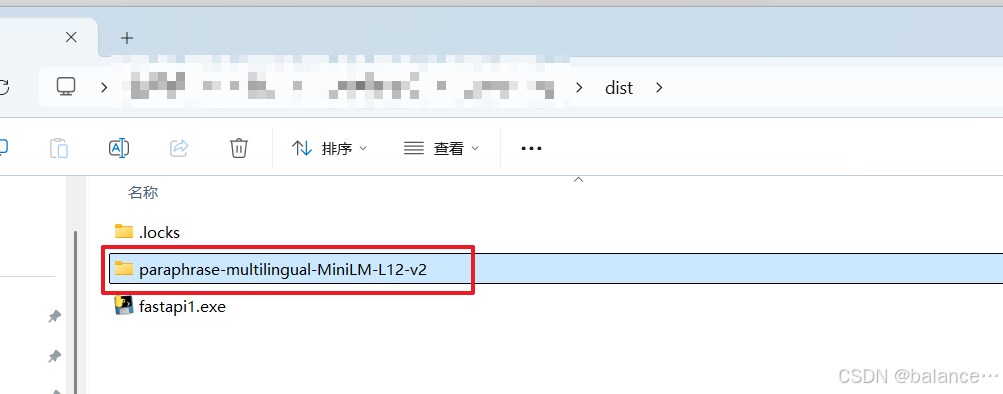
然后打包(windows打成exe可执行文件)
pyinstaller --onefile fastapi1.py离线环境双击exe ,即可以通过代码request进行调用。实现我们想要的效果。
总结
做这个的时候postman调用不通,当时换了个工具,离线以后可能因为有headers还是调不到,最后直接在java里边写了个main函数调用成功。
及时变通。别把自己逼到死角。