OpenVINO(Open Visual Inference and Neural Network Optimization)是一款用于优化和部署深度学习模型(AI推理)的开源软件工具包,支持跨设备(从PC到云端)部署AI,并可自动加速。源码地址:https://github.com/openvinotoolkit/openvino ,license为Apache-2.0,最新发布版本2026.0.0。
OpenVINO优势:
(1).推理优化,加速模型推理。
(2).支持多种模型,支持使用PyTorch、TensorFlow、ONNX、Keras、PaddlePaddle和JAX/Flax等流行框架训练的模型。使用Optimum Intel直接集成Hugging Face Hub中基于Transformer和Diffuser构建的模型。无需原始框架即可转换和部署模型。
(3).支持多种平台,除了支持在Linux、Windows、MacOS系统上使用,也可高效部署于从边缘到云端的各种平台。OpenVINO支持在CPU(x86、ARM)、GPU(Intel集成显卡和独立显卡)以及AI加速器(Intel NPU)上进行推理。
(4).包含C++、Python、C和NodeJS的API,并提供GenAI API以优化模型流程和性能。
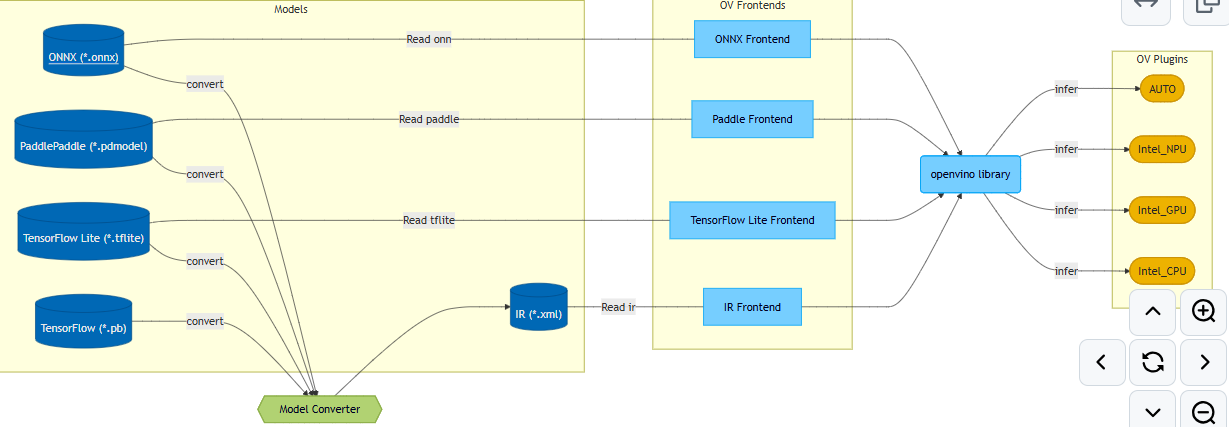
OpenVINO提供从不同框架加载模型并在不同加速器上运行的功能,如下图所示:
OpenVINO组件包括:GitHub仓库中的src目录
1.OpenVINO Runtime是一组C++库,并提供C和Python绑定,为在你选择的平台上提供通用的推理解决方案提供API。
(1).core:提供模型表示和修改(model representation and modification)的基础API。
(2).inference:提供在设备上进行模型推理的API。
(3).transformations:包含OpenVINO插件中使用的一组常用转换。
(4).low precision transformations:包含低精度模型中使用的一组转换。
(5).bindings:包含所有由OpenVINO团队维护的可用OpenVINO绑定。
1).C:OpenVINO Runtime的C API。
2).Python:OpenVINO Runtime的Python API。
2.plugins:包含由OpenVINO团队开源维护的OpenVINO插件。
3.frontends:包含可用的OpenVINO前端,允许从原生框架格式读取模型。
4.OpenVINO Model Converter(OVC):是一款跨平台命令行工具,可简化训练环境和部署环境之间的转换,并调整深度学习模型,使其在终端目标设备上实现最佳性能。
5.samples:提供C、C++和Python应用程序,展示OpenVINO的基本用例。
使用Anaconda配置环境,依次执行如下命令
bash
conda create --name openvino python=3.10 -y
conda activate openvino
pip install -U openvino==2026.0.0
pip install torch==2.9.1 torchvision==0.24.1 torchaudio==2.9.1 --index-url https://download.pytorch.org/whl/cpu
pip install opencv-python==4.13.0.92 opencv-contrib-python==4.13.0.92
pip install colorama==0.4.6验证,输入以下命令:输出为:'CPU', 'GPU'
bash
python -c "from openvino import Core; print(Core().available_devices)"Windows10编译OpenVINO源码操作步骤:要求vs20219及以上版本,这里使用vs2022
1.从 https://github.com/openvinotoolkit/openvino clone代码,且换到tag 2026.0.0,执行以下命令
bash
git checkout 2026.0.02.clone第三方依赖,执行如下命令
bash
git submodule update --init注:
(1).有些首次下载失败,可多次执行上述命令
(2).后面编译时,若提示有缺少的CMakeLists.txt,则说明还是有下载失败的,则可以在相应目录下单独执行git clone项目
3.编写build.sh脚本,内容如下:
bash
#! /bin/bash

if [ $# != 1 ]; then
    echo "Error: requires a parameter: relese or debug"
    echo "For example: $0 debug"
    exit -1
fi

if [ $1 != "release"  ] && [ $1 != "debug" ]; then
    echo "Error: this parameter can only be release or debug"
    exit -1
fi

if [[ ! -d "build" ]]; then
    mkdir build
    cd build
else
    cd build
fi

if [ $1 == "release" ]; then
    build_type="Release"
else
    build_type="Debug"
fi

cmake \
    -G"Visual Studio 17 2022" -A x64 \
    -DCMAKE_BUILD_TYPE=${build_type} \
    -DCMAKE_CONFIGURATION_TYPES=${build_type} \
    -DENABLE_INTEL_GPU=OFF \
    -DENABLE_SAMPLES=OFF \
    -DCMAKE_INSTALL_PREFIX=../install \
    ..
cmake --build . --target install --config $1
4.执行:./build.sh debug or ./build.sh release
Intel HD Graphics/Intel UHD Graphics可用于OpenVINO GPU:可通过"英特尔驱动程序和支持助理"安装并升级驱动:https://www.intel.cn/content/www/cn/zh/support/intel-driver-support-assistant.html ,Intel-Driver-and-Support-Assistant-Installer.exe
可直接从 https://storage.openvinotoolkit.org/repositories/openvino/packages/2026.0/windows/ 下载OpenVINO Runtime二进制库:openvino_toolkit_windows_2026.0.0.20965.c6d6a13a886_x86_64.zip
openvino.convert_model函数支持以下PyTorch模型对象类型:
(1).torch.nn.Module派生类:当使用torch.nn.Module作为输入模型时,openvino.convert_model通常需要指定example_input参数。在内部,它会在模型转换过程中触发模型跟踪,利用torch.jit.trace函数的功能。
(2).torch.jit.ScriptModule
(3).torch.jit.ScriptFunction
(4).torch.export.ExportedProgram
openvino.save_model:保存OpenVINO支持的IR(Intermediate Representation)格式
(1).XML文件:描述网络拓扑,如best.xml。
(2).BIN文件:包含权重和偏差(weights and biases)二进制数据,如best.bin。
Python测试代码如下:分类,直接将PyTorch中的densenet121模型转换为openvino支持的模型
python
def parse_args():
	parser = argparse.ArgumentParser(description="model convert: pytorch tor openvino")
	parser.add_argument("--task", required=True, type=str, choices=["convert", "predict"], help="specify what kind of task")
	parser.add_argument("--openvino_model_name", type=str, help="openvino model file, for example: result/densenet121.xml")
	parser.add_argument("--device_name", type=str, choices=["CPU", "GPU", "AUTO"], default="CPU", help="device name")
	parser.add_argument("--image_name", type=str, default="", help="test image")

	args = parser.parse_args()
	return args

def convert(openvino_model_name):
	model = torchvision.models.densenet121(weights=torchvision.models.DenseNet121_Weights.IMAGENET1K_V1)
	model.eval()

	ov_model = ov.convert_model(model, example_input=torch.rand(1, 3, 224, 224))
	ov_model.reshape({ov_model.input(0): [1, 3, 224, 224]}) # fixed input shape, static rather than dynamic
	ov.save_model(ov_model, openvino_model_name, compress_to_fp16=False)

def _letterbox(img, imgsz):
	shape = img.shape[:2] # current shape: [height, width, channel]
	new_shape = [imgsz, imgsz]

	# scale ratio (new / old)
	r = min(new_shape[0] / shape[0], new_shape[1] / shape[1])

	# compute padding
	new_unpad = int(round(shape[1] * r)), int(round(shape[0] * r))
	dw, dh = new_shape[1] - new_unpad[0], new_shape[0] - new_unpad[1] # wh padding
	dw /= 2 # divide padding into 2 sides
	dh /= 2

	if shape[::-1] != new_unpad: # resize
		img = cv2.resize(img, new_unpad, interpolation=cv2.INTER_LINEAR)

	top, bottom = int(round(dh - 0.1)), int(round(dh + 0.1))
	left, right = int(round(dw - 0.1)), int(round(dw + 0.1))

	img = cv2.copyMakeBorder(img, top, bottom, left, right, cv2.BORDER_CONSTANT, value=(114, 114, 114)) # add border

	return img, left, top, r

def _preprocess(img, input_shape):
	_, _, h, _ = input_shape

	img = cv2.cvtColor(img, cv2.COLOR_BGR2RGB)
	img, x_offset, y_offset, r = _letterbox(img, imgsz=h)

	img = img.astype(np.float32) / 255.0
	mean = np.array([0.485, 0.456, 0.406])
	std  = np.array([0.229, 0.224, 0.225])
	img = (img - mean) / std

	img = np.transpose(img, (2, 0, 1)) # HWC -> CHW
	img = np.expand_dims(img, axis=0) # NCHW

	return img, x_offset, y_offset, r

def _softmax(x):
	x = x - np.max(x)
	exp_x = np.exp(x)
	return exp_x / np.sum(exp_x)

def predict(model_name, device_name, image_name):
	if model_name is None or not model_name or not Path(model_name).is_file():
		raise ValueError(colorama.Fore.RED + f"{model_name} is not a model file")
	if image_name is None or not image_name or not Path(image_name).is_file():
		raise ValueError(colorama.Fore.RED + f"{image_name} is not a image file")

	img = cv2.imread(image_name)
	if img is None:
		raise FileNotFoundError(colorama.Fore.RED + f"image not found: {image_name}")

	core = ov.Core()
	model = core.read_model(model=model_name)
	compiled_model = core.compile_model(model=model, device_name=device_name)

	input_layer = compiled_model.input(0)
	input_shape = input_layer.shape
	output_layer = compiled_model.output(0)
	output_shape = output_layer.shape
	print(f"input shape: {input_shape}; output shape: {output_shape}")

	input_tensor, x_offset, y_offset, r = _preprocess(img, input_shape)

	result = compiled_model([input_tensor])[output_layer]

	probs = _softmax(result[0])
	class_id = int(np.argmax(probs))
	score = float(probs[class_id])
	print(f"class: {class_id}, score: {score:.6f}")

if __name__ == "__main__":
	colorama.init(autoreset=True)
	args = parse_args()

	if args.task == "convert":
		convert(args.openvino_model_name)
	elif args.task == "predict":
		predict(args.openvino_model_name, args.device_name, args.image_name)

	print(colorama.Fore.GREEN + "====== execution completed ======")
测试代码执行结果如下:预测正确

以上Python测试代码对应的C++代码如下:
cpp
namespace {

constexpr char model_path[]{ "../../../data/densenet121.xml" };
constexpr char image_name[]{ "../../../data/images/hen.webp" };
constexpr char device_name[]{ "CPU" }; // CPU, GPU
constexpr int input_width{ 224 }, input_height{ 224 };
constexpr float imagenet_mean[3] = { 0.485f, 0.456f, 0.406f };
constexpr float imagenet_std[3] = { 0.229f, 0.224f, 0.225f };

} // namespace

int test_openvino_classify()
{
	ov::Core core{};

	std::cout << "available devices: ";
	for (const auto& dev: core.get_available_devices())
		std::cout << dev << " ";
	std::cout << std::endl;

	try {
		auto model = core.read_model(model_path);
		auto compiled_model = core.compile_model(model, device_name);

		auto img = cv::imread(image_name);
		if (img.empty()) {
			std::cerr << "Error: unable to read image: " << image_name << std::endl;
			return -1;
		}

		auto blob = cv::dnn::blobFromImage(img, 1.0 / 255.0, cv::Size(input_width, input_height), cv::Scalar(), true, false); // no use letterbox
		float* data = reinterpret_cast<float*>(blob.data);

		int channel_size = input_width * input_height;
		for (int c = 0; c < 3; ++c) {
			float* ptr = data + c * channel_size;

			for (int i = 0; i < channel_size; ++i)
				ptr[i] = (ptr[i] - imagenet_mean[c]) / imagenet_std[c];
		}

		ov::Tensor input_tensor(ov::element::f32, { 1, 3, input_height, input_width }, data);
		auto infer_request = compiled_model.create_infer_request();
		infer_request.set_input_tensor(input_tensor);
		infer_request.infer();

		auto output = infer_request.get_output_tensor();
		const float* out_data = output.data<const float>();
		int num_classes = output.get_shape()[1];
		int class_id = 0;
		float max_val = out_data[0];

		for (int i = 1; i < num_classes; ++i) {
			if (out_data[i] > max_val) {
				max_val = out_data[i];
				class_id = i;
			}
		}

		// softmax
		std::vector<float> probs(num_classes);
		float max_logit = *std::max_element(out_data, out_data + num_classes);

		float sum = 0.f;
		for (int i = 0; i < num_classes; ++i) {
			probs[i] = std::exp(out_data[i] - max_logit);
			sum += probs[i];
		}

		for (int i = 0; i < num_classes; ++i) {
			probs[i] /= sum;
		}

		std::cout << "classes num: " << num_classes << ", current image class id: " << class_id << ", score: " << probs[class_id] << std::endl;
	}
	catch (const std::exception& e) {
		std::cerr << "Error: " << e.what() << std::endl;
	}

	return 0;
}
执行结果如下:预测正确
