简历解析是命名实体识别(NER)最实际的应用之一。不是从新闻文本中提取通用实体,如人员或组织,而是希望识别简历中的结构化信息,如姓名、电子邮件、电话号码、职位、公司、技能、地点、学位和大学。
一旦这可靠地工作,它就对招聘工作流、候选人搜索、人才分析、申请人跟踪系统和内部知识管理变得有用。一个好的简历解析器可以将非结构化文本转化为结构化字段,供下游系统过滤、排名和分析。
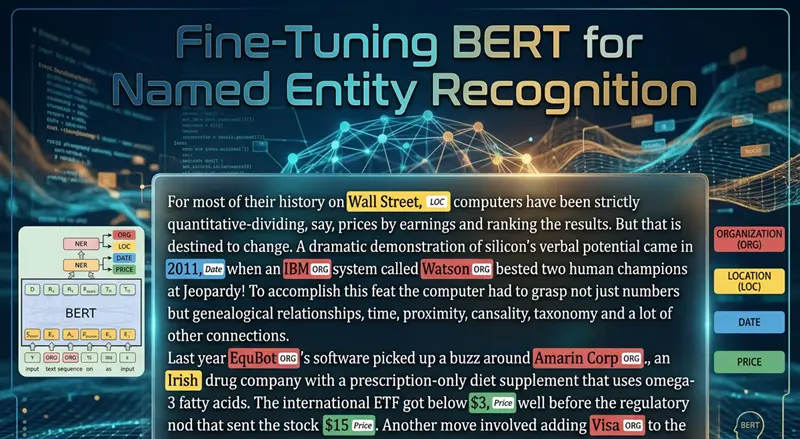
在本教程中,我们将使用 Hugging Face 和 Google Colab 微调 BERT 模型用于简历风格的 NER。为了保持笔记本完全可运行并直接专注于用例,训练数据将是笔记本内部构建的小型合成简历数据集。然后我们将在样本简历上评估模型并运行推理。
1、为什么简历解析适合基于 BERT 的 NER
NER 是一个序列标注任务。句子中的每个 token 都会收到一个标签,例如:
O表示不在任何实体中的 tokenB-XXX表示实体的开始I-XXX表示实体的延续
这种框架自然地映射到简历。如果一行包含候选人姓名、电话号码和电子邮件地址,token 分类模型可以学习直接标记这些范围。
在本教程中,标签模式包括:
NAMEEMAILPHONESKILLDEGREEUNIVERSITYCOMPANYJOB_TITLELOCATIONYEARS_EXPERIENCE
这是一个实用的入门模式,因为它涵盖了人们构建简单简历解析器时首先想要的许多字段。
2、环境设置
在新的 Google Colab 会话中首先运行这个单元。它安装数据集处理、微调和 NER 评估所需的库。
!pip install -q transformers datasets evaluate seqeval accelerate我们使用:
transformers用于 BERT、分词器、Trainer API 和推理管道datasets用于数据集处理evaluate和seqeval用于 NER 指标accelerate以便训练在 Colab 中顺利运行
3、简历解析任务概述和标签模式
简历解析是一个实际的 NER 问题。不是通用实体,如人员或组织,而是希望从简历中提取结构化字段,如姓名、电子邮件、电话号码、技能、职位和大学。
我们将使用 IOB 标注:
-
O:不在任何实体中 -
B-XXX:实体的开始 -
I-XXX:实体的延续本笔记本中的合成数据集使用这些实体类型:
-
NAME -
EMAIL -
PHONE -
SKILL -
DEGREE -
UNIVERSITY -
COMPANY -
JOB_TITLE -
LOCATION -
YEARS_EXPERIENCEimport os
import random
import numpy as np
from datasets import Dataset, DatasetDict
import evaluate
from transformers import AutoModelForTokenClassification, AutoTokenizer, DataCollatorForTokenClassification, Trainer, TrainingArguments, pipelineSEED = 42
random.seed(SEED)
np.random.seed(SEED)MODEL_NAME = "bert-base-cased"
OUTPUT_DIR = "bert-resume-parser-model"
MAX_LENGTH = 256
NUM_EPOCHS = 4
TRAIN_BATCH_SIZE = 8
EVAL_BATCH_SIZE = 8
LEARNING_RATE = 2e-5ENTITY_TYPES = ["NAME", "EMAIL", "PHONE", "SKILL", "DEGREE", "UNIVERSITY", "COMPANY", "JOB_TITLE", "LOCATION", "YEARS_EXPERIENCE"]
label_names = ["O"]
for entity_type in ENTITY_TYPES:
label_names.append(f"B-{entity_type}")
label_names.append(f"I-{entity_type}")
id2label = {idx: label for idx, label in enumerate(label_names)}
label2id = {label: idx for idx, label in id2label.items()}print("Number of labels:", len(label_names))
print(label_names)运行上面的代码后,您将看到以下内容:
Number of labels: 21
['O', 'B-NAME', 'I-NAME', 'B-EMAIL', 'I-EMAIL', 'B-PHONE', 'I-PHONE', 'B-SKILL', 'I-SKILL', 'B-DEGREE', 'I-DEGREE', 'B-UNIVERSITY', 'I-UNIVERSITY', 'B-COMPANY', 'I-COMPANY', 'B-JOB_TITLE', 'I-JOB_TITLE', 'B-LOCATION', 'I-LOCATION', 'B-YEARS_EXPERIENCE', 'I-YEARS_EXPERIENCE']
4、构建小型合成简历数据集
在真实项目中,您通常会在手动标注的简历文本上进行训练。对于教程,这引入了两个问题:
-
合适的公共数据集可能不容易访问或重用
-
笔记本变得更难干净地复现
因此,笔记本使用现实的简历字段构建了一个小型合成 token 标注数据集。每个示例包含:
-
候选人姓名
-
电子邮件地址
-
电话号码
-
地点
-
学位和大学
-
职位和公司
-
工作年限
-
一些技能
这不是为了成为生产级数据集。它是一个教学数据集,使完整的 BERT 微调工作流易于运行和检查。
在这样一个小的合成数据集上,模型可能很快过拟合。在这种情况下这是可以接受的,因为教程是关于工作流,而不是声称生产质量的基准数据。
profiles = [
    {"name": ["Alice", "Johnson"], "email": ["alice.johnson@example.com"], "phone": ["555-0101"], "location": ["Seattle", ",", "WA"], "degree": ["B.Sc", "in", "Computer", "Science"], "university": ["University", "of", "Washington"], "job_title": ["Machine", "Learning", "Engineer"], "company": ["Northwind", "Analytics"], "years_experience": ["5", "years"], "skills": [["Python"], ["PyTorch"], ["SQL"]]},
    {"name": ["Brian", "Lee"], "email": ["brian.lee@example.com"], "phone": ["555-0102"], "location": ["Austin", ",", "TX"], "degree": ["M.Sc", "in", "Data", "Science"], "university": ["University", "of", "Texas"], "job_title": ["Data", "Scientist"], "company": ["Lakeshore", "AI"], "years_experience": ["4", "years"], "skills": [["Python"], ["TensorFlow"], ["Pandas"]]},
    {"name": ["Carla", "Martinez"], "email": ["carla.martinez@example.com"], "phone": ["555-0103"], "location": ["Boston", ",", "MA"], "degree": ["B.A", "in", "Information", "Systems"], "university": ["Boston", "University"], "job_title": ["NLP", "Engineer"], "company": ["BrightPath", "Labs"], "years_experience": ["6", "years"], "skills": [["Transformers"], ["spaCy"], ["Docker"]]},
    {"name": ["Daniel", "Kim"], "email": ["daniel.kim@example.com"], "phone": ["555-0104"], "location": ["San", "Francisco", ",", "CA"], "degree": ["B.Eng", "in", "Software", "Engineering"], "university": ["Stanford", "University"], "job_title": ["AI", "Research", "Engineer"], "company": ["GoldenGate", "Systems"], "years_experience": ["7", "years"], "skills": [["Python"], ["Hugging", "Face"], ["Kubernetes"]]},
    {"name": ["Emma", "Davis"], "email": ["emma.davis@example.com"], "phone": ["555-0105"], "location": ["Chicago", ",", "IL"], "degree": ["M.S", "in", "Artificial", "Intelligence"], "university": ["Northwestern", "University"], "job_title": ["Data", "Engineer"], "company": ["Urban", "Insights"], "years_experience": ["3", "years"], "skills": [["Spark"], ["SQL"], ["Airflow"]]},
    {"name": ["Farah", "Ahmed"], "email": ["farah.ahmed@example.com"], "phone": ["555-0106"], "location": ["New", "York", ",", "NY"], "degree": ["B.Sc", "in", "Mathematics"], "university": ["Columbia", "University"], "job_title": ["Business", "Intelligence", "Analyst"], "company": ["Metro", "Dataworks"], "years_experience": ["5", "years"], "skills": [["Tableau"], ["SQL"], ["Excel"]]},
]
section_variants = [(["Summary", ":"], ["Experienced", "professional", "with"], ["working", "on"], ["based", "in"]), (["Profile", ":"], ["Results-driven", "candidate", "with"], ["specializing", "in"], ["located", "in"]), (["Resume", ":"], ["Practical", "engineer", "with"], ["focused", "on"], ["currently", "in"])]

def add_labeled_span(tokens, labels, span_tokens, entity_type):
    for index, token in enumerate(span_tokens):
        tokens.append(token)
        labels.append(f"{'B' if index == 0 else 'I'}-{entity_type}")

def add_plain_tokens(tokens, labels, plain_tokens):
    for token in plain_tokens:
        tokens.append(token)
        labels.append("O")

def build_resume_example(profile, variant_index):
    header_tokens, intro_tokens, skill_intro_tokens, location_intro_tokens = section_variants[variant_index]
    tokens, labels = [], []
    add_labeled_span(tokens, labels, profile["name"], "NAME")
    add_plain_tokens(tokens, labels, ["Email", ":"])
    add_labeled_span(tokens, labels, profile["email"], "EMAIL")
    add_plain_tokens(tokens, labels, ["Phone", ":"])
    add_labeled_span(tokens, labels, profile["phone"], "PHONE")
    add_plain_tokens(tokens, labels, header_tokens + intro_tokens)
    add_labeled_span(tokens, labels, profile["years_experience"], "YEARS_EXPERIENCE")
    add_plain_tokens(tokens, labels, ["of", "experience", "as", "a"])
    add_labeled_span(tokens, labels, profile["job_title"], "JOB_TITLE")
    add_plain_tokens(tokens, labels, ["at"])
    add_labeled_span(tokens, labels, profile["company"], "COMPANY")
    add_plain_tokens(tokens, labels, skill_intro_tokens)
    add_labeled_span(tokens, labels, profile["skills"][0], "SKILL")
    add_plain_tokens(tokens, labels, [","])
    add_labeled_span(tokens, labels, profile["skills"][1], "SKILL")
    add_plain_tokens(tokens, labels, [",", "and"])
    add_labeled_span(tokens, labels, profile["skills"][2], "SKILL")
    add_plain_tokens(tokens, labels, location_intro_tokens)
    add_labeled_span(tokens, labels, profile["location"], "LOCATION")
    add_plain_tokens(tokens, labels, ["Education", ":"])
    add_labeled_span(tokens, labels, profile["degree"], "DEGREE")
    add_plain_tokens(tokens, labels, ["from"])
    add_labeled_span(tokens, labels, profile["university"], "UNIVERSITY")
    return {"tokens": tokens, "ner_tags": [label2id[label] for label in labels]}

examples = []
for repeat_index in range(6):
    for profile_index, profile in enumerate(profiles):
        examples.append(build_resume_example(profile, (repeat_index + profile_index) % len(section_variants)))
random.shuffle(examples)
dataset_dict = DatasetDict({"train": Dataset.from_list(examples[:24]), "validation": Dataset.from_list(examples[24:30]), "test": Dataset.from_list(examples[30:36])})
print(dataset_dict)
print("Sample tokens:", dataset_dict["train"][0]["tokens"])
print("Sample labels:", [id2label[idx] for idx in dataset_dict["train"][0]["ner_tags"]])
DatasetDict({
    train: Dataset({
        features: ['tokens', 'ner_tags'],
        num_rows: 24
    })
    validation: Dataset({
        features: ['tokens', 'ner_tags'],
        num_rows: 6
    })
    test: Dataset({
        features: ['tokens', 'ner_tags'],
        num_rows: 6
    })
})
Sample tokens: ['Daniel', 'Kim', 'Email', ':', 'daniel.kim@example.com', 'Phone', ':', '555-0104', 'Profile', ':', 'Results-driven', 'candidate', 'with', '7', 'years', 'of', 'experience', 'as', 'a', 'AI', 'Research', 'Engineer', 'at', 'GoldenGate', 'Systems', 'specializing', 'in', 'Python', ',', 'Hugging', 'Face', ',', 'and', 'Kubernetes', 'located', 'in', 'San', 'Francisco', ',', 'CA', 'Education', ':', 'B.Eng', 'in', 'Software', 'Engineering', 'from', 'Stanford', 'University']
Sample labels: ['B-NAME', 'I-NAME', 'O', 'O', 'B-EMAIL', 'O', 'O', 'B-PHONE', 'O', 'O', 'O', 'O', 'O', 'B-YEARS_EXPERIENCE', 'I-YEARS_EXPERIENCE', 'O', 'O', 'O', 'O', 'B-JOB_TITLE', 'I-JOB_TITLE', 'I-JOB_TITLE', 'O', 'B-COMPANY', 'I-COMPANY', 'O', 'O', 'B-SKILL', 'O', 'B-SKILL', 'I-SKILL', 'O', 'O', 'B-SKILL', 'O', 'O', 'B-LOCATION', 'I-LOCATION', 'I-LOCATION', 'I-LOCATION', 'O', 'O', 'B-DEGREE', 'I-DEGREE', 'I-DEGREE', 'I-DEGREE', 'O', 'B-UNIVERSITY', 'I-UNIVERSITY']
5、将数据转换为 Hugging Face 期望的格式
我们的示例已经遵循核心 token 分类格式:token 列表和对齐的标签列表。在实践中,当用您自己标注的简历数据替换合成样本时,这也是您想要保留的格式。
print(dataset_dict["train"].features)
print("Number of training samples:", len(dataset_dict["train"]))
print("Number of validation samples:", len(dataset_dict["validation"]))
print("Number of test samples:", len(dataset_dict["test"]))
{'tokens': List(Value('string')), 'ner_tags': List(Value('int64'))}
Number of training samples: 24
Number of validation samples: 6
Number of test samples: 6
6、分词和标签对齐
BERT 将文本分词为子词片段。这意味着单个原始 token 可能变成多个模型 token。我们需要对齐标签,以便只有正确的 token 片段对损失有贡献。
tokenizer = AutoTokenizer.from_pretrained(MODEL_NAME)

def tokenize_and_align_labels(examples):
    tokenized_inputs = tokenizer(examples["tokens"], truncation=True, is_split_into_words=True, max_length=MAX_LENGTH)
    all_labels = []
    for batch_index, labels in enumerate(examples["ner_tags"]):
        word_ids = tokenized_inputs.word_ids(batch_index=batch_index)
        previous_word_id = None
        label_ids = []
        for word_id in word_ids:
            if word_id is None:
                label_ids.append(-100)
            elif word_id != previous_word_id:
                label_ids.append(labels[word_id])
            else:
                current_label = id2label[labels[word_id]]
                label_ids.append(label2id[current_label.replace("B-", "I-", 1)] if current_label.startswith("B-") else labels[word_id])
            previous_word_id = word_id
        all_labels.append(label_ids)
    tokenized_inputs["labels"] = all_labels
    return tokenized_inputs

tokenized_datasets = dataset_dict.map(tokenize_and_align_labels, batched=True)
print(tokenized_datasets)
7、加载 BERT 模型
这是我们加载预训练的 bert-base-cased 并准备它进行上面定义的简历实体标签的 token 分类的地方。
model = AutoModelForTokenClassification.from_pretrained(MODEL_NAME, num_labels=len(label_names), id2label=id2label, label2id=label2id)
data_collator = DataCollatorForTokenClassification(tokenizer=tokenizer)
seqeval = evaluate.load("seqeval")
8、使用 Trainer 微调模型
我们采用预训练的 BERT,在 token 化的简历 NER 数据集上训练它,并在训练期间在验证集上评估。
def compute_metrics(eval_prediction):
    logits, labels = eval_prediction
    predictions = np.argmax(logits, axis=-1)
    true_predictions = []
    true_labels = []
    for prediction_row, label_row in zip(predictions, labels):
        filtered_predictions = []
        filtered_labels = []
        for prediction_id, label_id in zip(prediction_row, label_row):
            if label_id == -100:
                continue
            filtered_predictions.append(id2label[prediction_id])
            filtered_labels.append(id2label[label_id])
        true_predictions.append(filtered_predictions)
        true_labels.append(filtered_labels)
    results = seqeval.compute(predictions=true_predictions, references=true_labels)
    return {"precision": results["overall_precision"], "recall": results["overall_recall"], "f1": results["overall_f1"], "accuracy": results["overall_accuracy"]}

training_args = TrainingArguments(output_dir=OUTPUT_DIR, learning_rate=LEARNING_RATE, per_device_train_batch_size=TRAIN_BATCH_SIZE, per_device_eval_batch_size=EVAL_BATCH_SIZE, num_train_epochs=NUM_EPOCHS, weight_decay=0.01, eval_strategy="epoch", save_strategy="epoch", load_best_model_at_end=True, logging_steps=5, report_to="none", seed=SEED)
trainer = Trainer(model=model, args=training_args, train_dataset=tokenized_datasets["train"], eval_dataset=tokenized_datasets["validation"], processing_class=tokenizer, data_collator=data_collator, compute_metrics=compute_metrics)
trainer.train()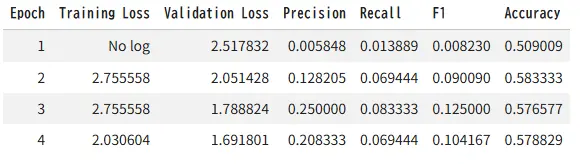
9、评估微调模型
训练后,在保留的测试集上评估,然后将微调模型和分词器保存到本地 Colab 运行时。
test_metrics = trainer.evaluate(tokenized_datasets["test"])
print(test_metrics)
trainer.save_model(OUTPUT_DIR)
tokenizer.save_pretrained(OUTPUT_DIR)
print("Saved files:", os.listdir(OUTPUT_DIR))
{'eval_loss': 1.6579381227493286, 'eval_precision': 0.18518518518518517, 'eval_recall': 0.06944444444444445, 'eval_f1': 0.10101010101010101, 'eval_accuracy': 0.5767441860465117, 'eval_runtime': 1.4616, 'eval_samples_per_second': 4.105, 'eval_steps_per_second': 0.684, 'epoch': 4.0}
/usr/local/lib/python3.12/dist-packages/seqeval/metrics/v1.py:57: UndefinedMetricWarning: Precision and F-score are ill-defined and being set to 0.0 in labels with no predicted samples. Use `zero_division` parameter to control this behavior.
  _warn_prf(average, modifier, msg_start, len(result))
Writing model shards: 100%
 1/1 [00:11<00:00, 11.87s/it]
Saved files: ['training_args.bin', 'checkpoint-12', 'checkpoint-3', 'checkpoint-6', 'tokenizer.json', 'tokenizer_config.json', 'checkpoint-9', 'model.safetensors', 'config.json']
10、在样本简历文本上运行推理
对于即时推理,使用 trainer.model 和内存中的分词器。这样可以避免如果保存的文件夹因为之前的单元未完成而缺失时的失败。
ner_pipeline = pipeline("token-classification", model=trainer.model, tokenizer=tokenizer, aggregation_strategy="simple")

sample_resume = '''
Sophia Turner
Email: sophia.turner@example.com
Phone: 555-0199
Profile: NLP Engineer with 5 years of experience as a Senior Data Scientist at Redwood Analytics.
Skilled in Python, Transformers, and SQL. Located in Denver, CO.
Education: M.Sc in Computer Science from University of Colorado.
'''

predictions = ner_pipeline(sample_resume)
for prediction in predictions:
    print(prediction)
{'entity_group': 'EMAIL', 'score': np.float32(0.21079148), 'word': 'so', 'start': 22, 'end': 24}
{'entity_group': 'EMAIL', 'score': np.float32(0.47382832), 'word': '##a. turner @ example. com', 'start': 27, 'end': 47}
{'entity_group': 'PHONE', 'score': np.float32(0.31116828), 'word': '##5 - 0199', 'start': 57, 'end': 63}
{'entity_group': 'EMAIL', 'score': np.float32(0.07878011), 'word': 'Red', 'start': 143, 'end': 146}
{'entity_group': 'COMPANY', 'score': np.float32(0.10032159), 'word': '##ly', 'start': 154, 'end': 156}
{'entity_group': 'LOCATION', 'score': np.float32(0.15617272), 'word': ',', 'start': 221, 'end': 222}
{'entity_group': 'DEGREE', 'score': np.float32(0.1820803), 'word': '.', 'start': 239, 'end': 240}
我们的分数非常低:
-
0.47
-
0.31
-
0.21
-
0.10
-
0.07
如何解读它们:
-
越接近 1.0 = 越自信
-
越接近 0.0 = 越不自信
这意味着模型不自信,预测很差。这与糟糕的输出相符:
-
"so" 被预测为 EMAIL
-
"Red" 被预测为 EMAIL
-
"." 被预测为 DEGREE
所以在这个运行中,分数基本上在说:
-
模型在弱弱地猜测
-
它没有很好地学习任务
-
微小的合成数据集不足以进行稳定的提取
重要细节:
-
这些分数不是准确率
-
它们不是整个输出正确的概率
-
它们只是每个预测范围的置信度估计
实用规则:
-
高质量的 NER 预测通常有更高的置信度和更好的范围边界
-
低置信度加上明显错误的范围意味着模型还不可用
在我们的案例中,糟糕的输出是预期的,因为:
-
数据集很小
-
标签是合成的
-
在 24 个示例上进行完整的 BERT 微调是不稳定的
-
推理时的简历文本与训练中看到的微小模式不同
11、将预测后处理为简历字段
NER 预测本身很有用,但简历解析通常需要结构化输出格式。下面的辅助函数将预测分组为一个简单的字典。
def predictions_to_resume_fields(predictions):
    fields = {entity_type: [] for entity_type in ENTITY_TYPES}
    for item in predictions:
        entity_group = item["entity_group"]
        word = item["word"].replace(" ##", "")
        if entity_group in fields and word not in fields[entity_group]:
            fields[entity_group].append(word)
    return fields

structured_output = predictions_to_resume_fields(predictions)
for field_name, values in structured_output.items():
    if values:
        print(f"{field_name}: {values}")
EMAIL: ['so', '##a. turner @ example. com', 'Red']
PHONE: ['##5 - 0199']
DEGREE: ['.']
COMPANY: ['##ly']
LOCATION: [',']
12、如何用真实的简历标注替换合成数据
要将此笔记本适配到真实项目,请保持相同的整体流程,只替换合成数据集部分。
实用检查清单是:
- 用 token 级别的 IOB 标签标注简历文本。
- 保持本笔记本中使用的相同
tokens和ner_tags结构。 - 仅在您的用例需要更多实体类型时扩展标签模式。
- 增加示例数量,以便模型看到更多简历布局、更多职位和更多写作风格。
- 重用相同的分词、训练、评估和推理部分。
本笔记本旨在成为可复现的起点,而不是生产就绪的解析器。在生产环境中,您最大的收益通常来自更高质量的标注和更多样化的训练集。
原文链接:微调BERT进行命名实体识别 - 汇智网