- 🍨 本文为 🔗365天深度学习训练营中的学习记录博客
- 🍖 原作者: K同学啊
一、前置知识
1、知识总结
二、代码实现
1、准备工作
1.1.设置GPU
import tensorflow as tf
gpus = tf.config.list_physical_devices("GPU")

if gpus:
    gpu0 = gpus[0] #如果有多个GPU,仅使用第0个GPU
    tf.config.experimental.set_memory_growth(gpu0, True) #设置GPU显存用量按需使用
    tf.config.set_visible_devices([gpu0],"GPU")

print(gpus)

[PhysicalDevice(name='/physical_device:GPU:0', device_type='GPU')]
1.2.导入数据
import os,PIL,pathlib
import matplotlib.pyplot as plt
import numpy             as np
from tensorflow          import keras
from tensorflow.keras    import layers,models

# 查看当前工作路径(确认路径是否正确)
print("当前工作路径:", os.getcwd())

# 定义数据目录(建议用绝对路径更稳妥,相对路径依赖当前工作路径)
data_dir = './data/day10/'
data_dir = pathlib.Path(data_dir)

# 获取数据目录下的所有子路径(文件夹或文件)
data_paths = list(data_dir.glob('*'))

# 提取每个子路径的名称(即类别名,自动适配系统分隔符)
classeNames = [path.name for path in data_paths]
classeNames

当前工作路径: /root/autodl-tmp/TensorFlow2


['cat', 'dog']
1.3.查看数据
image_count = len(list(data_dir.glob('*/*')))
print("图片总数为:",image_count)

图片总数为: 600
1.4.可视化图片
roses = list(data_dir.glob('dog/*.jpg'))
PIL.Image.open(str(roses[0]))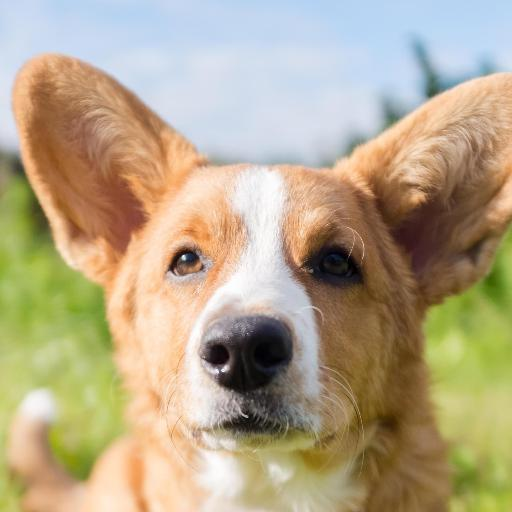
2、数据预处理
2.1.加载数据
-
使用image_dataset_from_directory方法将磁盘中的数据加载到tf.data.Dataset中
img_height = 224
img_width = 224
batch_size = 32train_ds = tf.keras.preprocessing.image_dataset_from_directory(
data_dir,
validation_split=0.3,
subset="training",
seed=12,
image_size=(img_height, img_width),
batch_size=batch_size)Found 600 files belonging to 2 classes.
Using 420 files for training.验证集
val_ds = tf.keras.preprocessing.image_dataset_from_directory(
data_dir,
validation_split=0.3,
subset="validation",
seed=12,
image_size=(img_height, img_width),
batch_size=batch_size)Found 600 files belonging to 2 classes.
Using 180 files for validation.val_batches = tf.data.experimental.cardinality(val_ds)
test_ds = val_ds.take(val_batches // 5)
val_ds = val_ds.skip(val_batches // 5)print('Number of validation batches: %d' % tf.data.experimental.cardinality(val_ds))
print('Number of test batches: %d' % tf.data.experimental.cardinality(test_ds))class_names = train_ds.class_names
print(class_names)Number of validation batches: 5
Number of test batches: 1
['cat', 'dog']
2.2.检查数据
- Image_batch是形状的张量(32,224,224,3)。这是一批形状224x224x3的32张图片(最后一维指的是彩色通道RGB)。
-
Label_batch是形状(32,)的张量,这些标签对应32张图片
for image_batch, labels_batch in train_ds:
print(image_batch.shape)
print(labels_batch.shape)
break(32, 224, 224, 3)
(32,)
2.3.配置数据集
- shuffle() :打乱数据,关于此函数的详细介绍可以参考
- prefetch() :预取数据,加速运行
-
cache() :将数据集缓存到内存当中,加速运行
AUTOTUNE = tf.data.AUTOTUNE
def preprocess_image(image,label):
return (image/255.0,label)归一化处理
train_ds = train_ds.map(preprocess_image, num_parallel_calls=AUTOTUNE)
val_ds = val_ds.map(preprocess_image, num_parallel_calls=AUTOTUNE)
test_ds = test_ds.map(preprocess_image, num_parallel_calls=AUTOTUNE)train_ds = train_ds.cache().prefetch(buffer_size=AUTOTUNE)
val_ds = val_ds.cache().prefetch(buffer_size=AUTOTUNE)
2.4. 可视化数据
plt.figure(figsize=(15, 10))  # 图形的宽为15高为10

for images, labels in train_ds.take(1):
    for i in range(8):

        ax = plt.subplot(5, 8, i + 1)
        plt.imshow(images[i])
        plt.title(class_names[labels[i]])

        plt.axis("off")

2026-04-10 09:12:06.948107: W tensorflow/core/kernels/data/cache_dataset_ops.cc:856] The calling iterator did not fully read the dataset being cached. In order to avoid unexpected truncation of the dataset, the partially cached contents of the dataset  will be discarded. This can happen if you have an input pipeline similar to `dataset.cache().take(k).repeat()`. You should use `dataset.take(k).cache().repeat()` instead.
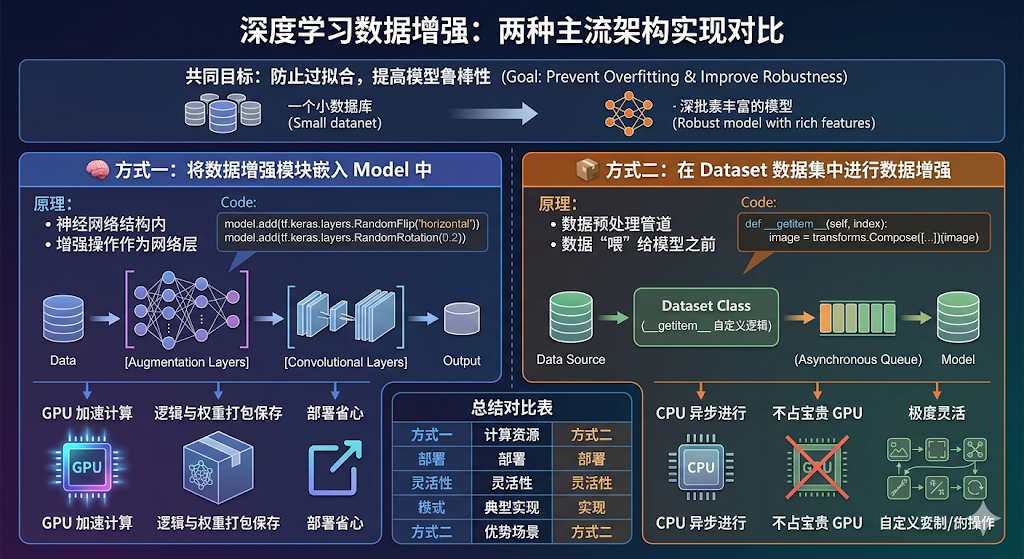
3、数据增强
3.1.增强函数
我们可以使用 tf.keras.layers.experimental.preprocessing.RandomFlip 与 tf.keras.layers.experimental.preprocessing.RandomRotation 进行数据增强
- tf.keras.layers.experimental.preprocessing.RandomFlip:水平和垂直随机翻转每个图像。
-
tf.keras.layers.experimental.preprocessing.RandomRotation:随机旋转每个图像
第一个层表示进行随机的水平和垂直翻转,而第二个层表示按照 0.2 的弧度值进行随机旋转。
data_augmentation = tf.keras.Sequential([
tf.keras.layers.experimental.preprocessing.RandomFlip("horizontal_and_vertical"),
tf.keras.layers.experimental.preprocessing.RandomRotation(0.2),
])Add the image to a batch.
image = tf.expand_dims(images[i], 0)
图形显示
plt.figure(figsize=(8, 8))
for i in range(9):
augmented_image = data_augmentation(image)
ax = plt.subplot(3, 3, i + 1)
plt.imshow(augmented_image[0])
plt.axis("off")
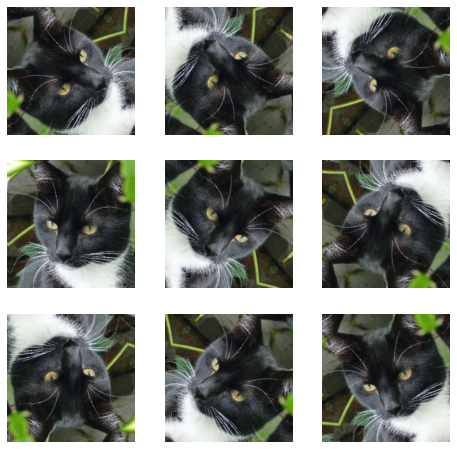
更多增强方式: https://www.tensorflow.org/api_docs/python/tf/keras/layers/RandomRotation
3.2.增强方式
在Model中嵌入,这样做的好处是:
- 数据增强这块的工作可以得到GPU的加速(如果你使用了GPU训练的话)
-
注意:只有在模型训练时(Model.fit)才会进行增强,在模型评估(Model.evaluate)以及预测(Model.predict)时并不会进行增强操作。
model = tf.keras.Sequential([
data_augmentation,
layers.Conv2D(16, 3, padding='same', activation='relu'),
layers.MaxPooling2D(),
])
3.3.训练模型
- 损失函数(loss):用于衡量模型在训练期间的准确率。
- 优化器(optimizer):决定模型如何根据其看到的数据和自身的损失函数进行更新。
-
评价函数(metrics):用于监控训练和测试步骤。以下示例使用了准确率,即被正确分类的图像的比率。
model = tf.keras.Sequential([
layers.Conv2D(16, 3, padding='same', activation='relu'),
layers.MaxPooling2D(),
layers.Conv2D(32, 3, padding='same', activation='relu'),
layers.MaxPooling2D(),
layers.Conv2D(64, 3, padding='same', activation='relu'),
layers.MaxPooling2D(),
layers.Flatten(),
layers.Dense(128, activation='relu'),
layers.Dense(len(class_names))
])model.compile(optimizer='adam',
loss=tf.keras.losses.SparseCategoricalCrossentropy(from_logits=True),
metrics=['accuracy'])epochs=20
history = model.fit(
train_ds,
validation_data=val_ds,
epochs=epochs
)Epoch 1/20
14/14 [==============================] - 4s 54ms/step - loss: 0.8322 - accuracy: 0.5048 - val_loss: 0.6339 - val_accuracy: 0.5811
Epoch 2/20
14/14 [==============================] - 0s 19ms/step - loss: 0.4953 - accuracy: 0.7762 - val_loss: 0.4305 - val_accuracy: 0.8041
...
Epoch 19/20
14/14 [==============================] - 0s 18ms/step - loss: 0.0103 - accuracy: 0.9929 - val_loss: 0.5031 - val_accuracy: 0.9257
Epoch 20/20
14/14 [==============================] - 0s 18ms/step - loss: 0.0107 - accuracy: 0.9952 - val_loss: 0.3025 - val_accuracy: 0.9257loss, acc = model.evaluate(test_ds)
print("Accuracy", acc)1/1 [==============================] - 0s 77ms/step - loss: 0.2731 - accuracy: 0.8750
Accuracy 0.875