HBase以及Hadoop会被部署在远程服务器集群,本地使用idea访问。
注:本教程指令和配置文件中的用户名、ip等均是博主本人的,你需要改成你自己设置的
虚拟机配置
本地客户端访问HBase需要服务器IP地址,如果不是虚拟机请忽略这部分
虚拟机默认DHCP协议,每次启动分配的IP可能不同,因此采用双网卡机制,一个IP用于外网访问,另一个用于固定虚拟机IP
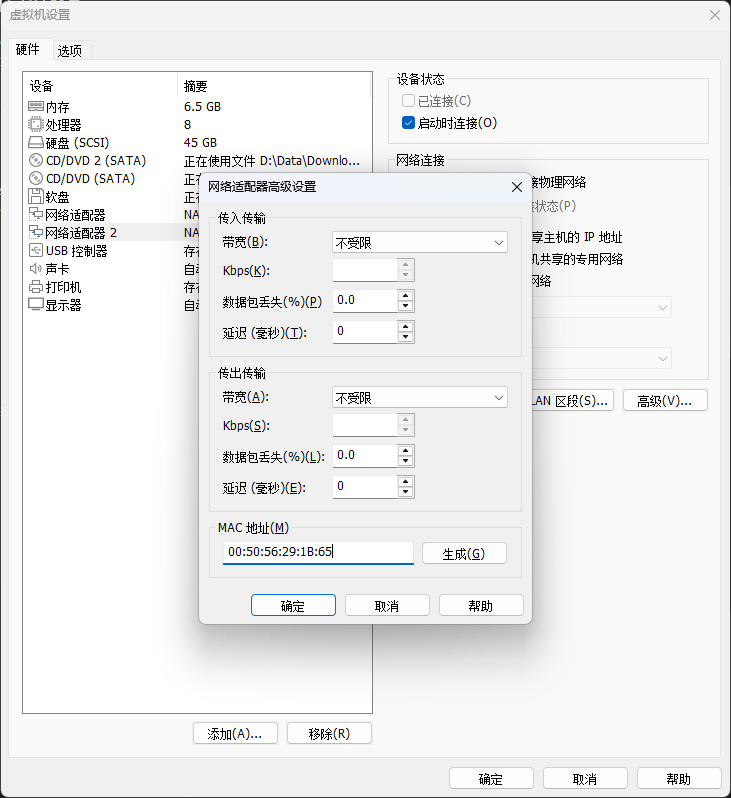
1.添加新的网络适配器生成MAC地址
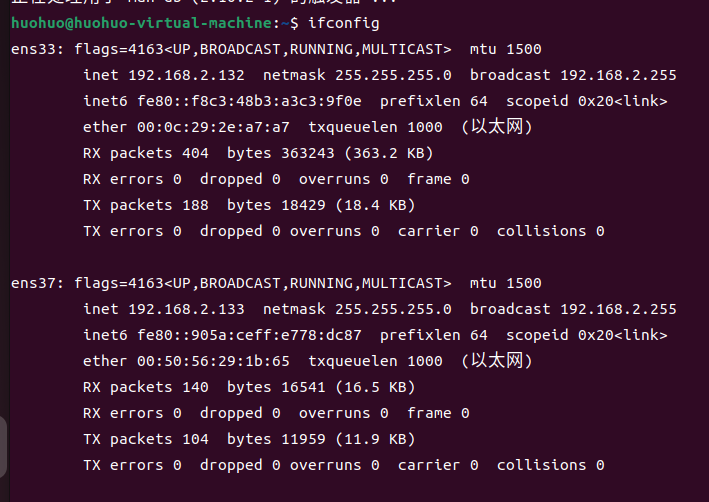
2.重启虚拟机输入ifconfig发现新添加的网卡
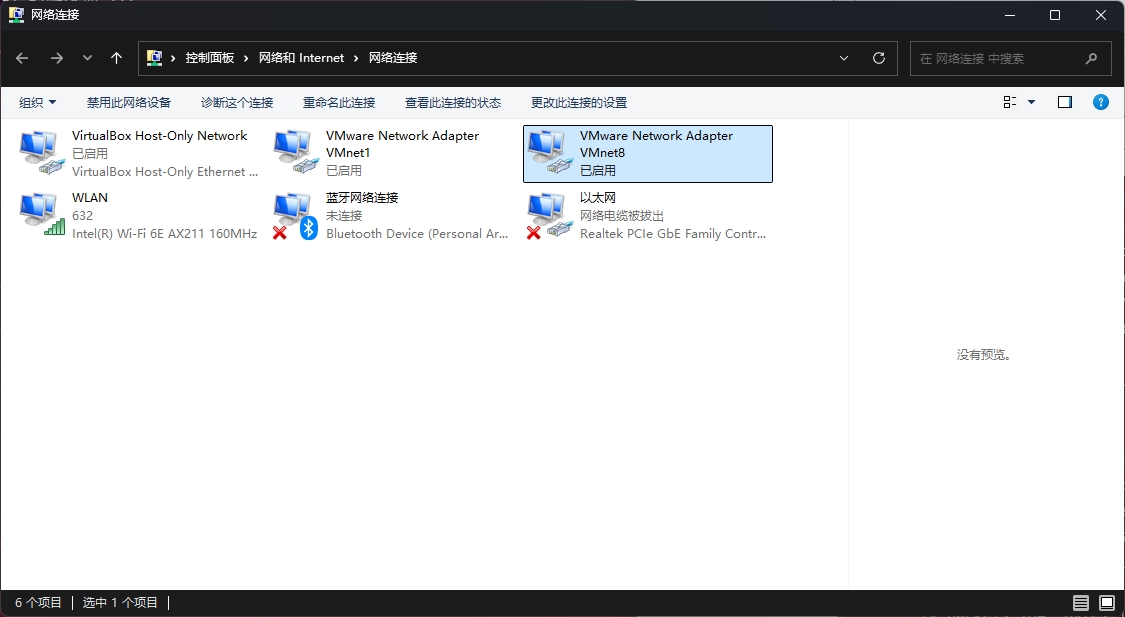
 3.在宿主机(主机)网络连接右键VM8进入属性
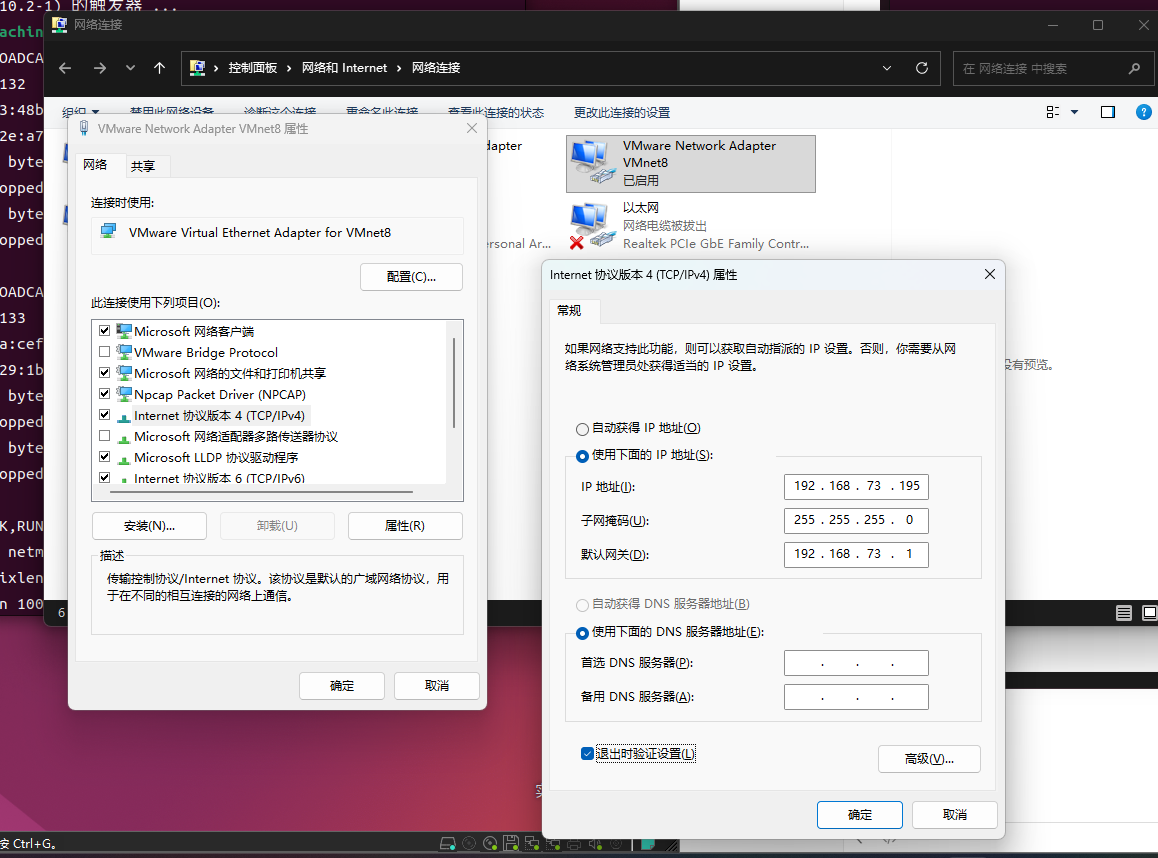
4.双击Internet协议版本4,设置固定IP
- IP地址:
192.168.73.1(或其他任意值,最后一位不要是195,不要是1和255) - 子网掩码:
255.255.255.0 - 默认网关:留空
重要 :这是Windows宿主机的VMnet8网络适配器的IP,不是虚拟机的IP。此处设置的IP必须与后续步骤6中虚拟机ens37的IP(
192.168.73.195)在同一网段(前三段相同),但最后一位不能相同!否则会导致IP地址冲突,Windows无法连接虚拟机。
5.查看现有网络配置
cmd
ip link show
ip addr show ens33
nmcli connection show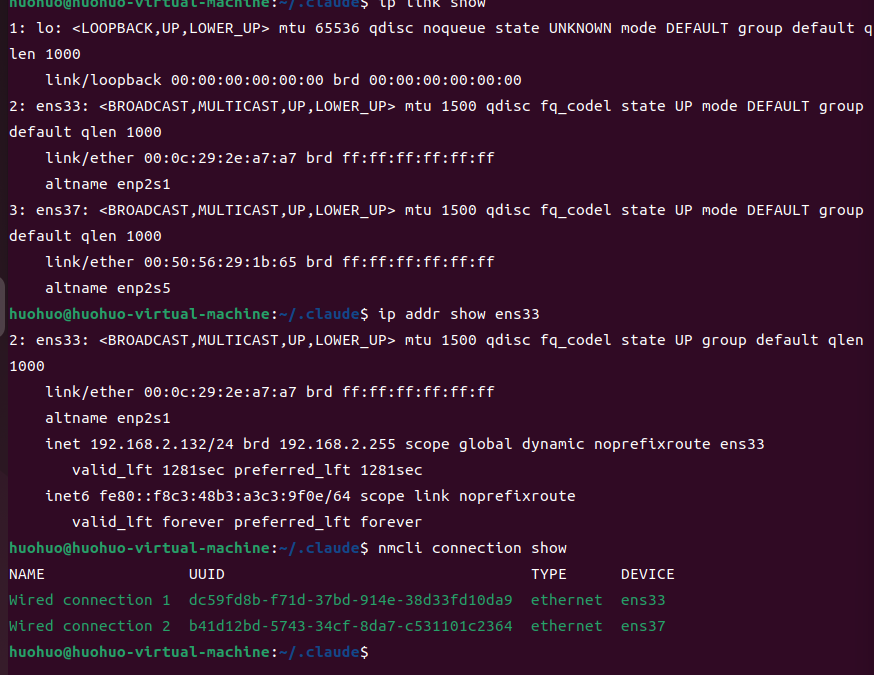
6.在 ens37 的 NetworkManager 连接上设置你之前配置的静态 IP
如果你的系统是ubuntu 22.04左右,那么应该直接用NetworkManager 即可配置,这部分各个系统可能不同
cmd
nmcli connection modify "Wired connection 2" \
    ipv4.addresses 192.168.73.195/24 \
    ipv4.method manual \
    ipv4.gateway "" \
    ipv4.dns "8.8.8.8"
7.重新激活连接使配置生效
nmcli connection up "Wired connection 2"8.验证结果
ip addr show ens37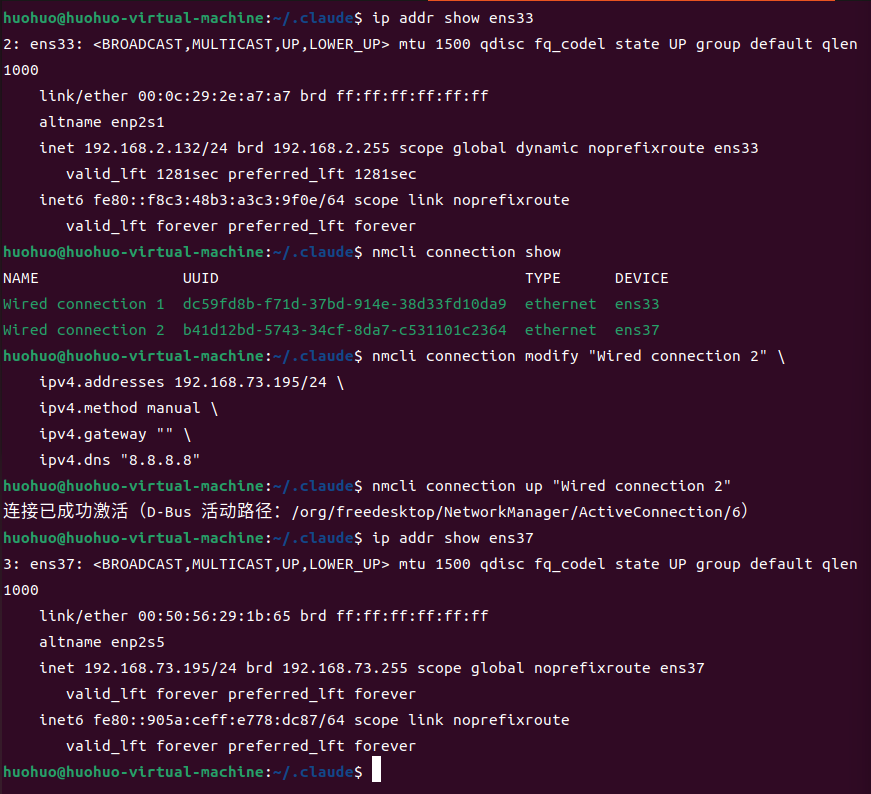
配置 HBase 参数,实现允许外网 IP 访问
(1) 修改原来的 hbase-site.xml 文件。
vi /home/huohuo/hbase-2.5.8/conf/hbase-site.xml(2) hbase-site.xml 文件修改为如下内容:
注意 :
hbase.zookeeper.quorum填你之前设置的虚拟机 IP(如192.168.73.195)注意 :
hbase.rootdir仍然使用hdfs://master:9000/hbase(用主机名),因为 HDFS NameNode 只监听了 127.0.0.1。注意 :
hbase.master.info.port是 HBase 2.x 的 Web UI 端口,默认值为 -1(禁用),必须显式配置。注意 :
hbase.zookeeper.property.dataDir路径根据实际安装位置设置。
xml
<configuration>
  <property>
    <name>hbase.rootdir</name>
    <value>hdfs://master:9000/hbase</value>
  </property>

  <property>
    <name>dfs.replication</name>
    <value>1</value>
  </property>

  <property>
    <name>hbase.cluster.distributed</name>
    <value>true</value>
  </property>

  <property>
    <name>hbase.zookeeper.quorum</name>
    <value>192.168.73.195</value>
  </property>

  <property>
    <name>hbase.zookeeper.property.clientPort</name>
    <value>2181</value>
  </property>

  <property>
    <name>hbase.unsafe.stream.capability.enforce</name>
    <value>false</value>
  </property>

  <property>
    <name>hbase.zookeeper.property.dataDir</name>
    <value>/home/huohuo/zookeeper-data</value>
  </property>

  <property>
    <name>hbase.master.ipc.address</name>
    <value>0.0.0.0</value>
  </property>

  <property>
    <name>hbase.regionserver.ipc.address</name>
    <value>0.0.0.0</value>
  </property>

  <property>
    <name>hbase.master.info.port</name>
    <value>16010</value>
  </property>
</configuration>
(3) 确保 hbase-env.sh 中 HBASE_MANAGES_ZK=true:
vim /home/huohuo/hbase-2.5.8/conf/hbase-env.sh确认有这一行:
export HBASE_MANAGES_ZK=true(4) 修改 regionservers 文件:
vim /home/huohuo/hbase-2.5.8/conf/regionservers内容为:
master配置虚拟机防火墙
Ubuntu 用的是 ufw 作为防火墙,实验时为方便起见,可以禁用防火墙,生产环境部署则应该按端口号进行防火墙规则配置,比如
# sudo ufw allow 16000
# sudo ufw allow 16010
# sudo ufw allow 16020
# sudo ufw allow 16030
# sudo ufw allow 2181
(1) 查看防火墙状态
sudo ufw status(2) 停止防火墙
sudo ufw disable
(3) 禁止 ufw 开机启动
systemctl disable ufw(4) 输入查看防火墙状态为inactive即可
虚拟机修改 hostname,实现通过主机名访问 HBase 和 Hadoop
配置hbase-site.xml 时使用了 master 作为主机名(用于 hbase.rootdir 的 HDFS 路径),但系统还不认识 master,因此需要配置
(1) 添加 master 主机名映射
sudo sh -c 'echo "192.168.73.195 master" >> /etc/hosts'关键 :必须将 master 映射到虚拟机的实际 IP
192.168.73.195,不能 映射到127.0.0.1。否则 HBase 会将自己的服务地址注册为localhost/127.0.0.1到 ZooKeeper,导致远程客户端拿到错误地址后连接失败(Connection refused: localhost/127.0.0.1:16020)。
然后设置主机名:
hostnamectl set-hostname master验证添加成功
cat /etc/hosts
hostname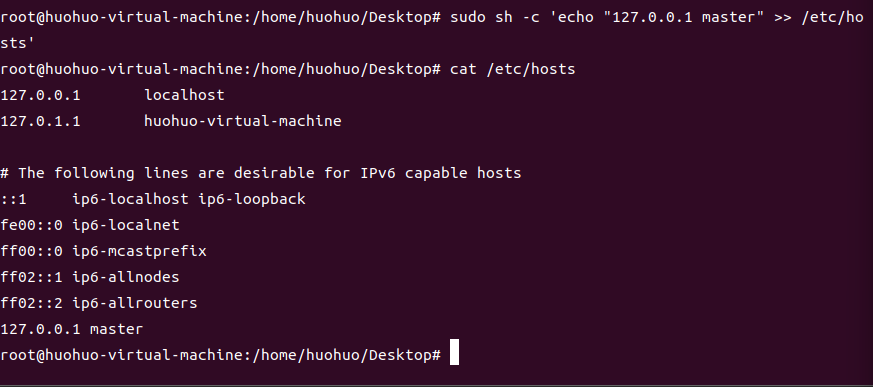
这样虚拟机内部访问 master 就会解析到 192.168.73.195(本机实际 IP)
(2) 修改宿主机的 hosts 文件,这个也可不做,idea配置时直接写ip就行了比如 192.168.73.195
这一步是为了让你的 Windows 也能通过 master 这个主机名访问到虚拟机里的 HBase/Hadoop。
Hosts 文件路径是 C:\Windows\System32\drivers\etc\hosts 用记事本打开,在文件末尾加上虚拟机的 IP 地址和虚拟机的主机名 master
比如在末尾添加 192.168.73.195 master
windows 系统中,保存该文件需要系统权限。可以复制到桌面改完再复制回去,提示覆盖需要管理员时点继续即可
(3) 验证
ping master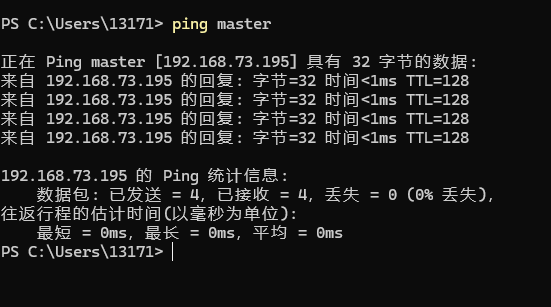
| 位置 | 配置的映射 | 作用 |
|---|---|---|
| 虚拟机 /etc/hosts | 192.168.73.195 master |
虚拟机内部 HBase/Hadoop 通过 master 访问自己 |
| Windows hosts | 192.168.73.195 master |
Windows 通过 master 访问虚拟机里的服务 |
两边都配好后,HBase 和 Hadoop 就能通过
master这个主机名正常通信了。
配置 SSH 免密登录(关键)
因为 hbase.zookeeper.quorum 配置的是 IP 192.168.73.195,start-hbase.sh 启动时会尝试 SSH 到该地址启动 ZooKeeper。如果不配置免密,ZooKeeper 无法启动。
ssh-keygen -t rsa -N "" -f ~/.ssh/id_rsa
cat ~/.ssh/id_rsa.pub >> ~/.ssh/authorized_keys
chmod 600 ~/.ssh/authorized_keys
ssh -o StrictHostKeyChecking=no 192.168.73.195 "echo OK"
首次连接会提示确认主机密钥,输入 yes 确认即可。
配置虚拟机中的 HBase 和 Hadoop 为系统服务
前期准备:配置hadoop核心参数
编辑 core-site.xml
vi /home/huohuo/hadoop-3.3.6/etc/hadoop/core-site.xml改为:
xml
<configuration>
	<property>
  		<name>fs.defaultFS</name>
  		<value>hdfs://master:9000</value>
	</property>
</configuration>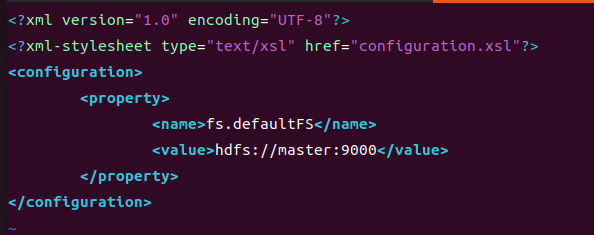
编辑 hdfs-site.xml
vi /home/huohuo/hadoop-3.3.6/etc/hadoop/hdfs-site.xml将内容修改为:
xml
<?xml version="1.0" encoding="UTF-8"?>
<?xml-stylesheet type="text/xsl" href="configuration.xsl"?>

<configuration>
  <property>
    <name>dfs.replication</name>
    <value>1</value>
  </property>
  <property>
    <name>dfs.namenode.name.dir</name>
    <value>/home/huohuo/hadoop-data/dfs/namenode</value>
  </property>
  <property>
    <name>dfs.datanode.data.dir</name>
    <value>/home/huohuo/hadoop-data/dfs/datanode</value>
  </property>
</configuration>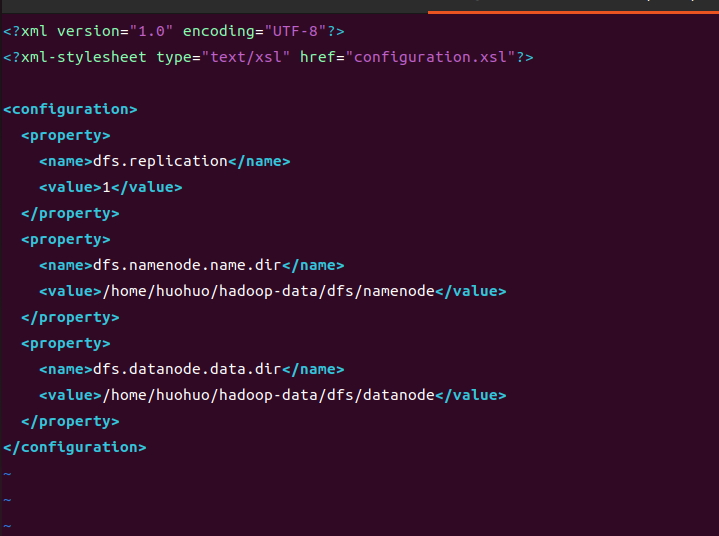
创建 HDFS 数据目录
mkdir -p /home/huohuo/hadoop-data/dfs/namenode
mkdir -p /home/huohuo/hadoop-data/dfs/datanode
继续配置系统服务
创建 systemd 服务文件
在终端执行:
sudo vi /etc/systemd/system/hadoop-hbase.service确认JAVA_HOME路径
echo $JAVA_HOME设置全局 JAVA_HOME
echo 'JAVA_HOME=/usr/lib/jvm/java-8-openjdk-amd64' >> /etc/environment
同时也写入 profile.d(确保登录 shell 也能读到)
echo 'export JAVA_HOME=/usr/lib/jvm/java-8-openjdk-amd64' > /etc/profile.d/java.sh
粘贴如下内容
[Unit]
Description=Hadoop and HBase Services
After=network.target

[Service]
Type=forking
User=huohuo
Environment=JAVA_HOME=/usr/lib/jvm/java-8-openjdk-amd64
ExecStart=/bin/bash -c '/home/huohuo/hadoop-3.3.6/sbin/start-all.sh && sleep 5 && /home/huohuo/hbase-2.5.8/bin/start-hbase.sh'
ExecStop=/bin/bash -c '/home/huohuo/hbase-2.5.8/bin/stop-hbase.sh && sleep 5 && /home/huohuo/hadoop-3.3.6/sbin/stop-all.sh'
ExecReload=/bin/bash -c '/home/huohuo/hbase-2.5.8/bin/stop-hbase.sh && sleep 5 && /home/huohuo/hadoop-3.3.6/sbin/stop-all.sh && sleep 5 && /home/huohuo/hadoop-3.3.6/sbin/start-all.sh && sleep 5 && /home/huohuo/hbase-2.5.8/bin/start-hbase.sh'

[Install]
WantedBy=multi-user.target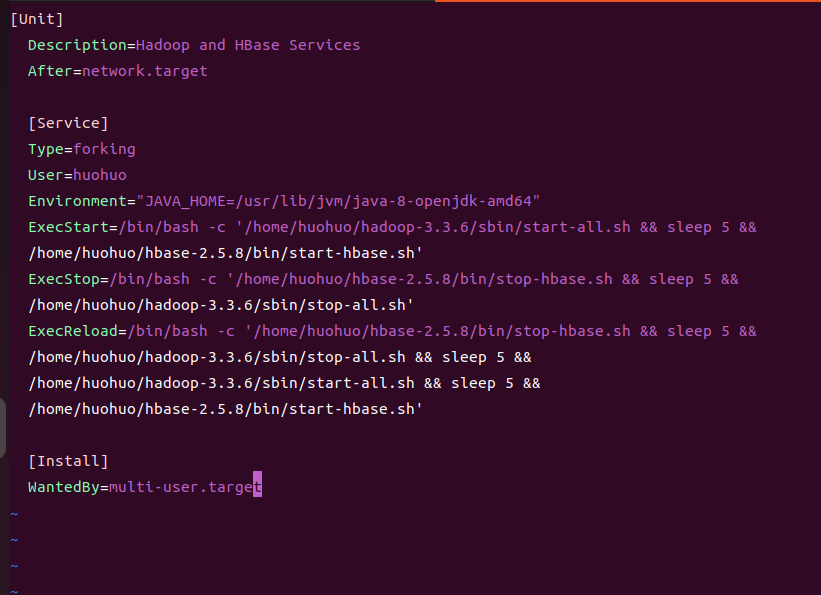
保存并退出后,重载systemd:
systemctl daemon-reload设置开机自启动:
systemctl enable hadoop-hbase.service首次启动需格式化 NameNode
如果遇到权限问题,将你的用户添加权限,比如我的目录就是默认root创建的,但是配置的huohuo没权限
chown -R huohuo:huohuo /home/huohuo/hadoop-data
su - huohuo -c '/home/huohuo/hadoop-3.3.6/bin/hdfs namenode -format'启动服务
systemctl start hadoop-hbase.service
验证jps
jps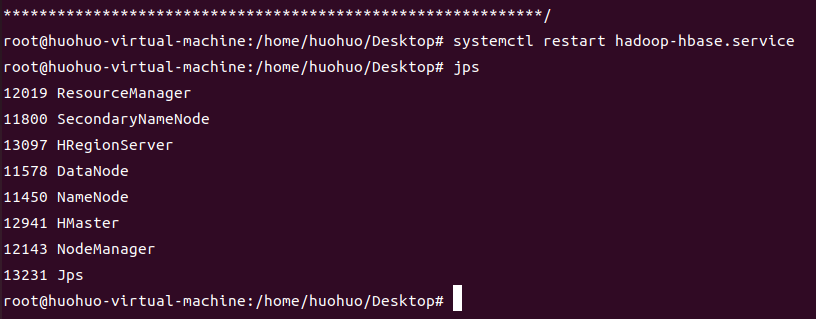
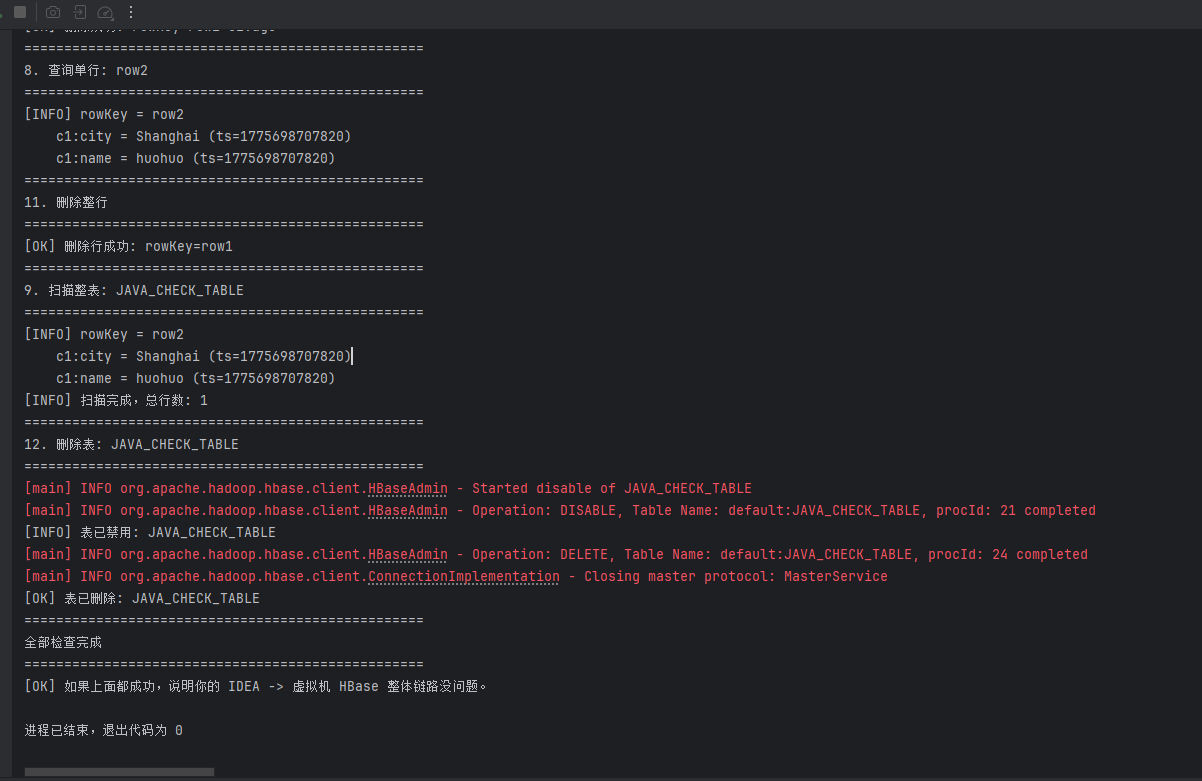
Hadoop 和 HBase 都已经正常启动,可以下一步操作了
常见问题:如果 HMaster 启动失败但 ZooKeeper 正常,可能是因为 HMaster 启动时 ZK 还没完全就绪。此时可单独重启 Master:
/home/huohuo/hbase-2.5.8/bin/hbase-daemon.sh start master如果 HMaster/HQuorumPeer 进程残留但端口没监听,需要先清理:
jps | grep -E 'HMaster|HRegionServer|HQuorumPeer' | awk '{print $1}' | xargs kill -9
rm -rf /home/huohuo/zookeeper-data/*
/home/huohuo/hbase-2.5.8/bin/start-hbase.sh
端口说明
| 端口 | 进程 | 用途 |
|---|---|---|
| 9000 | HDFS NameNode | HDFS 文件系统(仅监听 127.0.0.1) |
| 2181 | ZooKeeper (HQuorumPeer) | 集群协调,客户端入口 |
| 16000 | HMaster RPC | 元数据操作,客户端自动连接 |
| 16010 | HMaster Web UI | 浏览器监控页面 |
| 16020 | HRegionServer | 实际数据读写,客户端直连 |
idea操作
新建maven项目尝试操作虚拟机里的HBase
编辑pom添加依赖
hbase version改为和虚拟机里的一致(hbase version 命令查看,本环境为 2.5.8)
xml
 	<properties>
        <maven.compiler.release>11</maven.compiler.release>
        <project.build.sourceEncoding>UTF-8</project.build.sourceEncoding>
        <hbase.version>2.5.8</hbase.version>
        <junit.jupiter.version>5.10.2</junit.jupiter.version>
    </properties>

    <dependencies>
        <dependency>
            <groupId>org.apache.hbase</groupId>
            <artifactId>hbase-shaded-client</artifactId>
            <version>${hbase.version}</version>
        </dependency>

        <dependency>
            <groupId>commons-io</groupId>
            <artifactId>commons-io</artifactId>
            <version>2.16.1</version>
        </dependency>

        <dependency>
            <groupId>org.slf4j</groupId>
            <artifactId>slf4j-simple</artifactId>
            <version>1.7.36</version>
        </dependency>

        <dependency>
            <groupId>org.junit.jupiter</groupId>
            <artifactId>junit-jupiter-api</artifactId>
            <version>${junit.jupiter.version}</version>
            <scope>test</scope>
        </dependency>

        <dependency>
            <groupId>org.junit.jupiter</groupId>
            <artifactId>junit-jupiter-engine</artifactId>
            <version>${junit.jupiter.version}</version>
            <scope>test</scope>
        </dependency>
    </dependencies>
在 resource 目录下拷贝三个配置文件。
core-site.xml(与虚拟机中的不同)
xml
<?xml version="1.0" encoding="UTF-8"?>
<?xml-stylesheet type="text/xsl" href="configuration.xsl"?>
<configuration>
    <!-- 把 192.168.73.195 改成你的虚拟机 IP -->
    <property>
        <name>hadoop.tmp.dir</name>
        <value>/usr/hadoop/tmp</value>
    </property>
    <property>
        <name>fs.defaultFS</name>
        <value>hdfs://192.168.73.195:9000</value>
    </property>
</configuration>hbase-site.xml(与虚拟机中的不同)
xml
<?xml version="1.0" encoding="UTF-8"?>
<?xml-stylesheet type="text/xsl" href="configuration.xsl"?>
<configuration>
    <!-- 改成你的虚拟机 IP -->
    <property>
        <name>hbase.cluster.distributed</name>
        <value>true</value>
    </property>
    <property>
        <name>hbase.tmp.dir</name>
        <value>/tmp/hbase</value>
    </property>
    <property>
        <name>hbase.unsafe.stream.capability.enforce</name>
        <value>false</value>
    </property>
    <property>
        <name>hbase.zookeeper.quorum</name>
        <value>192.168.73.195</value>
    </property>
    <property>
        <name>hbase.zookeeper.property.clientPort</name>
        <value>2181</value>
    </property>
</configuration>hdfs-site.xml(如果客户端需要读写 HDFS,加上这个)
xml
<?xml version="1.0" encoding="UTF-8"?>
<?xml-stylesheet type="text/xsl" href="configuration.xsl"?>
<configuration>
    <property>
        <name>dfs.replication</name>
        <value>1</value>
    </property>
</configuration>
编写 Java 代码进行测试
建议结构
完整检查:
-
能不能连上 HBase
-
能不能拿到 Admin
-
能不能列出表
-
能不能建表
-
能不能插入数据
-
能不能查询单条
-
能不能全表扫描
-
能不能删一列
-
能不能删一行
-
能不能删表
src
└─ main
├─ java
│ └─ com.huohuo.hbase
│ ├─ HBaseApp.java
│ ├─ HBaseClientFactory.java
│ ├─ HBaseService.java
│ └─ Printer.java
└─ resources
├─ core-site.xml
├─ hbase-site.xml
└─ hdfs-site.xml
HBaseClientFactory.java
java
package com.huohuo.hbase;

import org.apache.hadoop.conf.Configuration;
import org.apache.hadoop.hbase.HBaseConfiguration;
import org.apache.hadoop.hbase.client.Connection;
import org.apache.hadoop.hbase.client.ConnectionFactory;

import java.io.IOException;

public final class HBaseClientFactory {

    private HBaseClientFactory() {
    }

    public static Configuration createConfiguration() {
        Configuration configuration = HBaseConfiguration.create();

        // 保险起见,再显式写一遍,避免 resources 没加载到时出问题
        configuration.set("hbase.zookeeper.quorum", "192.168.73.195");
        configuration.set("hbase.zookeeper.property.clientPort", "2181");
        configuration.set("hbase.cluster.distributed", "true");
        configuration.set("hbase.unsafe.stream.capability.enforce", "false");

        return configuration;
    }

    public static Connection createConnection() throws IOException {
        return ConnectionFactory.createConnection(createConfiguration());
    }
}
Printer.java
java
package com.huohuo.hbase;

public final class Printer {

    private Printer() {
    }

    public static void line() {
        System.out.println("==================================================");
    }

    public static void title(String title) {
        line();
        System.out.println(title);
        line();
    }

    public static void ok(String message) {
        System.out.println("[OK] " + message);
    }

    public static void info(String message) {
        System.out.println("[INFO] " + message);
    }

    public static void warn(String message) {
        System.out.println("[WARN] " + message);
    }

    public static void error(String message, Exception e) {
        System.err.println("[ERROR] " + message);
        if (e != null) {
            e.printStackTrace();
        }
    }
}
HBaseService.java
java
package com.huohuo.hbase;

import org.apache.hadoop.hbase.Cell;
import org.apache.hadoop.hbase.CellUtil;
import org.apache.hadoop.hbase.NamespaceDescriptor;
import org.apache.hadoop.hbase.TableName;
import org.apache.hadoop.hbase.client.*;
import org.apache.hadoop.hbase.util.Bytes;

import java.io.IOException;

public class HBaseService implements AutoCloseable {

    private final Connection connection;
    private final Admin admin;

    public HBaseService() throws IOException {
        this.connection = HBaseClientFactory.createConnection();
        this.admin = connection.getAdmin();
    }

    public void checkConnection() throws IOException {
        Printer.title("1. 检查连接");
        Printer.ok("Connection 已创建: " + !connection.isClosed());
        Printer.ok("Admin 已获取: " + (admin != null));
    }

    public void listNamespaces() throws IOException {
        Printer.title("2. 列出命名空间");
        NamespaceDescriptor[] namespaces = admin.listNamespaceDescriptors();
        for (NamespaceDescriptor ns : namespaces) {
            Printer.info("namespace = " + ns.getName());
        }
    }

    public void listTables() throws IOException {
        Printer.title("3. 列出所有表");
        TableName[] tableNames = admin.listTableNames();
        if (tableNames.length == 0) {
            Printer.warn("当前没有表");
            return;
        }
        for (TableName tableName : tableNames) {
            Printer.info("table = " + tableName.getNameAsString());
        }
    }

    public void createTable(String tableName, String... columnFamilies) throws IOException {
        Printer.title("4. 创建表: " + tableName);

        TableName tn = TableName.valueOf(tableName);
        if (admin.tableExists(tn)) {
            Printer.warn("表已存在,不重复创建: " + tableName);
            return;
        }

        TableDescriptorBuilder builder = TableDescriptorBuilder.newBuilder(tn);
        for (String cf : columnFamilies) {
            ColumnFamilyDescriptor family = ColumnFamilyDescriptorBuilder
                    .newBuilder(Bytes.toBytes(cf))
                    .build();
            builder.setColumnFamily(family);
        }

        admin.createTable(builder.build());
        Printer.ok("创建表成功: " + tableName);
    }

    public void describeTable(String tableName) throws IOException {
        Printer.title("5. 查看表结构: " + tableName);

        TableName tn = TableName.valueOf(tableName);
        if (!admin.tableExists(tn)) {
            Printer.warn("表不存在: " + tableName);
            return;
        }

        TableDescriptor descriptor = admin.getDescriptor(tn);
        Printer.info("表名: " + descriptor.getTableName().getNameAsString());
        descriptor.getColumnFamilies()
                .forEach(cf -> Printer.info("列族: " + cf.getNameAsString()));
    }

    public void putRow(String tableName, String rowKey, String family, String qualifier, String value) throws IOException {
        Printer.title("6. 插入数据");

        try (Table table = connection.getTable(TableName.valueOf(tableName))) {
            Put put = new Put(Bytes.toBytes(rowKey));
            put.addColumn(Bytes.toBytes(family), Bytes.toBytes(qualifier), Bytes.toBytes(value));
            table.put(put);
        }

        Printer.ok(String.format("插入成功: table=%s rowKey=%s %s:%s=%s",
                tableName, rowKey, family, qualifier, value));
    }

    public void putRowMultiColumns(String tableName, String rowKey) throws IOException {
        Printer.title("7. 插入多列数据");

        try (Table table = connection.getTable(TableName.valueOf(tableName))) {
            Put put = new Put(Bytes.toBytes(rowKey));
            put.addColumn(Bytes.toBytes("c1"), Bytes.toBytes("name"), Bytes.toBytes("huohuo"));
            put.addColumn(Bytes.toBytes("c1"), Bytes.toBytes("age"), Bytes.toBytes("20"));
            put.addColumn(Bytes.toBytes("c1"), Bytes.toBytes("city"), Bytes.toBytes("Shanghai"));
            table.put(put);
        }

        Printer.ok("多列插入成功: rowKey=" + rowKey);
    }

    public void getRow(String tableName, String rowKey) throws IOException {
        Printer.title("8. 查询单行: " + rowKey);

        try (Table table = connection.getTable(TableName.valueOf(tableName))) {
            Get get = new Get(Bytes.toBytes(rowKey));
            Result result = table.get(get);

            if (result.isEmpty()) {
                Printer.warn("未查询到数据");
                return;
            }

            printResult(result);
        }
    }

    public void scanTable(String tableName) throws IOException {
        Printer.title("9. 扫描整表: " + tableName);

        try (Table table = connection.getTable(TableName.valueOf(tableName));
             ResultScanner scanner = table.getScanner(new Scan())) {

            int count = 0;
            for (Result result : scanner) {
                printResult(result);
                count++;
            }

            Printer.info("扫描完成,总行数: " + count);
        }
    }

    public void deleteColumn(String tableName, String rowKey, String family, String qualifier) throws IOException {
        Printer.title("10. 删除单元格");

        try (Table table = connection.getTable(TableName.valueOf(tableName))) {
            Delete delete = new Delete(Bytes.toBytes(rowKey));
            delete.addColumns(Bytes.toBytes(family), Bytes.toBytes(qualifier));
            table.delete(delete);
        }

        Printer.ok(String.format("删除成功: rowKey=%s %s:%s", rowKey, family, qualifier));
    }

    public void deleteRow(String tableName, String rowKey) throws IOException {
        Printer.title("11. 删除整行");

        try (Table table = connection.getTable(TableName.valueOf(tableName))) {
            Delete delete = new Delete(Bytes.toBytes(rowKey));
            table.delete(delete);
        }

        Printer.ok("删除行成功: rowKey=" + rowKey);
    }

    public void disableAndDropTable(String tableName) throws IOException {
        Printer.title("12. 删除表: " + tableName);

        TableName tn = TableName.valueOf(tableName);
        if (!admin.tableExists(tn)) {
            Printer.warn("表不存在,无需删除: " + tableName);
            return;
        }

        if (admin.isTableEnabled(tn)) {
            admin.disableTable(tn);
            Printer.info("表已禁用: " + tableName);
        }

        admin.deleteTable(tn);
        Printer.ok("表已删除: " + tableName);
    }

    private void printResult(Result result) {
        String rowKey = Bytes.toString(result.getRow());
        Printer.info("rowKey = " + rowKey);

        for (Cell cell : result.rawCells()) {
            String family = Bytes.toString(CellUtil.cloneFamily(cell));
            String qualifier = Bytes.toString(CellUtil.cloneQualifier(cell));
            String value = Bytes.toString(CellUtil.cloneValue(cell));
            long timestamp = cell.getTimestamp();

            System.out.printf("    %s:%s = %s (ts=%d)%n",
                    family, qualifier, value, timestamp);
        }
    }

    @Override
    public void close() throws IOException {
        if (admin != null) {
            admin.close();
        }
        if (connection != null && !connection.isClosed()) {
            connection.close();
        }
    }
}
HBaseApp.java
这个是主程序,直接右键运行 main 就行。
java
package com.huohuo.hbase;
public class HBaseApp {
private static final String TABLE_NAME = "JAVA_CHECK_TABLE";
public static void main(String[] args) {
try (HBaseService service = new HBaseService()) {
service.checkConnection();
service.listNamespaces();
service.listTables();
service.createTable(TABLE_NAME, "c1");
service.describeTable(TABLE_NAME);
service.putRow(TABLE_NAME, "row1", "c1", "name", "huohuo");
service.putRow(TABLE_NAME, "row1", "c1", "course", "hbase");
service.putRowMultiColumns(TABLE_NAME, "row2");
service.getRow(TABLE_NAME, "row1");
service.getRow(TABLE_NAME, "row2");
service.scanTable(TABLE_NAME);
service.deleteColumn(TABLE_NAME, "row2", "c1", "age");
service.getRow(TABLE_NAME, "row2");
service.deleteRow(TABLE_NAME, "row1");
service.scanTable(TABLE_NAME);
// 不想删表就先注释掉这一行
service.disableAndDropTable(TABLE_NAME);
Printer.title("全部检查完成");
Printer.ok("如果上面都成功,说明你的 IDEA -> 虚拟机 HBase 整体链路没问题。");
} catch (Exception e) {
Printer.error("程序运行失败", e);
}
}
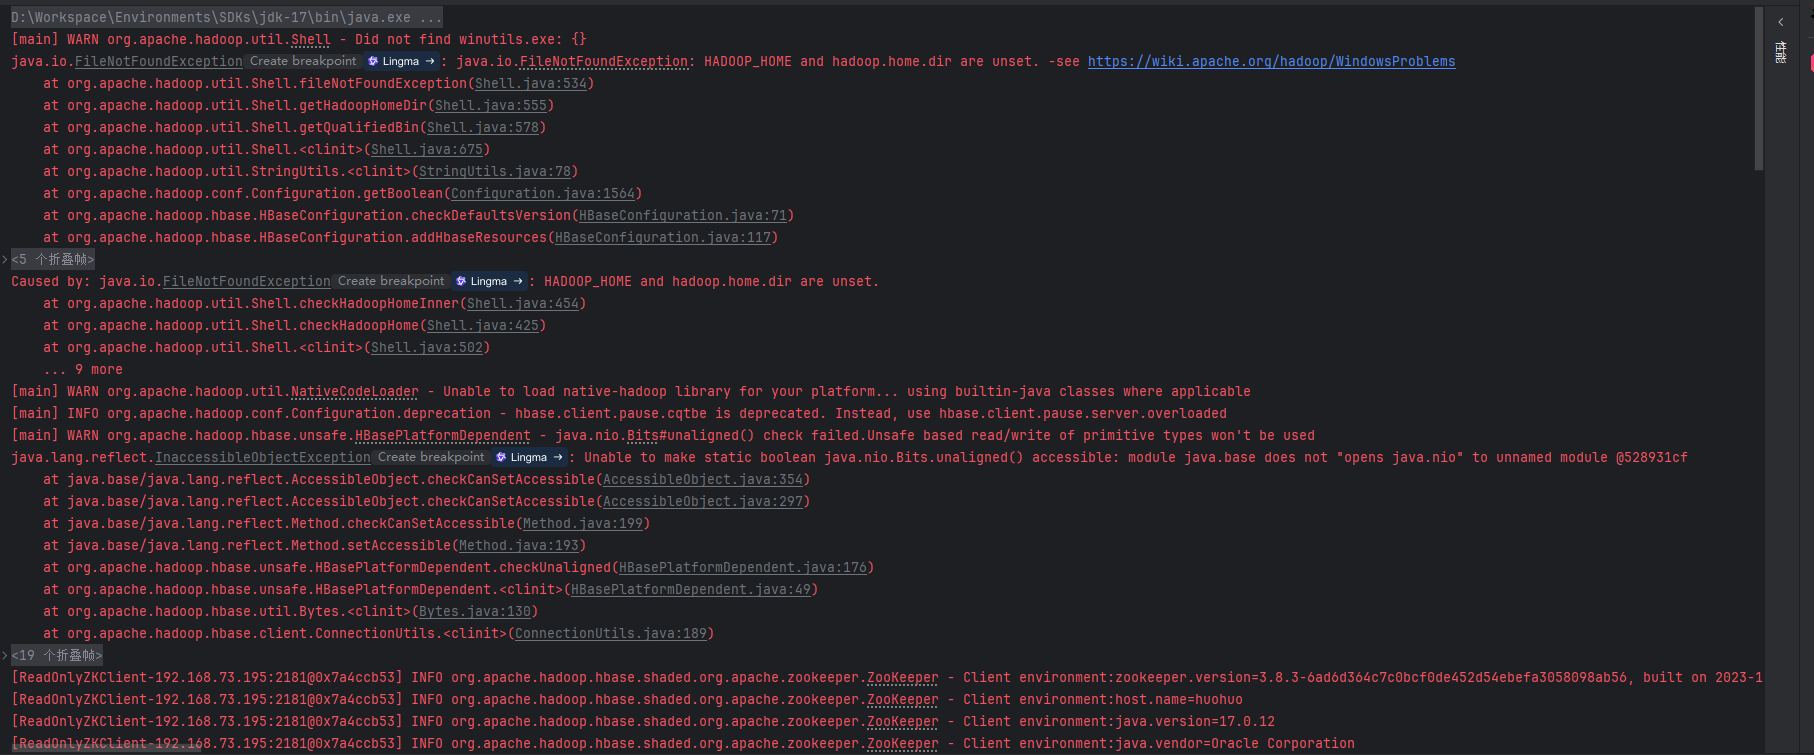
} 其中,出现这些警告可以忽略,是环境告警
end