文章目录
-
-
-
- [1. 环境介绍](#1. 环境介绍)
- [2. 新建虚拟电脑](#2. 新建虚拟电脑)
- [3. 安装前的准备](#3. 安装前的准备)
- [4. OpenClaw 安装](#4. OpenClaw 安装)
- [5. OpenClaw 初体验](#5. OpenClaw 初体验)
- [6. OpenClaw 常用命令](#6. OpenClaw 常用命令)
-
-
1. 环境介绍
本文使用的操作系统及软件介绍:
| 名称 | 描述 | 文章 |
|---|---|---|
| Windows 10 专业版 | 在 Windows 系统上使用虚拟机软件 | |
| Oracle VirtualBox | 虚拟机软件(Windows 版本) | VirtualBox 介绍及安装 |
| ubuntu-24.04.4-desktop-amd64.iso | Ubuntu24.04 LTS 桌面版镜像文件 | 官方下载地址 ,我下载好的镜像 |
| Oh My Zsh | Zsh 终端配置管理工具 | Oh My Zsh 介绍及安装 |
| zsh-autosuggestions | 根据历史命令自动提示并补全命令 | Oh My Zsh 第三方插件 |
| zsh-syntax-highlighting | 检测命令是否存在,命令高亮显示 | Oh My Zsh 第三方插件 |
| nvm | node 版本管理工具 | nvm 安装和使用教程 |
2. 新建虚拟电脑
使用镜像文件(ubuntu-24.04.4-desktop-amd64.iso)创建虚拟电脑,虚拟硬件资源分配参考:
| 硬件项 | 推荐配置 | 核心理由 |
|---|---|---|
| 基础内存 (RAM) | 16384 MB(16GB) | 满足 AI 工具对内存的高需求,同时保证宿主机流畅 |
| 处理器 (CPU) | 4 核心 | 平衡性能与调度开销,足够处理并发任务 |
| 磁盘空间 | 100 GB | 预留充足空间给 Docker 镜像、模型缓存和系统更新 |
Ubuntu 24.04 Desktop 版安装完成后,将网络修改为桥接网卡,然后运行以下命令查看局域网 IP:
bash
# 查看 IP 地址
hostname -I
# 安装 openssh-server
sudo apt update
sudo apt install openssh-server -y
# 启动 ssh 服务
sudo systemctl start ssh
安装 Oh My Zsh 和 OpenClaw 都需要有 git,安装 OpenClaw 和 nvm 时需要使用 curl。
bash
# Ubuntu Desktop 没有预装 git curl,需要手动安装
sudo apt install git curl -y
终端 Shell 类型默认为 bash,安装并切换为 zsh 终端,然后安装以下工具(非必需,只是为了让虚拟机更好用):
- oh my zsh (需要先安装 git,因为它的安装脚本会使用 git 拉取代码)
- zsh-autosuggestions(历史命令提示,快速执行之前运行过的命令)
- zsh-syntax-highlighting(语法高亮,方便检查命令是否存在)
bash
# 安装 zsh
sudo apt install zsh -y
# 将终端 shell 类型切换为 zsh
chsh -s $(which zsh)
# 以下软件工具安装步骤略过,本文的软件介绍中有详细安装教程
# oh my zsh、zsh-autosuggestions、zsh-syntax-highlighting
3. 安装前的准备
获取模型提供商的密钥(API Key):
- DeepSeek 开放平台:https://platform.deepseek.com
OpenClaw 环境要求(在官方文档的入门指南中可以看到):
- Git:(OpenClaw 的安装脚本需要 Git)
- Node.js:推荐 Node 24(也支持 22.14+)
运行 OpenClaw 的安装脚本时,会检测是否已安装 git 和 node,如果没有安装会自动安装(国外仓库),为了加快 OpenClaw 的安装速度,所以在安装 OpenClaw 之前我们就先安装好 git 和 node,尽可能的减少安装时间。
推荐使用 nvm 安装 node,先安装 nvm,然后安装 Node 24:
bash
# nvm 安装命令(在软件介绍中有安装教程文章链接)
# ...
# nvm 安装后,重载 .zshrc 立即使用
source ~/.zshrc
# 安装 Node 24 最新的 lts 版本
nvm install 24 --lts
配置国内镜像,加速安装(如果不配置镜像,OpenClaw 安装很慢,并且大概率安装失败)
bash
npm config set registry https://registry.npmmirror.com4. OpenClaw 安装
OpenClaw 官方网站(安装指南、使用文档):
- OpenClaw 官网:https://openclaw.ai
- OpenClaw 入门指南:https://docs.openclaw.ai/zh-CN/start/getting-started
运行以下命令安装(适用于 macOS / Linux):
bash
curl -fsSL https://openclaw.ai/install.sh | bash安装脚本运行后,你会看到以下内容(来到 Installing OpenClaw v2026.4.9 会卡住,正在下载 OpenClaw):
plaintext
  🦞 OpenClaw Installer
  Your messages, your servers, Meta's tears.

✓ Detected: linux

Install plan
OS: linux
Install method: npm
Requested version: latest

[1/3] Preparing environment
✓ Node.js v24.14.1 found
· Active Node.js: v24.14.1 (/home/vboxuser/.nvm/versions/node/v24.14.1/bin/node)
· Active npm: 11.11.0 (/home/vboxuser/.nvm/versions/node/v24.14.1/bin/npm)

[2/3] Installing OpenClaw
✓ Git already installed
· Installing OpenClaw v2026.4.9
我们只需要等待 OpenClaw 下载完成,等待时间可能会比较久 10~30 分钟都有可能,下载完成后可以看到:
plaintext
[2/3] Installing OpenClaw
✓ Git already installed
· Installing OpenClaw v2026.4.9
✓ OpenClaw npm package installed
✓ OpenClaw installed

[3/3] Finalizing setup

🦞 OpenClaw installed successfully (OpenClaw 2026.4.9 (0512059))!
Cozy. I've already read your calendar. We need to talk.

· Starting setup


🦞 OpenClaw 2026.4.9 (0512059) --- I'm the middleware between your ambition and your attention span.

▄▄▄▄▄▄▄▄▄▄▄▄▄▄▄▄▄▄▄▄▄▄▄▄▄▄▄▄▄▄▄▄▄▄▄▄▄▄▄▄▄▄▄▄▄▄▄▄▄▄▄▄
██░▄▄▄░██░▄▄░██░▄▄▄██░▀██░██░▄▄▀██░████░▄▄▀██░███░██
██░███░██░▀▀░██░▄▄▄██░█░█░██░█████░████░▀▀░██░█░█░██
██░▀▀▀░██░█████░▀▀▀██░██▄░██░▀▀▄██░▀▀░█░██░██▄▀▄▀▄██
▀▀▀▀▀▀▀▀▀▀▀▀▀▀▀▀▀▀▀▀▀▀▀▀▀▀▀▀▀▀▀▀▀▀▀▀▀▀▀▀▀▀▀▀▀▀▀▀▀▀▀▀
                  🦞 OPENCLAW 🦞

┌  OpenClaw setup
│
◇  Security ─────────────────────────────────────────────────────────────────────────────────╮
│                                                                                            │
│  Security warning --- please read.                                                           │
│                                                                                            │
│  OpenClaw is a hobby project and still in beta. Expect sharp edges.                        │
│  By default, OpenClaw is a personal agent: one trusted operator boundary.                  │
│  This bot can read files and run actions if tools are enabled.                             │
│  A bad prompt can trick it into doing unsafe things.                                       │
│                                                                                            │
│  OpenClaw is not a hostile multi-tenant boundary by default.                               │
│  If multiple users can message one tool-enabled agent, they share that delegated tool      │
│  authority.                                                                                │
│                                                                                            │
│  If you're not comfortable with security hardening and access control, don't run           │
│  OpenClaw.                                                                                 │
│  Ask someone experienced to help before enabling tools or exposing it to the internet.     │
│                                                                                            │
│  Recommended baseline:                                                                     │
│  - Pairing/allowlists + mention gating.                                                    │
│  - Multi-user/shared inbox: split trust boundaries (separate gateway/credentials, ideally  │
│    separate OS users/hosts).                                                               │
│  - Sandbox + least-privilege tools.                                                        │
│  - Shared inboxes: isolate DM sessions (`session.dmScope: per-channel-peer`) and keep      │
│    tool access minimal.                                                                    │
│  - Keep secrets out of the agent's reachable filesystem.                                   │
│  - Use the strongest available model for any bot with tools or untrusted inboxes.          │
│                                                                                            │
│  Run regularly:                                                                            │
│  openclaw security audit --deep                                                            │
│  openclaw security audit --fix                                                             │
│                                                                                            │
│  Must read: https://docs.openclaw.ai/gateway/security                                      │
│                                                                                            │
├────────────────────────────────────────────────────────────────────────────────────────────╯
│
◆  I understand this is personal-by-default and shared/multi-user use requires lock-down. Continue?
│  ○ Yes / ● No
只关注的是最后一句话,这是安全风险提示确认环节,需要切换为 Yes 才能继续安装:
- 切换选项:使用左右方向键,将光标(高亮圆点)移动到 Yes 上
- 确认进入:切换到 Yes 后,按回车键(Enter)确认,即可进入下一步配置
plaintext
I understand this is personal-by-default and shared/multi-user use requires lock-down.
 ● Yes / ○ No
这是 OpenClaw 的安装模式选择界面,默认选中 QuickStart(这是官方推荐给新手的模式)
- QuickStart:快速启动,系统会自动使用推荐的默认配置(新手推荐)
- Manual:手动配置,逐项确认每一个设置细节,包括网管端口、绑定地址等
plaintext
◇  I understand this is personal-by-default and shared/multi-user use requires lock-down.
│  Yes
│
◆  Setup mode
│  ● QuickStart (Configure details later via openclaw configure.)
│  ○ Manual
选择 AI 模型提供商(根据手头拥有的 API Key 或你的需求选择):
简单来说,OpenClaw 只是一个空壳或框架,它需要连接大模型才能拥有智能(设定使用哪家的大脑来驱动它)
plaintext
◇  Setup mode
│  QuickStart
│
◇  QuickStart ─────────────────────────╮
│                                      │
│  Gateway port: 18789                 │
│  Gateway bind: Loopback (127.0.0.1)  │
│  Gateway auth: Token (default)       │
│  Tailscale exposure: Off             │
│  Direct to chat channels.            │
│                                      │
├──────────────────────────────────────╯
│
◆  Model/auth provider
│  ● Anthropic (Claude CLI + API key)
│  ○ Arcee AI
│  ○ BytePlus
│  ○ Chutes
│  ○ Cloudflare AI Gateway
│  ○ Copilot Proxy
│  ○ Custom Provider
│  ○ DeepSeek
│  ○ Fireworks
│  ○ Gemini CLI OAuth
│  ○ GitHub Copilot
│  ○ Google
│  ○ Hugging Face
│  ○ Kilo Gateway
│  ○ LiteLLM
│  ○ Microsoft Foundry
│  ○ MiniMax
│  ○ Mistral AI
│  ○ Moonshot AI (Kimi K2.5)
│  ○ Ollama
│  ○ OpenAI
│  ○ OpenAI Codex
│  ○ OpenCode
│  ○ OpenRouter
│  ○ Qianfan
│  ○ Qwen Cloud
│  ○ SGLang
│  ○ StepFun
│  ○ Synthetic
│  ○ Together AI
│  ○ Venice AI
│  ○ Vercel AI Gateway
│  ○ vLLM
│  ○ Volcano Engine
│  ○ xAI (Grok)
│  ○ Xiaomi
│  ...
└
我选择 DeepSeek,然后输入 DeepSeek 的 API key(为了避免泄露,API key 后几位我就使用 x 替代了)
plaintext
◇  Model/auth provider
│  DeepSeek
│
◇  Enter DeepSeek API key
│  sk-511d10a894b64b24a960c8895xxxxxxx
选择默认 AI 模型:检查到刚才选择了 DeepSeek,现在让你选择具体使用哪一个版本的模型(我们使用默认的)
- Keep current:DeepSeek Chat (V3) 日常全能型。反应快,适合写代码、问问题、写文案
- deepseek-reasoner:DeepSeek R1 (推理版) 深度思考型。
- Enter model manually:手动输入。如果你知道其他特定的模型 ID,可以在这里手动填入
plaintext
◇  Model configured ────────────────────────────╮
│                                               │
│  Default model set to deepseek/deepseek-chat  │
│                                               │
├───────────────────────────────────────────────╯
│
◆  Default model
│  ● Keep current (deepseek/deepseek-chat)
│  ○ Enter model manually
│  ○ deepseek/deepseek-chat
│  ○ deepseek/deepseek-reasoner
└
选择聊天渠道(Channel),也就是在问你:你想在哪里和我聊天?(推荐操作:Skip for now 暂时跳过)
- 使用上下方向键,切换到 Skip for now,回车执行,进入下一步
plaintext
◇  Default model
│  Keep current (deepseek/deepseek-chat)
│
◇  Channel status ──────────────────────────────────────╮
│                                                       │
│  LINE: needs token + secret                           │
│  Accounts: 0                                          │
│  Discord: needs token                                 │
│  iMessage: needs setup                                │
│  imsg: missing (imsg)                                 │
│  Signal: needs setup                                  │
│  signal-cli: missing (signal-cli)                     │
│  Slack: needs tokens                                  │
│  Telegram: needs token                                │
│  WhatsApp: not linked                                 │
│  QQ Bot: needs AppID + AppSecret                      │
│  Google Chat: needs service account                   │
│  MS Teams: needs app credentials                      │
│  Mattermost: needs token + url                        │
│  Nextcloud Talk: needs setup                          │
│  Feishu: needs app credentials                        │
│  Matrix: needs homeserver + access token or password  │
│  BlueBubbles: needs setup                             │
│  IRC: needs host + nick                               │
│  Zalo: needs token                                    │
│  Zalo Personal: needs QR login                        │
│  Synology Chat: needs token + incoming webhook        │
│  Accounts: 0                                          │
│  Tlon: needs setup                                    │
│  Nostr: needs private key                             │
│  Relays: 2                                            │
│  Twitch: not configured                               │
│  Twitch: installed                                    │
│                                                       │
├───────────────────────────────────────────────────────╯
│
◇  How channels work ───────────────────────────────────────────────────────────────────────╮
│                                                                                           │
│  DM security: default is pairing; unknown DMs get a pairing code.                         │
│  Approve with: openclaw pairing approve <channel> <code>                                  │
│  Public DMs require dmPolicy="open" + allowFrom=["*"].                                    │
│  Multi-user DMs: run: openclaw config set session.dmScope "per-channel-peer" (or          │
│  "per-account-channel-peer" for multi-account channels) to isolate sessions.              │
│  Docs: channels/pairing              │
│                                                                                           │
│  Feishu: 飞书/Lark enterprise messaging with doc/wiki/drive tools.                        │
│  Google Chat: Google Workspace Chat app with HTTP webhook.                                │
│  Nostr: Decentralized protocol; encrypted DMs via NIP-04.                                 │
│  Microsoft Teams: Teams SDK; enterprise support.                                          │
│  Mattermost: self-hosted Slack-style chat; install the plugin to enable.                  │
│  Nextcloud Talk: Self-hosted chat via Nextcloud Talk webhook bots.                        │
│  Matrix: open protocol; install the plugin to enable.                                     │
│  BlueBubbles: iMessage via the BlueBubbles mac app + REST API.                            │
│  LINE: LINE Messaging API webhook bot.                                                    │
│  Zalo: Vietnam-focused messaging platform with Bot API.                                   │
│  Zalo Personal: Zalo personal account via QR code login.                                  │
│  Synology Chat: Connect your Synology NAS Chat to OpenClaw with full agent capabilities.  │
│  Tlon: decentralized messaging on Urbit; install the plugin to enable.                    │
│  Discord: very well supported right now.                                                  │
│  iMessage: this is still a work in progress.                                              │
│  IRC: classic IRC networks with DM/channel routing and pairing controls.                  │
│  QQ Bot: connect to QQ via official QQ Bot API with group chat and direct message         │
│  support.                                                                                 │
│  Signal: signal-cli linked device; more setup (David Reagans: "Hop on Discord.").         │
│  Slack: supported (Socket Mode).                                                          │
│  Telegram: simplest way to get started --- register a bot with @BotFather and get going.    │
│  Twitch: Twitch chat integration                                                          │
│  WhatsApp: works with your own number; recommend a separate phone + eSIM.                 │
│                                                                                           │
├───────────────────────────────────────────────────────────────────────────────────────────╯
│
◆  Select channel (QuickStart)
│  ○ Feishu/Lark (飞书)
│  ○ Google Chat (Chat API)
│  ○ Nostr
│  ○ Microsoft Teams (Bot Framework)
│  ○ Mattermost (plugin)
│  ○ Nextcloud Talk (self-hosted)
│  ○ Matrix (plugin)
│  ○ BlueBubbles (macOS app)
│  ○ LINE (Messaging API)
│  ○ Zalo (Bot API)
│  ● Zalo (Personal Account) (recommended · QR login)
│  ○ Synology Chat (Webhook)
│  ○ Tlon (Urbit)
│  ○ Discord (Bot API)
│  ○ iMessage (imsg)
│  ○ IRC (Server + Nick)
│  ○ QQ Bot
│  ○ Signal (signal-cli)
│  ○ Slack
│  ○ Telegram (Bot API)
│  ○ Twitch (Chat)
│  ○ WhatsApp (QR link)
│  ○ Skip for now
└
配置联网搜索能力,这一步是在问你:想让 AI 通过哪个搜索引擎去上网查找资料 ?
- Skip for now 暂时跳过(此时,我们先选择这个)
- Tavily Search 最推荐(国内用户首选,免费额度足够个人日常使用,选它需要去 Tavily 官网注册账号拿个 API Key)
plaintext
◇  Select channel (QuickStart)
│  Skip for now
Updated ~/.openclaw/openclaw.json
Workspace OK: ~/.openclaw/workspace
Sessions OK: ~/.openclaw/agents/main/sessions
│
◇  Web search ─────────────────────────────────────────────────────────────────╮
│                                                                              │
│  Web search lets your agent look things up online.                           │
│  Choose a provider. Some providers need an API key, and some work key-free.  │
│  Docs: https://docs.openclaw.ai/tools/web                                    │
│                                                                              │
├──────────────────────────────────────────────────────────────────────────────╯
│
◆  Search provider
│  ○ Brave Search
│  ○ Exa Search
│  ○ Firecrawl Search
│  ○ Gemini (Google Search)
│  ○ Grok (xAI)
│  ○ Kimi (Moonshot)
│  ○ Ollama Web Search
│  ○ Perplexity Search
│  ○ SearXNG Search
│  ○ Tavily Search
│  ● Skip for now (Configure later with openclaw configure --section web)
Skills 配置确认环节,建议选择 Yes(默认选择),然后回车确认(Skills:可以理解为 AI 的插件或超能力)
plaintext
◇  Search provider
│  Skip for now
│
◇  Skills status ─────────────╮
│                             │
│  Eligible: 4                │
│  Missing requirements: 39   │
│  Unsupported on this OS: 7  │
│  Blocked by allowlist: 0    │
│                             │
├─────────────────────────────╯
│
◆  Configure skills now? (recommended)
│  ● Yes / ○ No
OpenClaw 技能依赖安装,列出的都是 OpenClaw 的 "扩展插件"(Skills),我们先安装两个:
- session-logs:保存你和 AI 的所有对话记录
- summarize:帮你总结长篇文章、网页、甚至视频的核心内容
plaintext
◇  Configure skills now? (recommended)
│  Yes
│
◆  Install missing skill dependencies
│  ◻ Skip for now
│  ◻ 🔐 1password
│  ◻ 📰 blogwatcher
│  ◻ 🫐 blucli
│  ◻ 📸 camsnap
│  ◻ 🧩 clawhub
│  ◻ 🛌 eightctl
│  ◻ ✨ gemini
│  ◻ 🧩 gh-issues
│  ◻ 🧲 gifgrep
│  ◻ 🐙 github
│  ◻ 🎮 gog
│  ◻ 📍 goplaces
│  ◻ 📧 himalaya
│  ◻ 📦 mcporter
│  ◻ 📄 nano-pdf
│  ◻ 💎 obsidian
│  ◻ 🎤 openai-whisper
│  ◻ 💡 openhue
│  ◻ 🧿 oracle
│  ◻ 🛵 ordercli
│  ◻ 🔊 sag
│  ◼ 📜 session-logs
│  ◻ 🌊 songsee
│  ◻ 🔊 sonoscli
│  ◼ 🧾 summarize
│  ◻ 🧵 tmux
│  ◻ 🎬 video-frames
│  ◻ 📱 wacli
│  ◻ 🐦 xurl
是否需要显示 Homebrew 安装命令,我们选择 Yes,回车进入下一步
plaintext
◇  Install missing skill dependencies
│  📜 session-logs, 🧾 summarize
│
◇  Homebrew recommended ──────────────────────────────────────────────────────────╮
│                                                                                 │
│  Many skill dependencies are shipped via Homebrew.                              │
│  Without brew, you'll need to build from source or download releases manually.  │
│                                                                                 │
├─────────────────────────────────────────────────────────────────────────────────╯
│
◆  Show Homebrew install command?
│  ● Yes / ○ No
└
这里提示 session-logs 和 summarize 安装失败,因为我们还没有安装 Homebrew
最后一句:Set GOOGLE_PLACES_API_KEY for goplaces ? 我们直接选择 No
- goplaces 是一个用来查询地理位置/地图信息的技能,除非明确需要让 AI 帮你查餐厅、查路线(需要配置 API Key)
plaintext
◇  Show Homebrew install command?
│  Yes
│
◇  Homebrew install ─────────────────────────────────────────────────────╮
│                                                                        │
│  Run:                                                                  │
│  /bin/bash -c "$(curl -fsSL                                            │
│  https://raw.githubusercontent.com/Homebrew/install/HEAD/install.sh)"  │
│                                                                        │
├────────────────────────────────────────────────────────────────────────╯
│
◇  Install failed: session-logs --- brew not installed --- Homebrew is not installed. Install it from https://brew.sh or install "jq" manually using your system package manager ...
Tip: run `openclaw doctor` to review skills + requirements.
Docs: https://docs.openclaw.ai/skills
│
◇  Install failed: summarize --- brew not installed --- Homebrew is not installed. Install it from https://brew.sh or install "steipete/tap/summarize" manually using your sys...
Tip: run `openclaw doctor` to review skills + requirements.
Docs: https://docs.openclaw.ai/skills
│
◆  Set GOOGLE_PLACES_API_KEY for goplaces?
│  ○ Yes / ● No
└
后面这几项都设置 No,回车进入下一步
- NOTION_API_KEY:是否配置 Notion 笔记软件 API 密钥
- OPENAI_API_KEY:是否要配置 OpenAI API 密钥 以使用 Whisper 语音转文字 功能的界面
- ELEVENLABS_API_KEY:是否要配置 ElevenLabs API 密钥 以使用 SAG (语音生成) 功能的界面
plaintext
◇  Set GOOGLE_PLACES_API_KEY for goplaces?
│  No
│
◇  Set NOTION_API_KEY for notion?
│  No
│
◇  Set OPENAI_API_KEY for openai-whisper-api?
│  No
│
◆  Set ELEVENLABS_API_KEY for sag?
│  ○ Yes / ● No
└
OpenClaw 的 Hooks(钩子) 配置,可以把 Hooks 理解为给 AI 安装的一层 "自动化后台脚本"
按空格键勾选以下 2 个核心选项:
- session-memory:会话记忆
- command-logger:命令日志
plaintext
◇  Hooks ──────────────────────────────────────────────────────────────────╮
│                                                                          │
│  Hooks let you automate actions when agent commands are issued.          │
│  Example: Save session context to memory when you issue /new or /reset.  │
│                                                                          │
│  Learn more: https://docs.openclaw.ai/automation/hooks                   │
│                                                                          │
├──────────────────────────────────────────────────────────────────────────╯
│
◆  Enable hooks?
│  ◻ Skip for now
│  ◻ 🚀 boot-md
│  ◻ 📎 bootstrap-extra-files
│  ◼ 📝 command-logger
│  ◼ 💾 session-memory
└
恭喜你,安装流程已经基本完成,现在到了最后一步:"孵化" 你的机器人
- Hatch in TUI (recommended):在当前的终端窗口里进入一个聊天界面(我们使用这个)
- Open the Web UI:在浏览器里打开一个图形化网页界面
- Do this later:跳过启动,以后想用的时候再手动输入命令启动
plaintext
◇  Enable hooks?
│  📝 command-logger, 💾 session-memory
│
◇  Hooks Configured ────────────────────────────────╮
│                                                   │
│  Enabled 2 hooks: command-logger, session-memory  │
│                                                   │
│  You can manage hooks later with:                 │
│    openclaw hooks list                            │
│    openclaw hooks enable <name>                   │
│    openclaw hooks disable <name>                  │
│                                                   │
├───────────────────────────────────────────────────╯
Config overwrite: /home/vboxuser/.openclaw/openclaw.json (sha256 34f58047d9ef485dbc0ca410f590035a07d209301a9658b75a5c1d3f40660d5f -> fddda689d18407fefa790e6eabf43136147dad011c40d86b51563e1df0ee264b, backup=/home/vboxuser/.openclaw/openclaw.json.bak)
│
◇  Systemd ────────────────────────────────────────────────────────────────────────────────╮
│                                                                                          │
│  Linux installs use a systemd user service by default. Without lingering, systemd stops  │
│  the user session on logout/idle and kills the Gateway.                                  │
│  Enabling lingering now (may require sudo; writes /var/lib/systemd/linger).              │
│                                                                                          │
├──────────────────────────────────────────────────────────────────────────────────────────╯
│
◇  Systemd ─────────────────────────────────╮
│                                           │
│  Enabled systemd lingering for vboxuser.  │
│                                           │
├───────────────────────────────────────────╯
│
◇  Gateway service runtime ────────────────────────────────────────────╮
│                                                                      │
│  QuickStart uses Node for the Gateway service (stable + supported).  │
│                                                                      │
├──────────────────────────────────────────────────────────────────────╯
│
◑  Installing Gateway service...
Installed systemd service: /home/vboxuser/.config/systemd/user/openclaw-gateway.service
◇  Gateway service installed.
│
◇
Agents: main (default)
Heartbeat interval: 30m (main)
Session store (main): /home/vboxuser/.openclaw/agents/main/sessions/sessions.json (0 entries)
│
◇  Optional apps ────────────────────────╮
│                                        │
│  Add nodes for extra features:         │
│  - macOS app (system + notifications)  │
│  - iOS app (camera/canvas)             │
│  - Android app (camera/canvas)         │
│                                        │
├────────────────────────────────────────╯
│
◇  Control UI ─────────────────────────────────────────────────────────────────────╮
│                                                                                  │
│  Web UI: http://127.0.0.1:18789/                                                 │
│  Web UI (with token):                                                            │
│  http://127.0.0.1:18789/#token=08e634479a2dae3674fdcb5007d6c732e305cc9ffc567121  │
│  Gateway WS: ws://127.0.0.1:18789                                                │
│  Gateway: reachable                                                              │
│  Docs: https://docs.openclaw.ai/web/control-ui                                   │
│                                                                                  │
├──────────────────────────────────────────────────────────────────────────────────╯
│
◇  Start TUI (best option!) ─────────────────────────────────╮
│                                                            │
│  This is the defining action that makes your agent you.    │
│  Please take your time.                                    │
│  The more you tell it, the better the experience will be.  │
│  We will send: "Wake up, my friend!"                       │
│                                                            │
├────────────────────────────────────────────────────────────╯
│
◇  Token ────────────────────────────────────────────────────────────────────────────────────╮
│                                                                                            │
│  Gateway token: shared auth for the Gateway + Control UI.                                  │
│  Stored in: $OPENCLAW_CONFIG_PATH (default: ~/.openclaw/openclaw.json) under               │
│  gateway.auth.token, or in OPENCLAW_GATEWAY_TOKEN.                                         │
│  View token: openclaw config get gateway.auth.token                                        │
│  Generate token: openclaw doctor --generate-gateway-token                                  │
│  Web UI keeps dashboard URL tokens in memory for the current tab and strips them from the  │
│  URL after load.                                                                           │
│  Open the dashboard anytime: openclaw dashboard --no-open                                  │
│  If prompted: paste the token into Control UI settings (or use the tokenized dashboard     │
│  URL).                                                                                     │
│                                                                                            │
├────────────────────────────────────────────────────────────────────────────────────────────╯
│
◆  How do you want to hatch your bot?
│  ● Hatch in TUI (recommended)
│  ○ Open the Web UI
│  ○ Do this later
└
恭喜你,进行到此处,OpenClaw 安装完成,打开新的终端窗口运行以下命令查看 OpenClaw 版本:
bash
# 简写形式:openclaw -v
openclaw --version
# 如果 openclaw 命令还是未找到,重载终端配置文件后重试
source ~/.zshrc
5. OpenClaw 初体验
现在我们已经将 OpenClaw 安装好了,接下来我们来体验一下
使用浏览器打开控制面板(必须在虚拟电脑内的终端执行,使用 SSH 连接虚拟电脑终端运行该命令无法打开控制面板)
bash
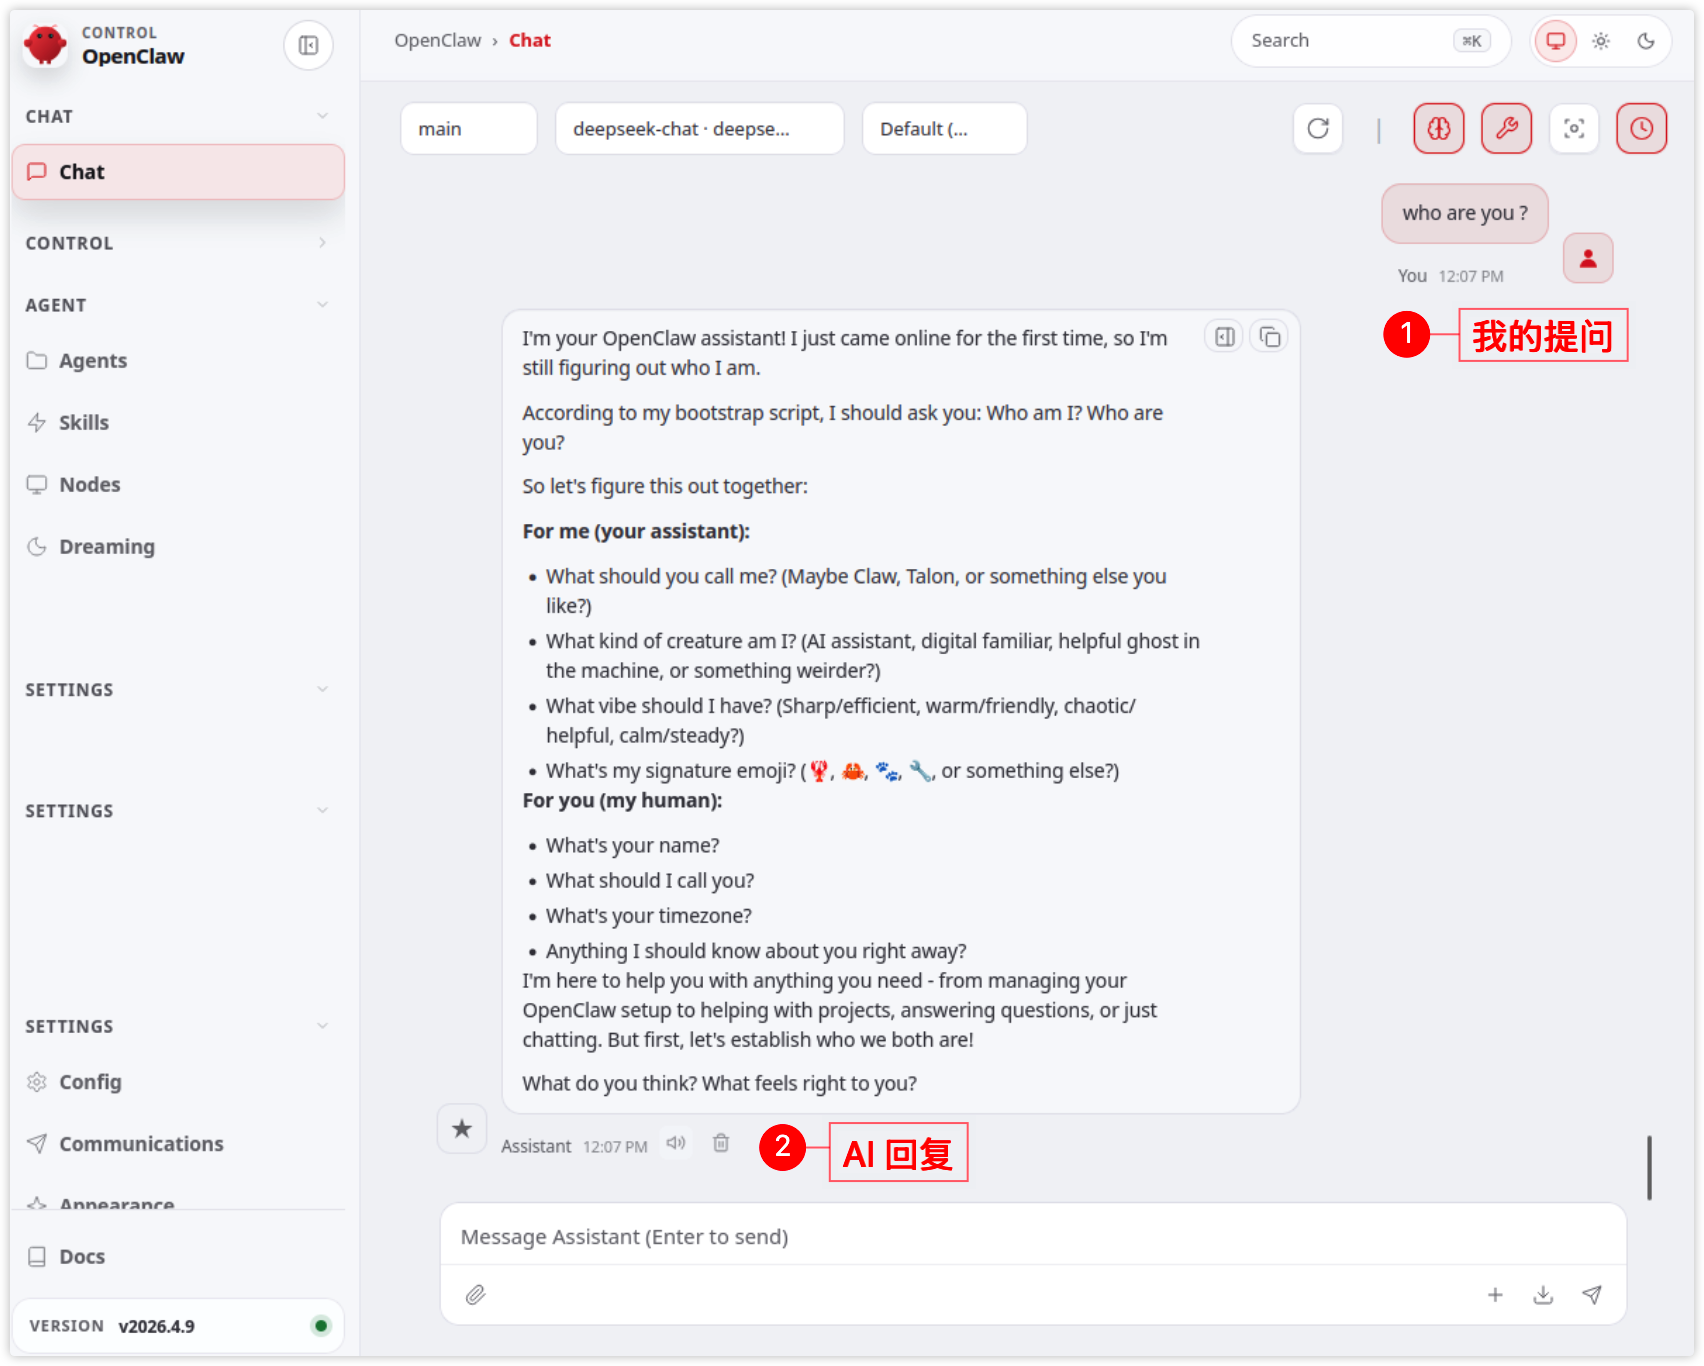
openclaw dashboard在控制面板的 Chat 中发起聊天,发现 AI 一直在转圈加载,无法正常使用,这是为什么 ?
运行以下命令实时查看日志输出,作用类似于 Linux 的 tail -f,常用于调试和监控运行中的服务或任务
bash
openclaw logs --follow你将会看到以下错误输出:
- 这说明 OpenClaw 客户端(CLI)想要连接网关,但是被网关的安全机制拦截了
- 简单来说,网关不认识你的命令行工具,觉得它是陌生设备,所以拒绝连接。这在 OpenClaw 中是很常见的 "新手墙"
- 解决方法:批准设备。相当于告诉网关:这个命令行工具是我自己在用的,放行
plaintext
error gateway connect failed: GatewayClientRequestError: pairing required打开一个新的终端窗口,输入以下命令,查看待批准的设备,看是谁在请求连接
bash
openclaw devices list你会看到类似这样的输出,重点看第一列的 Request ID(一串长字符):
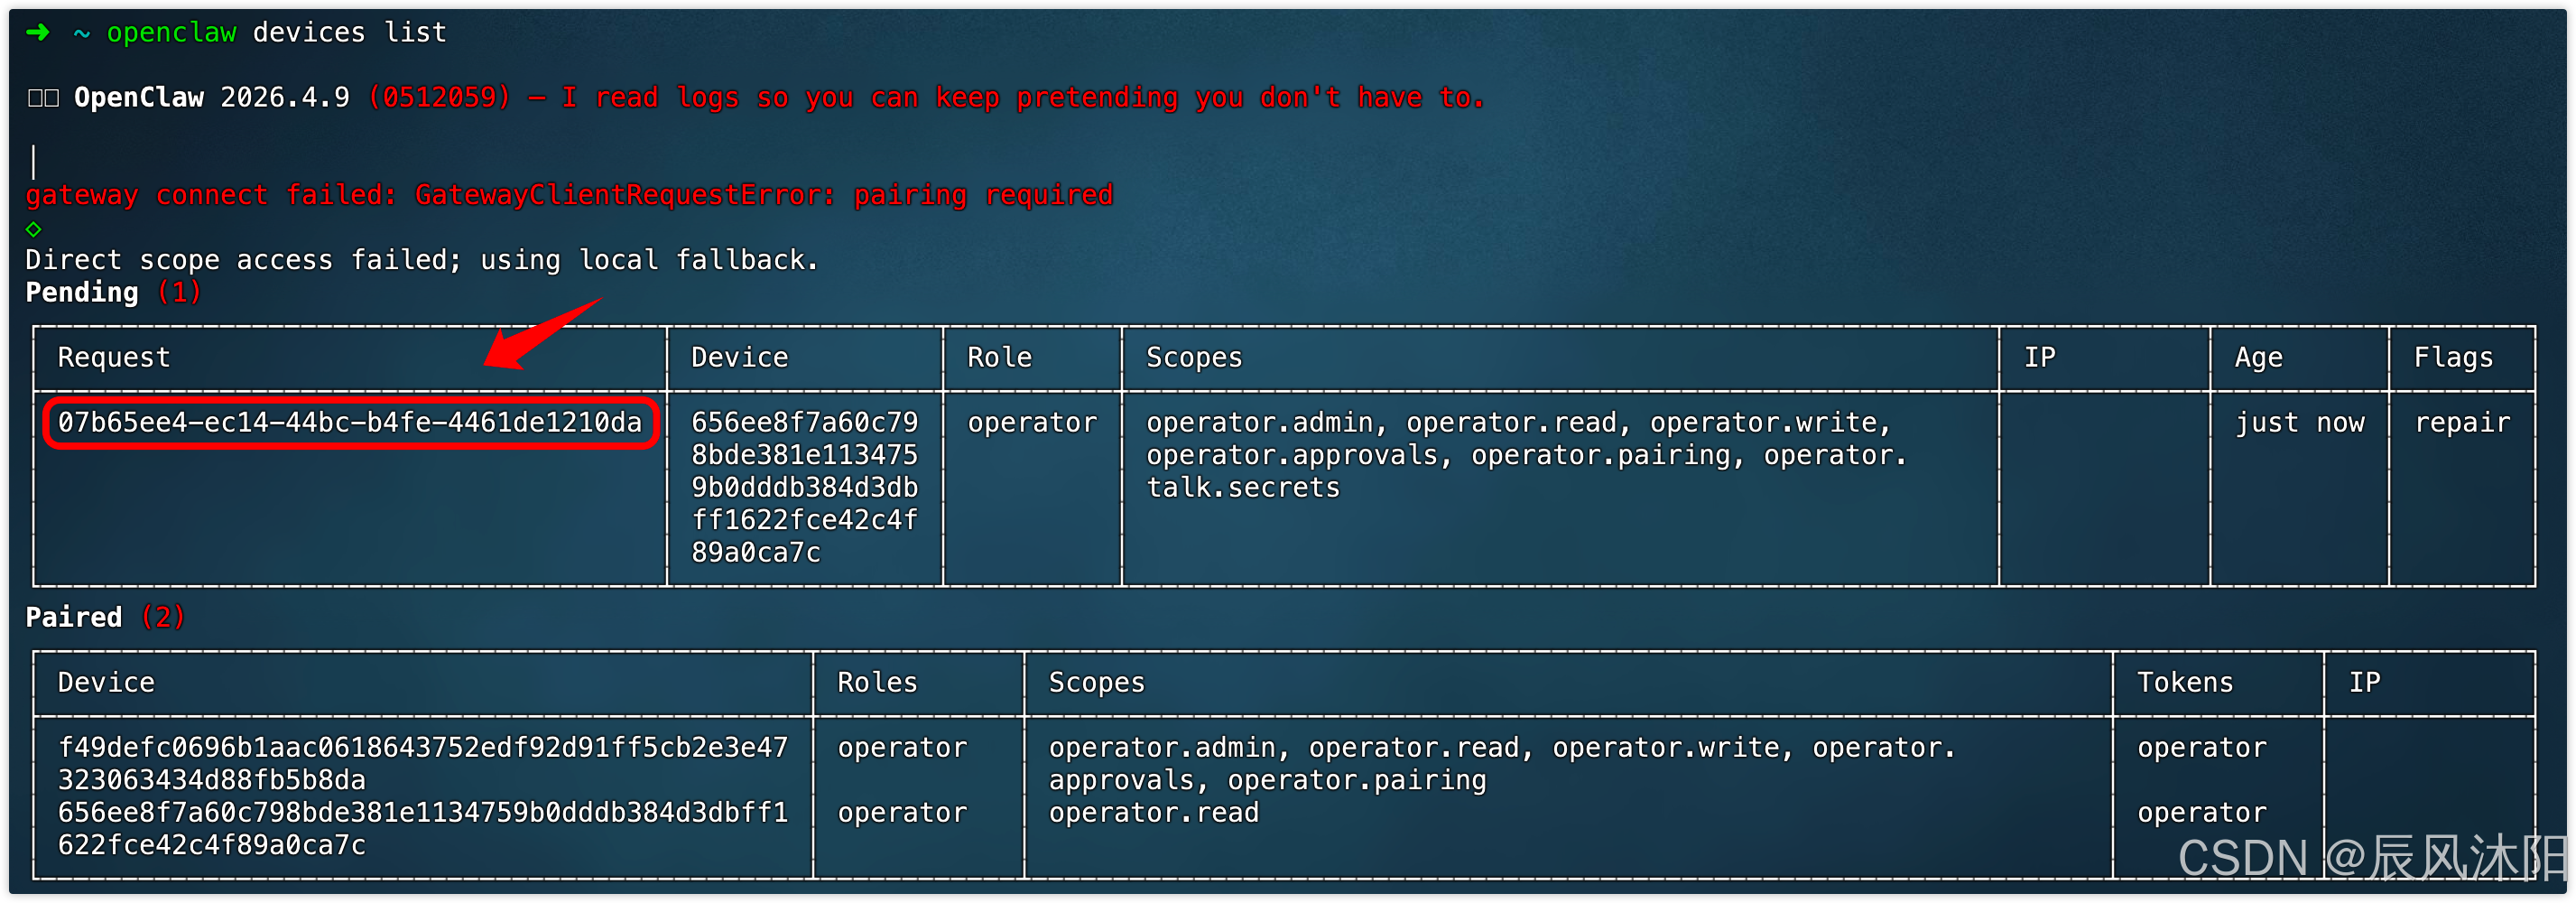
复制上面的 Request ID,然后运行批准命令批准该设备
bash
openclaw devices approve 07b65ee4-ec14-44bc-b4fe-4461de1210da批准设备后,再去控制面板 Chat 聊天就没有 Gateway 网关的错误了,但是仍然无法聊天,查看日志输出排查问题:
日志文件默认存放在 /tmp/openclaw 中,运行以下命令:
bash
# 查看目录下的问题
ls -al /tmp/openclaw
# 删除日志(为了方便排查新的问题,将之前的日志删除掉)
rm -rf /tmp/openclaw/*.log
# 查看实时日志
openclaw logs --follow
现在我们去控制面板 Chat 聊天,就可以看到终端的实时日志输出,得到错误信息:
- 402 Insufficient Balance:这是使用 AI 模型的余额不足(API Key),我使用的是 DeepSeek
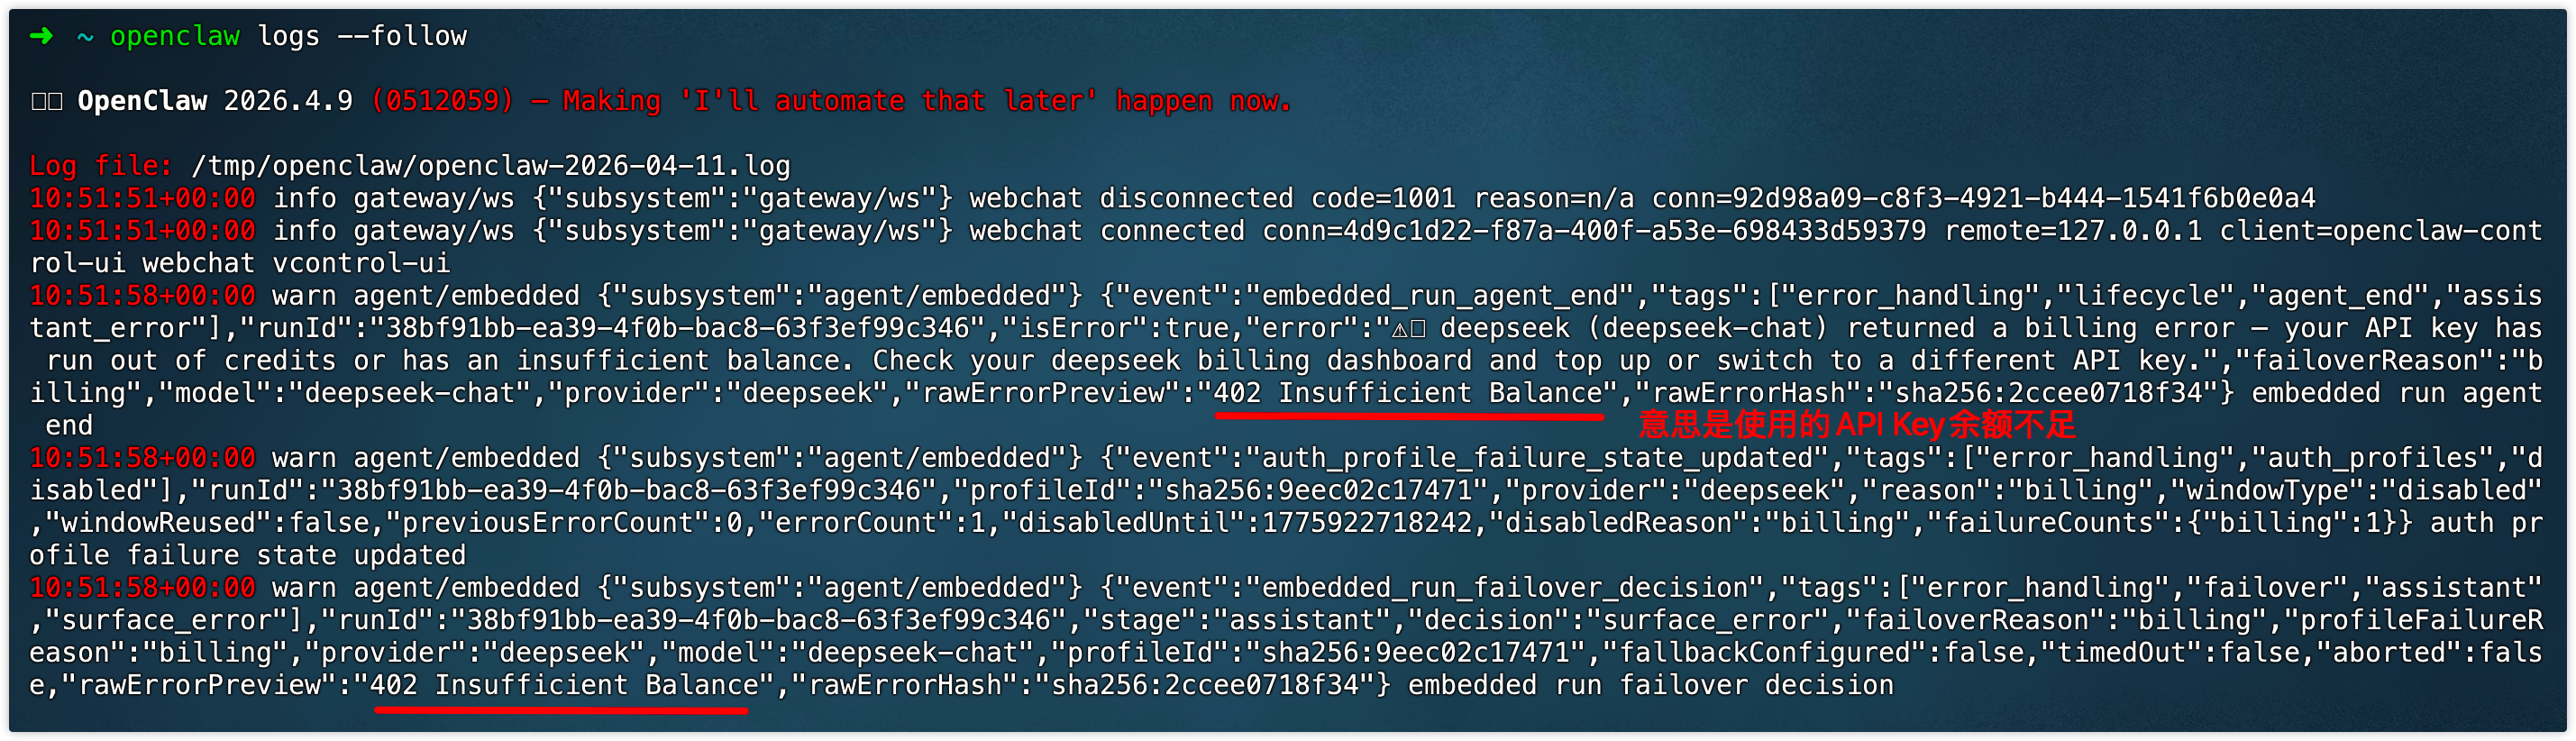
我去 DeepSeek 开放平台充值了 10块钱余额(充值前需要实名认证),AI 就能使用了
聪明的你在初体验 OpenClaw 时,一定发现了在 Ubuntu 中无法切换中文输入法的问题,那么应该解决 ?
本文重点是 OpenClaw 的安装和使用,Ubuntu 的中文输入法问题,请移步:Ubuntu Desktop 切换中文输入法
6. OpenClaw 常用命令
查看 OpenClaw 版本号
bash
# 简写形式:openclaw -v
openclaw --version
打开控制面板
bash
openclaw dashboard查看运行状态
bash
openclaw status验证 Gateway 网关是否正在运行(可以看到 Gateway 网关 正在监听端口 18789)
bash
openclaw gateway status