yolo识别速度较快,如何使用yolo进行训练,预测和c++工程使用,本篇文章将详细讲一讲。
一.下载YOLO
从Ultralytics网站上https://github.com/ultralytics/ultralytics 上下载源代码。
当然首先得配置环境,
1.首先下载miniconda3,我下载的是 https://mirrors.tuna.tsinghua.edu.cn/anaconda/miniconda/页面上得Miniconda3-py310_22.11.1-1-Windows-x86_64.exe,安装的时候选择path加到环境变量中。
2.安装cuda和驱动,首先下载驱动,安装驱动,然后下载cuda,cuda版本是11.6,那就下载cuda11.6 https://developer.nvidia.com/cuda-11-6-0-download-archive?target_os=Windows
3.安装pytorch,当然得和cuda版本适配,我下载的是https://pytorch.org/get-started/previous-versions/?_gl=1*6kaf7a*_up*MQ..*_ga*MTgxNzc2OTE1NS4xNzc2MDAxMTMz*_ga_469Y0W5V62*czE3NzYwMDExMzIkbzEkZzAkdDE3NzYwMDExMzIkajYwJGwwJGgw
pip install torch==1.13.1+cu116 torchvision==0.14.1+cu116 torchaudio==0.13.1 --extra-index-url https://download.pytorch.org/whl/cu116
4.然后conda 创建一个虚拟环境。
conda create -n myyolov8
二.安装Ultralytics
进入 下载的ultrlytics文件夹中,然后使用
pip install -r requirements.txt安装所需,最后使用
pip install -e .这样就安装好了,没遇到问题。
三、使用已有数据集进行训练和使用
3.1训练、使用和导出onnx
from ultralytics import YOLO

if __name__ == '__main__':
    # Create a new YOLO model from scratch
    model = YOLO("yolo26n.yaml")

    # Load a pretrained YOLO model (recommended for training)
    model = YOLO("yolo26n.pt")

    # Train the model using the 'coco8.yaml' dataset for 3 epochs
    results = model.train(data="coco8.yaml", epochs=3)

    # Evaluate the model's performance on the validation set
    results = model.val()

    # Perform object detection on an image using the model
    results = model("https://ultralytics.com/images/bus.jpg")

    # Export the model to ONNX format
    success = model.export(format="onnx")
调用c++
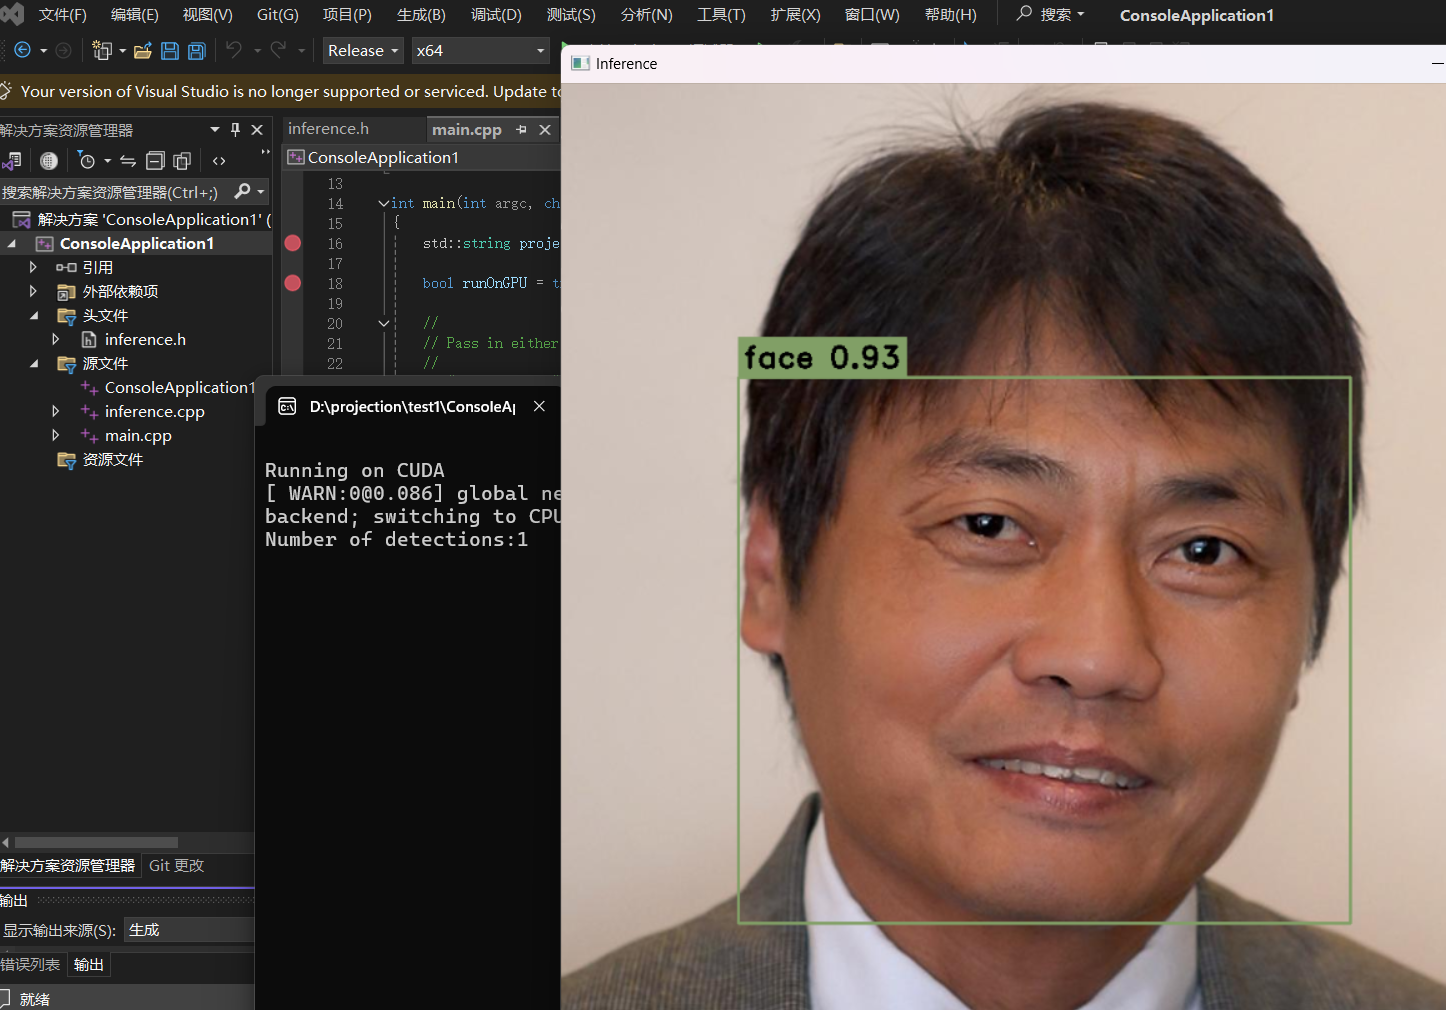
使用vs新建一个工程,配置好opencv
然后利用这几个文件,组建一个工程,

工程中,导入的onnx就是刚生成的onnx,生成的结果就是这个。
四、使用自己的数据集来训练和使用
4.1 目标识别
4.1.1 使用labelme 构建自己的数据集
我选择的是口罩数据集,自己使用labelme来标注,安装labelme的时候,需要解决一些问题,比如
安装Labelme 报错TypeError: 'type' object is not subscriptable
https://blog.csdn.net/weixin_44815456/article/details/145763253
https://blog.csdn.net/weixin_45932490/article/details/148953184
labelme的使用
https://blog.csdn.net/u011119817/article/details/118731850
labelme --flags flags.txt
flags.txt 内容就是:
face
face_mask
mask
导入图像目录,然后就可以画矩形框标注了。
但是label标注后生成的是json文件,需要转成txt文件。转换代码如下:
import os
import shutil
import numpy as np
import json
from glob import glob
import cv2
from sklearn.model_selection import train_test_split

def convert(size, box):
    dw = 1. / size[0]
    dh = 1. / size[1]
    x = (box[0] + box[1]) / 2.0 - 1
    y = (box[2] + box[3]) / 2.0 - 1
    w = box[1] - box[0]
    h = box[3] - box[2]
    x *= dw
    w *= dw
    y *= dh
    h *= dh
    return (x, y, w, h)

def change_2_yolo5(files, txt_Name):
    imag_name = []
    for json_file_ in files:
        json_filename = labelme_path + json_file_ + ".json"
        out_file = open('%s/%s.txt' % (labelme_path, json_file_), 'w')
        json_file = json.load(open(json_filename, "r", encoding="utf-8"))
        imag_name.append(json_file_+'.jpg')
        height, width, channels = cv2.imread(labelme_path + json_file_ + ".jpg").shape
        for multi in json_file["shapes"]:
            points = np.array(multi["points"])
            xmin = min(points[:, 0]) if min(points[:, 0]) > 0 else 0
            xmax = max(points[:, 0]) if max(points[:, 0]) > 0 else 0
            ymin = min(points[:, 1]) if min(points[:, 1]) > 0 else 0
            ymax = max(points[:, 1]) if max(points[:, 1]) > 0 else 0
            label = multi["label"].lower()
            if xmax <= xmin or ymax <= ymin:
                continue
            cls_id = classes.index(label)
            b = (float(xmin), float(xmax), float(ymin), float(ymax))
            bb = convert((width, height), b)
            out_file.write(str(cls_id) + " " + " ".join([str(a) for a in bb]) + '\n')
    return imag_name

def image_txt_copy(files, scr_path, dst_img_path, dst_txt_path):
    for file in files:
        img_path = scr_path + file
        shutil.copy(img_path, dst_img_path + file)
        scr_txt_path = scr_path + file.split('.')[0] + '.txt'
        shutil.copy(scr_txt_path, dst_txt_path + file.split('.')[0] + '.txt')

if __name__ == '__main__':
    classes = ['face','face_mask','mask']

    labelme_path = "E:/BaiduNetdiskDownload/yolov8/yolov8-all-in-one/yolov8-all-in-one/datasets/VOCdevkit/JPEGImages/"
    files = glob(labelme_path + "*.json")
    files = [i.replace("\\", "/").split("/")[-1].split(".json")[0] for i in files]

    trainval_files, test_files = train_test_split(files, test_size=0.1, random_state=55)
    train_files, val_files = train_test_split(trainval_files, test_size=0.1, random_state=55)

    train_name_list = change_2_yolo5(train_files, "train")
    val_name_list = change_2_yolo5(val_files, "val")
    test_name_list = change_2_yolo5(test_files, "test")

    file_List = ["train", "val", "test"]
    for file in file_List:
        if not os.path.exists('E:/BaiduNetdiskDownload/yolov8/yolov8-all-in-one/yolov8-all-in-one/datasets/VOCdevkit/VOC/images/%s' % file):
            os.makedirs('E:/BaiduNetdiskDownload/yolov8/yolov8-all-in-one/yolov8-all-in-one/datasets/VOCdevkit/VOC/images/%s' % file)
        if not os.path.exists('E:/BaiduNetdiskDownload/yolov8/yolov8-all-in-one/yolov8-all-in-one/datasets/VOCdevkit/VOC/labels/%s' % file):
            os.makedirs('E:/BaiduNetdiskDownload/yolov8/yolov8-all-in-one/yolov8-all-in-one/datasets/VOCdevkit/VOC/labels/%s' % file)

    image_txt_copy(train_name_list, labelme_path, 'E:/BaiduNetdiskDownload/yolov8/yolov8-all-in-one/yolov8-all-in-one/datasets/VOCdevkit/VOC/images/train/', 'E:/BaiduNetdiskDownload/yolov8/yolov8-all-in-one/yolov8-all-in-one/datasets/VOCdevkit/VOC/labels/train/')
    image_txt_copy(val_name_list, labelme_path, 'E:/BaiduNetdiskDownload/yolov8/yolov8-all-in-one/yolov8-all-in-one/datasets/VOCdevkit/VOC/images/val/', 'E:/BaiduNetdiskDownload/yolov8/yolov8-all-in-one/yolov8-all-in-one/datasets/VOCdevkit/VOC/labels/val/')
    image_txt_copy(test_name_list, labelme_path, 'E:/BaiduNetdiskDownload/yolov8/yolov8-all-in-one/yolov8-all-in-one/datasets/VOCdevkit/VOC/images/test/', 'E:/BaiduNetdiskDownload/yolov8/yolov8-all-in-one/yolov8-all-in-one/datasets/VOCdevkit/VOC/labels/test/')
然后要制作数据集,使用如下代码,生成 train,val, test
import os, shutil
from sklearn.model_selection import train_test_split

val_size = 0.1
test_size = 0.2
postfix = 'jpg'
imgpath = 'VOCdevkit/JPEGImages'
txtpath = 'VOCdevkit/txt'

os.makedirs('images/train', exist_ok=True)
os.makedirs('images/val', exist_ok=True)
os.makedirs('images/test', exist_ok=True)
os.makedirs('labels/train', exist_ok=True)
os.makedirs('labels/val', exist_ok=True)
os.makedirs('labels/test', exist_ok=True)

listdir = [i for i in os.listdir(txtpath) if 'txt' in i and i != 'classes.txt']
train, test = train_test_split(listdir, test_size=test_size, shuffle=True, random_state=0)
train, val = train_test_split(train, test_size=val_size, shuffle=True, random_state=0)

for i in train:
    shutil.copy('{}/{}.{}'.format(imgpath, i[:-4], postfix), 'images/train/{}.{}'.format(i[:-4], postfix))
    shutil.copy('{}/{}'.format(txtpath, i), 'labels/train/{}'.format(i))

for i in val:
    shutil.copy('{}/{}.{}'.format(imgpath, i[:-4], postfix), 'images/val/{}.{}'.format(i[:-4], postfix))
    shutil.copy('{}/{}'.format(txtpath, i), 'labels/val/{}'.format(i))

for i in test:
    shutil.copy('{}/{}.{}'.format(imgpath, i[:-4], postfix), 'images/test/{}.{}'.format(i[:-4], postfix))
    shutil.copy('{}/{}'.format(txtpath, i), 'labels/test/{}'.format(i))
清除空行
import os

# 设置文件夹路径
folder_path = 'VOCdevkit/txt'

# 获取文件夹中所有txt文件的路径
txt_files = [os.path.join(folder_path, f) for f in os.listdir(folder_path) if f.endswith('.txt')]

# 循环处理每个txt文件
for file_path in txt_files:
    # 读取文件内容
    with open(file_path, 'r') as f:
        lines = f.readlines()

    # 移除空行和只有空白字符的行
    lines = [line for line in lines if line.strip()]

    # 写回到文件中
    with open(file_path, 'w') as f:
        f.writelines(lines)

    print(f"已处理文件:{file_path}")

print("处理完成!")
最后就得到了标注的口罩数据集。
然后放到
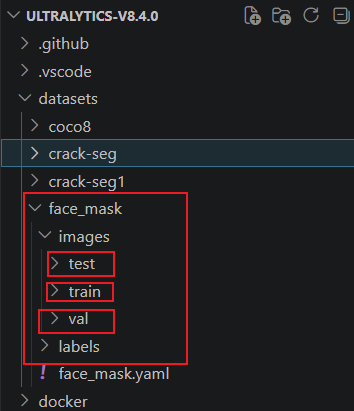
face_mask也需要改一下,改完后是这个样子:

这个在这里再放一份
最后要训练了同志们:
训练代码:
import os
# 禁用PyTorch的共享内存加载,直接绕过报错
os.environ["PYTORCH_DISABLE_SHM"] = "1"
from ultralytics import YOLO
if __name__ == '__main__':
model = YOLO("yolov8n.pt") #yolov8s-seg.pt
models = model.train(data="face_mask.yaml",epochs=130,imgsz=640, batch=1,device =0,workers=0)
model.export(format="onnx")
results =models("D:/projection/ultralytics-v8.4.0/datasets/face_mask/images/test/picture_016.jpg")
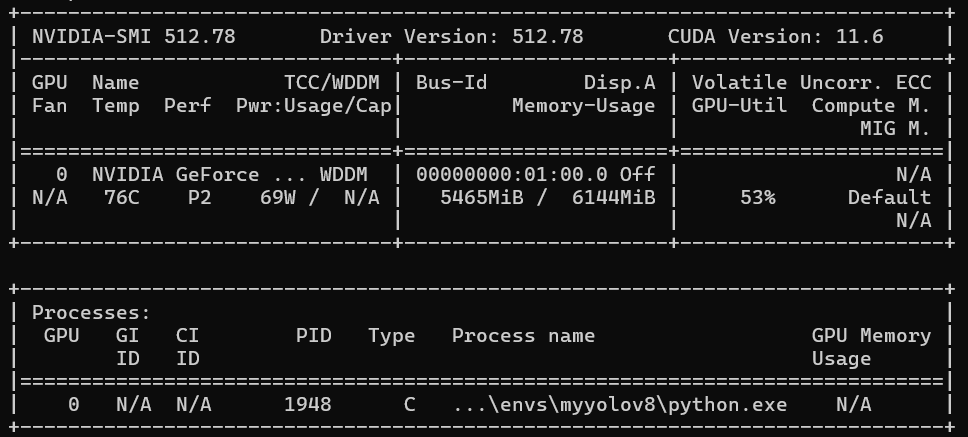
results[0].show()直接就可以训练,当然会遇到内存也不足的问题,还有使用的问题,看这个
错误:The "freeze_support()" line can be omitted if the program is not going to be frozen
https://blog.csdn.net/jackylzh/article/details/157258123
内存也不足的问题:
https://www.jb51.net/article/275647.htm
接着就可以训练了。在这里找到最后一次生成的pt参数文件,
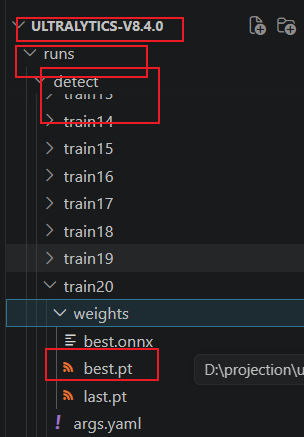
大家也可以看到onnx文件,
4.2 图像分割
数据用的原始数据集,训练是我自己训练
import os
# 禁用PyTorch的共享内存加载,直接绕过报错
os.environ["PYTORCH_DISABLE_SHM"] = "1"
from ultralytics import YOLO
if __name__ == '__main__':
model = YOLO("yolov8s-seg.pt") #yolov8s-seg.pt
models = model.train(data="crack-seg.yaml",epochs=130,imgsz=640, device =0,workers=0)
# model.export(format="onnx")
results =models("D:/projection/ultralytics-v8.4.0/datasets/crack-seg/images/test/1818.rf.7e52c1687bfb625e86c54c9d71a66d99.jpg")
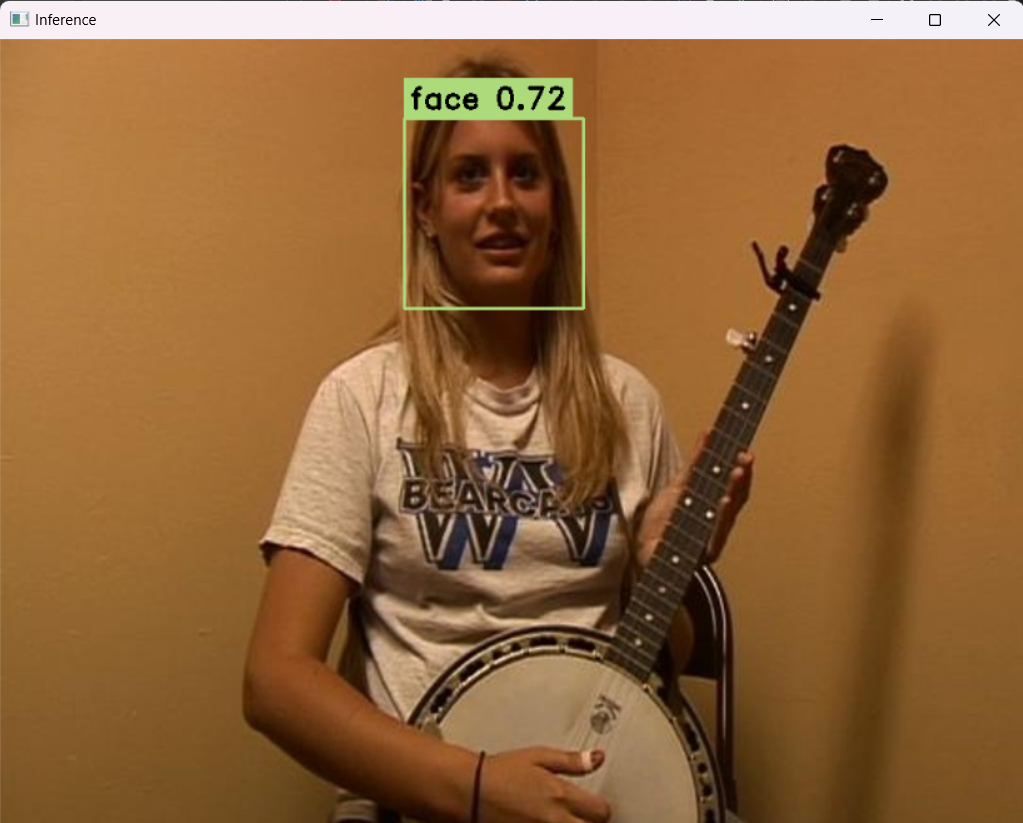
results[0].show()五、c++调用(转成onnx格式)
把这几个文件搞过来
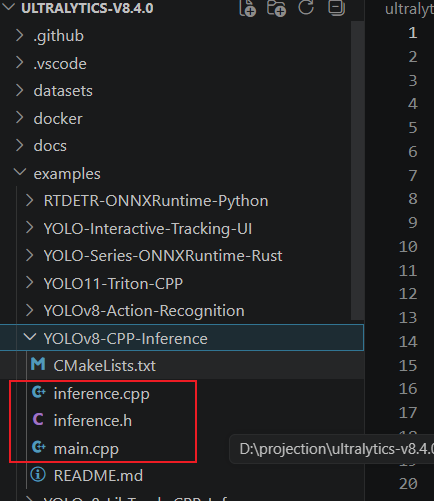
再vs中,构建一个工程,得到:
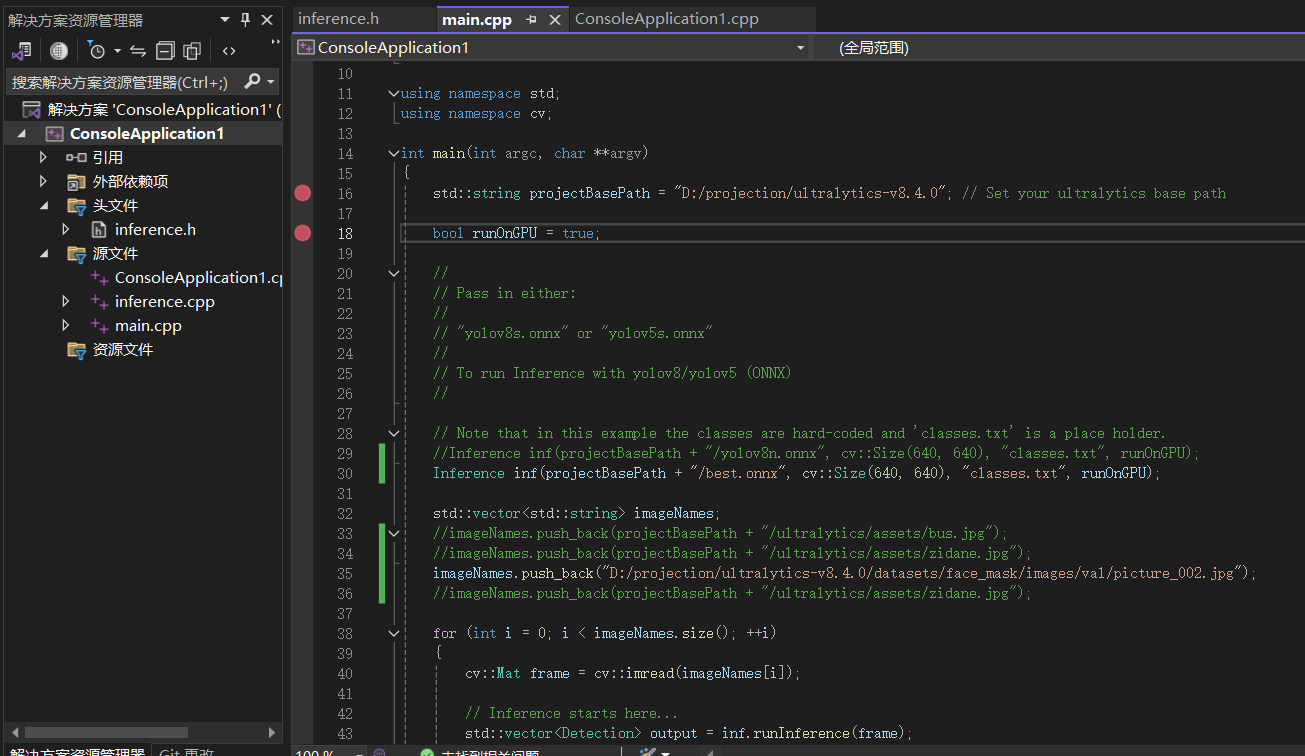
指定onnx的路径,运行,得到最后的结果: